MO Façade Panelization Optimization – Setup and Run
-
Intro
-
Hypothetical case
-
Parametric model
-
Selecting parameters and variables
-
Selecting objectives
-
Connecting to the Wallacei component
-
Running Wallacei
-
Conclusion
-
Useful links
Information
| Primary software used | Wallacei |
| Software version | 1.0 |
| Course | BKB3WV4 – Bouwkunde als wetenschap |
| Primary subject | AI & ML |
| Secondary subject | Optimization |
| Level | Intermediate |
| Last updated | November 27, 2024 |
| Keywords |
Responsible
| Teachers | |
| Faculty |
MO Façade Panelization Optimization – Setup and Run 0/8
MO Façade Panelization Optimization – Setup and Run
Example of setting up and running a facade optimization.
This tutorial is part of a line of tutorials about the use of parametric modelling, simulations and optimisation in research at BSc level. The overall line uses parametric modelling, simulations, and optimisation to generate data to support research investigations (to support answering a research question).
Within this line, this tutorial focuses on how to select and set objectives and how to run an optimization model to support a research / answer a research question. This tutorial can be followed as stand-alone tutorial or as part of the BK3WV4 course (BSc course). If you are attending the course BK3WV4, please follow this tutorial in preparation to the 3rd workshop.
In the previous tutorials of this line, you have learned about setting fix parameters and variables in parametric models, and about selecting performance indicators and related performance assessment (such as simulations).
In this tutorial you will learn how to run a multi-objective optimization. In this tutorial, a parametric model and a performance assessment method are linked to an optimizer. You will learn how to set variables and constraints in the optimisation process, set the objectives of the optimisation, and how to run the optimization.
The parametric model allows you to generate parametric alternatives that are assessed upon certain criteria. The optimizer allows you to automate the generation of the alternatives and the performance data while searching for solutions that meet certain objectives. In design and engineering, this process can be used to identify design solutions that meet certain targets. In research, this process can be used to generate a dataset that provides you information to answer certain research questions. In this tutorial, we focus on this second case (research).
It is important to notice that optimisation is not the only option to generate data using parametric models and simulations. There can be several other methods, sometimes to be preferred. Examples of other methods commonly used include sampling. There is a key difference between sampling and optimisation. Optimisation algorithms will try to converge the results toward desired targets – such as maximising or minimising a value. Sampling algorithms instead will try to ensure that the selected subset accurately reflects the characteristics of the entire dataset.
This tutorial assumes you are already familiar with basic concepts. (If you are following this tutorial because you are attending the course BK3WV4, you have already learned about parameters and variables, about performance indicators and simulations, about optimisation also in BK2WV3). Do you want to refresh your knowledge on these general concepts? Check their definitions here:
This tutorial uses an example that focuses on a façade panelization using Wallacei. This tutorial assumes you are already familiar with basic technical set up of optimisation loops. (If you are following this tutorial because you are attending the course BK3WV4, you have already learned about basic technical set up of optimisation in BK2WV3). If you want to know more background knowledge on basic technical set up of optimisation, this is explained in this tutorial:
MO Façade Panelization Optimization – Setup and Run 1/8
Hypothetical caselink copied
For this tutorial, we use a hypothetical case. Please note that the case is not supported by actual scientific information. It is merely an example that includes dummy information, to let you perform the computational workflow on a very simple case. (If you are following this tutorial because you are attending the course BK3WV4, in BK3WV4 you will make real literature review to set a well-grounded scientific framework of information). In this hypothetical case, assume you are researching on factors that affect the production footprint of a façade. Assume that in this research, one of your research questions is:
Which window parameters have the highest impact on the production footprint of a façade for a residential studio apartment design, while ensuring adequate lighting.
Assume you have already performed literature review about this subject. Assume that based on literature review you have decided to focus on an average residential studio design with 1 window on 1 façade. Assume that typical dimension for an average studio are (please note, this is dummy information):
- Room width = 6m
- Room depth = 6m
- Room height = 3m
Assume that based on literature review you have identified two factors that you want to focus on, as relevant for the production footprint. Both factors influence the level of efficiency, packaging material, and waste streams, and therefore the production footprint. These two factors are (please note, this is dummy information):
- The production cost, with a penalty for panel sizes that are produced in small amounts and a reduction of cost for panel sizes that can be produced in bulk.
- The number of unique panels (because for each unique panel new production features must be implemented).
Finally, assume that based on literature review you have figured out that to reach adequate lighting the window to wall ratio (WWR) should be between the range of 30-70%. Additionally, extensive direct lighting should be avoided while remaining at a minimum. It is preferred to have a direct light to floor ratio as close to 60% as possible on the summer solstice at noon. Both factors influence the internal climate and sustainability aspects, such as: overheating, and energy use.
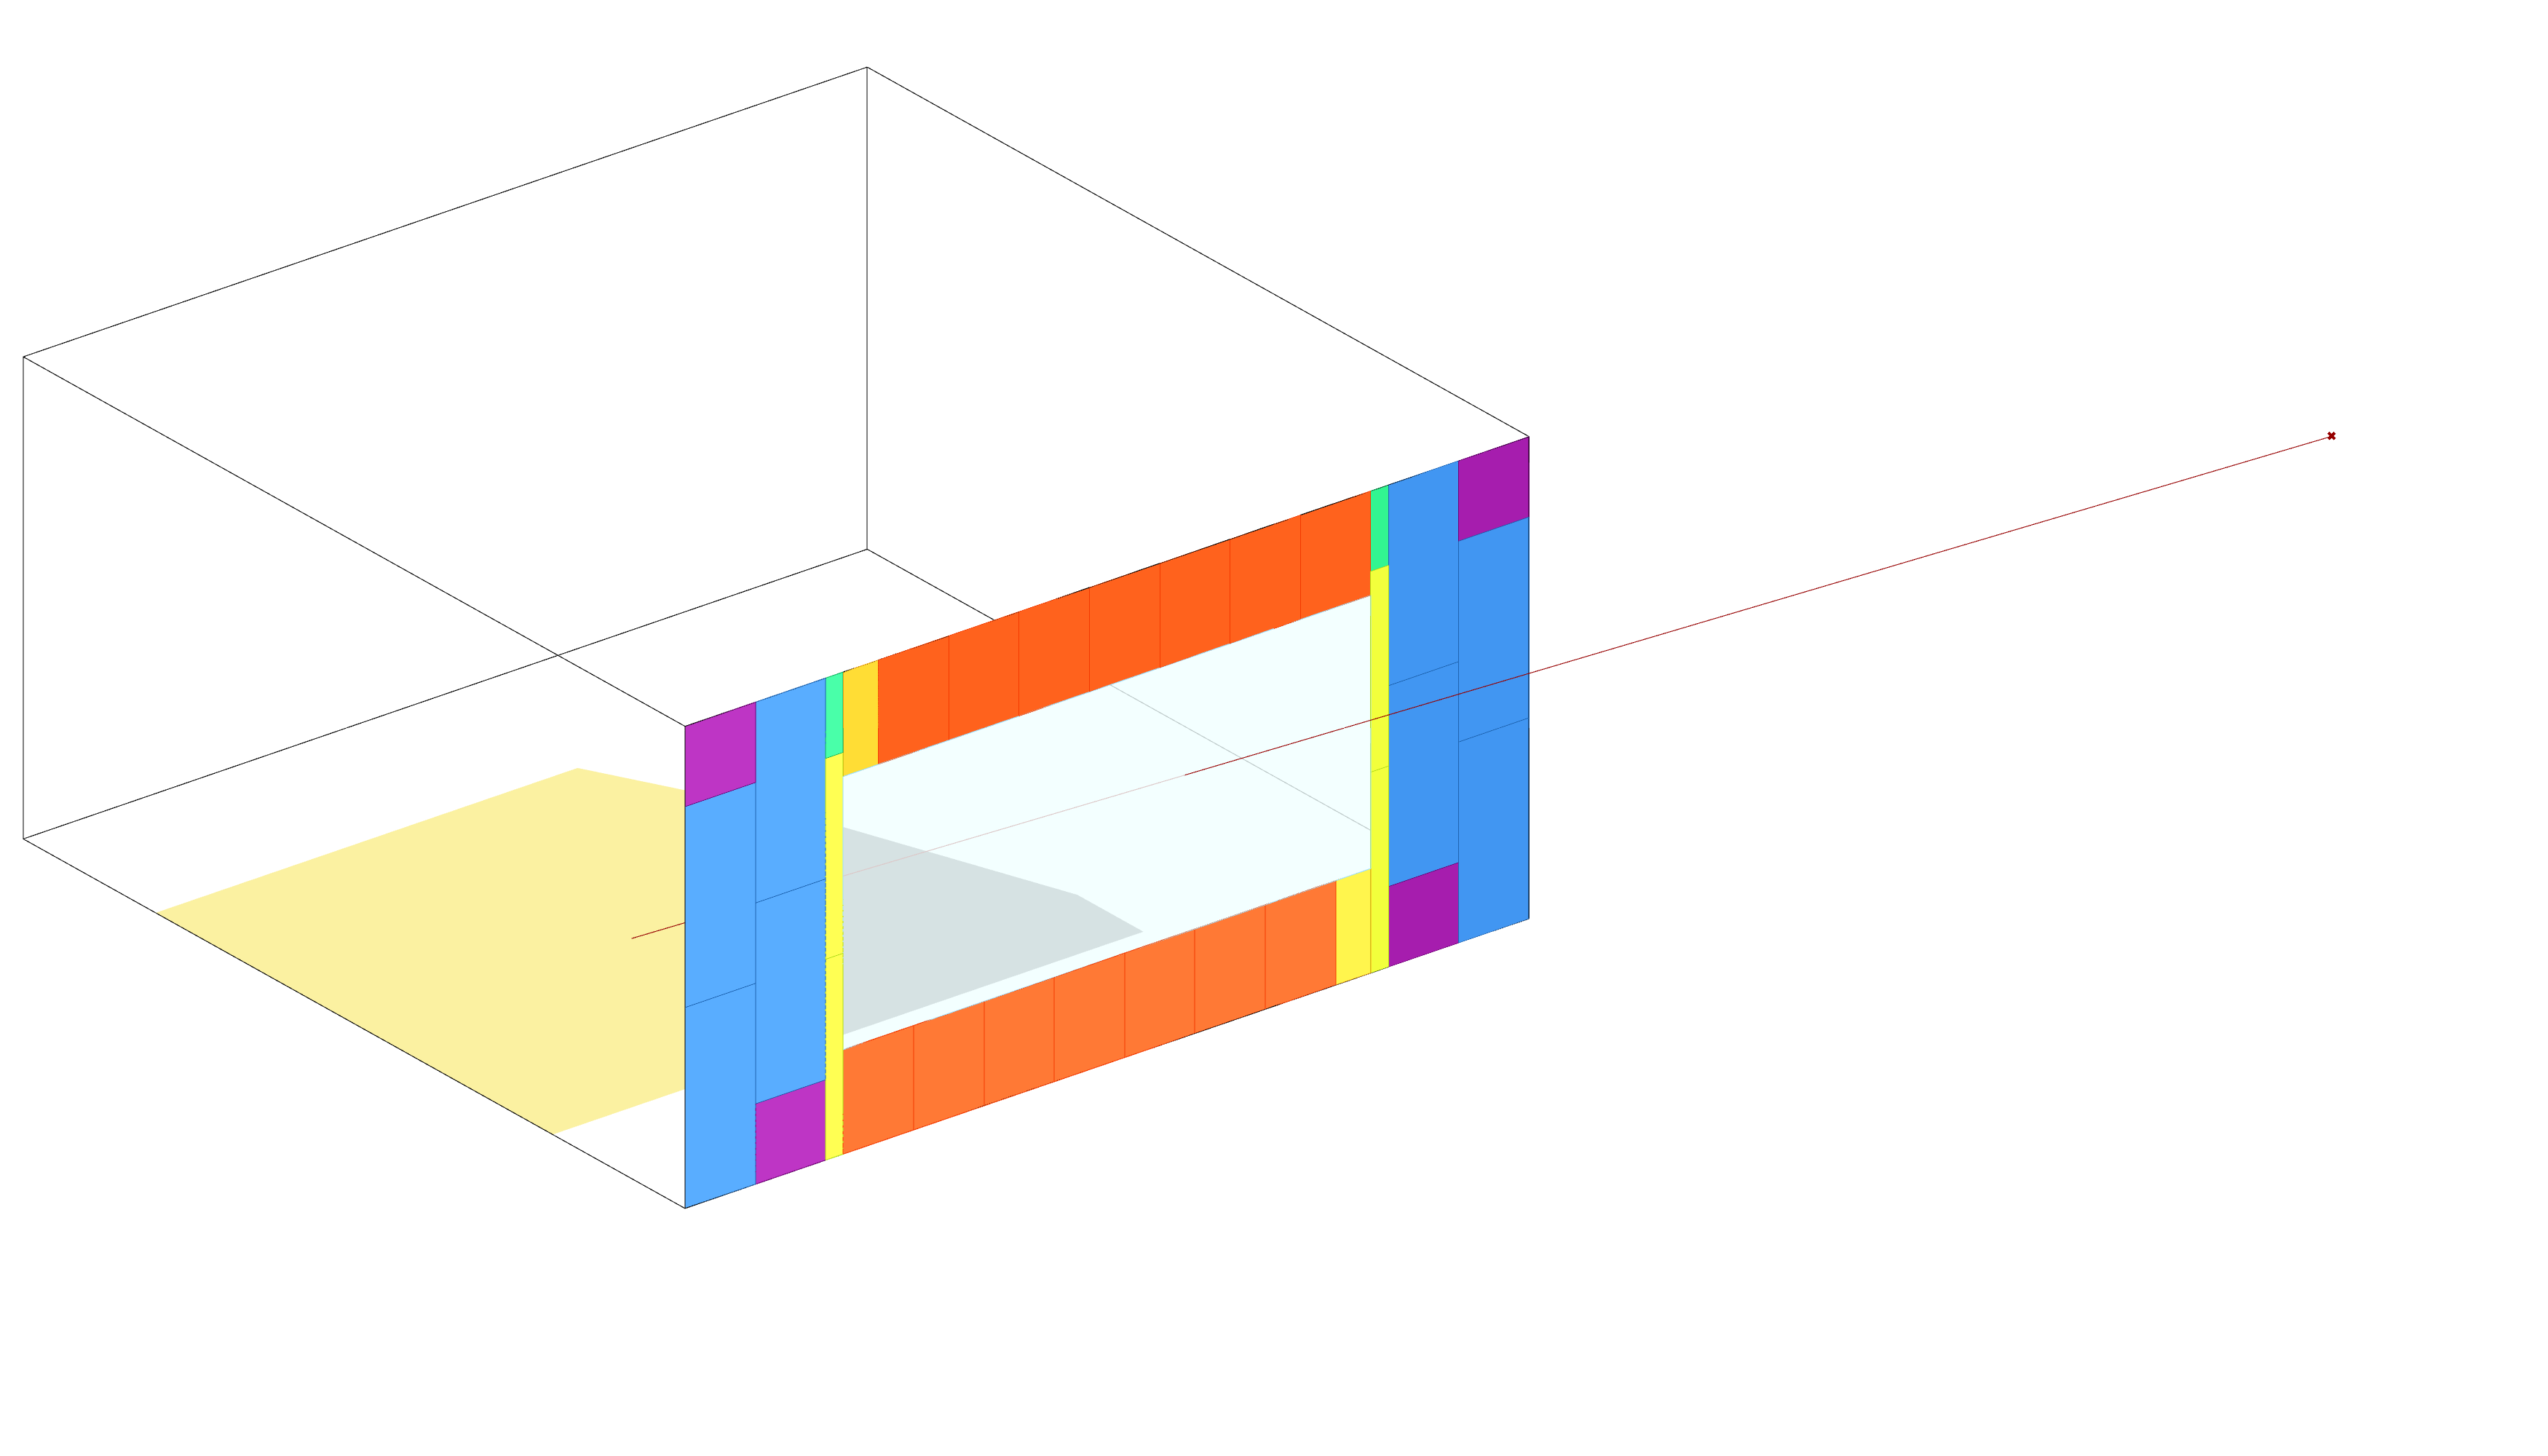
Based on the hypothetical case described above, in this tutorial we will create a grasshopper definition for façade panelization. We will consider the case of a façade with one window. We are going to optimize that façade panels pattern to achieve various goals, like minimum overall cost, for example. By running an optimization, we can investigate the pareto front to get insights on which parameters have the highest impact on the production footprint of the façade panels. With this information we can identify the following parameters, variables, and objectives for the optimization model:
Parameters:
- Room Dimensions
Variables:
- Window size
- Window positioning
Objectives:
- Minimal production cost
- Minimum number of unique panels
- Window to wall ratio between 30-50%
- Direct light area to floor ratio optimum of 60%
MO Façade Panelization Optimization – Setup and Run 2/8
Parametric modellink copied
Exercise file:
In this definition a room is created with one window on one of the walls of the room. That wall is later divided into panels. In the exercise file the parts you can adjust are highlighted. You can download the exercise file here:
We are not explaining here how the Grasshopper definition is created. If you want to understand how the geometry is created, you can follow this tutorial.
MO Façade Panelization Optimization – Setup and Run 3/8
Selecting parameters and variableslink copied
In this chapter you will learn about selecting parameters, variables and constraints for your optimization problem. We won’t go into detail about what parameters, variables and constraints are. If you want to know more about this, check the chapter ‘Selecting Variables’ of the following tutorial.
Parameters
Design aspects influencing the room dimensions such as width, length, and height are left as parameters; we do not change them in this optimization exercise. Another design aspect left unchanged is the distance of the window placement point from the wall edges (“Window-Facade spacing [m]”). Within the optimization problem we do not want to investigate those design aspects. It could be that those design aspects are given by the design brief or in terms of research are the boundary conditions or fixed aspects that are not included in the investigation.
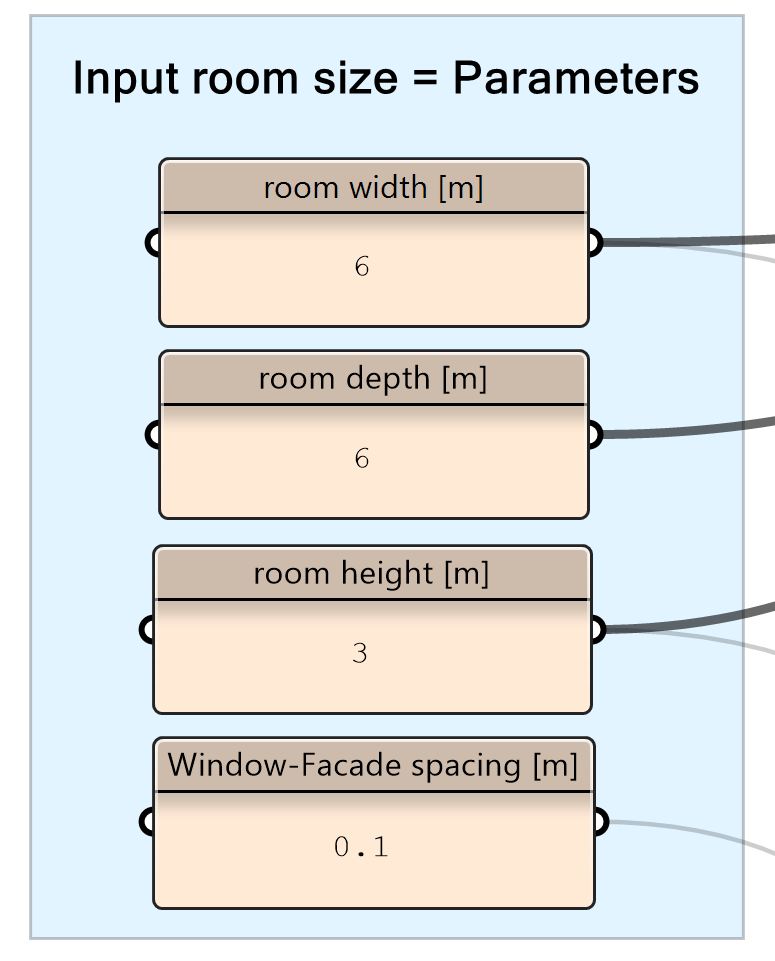
Ensure those design aspects in the Grasshopper scripts are put in panels, indicating unchangeable values. Follow these design criteria:
- Room width = 6m
- Room depth = 6m
- Room height = 3m
- Window-façade spacing = 0.1m
Create panels for the parameters.
Variables and constraints
The variables – parameters to be changed during the optimization process – are in this case “input window size”. In total there are 3 variables that can be changed during the optimization to create new design options. The window width, height and placement. During the geometry design, there are 9 possible window placement options defined in the grasshopper definition. So, in this case, a slider of integers and a domain of 0 to 8.
The domains of the variables are the constraints.
|
Variable |
Slider domain |
Step size |
|
Window width |
1.0 – 6.0 m |
0.25 m |
|
Window height |
1.0 – 2.5 m |
0.1 m |
|
Window placement |
0 – 8 |
1 |
The variables should be created with sliders and will later be connected to the WallaceiX component. The window height and placement can be defined by normal sliders. For the window width, we want to create a step size of 0.25 meters, to do this we would have to create a multiplication on the slider.
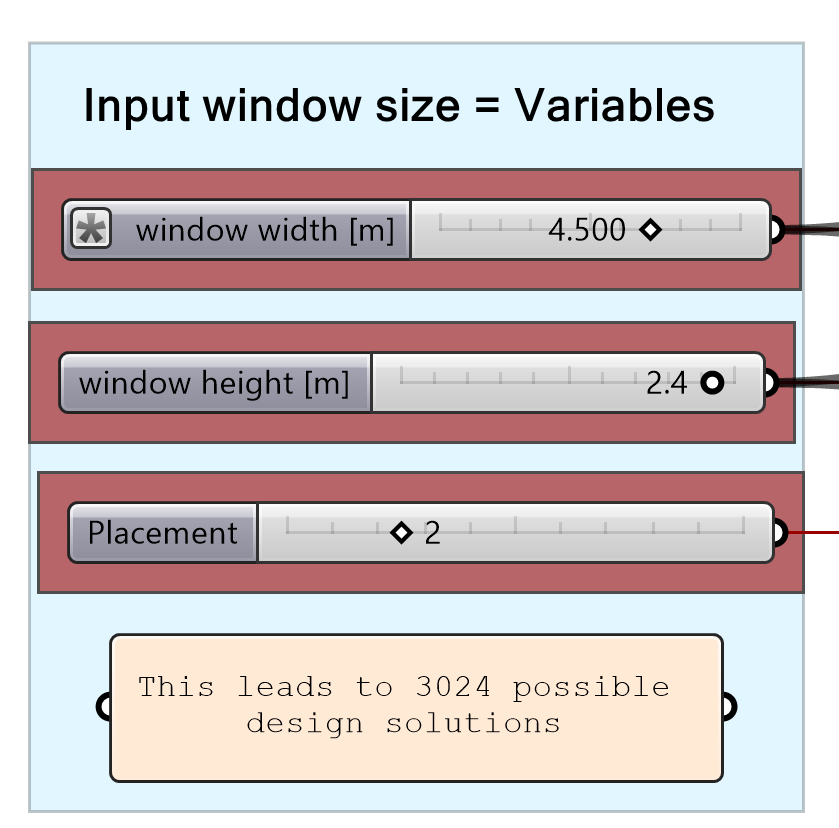
- Change the sliders of window height and placement to the right domain.
- Open the slider settings of the slider ‘window width’ and add the expression below
- Change the domain of the slider ‘window width’ to 2-18 which after the equation corresponds with a domain of 0.5-4.5.
MO Façade Panelization Optimization – Setup and Run 4/8
Selecting objectiveslink copied
After the parameters and variables are set, it’s time to choose the objectives for the optimisation. In the geometry setup script, a section was created called ‘calculating design fitness’. This section consists of possible objectives. As you can see, many options are possible. In the next steps we will select suitable objectives and prepare them for the optimization algorithm. If you want to know more about how the Fitness is calculated, you can follow this tutorial:
In the next steps we will select and prepare objectives. You can follow this tutorial, if you want to know more about how to prepare objectives for minimization algorithms such as Wallacei and the different types of objectives that exist. It is recommended that you have this knowledge before moving on to the next part, as this tutorial will skip over basic parts.
As known, the maximum number of objectives of a multi-objective optimization problem is 3. Most optimization algorithms still work with more objectives; however, this could cause problems related to efficiency and computational costs. So, let’s keep the number of objectives to 3 for this problem.
Selecting the objectives starts from the research or design objective you want to reach; in case of this exercise the research question is as follows:
Which window parameters have the highest impact on the production footprint of a façade for a residential studio apartment design, while remaining adequate lighting.
Based on the assumptions mentioned before, this leads to the following objectives of our problem:
Minimal production cost
- Minimum number of unique panels
- Window to wall ratio between 30-50%
- Direct light area to floor ratio optimum of 60%
Which window parameters have the highest impact on the production footprint of a façade for a residential studio apartment design, while remaining adequate lighting.
- Parameters: room dimensions
- Variables: window size, window placement
- Constraints: minimum, and maximum window size, number of window placement options
- Objective: Minimum production cost, minimum number of unique panels, WWR within a domain
What is the most effective combination of grid parameters that can lead to minimized production footprint of a façade for a residential studio apartment design, while remaining adequate lighting.
- Parameters: window size, window placement
- Variables: room dimensions
- Constraints: minimum, and maximum room size
- Objective: Minimum production cost, minimum number of unique panels, WFR within a domain
Objective 1: Production cost minimization
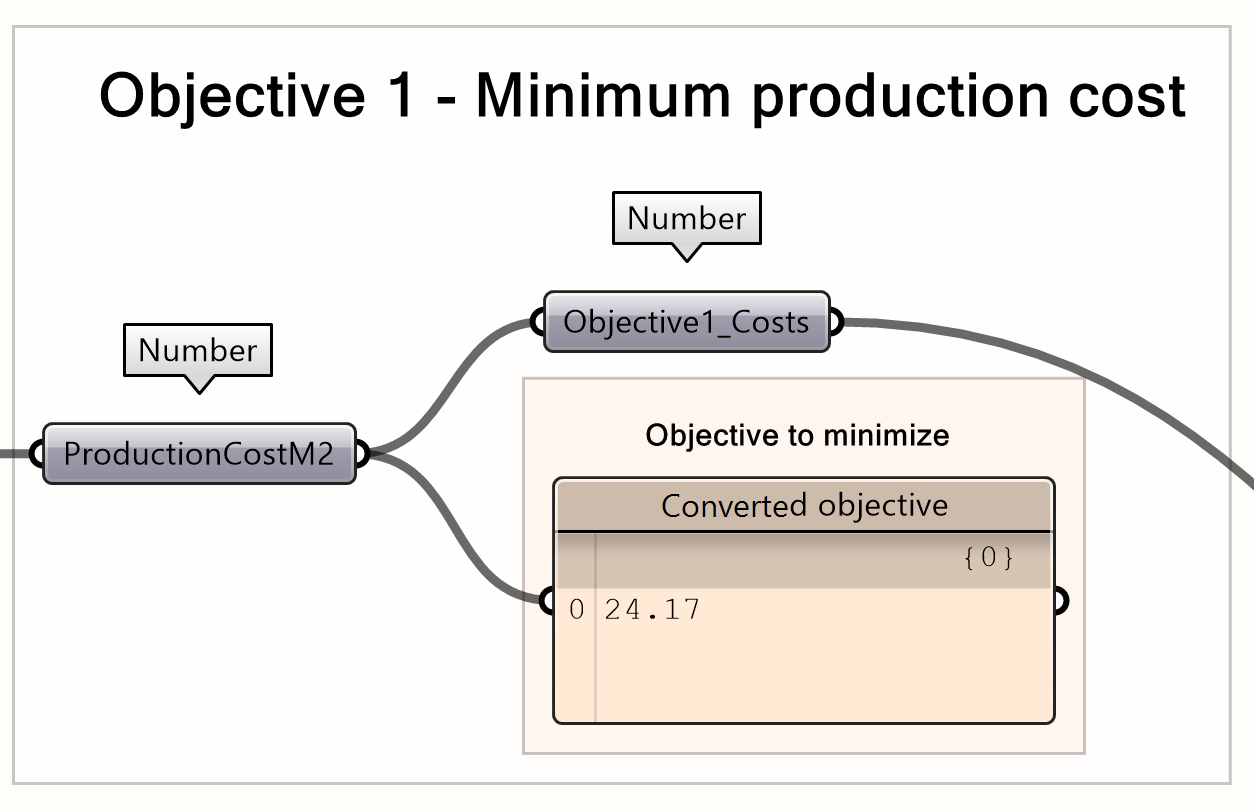
We want to minimize overall production costs per m2 panel. As it is already a minimization objective, we don’t have to change anything.
Objective 2: Minimum number of unique panels
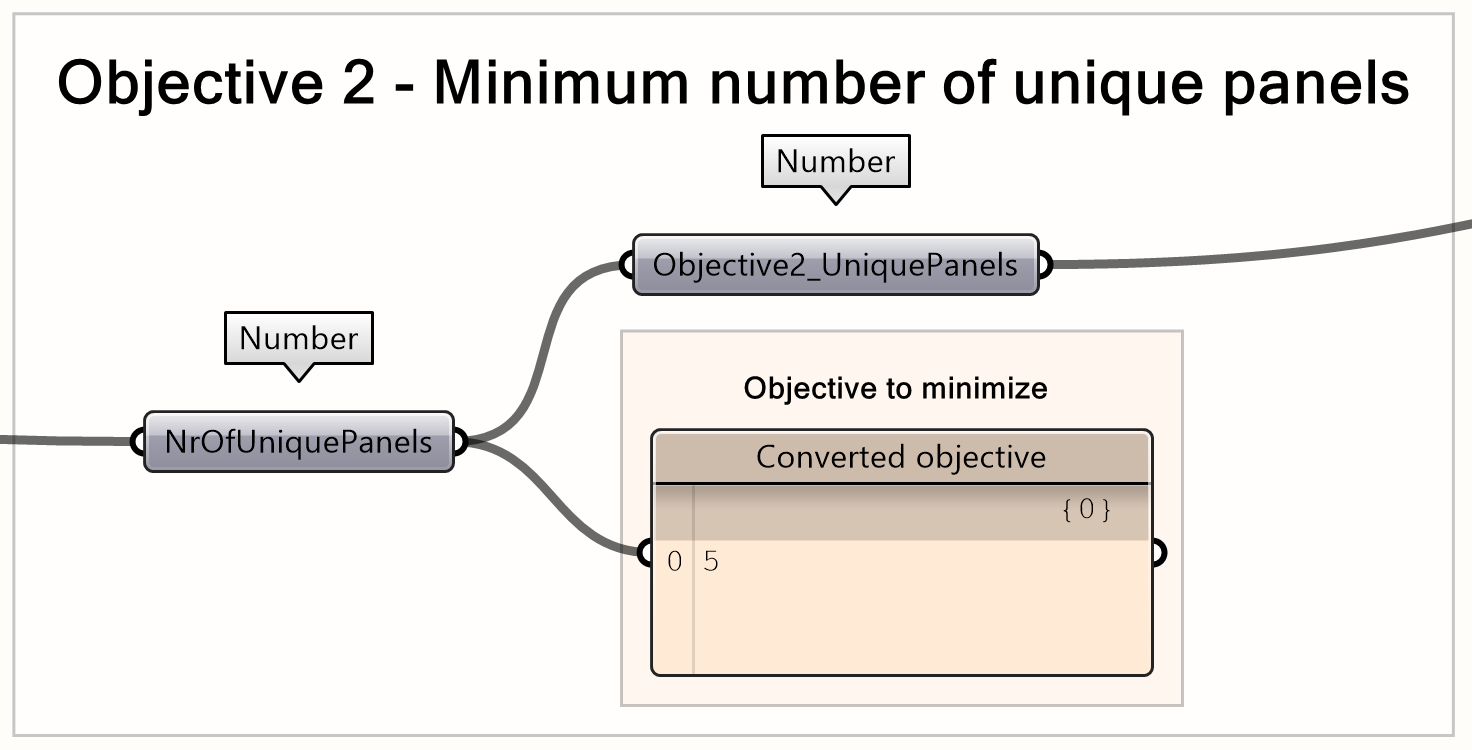
Lastly, we want to minimize the number of unique panels. Each unique panel means another line in the fabrication process, additional storage and a more complicated installation process on site. Therefore, the number of unique panels should be minimized. The number of unique panels can be found with the cost calculator. As we want to minimize the value, no preparation has to happen.
Objective 3: WWR within domain and DLFR closest to value
As mentioned, we want to have a maximum of 3 objectives. However, many times you will see that an optimization problem asks for more objectives. This can be solved by combining objectives together. In our case we can combine the WWR range objective and the optimal direct light area to floor ratio (DRFL) objective in one objective.
The Window-Wall Ratio should stay within the range of 0.3-0.5. You don’t want to have a window so small that there’s barely any sun inside, and not large so that it becomes too resource and energy intensive. For this you can use the domain constraint equation, which calculates the absolute difference between the start and end of the domain in comparison to the value.
At the same time, we want the direct light area to floor ratio (DRFL) on the summer solace at noon to be as close to 0.6 as possible for the purpose of this exercise. For this you need to minimize the absolute difference between the actual DRFL and the set target of 0.6.
The final aquation of combining these objectives is as follows:
Where:
- x = objective A to test
- y = objective b to test
- z = start domain
- u = end domain
- v = optimal value
- To translate the equation into Grasshopper, start by creating an Expression component where you will input the equation.
- Next, set the minimum and maximum values for the Window-to-Wall Ratio (WWR), which will define the start and end of your domain. Use a Panel component to input these values. Once done, connect the minimum WWR value to the z input (start domain) and the maximum WWR value to the u input (end domain)
- After that, determine the optimal Daylight Factor Reduction (DLFR) value. Again, you can use a Panel component for this. Once you have entered the value, connect it to the v input of the equation.
- Finally, connect the WWR value to the x input of the equation and the DLFR value to the y input. This completes the setup, and your equation should now be ready to calculate based on the inputs provided.

MO Façade Panelization Optimization – Setup and Run 5/8
Connecting to the Wallacei componentlink copied
It’s time to connect everything to the Wallacei component. There are two mandatory inputs – “Genes” (your variables – sliders and gene pools), and “Objectives” (your fitness objectives to minimize). There are also two optional inputs – “Data” and “Phenotype”.
Genes = variables
To the “Genes” input you should connect all the sliders and/or gene pools that are your variables to change during the optimization process. (Reminder – to connect more than one component to an input, hold Shift when dragging).
In this case the sliders of “input window size” should be connected to the “Genes”.
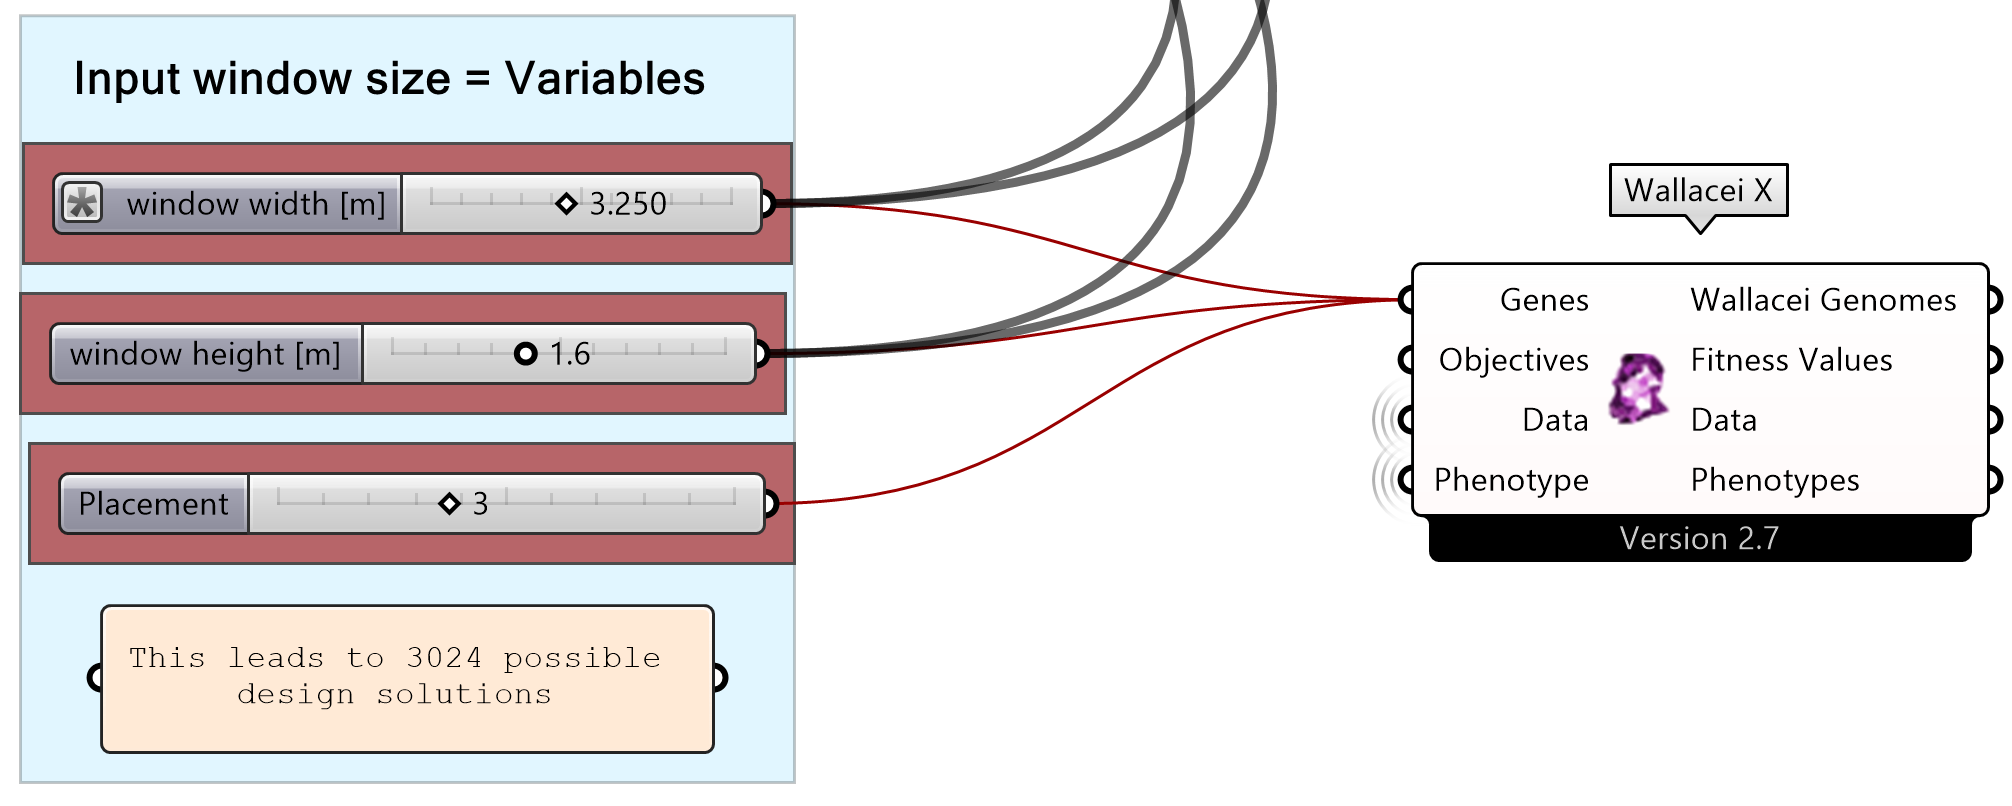
Objectives = fitness objectives
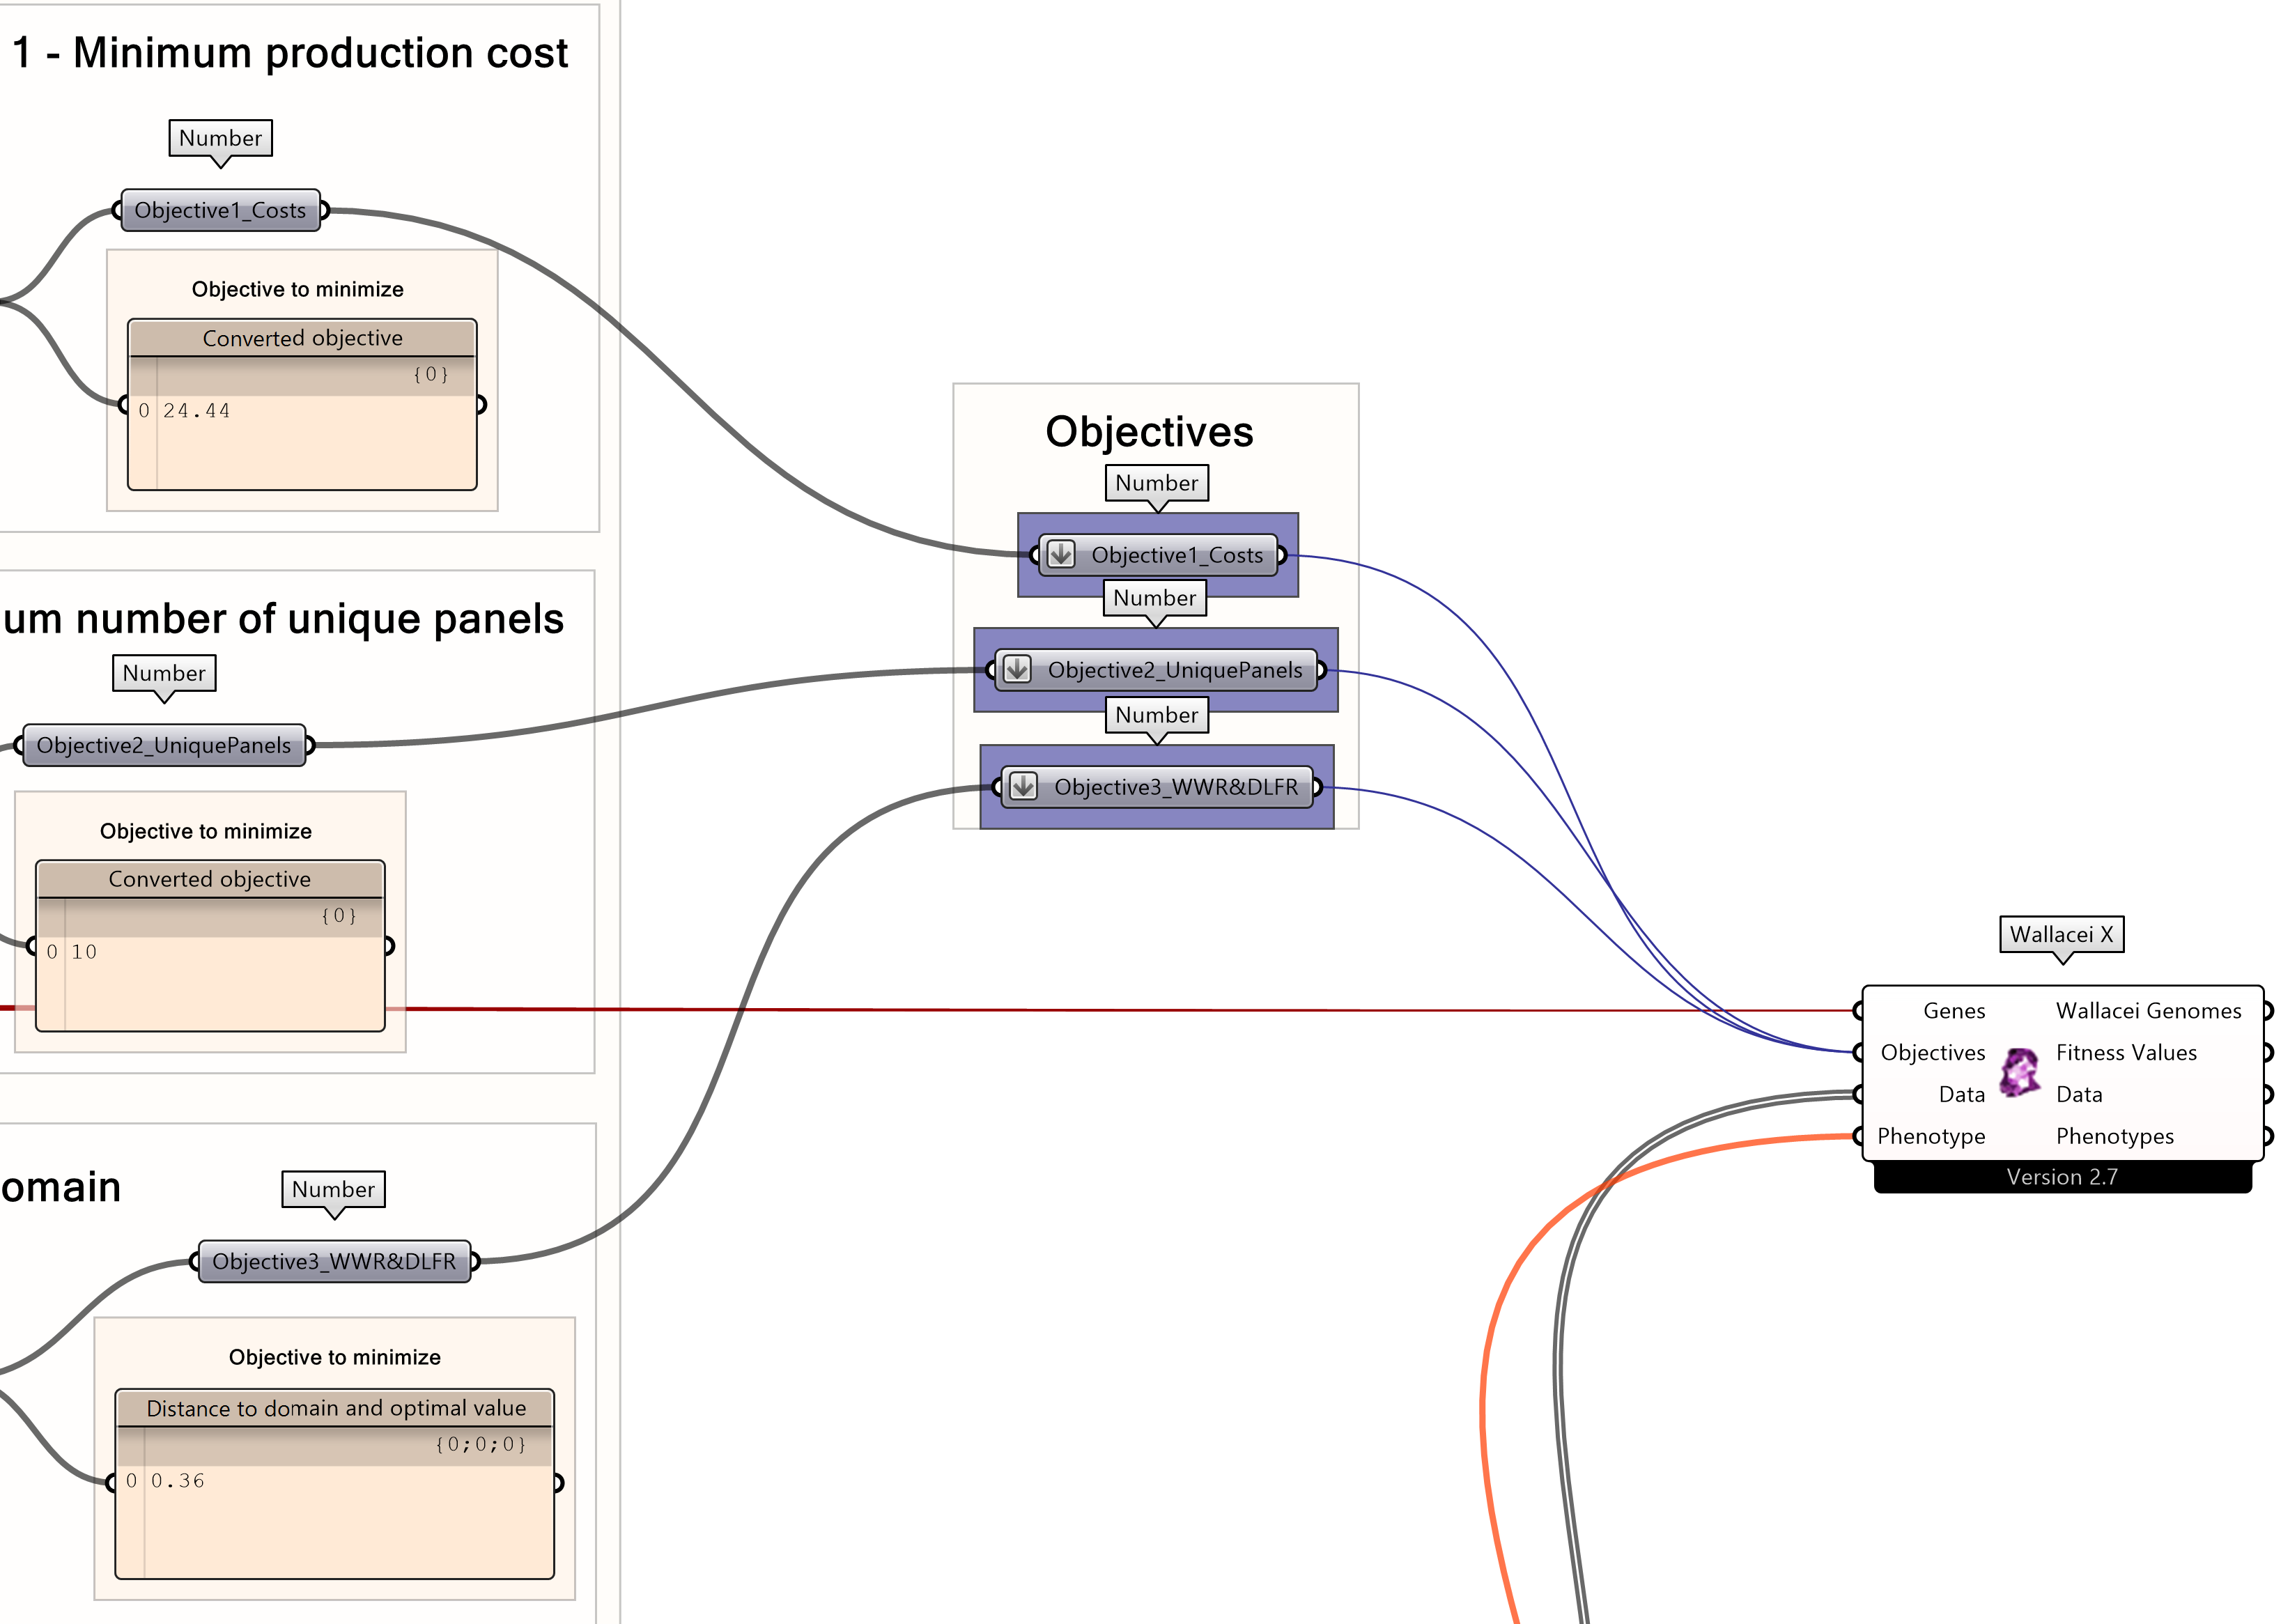
Now to the Objectives. Here you should connect every component holding a value to be minimized. We conveniently prepared them in earlier steps. Here we just grouped them before connecting to WallaceiX, for better clarity.
Additionally, you should flatten each of the objective values before connecting them with Wallacei, in this way the order of the objectives will stay the same.
Data
The optional “Data” input can be whatever short numerical or text data you want to include with each solution. Data will be generated during the optimization process, so you will receive this information on each of the solutions you ran.

In our case, it can be for example a total number of panels, which can be derived from the “cost calculator” section in the grasshopper definition. Additionally, we would also add in the WWR and the DLFR, as objective 3 includes a calculation but not the actual WWR and DLFR values.
Phenotype (Optional)
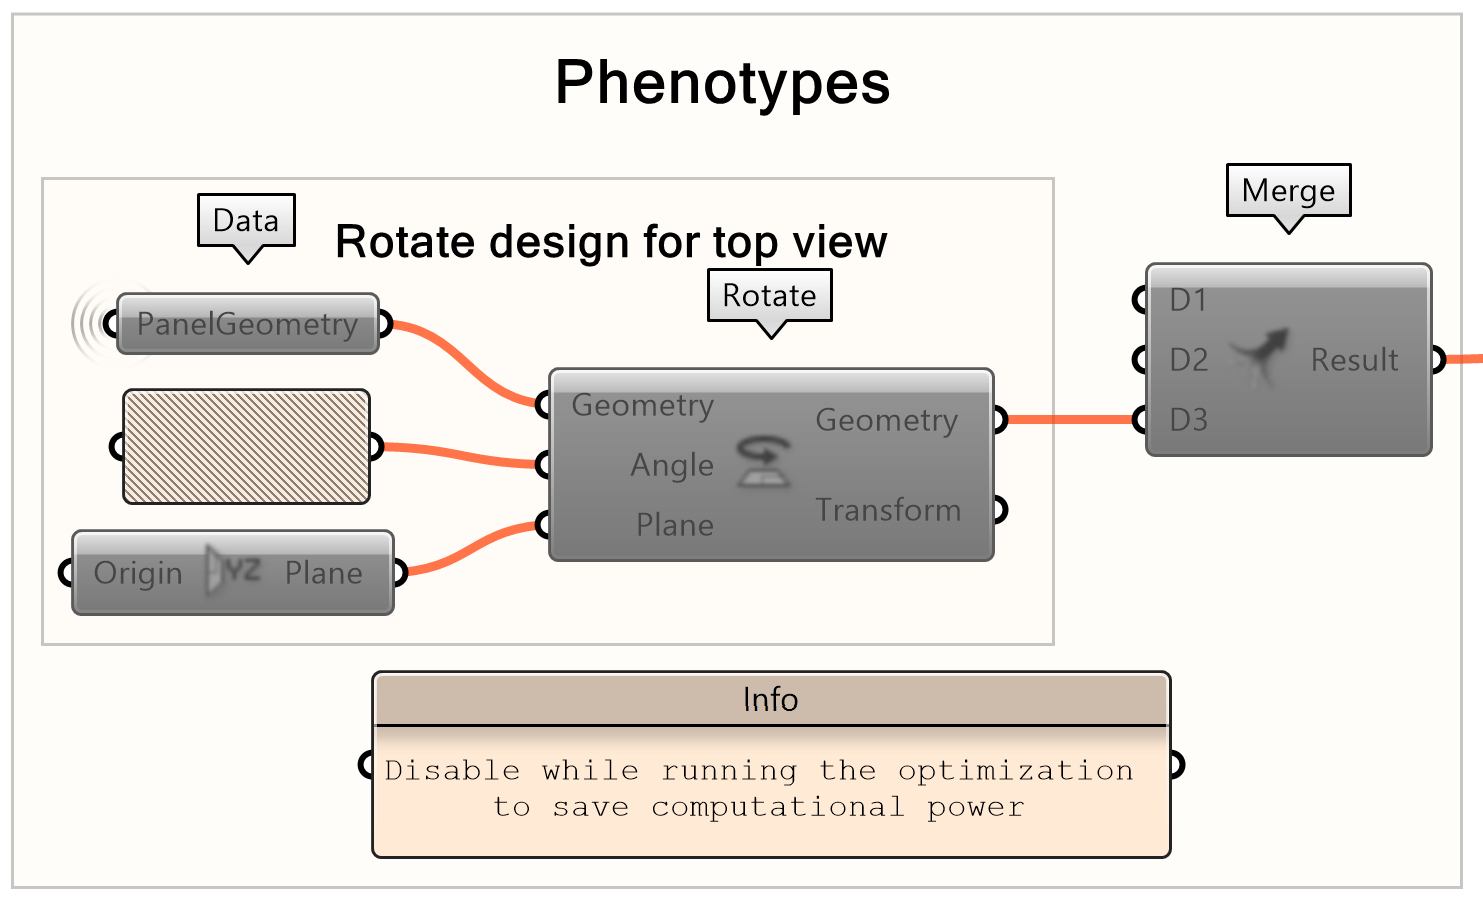
Phenotype is the geometry or additional information you might want later, after the optimization. For example, to easily visualize different chosen solutions. In this case we rotate the façade panel design to top view. This goes into “Phenotype”.
Note: while running the optimization you should disable the phenotypes. If you have them enabled it slows the optimization algorithm down. Phenotypes are only used by Wallacei after running the optimization.
Wallacei connection
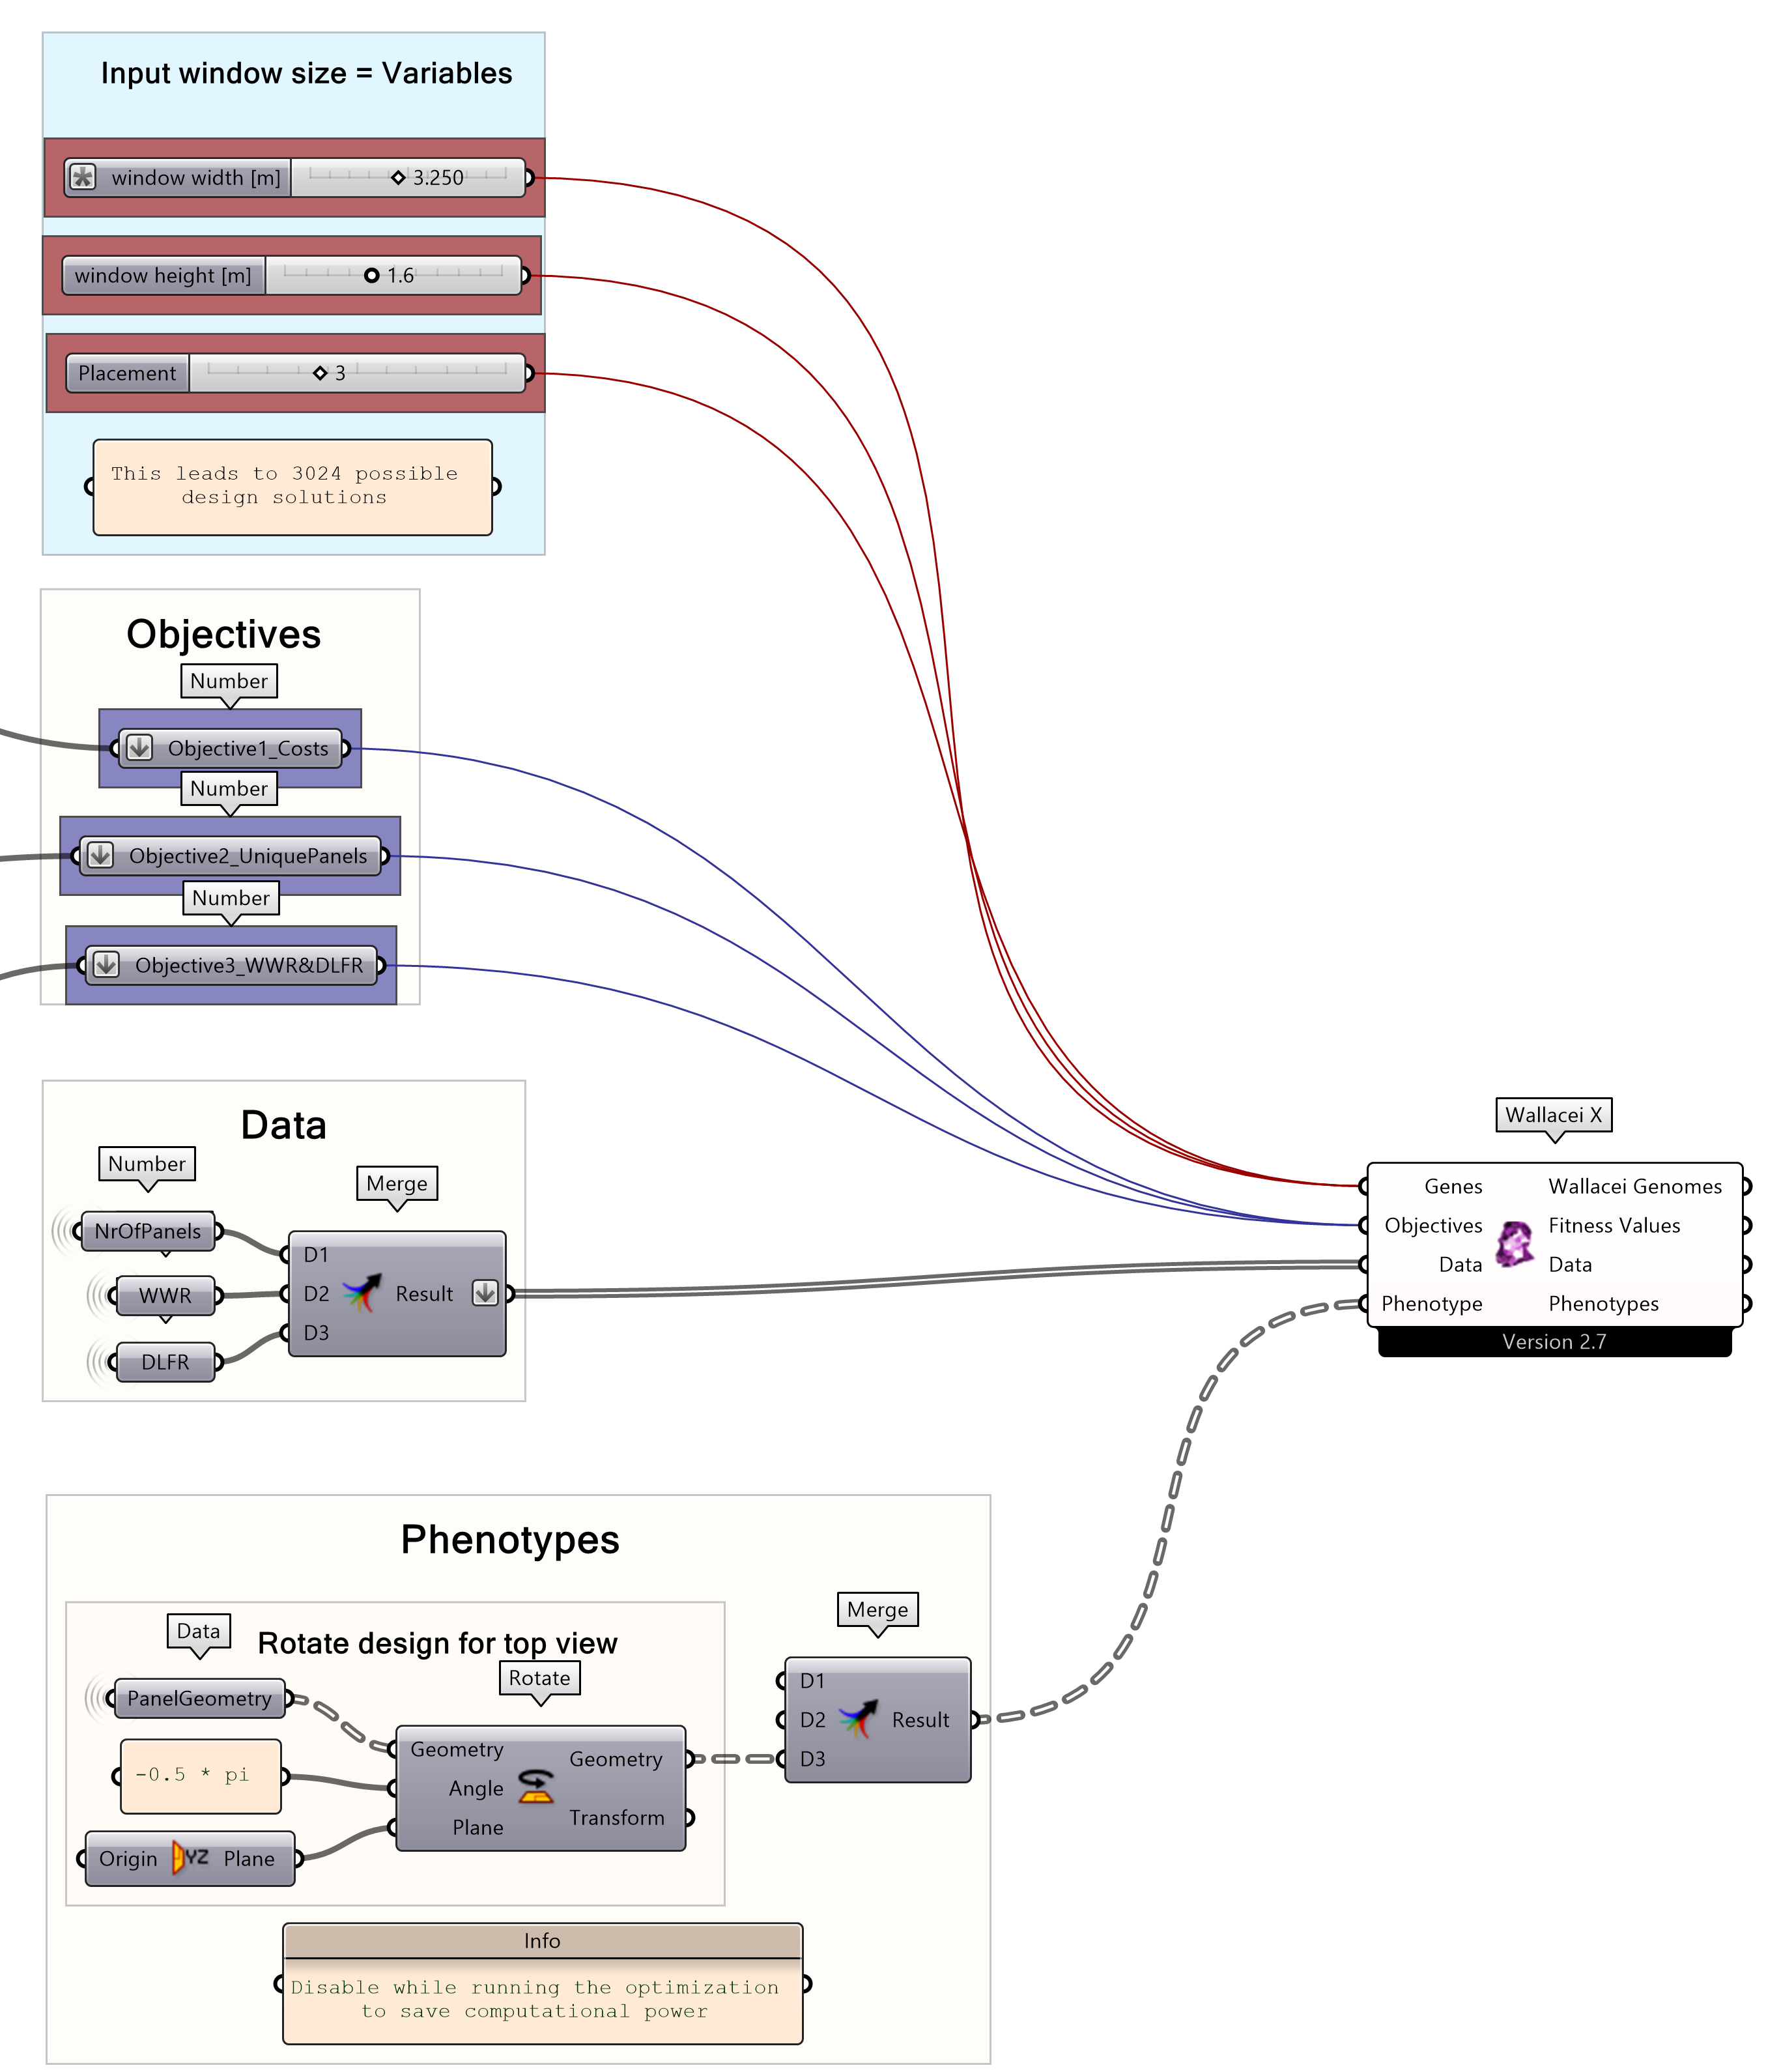
Now, everything should be connected, and you are ready to go into the WallaceiX component interface (double click the component icon).
MO Façade Panelization Optimization – Setup and Run 6/8
Running Wallaceilink copied
As a last step in this tutorial, we will be running the optimization algorithm. We will be setting the population size, running the algorithm and saving the results.
Population size
Before setting the population size it is important to know how many possible design solutions there are in total. For example, in this exercise there are 3024 design solutions available, setting a population size above this is useless. The optimization algorithm should not run all the solutions only a fraction of it.
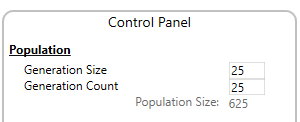
For this exercise we will run 625 design solutions, which should give us enough information to find optimal solutions. Change the following settings: “Generation Size: 25” and “Generation Count: 25”
Running Wallacei
Before running the optimization check your Grasshopper file carefully. Remove unnecessary iteration steps, check for errors and hide as much as possible in the Rhino view port. Lastly, save your Grasshopper file one more time before hitting start! (In case your file crashes)
Assuming you went through all the safeguards, it’s time to click that magic button “Start”! (in the bottom left corner). The optimization is running now.
While Wallacei is running you will see the Standard Deviation Graphs, Parallel Coordinate Plot and Objective space being filled.

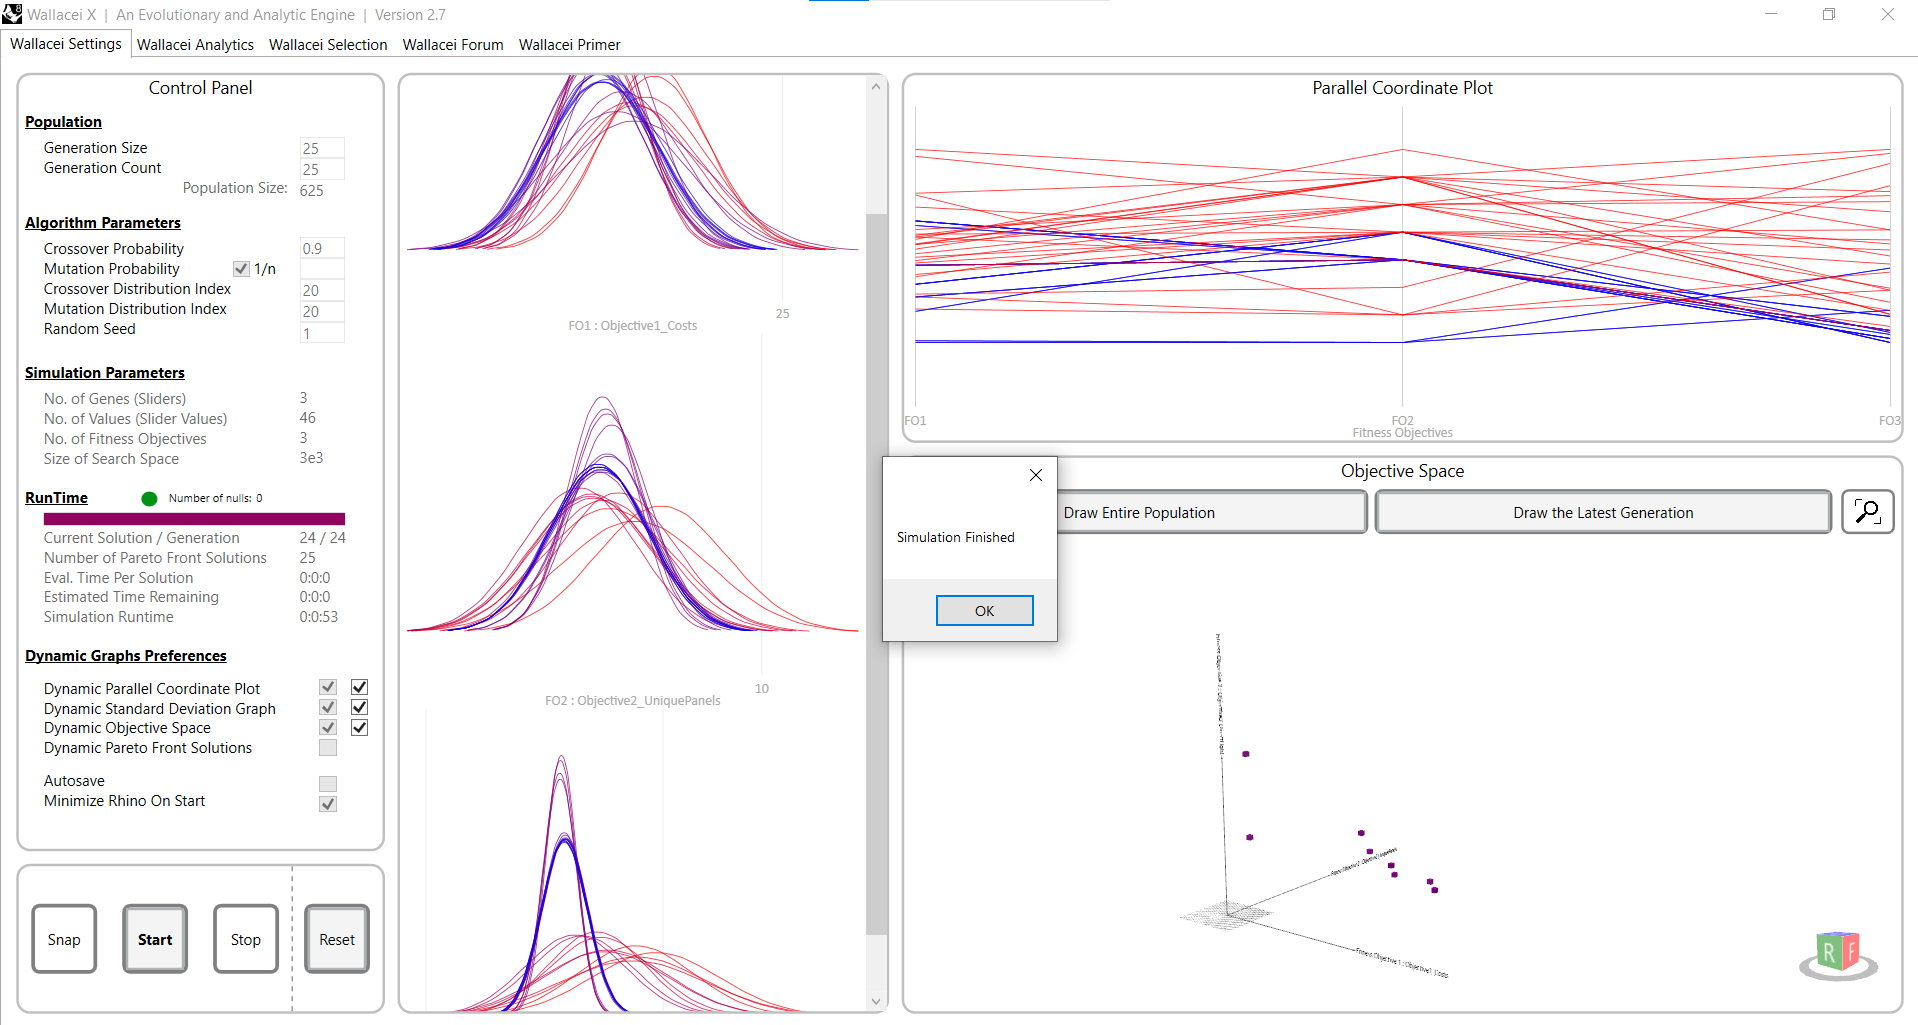
In the case of this exercise’s optimization, after 40 seconds the optimization is done running. The screen will look as follows and a pop-up “simulation finished” appears.
Click on “ok” on the pop-up, but don’t close the Wallacei screen yet.
Saving results
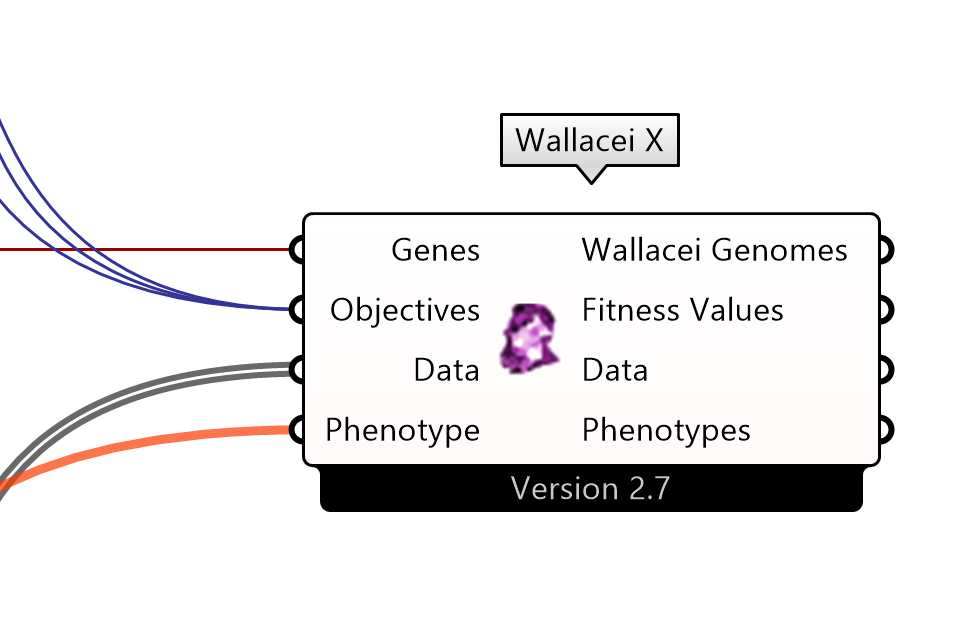
After the optimization is done, the first important thing to do is save the optimization results. Minimize the Wallacei screen and open your Grasshopper script. The WallaceiX component turned purple, meaning it has information inside it. Save your Grasshopper script to ensure that you keep your optimization results for the next time.
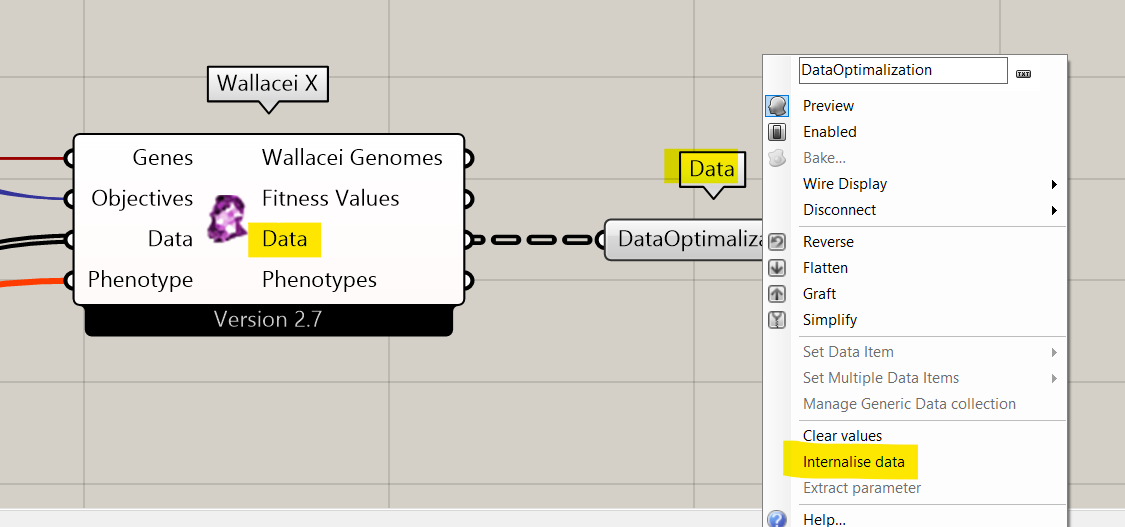
Additionally, to secure the ‘Data’ output of Wallacei you should connect a data component to it and internalize the data. To ensure that if you open the file the next time, the data is saved as well.
After you save your Grasshopper script and internalize the data, you can safely close everything. Next time you open the Grasshopper script the purple Wallacei component with the saved result will be waiting for you. Or you keep the script open, and continue with the analytics of the results, which are explained in the next tutorial.
MO Façade Panelization Optimization – Setup and Run 7/8
Conclusionlink copied
The file is now ready to run the optimization. Or is already running while you’re reading this.
In this tutorial, you started with a design and a research question. From that question, we identified the room size as the parameter, with the window-to-wall ratio and window positioning as variables. Initially, we had four objectives: minimizing production cost, reducing the number of unique panels, achieving a 30-50% window-to-wall ratio, and ensuring 60% of the floor receives direct light. To simplify the process, we merged the last two objectives into a single equation, reducing the problem to three key objectives without compromising our design goals.
By following along, you learned how to set up the Grasshopper definition and translate your research question into appropriate input variables and objectives. You learned how to combine objectives, you also performed multi-objective optimization using WallaceiX, and discovered which variables produced the most effective results for this example.
Now it’s your turn! With the skills you’ve gained, you can create your own research question, define parameters, variables, and objectives, and run your own optimization.
Go ahead and give it a try, who knows what exciting design solutions you’ll uncover!

Exercise file
Here you can download the final exercise file. In this file you will find the parametric room set-up to answer the research question explained in the example.
MO Façade Panelization Optimization – Setup and Run 8/8
Useful linkslink copied
Linked tutorials
If you want to know more background information about the basic optimization terminology you check the page on subjects and definition on optimization. As mentioned before, this exercise is part of a workshop from the BK3WV4 course, you can find the workshop details below.
For more background information on how the geometry is created, you can follow the tutorial ‘Façade Panelization’. For more information on the basics of how to set-up and run an optimization model with Wallacei, you can follow the Wallacei Basics tutorial.
Follow up tutorials
The next step in analyzing the optimization results, you can learn more about it by following the Wallacei basics tutorial and then follow the example exercise which uses the same room and research question:
Write your feedback.
Write your feedback on "MO Façade Panelization Optimization – Setup and Run"".
If you're providing a specific feedback to a part of the chapter, mention which part (text, image, or video) that you have specific feedback for."Thank your for your feedback.
Your feedback has been submitted successfully and is now awaiting review. We appreciate your input and will ensure it aligns with our guidelines before it’s published.
