DigiPedia Teacher Dashboard Onboarding
-
Intro
-
1. Copyright Information
-
2. Setting up an Account
-
3. Uploading Media Files
-
4. Create a New Tutorial
-
5. Adding Elements
-
6. Additional Formatting Features
-
Conclusion
Information
| Primary software used | Jupyter Notebook |
| Course | DigiPedia Teacher Dashboard Onboarding |
| Primary subject | Other |
| Level | Beginner |
| Last updated | May 21, 2025 |
| Keywords |
Responsible
| Teachers | |
| Faculty |
DigiPedia Teacher Dashboard Onboarding 0/7
DigiPedia Teacher Dashboard Onboarding
The video and PDF guide provide you with information on how to create pages on Digipedia through the teacher dashboard.
Through a series of videos and accompanying text descriptions, we will give you the information you need to upload your tutorials to Digipedia.


You can download the Digpedia Teacher Dashboad manual to reference how to use the teacher dashboard
DigiPedia Teach Manual
Tutorial Template
DigiPedia Teacher Dashboard Onboarding 1/7
1. Copyright Informationlink copied
Copyright rules are different online than in the classroom!

Copyrighted Work
Published work is automatically protected by law once it is created unless the author uses a creative commons license. You always need written permission from the copyright holder to upload any copyrighted material to DigiPedia. Reach out to the DigiPedia team to receive access to the standard form to request permission.
- Examples of work that is typically under copyright:
- Images from the internet
- All student work (projects, reports, presentations)
- Master Thesis projects
- PhD Projects
- Published papers, articles, and books
If you do not acquire written permission you cannot publish the work on DigiPedia you can provide a link so people can access the work through the original source you can summarize the work and cite it you can quote the work and cite it
If you do acquire written permission keep a record of the obtained permission cite the work when publishing it on DigiPedia ensure when you upload copyrighted media to DigiPedia, your captions contain the following text: (Copyright remains with author(s). Used with permission.)
Creative Commons License
When an author states the work is published under a creative commons license, the specifics of the creative common license applies.
You may publish content that is licensed under a creative commons license without needing written permission from the license holder. You must always cite the work when it is published under a CC license and you must comply with any other CC license requirements the author states.
CC licenses start with CC BY and contain additional letters based on license requirements:
- BY: credit must be given to the creator
- SA: Adaptations must be shared under the same terms
- NC: Only noncommercial uses of the work are permitted
- ND: No derivatives or adaptations of the work are permitted
Check the details of CC licenses at https://creativecommons.org/share-your-work/cclicenses/
NOTE: Using a CC BY license makes the reuse of material easy. All that is required is a citation to credit the original author. This is why, in accordance with the TU Delft Open Science program, material that is published on by teachers on DigiPedia is automatically published under a CC BY license. An exemption can be requested for special cases.
Public Domain
Material in the public domain is no longer protected by intellectual property laws such as copyright laws.
You can use public domain work freely without citations.
Fair Use
Fair use allows copyrighted material to be used for select purposes. These purposes include criticism, comment, news reporting, teaching, scholarship, or research. Fair use laws allow teachers to use copyrighted materials in a classroom.
Fair use does not apply to publishing material on DigiPedia. You cannot publish copyrighted material without written permission from the copyright holder.
DigiPedia Teacher Dashboard Onboarding 2/7
2. Setting up an Accountlink copied

Register at Surf
To give you all the credits of making a tutorial, you have to sign-in to SurfShare Kit once
- Go to: https://surfsharekit.nl/login
- Click on ‘Inloggen met SURFconext’
- Create an account at by logging-in with your NET-ID
Log In to the Teacher Dashboard

- Go to https://dashboard.DigiPedia.tudelft.nl/
- Click on “Log in with OpenID connect”
- Log-in with your NET-ID
Overview
To create a tutorial there are 2 main steps:
- Upload media files to the media library
- Create a tutorial page

DigiPedia Teacher Dashboard Onboarding 3/7
3. Uploading Media Fileslink copied
You can either upload your media files in the media library before you work on your tutorial or you can add them along the way. Test out each workflow to see what works for you. If you upload everything together in the Media Library tab. These are the steps you take.

1. Select the Media tab on the top right corner of the page

2. Upload all images of the tutorial in the media one by one by clicking on Upload file (top right corner)

3. Drag and drop the image and add title (as in word). Click on save to add the image

TIP: you can also drop all your media files at once while uploading, then click on each image separately to give the image or video a title. Then click on save.
DigiPedia Teacher Dashboard Onboarding 4/7
4. Create a New Tutoriallink copied
Let’s create a new tutorial page.
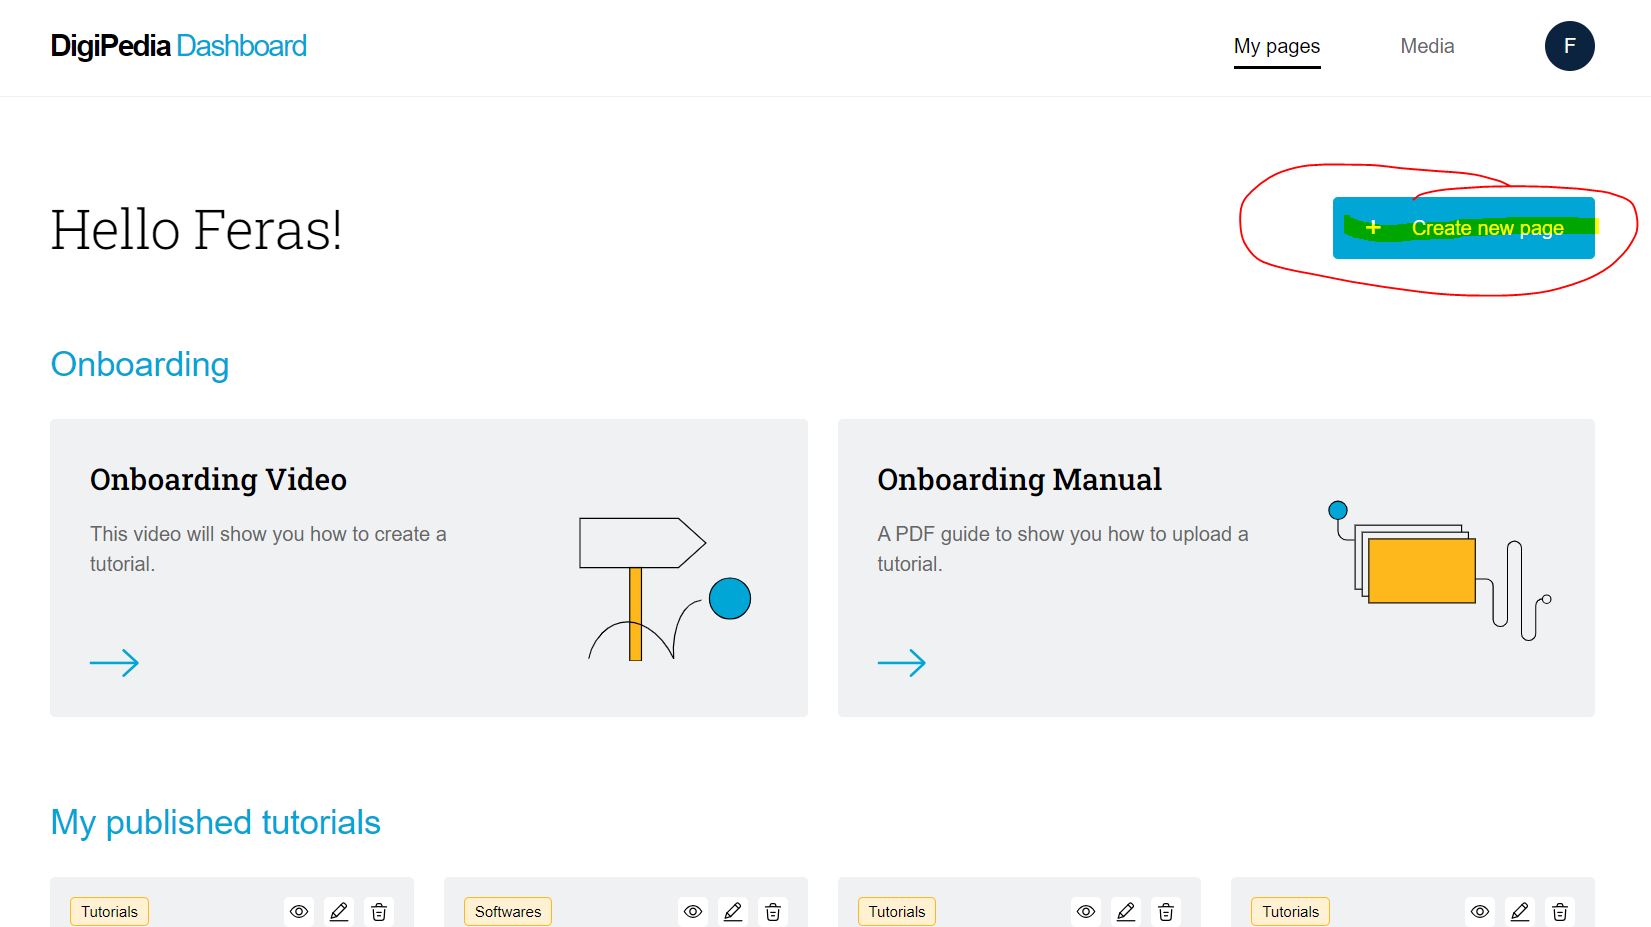
- Start a new tutorial by selecting My Tutorials on the top right corner of the page. Then click the Create new page (blue button)
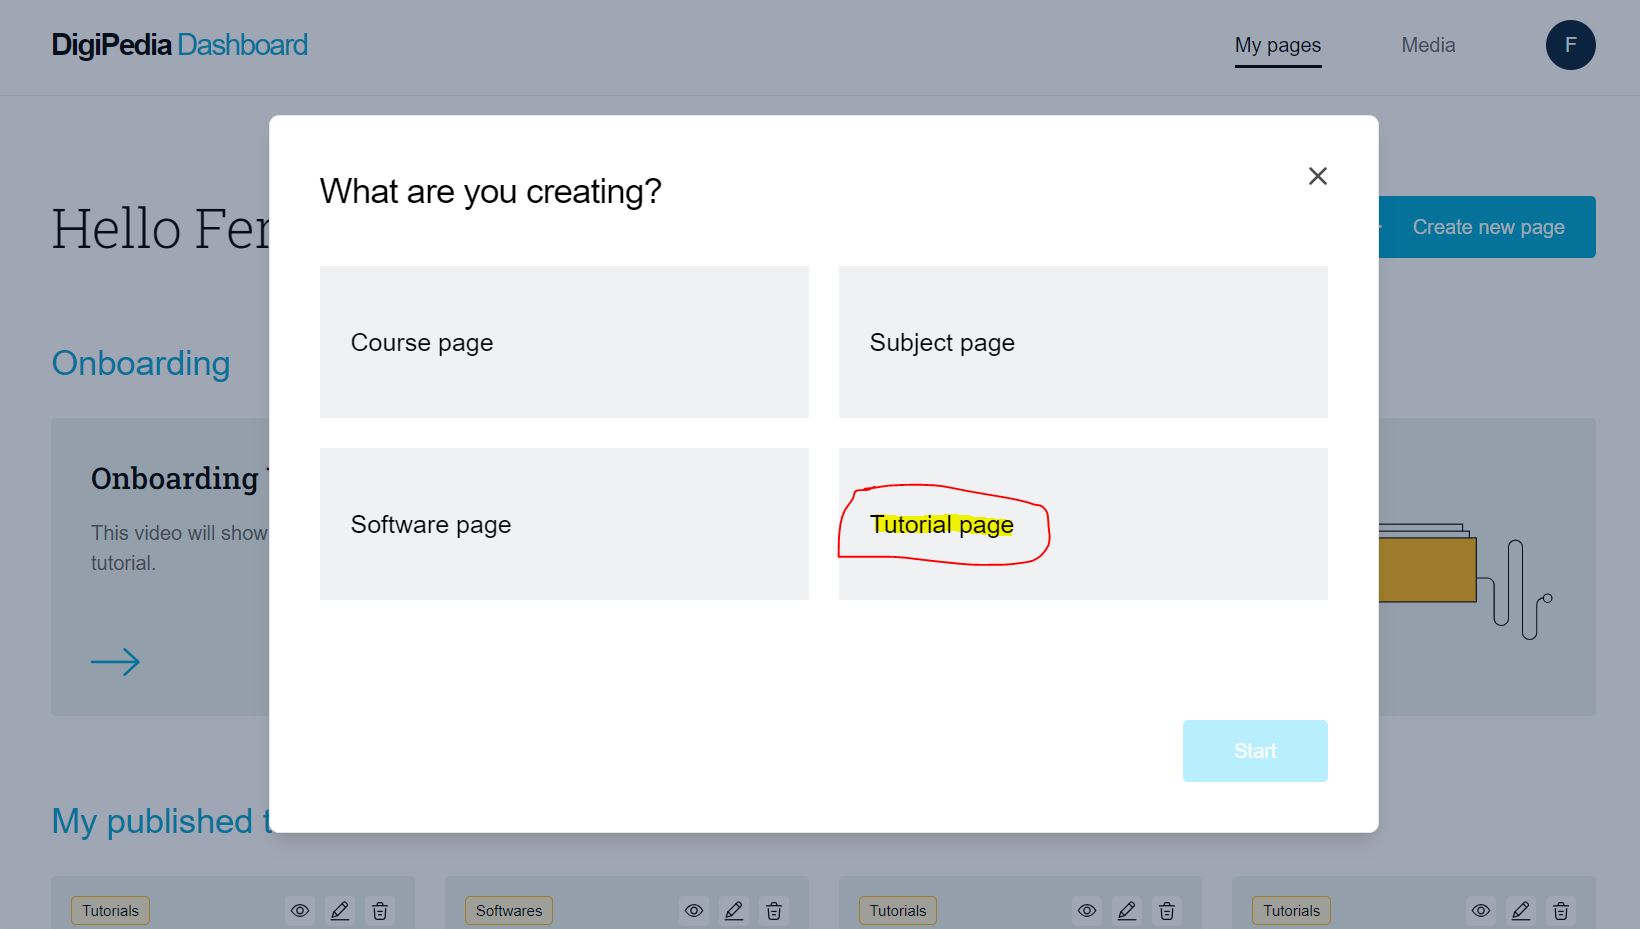
- Select tutorial page
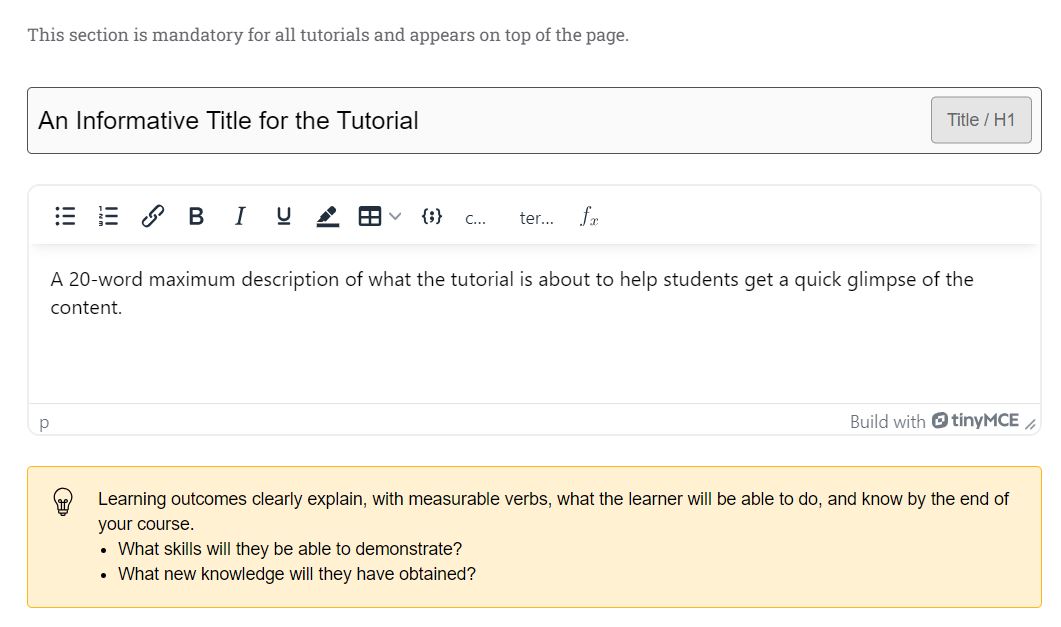
- Start by adding the title on the first box and description of the tutorial
- The tutorial description is cut by 20 words on the tutorial card, therefore try and stick to this.
Editing the Introduction
- The introduction text can be created when adding a text block under the description.
- This first text box automatic generates the introduction chapter, you don’t need to make a new chapter for this.
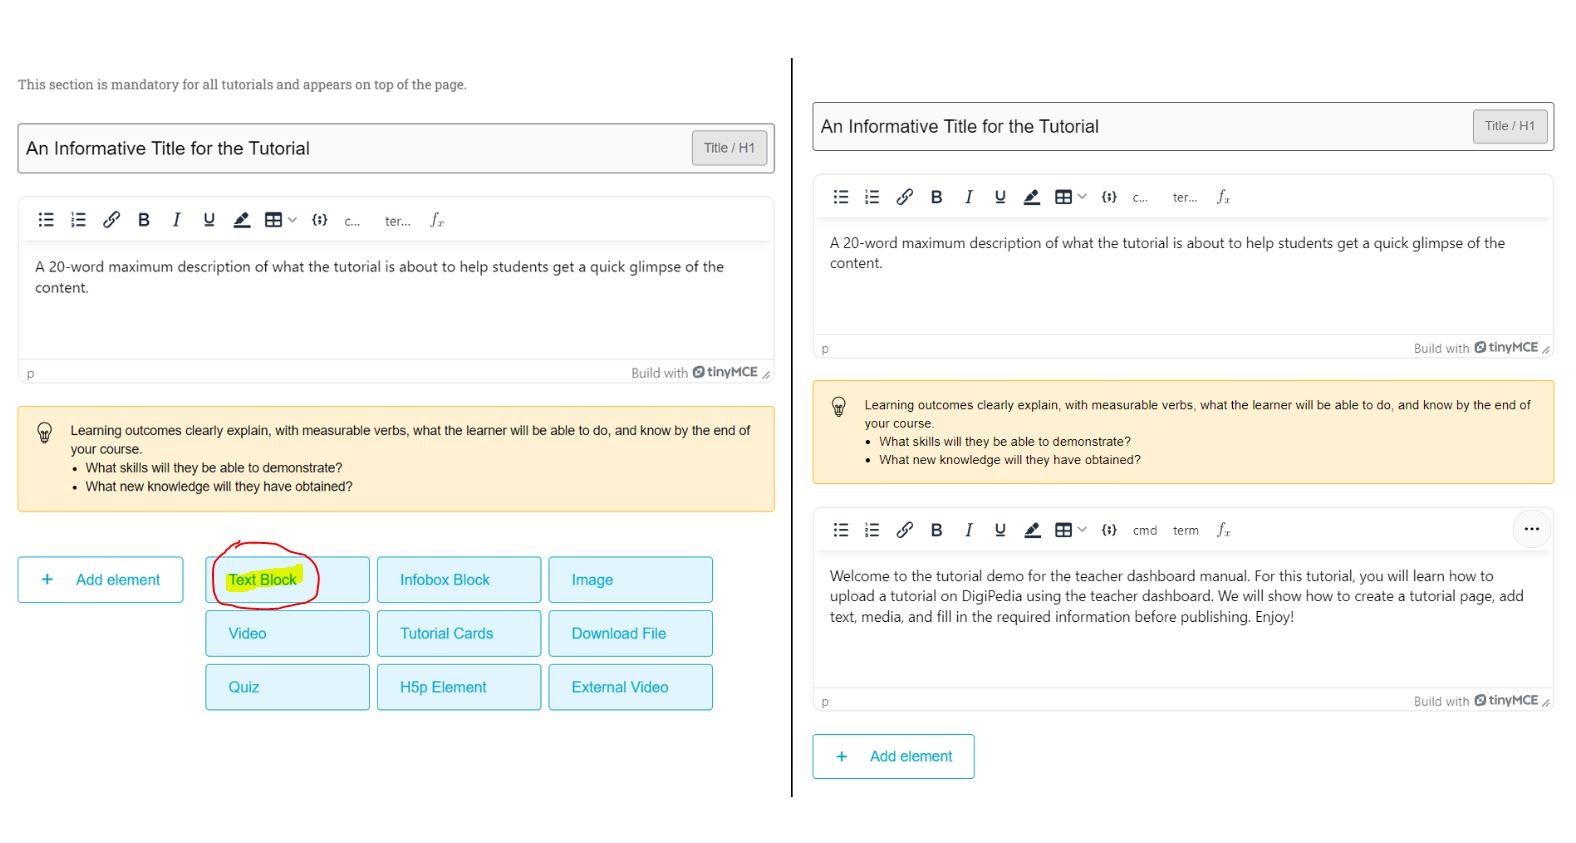
- To add another element, click on the “add element” button under the first text box and then select the type of element you will create
- Currently, on the introduction page you cannot make text next to an image, only full-width images and videos.
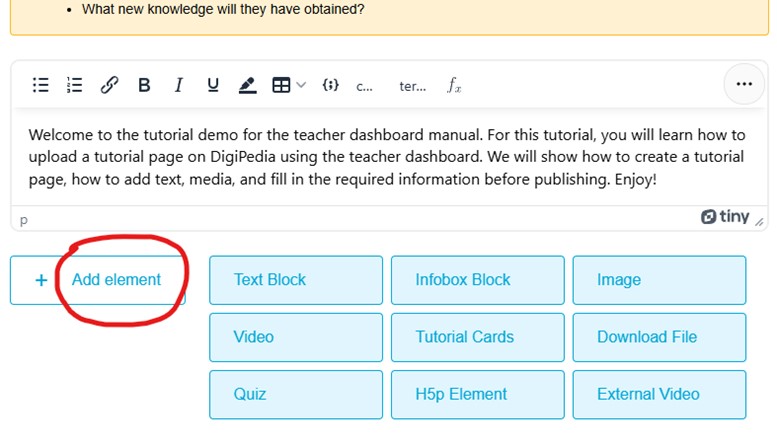
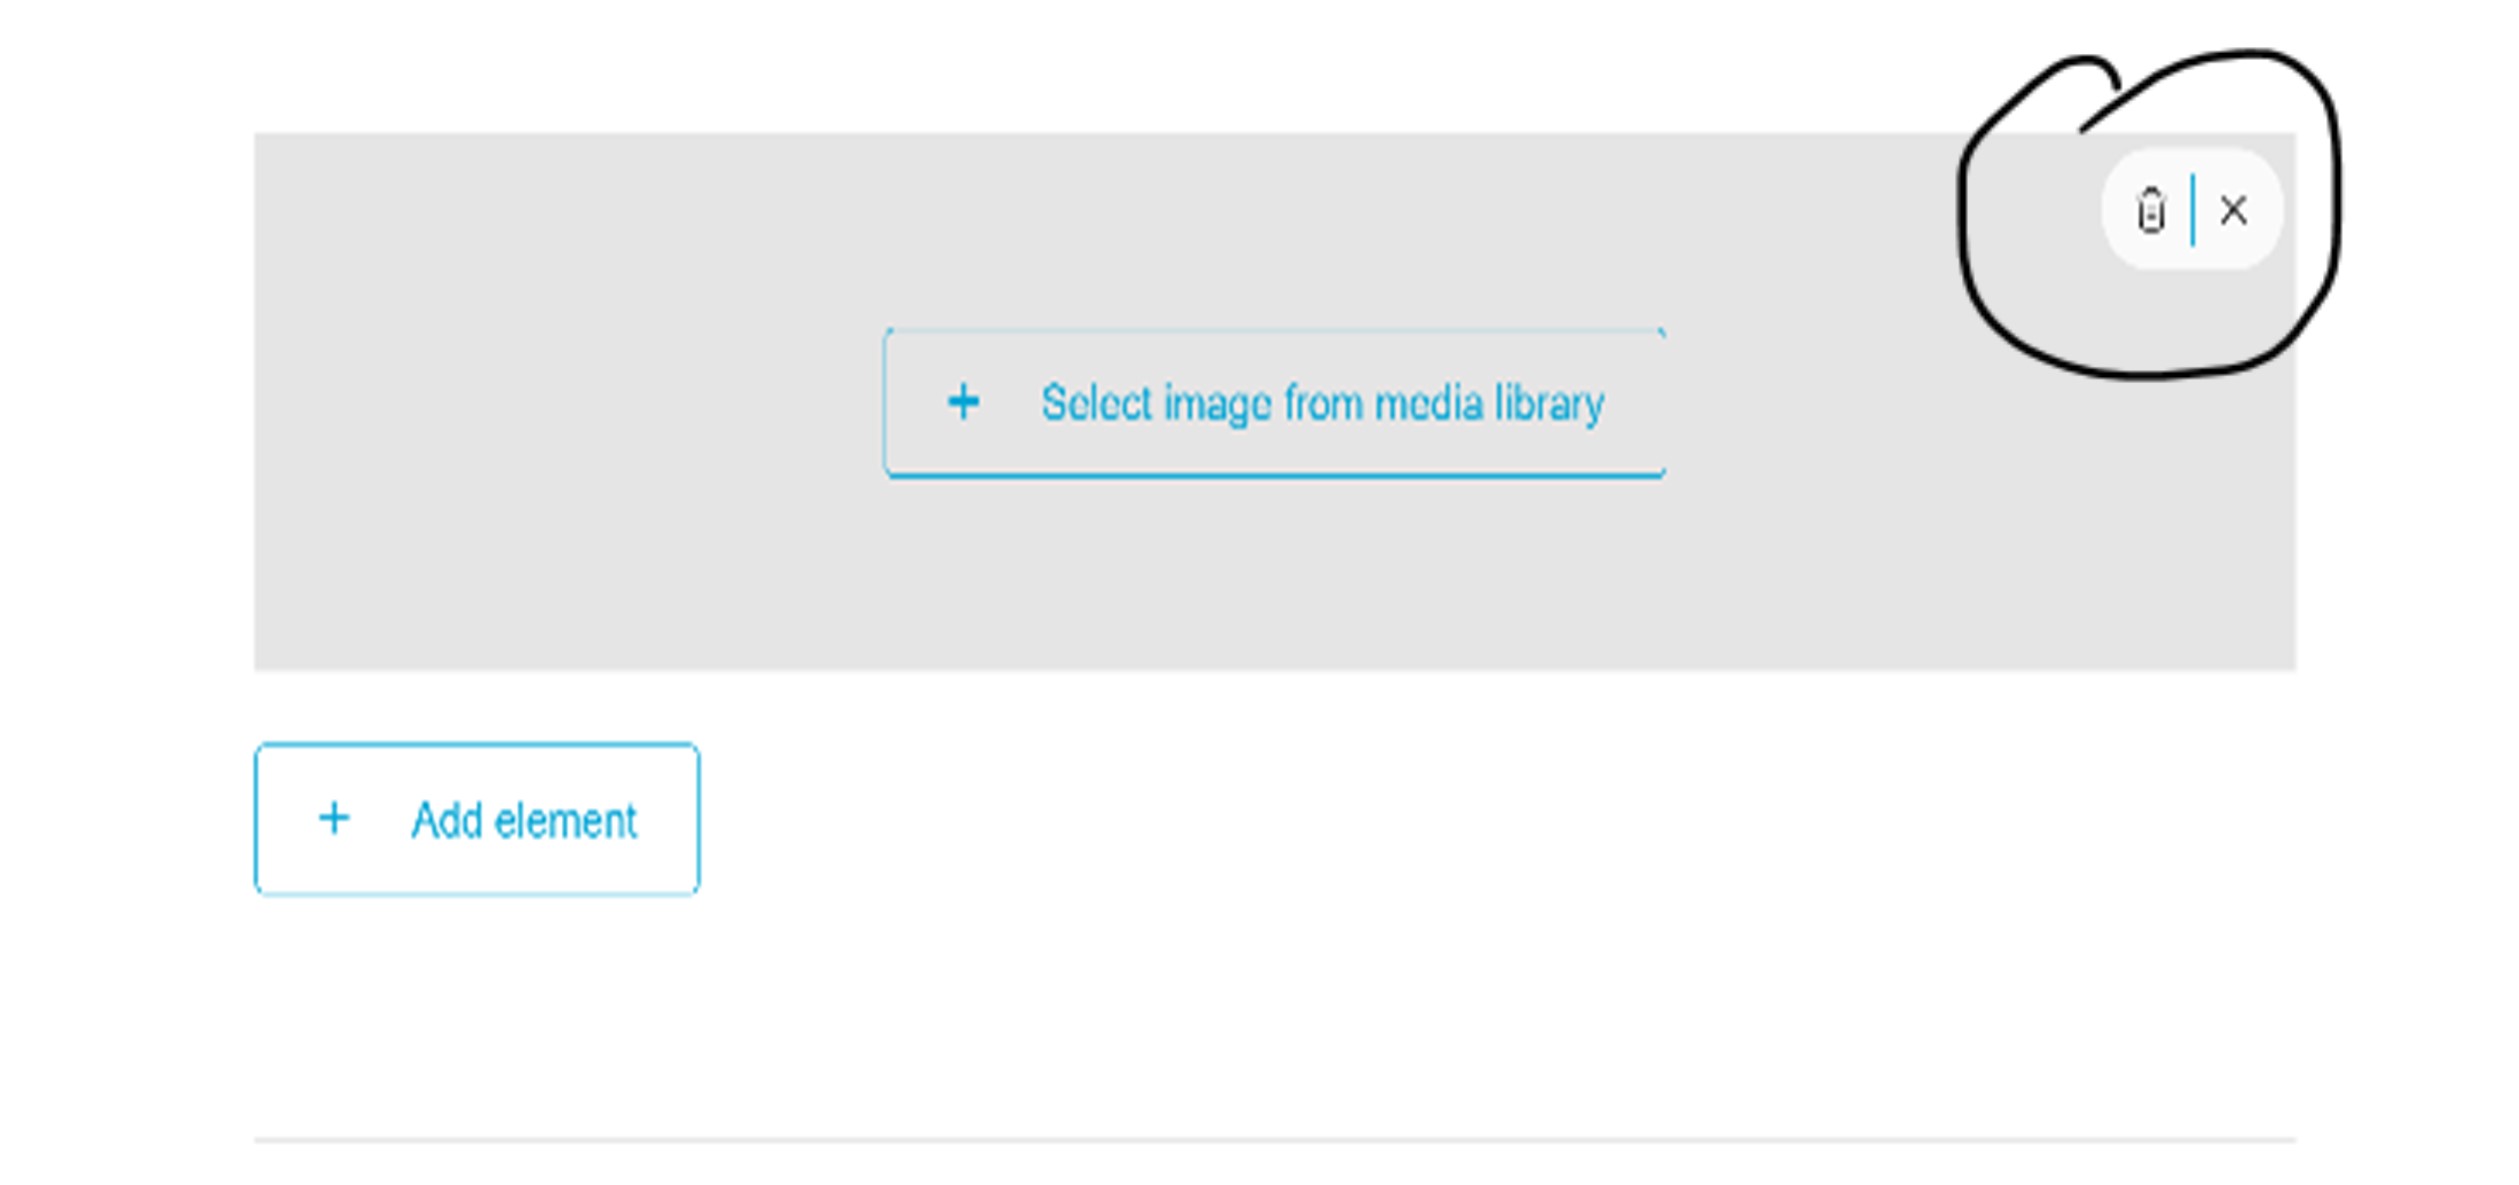
- If you add a wrong element, you can delete it by clicking on the 3 dots at its upper right corner and click the delete icon. This works the same for each element.
Save Your Tutorial
- After you enter your title and description, we recommend saving your tutorial.
- Save early and save often as there is no auto-save feature. It is best to save frequently so you do not lose work. If you close your browser without saving, you will lose the work you entered.
- To save the tutorial the first time you need to scroll all the way up, and at the top right corner click on “Save as Draft”. Only publish the tutorial when complete, as students are using the website and can end up on the page you’re building.
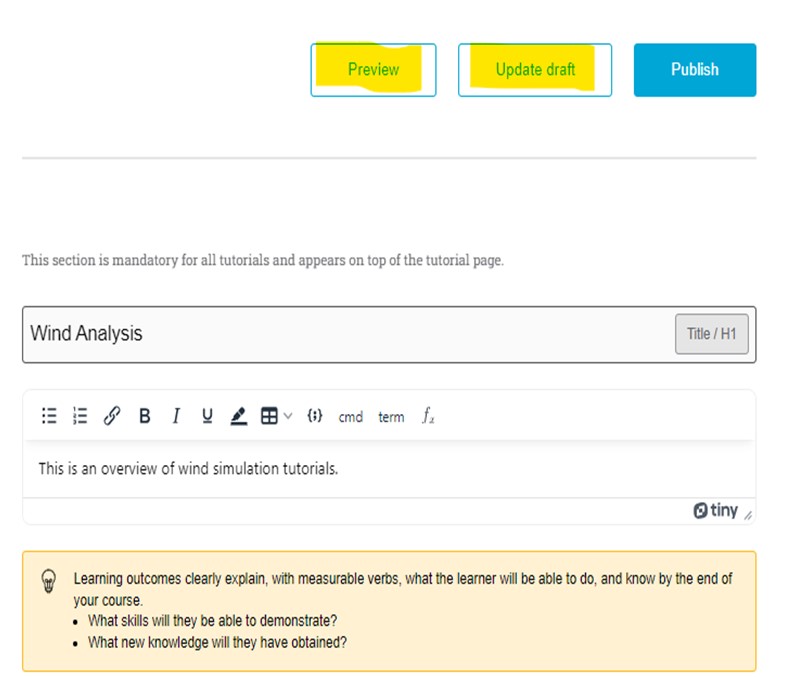
Selecting “Save as Draft” saves an editable tutorial page, which is not visible on the site. Every time you add changes you need to click on “Update draft”.
By clicking on “preview” you can see how the page looks. It is advisable to work together with the preview and the teacher dashboard to understand how it looks on the page.
Note: if previewing the page shows a blank page, then you must publish it to preview. Then, click “Switch to Draft”.
Tutorial Meta Data (required)
- The tutorial meta data is located at the bottom of the tutorial page, under “this tutorial belong to.”
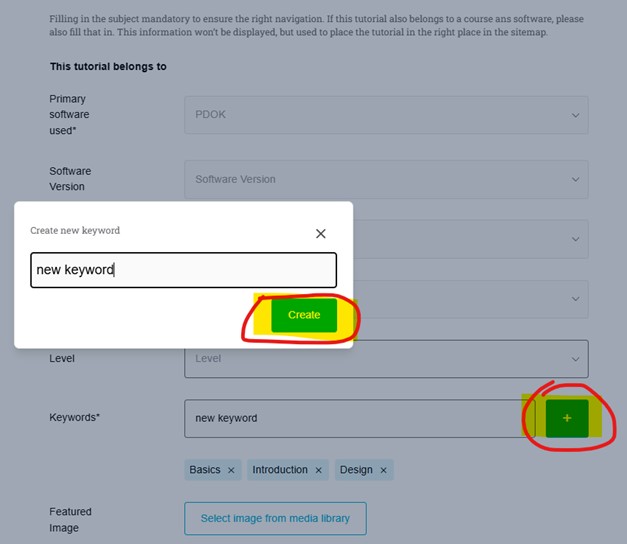
- Depending on the type of page, there will be different required meta data. For tutorial pages, there is information about the “software used”, “subject”, “keywords, faculty”, “teachers”
- You can add keywords by typing the keyword you’re looking for. If it does not exist, then use the + button to create a new keyword. Always give at least 3 keywords.
- This is also where a feature image can be added (required)
- This is an image that will be shown on the tutorial card. Make sure you have this image uploaded to the media library so you can select it.
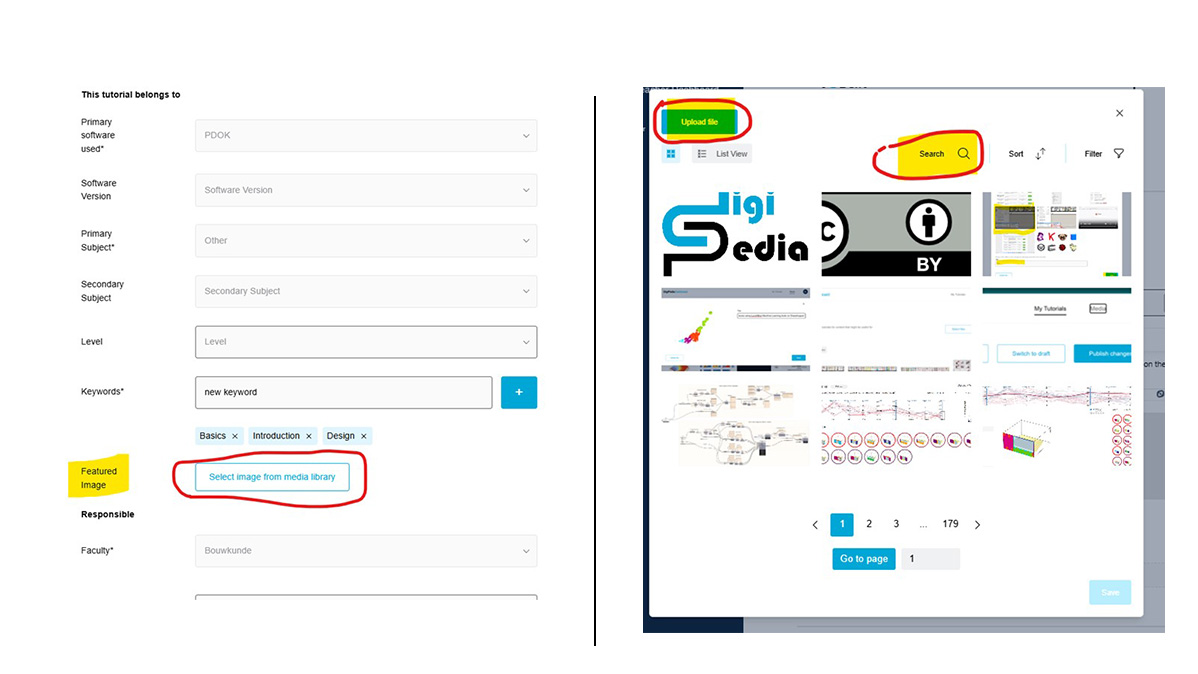
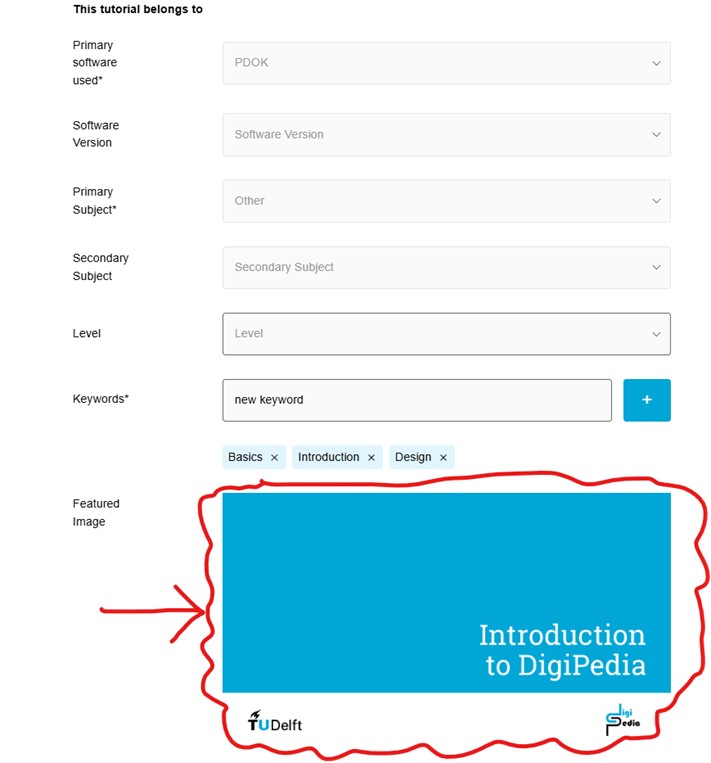
NOTE: you can either upload a new file by clicking on the “Upload File” button or search the media for the files you uploaded in the “Media.” In the end, you will see your image displayed on the page.
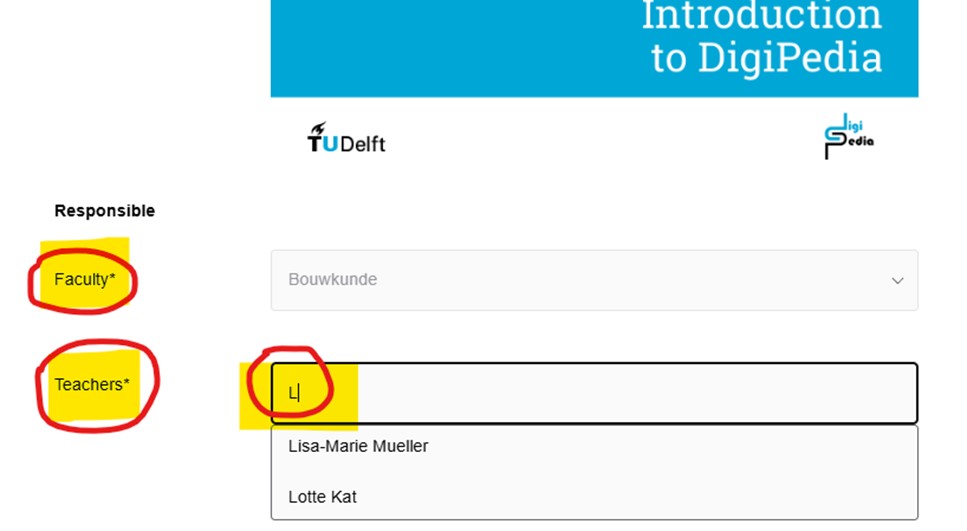
- Finally, you can enter the responsible “faculty” and “teachers.” You can type the name, and an option will show up to select from.
NOTE: all teachers and tutorial co-authors that you want to credit need to have registered at SurfSharekit and the Teacher Dashboard. Please see the instructions in Part 2: Preparation.
Adding Additional Chapters
- Once you are done with the introduction and you want to add a new chapter to your tutorial, click the “+ Add Chapter” button which will be located right after the introduction text under “This section is a chapter of your tutorial.”
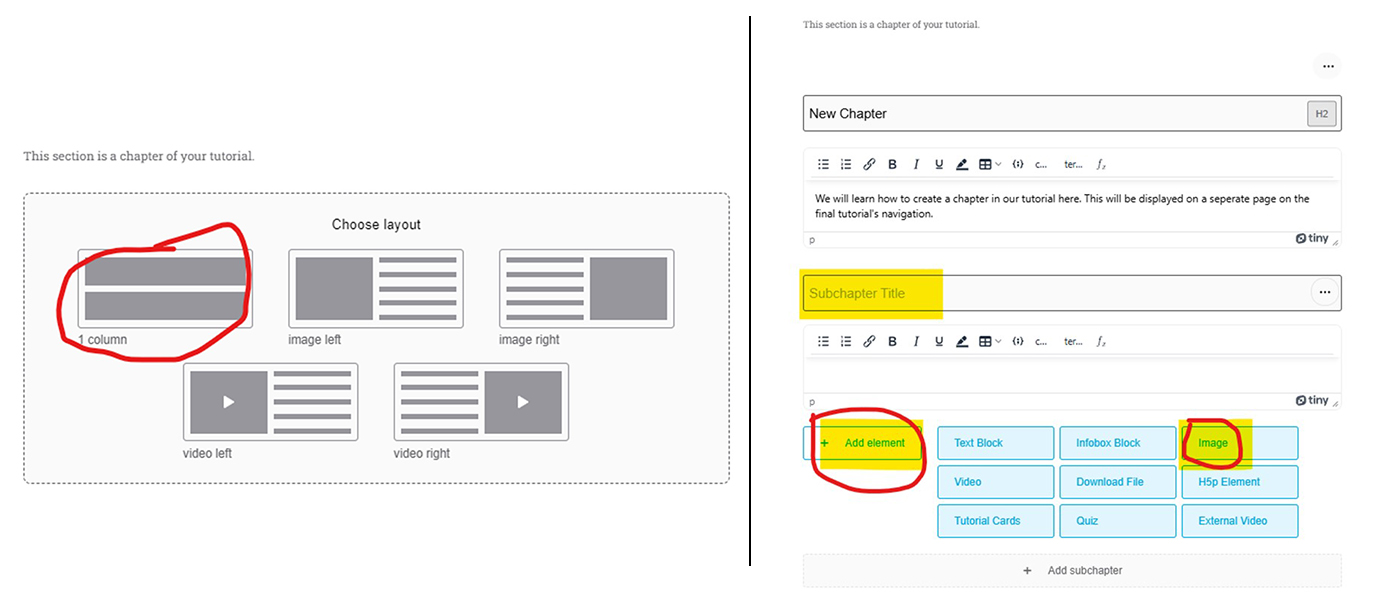
- Click on “add chapter.” You can select various layout options, be aware you cannot change this after you selected one, then the whole chapter will be removed should you want to change the chapter format.
- Therefore, it is advisable to always select the 1 column option here, as you can always leave the text empty, and you won’t notice it on the webpage.
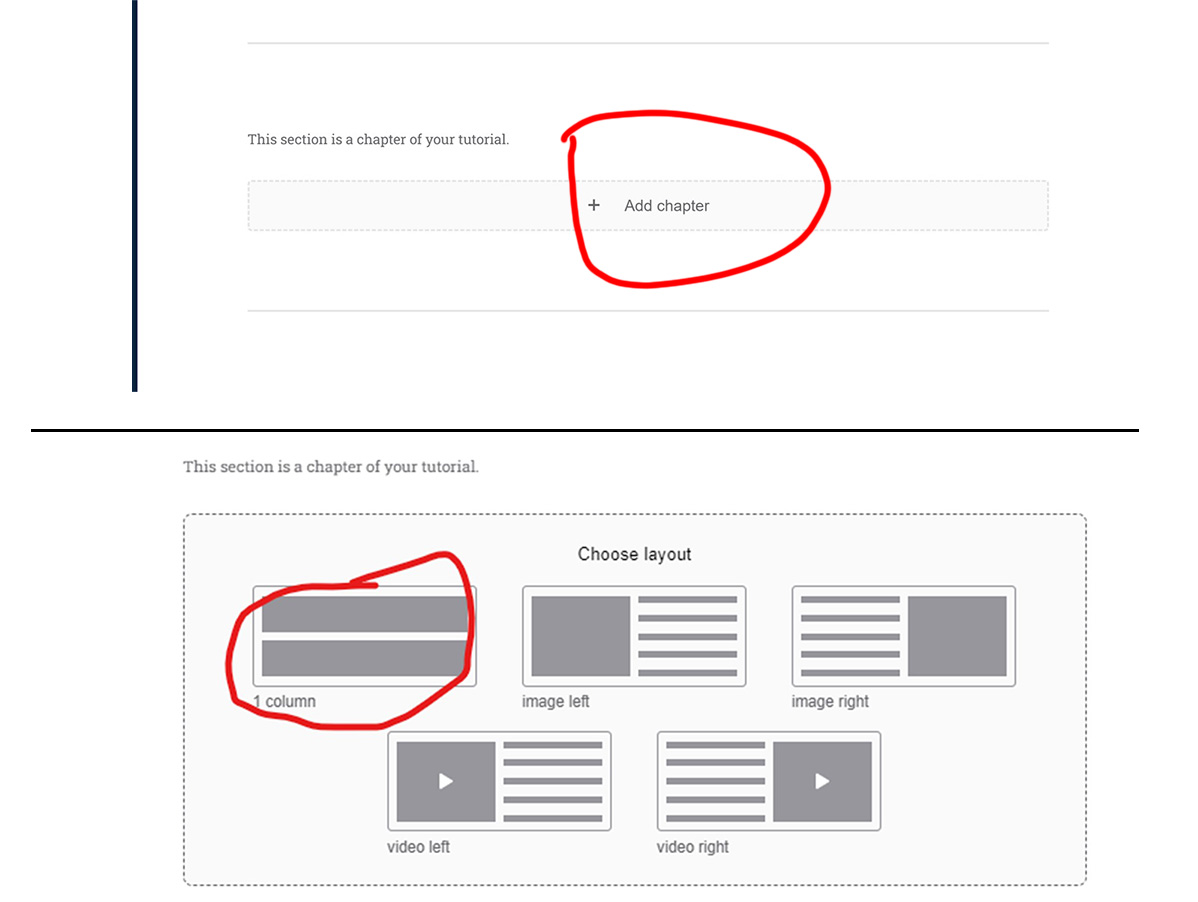
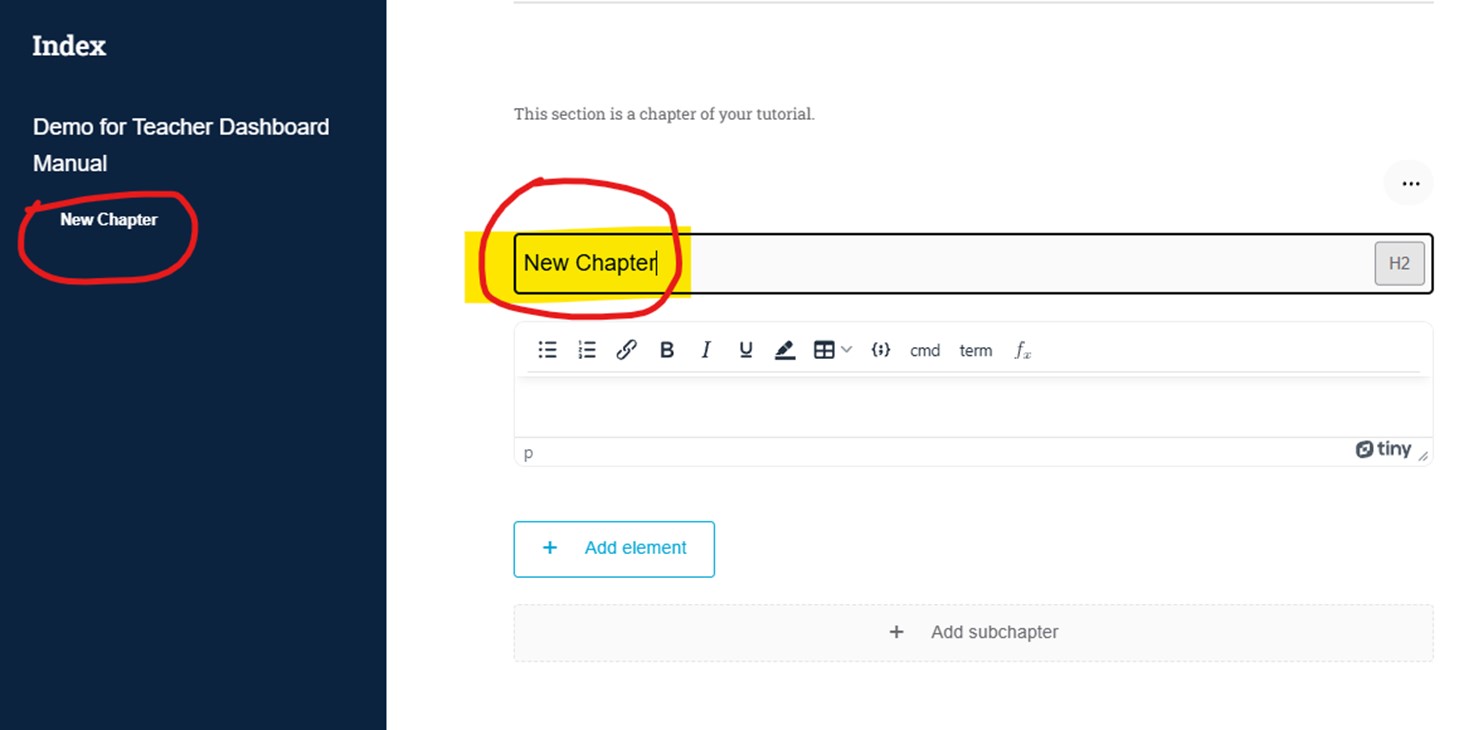
- Then add the “chapter title,”, next on the left side menu you will see the chapter added to the tutorial’s index. This will display as a new webpage in the final product when viewed by learners.
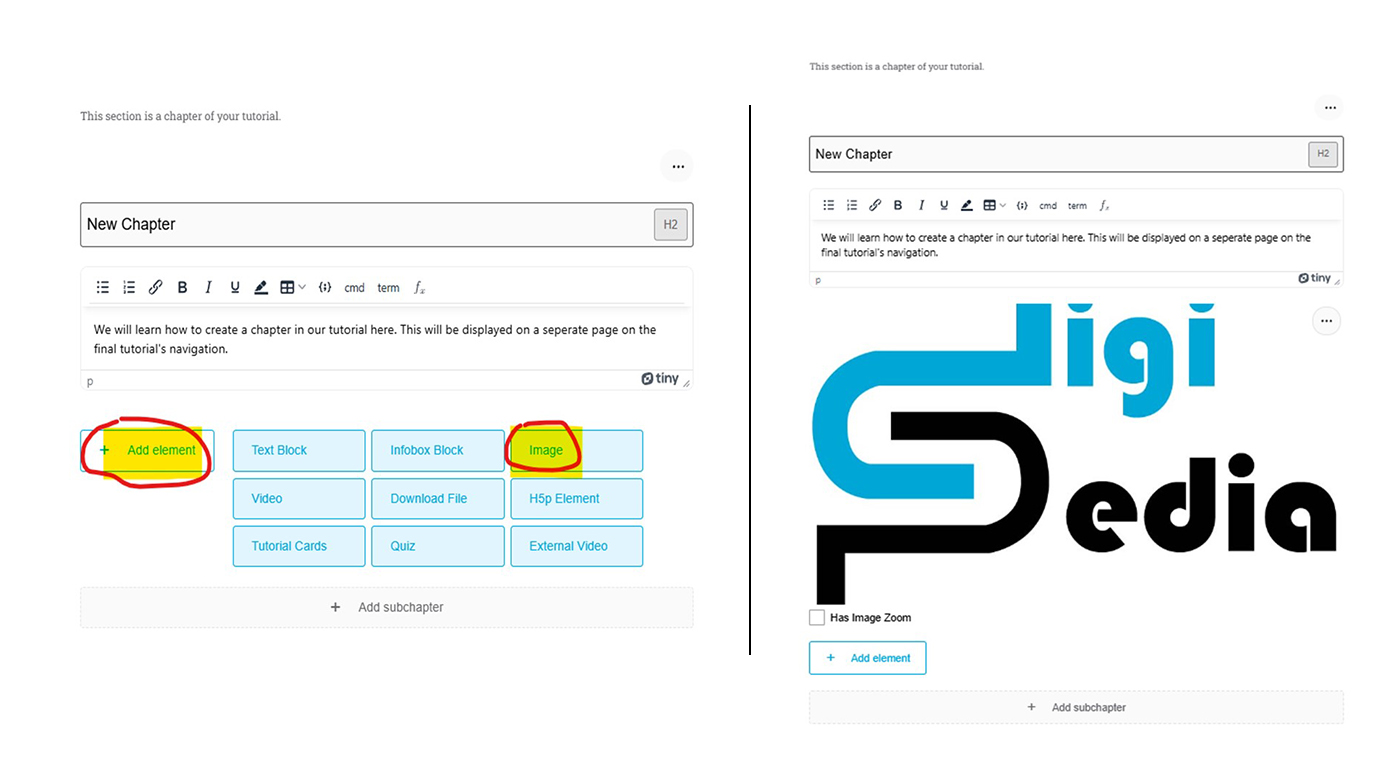
Next, add text, images and videos as done before by using “add elements.”
Adding Additional Subchapters
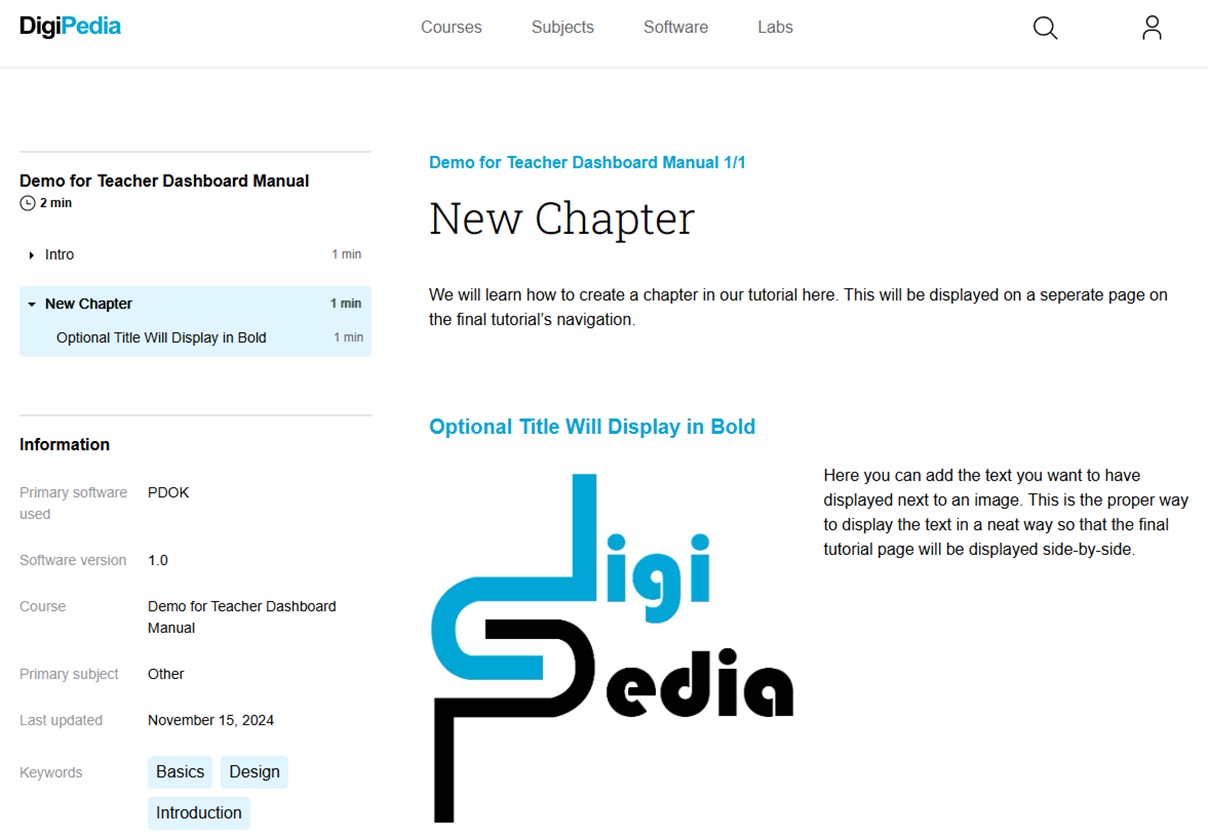
- In case you want to have image/video media and text next to each other, you can create a new using “add subchapter.” Currently you can only create a different page style by adding a “subchapter,” and choosing the image left or video left or image right or video right option. In this case you can leave the subchapter title empty, and it will show under the current chapter or subchapter.
- If you want to add full page size text, image of video click on ‘add element’ as shown before.
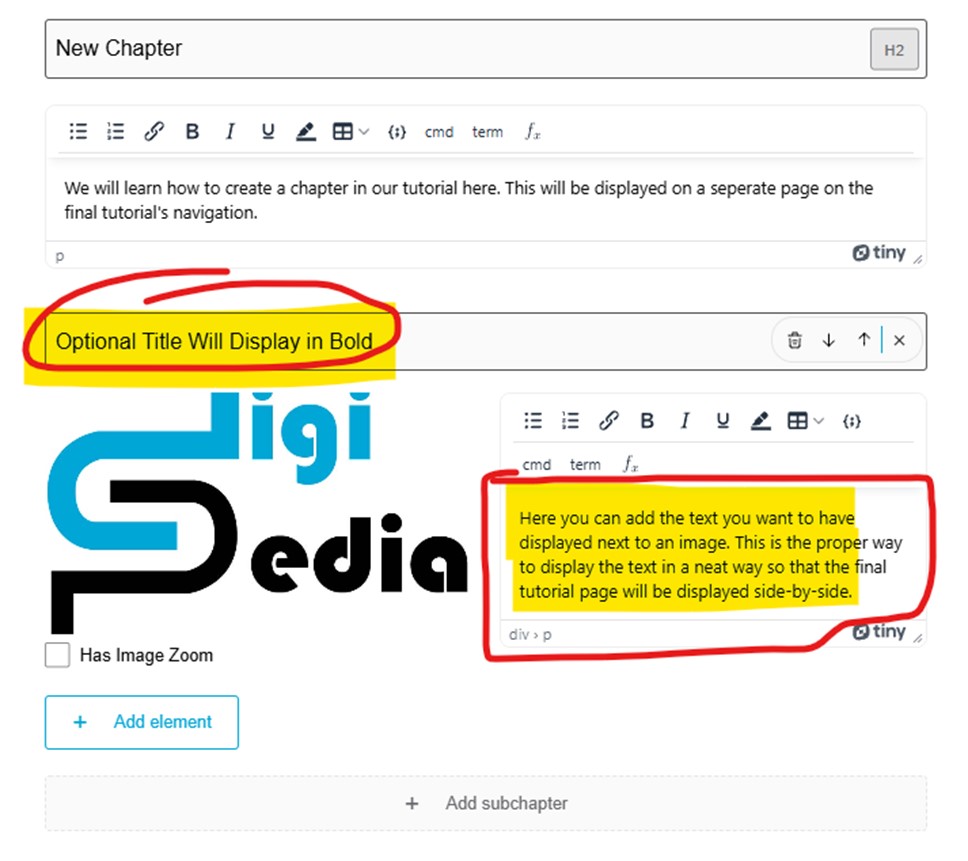
You can create a subchapter by clicking on “add subchapter” and select the correct page styling you want. Add in the title of the subchapter and it will display as bold text in the final webpage viewed by learners.
The page will look like this:
DigiPedia Teacher Dashboard Onboarding 5/7
5. Adding Elementslink copied
In the basic walkthrough for creating a tutorial page, we only discussed adding text and images. Here we will go into depth on each type of element you can use for pages on DigiPedia and how to add each one.

Text blocks
Text blocks contain text, equations, tables, and code. How to add specific types of information will be covered in Part 7: Editing Features.
NOTE: everything you copy from a different document, you “ctrl + shift + v” to paste, otherwise the styling of the document will be used, creating different font size, and many problems that you need to fix.
Videos
To add a video to your tutorial:
- Click on “Add element” and on “Video.”
- Click on “Select your video from the media Library.”
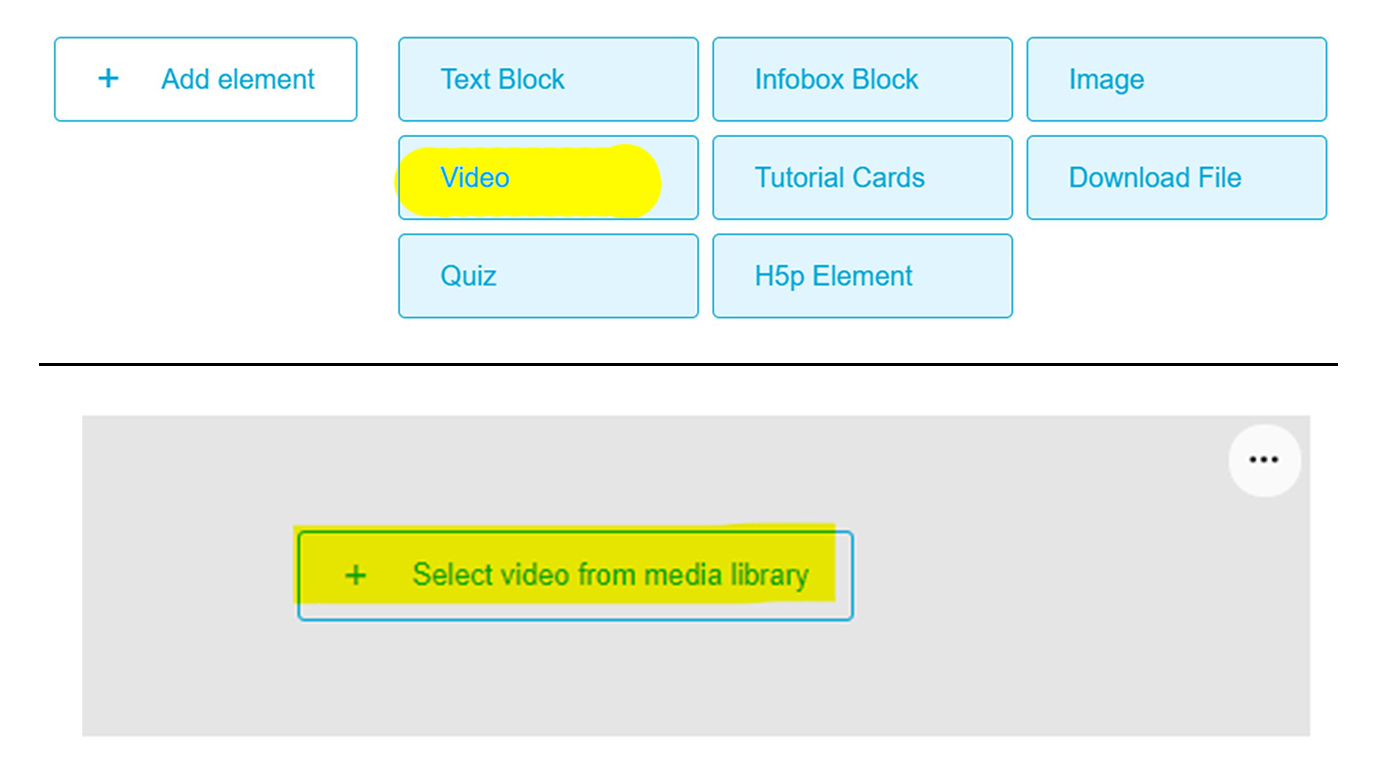
While you are inside this operation, you can upload a new file if you haven’t already:
- Click “Upload File” button in the upper left hand corner
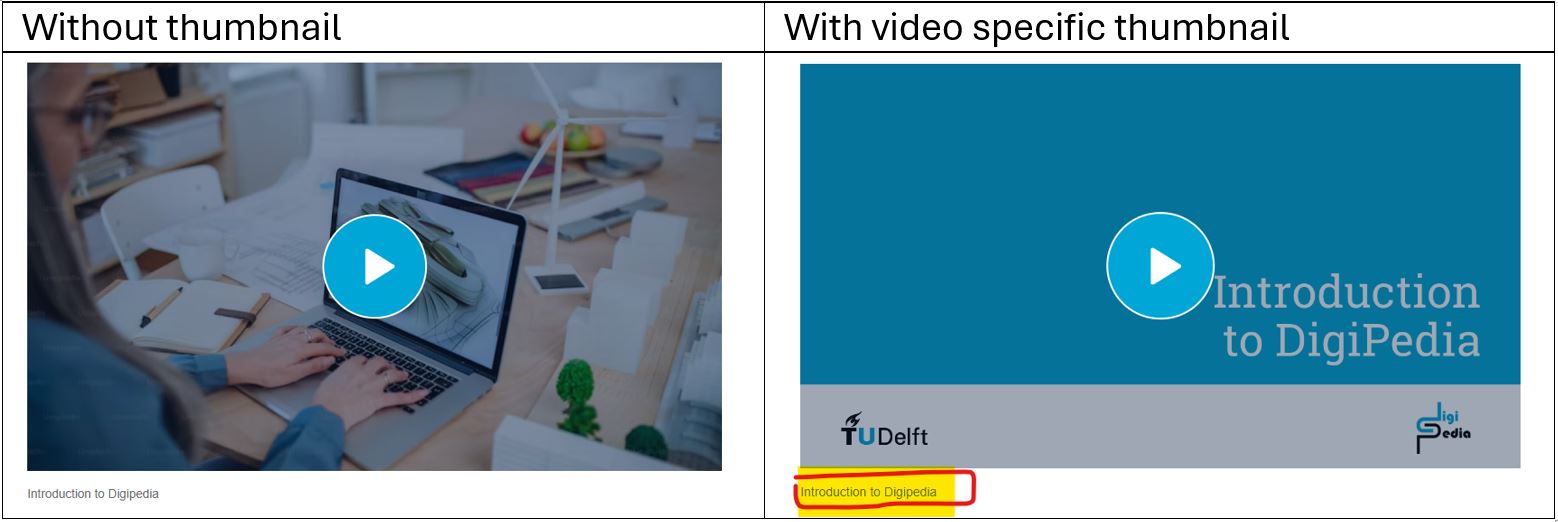
- Important on file naming: The video file name will be displayed as video caption in the webpage by the viewer! Give the file name a helpful title that relates to the tutorial.

- You can view all uploaded videos in tile or list view
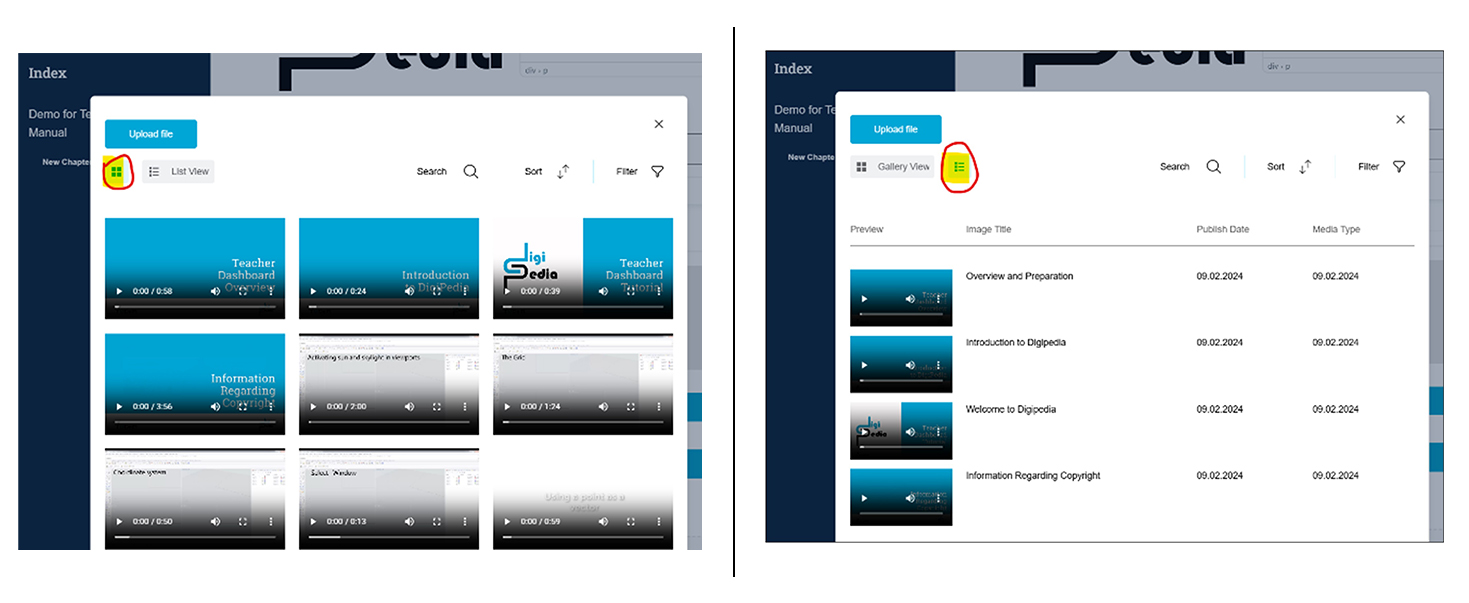
- To help you locate the correct video from the media, you can search for the file name, sort by new/old first, and filter for files uploaded by you.

When you find the video, you want to place:
- Click on the video and click on save
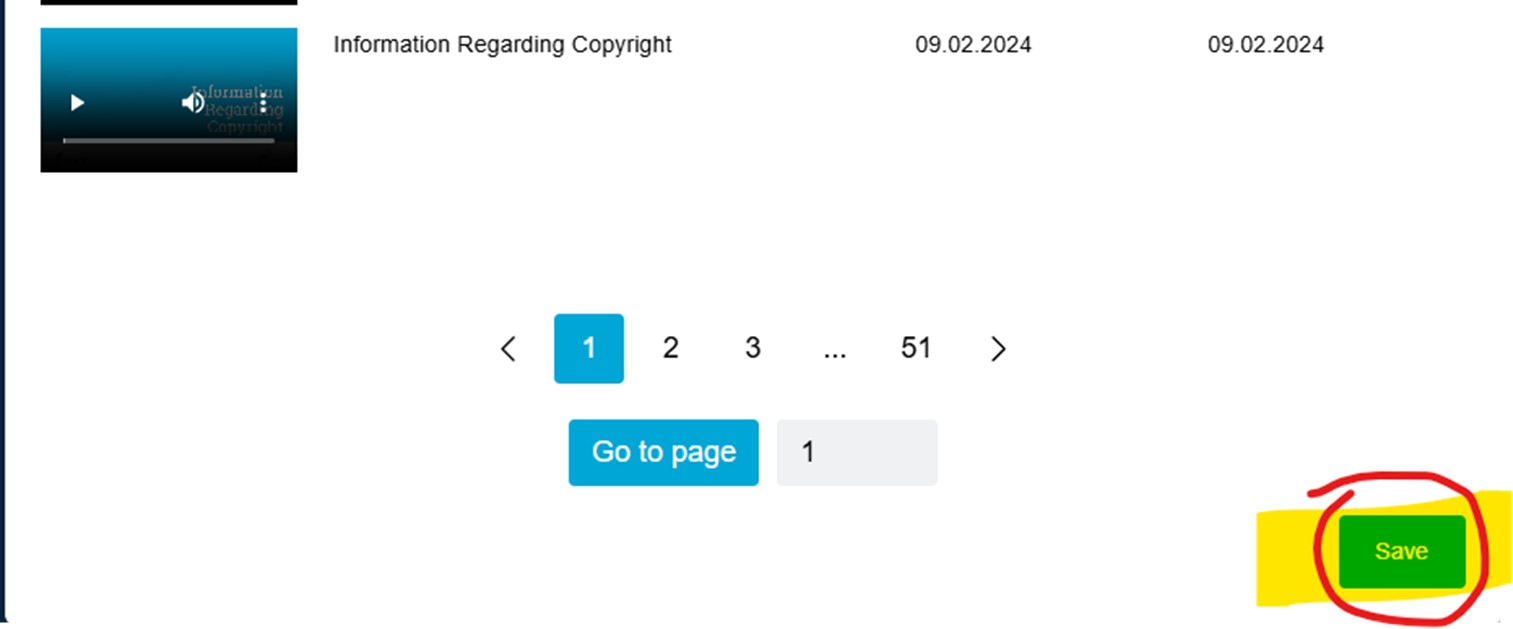
- Click on Set Thumbnail and select an image file as the thumbnail of your video from the media library
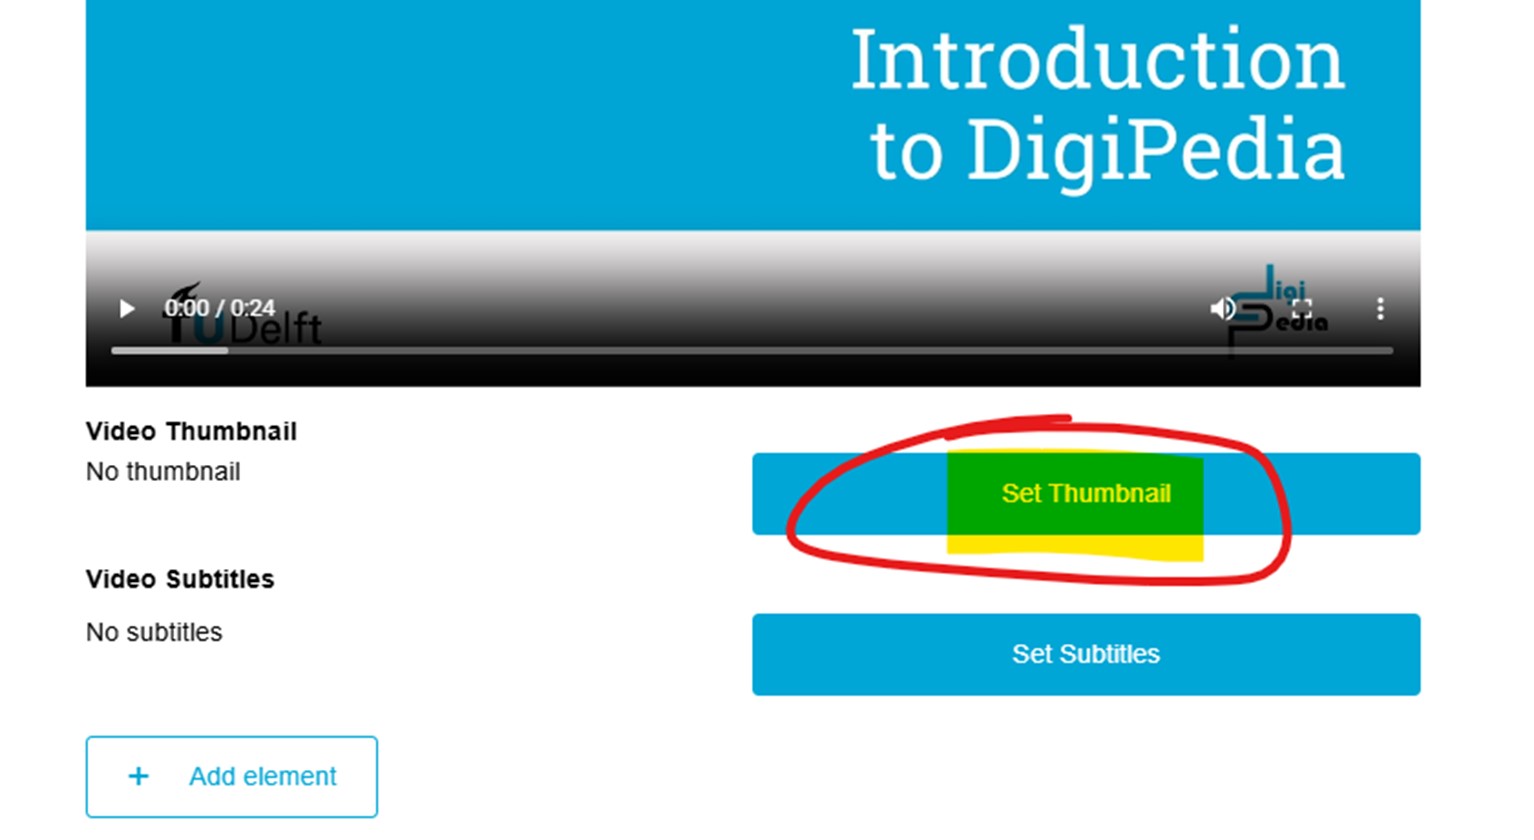
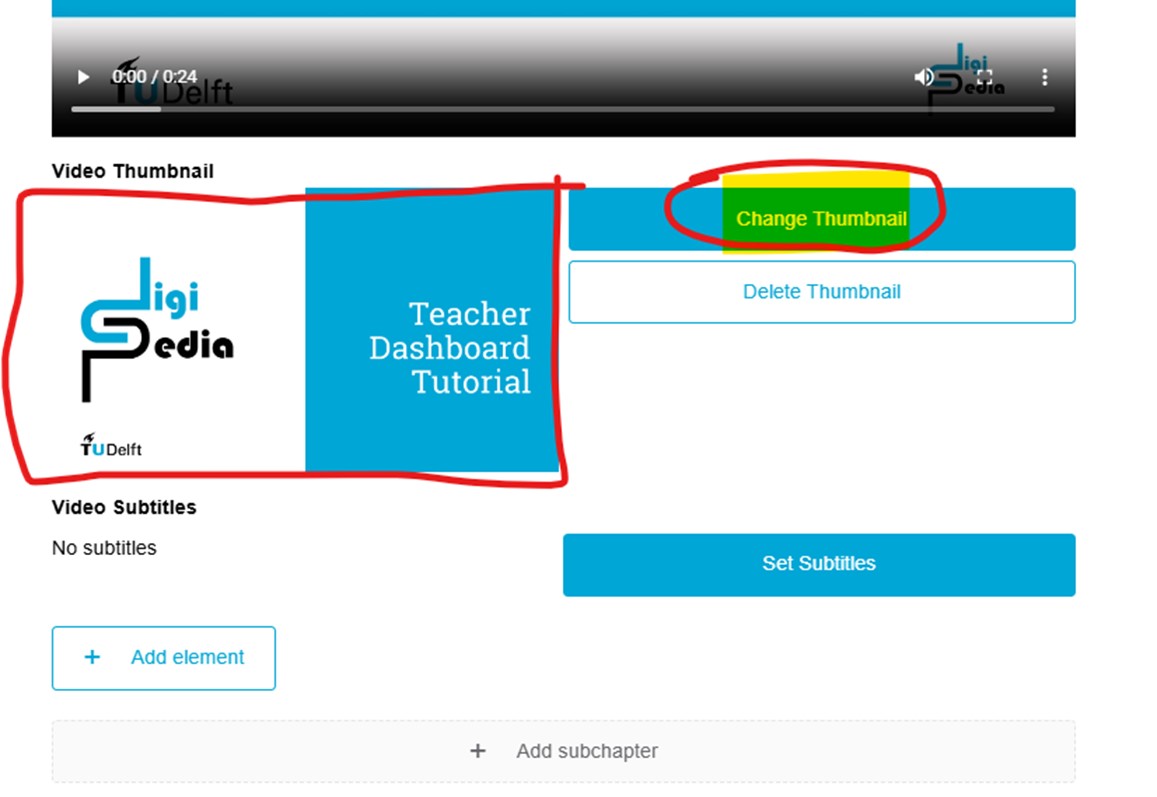
- The thumbnail will show up under the video in the teacher dashboard, you can change it by clicking “Change Thumbnail.”
NOTE: without adding a thumbnail your video will get the ‘general’ thumbnail, which looks like an incomplete upload. (see below). Notice that the file name is displayed underneath the video.
Video Subtitles
- Support for video subtitles is available. You can make your video more accessible by adding .vtt subtitle file. For more information on how to create your own subtitle, you can visit this website: support.microsoft.
- Currently .vtt file format is compatible. If you have any more questions or technical difficulties with getting the subtitles to work, please email the DigiPedia team.
- Click on Set Subtitle and upload your .vtt text file. Once subtitles are set, you can now change or delete them.
Quizzes
Quizzes allow you to enter multiple choice questions with one correct answer. Click on “add element” and “quiz” to get started with creating a tutorial quiz.
- Add your question, right answer and wrong answers
On the DigiPedia page, it looks like this. The answer options are randomly shuffled every time the page is reloaded.
Infobox
You can emphasize parts of your tutorial using the infobox block to distinguish between important information such as warnings, citations, and so on.

Create a new infobox block

Then add the text inside a normal text field. This looks like a normal text field but on the dashboard but it will be displayed differently highlighted in blue. You can recognize the infobox block on your dashboard because it only has a few options in the text editor.
The image below shows how the infobox block text will be displayed:

Tutorial Cards
Make your tutorial more user-friendly by adding a tutorial card. A tutorial card is a way to refer to other pages within DigiPedia. Do not use it for links that go outside DigiPedia. These can be added as links within the text which will be shown in the next section.
- First you click on “add element” then you choose “tutorial cards”

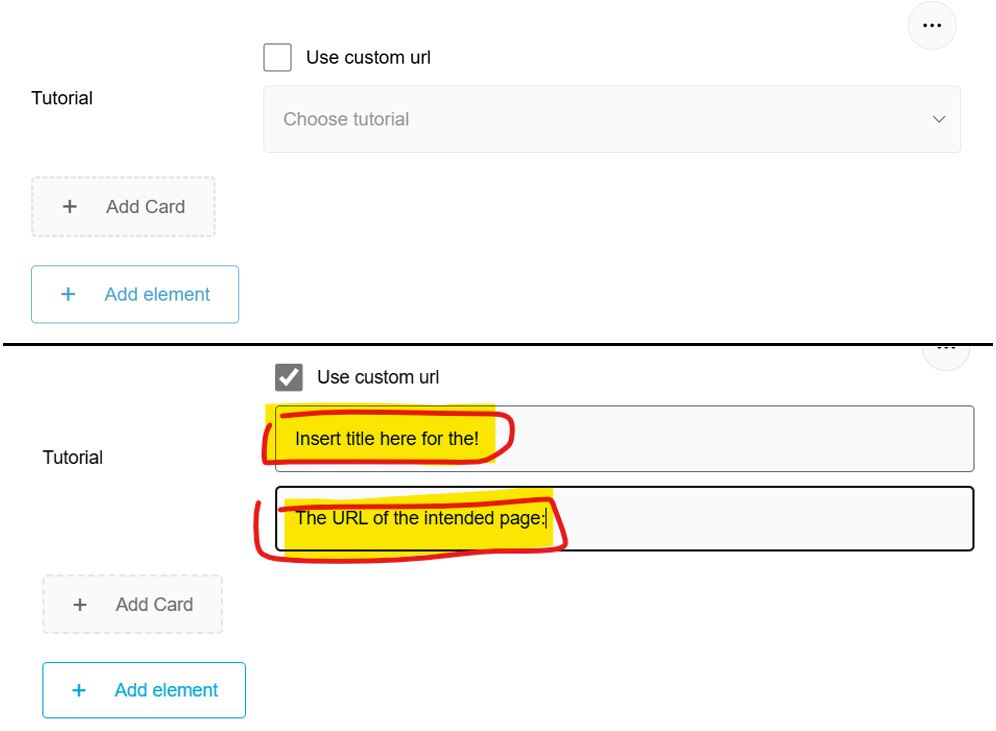
- You will get these two options either to choose a tutorial or use a custom URL from DigiPedia. The custom URL is used to navigate to pages other than tutorial pages, or to specific chapters within a DigiPedia page.
- Use the “Add Card” button to link multiple tutorials in the same section.
- Important note for custom URL: make sure to fill in the title!
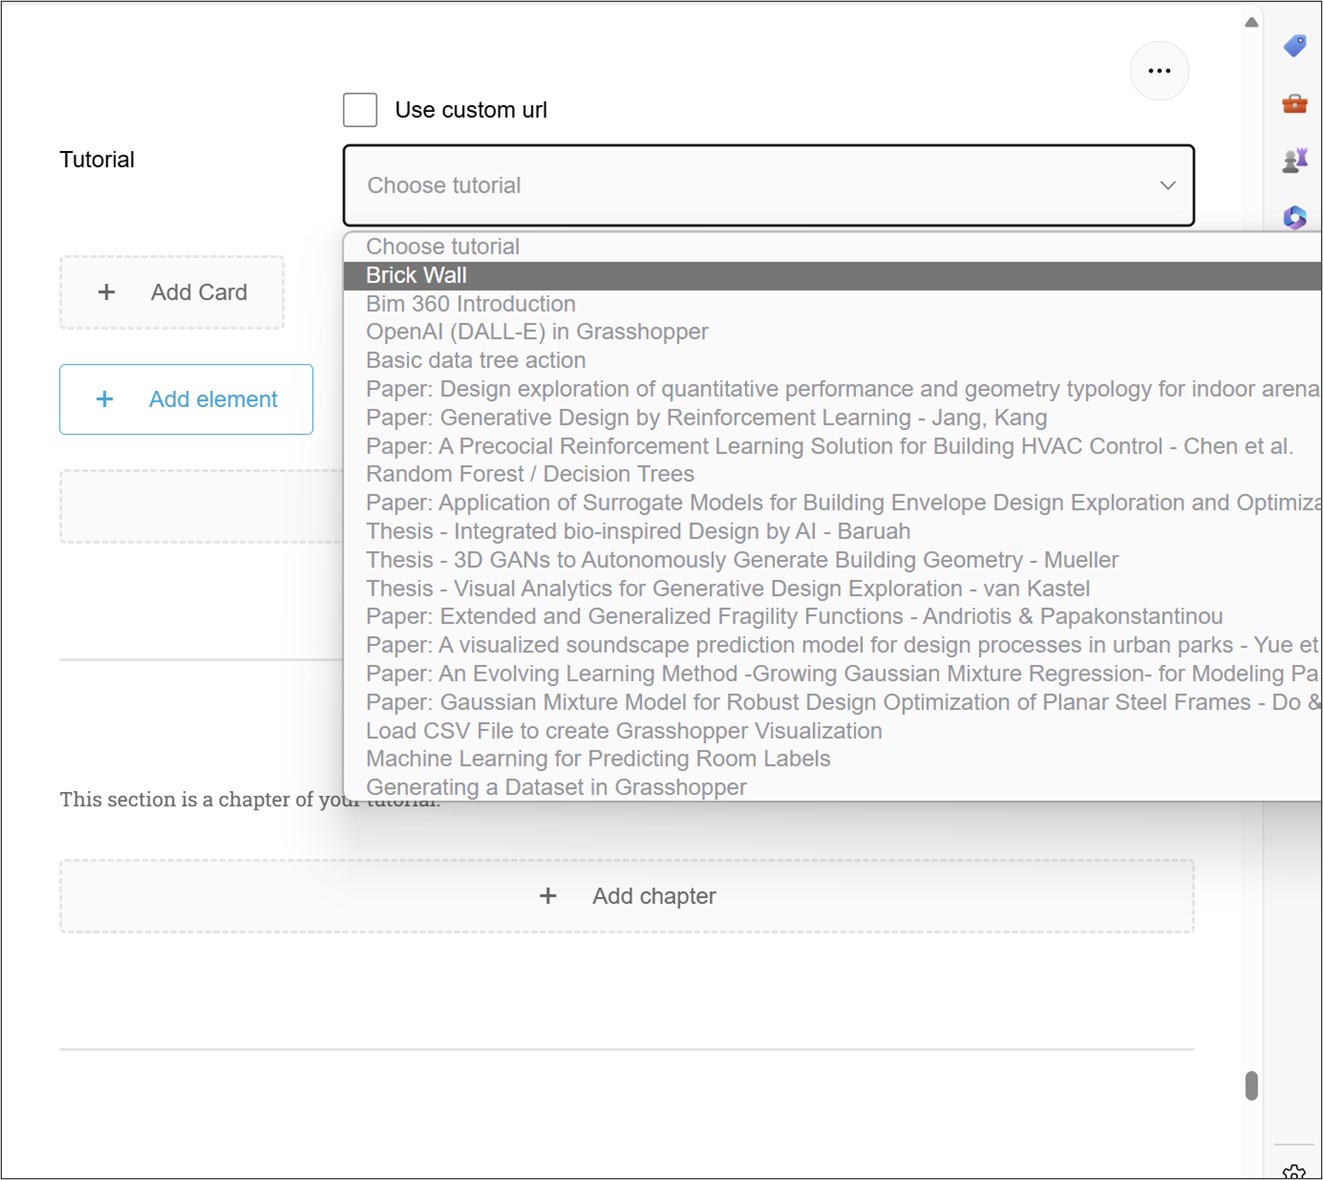
- To choose a tutorial you click the drop down menu and choose the tutorial you want to link. You can type the first letter of the name of the tutorial to jump to that letter in the list. For example, if your tutorial name is Brick Wall you can type “B” to jump to the tutorials that start with a B.
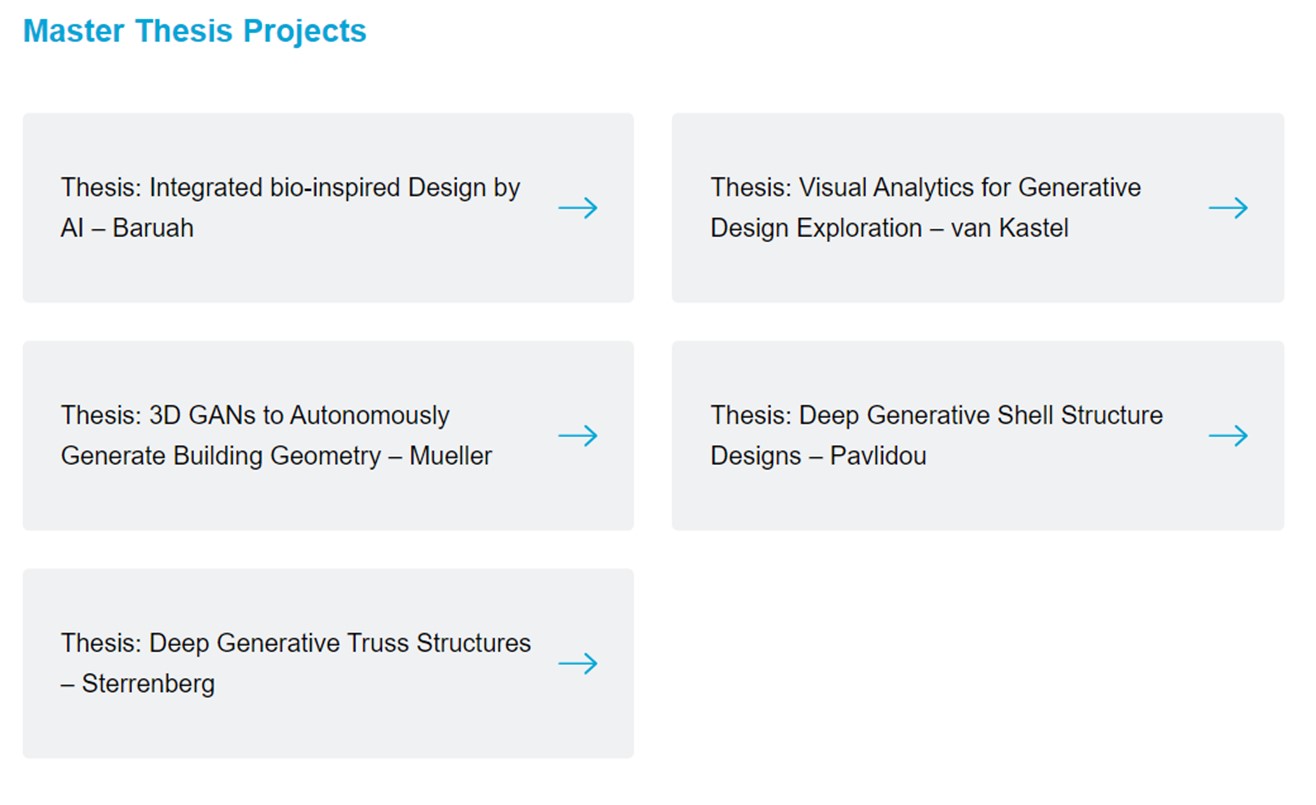
The tutorial cards will look like this:
H5P Elements
H5P elements provide extra functionality to your tutorial. To add an interactive video in H5P format, you need the embedding link of the video.
- Click on “add element” and “H5P element”
- Paste you published H5P link in the field

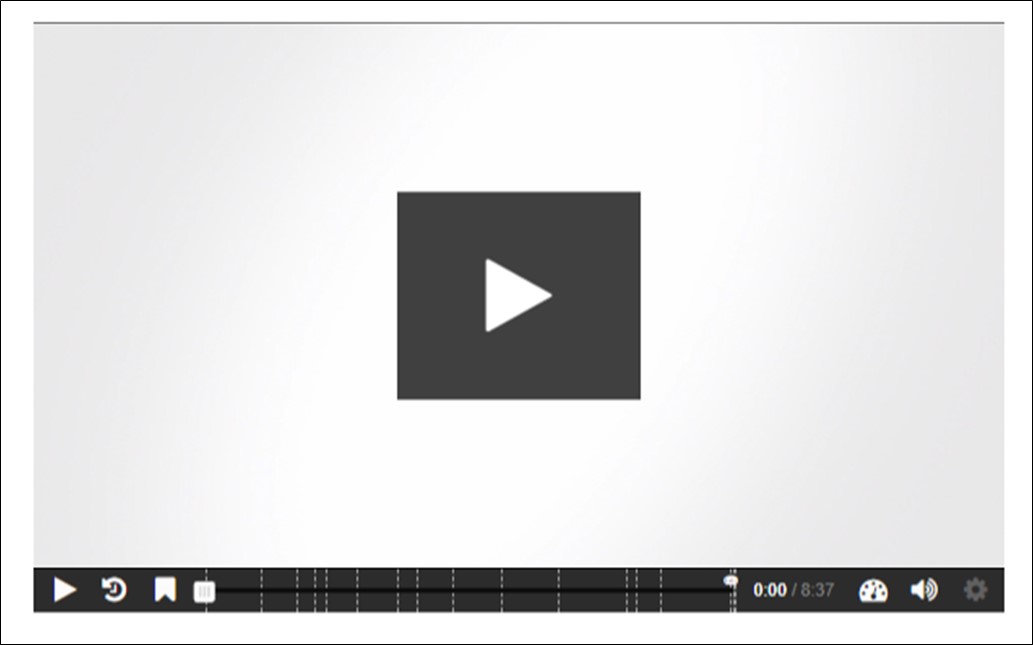
The H5P link will look like this on the page: (We recommend you have an engaging thumbnail)
Images
Adding images can be done in a few steps:
- Click on “Add element” and on “Image”
- Select your image from the media Library
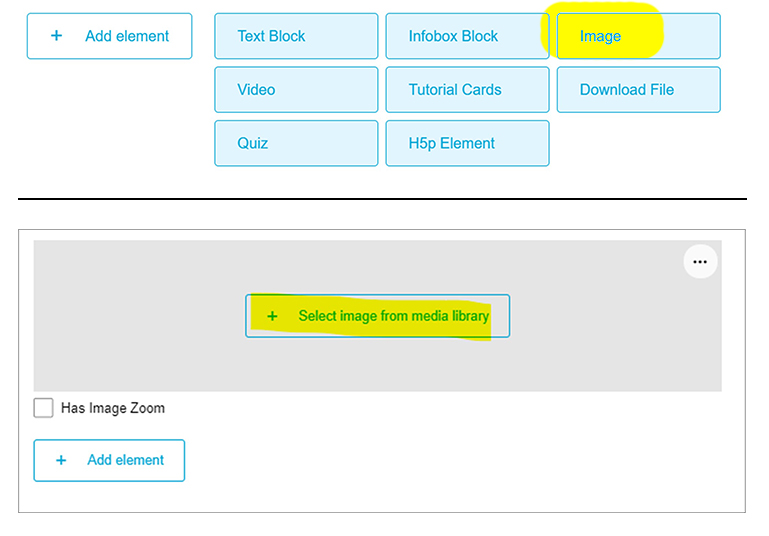
While you are inside this operation, you can upload a new file if you haven’t already:
- Click “Upload File” button in the upper left hand corner
- Important on file naming: The image file name will be displayed as image caption in the webpage by the viewer! Give the file name a helpful title that relates to the tutorial.

You can view all uploaded images in tile or list view
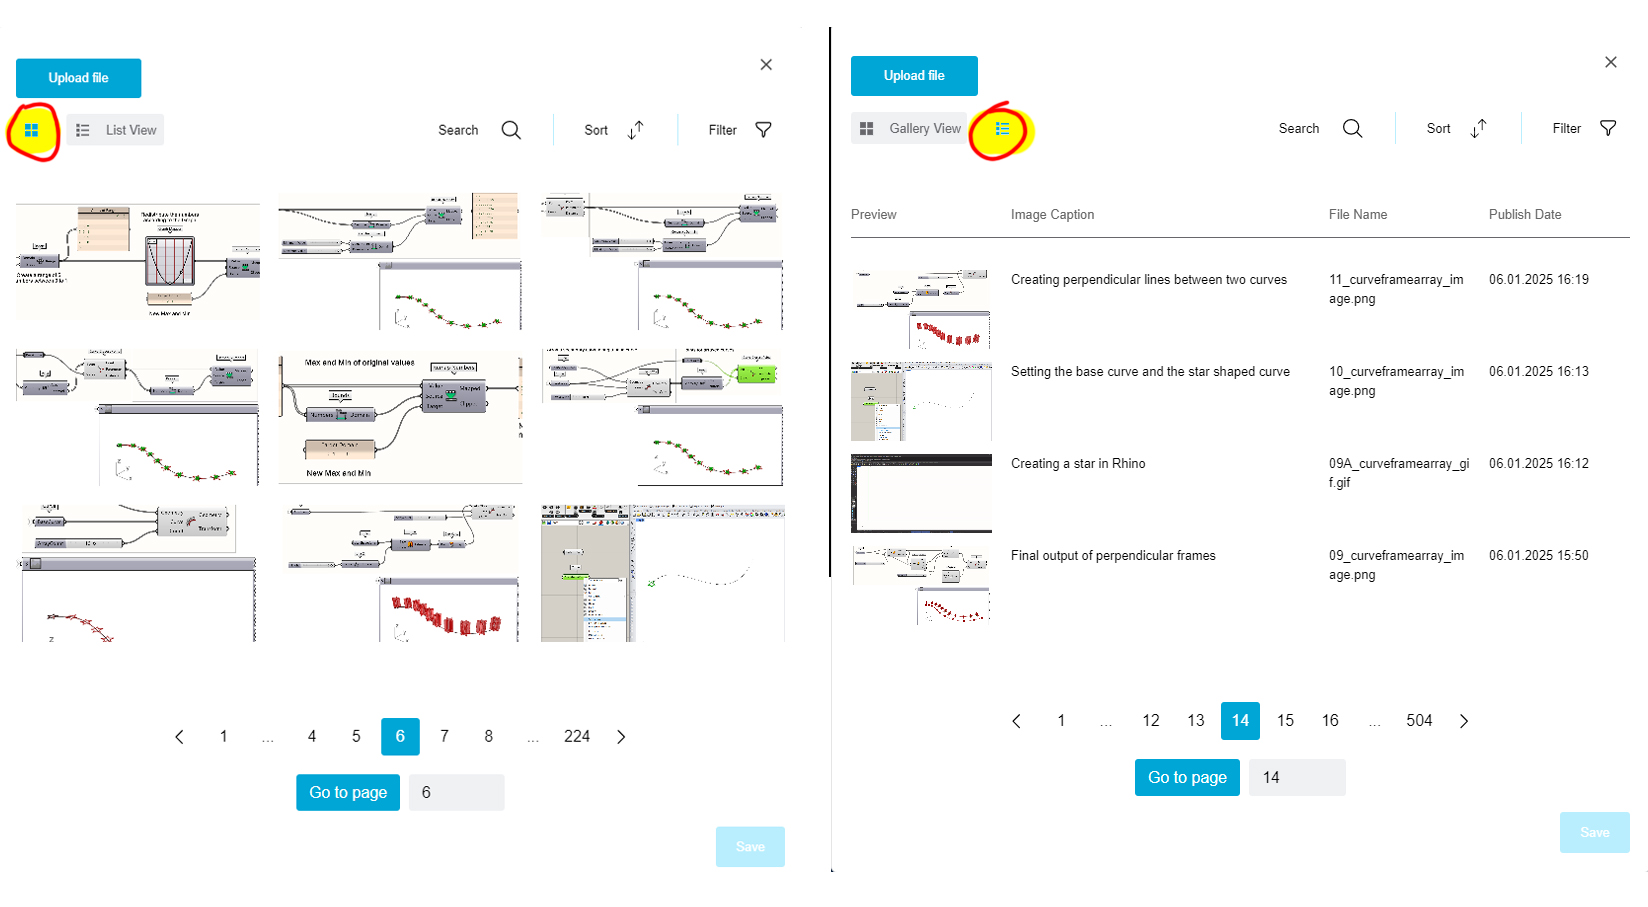
To help you locate the correct image from the media, you can search for the file name, sort by new/old first, and filter for files uploaded by you.

When you find the image you want to place:
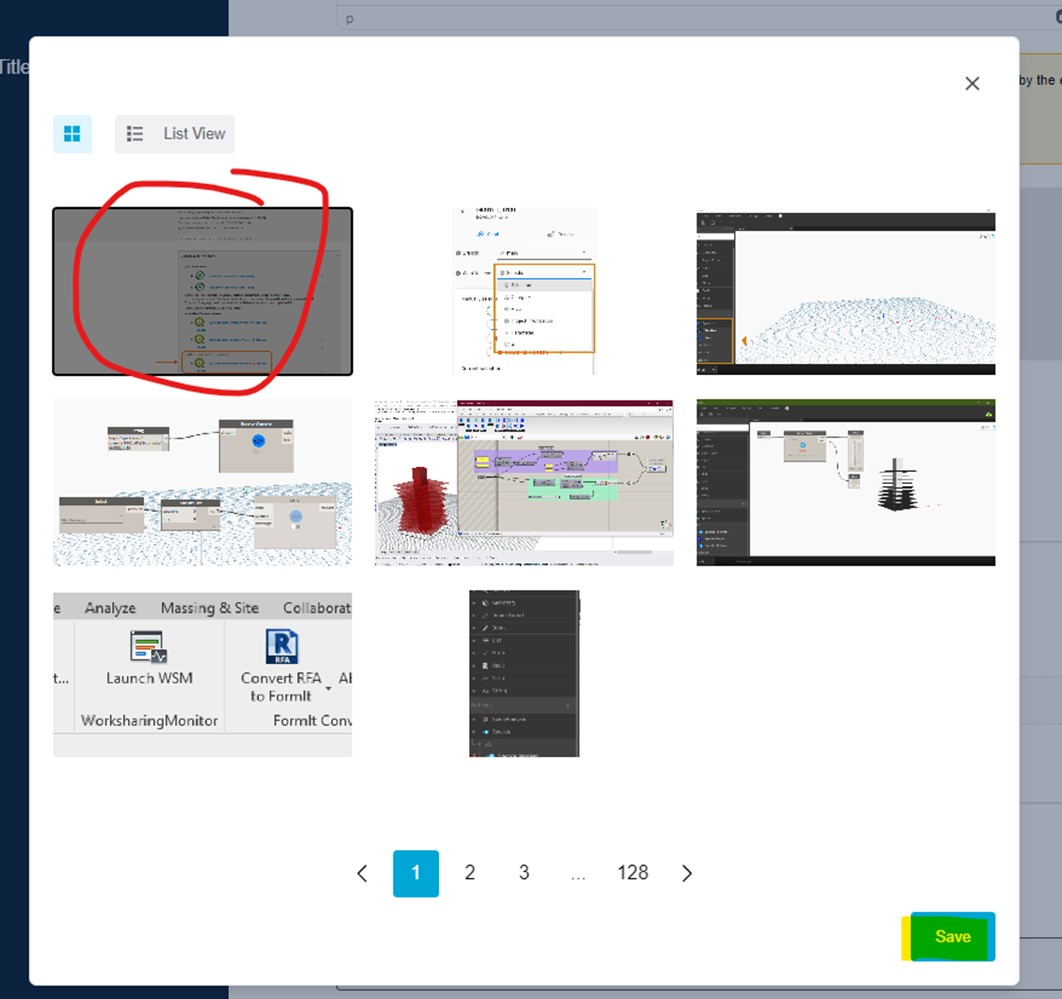
- Select the image. To add the image, scroll down and press the blue button save
- The caption of the image will be automatically added based on the file name you added in the media library
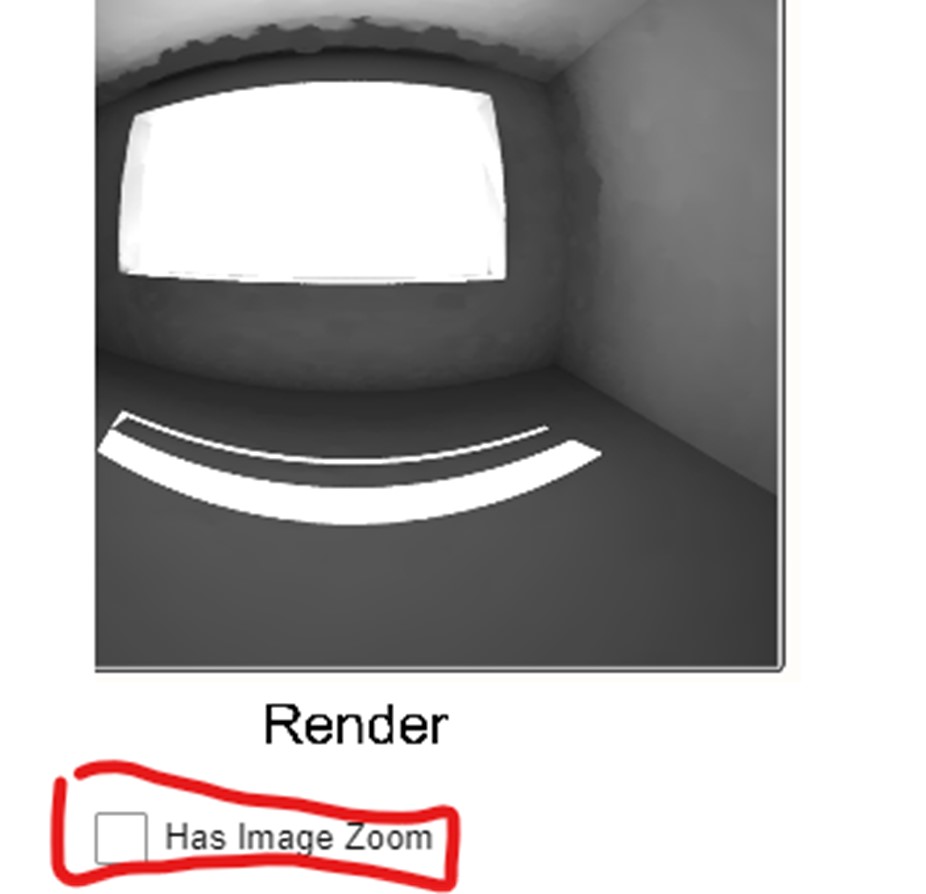
- You can add an extra zoom layer to the image by checking the box “Has Image Zoom.” This feature gives students the option to hover over the image and zoom in without having to click on the image.
NOTE: only add this feature to images where it is really needed.
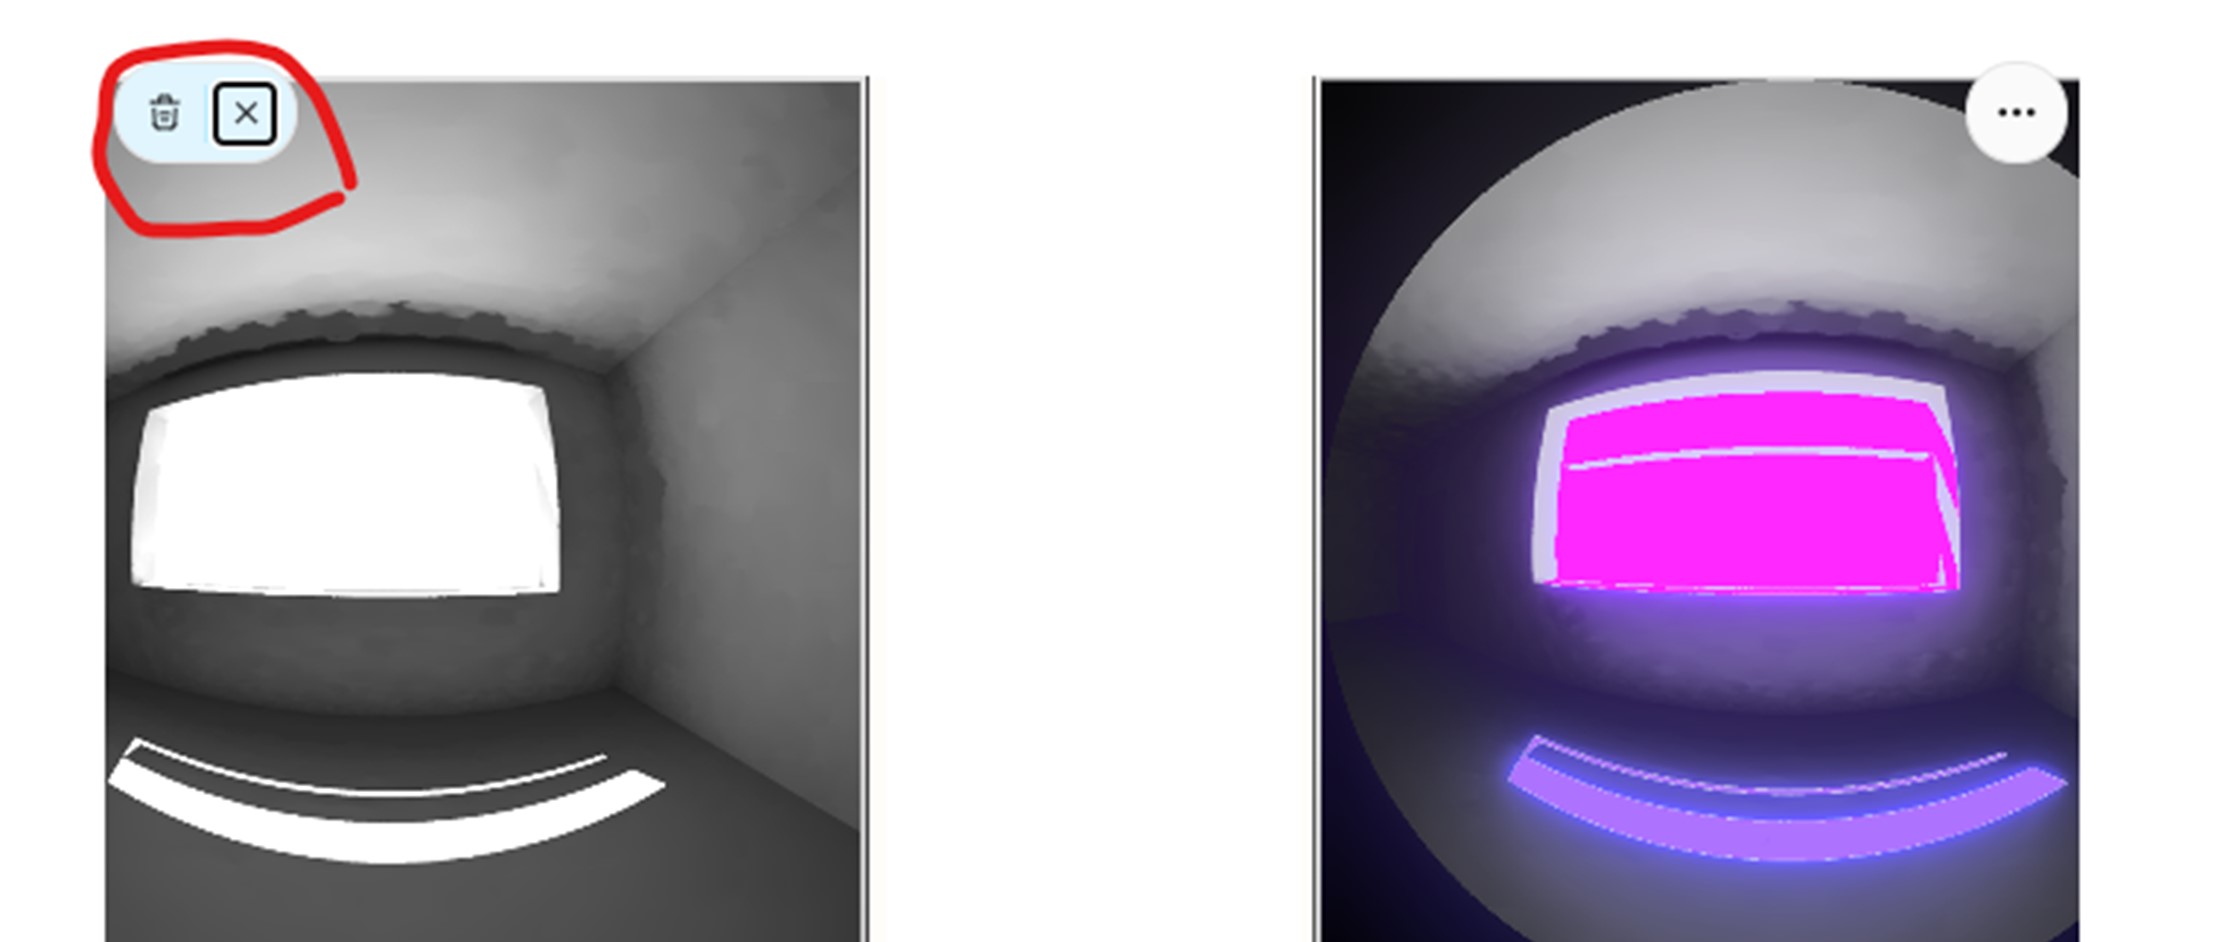
Removing an incorrect image:
- If you added a wrong image, you can remove the image by using the three dots on the left side of the picture. This works the same for videos.
Download File
If you want students to have access to files that accompany your tutorial, you can add a download file.
Supported files: Please note only some file types are supported. Text files, images files, PDF files, and ZIP files are supported. If you need to upload a Rhino, Grasshopper, or other unsupported file, please compress the file to a ZIP folder and upload the ZIP folder. You can also put multiple files in a ZIP folder if you need to.

Click the add element option and choose “Download File.”
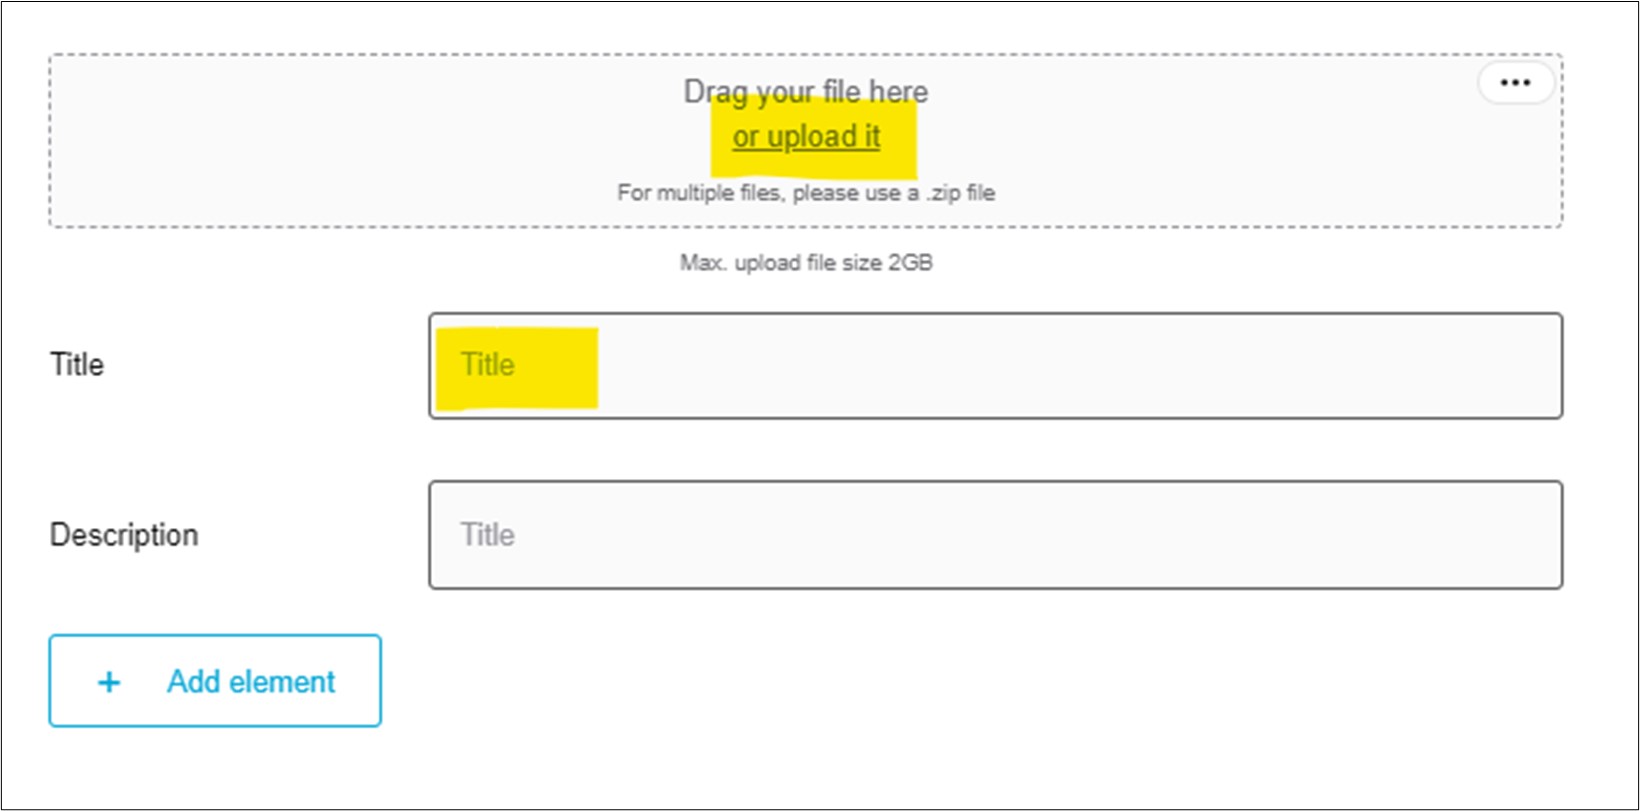
Drag and drop your file in the box as shown. You must add a title for the file and optionally fill in the description.
External Video
To insert an external video, you will use “Add Element” then “External Video”

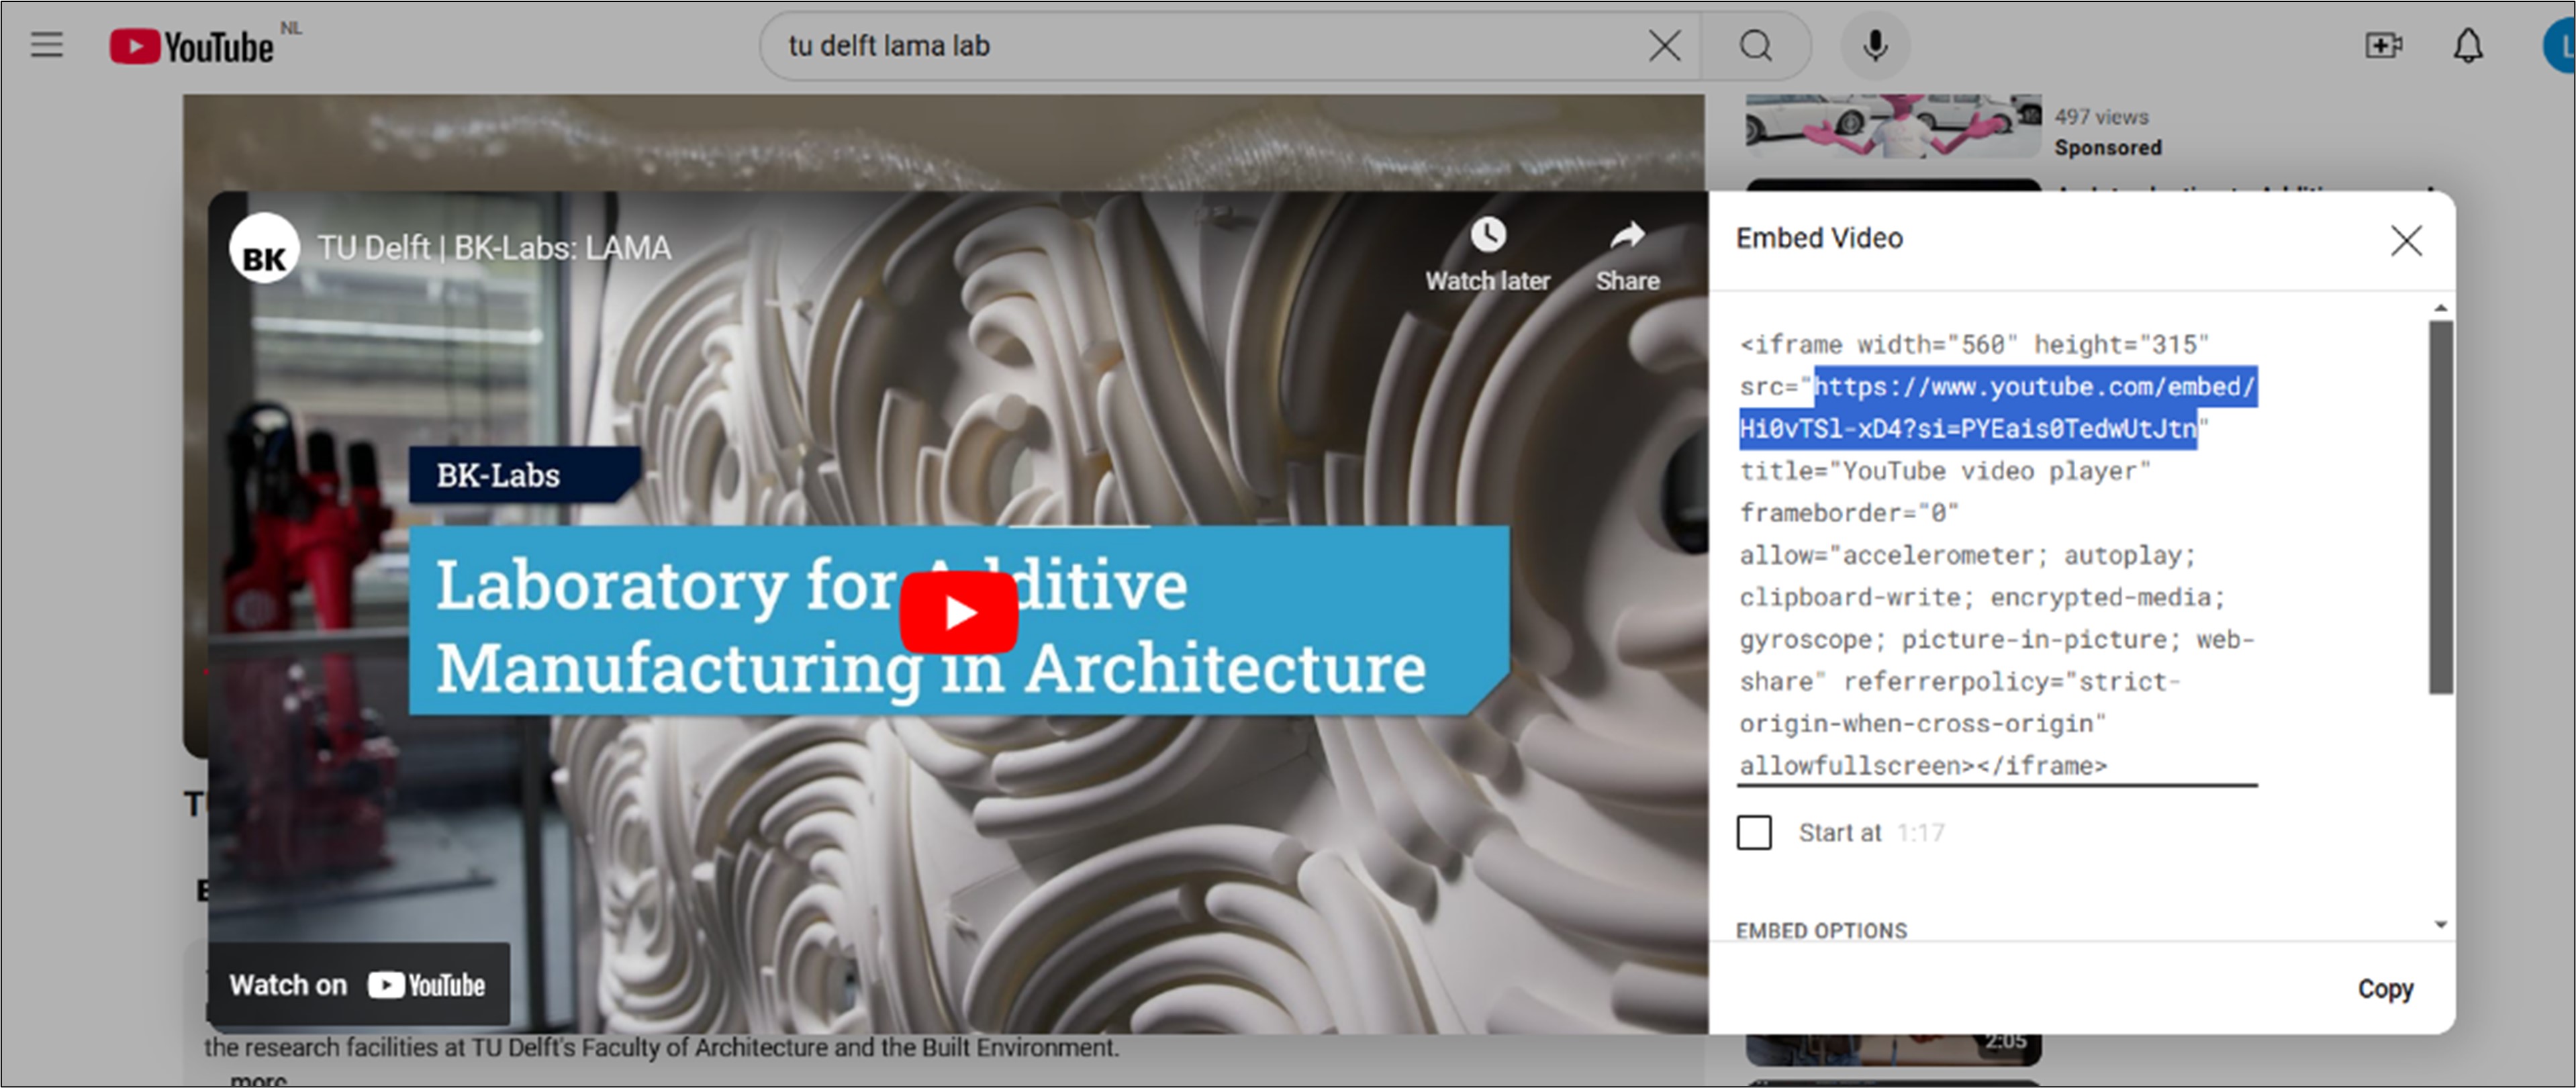
In case of a YouTube video, in YouTube:
- Go to the YouTube video and click on share
- Copy the video URL from here.
If this does’t work, then:
- Go to the YouTube video and click on share
- To ‘embed’ option
- Copy the source url as shown below
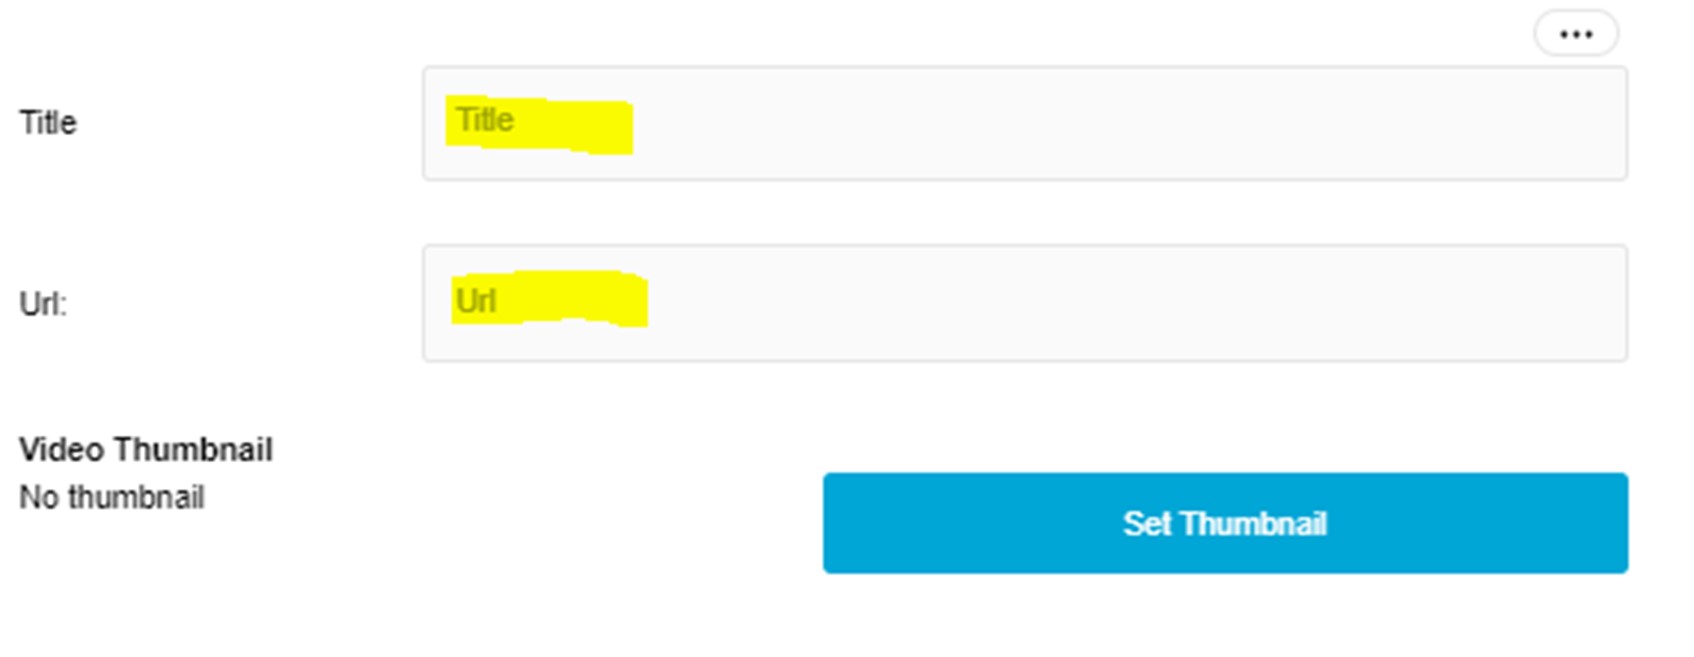
In DigiPedia
- You must a title you wish to display on the page
- Paste the URL into the URL field
- Upload a thumbnail by using the “Set Thumbnail” button
DigiPedia Teacher Dashboard Onboarding 6/7
6. Additional Formatting Featureslink copied
Text block features
In the text block you can do different things like:
- Lists
- Adding links
- Text Formatting
- Highlighting words
- Adding tables
- Adding dictionary terms to words
- Adding code
- Adding GH components flows and commands
- Adding equations
Lists
You can add either bullet pointed lists or numbered lists
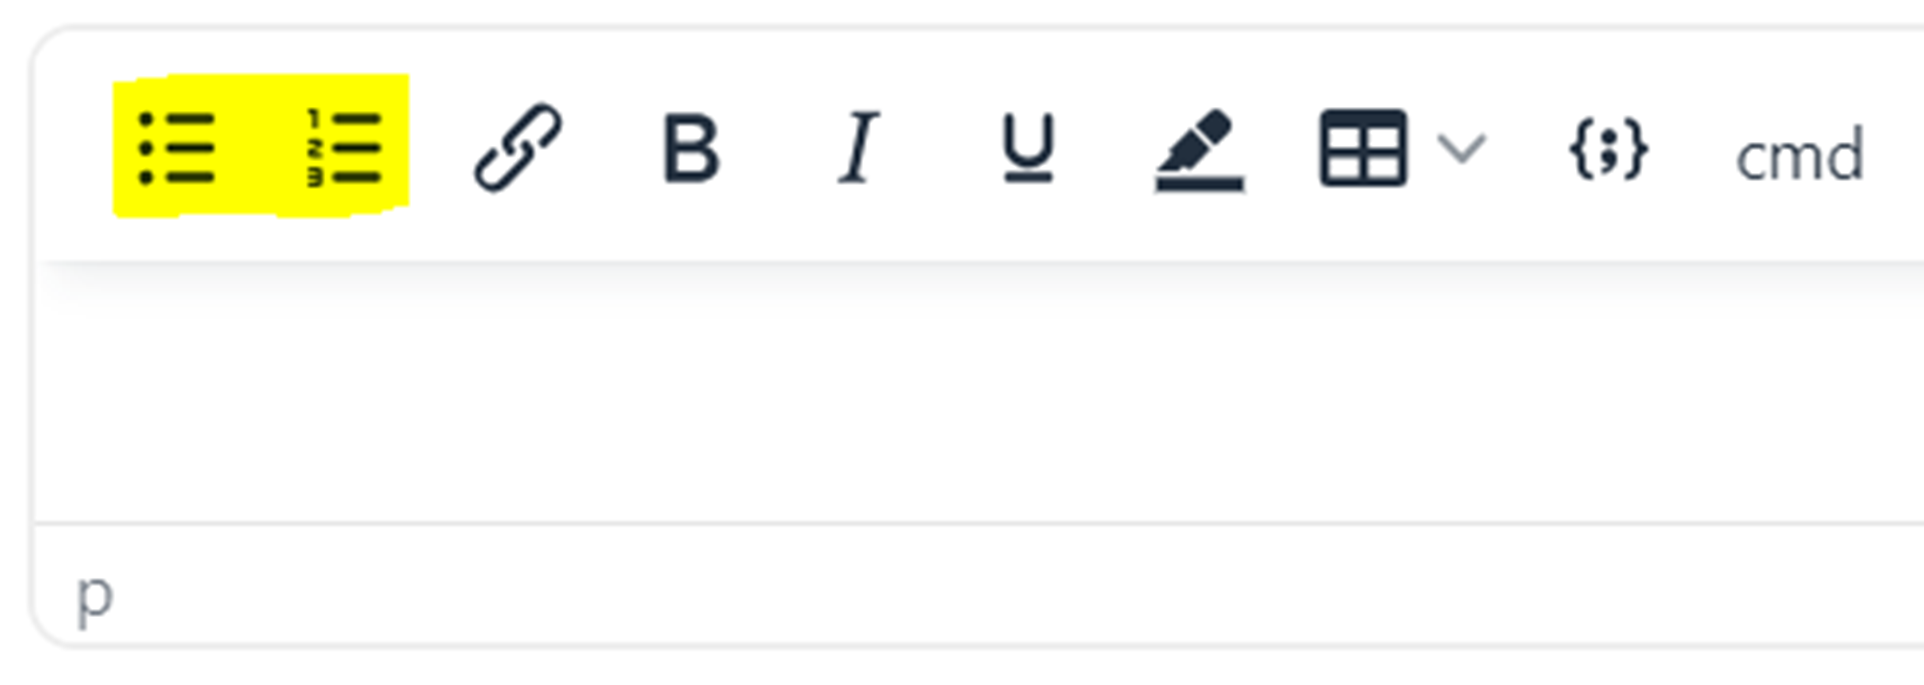
- Select the text you want to put in a list
- Click on the list icon you wish to add
Adding links
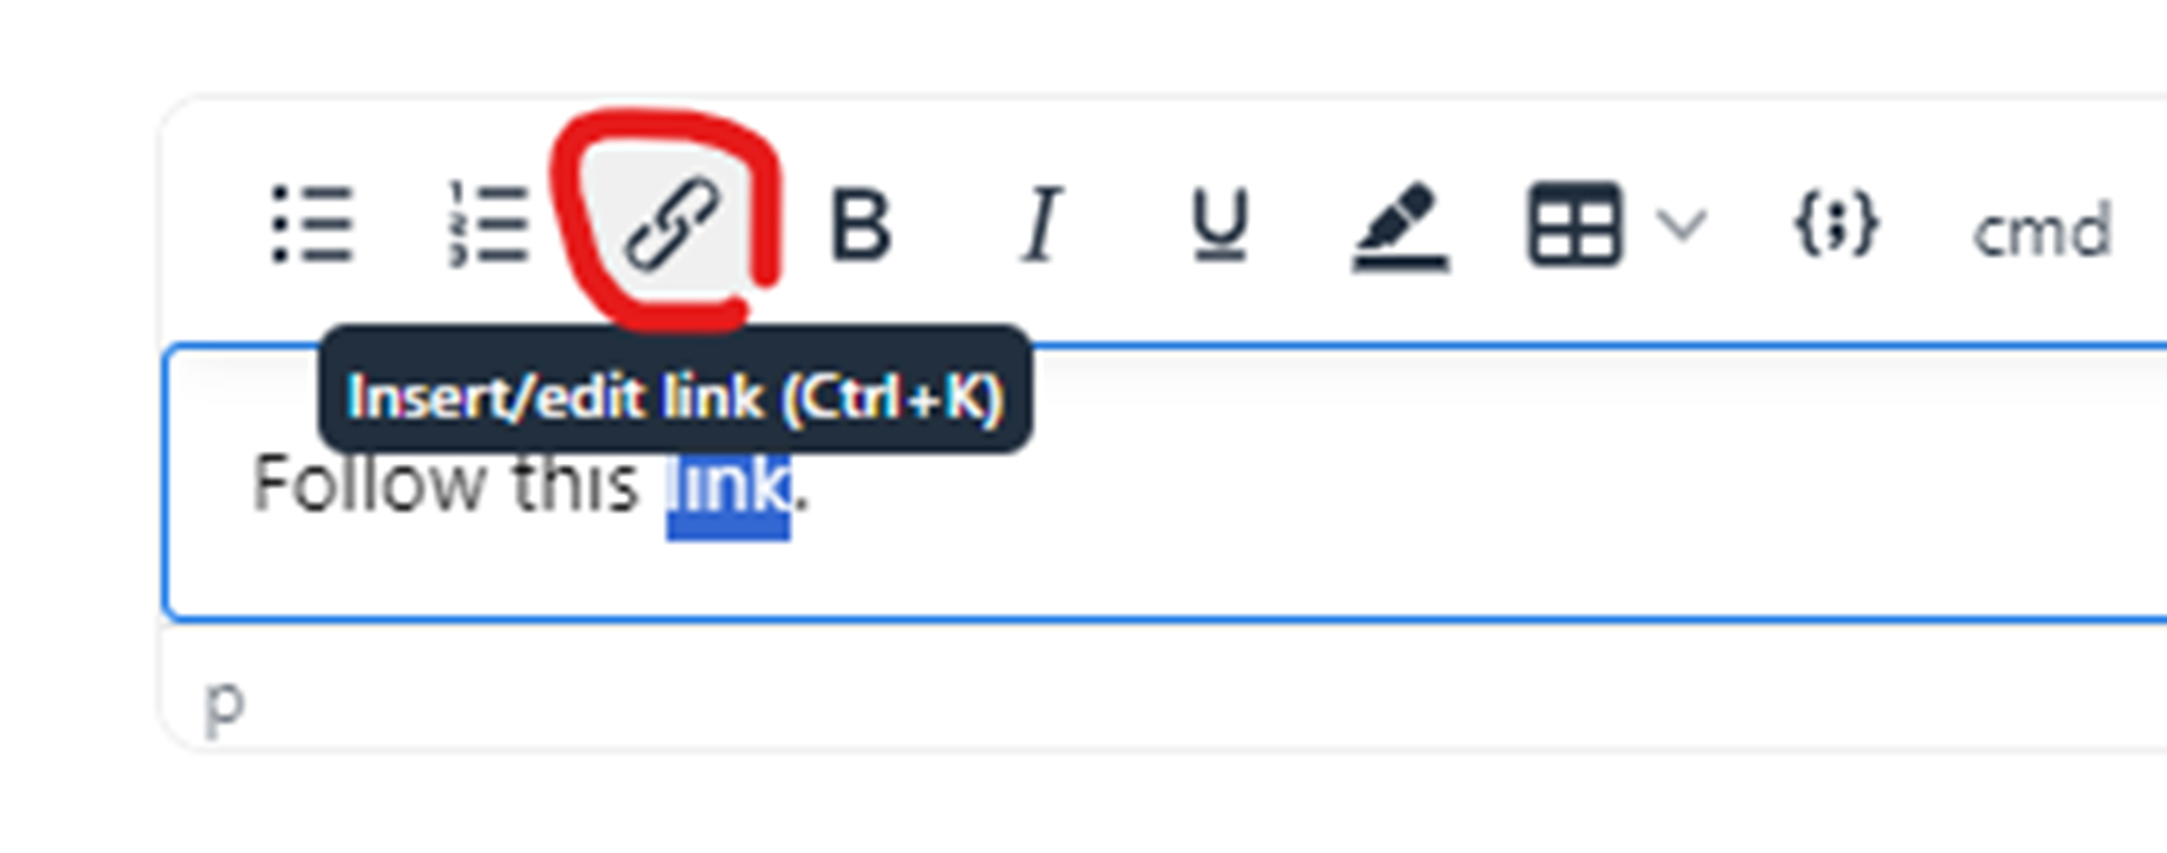
You can add links to different website with this feature
- Select the text you want to show underlined to click on
- Click on the link icon
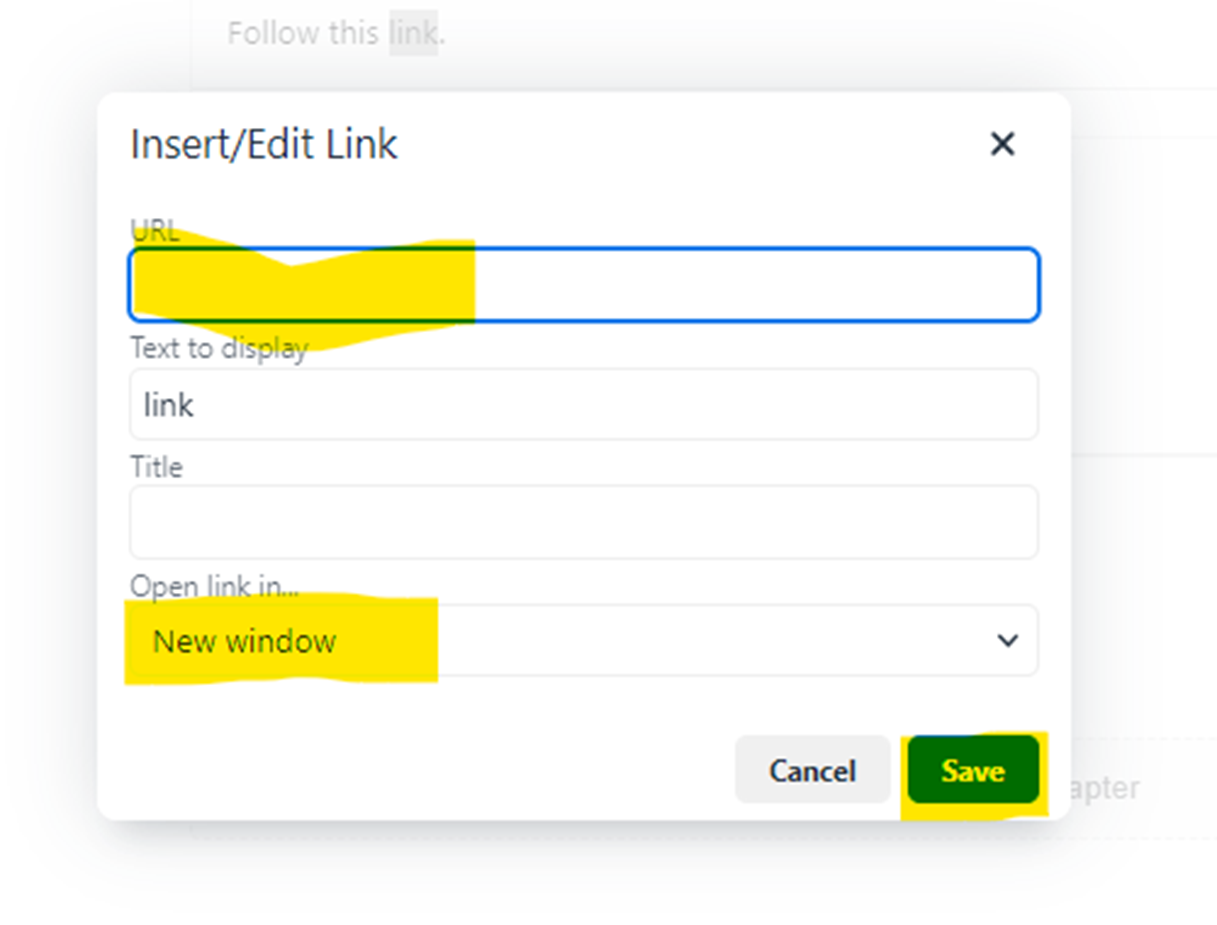
- Paste the link in “URL”
- Change the navigation option to open link in: “New Window”
- Click on “save”
Text Formatting
You can make text bold, italicized, or underlined using the buttons on the toolbar or the keyboard shortcuts control + B, control + I, and control + U respectively.
Highlighting words
You can highlight important words. In your text editor it will show up a yellow, but on the DigiPedia page as blue.
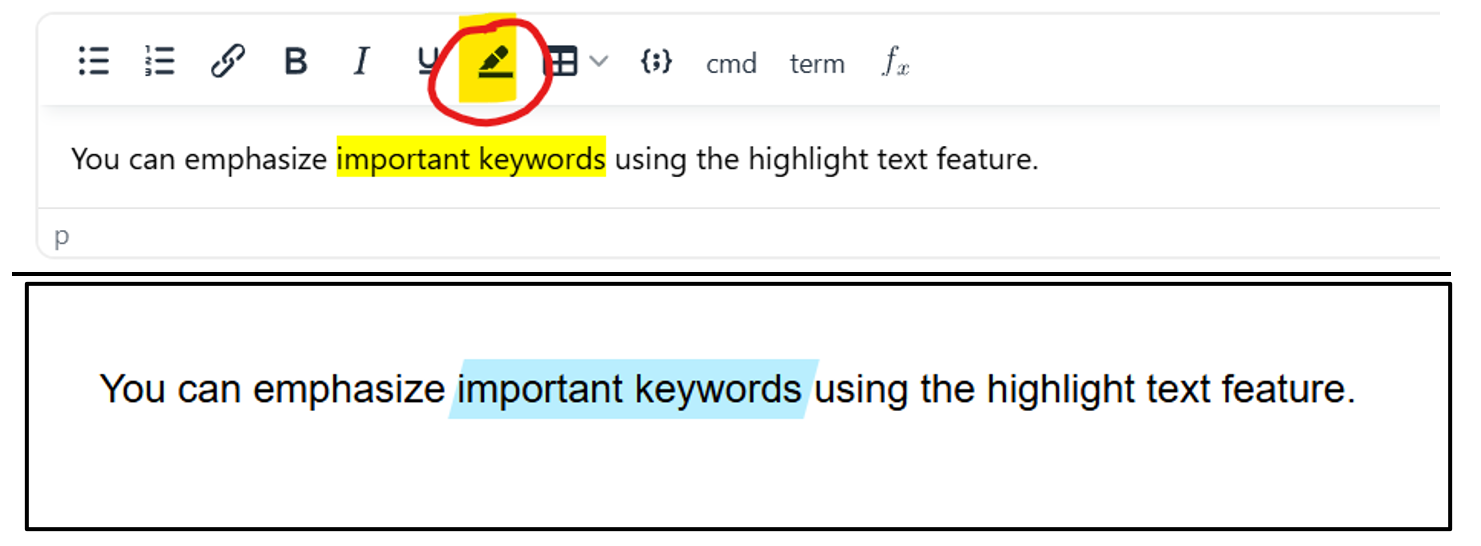
- Highlight the text you want to emphasize then click on the highlight icon in the text editor.
- You can undo this by applying the highlight action again.
Tables
You can add tables by clicking on the table icon in the text editor or directly pasting your table from Excel or Word.
- In the table editor it is quite hard to merge cells, if you have a table like that, we advise copying it from Excel or Word.

You can give the table a caption by clicking on “table properties,” check the box “show caption” and then save.
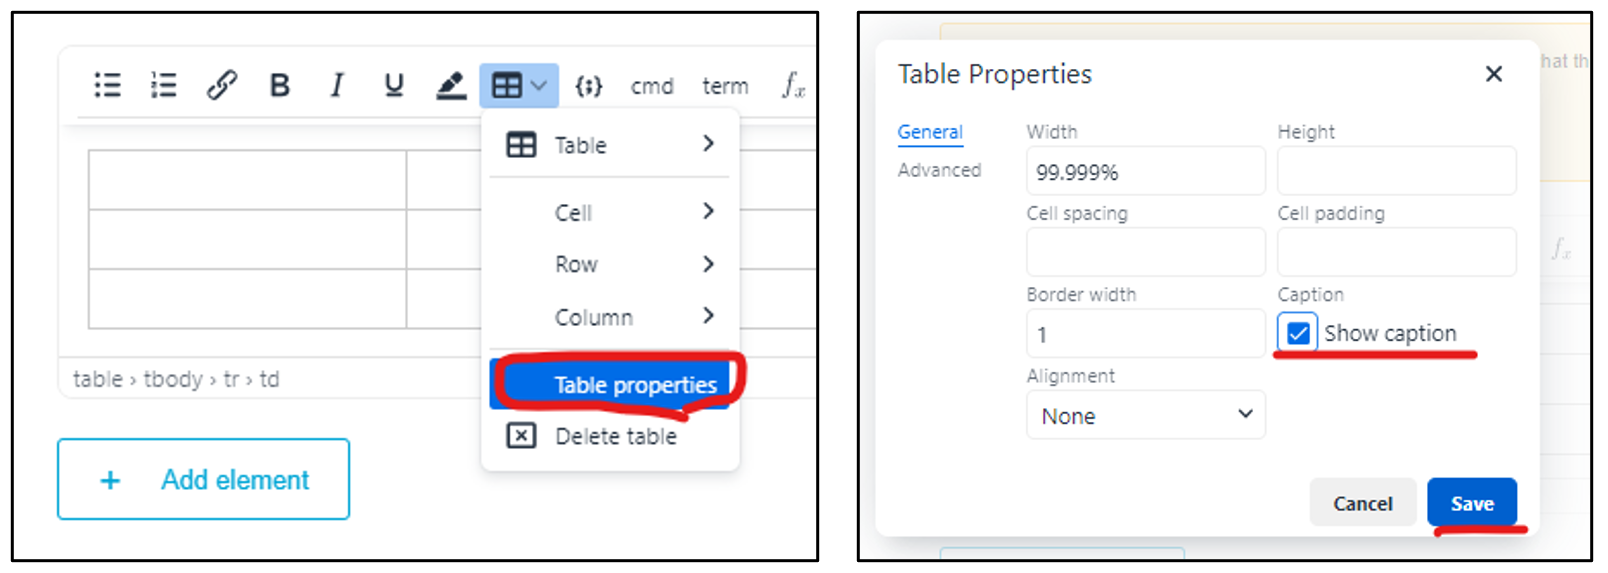
The word “caption” will appear above the table, change it accordingly.

Code parts:
Adding code snippets help distinguish between general text and code that learners should examine carefully. It is useful to make a separate code block between general text to make your tutorials more use friendly.
- To add the code, you first need to add a text box from the add element options
- Next you will choose the semi colon option from the top menu of the text box

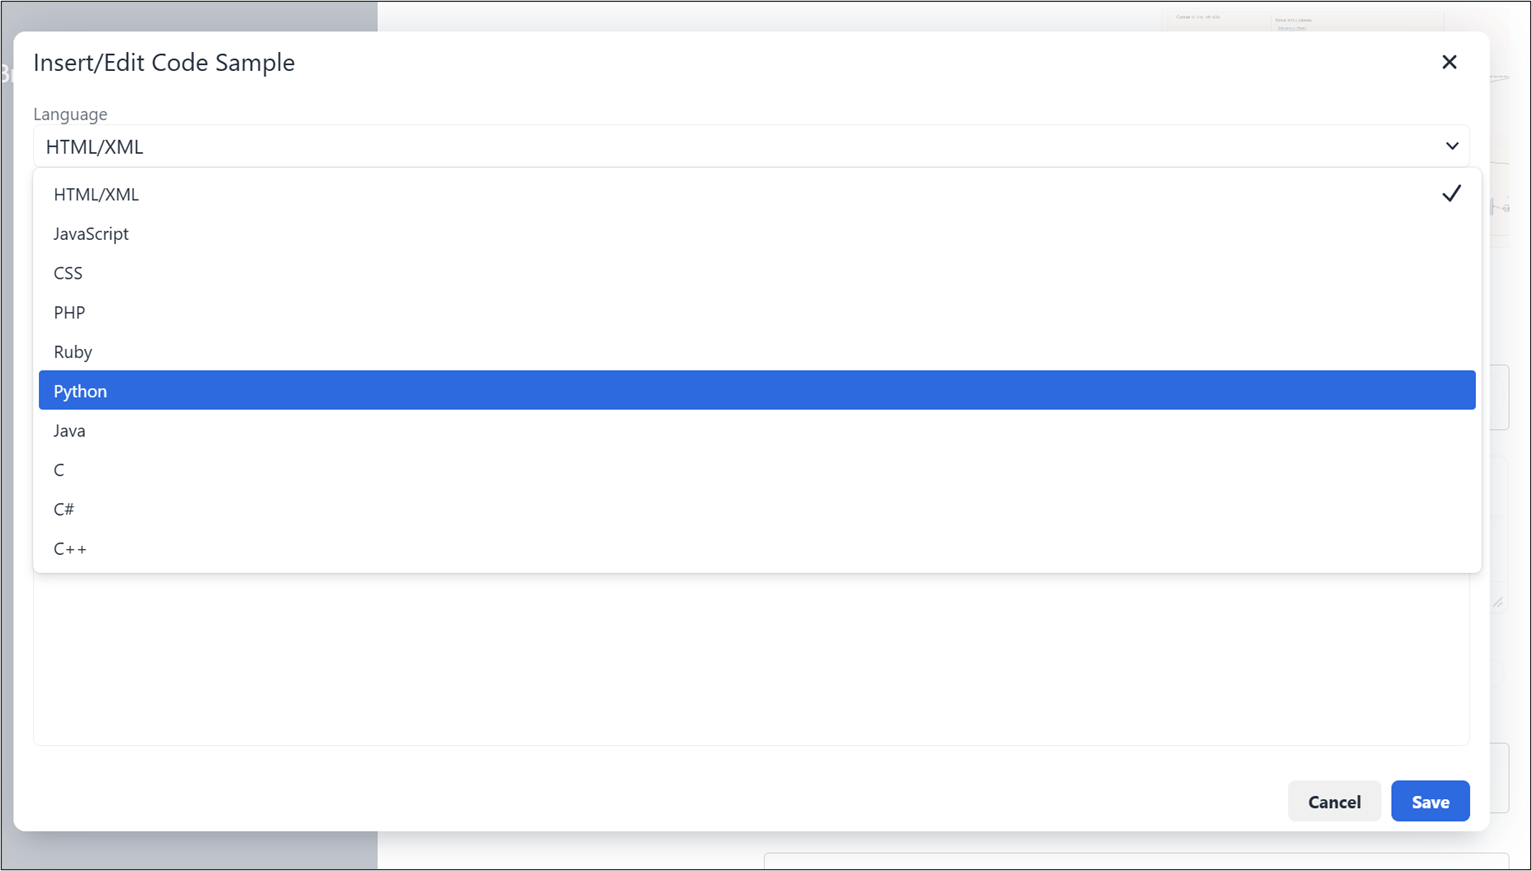
The default is HTML/XML, click on the drop down menu to change it to Python or the language you need
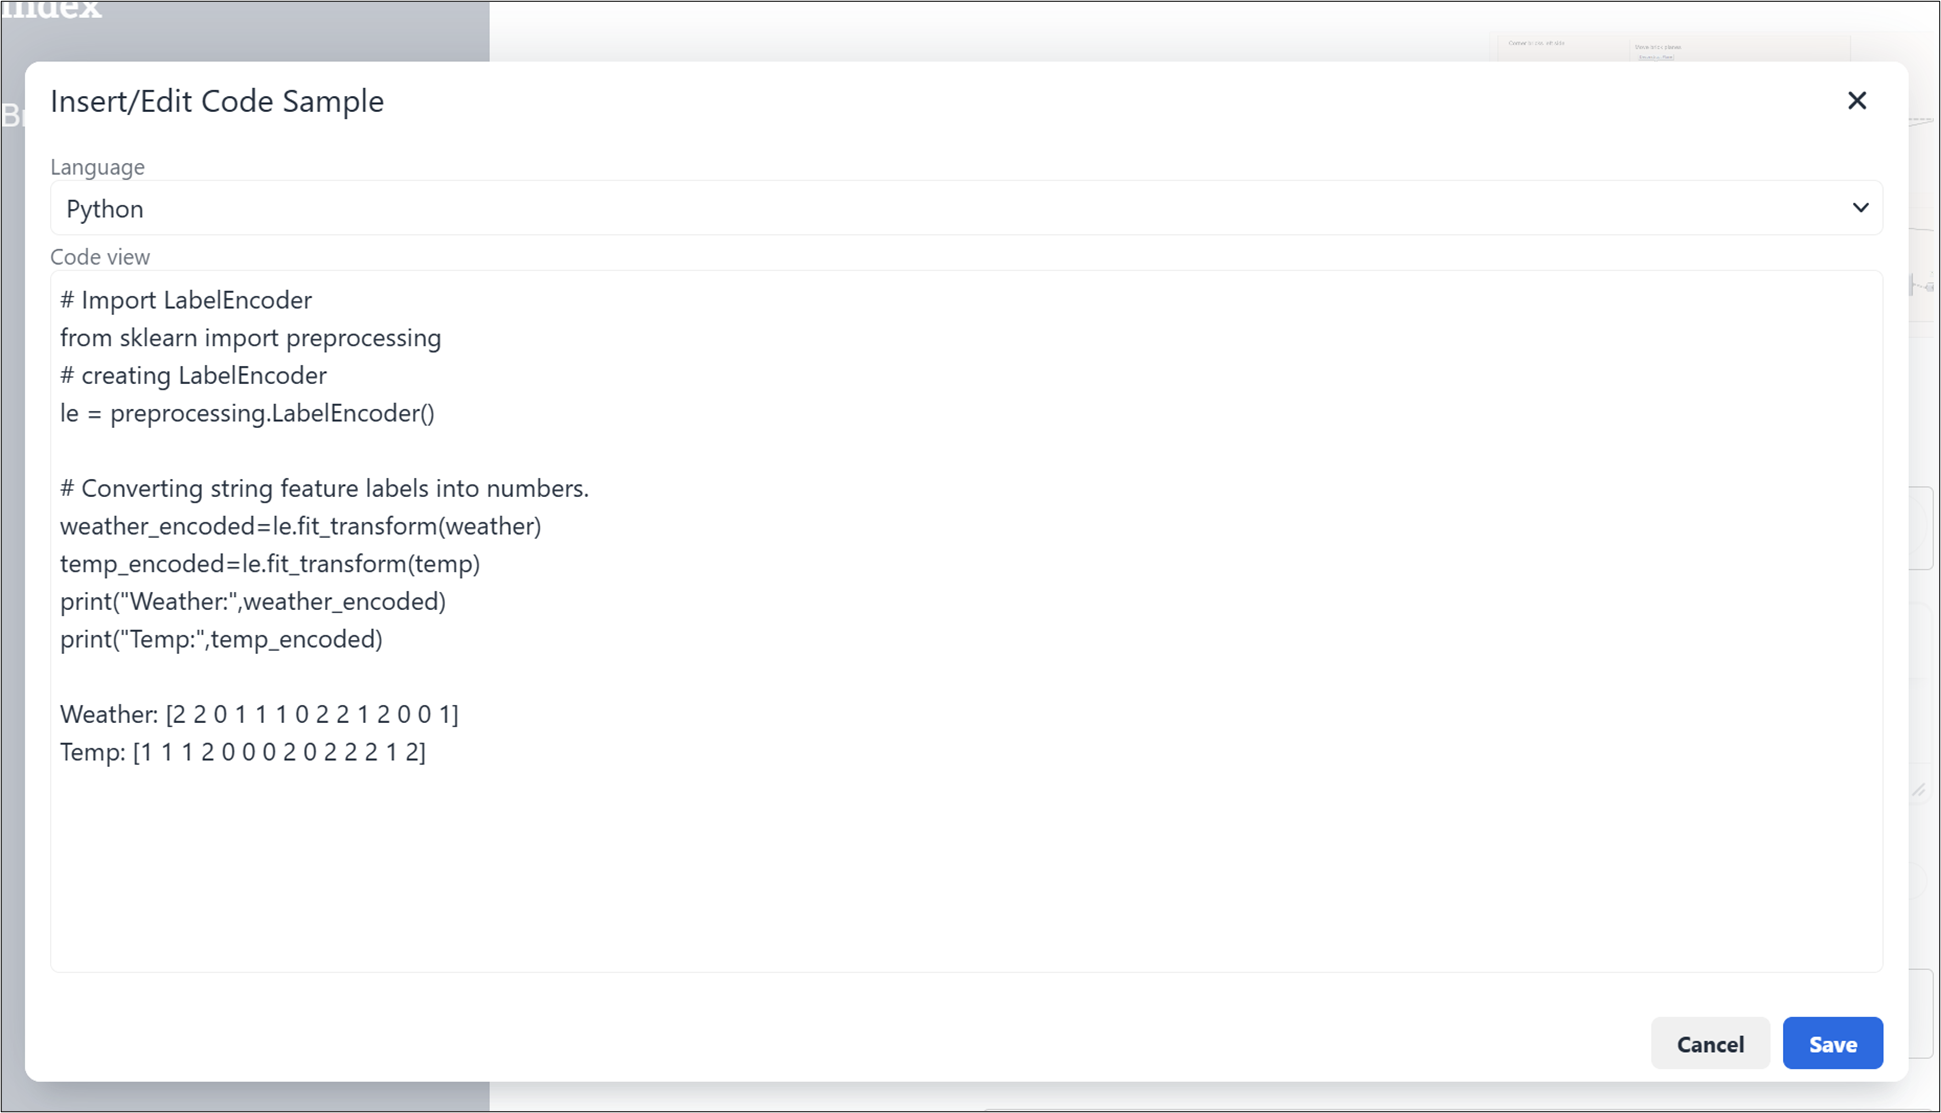
- You can then copy and paste your code in the code view and click on save
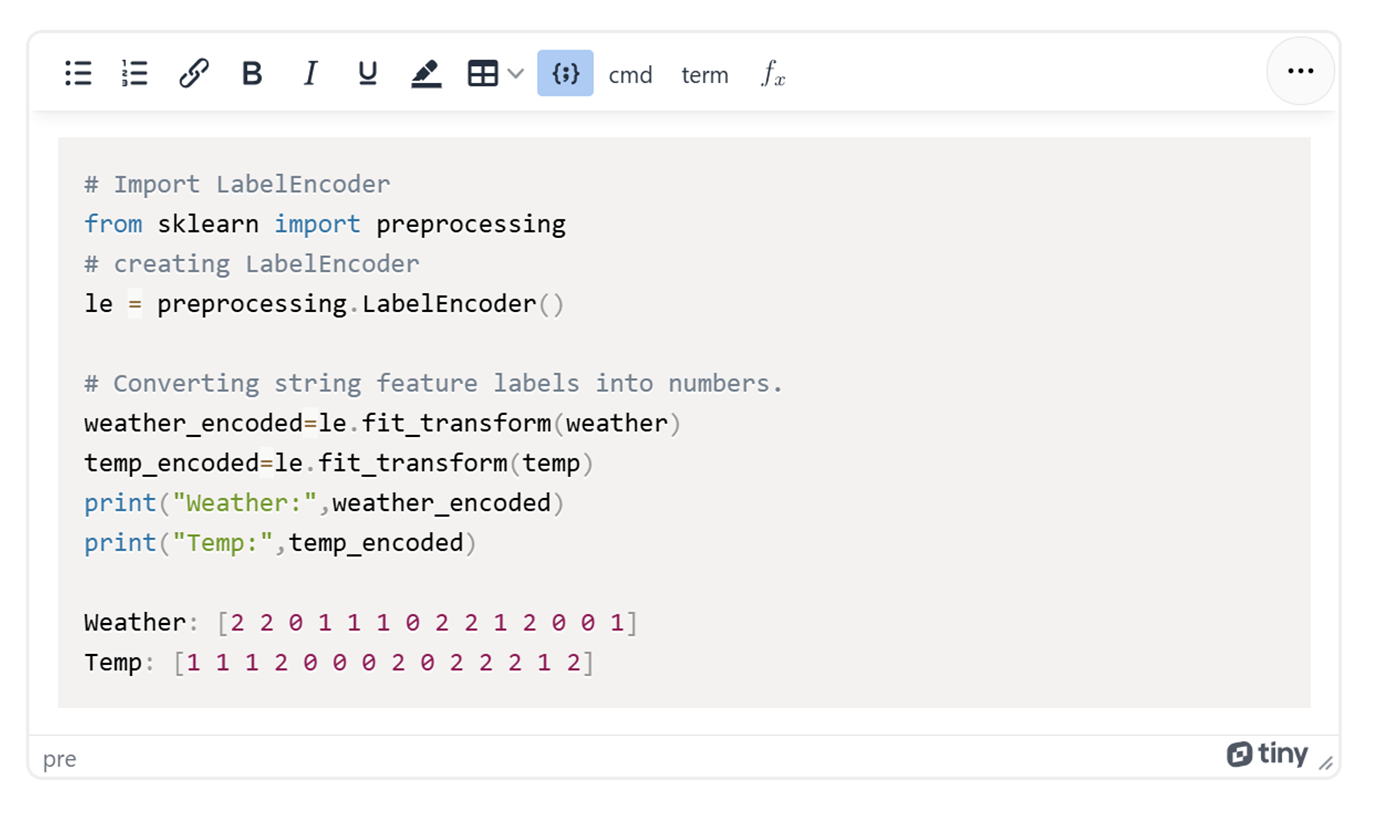
- You will then be able to preview your code in the text box
Creating Flows (or GH components)
To help with the readability of your tutorial, adding special text format for Grasshopper components can be done within the text formatting option.
- Important is to start a new line for creating the flow / GH component reference. Otherwise it won’t display correctly.
- Make sure the flow / GH component does NOT contain a bullet point.
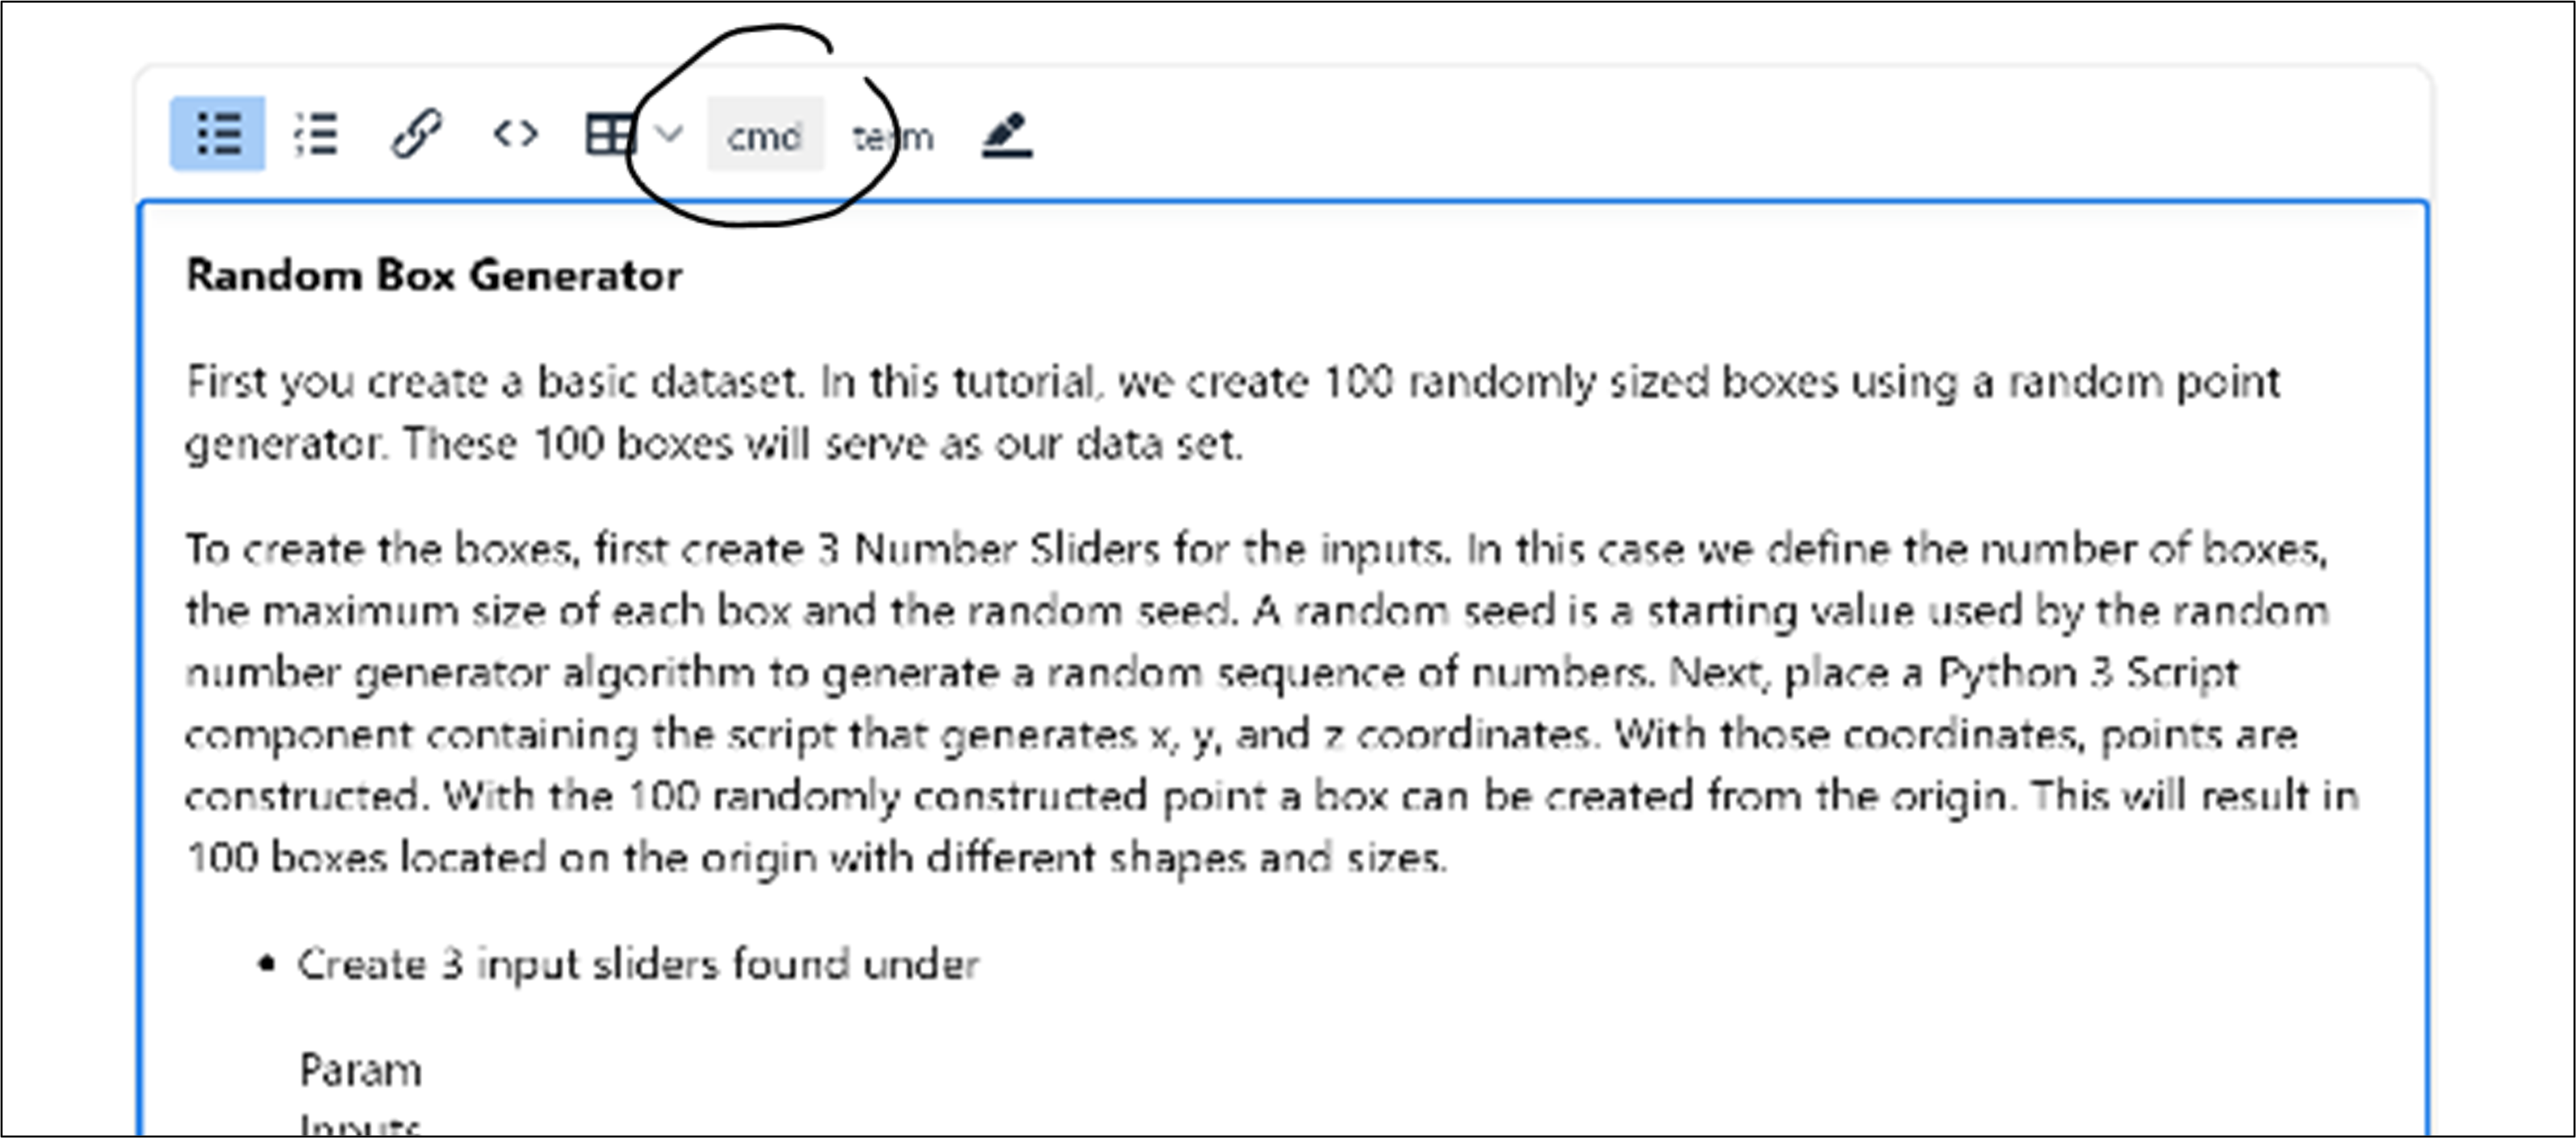
- At the top of this text element select “cmd”
- You will see a new dialogue popping up. Write out every step of the sequence
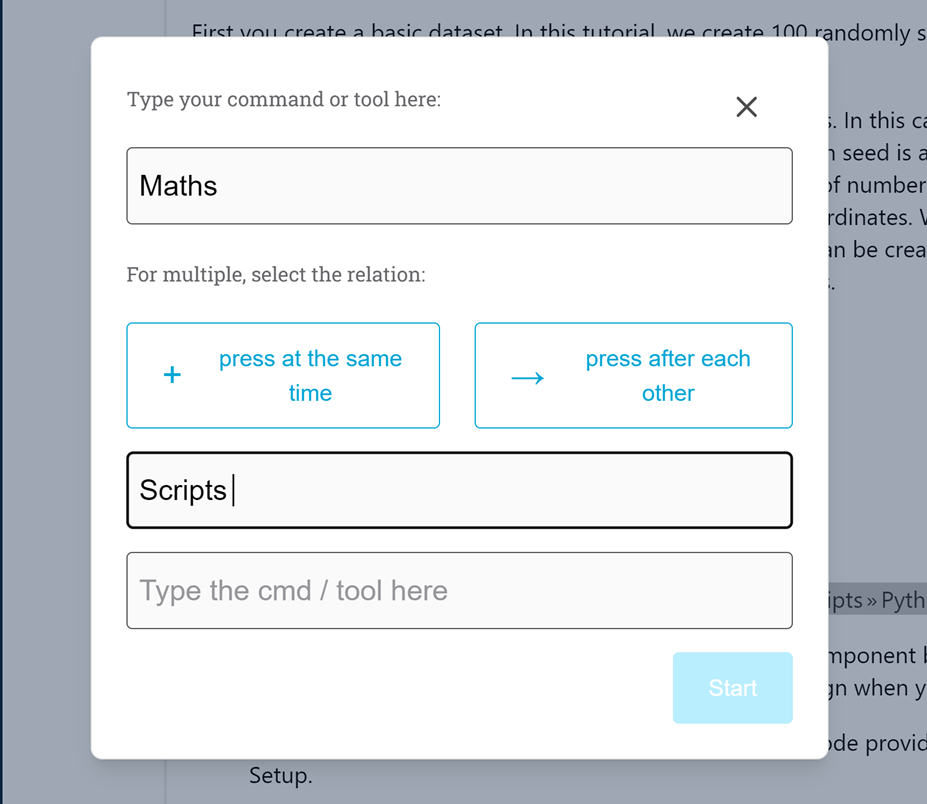
- If you want to display arrows between each component, then select press after each other on the right (to show with arrows in commands)
- If you want to display a plus sign between each component, then select the press at the same time on the left (to show + in between commands)
In the end it will look like this:

Dictionary terms
If you have terminologies or important words where it is useful to have the definitions quickly accessible, you can use a dictionary term. This feature allows you to define a word and when a learner hovers over the text, the definition will pop up on their screen. You can add dictionary terms to the word.

- Click on “term” in the text editor
Then you have two options:
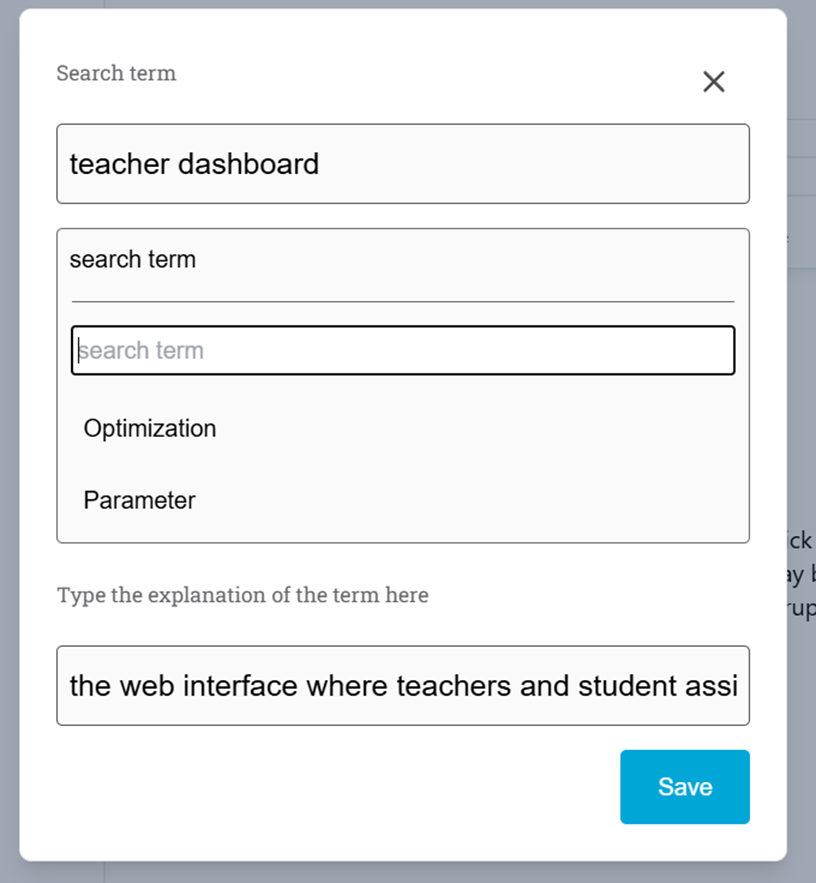
- Define a new term: In this case, enter the name of your term in the Term field and the description of the Explanation field.
- You can do so by selecting highlighting the term in the text, then clicking on Term format option.
- Then add your keyword and explanation.
- Note: the terms are case-sensitive and will be displayed exactly how they are entered.
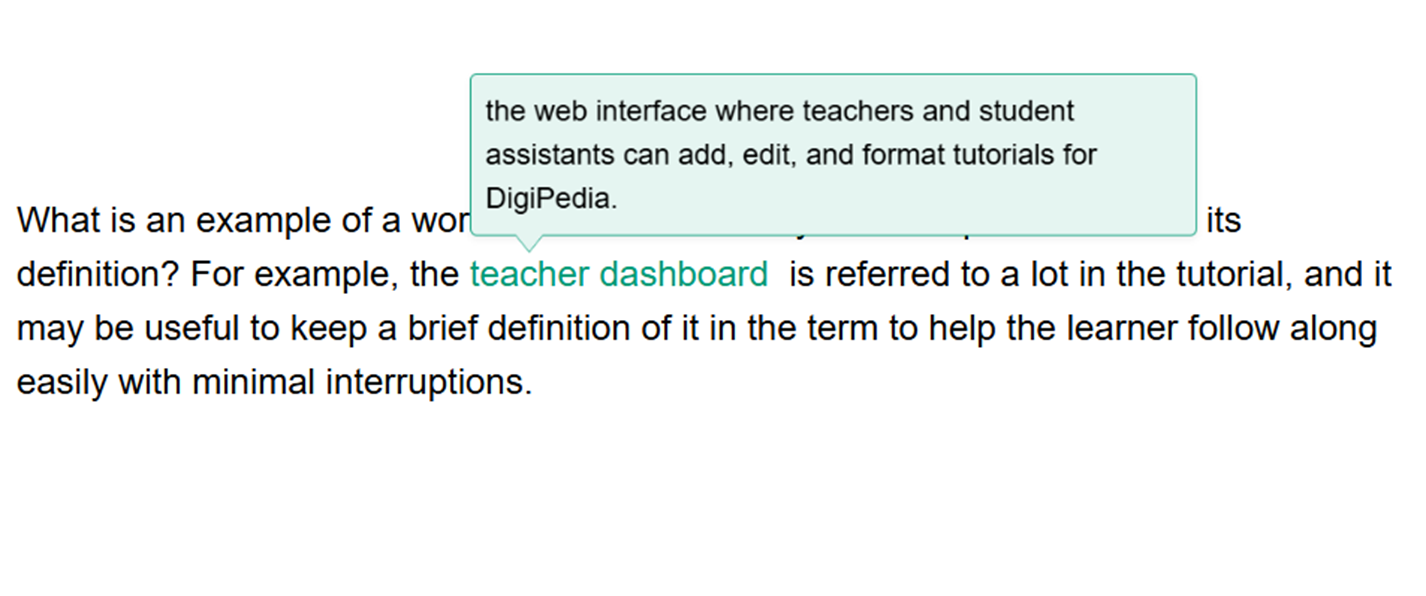
In the end, the term will show this when a learner hovers over the term using their mouse.
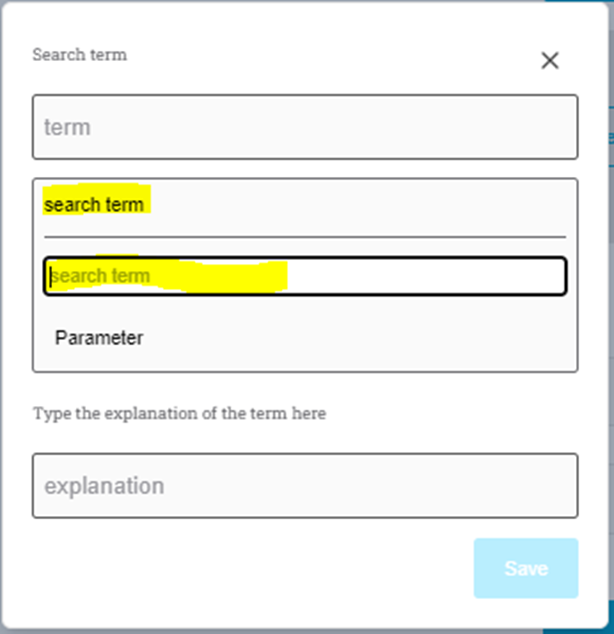
Or select from existing terms:
- Select an existing definition: you can search the terms database in DigiPedia for commonly used terms.
- Click on “Search Term” and then enter your term in the search term field. You can still edit the definition to suit your use case.
- If you want to add a predefined term and description to the saved DigiPeda dataset, you can submit the request to the DigiPedia team at the emails listed at the start of this document.
- Your term will appear in green, if you hover over it, the description shows
- If you made a mistake you can make direct edits inside the green popup. Click inside the green box while hovering over it. Now you can type to change the description.

Equation:
If you would like to add an equation into your tutorial, use the equation button.

When you click on the button, you can enter equations either by:
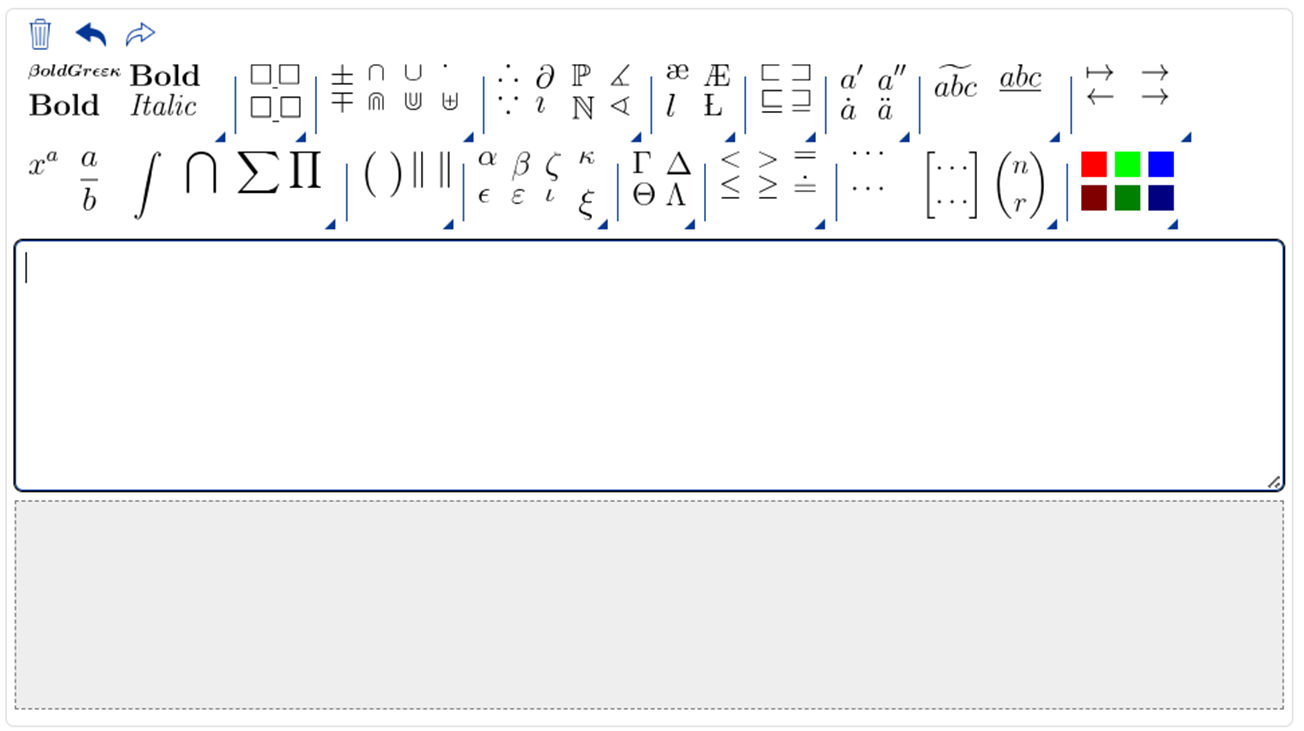
- You can enter an equation using any of the provided buttons
- You can copy and paste an equation in Latex into the text box
Note that your equation will be rendered on DigiPedia as an image.
DigiPedia Teacher Dashboard Onboarding 7/7
Conclusionlink copied
This manual was intended to serve as a guide to help with uploading tutorials to DigiPedia with the highest quality possible. If you need additional help with managing the process for uploading tutorials, do not hesitate to us at DigiPedia@tudelft.nl and request assistance. We are here to help you get familiar with the website and provide tips on how to make your tutorials look their best.
Write your feedback.
Write your feedback on "DigiPedia Teacher Dashboard Onboarding"".
If you're providing a specific feedback to a part of the chapter, mention which part (text, image, or video) that you have specific feedback for."Thank your for your feedback.
Your feedback has been submitted successfully and is now awaiting review. We appreciate your input and will ensure it aligns with our guidelines before it’s published.
