Workshop 5: Custom Object Detector
-
Intro
-
Fine-Tuning Computer Vision Models
-
Getting Started: The Dataset
-
Step 1: Load the Dataset
-
Step 2: Create a data.yaml File
-
Step 3: Split the Data (Train, Validation, Test)
-
Step 4: Run the Training Command on your Computer
-
Step 5: Test the Model’s Performance
-
Step 6: Deploy the Model
-
In Conclusion
Information
| Primary software used | Python |
| Software version | 1.0 |
| Course | Workshop 5: Custom Object Detector |
| Primary subject | AI & ML |
| Secondary subject | Machine Learning |
| Level | Intermediate |
| Last updated | November 6, 2025 |
| Keywords |
Responsible
| Teachers | |
| Faculty |
Workshop 5: Custom Object Detector 0/9
Workshop 5: Custom Object Detector
Fine-tuning object-detecting systems on custom image dataset
This tutorial is published as part of a series of workshops for an interfaculty course from TU Delft Faculty of Architecture and the Built Environment to support learning in and outside the class with open learning material. The intent of the workshop series is to increase familiarity with programming language Python for research and scientific applications as part of the course Creative Robotics in Spatial Design.
You are free to go through the learning material at your own to get familiar with Python fundamentals.

On Workshop 5 (the last programming workshop), we will create a basic object-detector to recognize objects of your choice. The basis of the vision models are pre-trained and focus on create a custom object detection program by importing existing Python libraries. We will go over the basics of computer vision models, curating datasets for fine-tuning pre-trained models, and deploying the model for testing using your webcam.
Learning Objectives
- Apply the practical basics of fine-tuning vision models
- Utilize open-source tools to source and label your own dataset for object detection
- Fine-tune models using a custom image dataset
Download Workshop Notebook (week 2, workshop 5)
The zip file contians the notebook and needed images/data to complete the workshop.
Previous Workshops
Workshop 5: Custom Object Detector 1/9
Fine-Tuning Computer Vision Modelslink copied
Computer vision is about teaching a computer to interpret and understand the visual world. Object detection is a core task within this field that tackles two fundamental questions simultaneously:
- what is the object (by means of classification)?
- where is the object (by means of localization)?
It works by training deep neural networks on datasets of labelled images. The system learns to recognize visual patterns from the way pixels are arranged for specific objects/classes. Some models can also output a bounding box or a pixel-level mask around the object to identify it on an image with a written label near the object.
Pre-Trained Models
There are many vision model options to choose from. They all have their pros and cons. Here is a breakdown of the most useful ones:
- YOLO (You Only Look Once): Fast and efficient for real-time object detection. Good for applications requiring speed or instantanuous response.
- Mask R-CNN: A highly accurate model for both object detection and instance segmentation. It provides a pixel-perfect mask for each object, making it great for applications needing precise shape information, though it’s generally slower than YOLO.
- DINOv2: A self-supervised model that learns visual features without labels. It’s good for understanding an object’s geometry and texture, making it excellent for tasks like finding similar items in the real world.
There are other models out there that tailor to other needs. For this workshop, our needs are a lightweight model that can detect and classify objects in real-time incoming feed from a webcam.
Object Detection System
There are many vision model options to choose from. They all have their pros and cons. for this course, we will use an existing computer vision framework called YOLO. In short, YOLO is an object-detection system that is delivered as a complete package. It is a complete computer vision system that you can quickly customize, program, and deploy. Normally, this would require more API components to work and requires a lot more preparation.
Link to the repository by Ultralytics: https://github.com/ultralytics/ultralytics
Image Classification
This is the most fundamental vision tasks. It assigns a label to an entire image to describe its main subject (i.e. “car”, “cat”, “person”). It answers what the image is based on the pixels it reads.
Object Detection (and Tracking)
YOLO excels at object detection that can run on local computers and even small edge devices like a raspberry pi equipped with a camera/sensor. It identifies the location o objects from an image by drawing a bounding box around each object and assign a class label for the bounding box. The tracking feature also allows to track each unique ID (object) to follow specific objects.
Instance Segmentation
Segmentation provides a more detailed description of the object by drawing a pixel-level mask that outlines the exact shape of each individual object. This is useful for knowing the precise shape and orientation of objects.
Pose Estimation
This is used for estimating human poses by detecting individual body parts such as shoulders, elbows, wrists, etc.) to create a skeletal representation of a person’s posture. This is useful for action recognition such as walking, sitting, etc.
What is Fine-Tuning?
Fine-tuning is done by taking a pre-trained model (such as yolo11s) and further training it on your own smaller image dataset. This adapts the model’s existing knowledge to recognize unique objects relevant to your specific task which saves you the time from having to train a model from scratch.
Workshop 5: Custom Object Detector 2/9
Getting Started: The Datasetlink copied
You can use your own images to fine-tune the model to detect specific objects. For example:
- Classify what the object is viewed in an image or scene.
- Localize where on the image the object is
Workshop Dataset (Labelled Shapes)
We will use an example dataset we made for this workshop “Labelled Shapes Dataset”. The dataset contains four hand-drawn shapes on a tablet with a stylus and the corresponding class label for each shape.
Labelling Your Own Image Dataset (optional)
You can take photos of the object(s) you want the model to detect and use it for fine-tuning your model to detect them.
Some helpful references to get started with labelling your own image dataset:
- It’s recommended to read the quick start guide for how to install correctly: https://labelstud.io/guide/quick_start
- Once you have the program running in your browser, you can read further in the documentation for object detection for getting started: https://labelstud.io/blog/quickly-create-datasets-for-training-yolo-object-detection-with-label-studio/
- A video published on YouTube by user “NeuralNine” goes over the basics from installation to various labelling tasks: https://youtu.be/R1ozTMrujOE?feature=shared
Run the Ultralytics Model via your Webcam (test your webcam)
If you have not yet installed and tested Ultralytics model and your webcame, follow the steps below.
Run this in your Jupyter Notebook. This will take a few minutes, so be patient:
%pip install ultralytics
%pip install opencv-python
Check you have it installed by importing YOLO:
from ultralytics import YOLOLoad the YOLO Model: There are many models to choose from. For the purposes of this workshop, we chose `yolo11s` (or `yolo11m`, `yolo11n`).
You can read more about the supported models here: https://docs.ultralytics.com/models/
model = YOLO('yolo11s.pt')Test the Model via Webcam:
Use this code block to display image feed from your webcam:
from ultralytics import YOLO
import cv2

# Load your custom-trained model
model = YOLO('yolo11s.pt')

# This line runs the pre-loaded YOLO model on your primary webcam for real-time inference
results = model.predict(source=0, stream=True)

print("Displaying webcam feed. Press any key to exit.")

# Loop through the results from the webcam
for r in results:
    # Get the frame with detections plotted on it
    im_array = r.plot()

    # Display the frame in a window named "YOLO Live"
    cv2.imshow('YOLO Live', im_array)

    # Wait for 1 millisecond for a key press.
    # If any key is pressed (waitKey doesn't return -1), break the loop.
    if cv2.waitKey(1) != -1:
        break

# Clean up and close the display window
cv2.destroyAllWindows()

print("Webcam feed closed.")
Press any key while the webcam is running to exit the loop.
Next Steps
Fine-tuning a YOLO model involves three main steps: preparing your dataset, preparing the training data, training, and evaluating the test set. The work will be broken down into steps in the following chapters.
Workshop 5: Custom Object Detector 3/9
Step 1: Load the Datasetlink copied
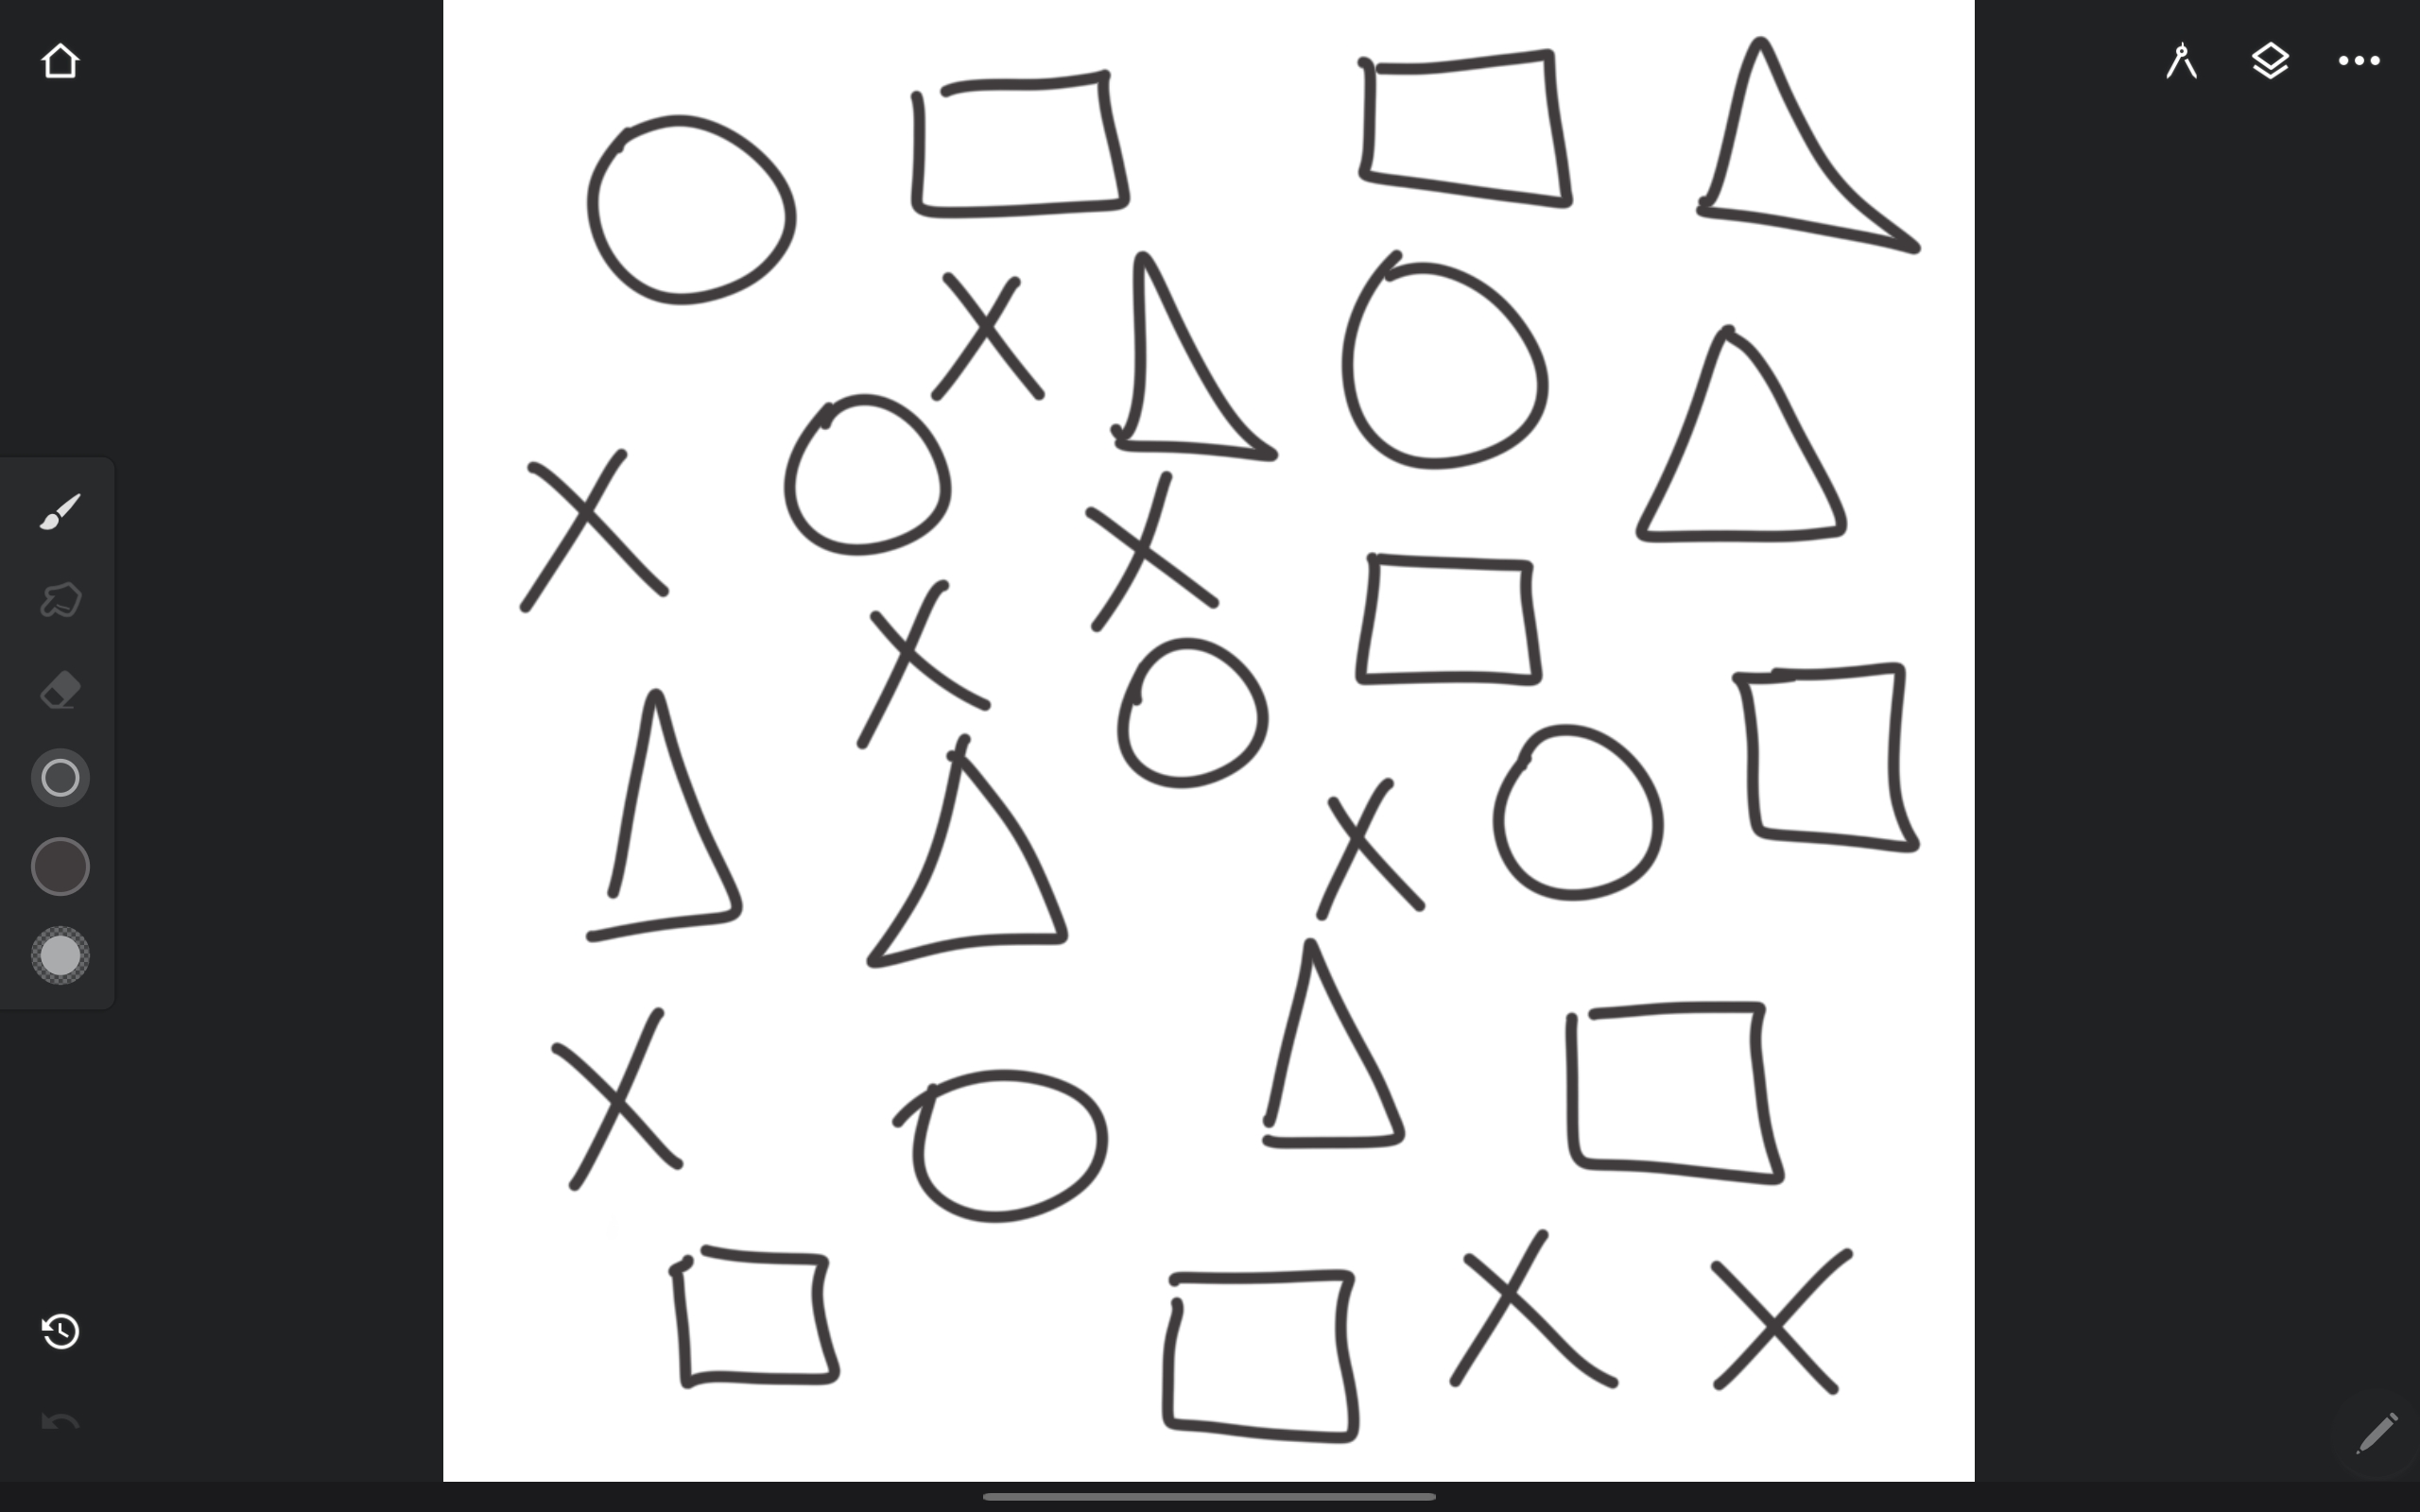
In this notebook, we are using a toy (Labelled Shapes) dataset of shapes on a white background. We want to train the model to recognize when the icons appear in a seen.
The image on the right shows what the shapes are: cross, triangle, square, and circle.
Important! In VS Code, navigate to File > Open Folder… then select the Week-2-Notebook-Day-5 folder! This will allow you to leverage relative paths more easily as already written in the Jupyter Notebook.
Unzip Data and Edit Path
Edit his path to the folder of the dataset (included already in your project directory). If it’s correct, you can proceed.
project_diris the project directory is your root path, assuming you opened the project folder in VS Code as the important note explains above.- The
dataset_pathuses relative path position from the root project directory path. So you do not need to write the entire computer path (although it is also okay). This makes it easier to run the code again from different computers without updating all the paths.
import os
project_dir = r""
dataset_path = r"data\labelled_shapes_dataset"
Unzip the data by using the following code.
import zipfile
import os

zip_path = rf"{project_dir}data\labelled_shapes_dataset.zip"
output_folder = rf"{project_dir}data\labelled_shapes_dataset"

os.makedirs(output_folder, exist_ok=True)
with zipfile.ZipFile(zip_path, 'r') as zip_ref:
    zip_ref.extractall(output_folder)
Note: if your zip file is for whatever reason in different path locations, then you need to edit it.
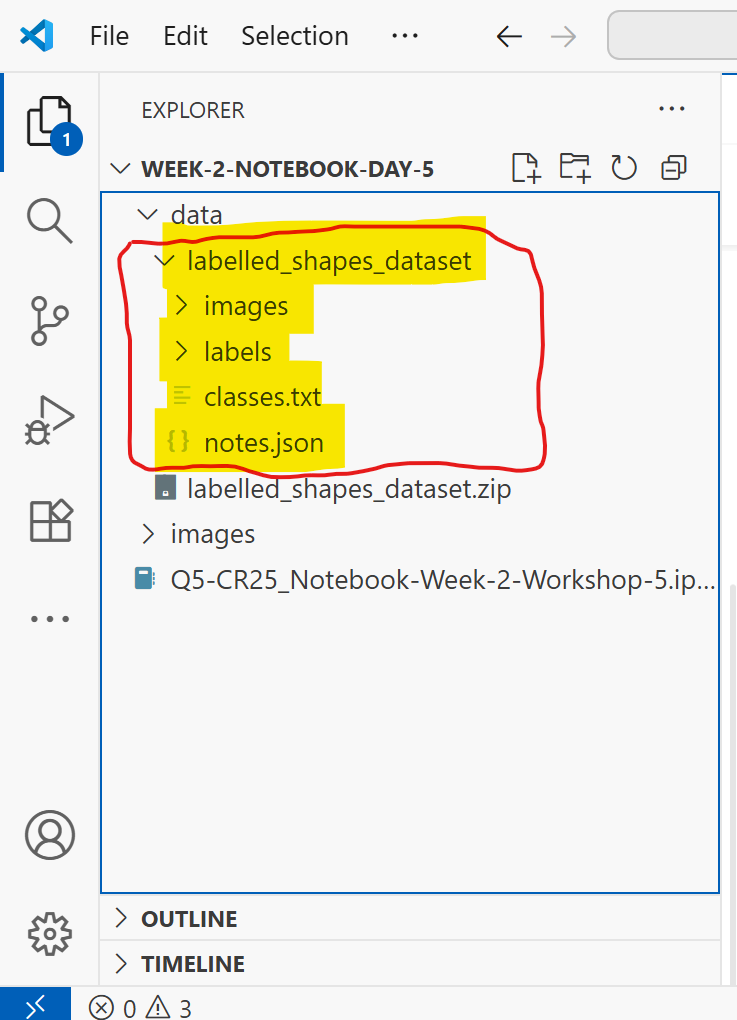
After unzipping, you will notice the files are in your directory which includes images and labels with additional configuration files. These were prepared for the purposes of this workshop.
After you’ve verified that the data was unzipped successfully, you can proceed to the next step.
Workshop 5: Custom Object Detector 4/9
Step 2: Create a data.yaml Filelink copied
This is a configuration file that points to your dataset and lists your custom object classes. You can read more about it in the Ultralytics guide. A simple data.yaml file is already prepared for this workshop which is needed for fine-tuning the model.
Install PyYAML library in your jupyter notebook:
%pip install PyYAMLAnd run the script below to create the data.yaml file in your data folder:
import yaml

os.makedirs(dataset_path, exist_ok=True)

# Define the data structure
data = {
    "train": "train",
    "val": "val",
    "test": "test",
    "nc": 4, #⚠️ ADD THE NUMBER OF CLASSES HERE"""
    "names": ["Circle", "Cross", "Square", "Triangle"] #⚠️ ADD THE NAMES OF THE CLASSES HERE
}

# Write to a YAML file
yaml_file_path = os.path.join(project_dir, "data", "labelled_shapes_dataset", "data.yaml")
with open(yaml_file_path, "w") as file:
    yaml.dump(data, file, default_flow_style=False)

print("YAML file 'data.yaml' created successfully.")
You should see this appear in your folder data > labelled_shapes_dataset > data.yaml
After completing this step, you should now have the dataset prepared for training it on the labelled shapes dataset.
Workshop 5: Custom Object Detector 5/9
Step 3: Split the Data (Train, Validation, Test)link copied
The concepts of training is beyond the scope of the workshop. In short, the dataset needs to be split into three portions:
- Training: this subset of the data is used to “teach” the model the new shapes
- Validation: this subset of the data is used to check the model’s performance during training
- Testing: this is the final test after training/fine-tuning step is complete to get final performance
The data splits are set for this workshop as 70% train, 20% validation, and 10% test. This was pre-determined for the workshop and are recommended to keep it the same to get the same results.
The following script was made to help split the data into the specified percentages. This can be edited to adjust the percentage and the path to the training data. But for now, running this as is will help you progress along the workshop.
from pathlib import Path
import random
import os
import shutil

#⚠️ User-defined variables
project_dir = project_dir
dataset_path = dataset_path
train_percent = 0.7
val_percent = 0.2
# test_percent will be calculated automatically with whatever remains, no need to set it manually

# Calculate test proportion
test_percent = 1 - train_percent - val_percent
if train_percent + val_percent + test_percent != 1:
    raise ValueError("Train, validation, and test proportions must sum to 1.")

# Define paths to input dataset
input_image_path = os.path.join(dataset_path, 'images')
input_label_path = os.path.join(dataset_path, 'labels')

# Define paths to image and annotation folders
train_img_path = os.path.join(dataset_path, r'train\images')
train_txt_path = os.path.join(dataset_path, r'train\labels')
val_img_path = os.path.join(dataset_path, r'val\images')
val_txt_path = os.path.join(dataset_path, r'val\labels')
test_img_path = os.path.join(dataset_path, r'test\images')
test_txt_path = os.path.join(dataset_path, r'test\labels')

# Clear destination folders if they already exist, otherwise create them
for dir_path in [train_img_path, train_txt_path, val_img_path, val_txt_path, test_img_path, test_txt_path]:
    if os.path.exists(dir_path):
        for file in os.listdir(dir_path):
            file_path = os.path.join(dir_path, file)
            try:
                if os.path.isfile(file_path) or os.path.islink(file_path):
                    os.unlink(file_path)
                elif os.path.isdir(file_path):
                    shutil.rmtree(file_path)
            except Exception as e:
                print(f'Failed to delete {file_path}. Reason: {e}')
        print(f'Cleared files in folder at {dir_path}.')
    else:
        os.makedirs(dir_path, exist_ok=True)
        print(f'Ensured folder exists at {dir_path}.')

# Get list of all images and annotation files
img_file_list = [path for path in Path(input_image_path).rglob('*') if path.is_file()]
txt_file_list = [path for path in Path(input_label_path).rglob('*.txt') if path.is_file()]

print(f'Number of image files: {len(img_file_list)}')
print(f'Number of annotation files: {len(txt_file_list)}')

# Determine number of files to move to each folder
file_num = len(img_file_list)
train_num = int(file_num * train_percent)
val_num = int(file_num * val_percent)
test_num = file_num - train_num - val_num

print('Images moving to train: %d' % train_num)
print('Images moving to validation: %d' % val_num)
print('Images moving to test: %d' % test_num)

# Select files randomly and copy them to train, val, or test folders
for i, set_num in enumerate([train_num, val_num, test_num]):
    for _ in range(set_num):
        img_path = random.choice(img_file_list)
        img_fn = img_path.name
        base_fn = img_path.stem
        txt_fn = base_fn + '.txt'
        txt_path = os.path.join(input_label_path, txt_fn)

        if i == 0:  # Copy first set of files to train folders
            new_img_path, new_txt_path = train_img_path, train_txt_path
        elif i == 1:  # Copy second set of files to validation folders
            new_img_path, new_txt_path = val_img_path, val_txt_path
        elif i == 2:  # Copy third set of files to test folders
            new_img_path, new_txt_path = test_img_path, test_txt_path

        shutil.copy(img_path, os.path.join(new_img_path, img_fn))
        if os.path.exists(txt_path):  # If txt path does not exist, this is a background image, so skip txt file
            shutil.copy(txt_path, os.path.join(new_txt_path, txt_fn))
        else:
            print(f"--> Label file not found for {img_fn} at path: {txt_path}")

        img_file_list.remove(img_path)
Your data will show in the data > labelled_shapes_dataset folder. Three new fodlers will be created for train, val, and test. Each of them contain a number of images and labels.
Now that your data has been processed, you can proceed to training a YOLO model on the image dataset.
Workshop 5: Custom Object Detector 6/9
Step 4: Run the Training Command on your Computerlink copied
Assuming the steps from before are done properly, then you can import an Ultralytics model to train it on your training data.
GPU vs CPU
Depending on your hardware, you can use either your computer’s CPU or GPU for training the model. The results should be the same, but the speed will vary. GPUs of Nvidia are generally faster, so if you have that on your computer, then you can go through a couple of extra steps to set this up.
Otherwise if you do not have an Nvidia graphics card, you can skip this step.
Check if you have a recognized Nvidia GPU by running this code in your jupyter notebook:
!nvidia-smiIf yes, you should see some information like your GPU name, but more importantly, your CUDA version.
If you have not yet installed PyTorch library, you can go through this step. Make sure your choose the correct version of the PyTorch library that correspond to your GPU Cuda Version.
pip installthe correct pytorch for your cuda version https://pytorch.org/get-started/previous-versions/
Edit the following code to your correct PyTorch version:
%pip install torch==2.7.1 torchvision==0.22.1 torchaudio==2.7.1 --index-url https://download.pytorch.org/whl/cu118Restart VS code and run this code. You can double check if the GPU is recognized or now by running the code:
import torch
print(torch.__version__)
print(torch.cuda.is_available())
print(torch.cuda.get_device_name(0) if torch.cuda.is_available() else "No GPU detected")
You should see “True” printed and the name of your GPU. If you are facing issues with this step, you can skip it and use your CPU.
Run the Ultralytics Model on your Computer
A training script is prepared based on the project directory structure. It will retreive the data needed and run the training. The specifics of training is beyond the scope of the workshop, the setup below is a starting point to see some results.
Assuming your data.yaml is correct, the data is in the correct path, and so on, you will see the training being executed.
from ultralytics import YOLO
import os

# this was defined already in the notebook
# project_dir = r""
# dataset_path = r"data\labelled_shapes_dataset"

#⚠️ Load a pre-trained model first
model = YOLO('yolo11n.pt') # or choose a different model from their available ones https://docs.ultralytics.com/models/#featured-models

# Create a new folder in the project directory called 'runs' and add it to the path below
runs = os.path.join(project_dir, 'runs')
# Create the folder if it does not exist
os.makedirs(runs, exist_ok=True)

# Now, fine-tune the model on the GPU
results = model.train(
    data=os.path.join(dataset_path, 'data.yaml'),
    epochs=60,# change the number of epochs as needed, more = more time, and vice versa
    device="cpu", #change this to 0 if you want to run on GPU
        # change this variable to "cpu", as is a string in between quotation, if you want to run on CPU instead of GPU
        # otherwise, set it to the integer value of 0 (without quotation marks)
    imgsz=640,
    project=runs  # Specify the project directory where to save the runs
)
View the Results
The results are saved in your project directory under Runs folder. Each time your run the training sequene, a new folder will be created and a number is added to it (the higher it is, the latest it is).
Workshop 5: Custom Object Detector 7/9
Step 5: Test the Model’s Performancelink copied
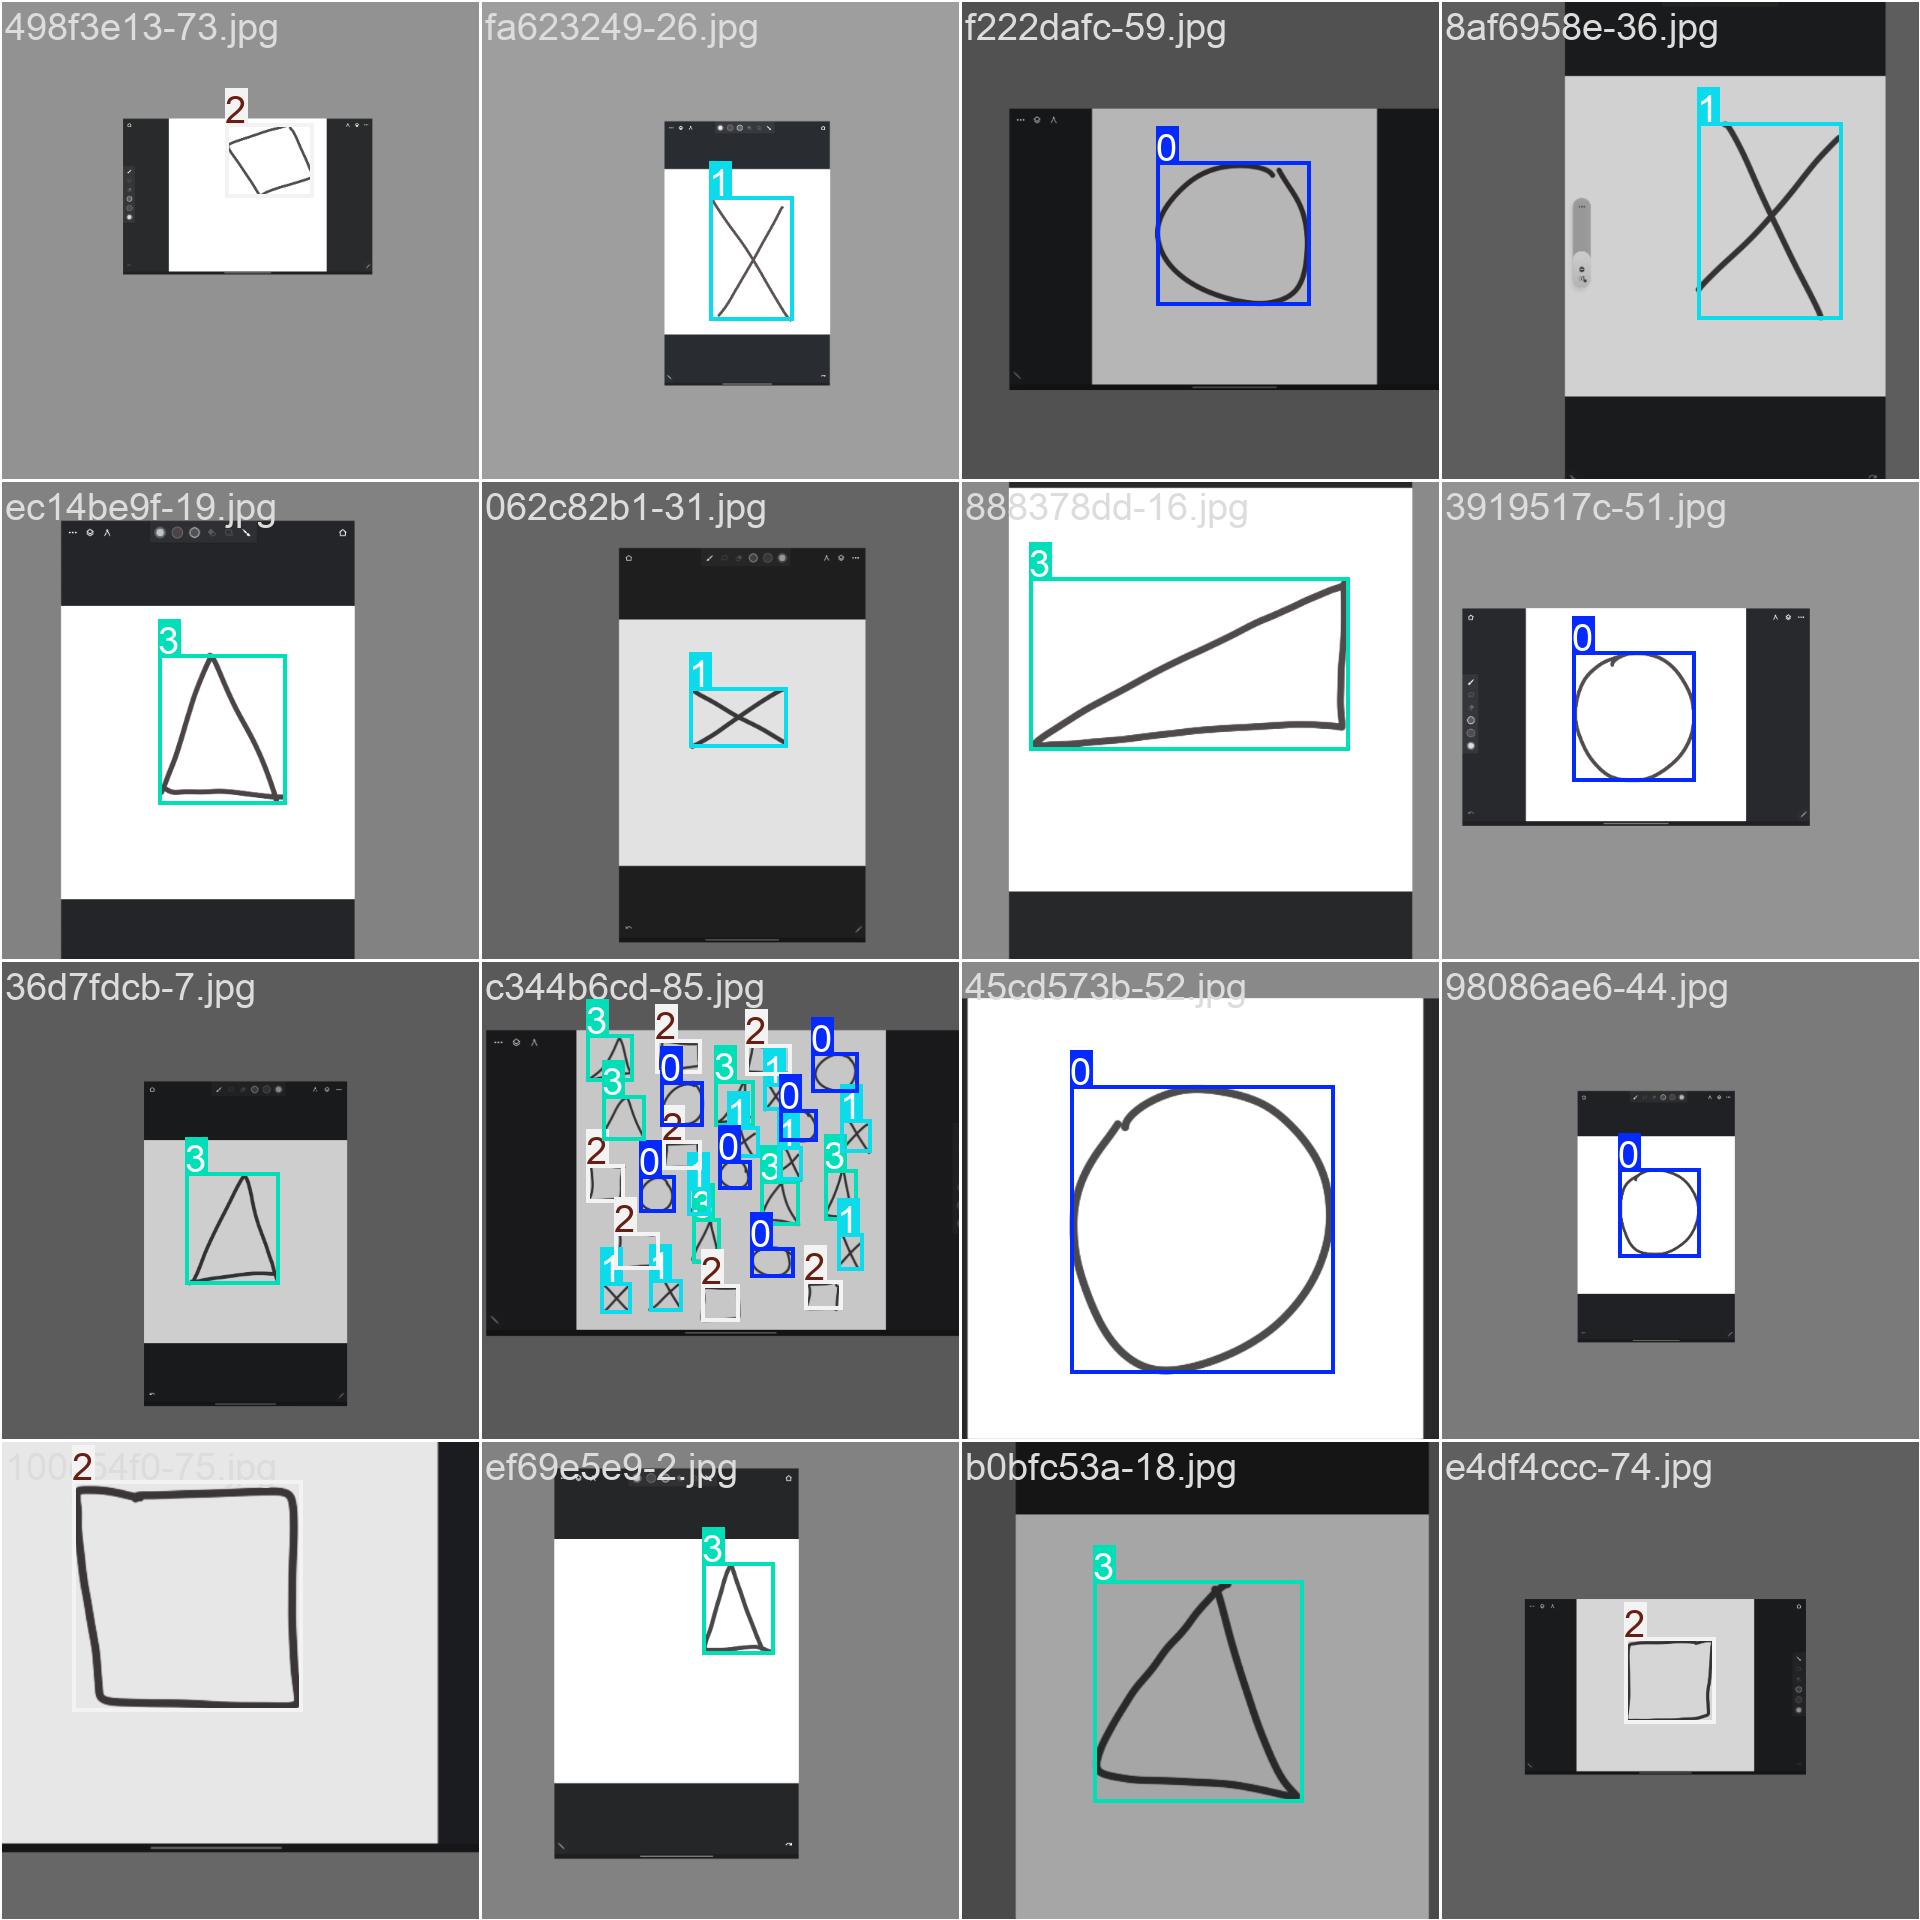
Running this script below evaluates the model’s performance on the held-out test set (in this workshop, we set aside 10% of the dataset as a test set, resulting to 9 test images).
Important: update the file path of the model variable to the train# of your latest run.
import os

#⚠️ Re-use the project_dir variable already defined in your notebook
project_dir = project_dir
dataset_path = dataset_path

# Load the best performing model
model = YOLO(r'runs\train3\weights\best.pt')
###update the folder path as needed for each run###

# Run prediction and specify the output directory
results = model.predict(
    source=(f'{dataset_path}/test/images'),  #⚠️ Path to the test images
    save=True,
    project=f'{project_dir}/runs', #⚠️ This sets the main output folder to your project's 'runs' directory.
    name='test_predictions_images'   # This creates a specific subfolder for this prediction run.
)

# Evaluate the model on the test set, specifying the output directory
metrics = model.val(
    split='test',
    project=f'{project_dir}/runs',  # Sets the main output folder to your project's 'runs' directory
    name='test_validation_results' # Creates a specific subfolder for this validation run
)

# Print the final mAP score from the metrics object
print(f"mAP50-95 Score on Test Set: {metrics.box.map}")
It should output a lot of results, most imporantly this:
                 Class     Images  Instances      Box(P          R      mAP50  mAP50-95): 100% ━━━━━━━━━━━━ 1/1 0.5it/s 2.2s
                   all          9          9       0.98          1      0.995      0.959
                Circle          1          1      0.972          1      0.995      0.995
                 Cross          2          2      0.974          1      0.995      0.895
                Square          3          3      0.987          1      0.995      0.995
              Triangle          3          3      0.988          1      0.995      0.951
What do those metrics mean? (srouce: Performance Metrics Deep Dive – Ultralytics YOLO Docs)
- P (Precision): The accuracy of the detected objects, indicating how many detections were correct.
- mAP50: Mean average precision calculated at an intersection over union (IoU) threshold of 0.50. It’s a measure of the model’s accuracy considering only the “easy” detections.
- mAP50-95: The average of the mean average precision calculated at varying IoU thresholds, ranging from 0.50 to 0.95. It gives a comprehensive view of the model’s performance across different levels of detection difficulty.
Workshop 5: Custom Object Detector 8/9
Step 6: Deploy the Modellink copied
Your model is now saved in the runs folder. The model weights is what you need to deploy the model, that is the result of your training. Choose the best.pt as your model for the one with the best performance.
Now you can use your webcam to and have the model analyze each frame from the webcam feed. If you draw the basic shapes on a piece of white paper, do you get the results you expect?
Important: make sure you update the train# in the file path to the latest run folder. You can also adjust the confidence threshold to something higher to prevent false positives.
# Run this command in VS Code in a new .py (Python) file:
import cv2
from ultralytics import YOLO
import os

# EDIT THIS PATH TO POINT TO YOUR RUNS FOLDER!
runs_folder_path = r'/runs'  # Adjust this path to your runs folder

MODEL_PATH = r'runs\train\weights\best.pt'  # Path to the YOLO model
CONFIDENCE_THRESHOLD = 0.5  # Confidence threshold for detections
IOU_THRESHOLD = 0.4  # IoU threshold for non-max suppression

# Load your custom-trained model
model = YOLO(MODEL_PATH)

# Use stream=True for efficient processing of video frames
results = model.predict(source=0, stream=True, conf=CONFIDENCE_THRESHOLD, iou=IOU_THRESHOLD)

print("Displaying webcam feed. Press any key to exit.")

# Loop through the results from the webcam
for r in results:
    # Get the frame with detections plotted on it
    im_array = r.plot()

    # Display the frame in a window named "YOLO Live"
    cv2.imshow('YOLO Live', im_array)

    # Wait for 1 millisecond for a key press.
    # If any key is pressed (waitKey doesn't return -1), break the loop.
    if cv2.waitKey(1) != -1:
        break

# Clean up and close the display window
cv2.destroyAllWindows()

print("Webcam feed closed.")
Workshop 5: Custom Object Detector 9/9
In Conclusionlink copied
Customizing a vision model to fit your project needs is made easier with publicly-available libraries and open-source dataset labelling workflows. This was just a project example of what you can do with Python libraries that are available to you. Despite the small size of the dataset and its general limitations, we were able fine-tune the model to preceive new objects. Your actual dataset will likely have to be larger, more diverse, different lighting/background combinations, and precisely labelled to get the best resutls.
The Final Workshop
This was the final programming workshop to sum up all the fundamentals into a practical project.
Previous Workshops
Write your feedback.
Write your feedback on "Workshop 5: Custom Object Detector"".
If you're providing a specific feedback to a part of the chapter, mention which part (text, image, or video) that you have specific feedback for."Thank your for your feedback.
Your feedback has been submitted successfully and is now awaiting review. We appreciate your input and will ensure it aligns with our guidelines before it’s published.