Wallacei basics – Setting-up and running an optimization
-
Intro
-
Selecting variables
-
Selecting objectives
-
Connecting to the Wallacei component
-
Running Wallacei
-
Conclusion
-
Useful links
Information
| Primary software used | Wallacei |
| Software version | 1.0 |
| Course | BKB3WV4 – Bouwkunde als wetenschap |
| Primary subject | AI & ML |
| Secondary subject | Optimization |
| Level | Intermediate |
| Last updated | November 27, 2024 |
| Keywords |
Responsible
| Teachers | |
| Faculty |
Wallacei basics – Setting-up and running an optimization 0/6
Wallacei basics – Setting-up and running an optimization
In this tutorial you will learn how to prepare your GH file for running a multi-objective optimization using Wallacei plugin. Wallacei is developed by Mohammed Makki, Milad Showkatbakhsh and Yutao Song. Wallacei uses advanced evolutionary algorithms to enable the exploration and optimization of different, often very complex design solutions. It gives us, designers, architects, and engineers the ability to perform multi-objective optimization by analysing and visualizing large populations of design alternatives.
You will learn how to select variables, constraints, and objectives of the optimisation. Additionally, you will learn how to eventually run an optimization with Wallacei and save the optimization results.
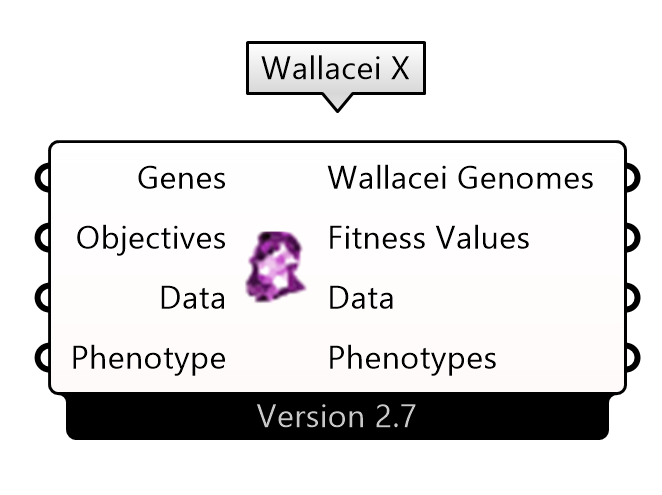
This is the Wallacei X component. With this component, you can run a multi-objective optimization algorithm. The mandatory input is genes = variables and objectives. Additionally, you can input data and phenotypes.
Wallacei basics – Setting-up and running an optimization 1/6
Selecting variableslink copied
First, let’s have a look at all different ways we can include variables in the optimisation definition. But what are variables anyway? There are also things, like parameters or constraints to be aware of.
Parameters are all data in the definition that influence the outcome in any way, but that cannot be adjusted. Those can include for example, a width of a window, height of some geometry, or simply a cost of something.
Variables are essentially parameters, but ones that can be changed within some range, with a slider for example. So, parameters remain unchanged in the definition, and variables are parameters that are allowed to change for any purposes, like optimisation.
Constraints are the boundaries set for variables, and they need to be set correctly, especially before running any optimisation. Constraint can be as simple as bounds that can be given to a certain slider, or more complex smaller definitions.
Types of input variables
There are two types of input variables that Wallacei can take: sliders and gene pools.
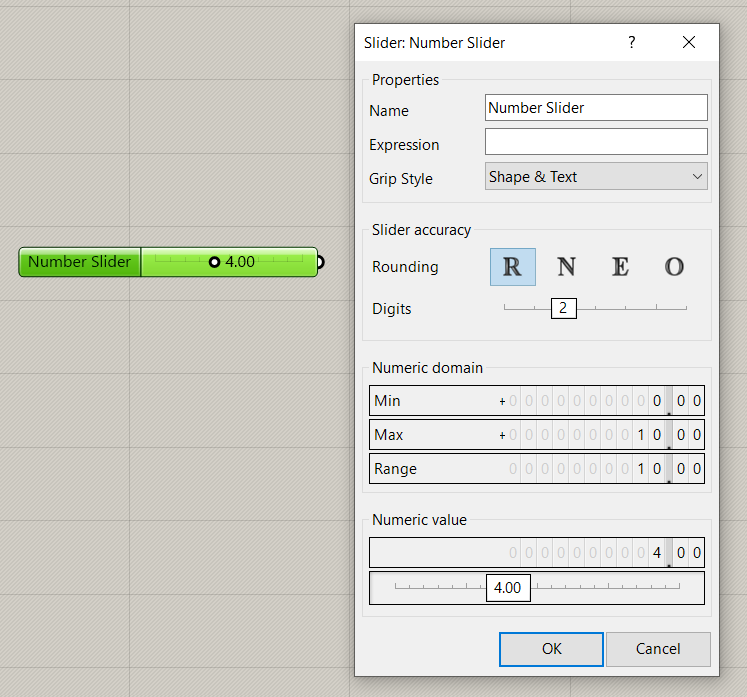
Sliders are well known, simple components to manipulate some value. They can be set up in different ways, varying in number of decimal places, domain, etc.
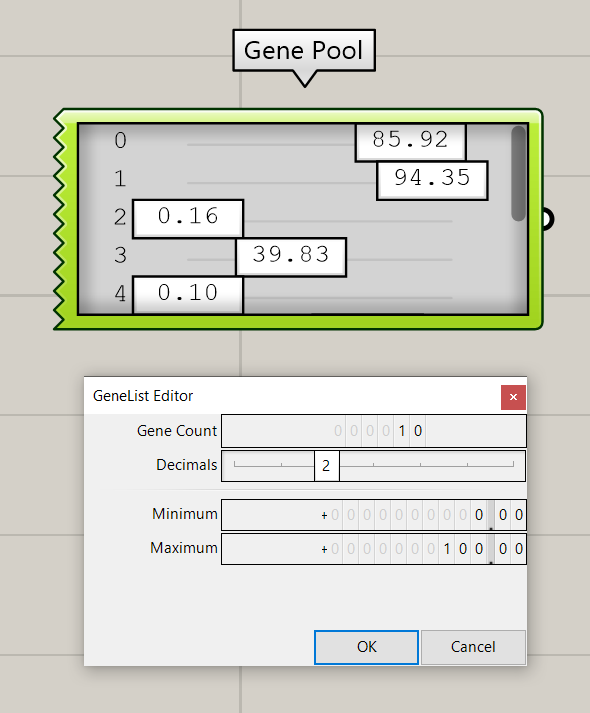
Gene Pools can be understood as an elegant set of sliders with the same shared characteristics. Gene Pools work as one component outputting a list of values.
Slider with step size
Let’s start with some precautions. The optimization will iterate over all the options of each slider or gene pool; therefore, you should choose the steps of sliders carefully. For example, if there is a domain between 0 and 1, with slider decimal spaces set to 3, it means there are 1000 possible values, but if decimal number is set to 1, there is already only 10 options possible. Those issues can make your definition be more or less detailed, but also take more or less time to run.
For example, the model is in millimetres, but you want to have the slider step set to 500mm. We need some clever workaround. One option is to make a slider with integers, going let’s say, from 0 to 10. That will give you 11 possible steps. Let’s multiply that value by 500, and we end up with the intended input – a “slider” going from 0 to 5,000, with a step size of 500.
- Create a slider with the steps (0 to 10)
- Create a panel with the multiplication factor (500)
- Create a multiplication component
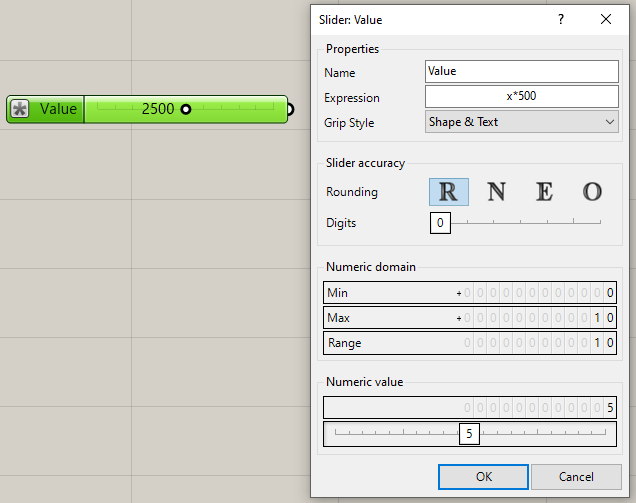
Or you can edit the slider directly in the slider settings, so the domain is from 0 to 5,000, and the step is 500, like this:
- Create a slider
- Double click to open the slider settings
- Change the numeric domain to your variable steps (from 0 to 10)
- Add in the expression “x* multiplication factor” to convert the step to your value. (x * 500)

Note: If you manually change the slider, you will see the original value and the converted value. In this example the original value 3 equals 1500.
Value list through slider
If you want to have a variable which is not a number but a different value, like a text representing some option which is taken by some component, you also need to use a slider for Wallacei to work. Therefore, you need to think of some tricks to use a slider that will go through some or all possible value list options.
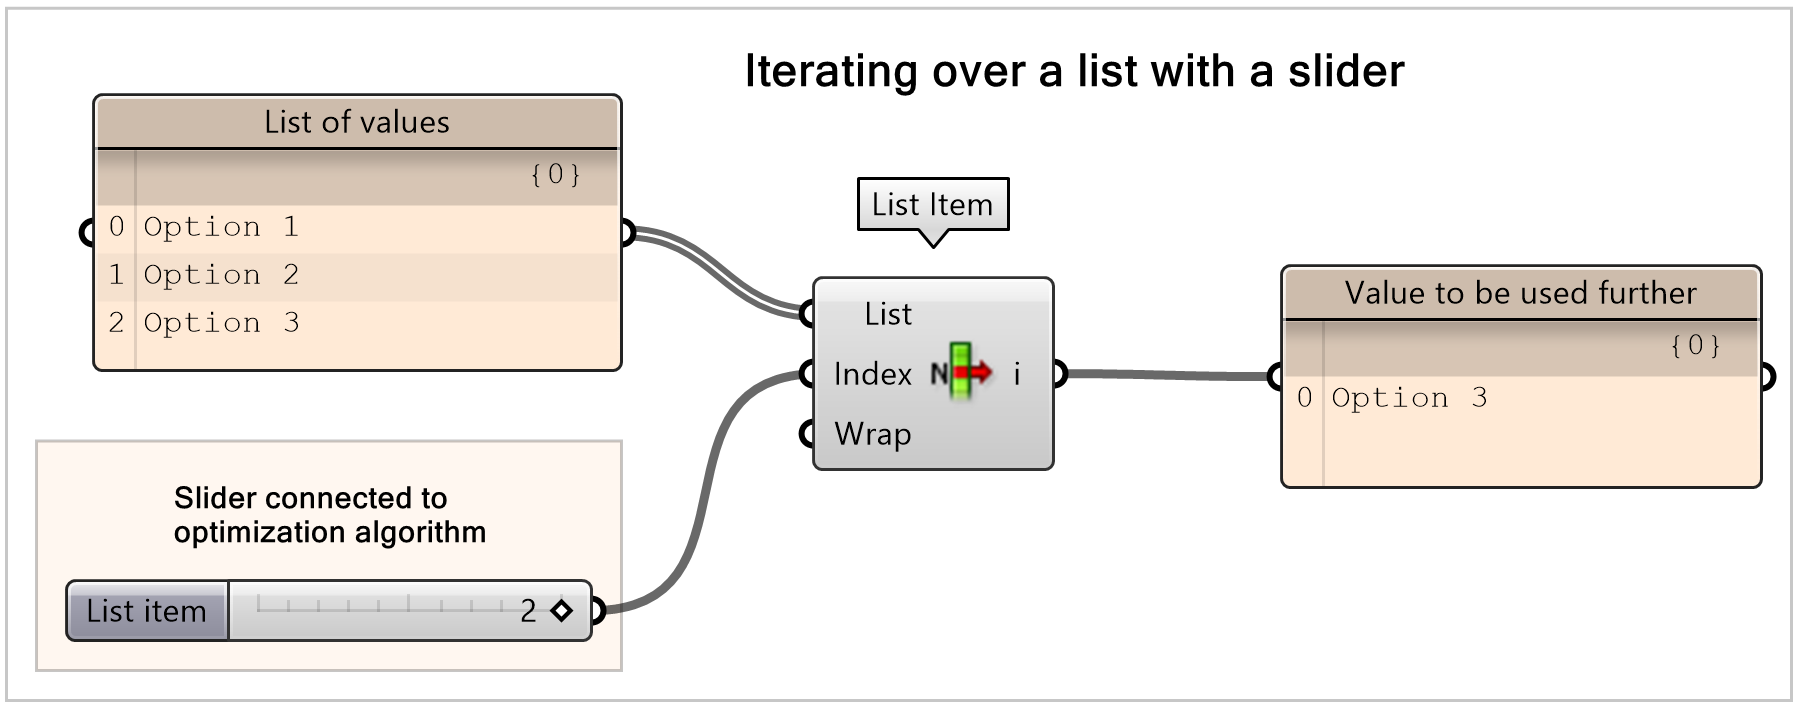
For example, if you use an input of three different values you can correspond them with a slider and the “list item” component to change the number to the corresponding input value. The Number Slider is what you connect later to an optimization algorithm.
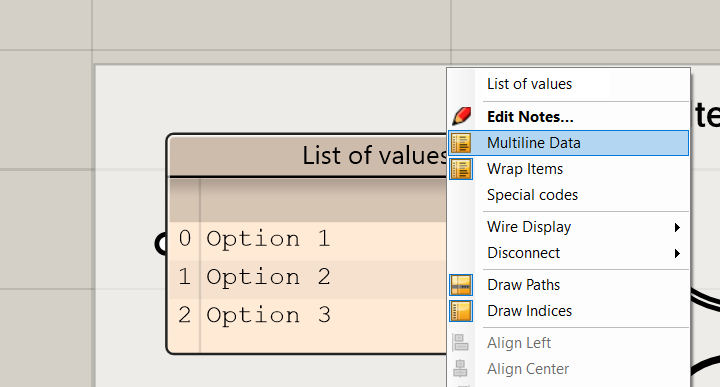
- Create a panel with you list options
- Change the panel settings to ‘multiline data’ with a right mouse click on the panel

- Create a number slider with a domain equal to the number of list items
- Create a list item component
- Connect the panel with list options to ‘List’ input of the List Item
- Connect the number slider with to ‘Index’ input of the List Item
Wallacei basics – Setting-up and running an optimization 2/6
Selecting objectiveslink copied
Let’s talk about the objectives of the optimisation. What are those?
Objectives can be whatever value we want to optimise the whole definition (the variables) for. It can be an outcome of some equations, or a number of some elements, or an output of some simulation like daylight factor. Objectives can be minimised or maximised, or other various additional operations and mixes can be performed. Shall we go through them?
Note: in the following images the Objective value that will be given based on the design is highlighted in blue. This means that this value is a value you receive from your Grasshopper script and not a value you have to input yourself.
Minimizing
Wallacei uses an algorithm which always minimizes each objective by default. Thus, for any objective you want to minimize you can directly input them, without doing any other special operations.
Maximizing
The Wallacei algorithm is set to minimize any objective which is connected to it. In order to achieve a maximization objective, you should first convert it into a minimization one by using its inverse number. It’s simple:

- Create a “one over X” component to use a maximization objective in Wallacei.
If you have an objective you want to maximize, and possible solutions give as a result 0 for this objective, you have to add an if statement to handle zero values. Running a zero value through a ‘one over X’ component results in infinity, therefore we have to replace the zero with a small value close to 0 before running it through the ‘one over X’ component.
The easiest way is to create an expression component with the following equation to change a 0 value to a small value close to 0:

- Create an expression component
- Double click the Expression component to open the edit settings.
- Add the if statement.
- Connect the result of the equation to the ‘one over X’ value
Note: if your original value to maximize is quite large, your value of the ‘One over X’ component becomes very small, many decimal places after 0, you enter the brink of Grasshopper’s detail capacity. To avoid problem associated with that you can first divide the original value by 1000 to make it smaller, and then putting it through the ‘One over X’ component.
Closest to a value
If your objective is to have a value of, you should change the objective value you input to one that is a difference from the output to the wanted value. The objective will be to minimize the distance between the optimal value and the result value of the design. An example could be to optimise the window percentage to the optimal window percentage.
The easiest way is to create an expression component with the following equation to calculate the absolute difference:

- Create an expression component
- Double click the Expression component to open the edit settings.
- Add the absolute value equation.
Constraint
Instead of only applying objectives to maximize or minimize, you could also apply constraints that you want your optimization to fulfil. This could be any kind of condition -both qualitative and quantitative. Think of it as the situation where you do not want the algorithm to even consider results falling below or above some value. Any ideas on how to do it?
One way is to make an objective to be maximised by Wallacei, and when that objective value breaches the constraint, it is then reduced to a value close to 0, so that the algorithm considers it as a bad option.
Important to note: In case it is only a constraint that refers to the range of values that can be assigned as inputs to the design variables, you can directly apply the constraint by altering the numeric range of the Number Slider or Gene Pool.
You can use the “expression” component and write a short “if” statement, like below. When using an expression notice that you need to input a numerical value for the if statement. Additionally, remember that Wallacei only minimises, so after the constraint equation is applied we have to add a ‘1 over X’ component or add this directly in the equation.
Expression for minimization with constraint:
Expression for maximization with constraint:
- Ensure your objective and constraint value are numbers by adding a Number component
- Create an expression component
- Double click the Expression component to open the edit settings.
- Add the constraint value equation.
- If you have an maximization objective: add an ‘1 over X’ component.
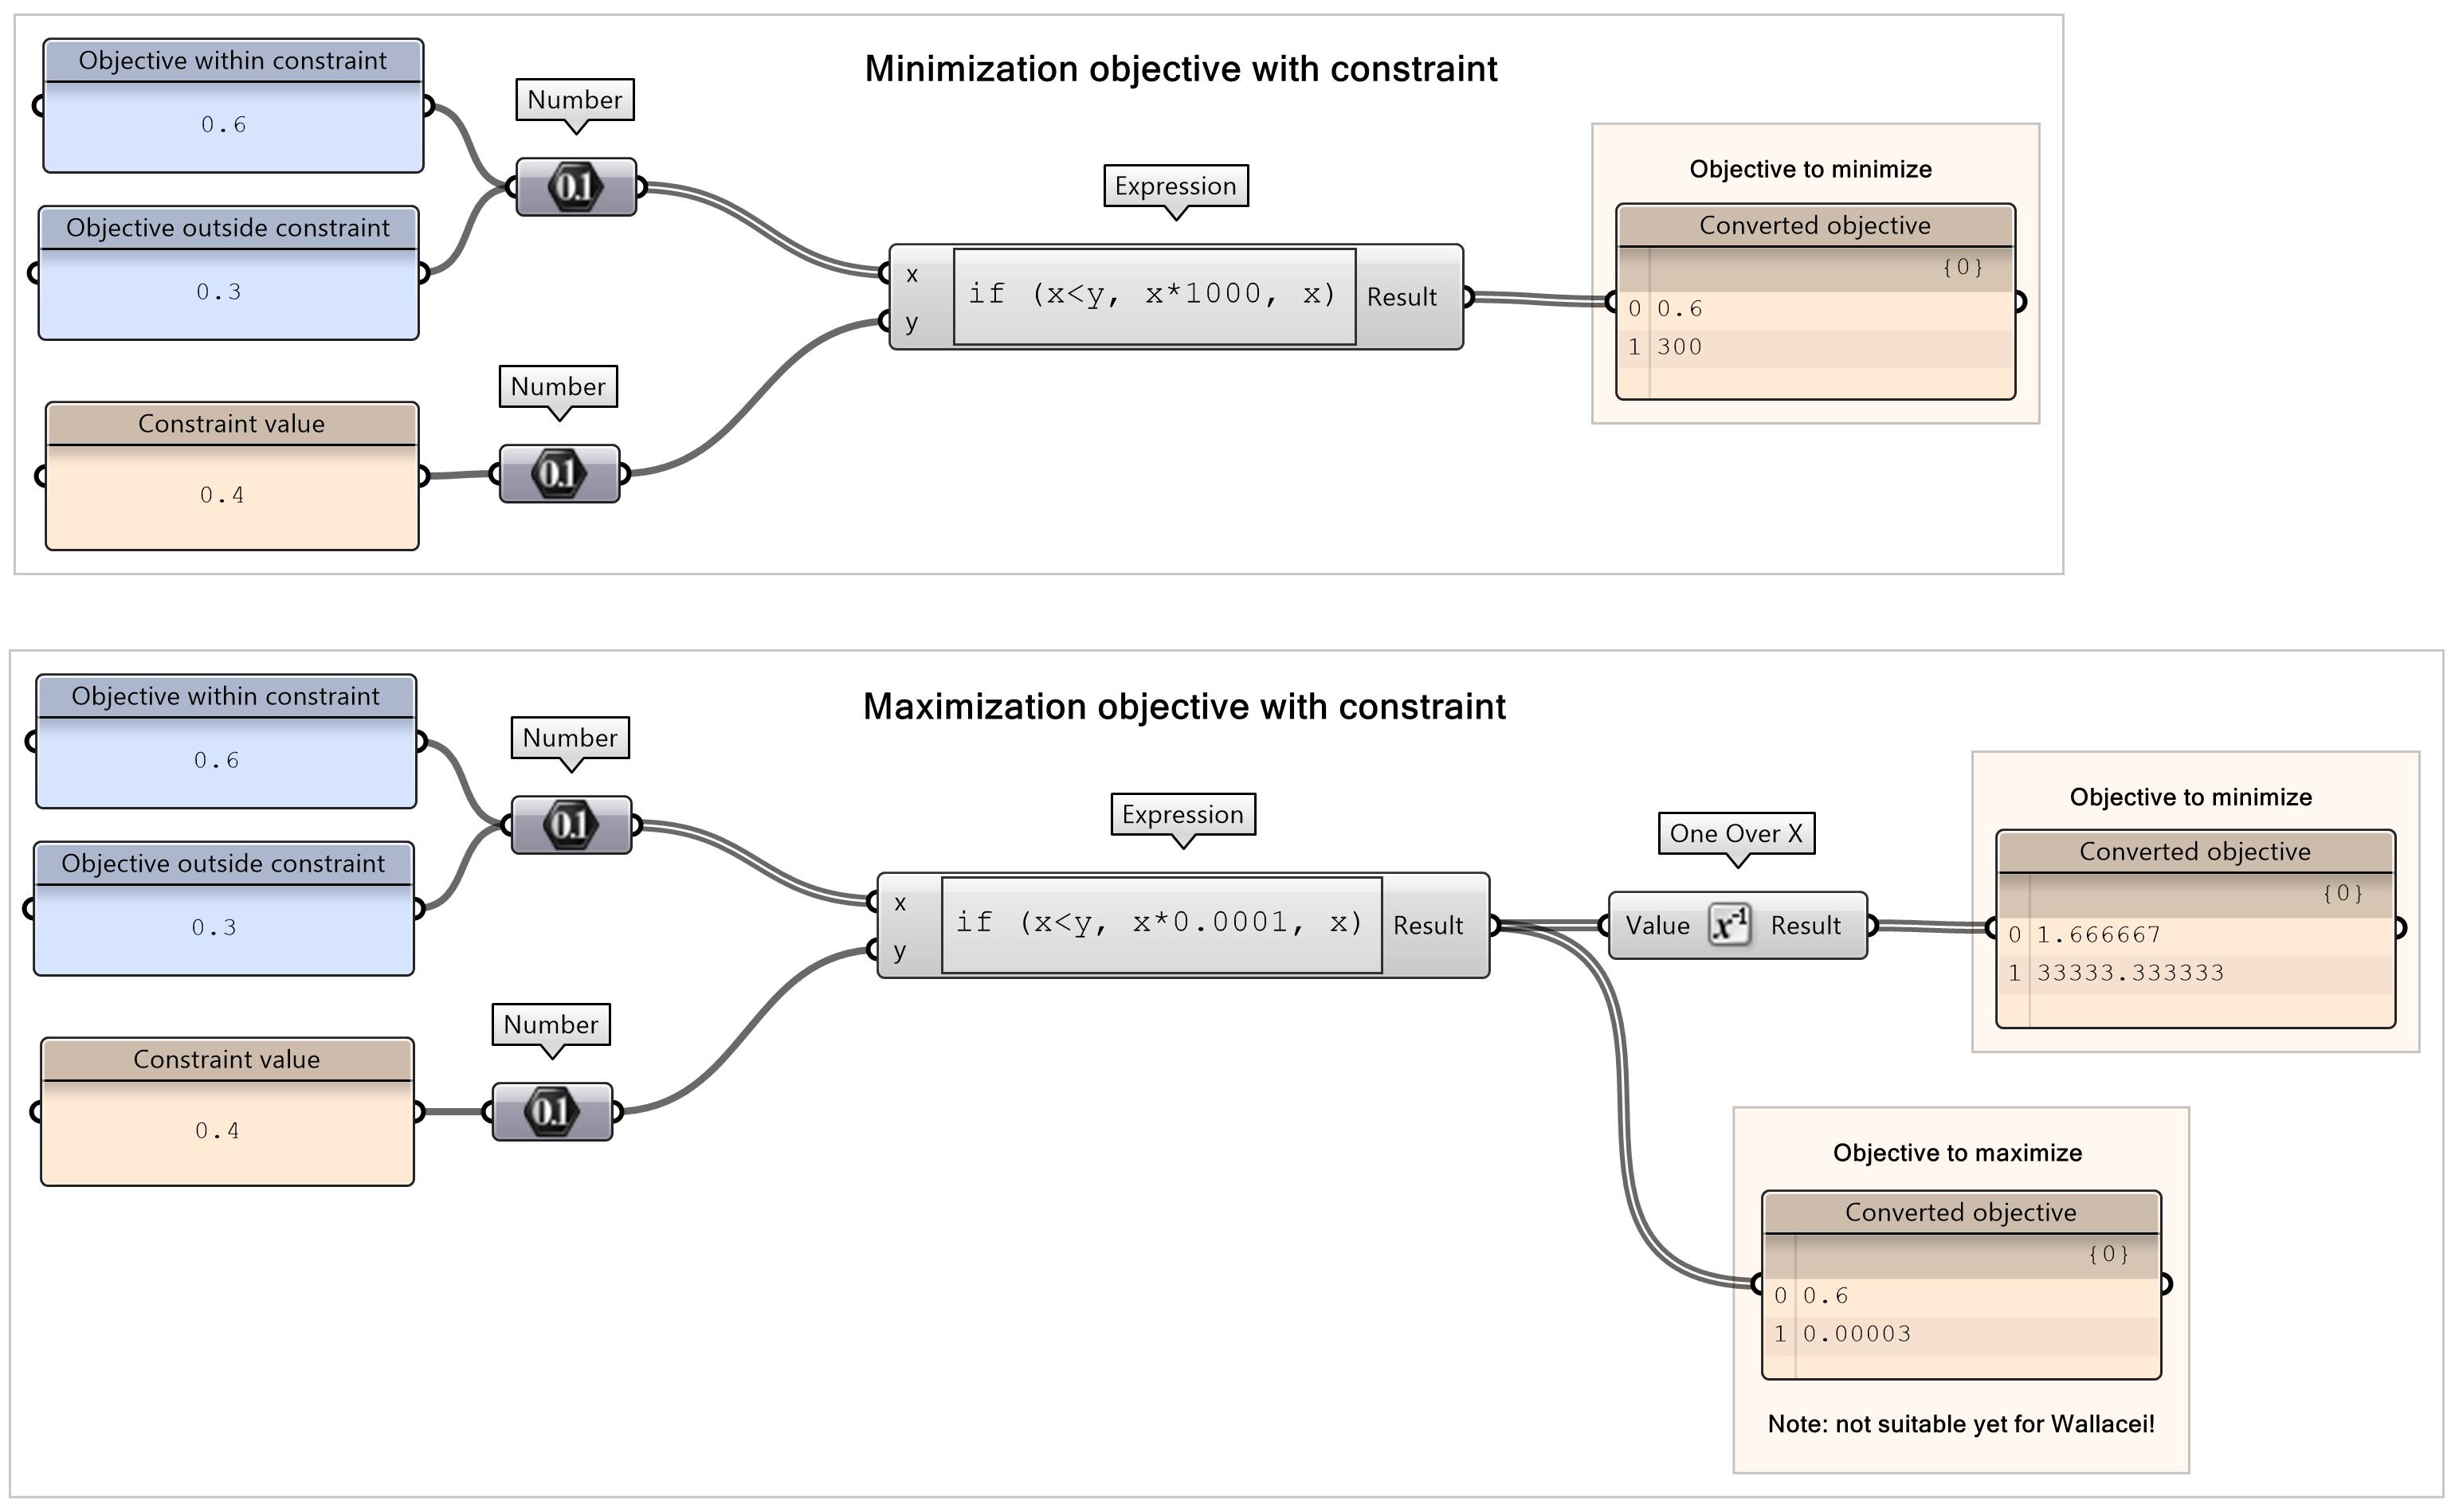
Note: the maximization objective is passed further unchanged when the value is 0.4 or higher. Notice that here, the objective does not fulfil the constraint and is passed further as a super small value. Why 0.0001 and not just 0? Leaving it as 0 usually leads to strange errors.
Domain as objective
Sometimes you might also want the objective to always stay between some values. You need to somehow force the optimization algorithm to push the value towards the preferred domain. So, in other words, you need a value which is the smallest when the objective fits inside the domain, and that value will be minimised by the optimization algorithm.
Again, the “expression” component comes into play, like this:
Where:
- x = objective value
- y = start of domain
- z = end of domain
In the expression, we first calculate the distance between the objective value and the start and end of the domain. If you would have an objective value inside the domain this would result in a value equal to the size of the domain (z-y), therefore we extract this value at the end. A value inside the domain will be converted to zero.
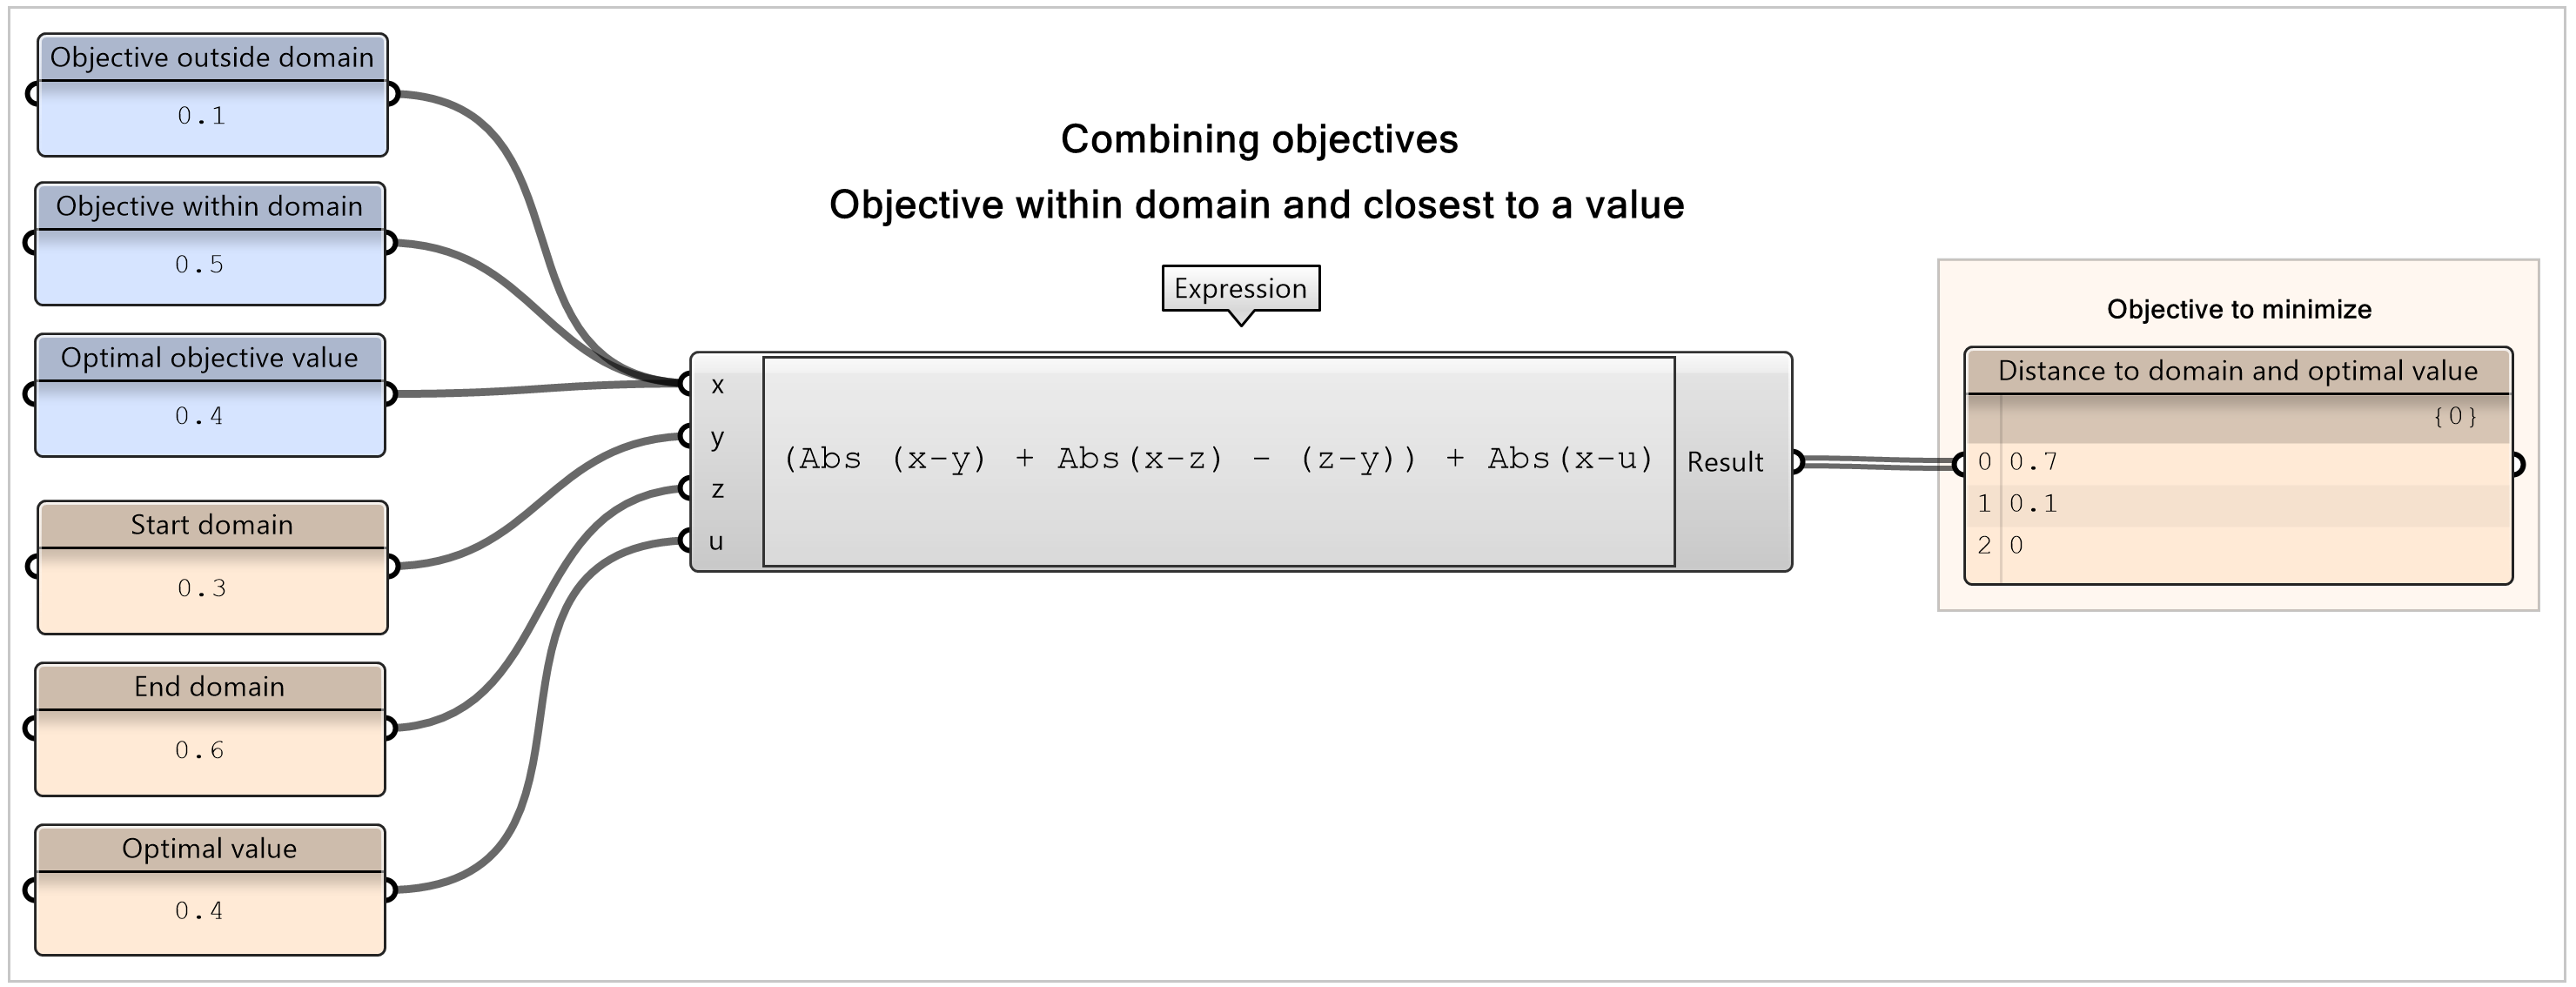
- Create an expression component
- Double click the Expression component to open the edit settings.
- Add the domain equation.
An example of applying a domain, could be the range of daylight values, you need a minimum amount of daylight. But you don’t want the amount of daylight to exceed a certain value as it could cause heating or glare problems.
For more explanation on how to apply a domain to an objective, watch this video that explains this neatly from the Wallacei team.
Combining Objectives
The less different objectives and inputs, the faster and more efficient the simulation and optimization objective will be. It might happen that two or more objectives can actually be merged into one.
For example, you want to minimise a couple of values, but you do not really care which is more or less important. You can then make an average of them, resulting with only one final objective to minimise.
Another example could be combining a range and optimal value together. Mathematically you could combine the equations together. For example, if you would have an objective value that has an optimal value, but also should exclude values outside a range, you can combine this together into one objective.

Wallacei basics – Setting-up and running an optimization 3/6
Connecting to the Wallacei componentlink copied
Now that all the parts are prepared, it’s time to connect everything to the Wallacei component. There are two mandatory inputs – “Genes” (your variables – sliders and gene pools), and “Objectives” (your fitness objectives to minimise). There are also two optional inputs – “Data” and “Phenotype”.
Genes = variables
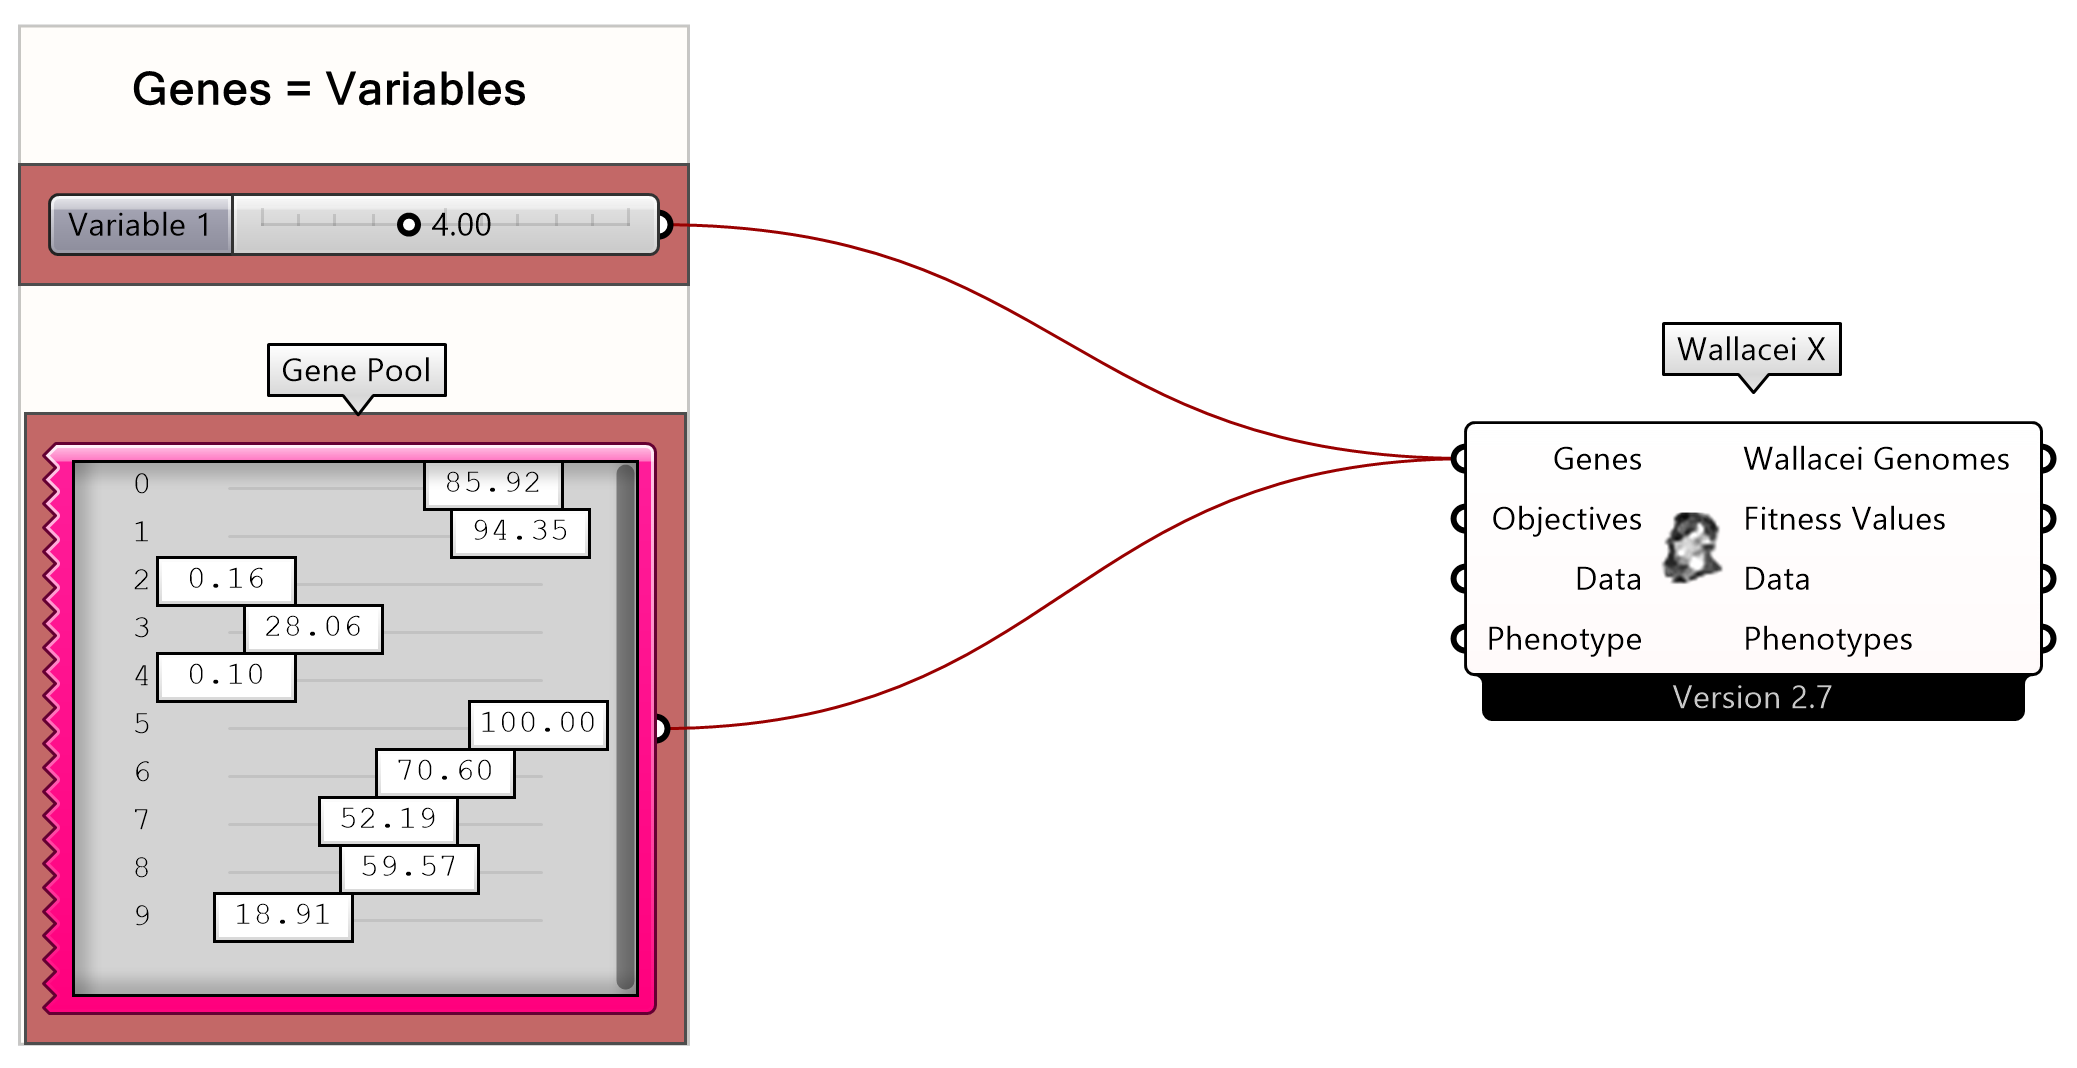
To the “Genes” input you should connect all the sliders and/or gene pools that are your variables to change during the optimisation process. To connect more than one component to an input, hold Shift when dragging.
Notice that after connecting, the sliders and their nodes are highlighted red. That’s all, simple as that.
Objectives = fitness objectives
Now to the Objectives, those are the values you want to minimize during the optimization process. Here you should connect every component holding a value to be minimised. Group all the objectives together to keep an overview and flatten the values to remain the same order of objectives while running the algorithm. Converting the objectives to a minimization should be prepared in earlier steps.
Notice that after connecting, the objectives and their nodes are highlighted purple.
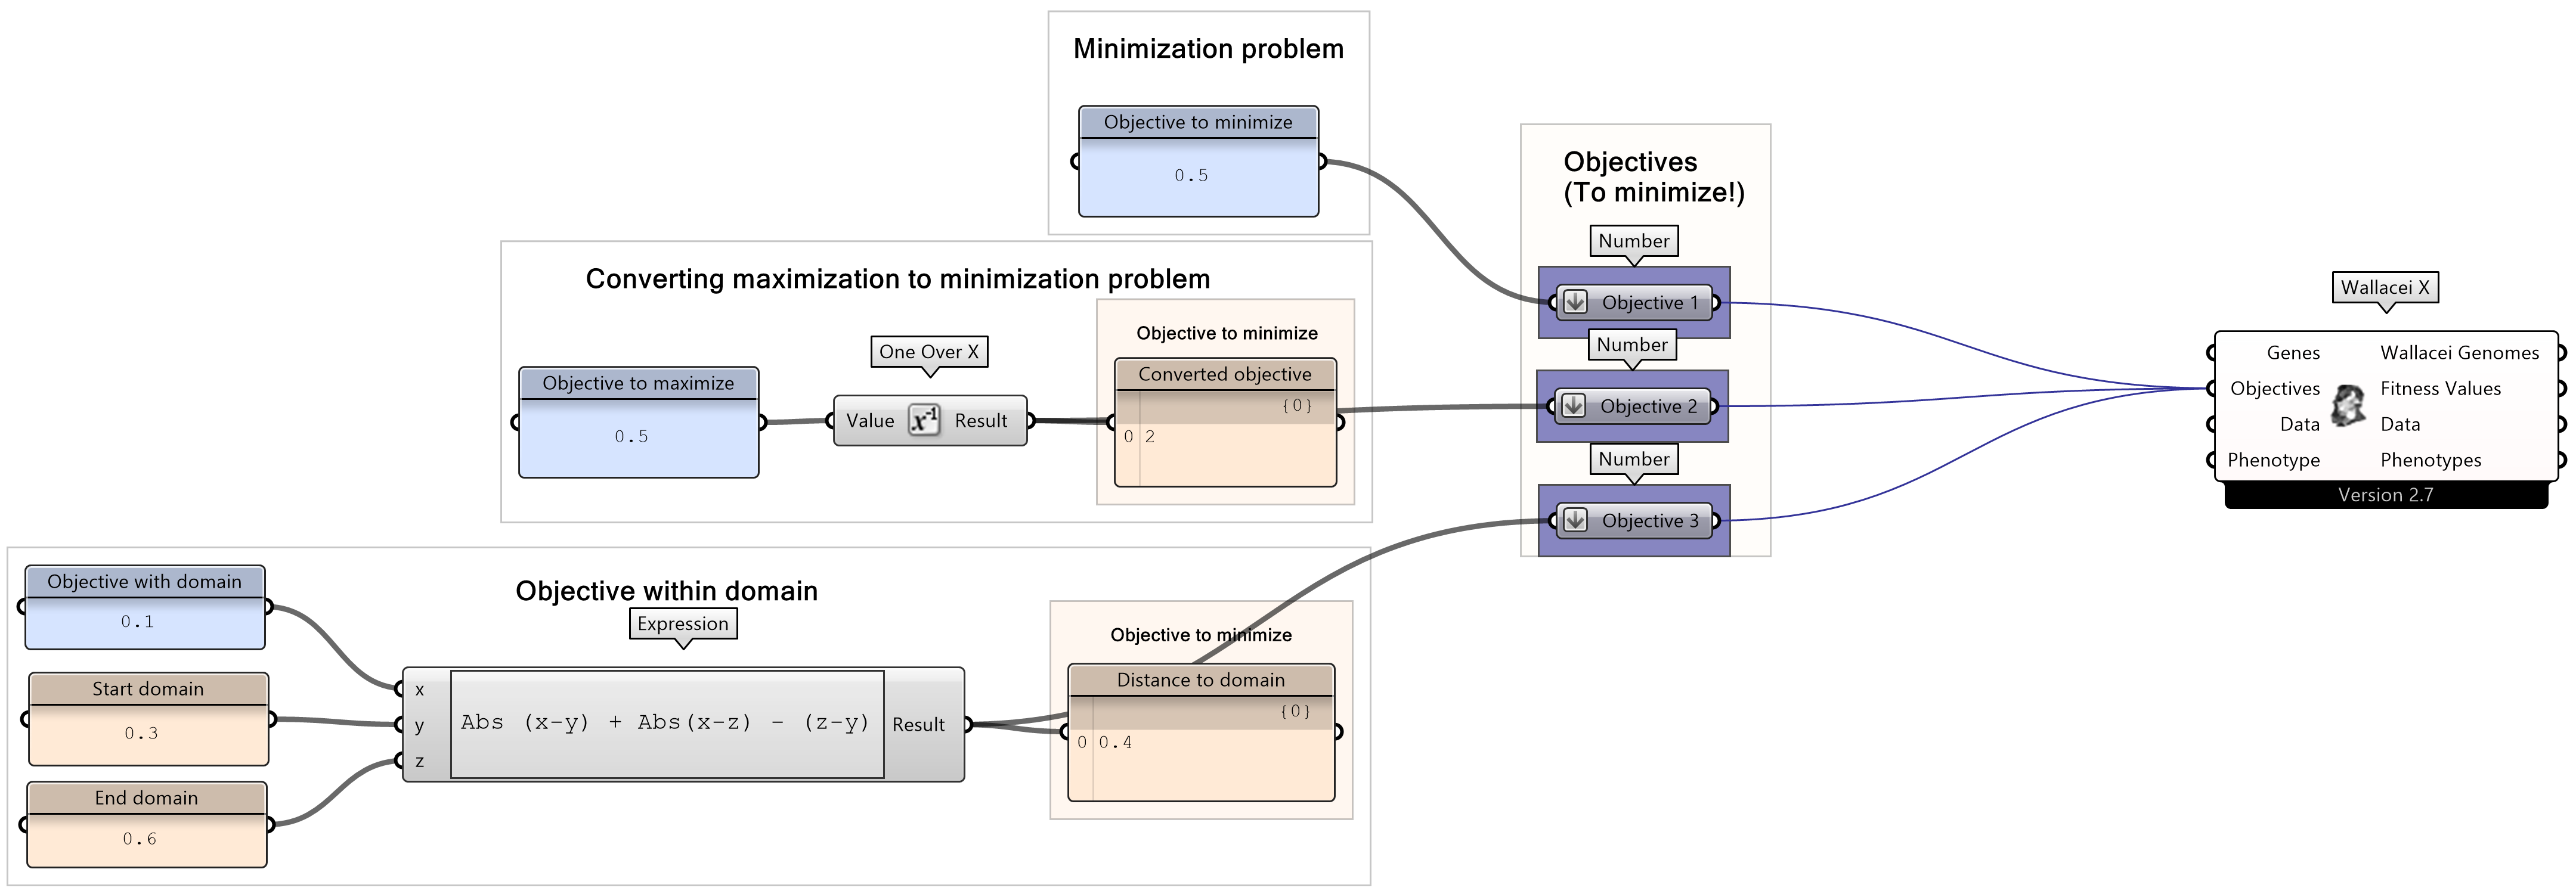
Note: flatten each of the objective values before connecting them with Wallacei, in this way the order of the objectives will stay the same after running the optimization.
Data (Optional)

As explained before, the “Data” input can be whatever short numerical or text data you want to include with each solution. It can be for example a number of unique panels, which can be derived from the design option.
Phenotype (Optional)
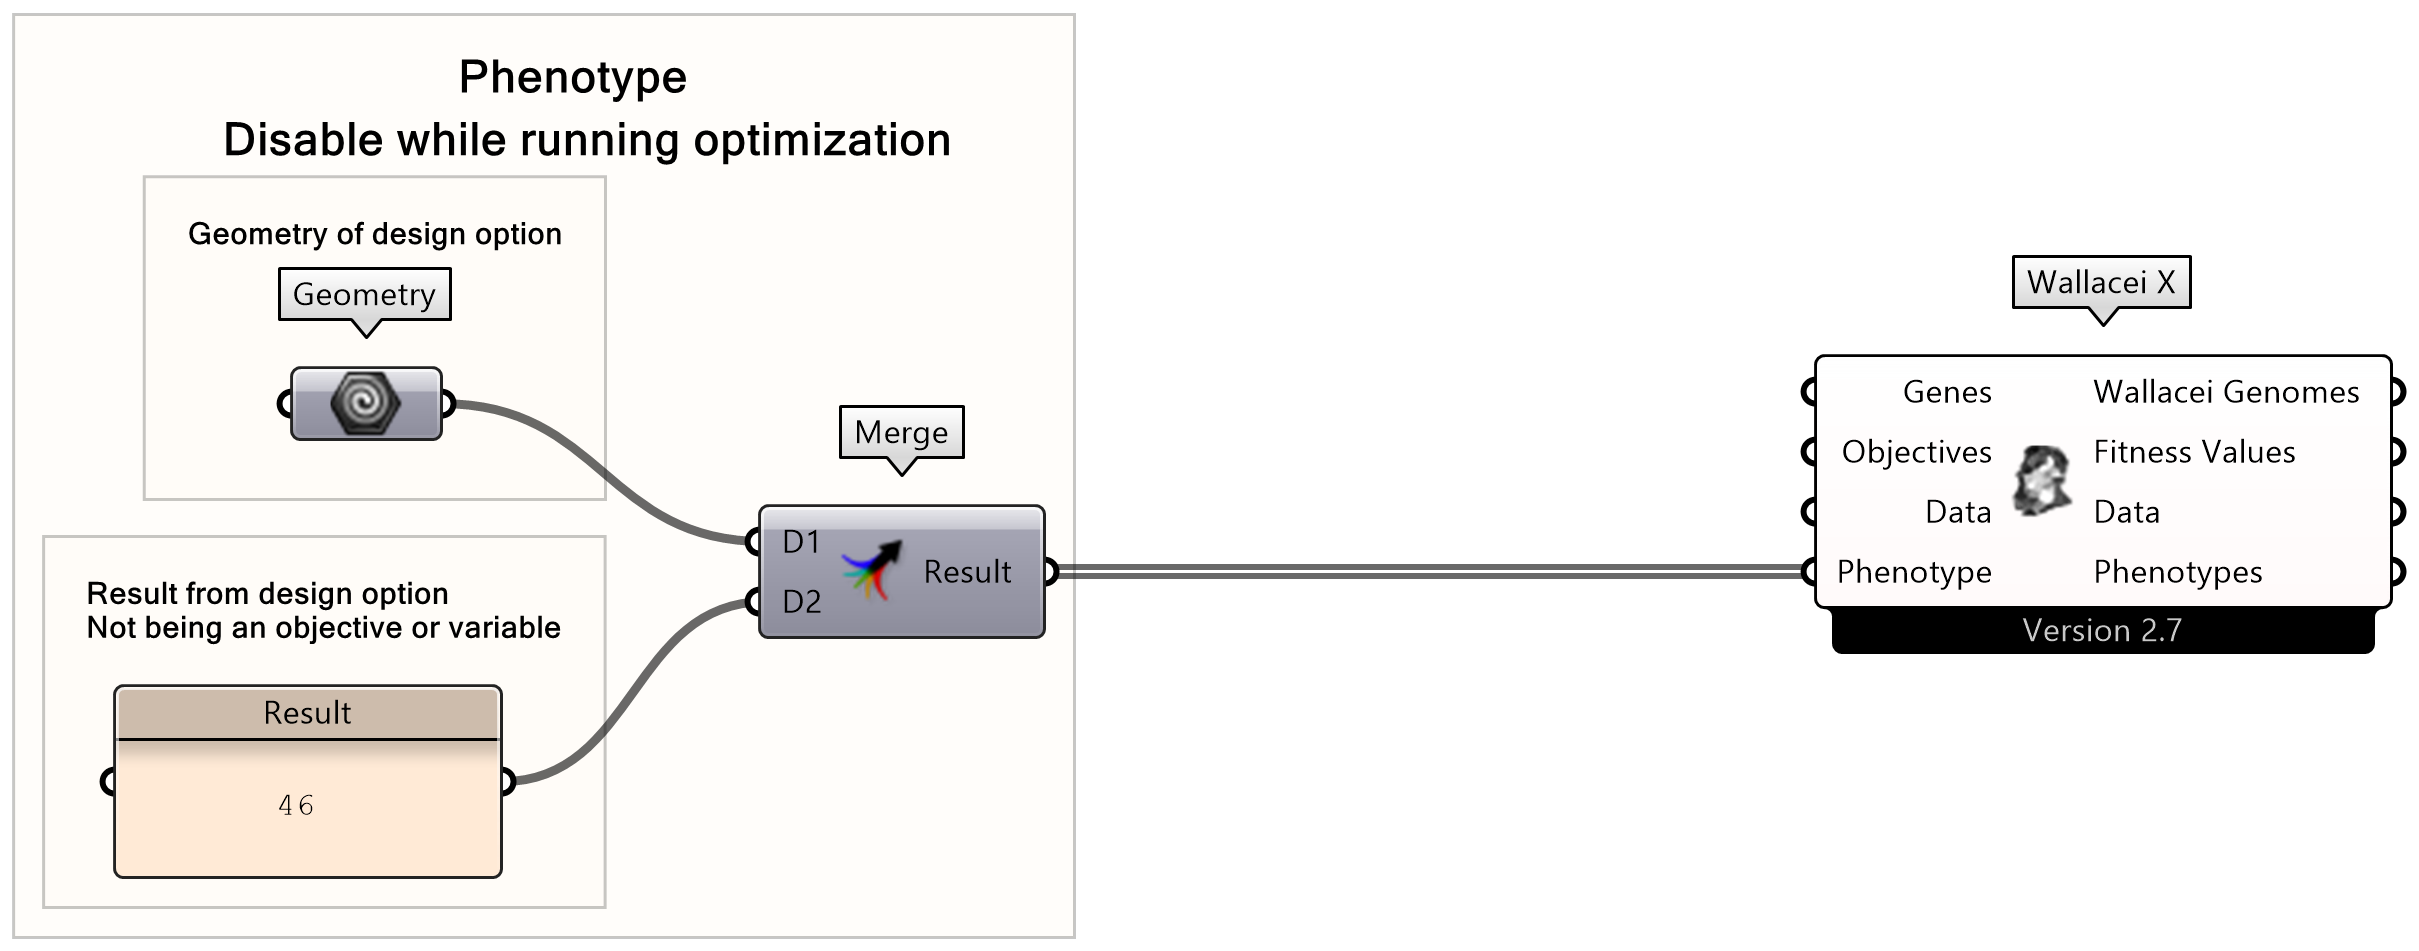
Phenotype is the geometry you might want later, after the optimization, to easily visualise different chosen solutions. In this case we prepared a section which groups unique panels into different tree branches, so the input is a list of lists of surfaces. This goes into “Phenotype”.
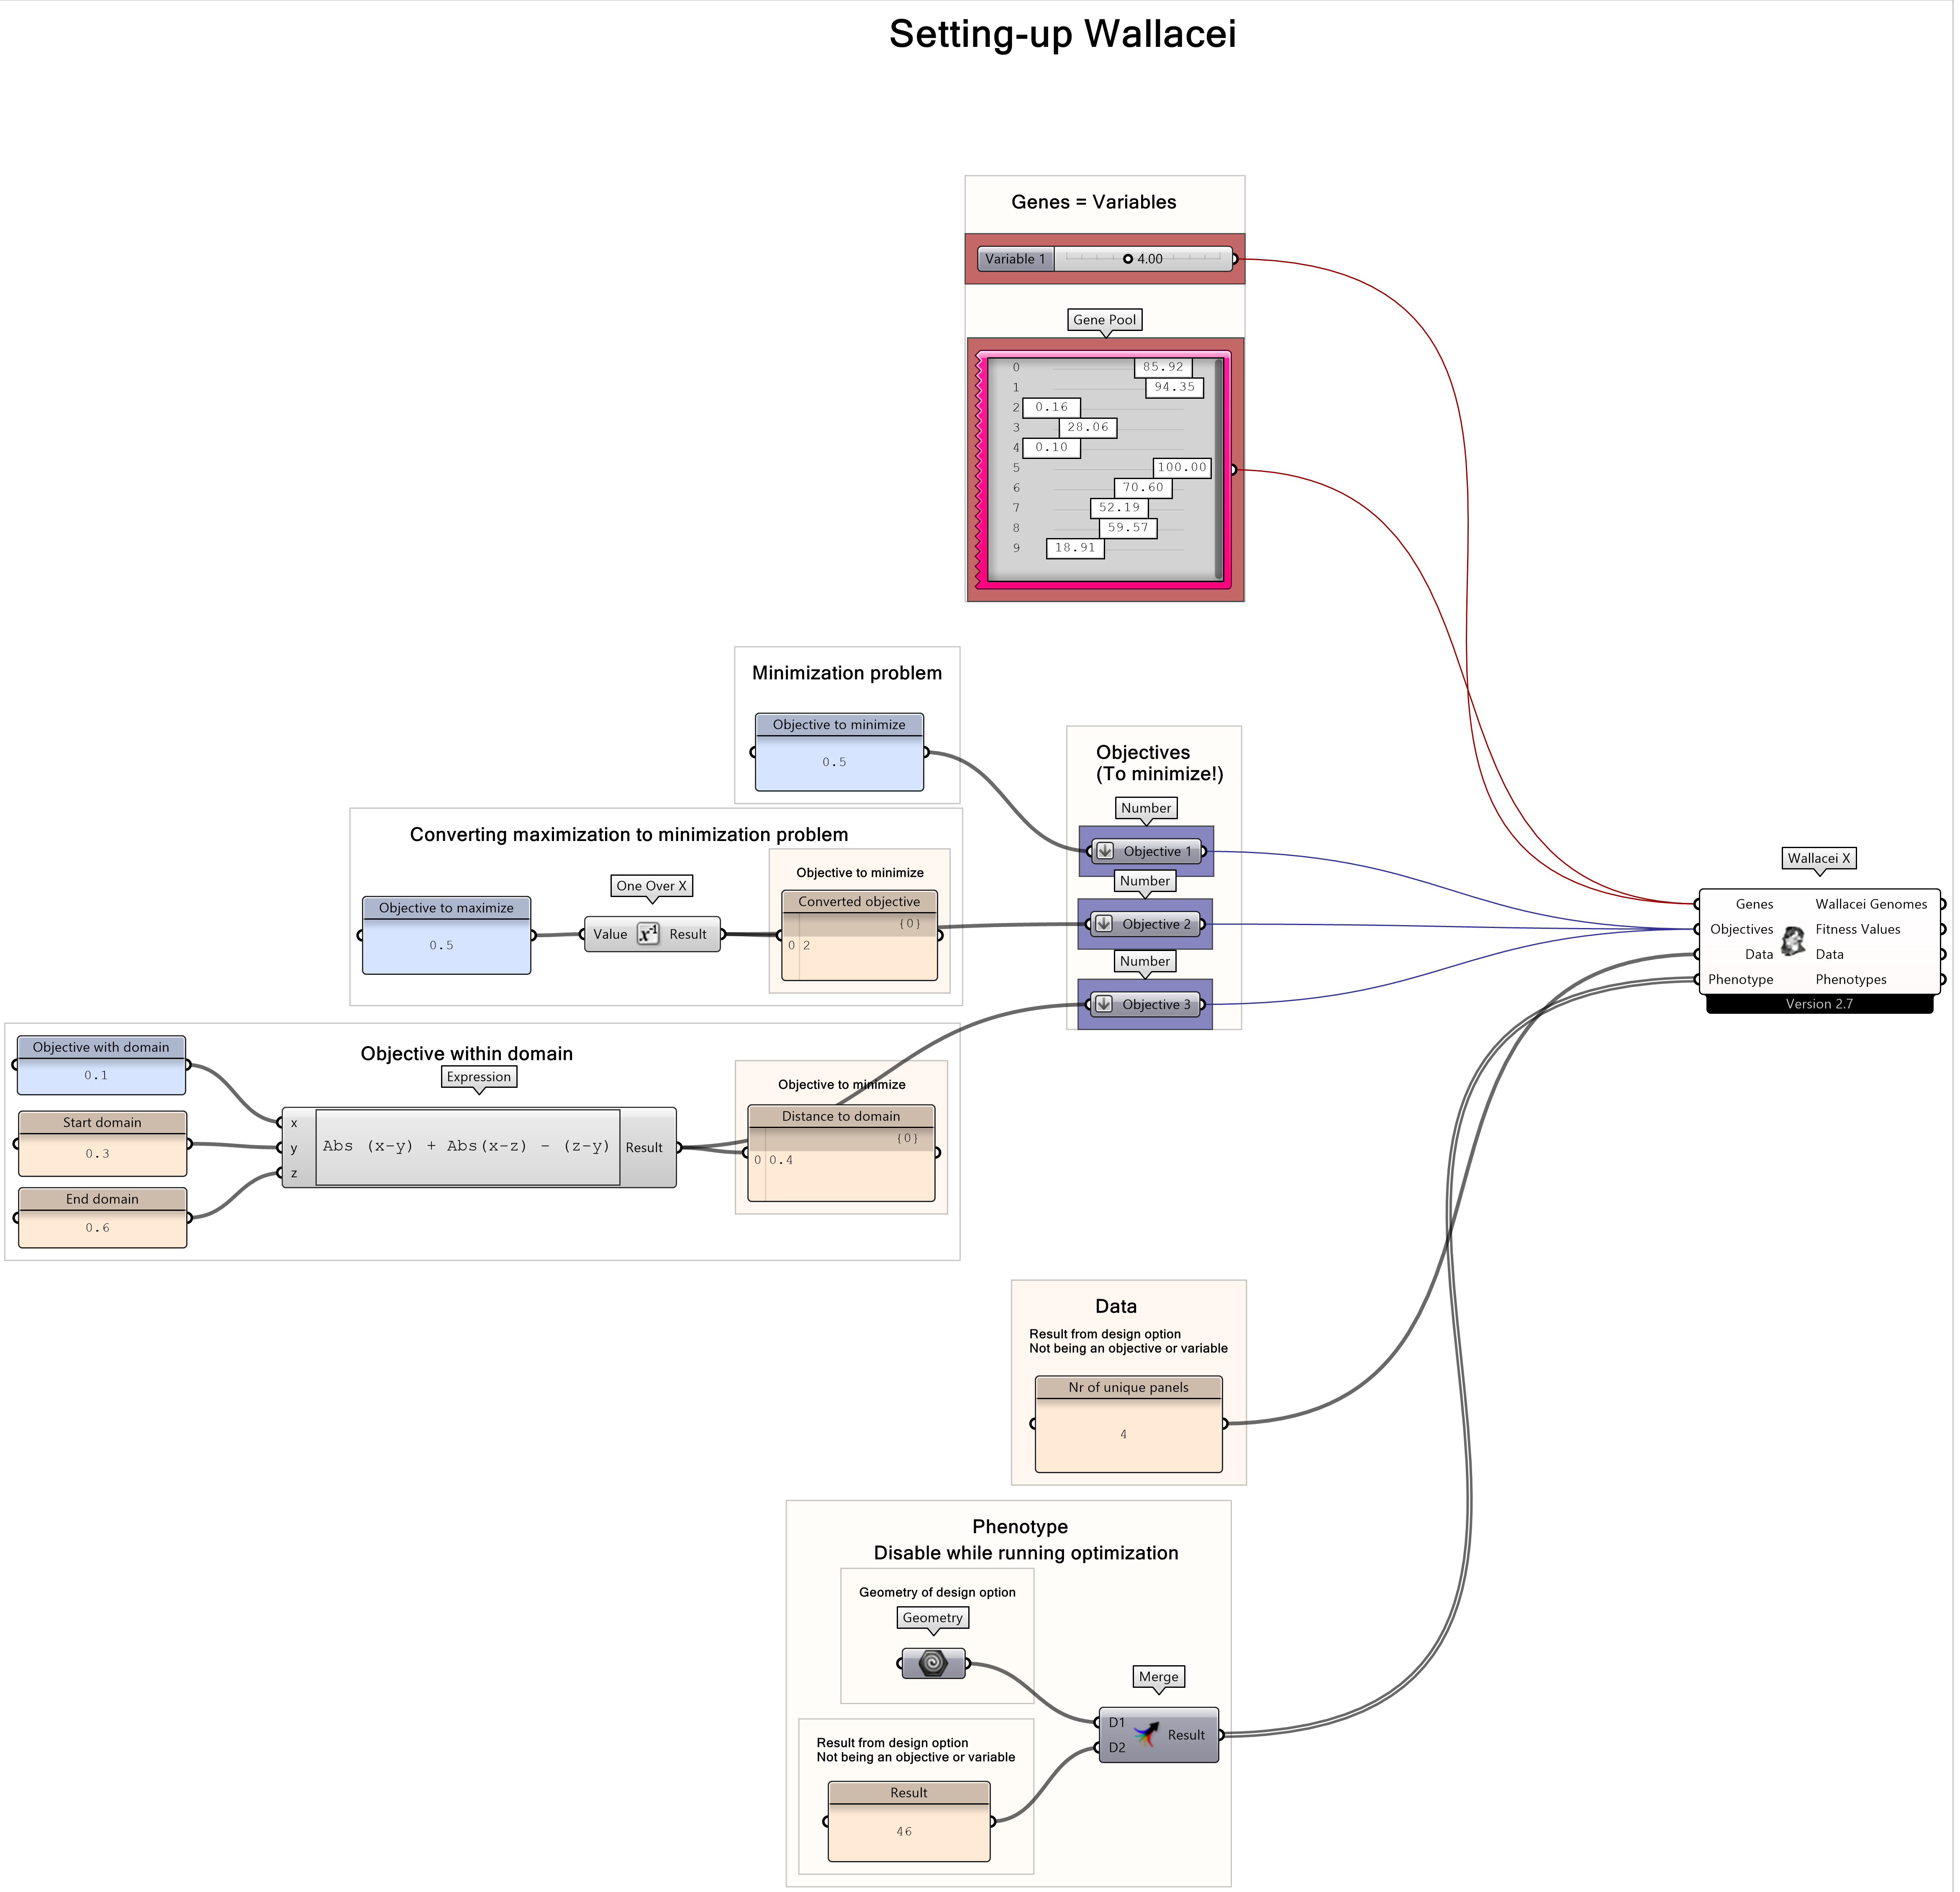
Now, everything should be connected and you are ready to go into the WallaceiX component interface.
Before you do so, save your Grasshopper script in case something goes wrong!
Now, double click the component icon
Wallacei basics – Setting-up and running an optimization 4/6
Running Wallaceilink copied
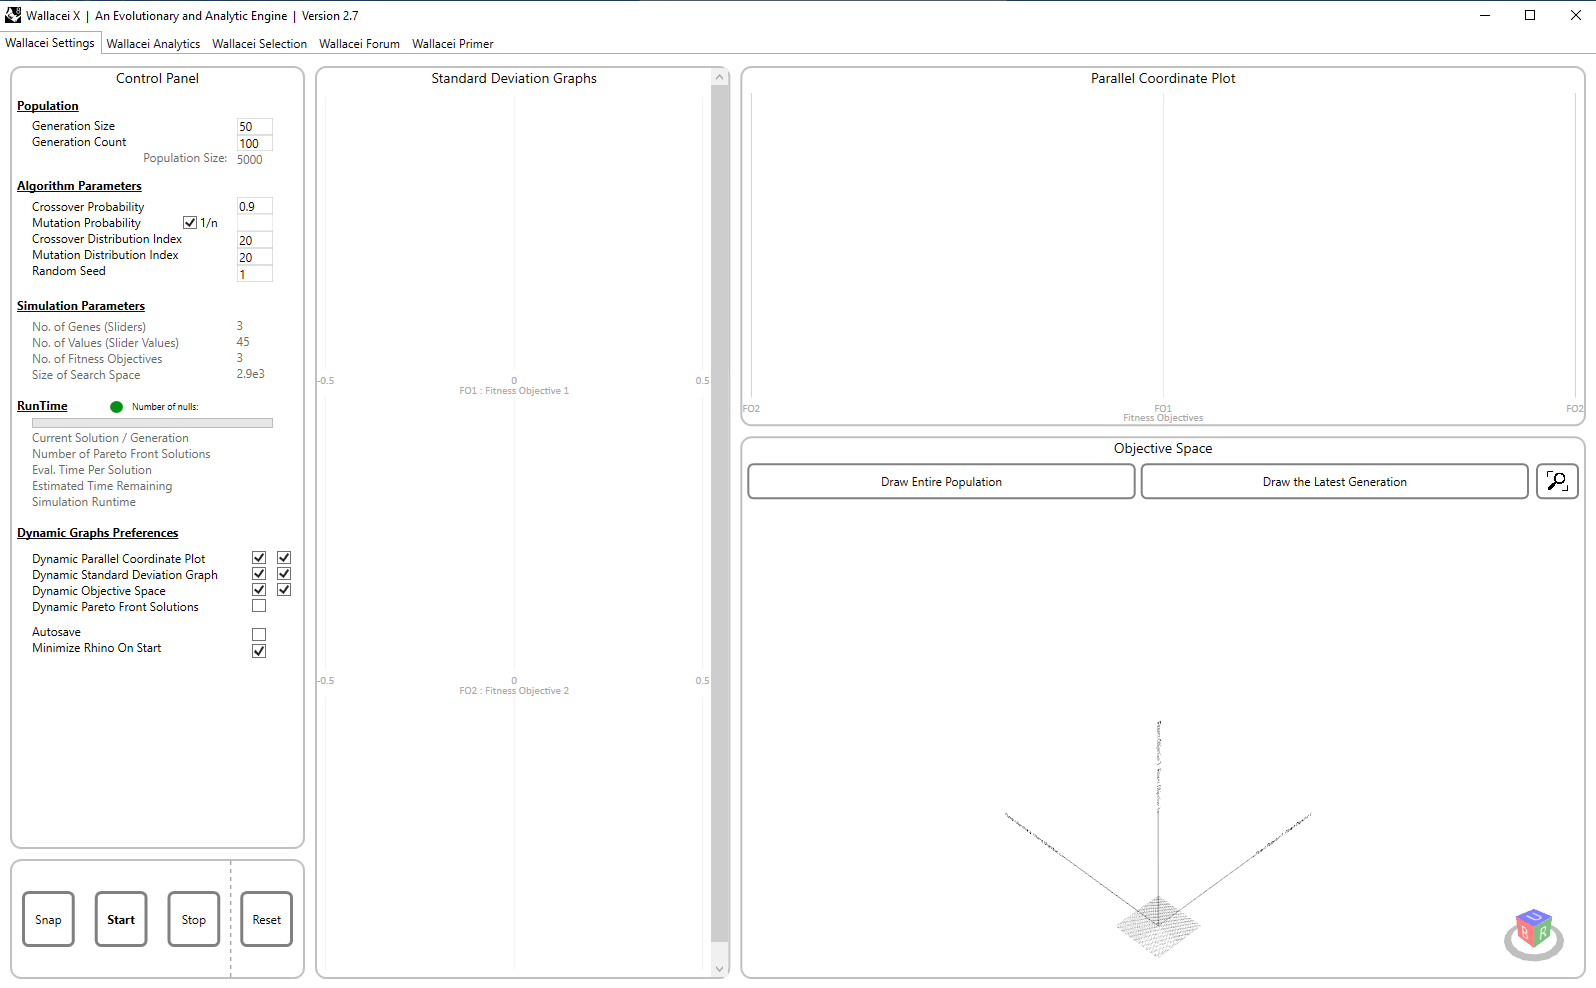
After double clicking the Wallacei component the Wallacei interface opens up. In this interface you can input the correct settings, run the optimization, analyze and select the solutions.
Crucial Settings
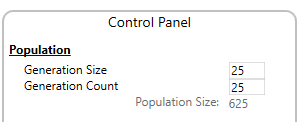
Now that you have the WallaceiX interface in front of you, there is a couple of things to stress before you do any further steps. Wallacei uses a Genetic Evolutionary Algorithm, which works in simple terms, by generating specific number of solutions per generation, in a specific number of them. Which means, that depending on the settings, it is going to run through a huge amount of computations.
Running Wallacei
Double check your grasshopper definition. Are there any components that do not serve any function, which can be deleted? Is everything connected to the WallaceiX component? Maybe some components that serve only to visualise things can be disabled? All of those aspects can influence the computation time, accuracy, and convergence to optimal solution.
Double check your input variables. If the possible number of steps for any slider is too large, multiplied by the number of sliders, the solution space is too large, the simulation will run longer. If the optimization is running too long, maybe try to reduce the generation size, or number of generations, or number of possible options in your sliders. A lot can be done.
Lastly, save your Grasshopper file one more time before hitting start! (In case your file crashes)
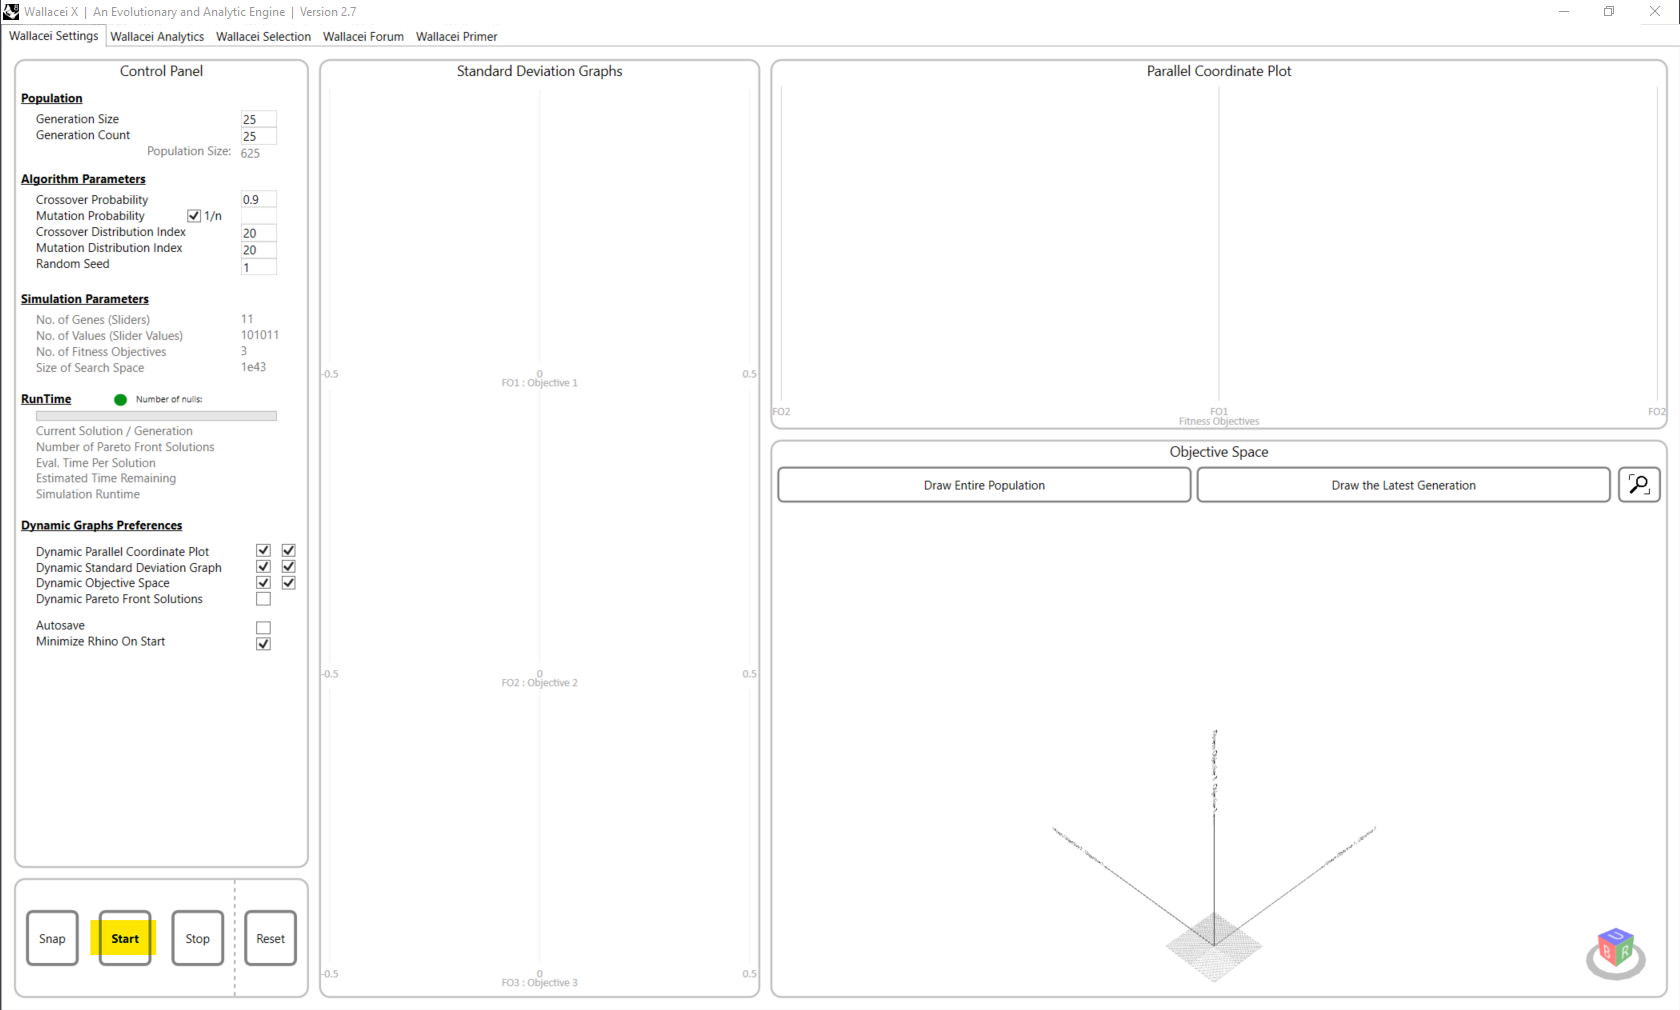
Assuming you went through all the safeguards, it’s time to click that magic button “Start”!
(in the bottom left corner).
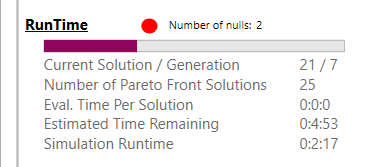
The optimization is running now. Keep checking if your possible design do not cause any invalid outcomes. Those invalid solutions will show as ‘Number of nulls’ in the Wallacei settings panel while running the optimization algorithm.
If this occurs, stop the optimization and go back to your parametric model. Find the combination of variables that generate these invalid design solutions and adjust the variables accordingly.
Saving results
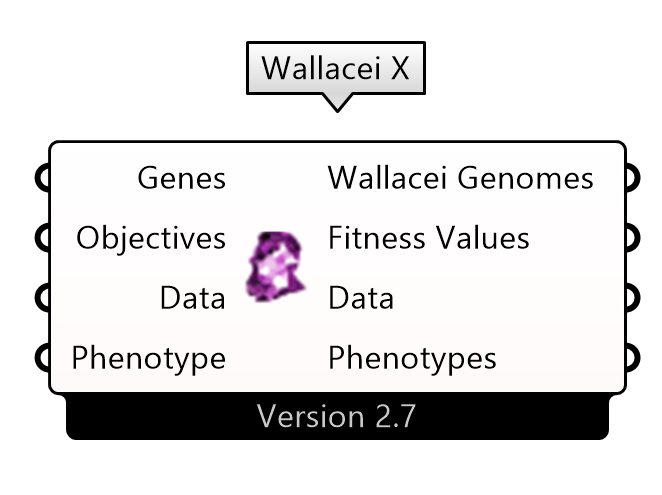
Once the optimization is done running, the icon changed from grey to purple, and everything is saved inside the WallaceiX component itself, the data is “internalised” inside. You just need to make sure to save the grasshopper file to ensure that the optimization results are there when you open the Grasshopper file later.
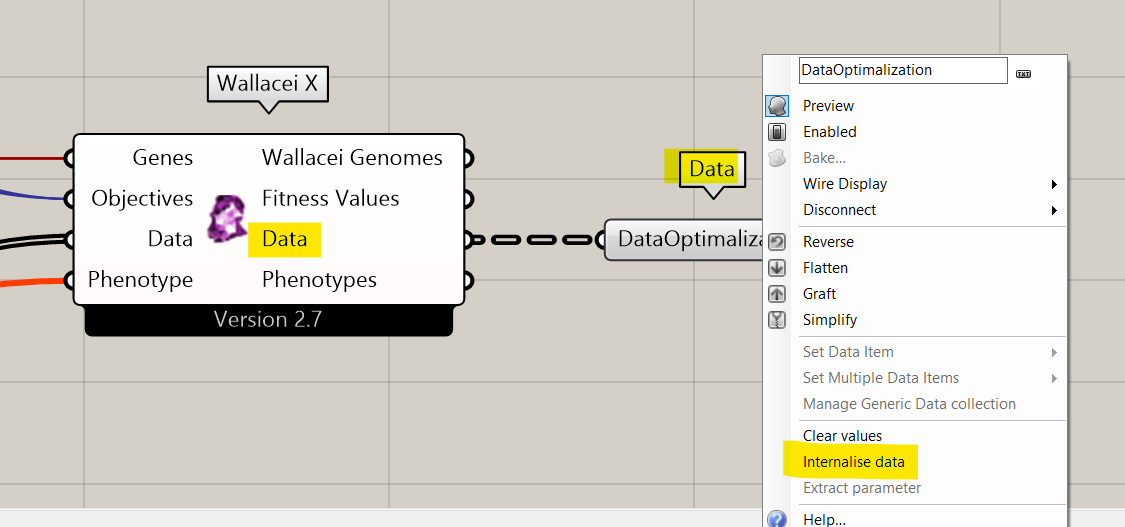
Additionally, to secure the ‘Data’ output of Wallacei you should connect a data component to it and internalise the data. To ensures that if you open the file the next time, that the data is saved as well.
For a more detailed explanation on the colour of the WallaceiX component, watch this video from Wallacei.
Wallacei basics – Setting-up and running an optimization 5/6
Conclusionlink copied
Just to recap, Wallacei is a multi-objective optimization. After following this tutorial, you should understand optimization terms like variables, parameters, and constraints. You should also know how to setup variables using number sliders and gene pools. Using this knowledge, you can set up your own objectives. Remember that Wallacei always minimizes the objectives. So, if you want the least output in terms of cost, then input your objectives directly in the Wallacei component, otherwise make sure you invert it. Finally, you should be able to setup and run the Wallacei component. Give it a try with your own objectives, Happy optimizing!

Complete exercise file
Wallacei basics – Setting-up and running an optimization 6/6
Useful linkslink copied
Follow up tutorials
The next step in the process is to analyse and select the optimization results, you can learn this in the Wallacei basics – Analyse and Select’ tutorial. If you want to learn how to prepare a script for and optimization and run it, you can follow the tutorial ‘MO Façade Panelization Optimization – Setup and run’.
Other useful links
Write your feedback.
Write your feedback on "Wallacei basics – Setting-up and running an optimization"".
If you're providing a specific feedback to a part of the chapter, mention which part (text, image, or video) that you have specific feedback for."Thank your for your feedback.
Your feedback has been submitted successfully and is now awaiting review. We appreciate your input and will ensure it aligns with our guidelines before it’s published.
