Speckle for Revit & Dynamo
-
Intro
-
Speckle for Revit
-
Speckle for Dynamo
Information
| Primary software used | Speckle |
| Course | Speckle for Revit & Dynamo |
| Primary subject | Collaboration |
| Secondary subject | Collaboration |
| Level | Intermediate |
| Last updated | November 27, 2024 |
| Keywords |
Responsible
| Teacher | |
| Faculty |
Speckle for Revit & Dynamo 0/2
Speckle for Revit & Dynamo
This tutorial describes how to use Speckle for Revit and Dynamo.

Welcome to this tutorial on using Speckle with Revit and Dynamo! Speckle is an open-source platform allowing exchange of information and collaboration in the architecture, engineering, and construction (AEC) industry. It provides easy data transmission between software programs, resulting in a more integrated and efficient workflow. In this video, we’ll look at how to use Speckle in combination with Autodesk Revit and Dynamo to improve your design and data management workflows.
Speckle for Revit & Dynamo 1/2
Speckle for Revitlink copied
How to get started

As already discussed, Speckle for Revit has a similar interface as Speckle for Rhino. In Revit, you can open the Speckle User interface by clicking ‘Revit connector’ in the Add-ins tab.
In order to send and receive data, you should follow the same principles as described, in Data Exchange in the tutorial Speckle for Rhino.
Important to note:
- When sending data created in Revit through Speckle, it will always be sent as a mesh. Although this does not create any problems when receiving the data in Rhino, you should remember to transform the meshes into polysurfaces if you need to send them back to Revit. Otherwise, they will not appear in your Revit model since Revit can only receive polysurfaces.
- In case that data is transferred between files that use different metric units, Speckle will convert its size so that the overall dimensions of the elements are always kept the same.
- Similarly to Speckle for Rhino, the data should be manually replaced from the user upon receiving. However, there are some cases when the elements will be automatically updated. See more details in the Speckle Guide – Revit Updating Elements.
Filters
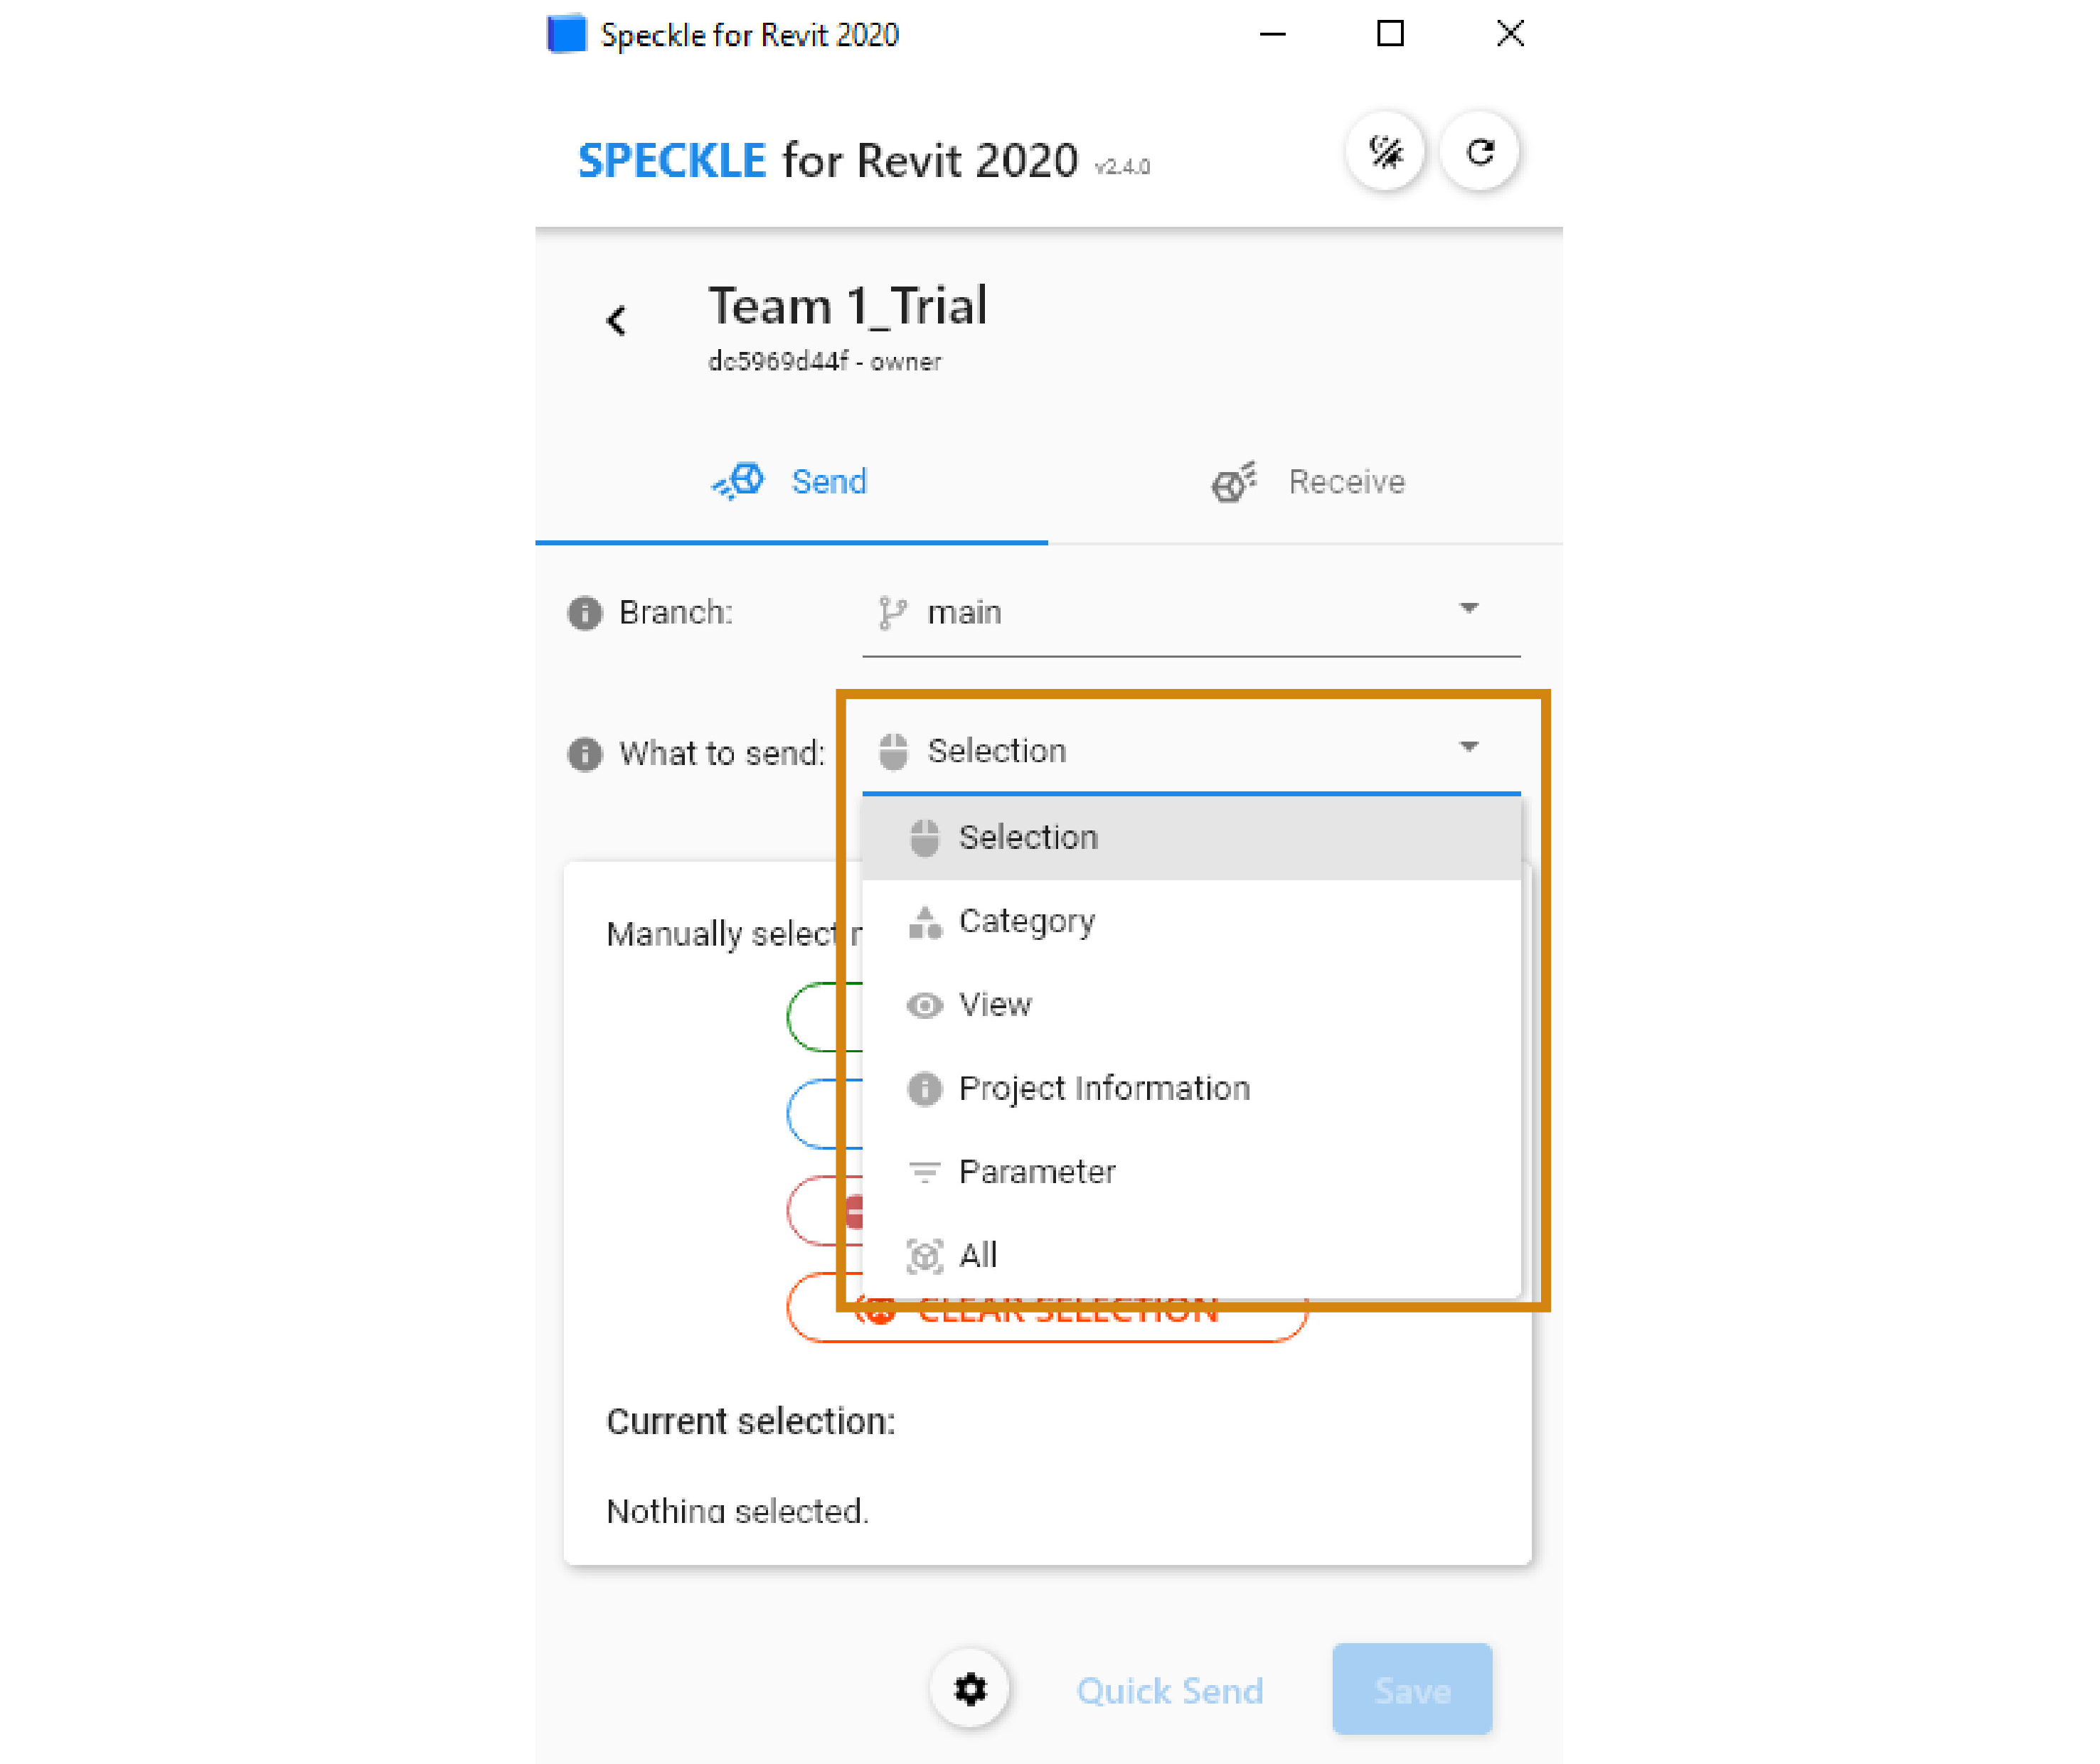
One important feature of the Speckle for Revit connector is the ability to select the data which are going to be sent based on their properties. In this regard, when you are inside the ‘Send’ tab you can browse in the drop-down menu and apply different filters in the selection. Such as the category filter, view filter, project info, and parameters.
- Category filter
You can select all the elements that belong to a specific Revit category, such as ceilings or columns. It needs to be highlighted that, in this regard, all the visible and non-visible elements that fulfil this criterion will be sent. - View filter
You can select all the visible elements included in a view. - Project info
You can select all the types of project information, such as levels or element properties. - Parameters
You can select all the elements that fulfil a specific parameter. It needs to be underlined that different parameter options may appear based on the properties of the elements that are included in the model each time.
Interoperability between Revit and Rhino
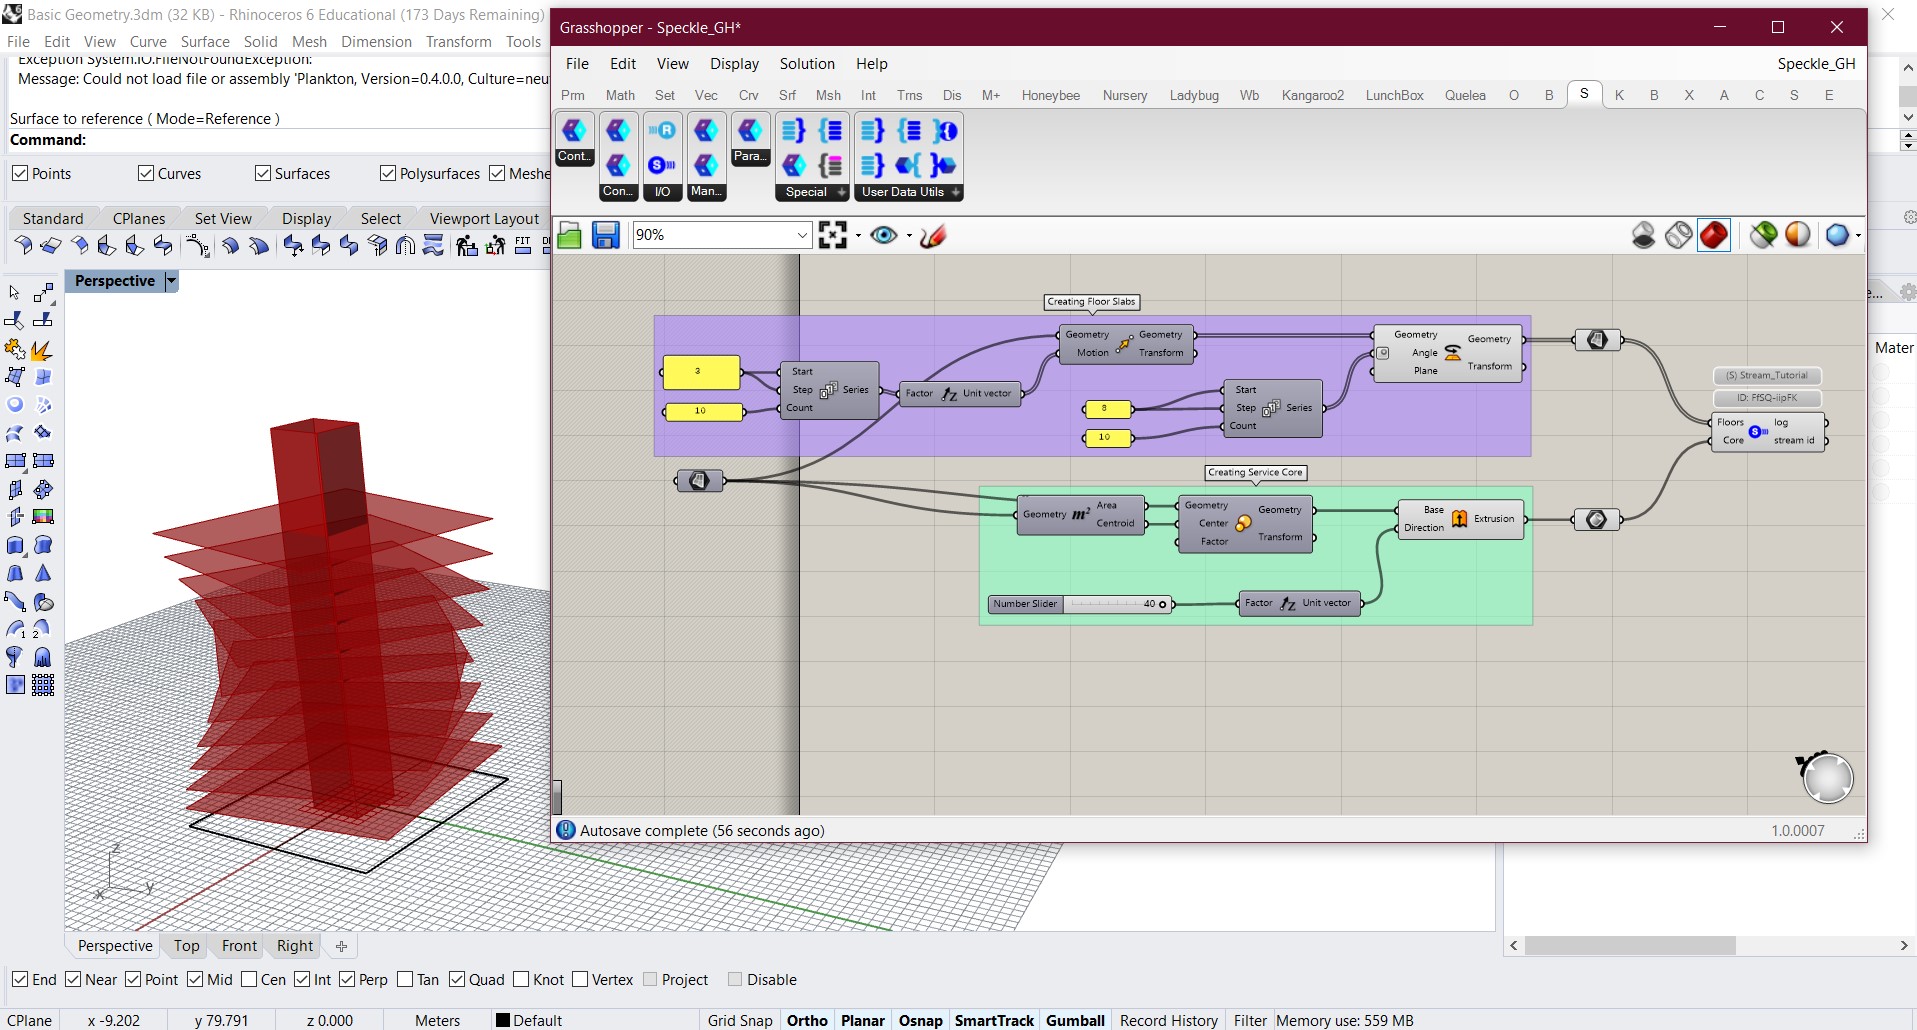
Speckle also allows you to transfer the geometrical data from Rhino interface to Revit interface and vice versa. This can be done through Grasshopper and Dynamo interface. The following link shows detailed documentation of how this can be achieved on the Speckle Dynamo Github page.
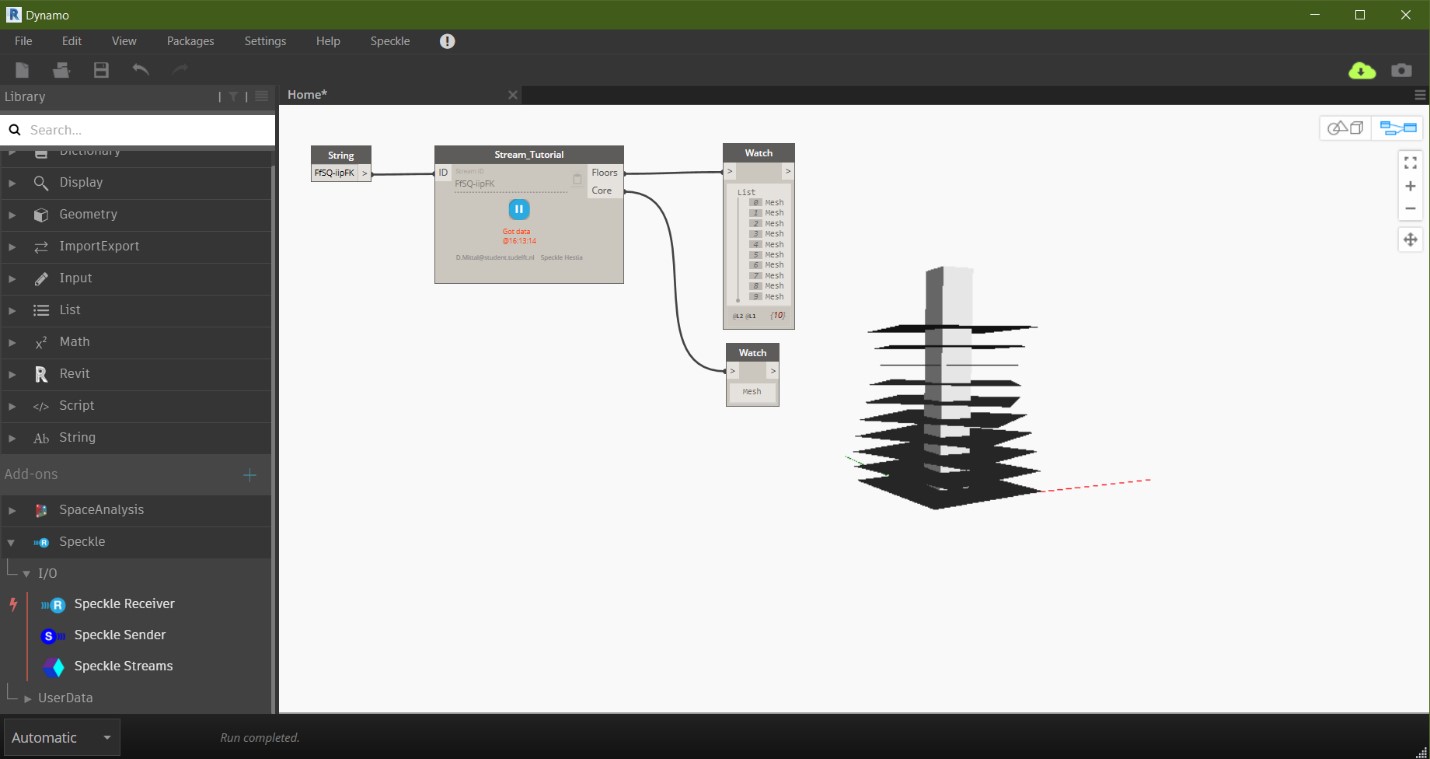
One example is shown in the following pictures where data of floors and core is transferred from Grasshopper to Dynamo.
Speckle for Revit & Dynamo 2/2
Speckle for Dynamolink copied
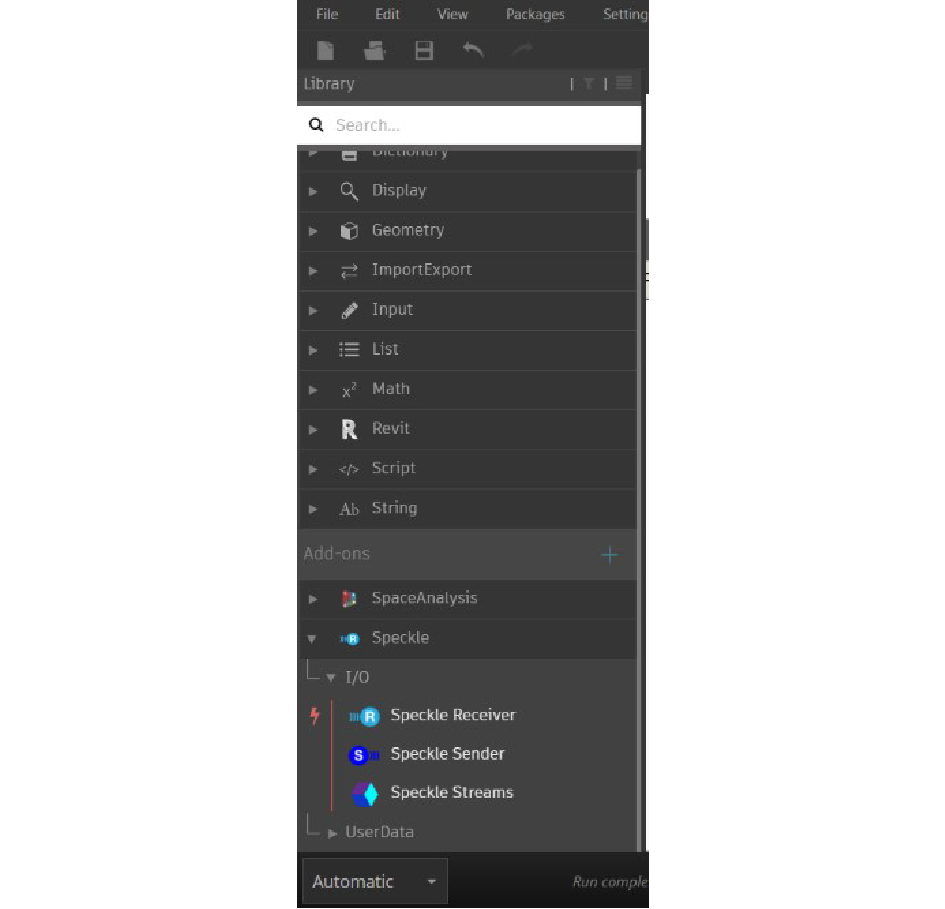
Speckle in Dynamo works like the one in grasshopper. It is also containing the same components to send and receive the objects. The option to add Custom User Data is also available in Dynamo. After the installation, you would be able to see the icons on the left of Dynamo.
On clicking the components, you can send the geometry data by the same method as mentioned in the grasshopper section. The more information on how to use Speckle for Dynamo is compiled in the Speckle Dynamo Basics.
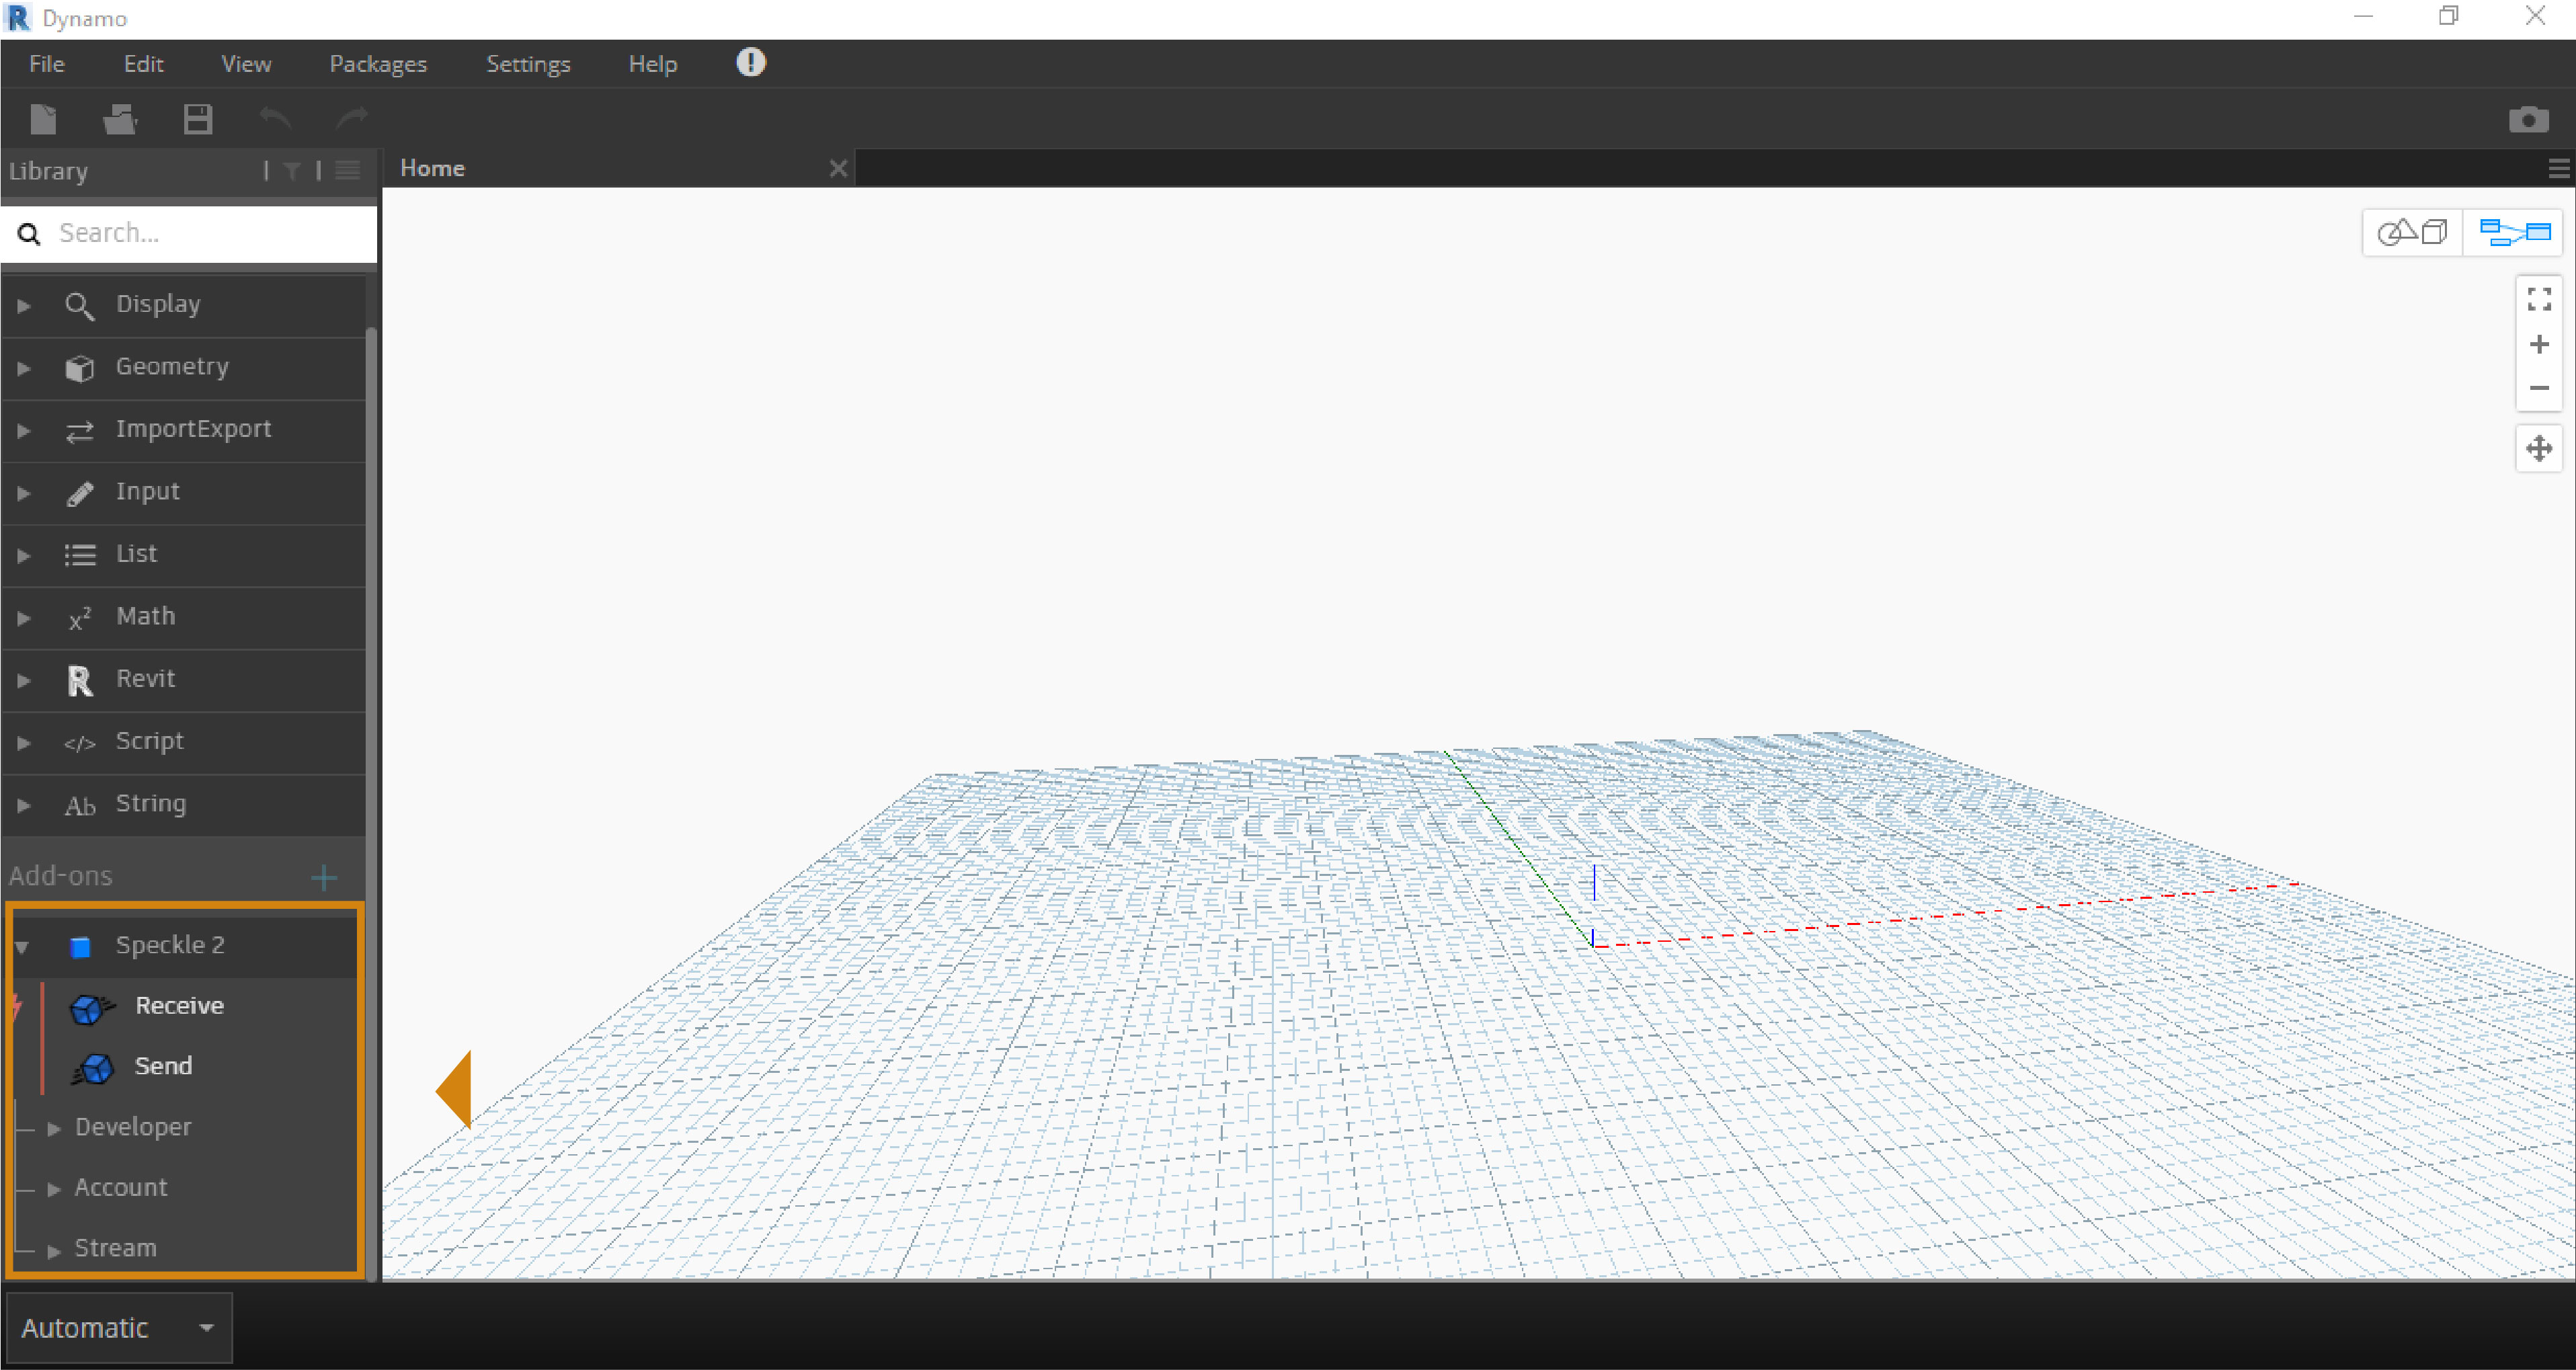
After installing the Speckle for Dynamo connector, you should be able to see the Speckle 2 tab in your Dynamo library on the left side.
Send & Receive data
In Speckle for Dynamo the approach is similar to the one followed for the data exchange in Speckle for Grasshopper.
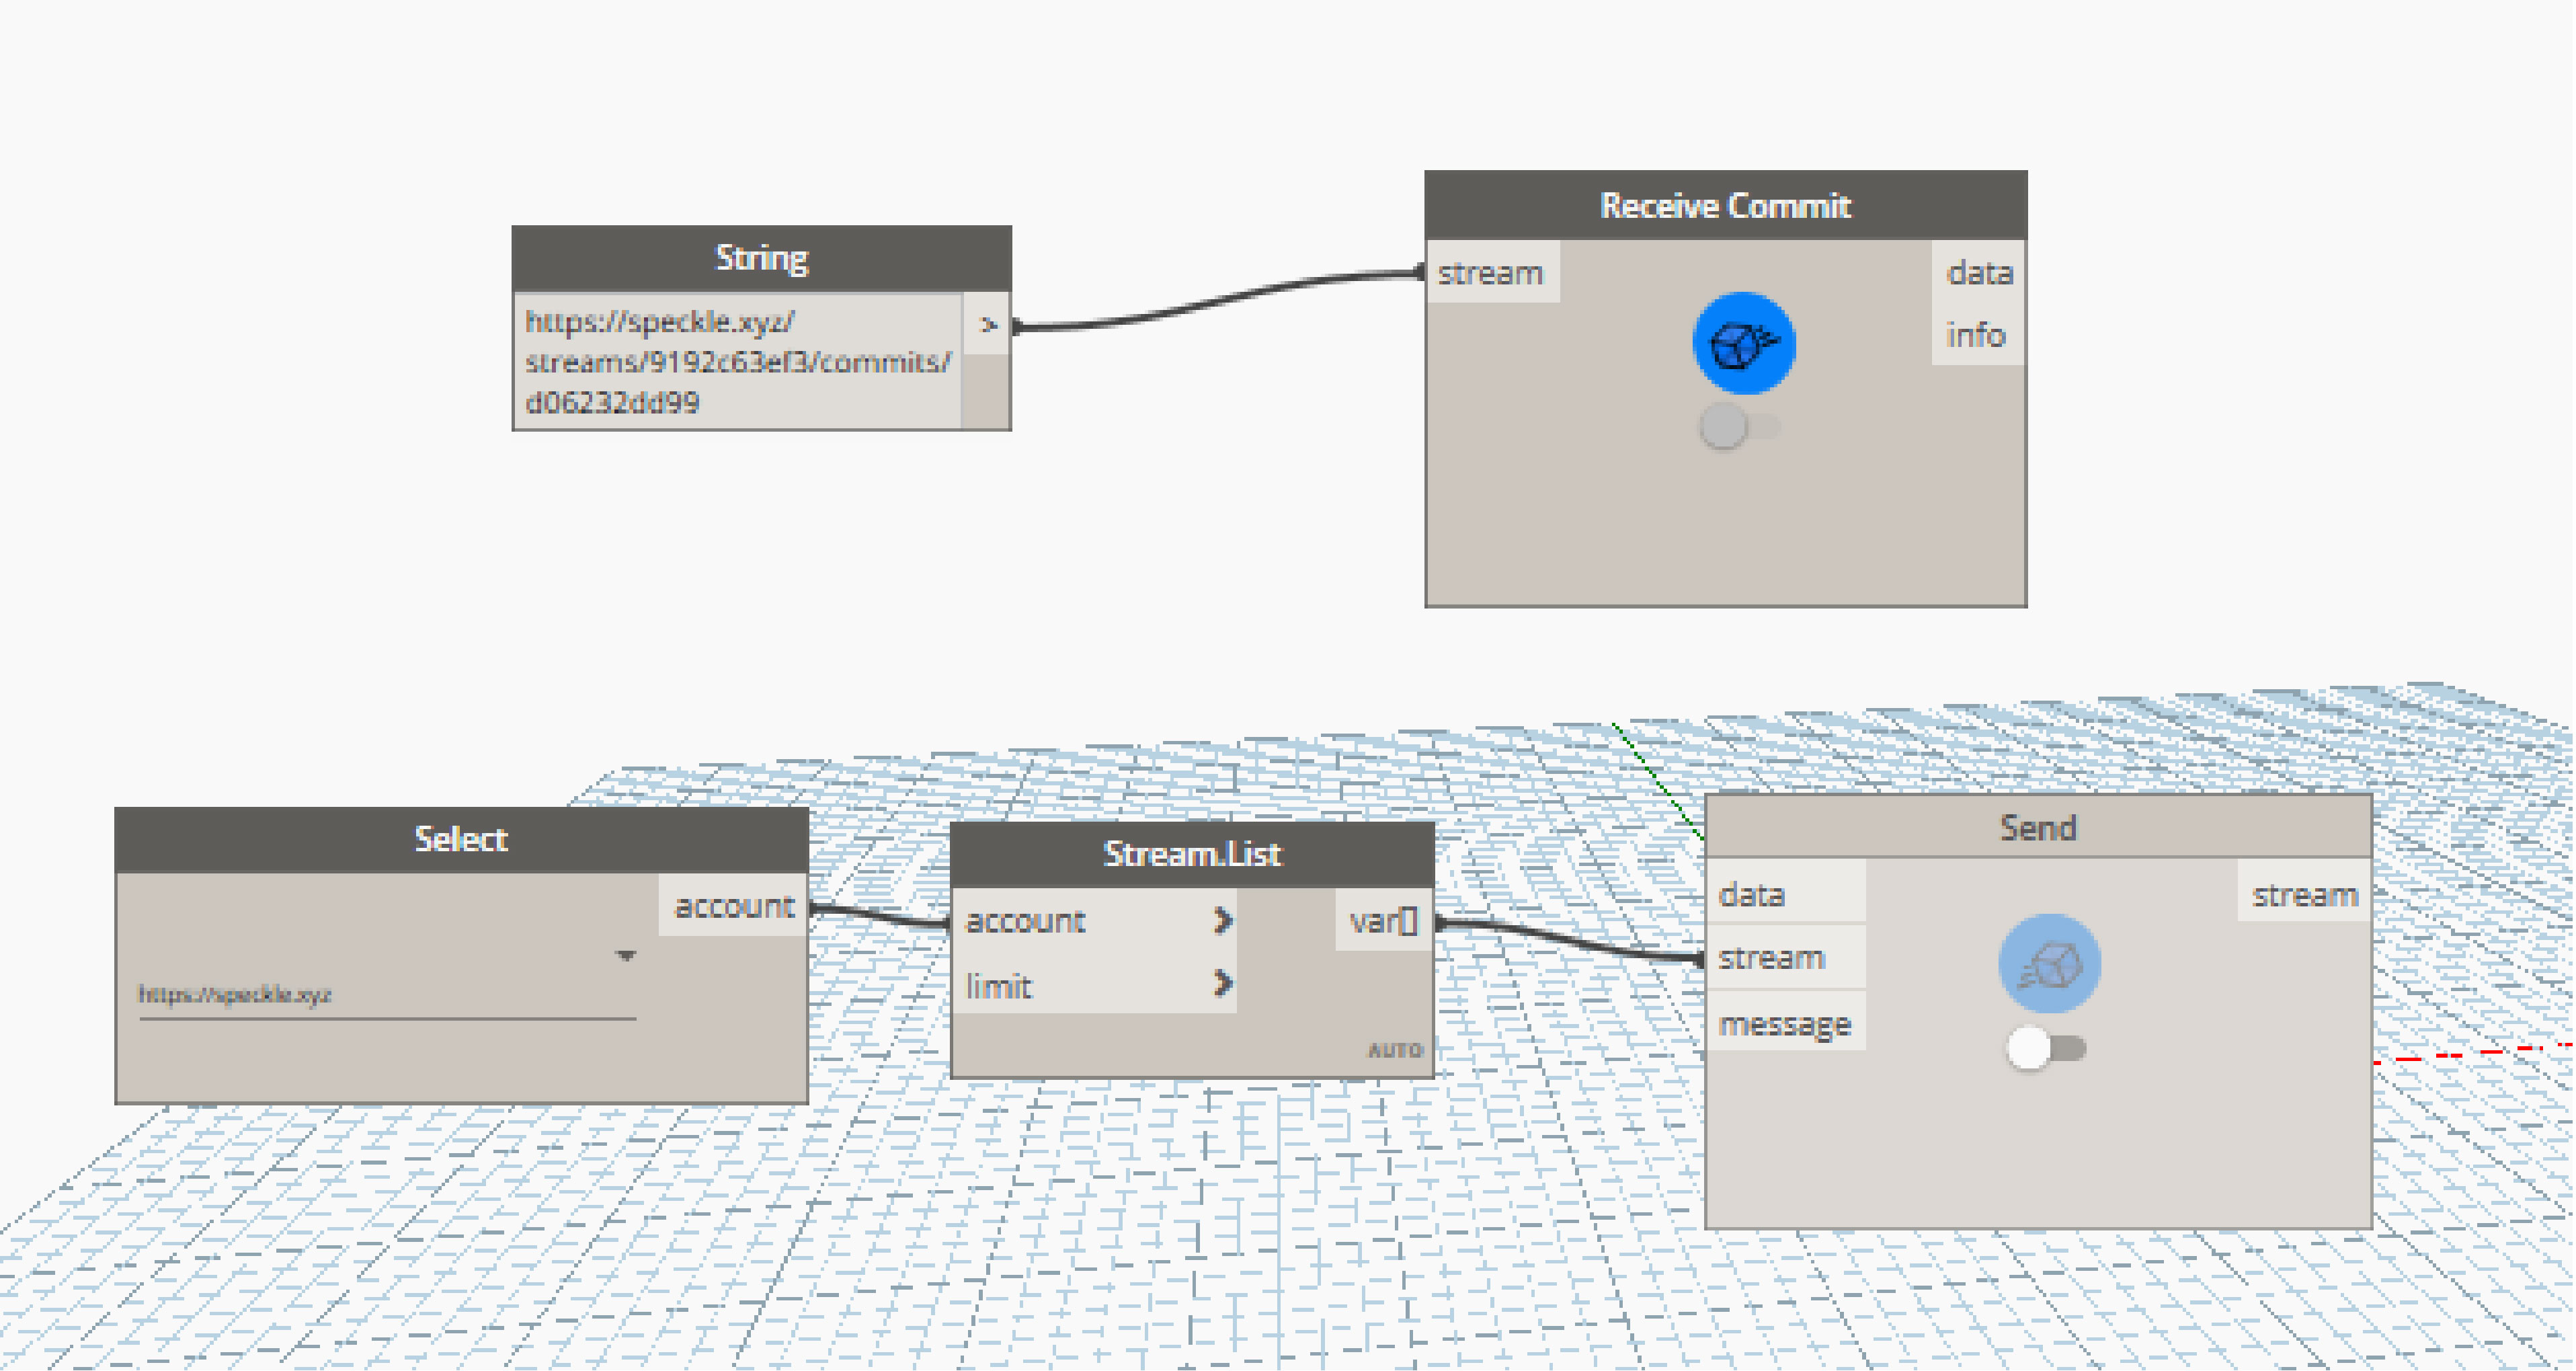
Stream, branch or commit ids to define which data are going to be sent or received through the node components. You can extract the ID URL through the Speckle Web App following the same steps as described in the tutorial Speckle for Grasshopper – Exchange Data. In the Dynamo interface, create an Input » String component and paste the URL there.
Alternatively, you can extract the stream ID through your Speckle account. You can do that inside Dynamo by:
Creating a Select component.
Connecting it as input to a List component.
Afterwards, connect the id output as input to a Send or a Receive component.
Important to note: In order to effectively send & receive the data, you should press the ‘Send’ or ‘Receive’ button that will appear on the node after you connect the respective inputs.
External Links
See a more detailed explanation about the data exchange in:
You can also find detailed explanations on the function of each specific node in
Write your feedback.
Write your feedback on "Speckle for Revit & Dynamo"".
If you're providing a specific feedback to a part of the chapter, mention which part (text, image, or video) that you have specific feedback for."Thank your for your feedback.
Your feedback has been submitted successfully and is now awaiting review. We appreciate your input and will ensure it aligns with our guidelines before it’s published.
