Simple Floorplan Interior Prediction with CNNs
-
Intro
-
Introduction I: Floorplan Interior Prediction
-
Introduction II: Preparing the files
-
Step 1: Importing Python Libraries
-
Step 2: Loading the dataset
-
Step 3: Designing the AI-model
-
Step 4: Training the AI-model
-
Step 5: Visualising the output
-
Step 6: Testing the AI-model
-
Conclusion
Information
| Primary software used | Python |
| Software version | 1.0 |
| Course | Simple Floorplan Interior Prediction with CNNs |
| Primary subject | AI & ML |
| Secondary subject | Machine Learning |
| Level | Beginner |
| Last updated | October 28, 2025 |
| Keywords |
Responsible
| Teacher | |
| Faculty |
Simple Floorplan Interior Prediction with CNNs 0/9
Simple Floorplan Interior Prediction with CNNs
This tutorial introduces CNNs for an architectural application, using a Google Colab Notebook. It is specifically aimed at architects/architecture students with limited programming and/or AI experience.
Introduction
This tutorial and Google Colab Notebook were developed for AI workshops and are specifically aimed at architects/architecture students with limited programming and/or AI experience. The model uses a dataset consisting of simple floorplans with walls and rooms to predict a mapping of the interior spaces. To make the model and the applied AI-concepts more accessible to beginners, several visualisations have been included in the code.
Enjoy!
Learning outcomes
After taking this tutorial, you will be able to:
- Describe the basic framework of (convolutional) neural network ((C)NN) models;
- Define and explain key (C)NN parameters such as epochs, learning rate, and loss functions;
- Analyse and visualise (C)NN model performance and results; and
- Evaluate potential applications of AI/(C)NNs within architectural design and research.
Contact
If you have any questions about this tutorial, please feel free to contact me at a.g.e.sterrenberg@tudelft.nl.
Simple Floorplan Interior Prediction with CNNs 1/9
Introduction I: Floorplan Interior Predictionlink copied
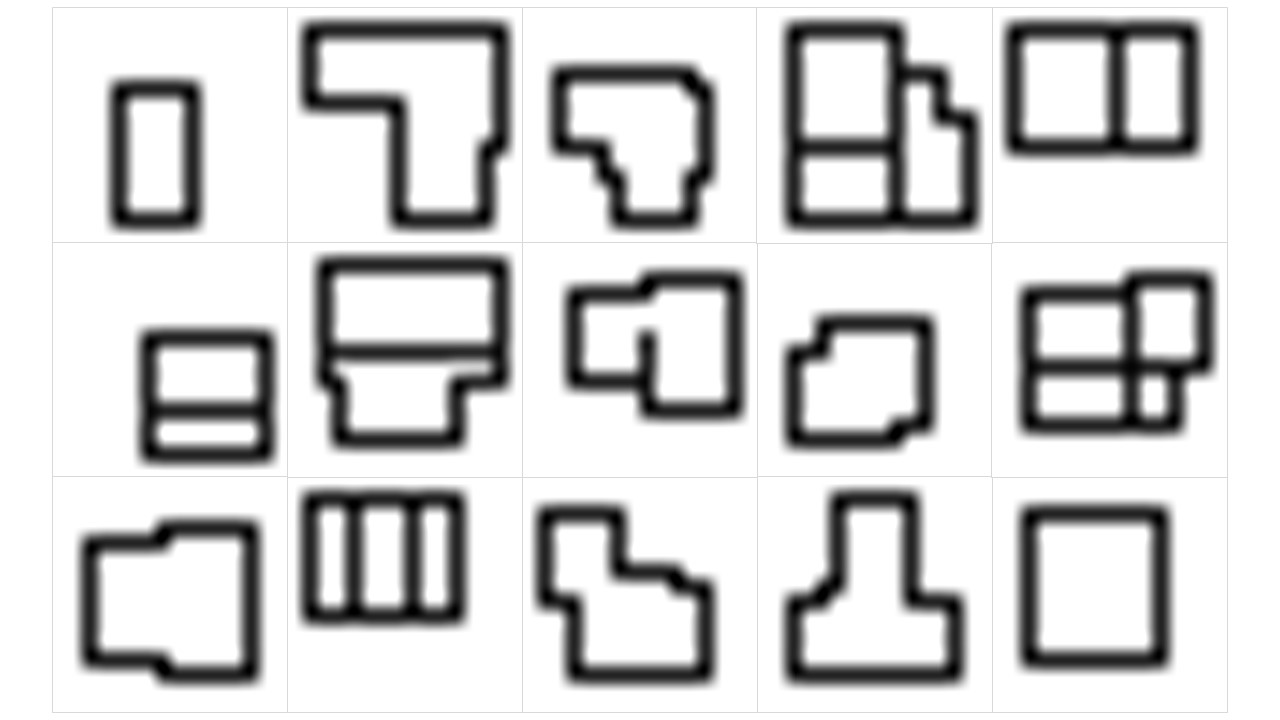
In this tutorial, we will develop an AI-model, using convolutional neural networks, that can predict these interior space mappings from a floorplan input. For such a model, we need a dataset.
In this case, the dataset consists of 21.245 16×16 px images of simple, generated floorplans. The content of this dataset is purposefully kept simple; this is to ensure quick training of our models. The figure below shows some sample floorplans:
For each floorplan, a map of the interior spaces has also been generated, see the example below:
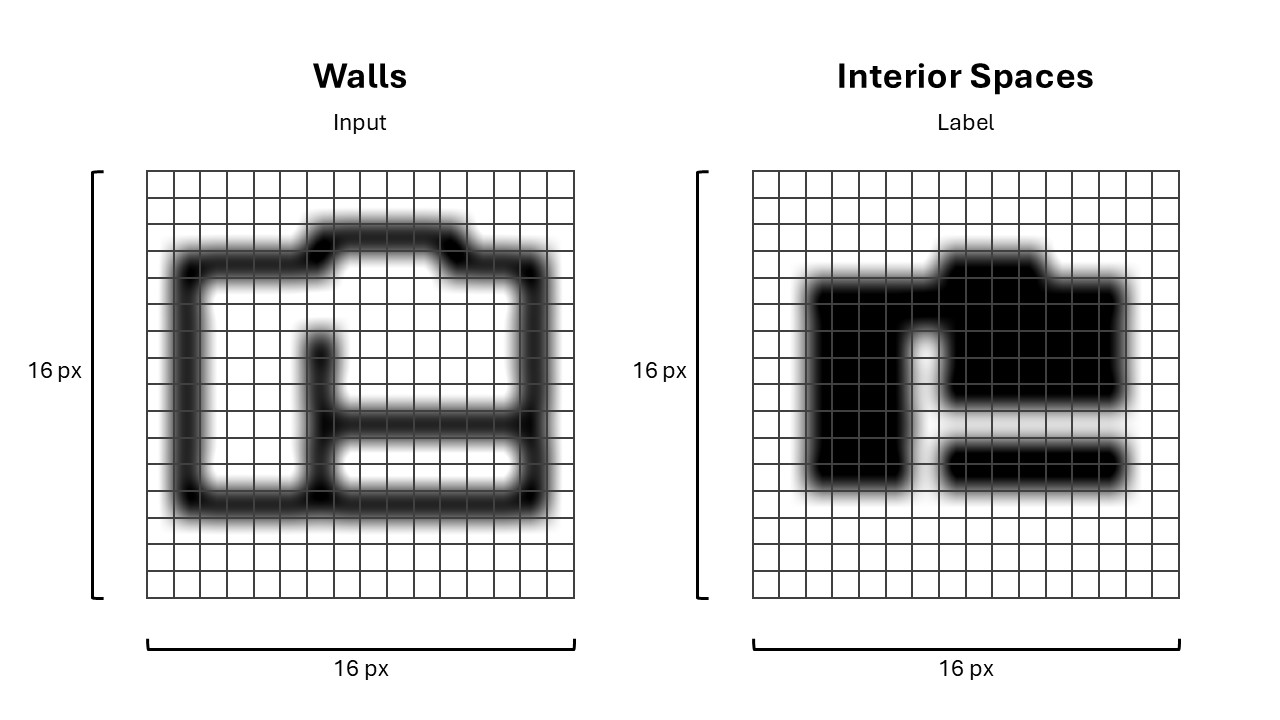
Our AI-model will use the floorplan images with walls as input, and will be asked to produce a mapping of the interior spaces, often referred to as the labels. All floorplan-interior pairs form the training dataset.
Simple Floorplan Interior Prediction with CNNs 2/9
Introduction II: Preparing the fileslink copied
To prepare for the tutorial, you’ll need to:
- Open the Google Colab Notebook
- Download the dataset and move it to ‘My Drive’ in your Google Drive
In the next two sections, further instructions are given. Alternatively, the video below outlines the same steps.
Open the Google Colab Notebook
To get started with the tutorial, please find the Google Colab Notebook using one of the links below:
🇳🇱 Dutch version: here
🇬🇧 English version: here
These include all the foundational code of our model.
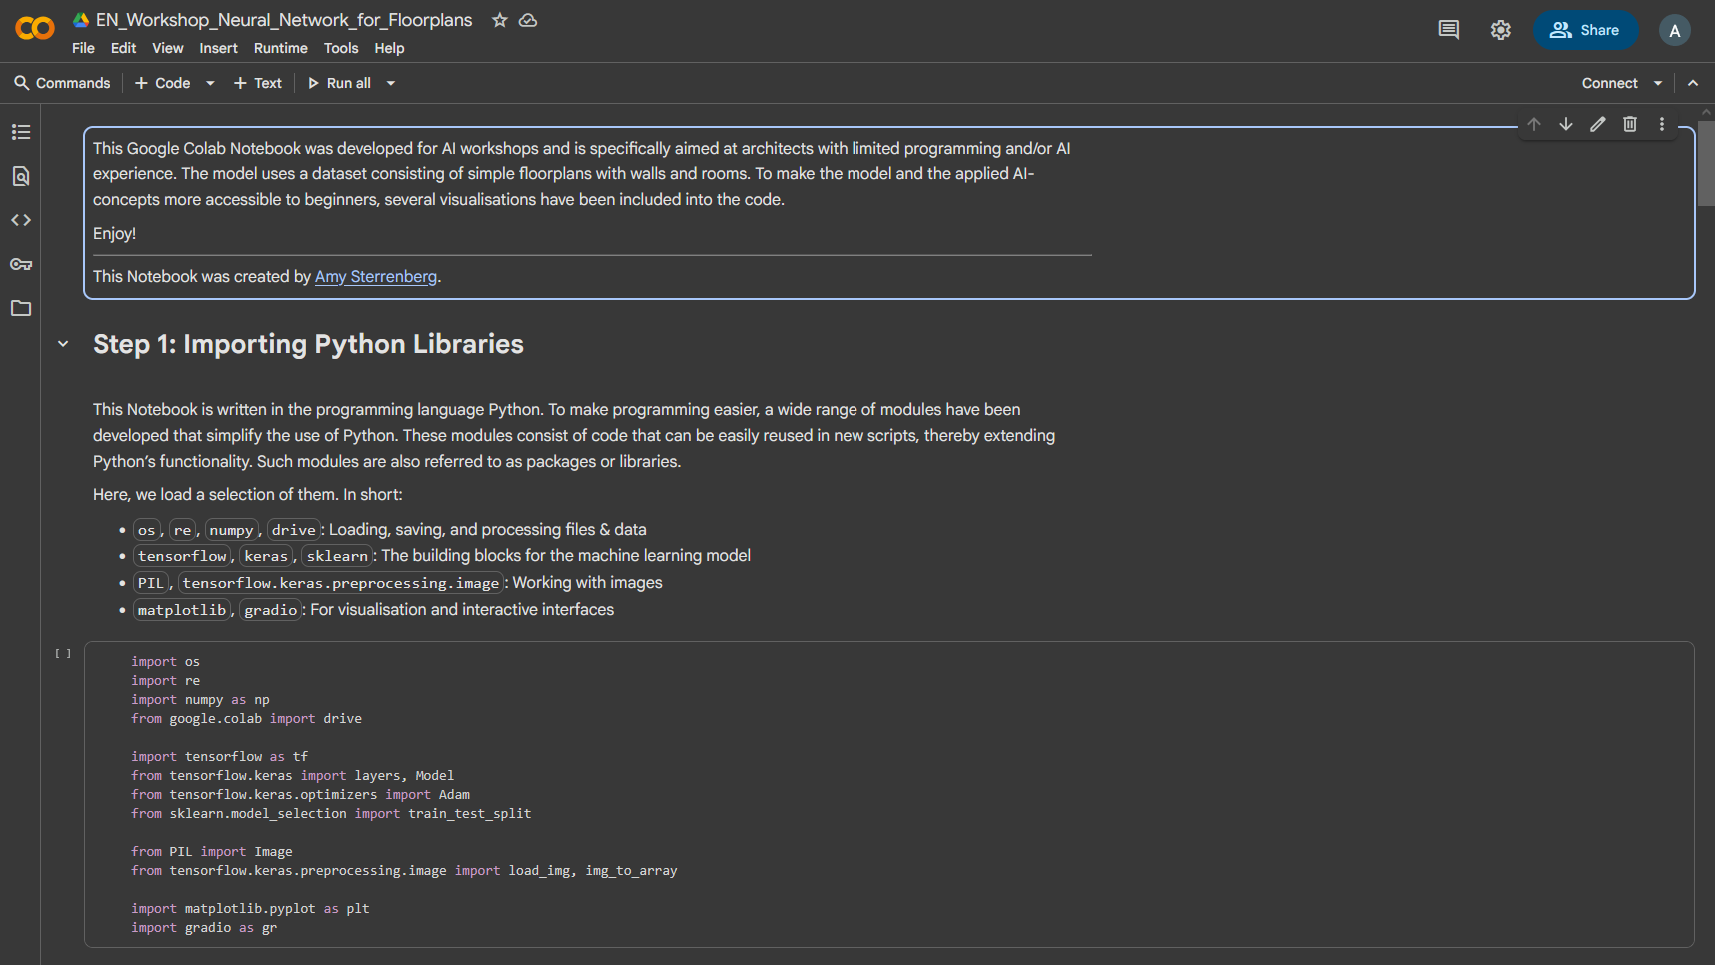
Google Colab is a free online platform that lets you write and run code directly in your browser. It combines text, code, and results in one interactive document called a notebook. Each code cell changes the notebook’s memory, so cells should be run in order to keep results consistent. The google colab notebook should look something like this:

You can restart the memory (called the runtime) at any time to clear all stored data and start fresh by clicking the arrow next to ‘Run all’ and selecting ‘Restart session’ (see right). Because Colab runs on Google’s servers, it works on any device and provides access to powerful computing resources for learning and experimentation.
Download the Dataset
Additionally, please download the required files to your own Google Drive (in the ‘My Drive’ folder) here.
Download the folder ‘dataset’ > Extract .zip > Upload the ‘dataset’ folder to ‘My Drive’
Files in the folder ‘test_images’ may be stored locally – these are optional
These files include our training dataset.
Please note that placing the ‘dataset’ folder in the correct location in your Google Drive is essential for this tutorial. See image below:

Simple Floorplan Interior Prediction with CNNs 3/9
Step 1: Importing Python Librarieslink copied
This Notebook is written in the programming language Python. To make programming easier, a wide range of modules have been developed that simplify the use of Python. These modules consist of code that can be easily reused in new scripts, thereby extending Python’s functionality. Such modules are also referred to as packages or libraries.
Here, we load a selection of them. In short:
os,re,numpy,drive: Loading, saving, and processing files & datatensorflow,keras,sklearn: The building blocks for the machine learning modelPIL,tensorflow.keras.preprocessing.image: Working with imagesmatplotlib,gradio: For visualisation and interactive interfaces

You can run cells in the Google Colab Notebook by clicking the ‘▶’ (play) symbol in the top left corner of the code cell. Please run the cell. This make take ~30 seconds. When the cell is done running, you will see a small checkmark in the top left corner, as shown below:

Simple Floorplan Interior Prediction with CNNs 4/9
Step 2: Loading the datasetlink copied
For the model, we need two datasets: (1) the data with the walls, and (2) the data with the interior spaces.
In the following code cell, we load the data in five steps:
- Connect Google Drive. This allows Colab to access the files stored in your drive.
- Define the file paths (not needed if the files are in the ‘My Drive’ folder)
- Load the data.
- Set the split percentage.
- Split the data into a training set and a validation set.
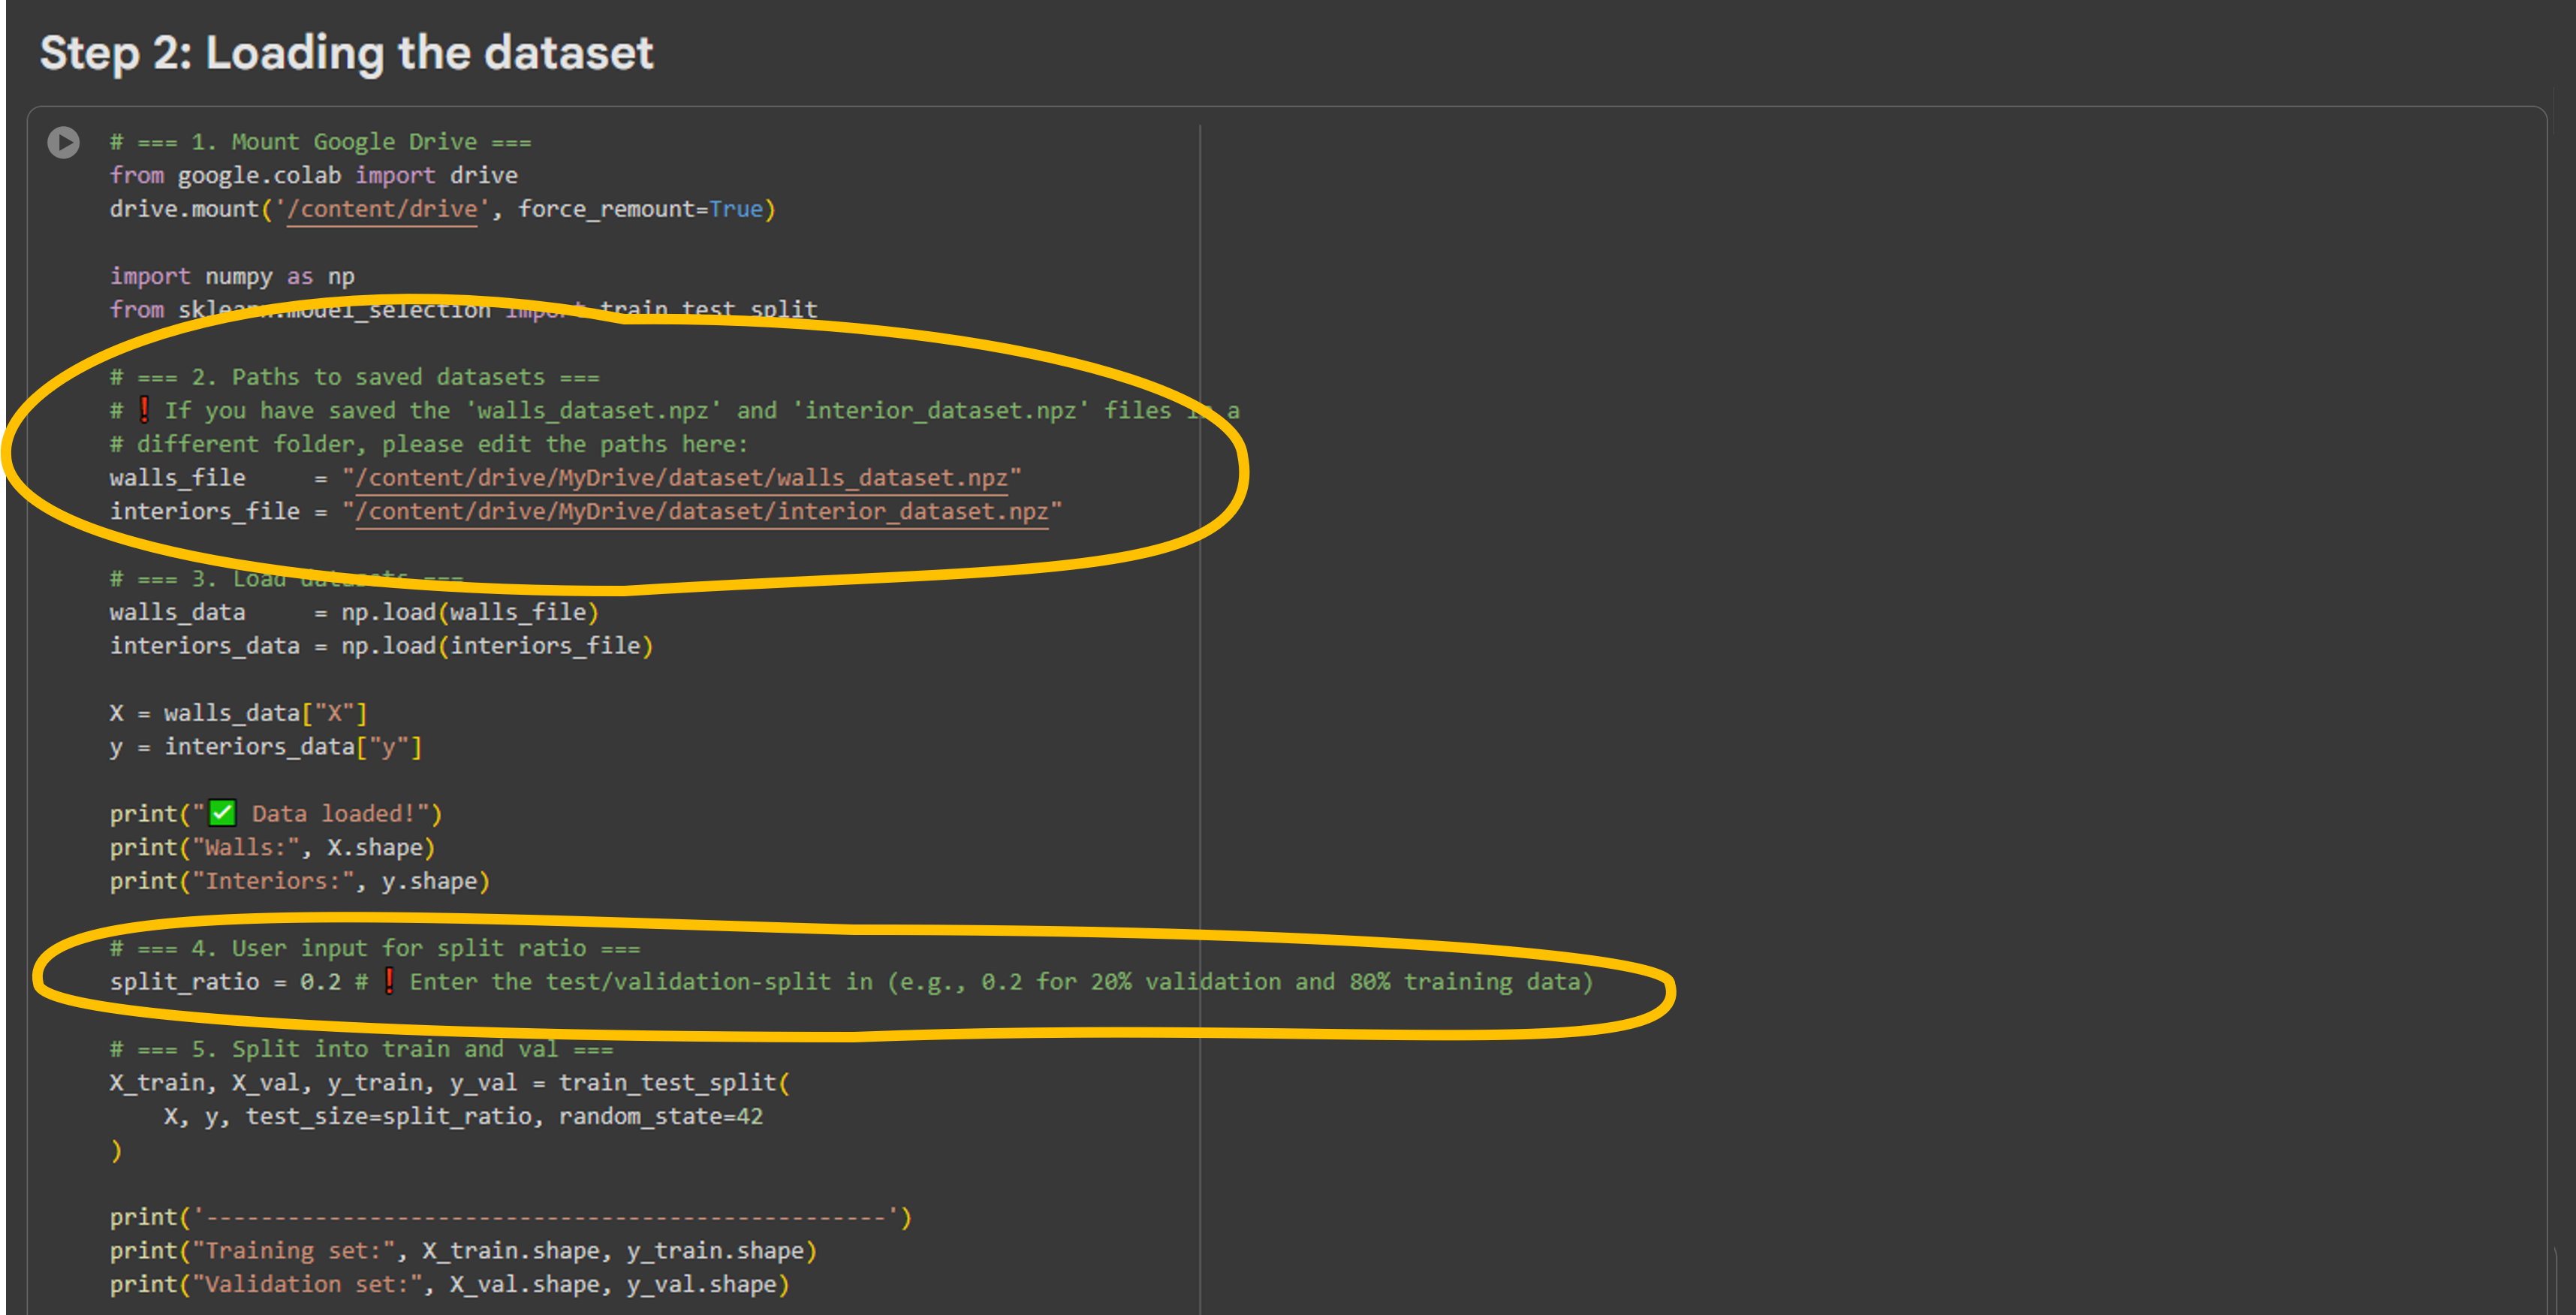
In this cell, two things can be adjusted:
- ❗ Under ‘2’, you must change the file paths if you have placed the datasets in a different folder.
- ❗ Under ‘4’, you can adjust what percentage of the data will be used for validation.
The validation percentage defined how much data will be used to train the model (training data) and how much will be used to test the model’s performance on unseen data (validation data). A split_ratio of 0.2 means that 80% of data will be used for training, and 20% for validation.
After running this cell, we will have the following parameters:
- X_train contains the input images (e.g., wall images).
- y_train contains the target images (e.g., interior images).
- X_val and y_val do the same, but for the validation set.
Finally, we print the shapes of the datasets so we can check whether everything is correct (for example, how many images there are and what their dimensions are).
Running this cell will give you a popup asking for permission to access your Google Drive. This is required for the Notebook to access the dataset files we prepared earlier. If you are prompted, please tick all permission boxes in the menus that follow.
Simple Floorplan Interior Prediction with CNNs 5/9
Step 3: Designing the AI-modellink copied
Next, it is time to build a neural network (NN) that learns to process and reconstruct input images. We’ll do that in the next code cell.
We have three models to choose from, ranging from simple to complex. The main difference lies in how many layers they have and how much detail the network can learn.
- ❗ Select the model you want to use by adjusting the `model_choice` parameter.
You may choose any model you like. Some explanation of the three models:
Model 1 – Simple model
This is the most basic network. It consists of an encoder (which compresses the input into a simpler representation) and a decoder (which translates it back to the original format).
- ✅ Trains quickly, useful for understanding the basics.
- ⛔ Likely to perform poorly on more complex patterns.
Model 2 – Medium model
This network is slightly deeper: it has more layers and a ‘bottleneck’. As a result, it can capture more details and deliver better results.
- ✅ Balanced trade-off between simplicity and performance.
- ⛔ Trains more slowly than Model 1.
Model 3 – Complex model (U-Net style)
This is a more advanced network, inspired by the well-known U-Net architecture. It combines information at different levels (large structures and fine details) to achieve more accurate results.
- ✅ Has the highest capacity to learn, and generally delivers the best results.
- ⛔ Requires more computational power and training time.


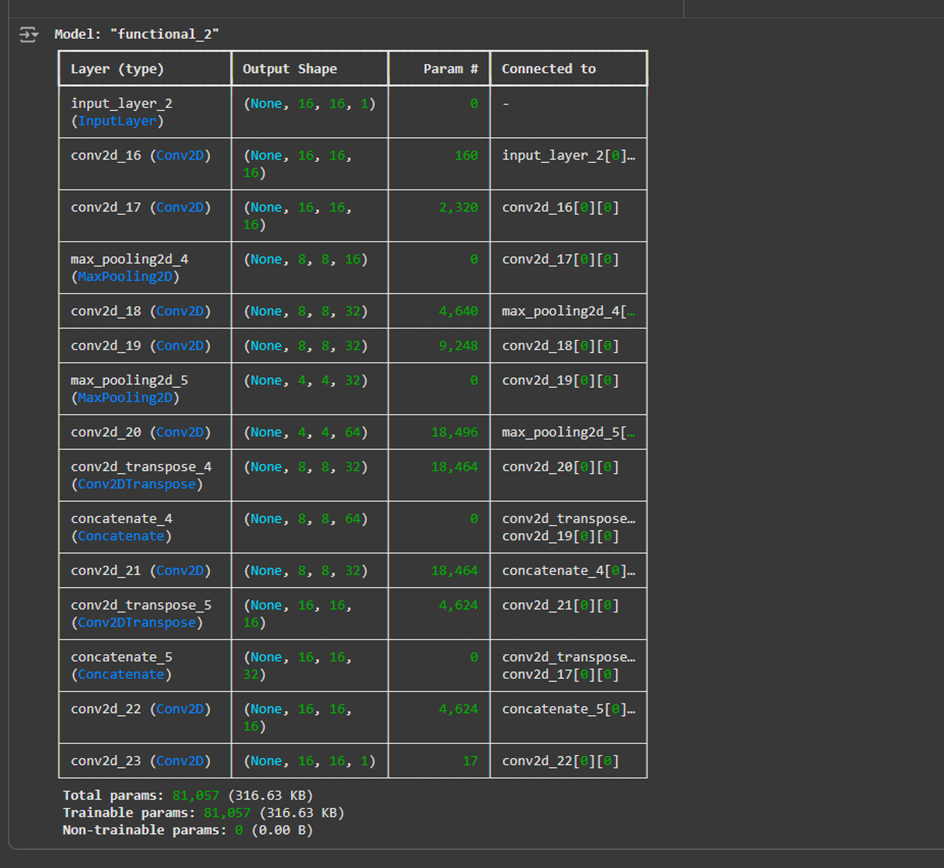
Please edit the model_choice parameter to the model you would like to train, and run the cell. This should give you a tabular overview of the model, such as:
Simple Floorplan Interior Prediction with CNNs 6/9
Step 4: Training the AI-modellink copied
In the next section of code, we train the model. The training data (the floorplans with their corresponding interior labels) are used by the model to learn to recognise patterns.
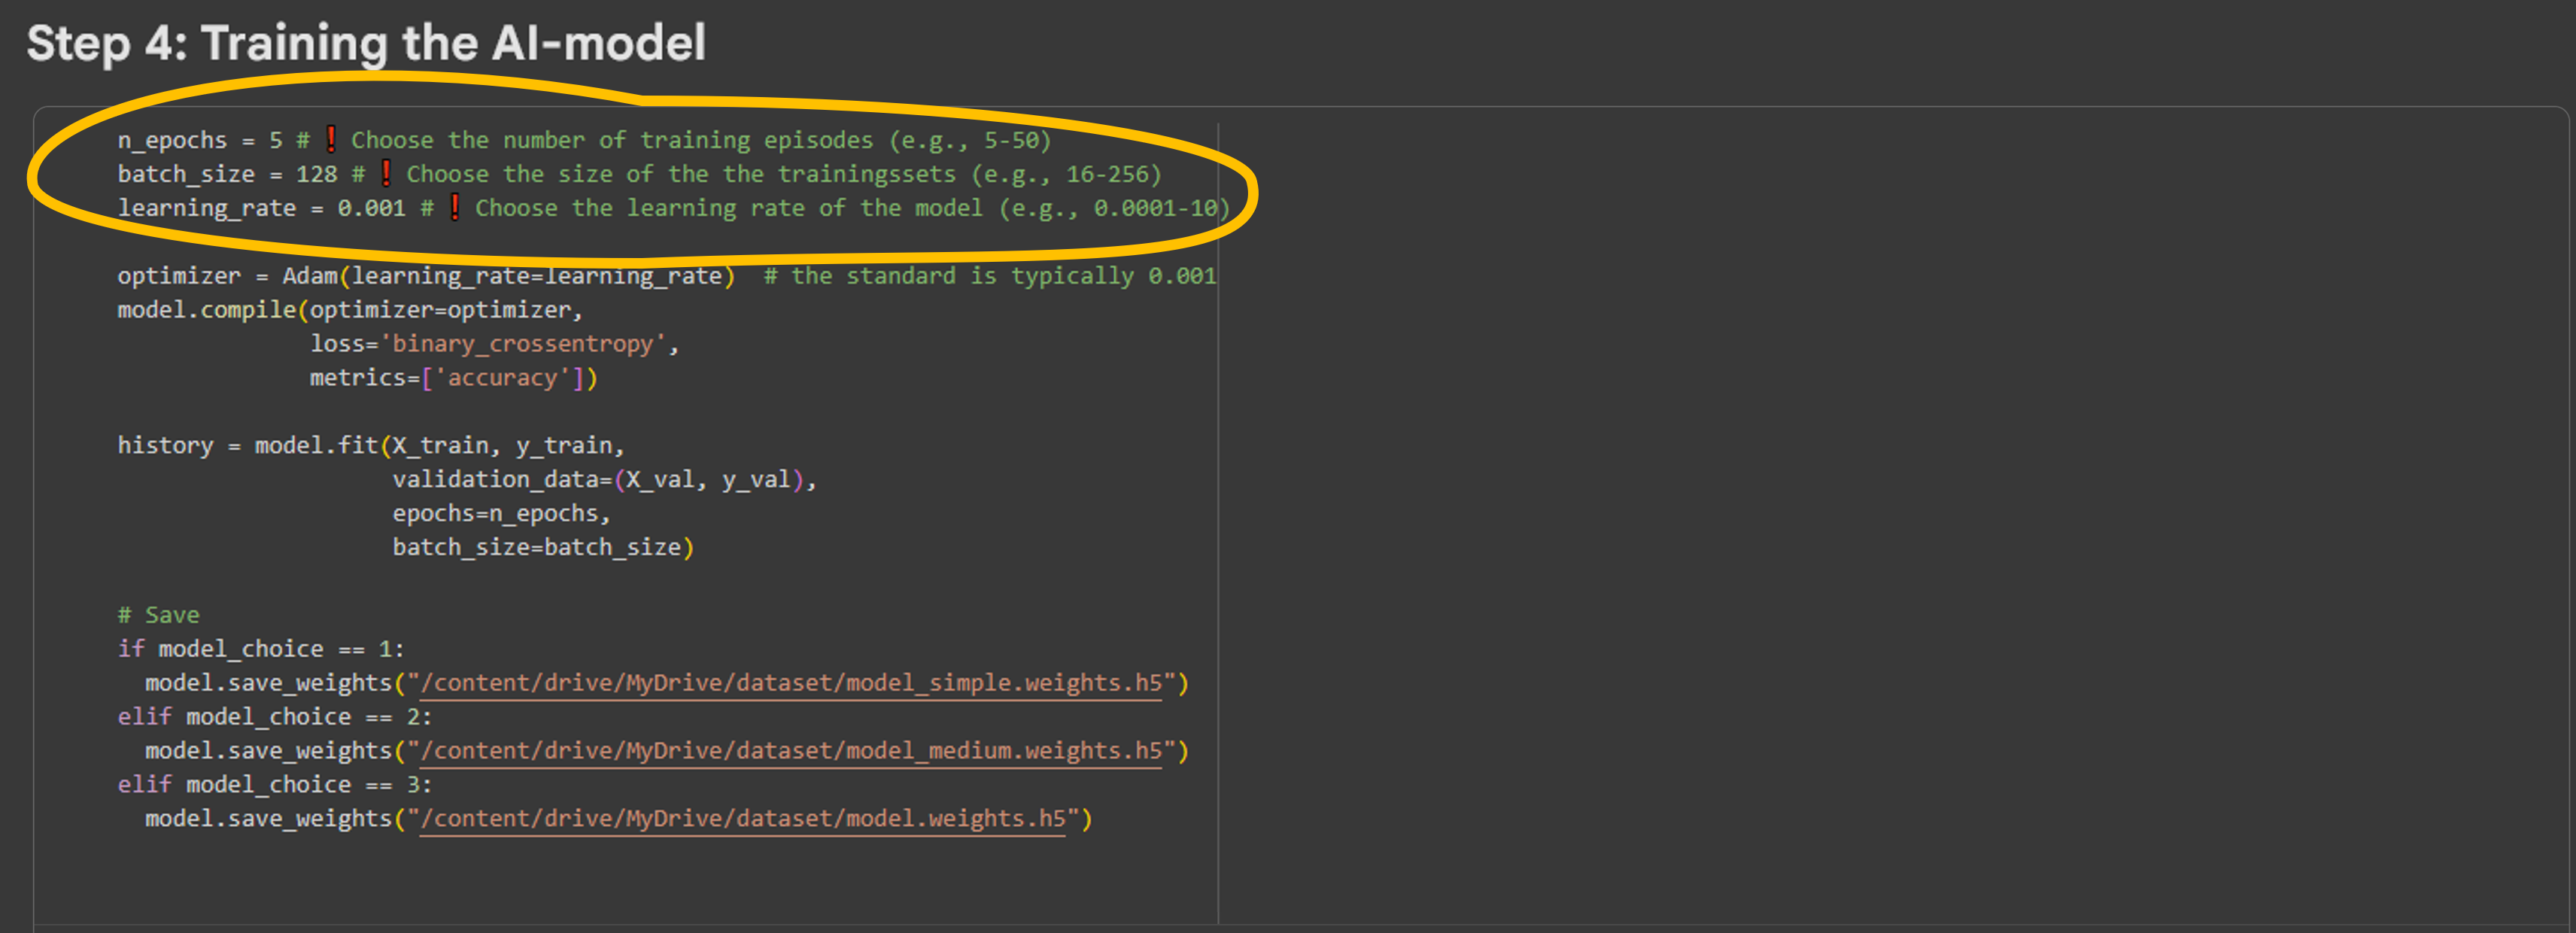
Here you can adjust the following parameters:
❗ n_epochs: The number of times the entire training dataset is passed through the model.
- 📉 Low value: finishes quickly, but the model may not learn enough.
- 📈 High value: better results, but risk of overfitting (the model learns too specifically and becomes less generalisable).
❗ batch_size: The number of examples the model processes at once before updating its internal parameters.
- 📉 Small batch (e.g. 32): more precise updates, but slower training.
- 📈 Large batch (e.g. 128 or 256): faster training, but less precise updates.
❗ learning_rate: The learning rate determines the size of the steps the model takes during learning.
- 📉 Low value (e.g. 0.0001): training is slower but more stable (less chance of “overshooting” the optimal solution).
- 📈 High value (e.g. 0.01 or higher): training is faster, but can become unstable or fail to converge properly.
After training, the model is saved to a file, so you can reuse it later without retraining.
The file name depends on which model you selected (1, 2, or 3).
NOTE: If you choose to re-train your model at any point, make sure to re-run the entire notebook. If not, it will start to add additional training to your existing model.
Run this cell. This may take a few minutes, depending on your chosen model and parameters. You can follow its training in the cell output:

Now, the model has been trained!
Simple Floorplan Interior Prediction with CNNs 7/9
Step 5: Visualising the outputlink copied
Next, we need to evaluate the model’s performance. To do this, we can:
- Plot the training progress of the model.
- Test the model’s performance on data samples.
Loss Curves
The next code cell plots the training progress of our model. These graphs show how well your chosen model and settings are performing. Two types of curves are displayed: loss and accuracy.
🔸 Loss
- Loss is a number that indicates how far the model’s prediction is from the correct answer.
- 📉 Lower = better: During training, you want to see the loss decrease.
🔸 Accuracy
- Accuracy shows the percentage of examples the model predicts correctly.
- 📈 Higher = better: During training, you want to see the accuracy increase.
There are two curves in each graph:
1. Train curves: performance on the training data (the data the model learns from).
2. Validation curves: performance on separate test data (to check if the model is not learning too specifically).
Other possible patterns
🔸 Loss curve:
- Both train-loss and val-loss go down → good sign.
- If train-loss keeps going down but val-loss goes up → the model is learning too specifically (overfitting).
🔸 Accuracy curve:
- Both train-acc and val-acc go up → good sign.
- If train-acc is much higher than val-acc → overfitting.
- If both curves stagnate at a low level → the model is too simple (underfitting).
Run the next cell to plot these curves:
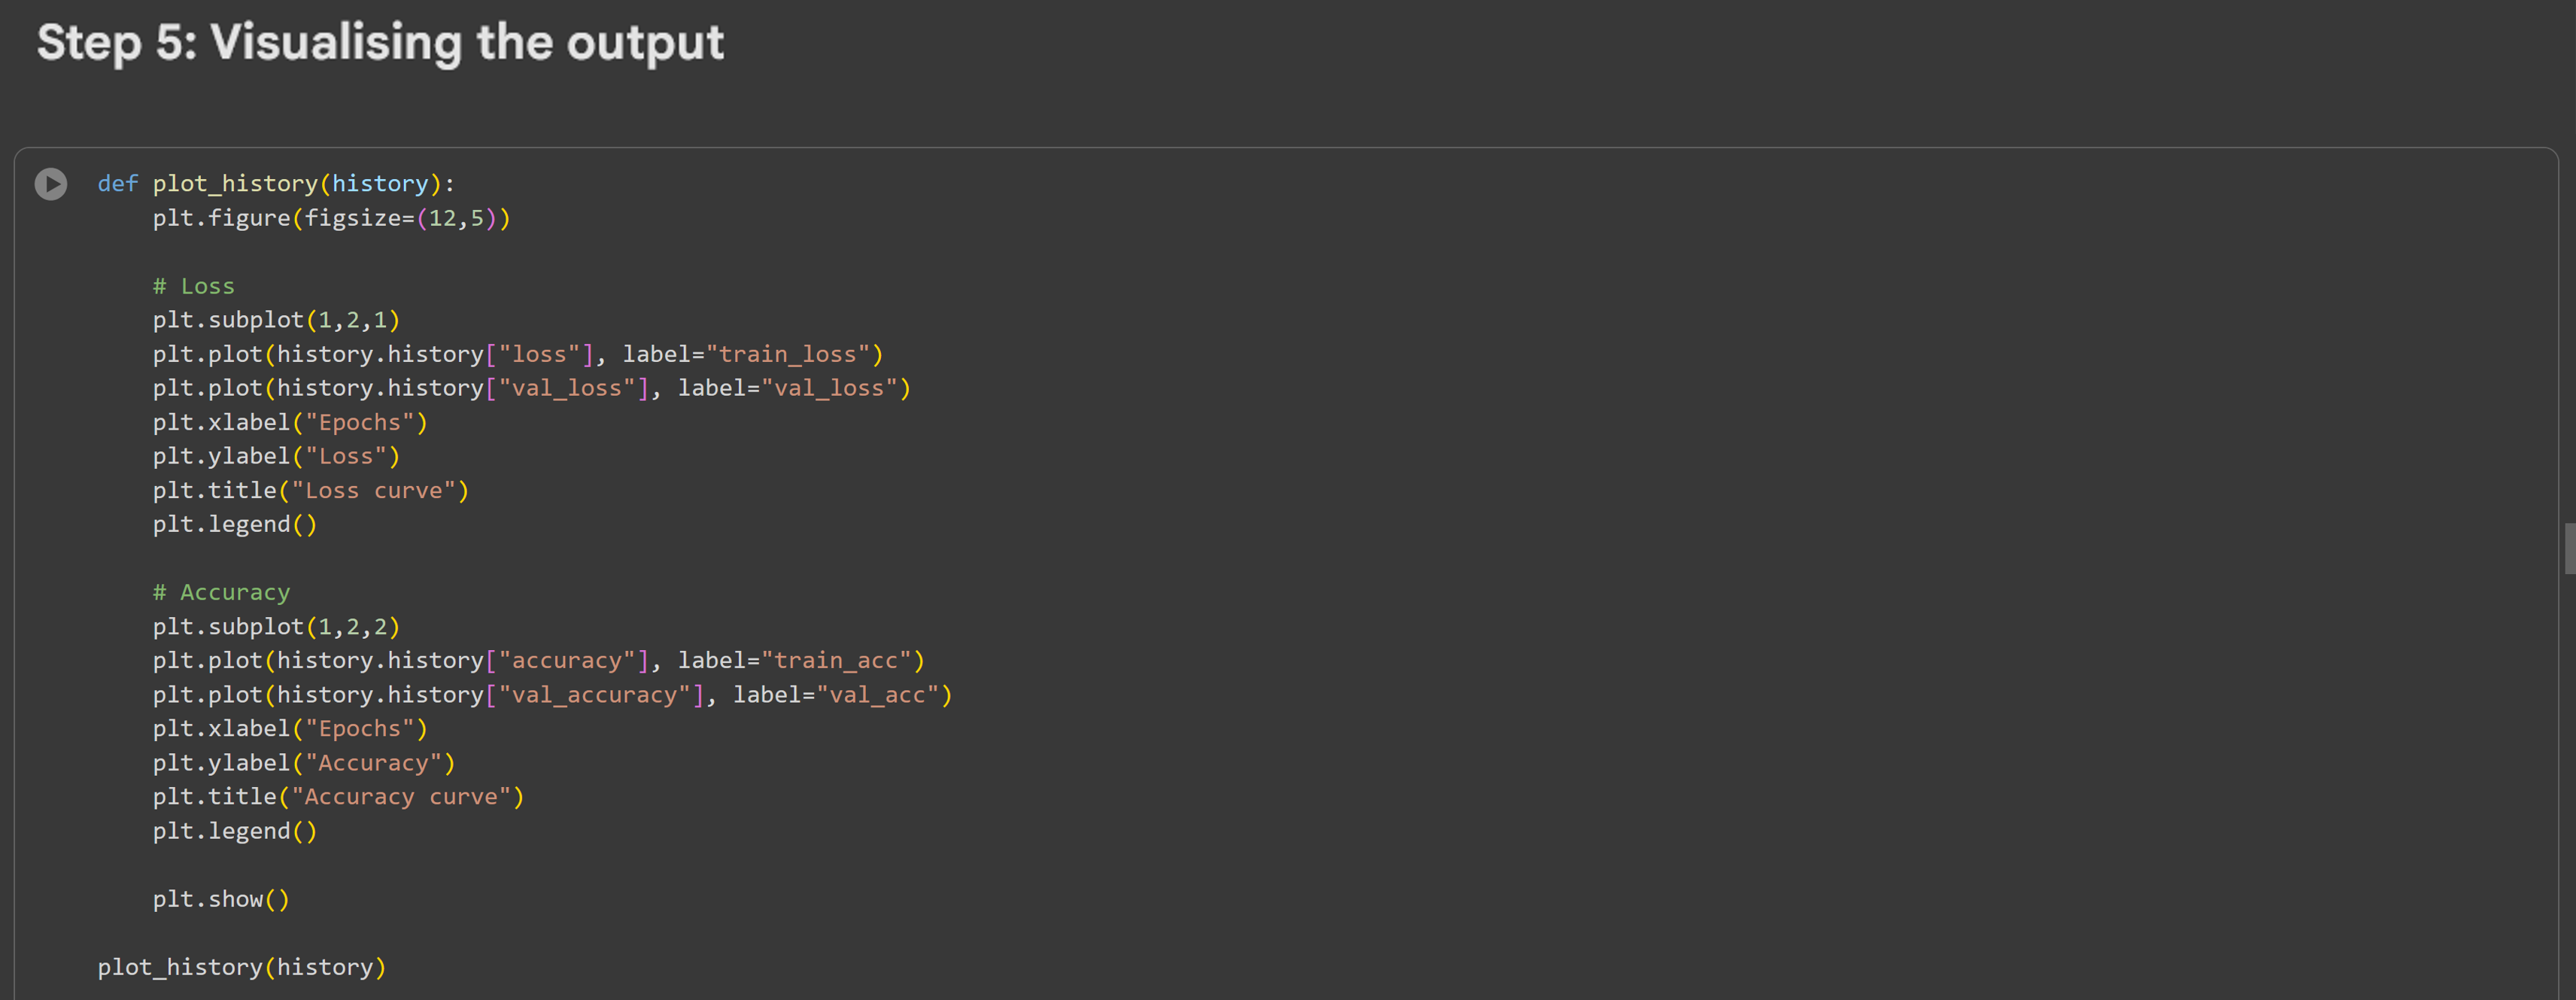
After you run the cell, you will get something like this:
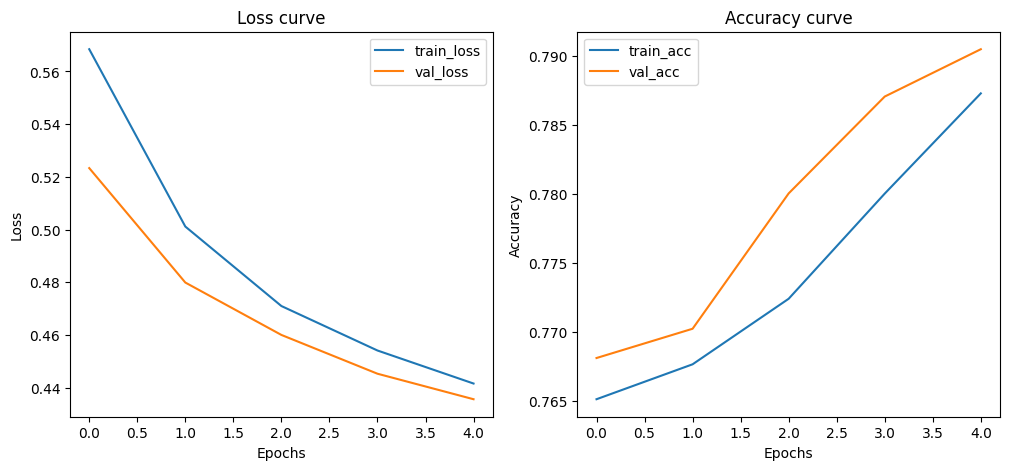
Evaluate if your curves look similar and match the description of good training as given above.
Predictions
Another way to evaluate the model’s performance is to compare its predictions with the true labels. This gives you a visual idea of how well the model is performing. In this code, you can alter the number of predictions you would like to see.
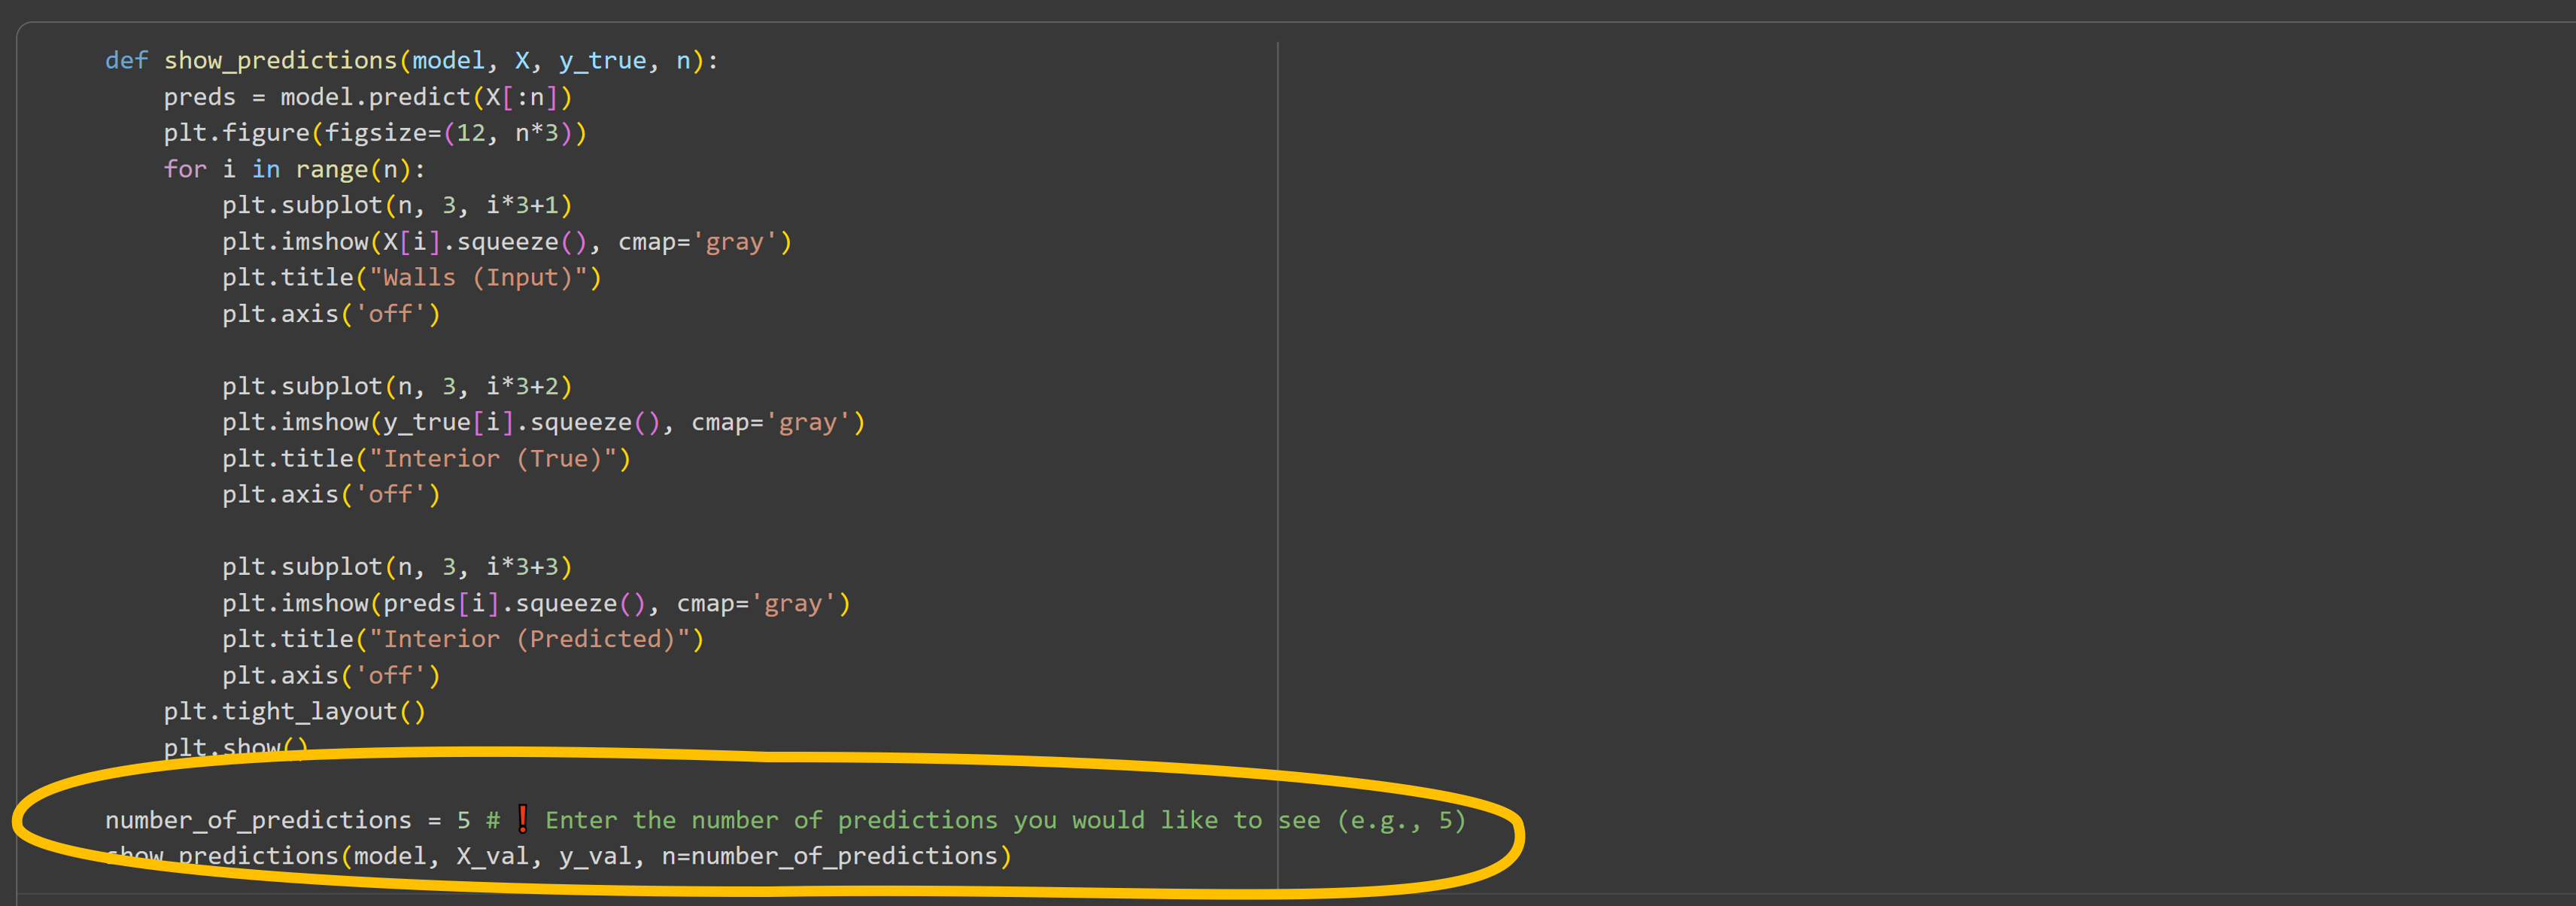
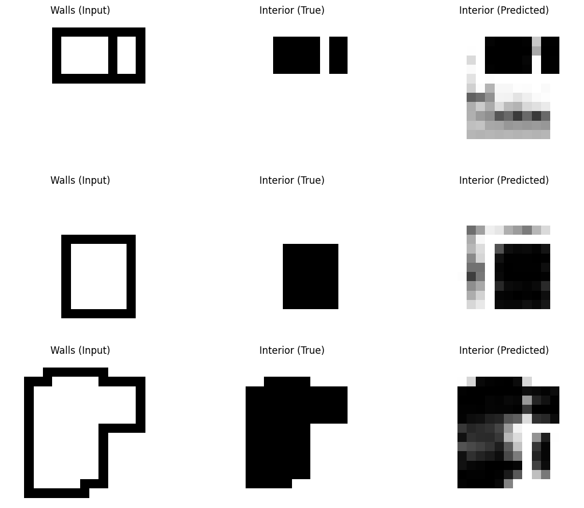
In the resulting image, each row consists of three images:
- Walls (Input): The input to the model, here the floorplans with walls.
- Interior (True): The actual outcome (the correct answer we already know).
- Interior (Predicted): The outcome predicted by the model.
✅ What are good results?
- The Interior (Predicted) column closely resembles the Interior (True) column.
- Shapes and contours from the input are correctly recognised.
- There are few or no blurry (grey) or missing parts.
⛔ What are bad results?
- The Interior (Predicted) outcome differs clearly from the Interior (True).
- Important shapes are missing or misplaced.
- The image is very noisy or blurry.
See an example below, with results that can still be improved. The interior shapes are recogniseable, but the images contain a lot of grey pixels; the image is noisy.
Simple Floorplan Interior Prediction with CNNs 8/9
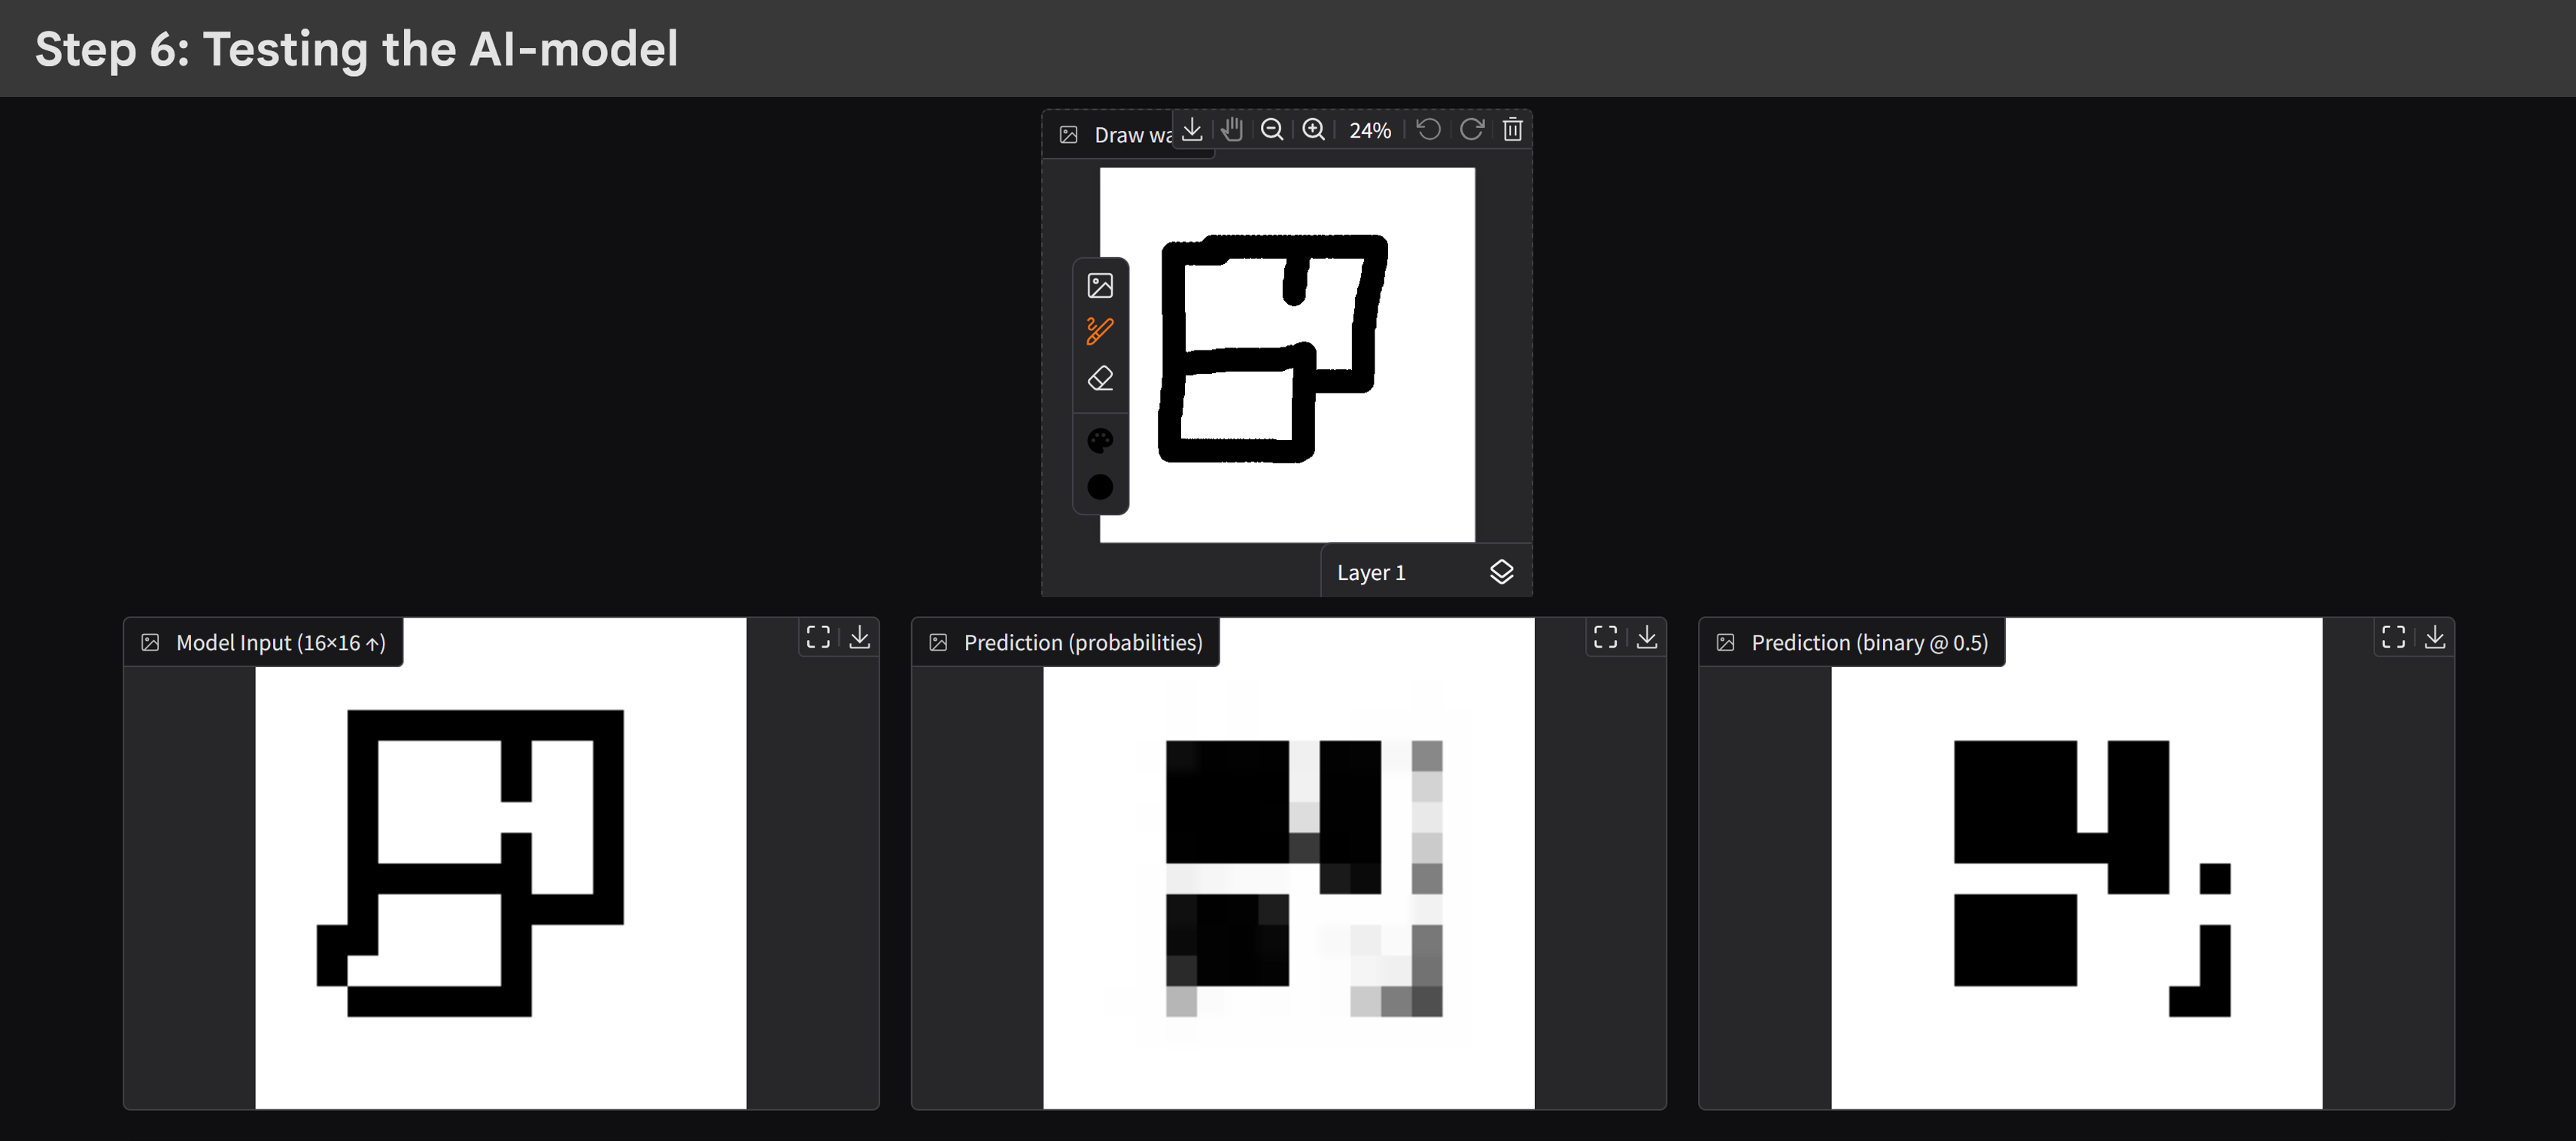
Step 6: Testing the AI-modellink copied
It is also possible to test the model with your own floorplans. The next piece of code builds an interactive gradio interface. It allows you to draw walls yourself and see what the model predicts as interior space.
🔸 Using the interface
- Draw: Use the canvas (“Draw walls”) to draw black walls on a white background.
- Predict: Click `Predict`. The drawn plan is automatically resized to 16×16 pixels (the size the model was trained on), and the model predicts the interior spaces.
- View results: The predictions appear in three columns side by side.
🔸 The outputs
- Model Input (16×16 ↑): Shows how your drawing looks after being resized and prepared for the model.
- Prediction (probabilities): A grayscale image where each pixel has a value between 0 (black) and 1 (white).
Darker → the model thinks it is likely not interior.
Lighter → the model thinks it is likely interior. - Prediction (binary @ 0.5): A black-and-white version, where pixels above the threshold of 0.5 are white (= interior) and everything below is black. This is a simplified output, useful for clear interpretation.
✅ What is a good result?
- The white areas in the predictions match the spaces you expect inside the walls.
- The shapes align logically with the walls you drew.
- The boundaries between walls and interior are sharp and clear.
- There is little noise in the predictions (few unnecessary speckles or grey spots).
- Different spaces are filled consistently: rooms you drew separately also remain visible as separate rooms.
⛔ What is a bad result?
- The model predicts almost everything as white or black, regardless of the walls.
- Interior spaces are misinterpreted (e.g. walls are crossed or rooms disappear).
- Images under “Prediction (probabilities)” contain many grey values (the model is highly uncertain).
- Edges are blurry or fading; walls are not well recognised.
- Random patterns or speckles appear instead of recognisable spaces.
- Two rooms that should be separate merge into one.
In the ‘test_images‘ folder, you can find examples of images you can use in this model. Some of these are very similar to those in the training dataset, but others (e.g., the complex multi-room plan, fully separate room plan, or the circle, triangle, and star shapes) are very different. By running these images through the model, you can get an idea of how the model can be applied to shapes outside of its dataset. Most likely, the model will not do perfectly in these cases.

This is the last step of the tutorial. Feel free to play around with this interface as much as you would like, or re-run the notebook to try new model configurations!
Simple Floorplan Interior Prediction with CNNs 9/9
Conclusionlink copied
In this tutorial we developped a CNN-based model for generating interior space mappings on simple floorplans. Feel free to re-do the tutorial as many times as you like. Adjusting model parameters can give you better insights into what they do.
You can also check out the video below, for a visual step by step tutorial. If you have any questions about this tutorial, please feel free to contact me at a.g.e.sterrenberg@tudelft.nl.
Write your feedback.
Write your feedback on "Simple Floorplan Interior Prediction with CNNs"".
If you're providing a specific feedback to a part of the chapter, mention which part (text, image, or video) that you have specific feedback for."Thank your for your feedback.
Your feedback has been submitted successfully and is now awaiting review. We appreciate your input and will ensure it aligns with our guidelines before it’s published.