Rhino Introduction
-
Intro
-
Starting up
-
Interface
-
Shading
-
Toolbars and Windows
-
Using Drawing Aids
-
Transformations
-
Organization of data
-
Saving and exporting
-
Conclusion
Information
| Primary software used | Rhino |
| Course | Rhino Introduction |
| Primary subject | 3D Modelling |
| Secondary subject | 3D modelling |
| Level | Beginner |
| Last updated | November 11, 2024 |
| Keywords |
Responsible
| Teacher | |
| Faculty |
Rhino Introduction 0/9
Rhino Introduction
In this tutorial you will learn the very basics of Rhinoceros software.
Rhino Introduction 1/9
Starting uplink copied
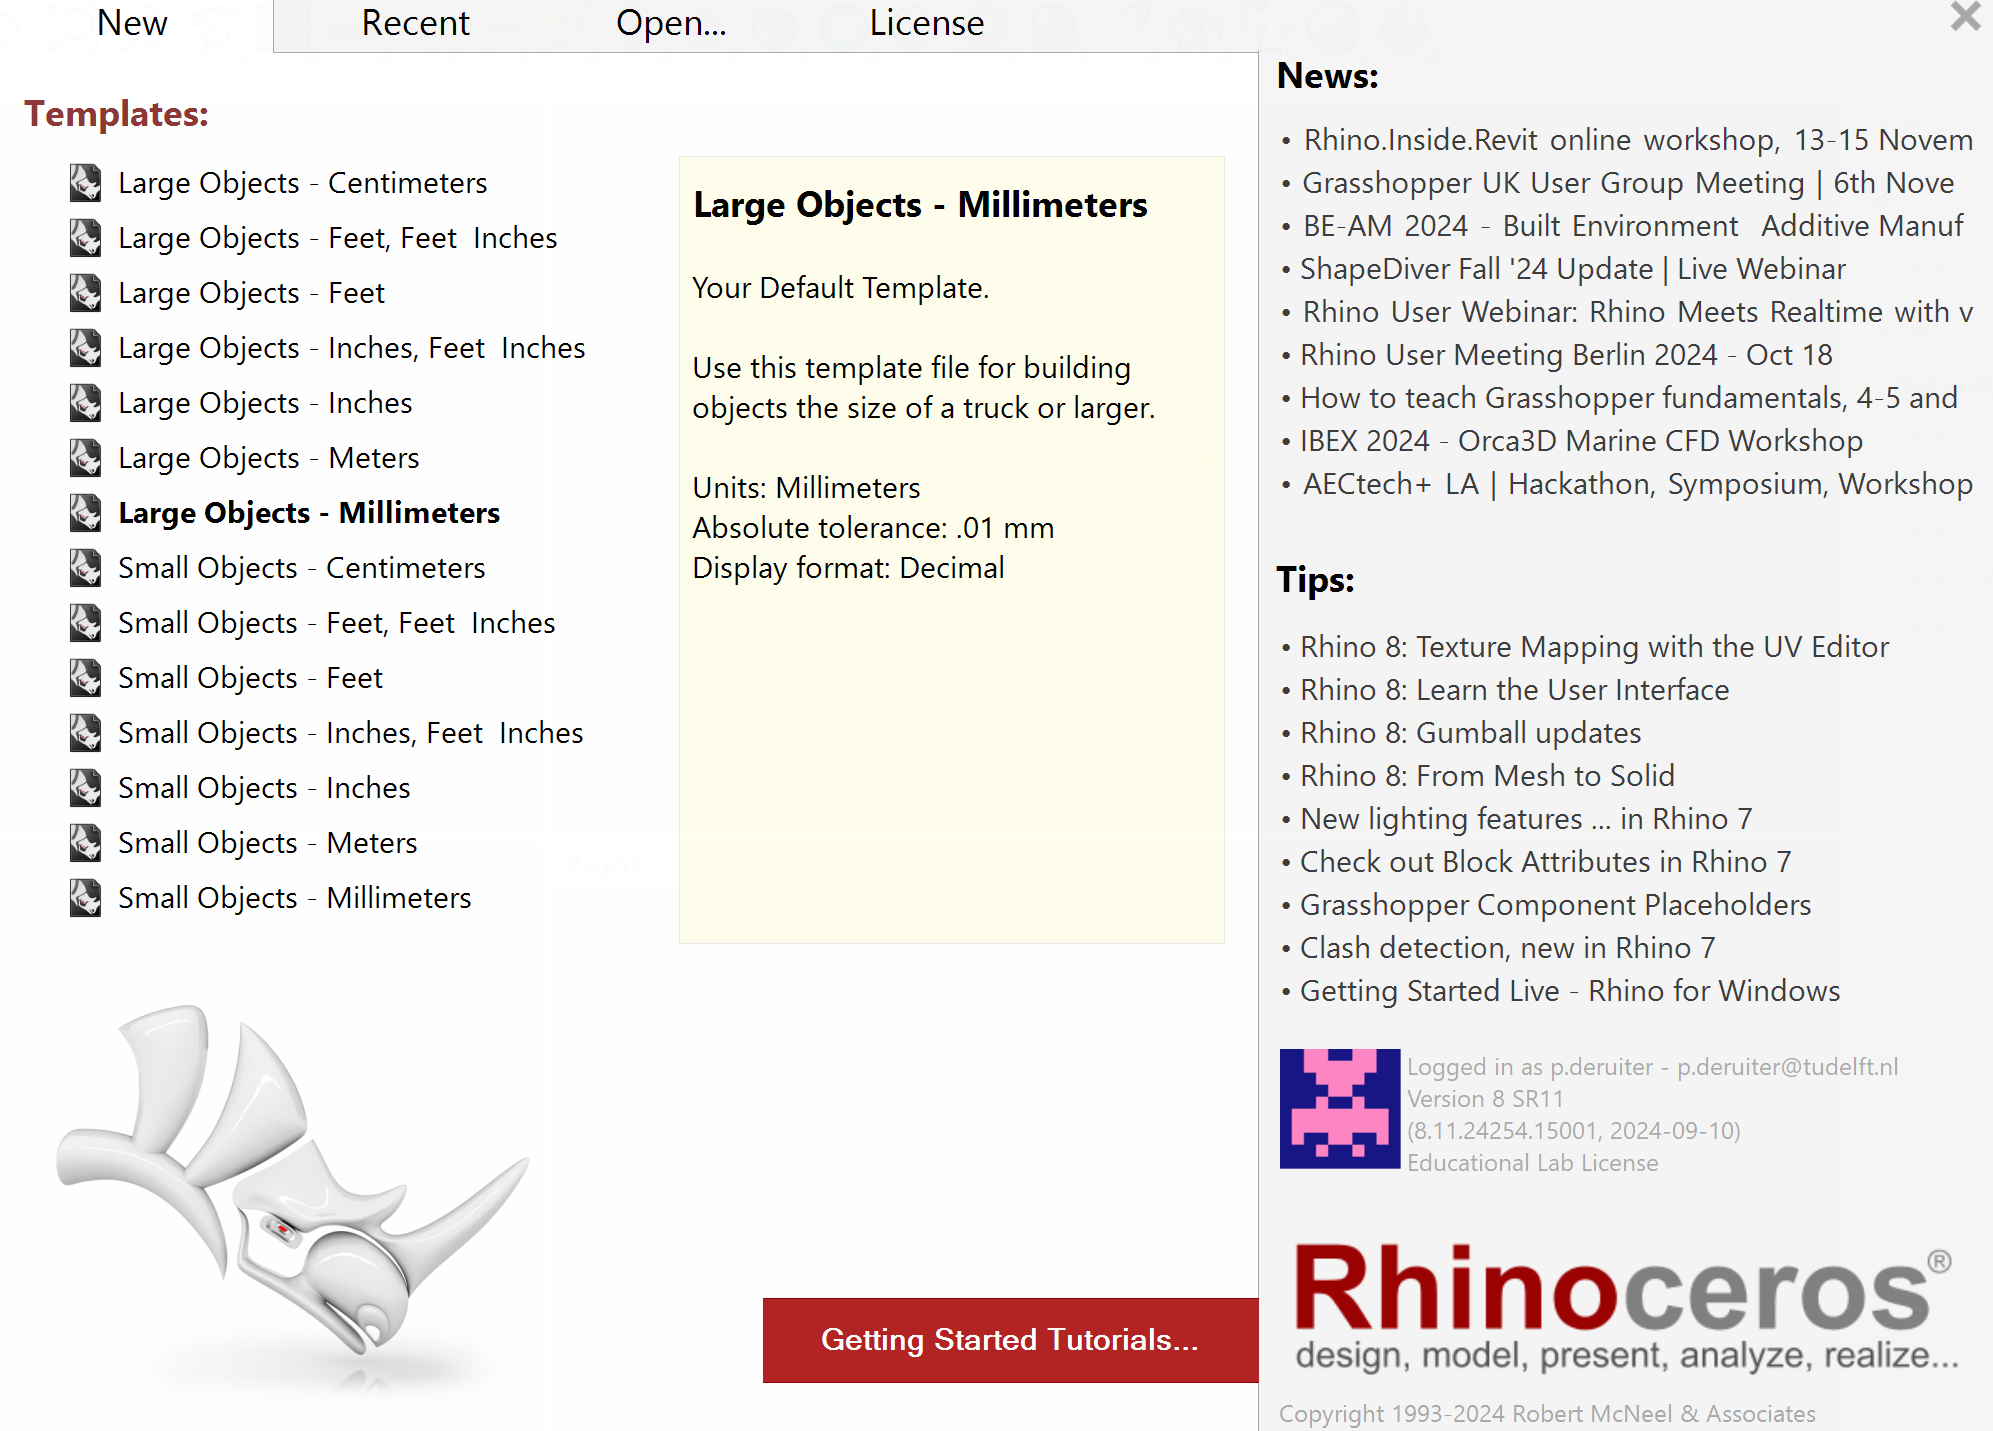
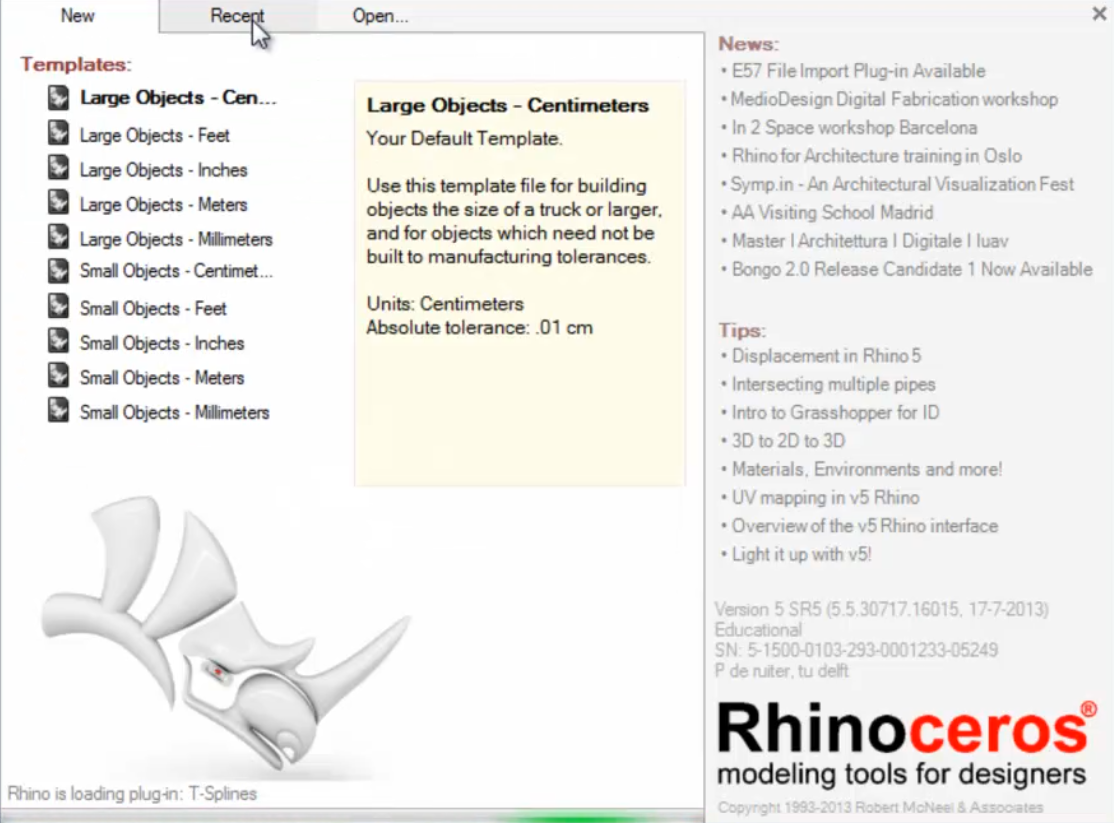
When you start up rhino you will get a menu asking on what scale you want to work. The options are small and large with different units. Small and large are defined by the size of a truck. So when we design a building we will use the Large option, with mm as unit.
Rhino Introduction 2/9
Interfacelink copied
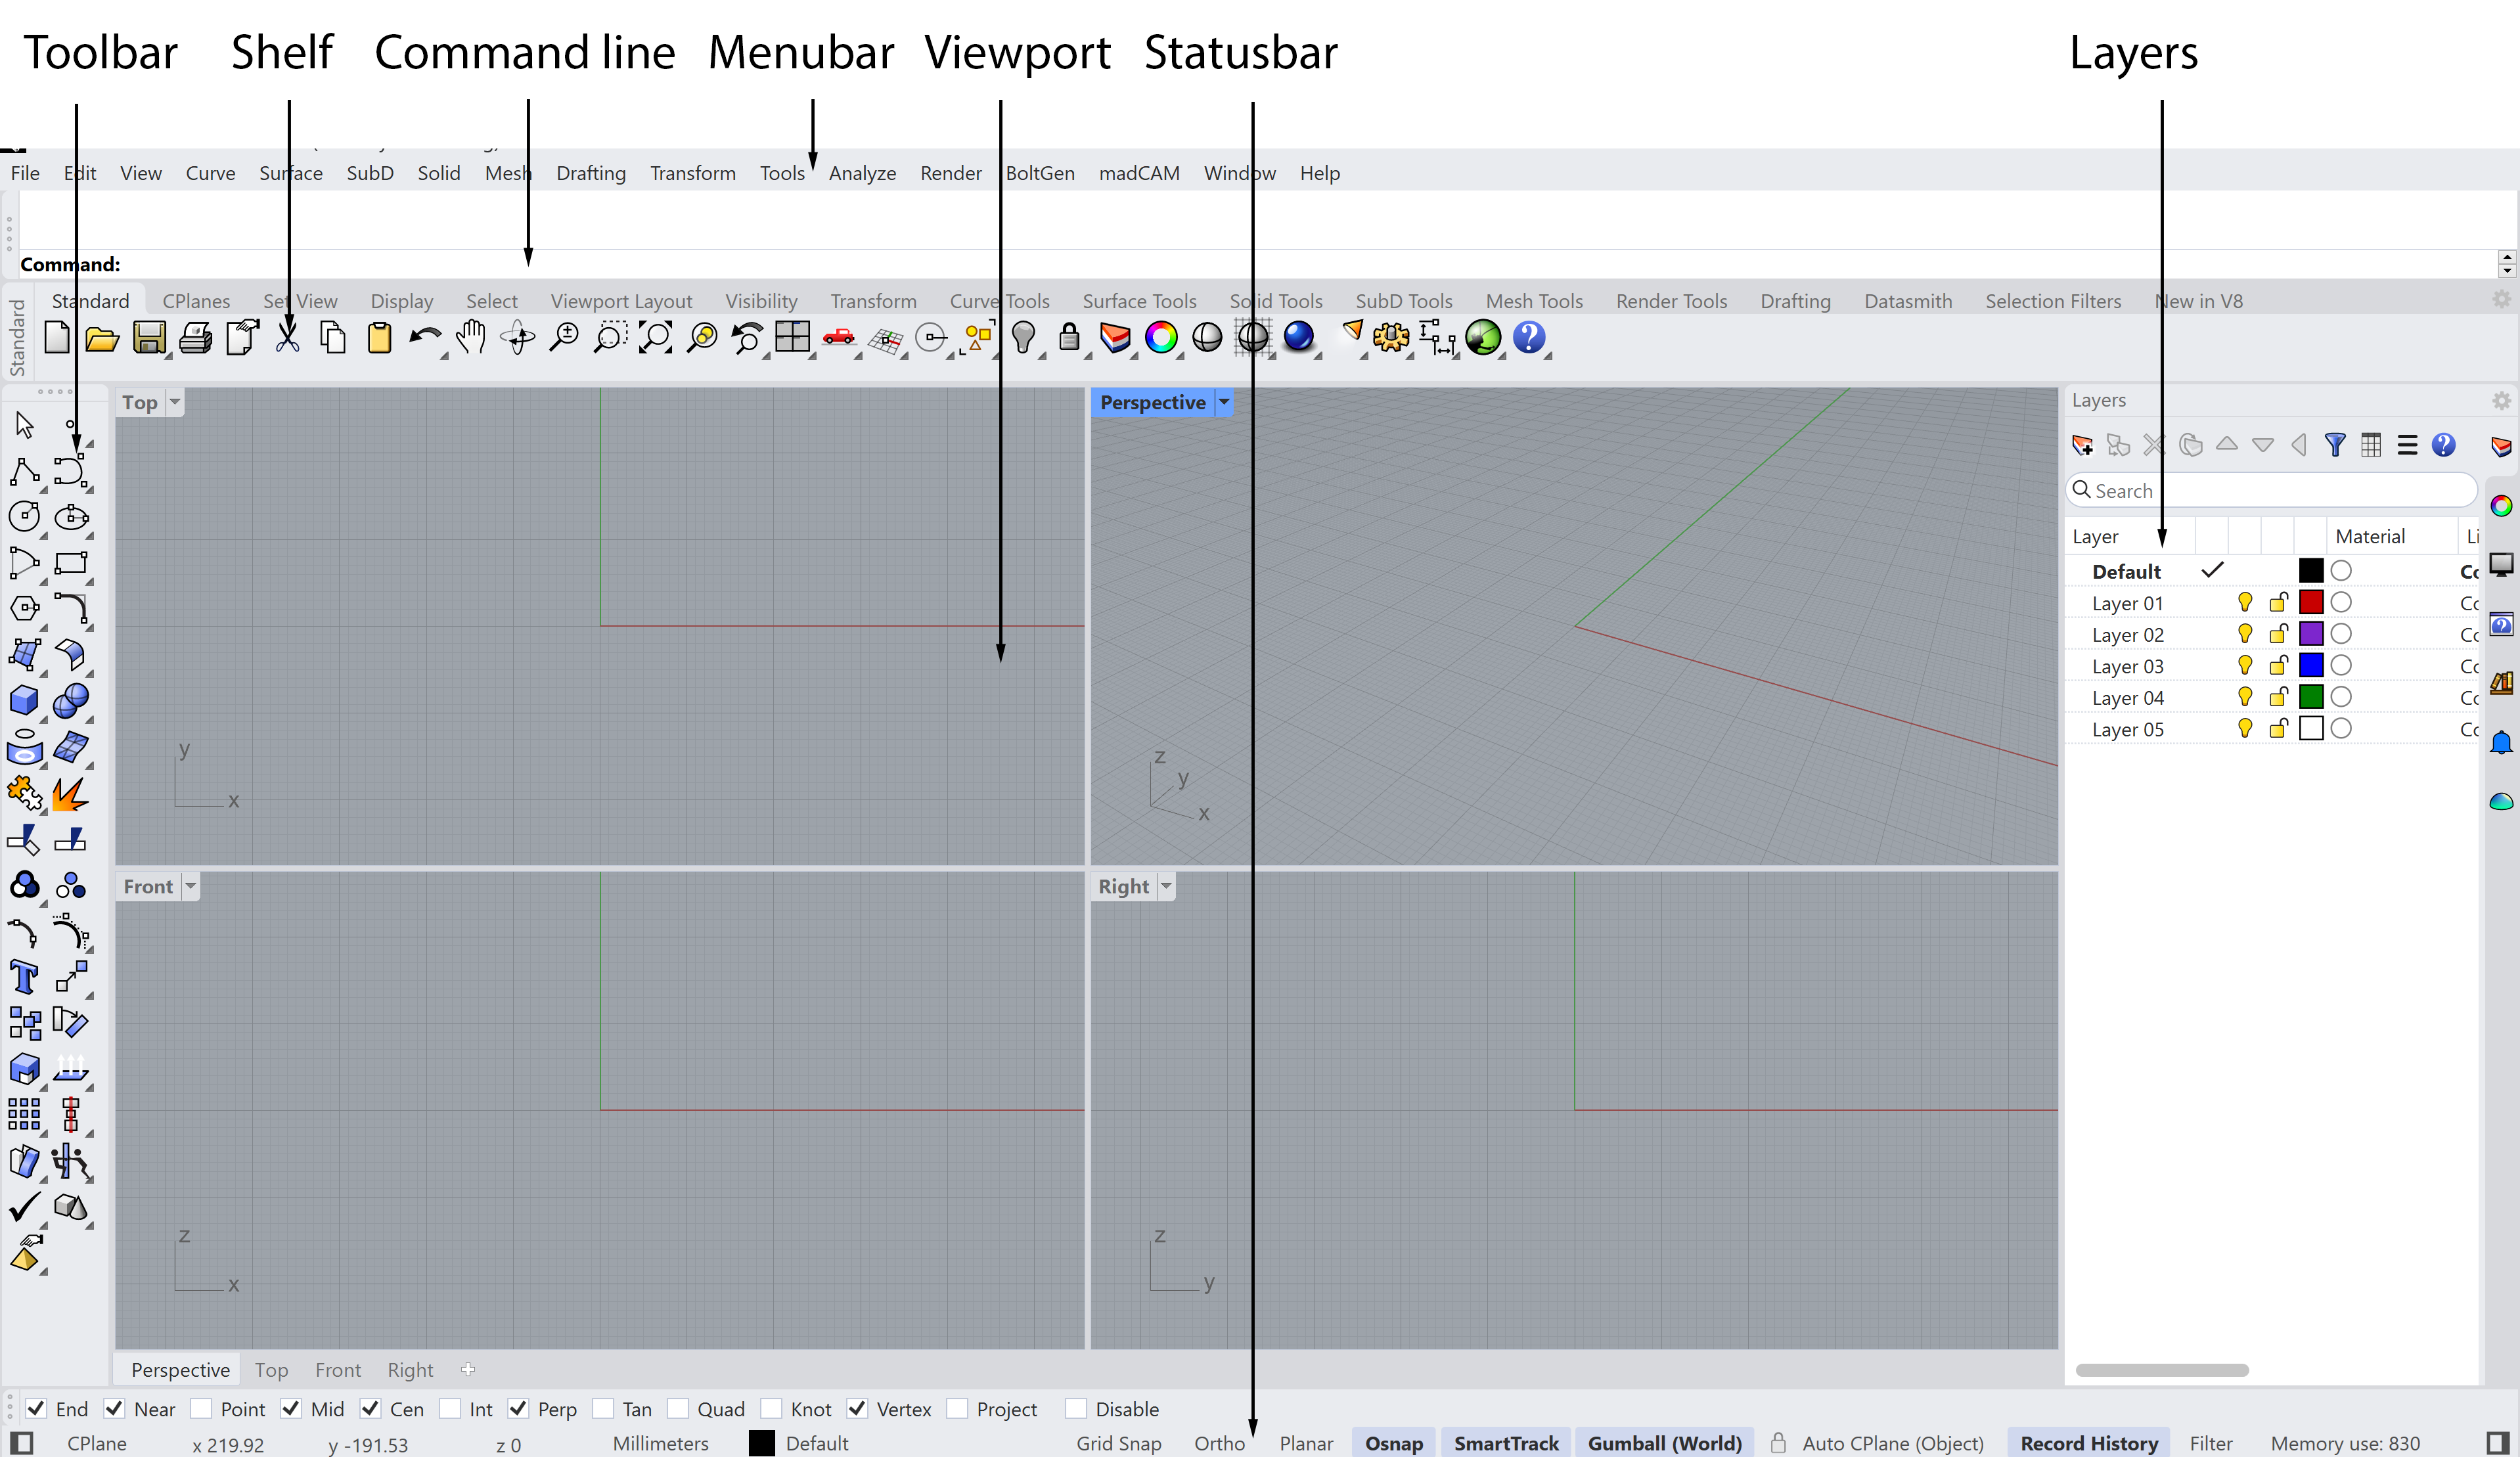
The interface of Rhino is quite straight forward. The interface has similarities with most 2d and 3d programs used at the faculty of Architecture. The drawing options are extensive and support a range of tools which enable the fast generation of complex 3d geometry. Keep in mind that the interface is designed and has a certain logic which is related to the workflow of the program itself.
Graphics Area
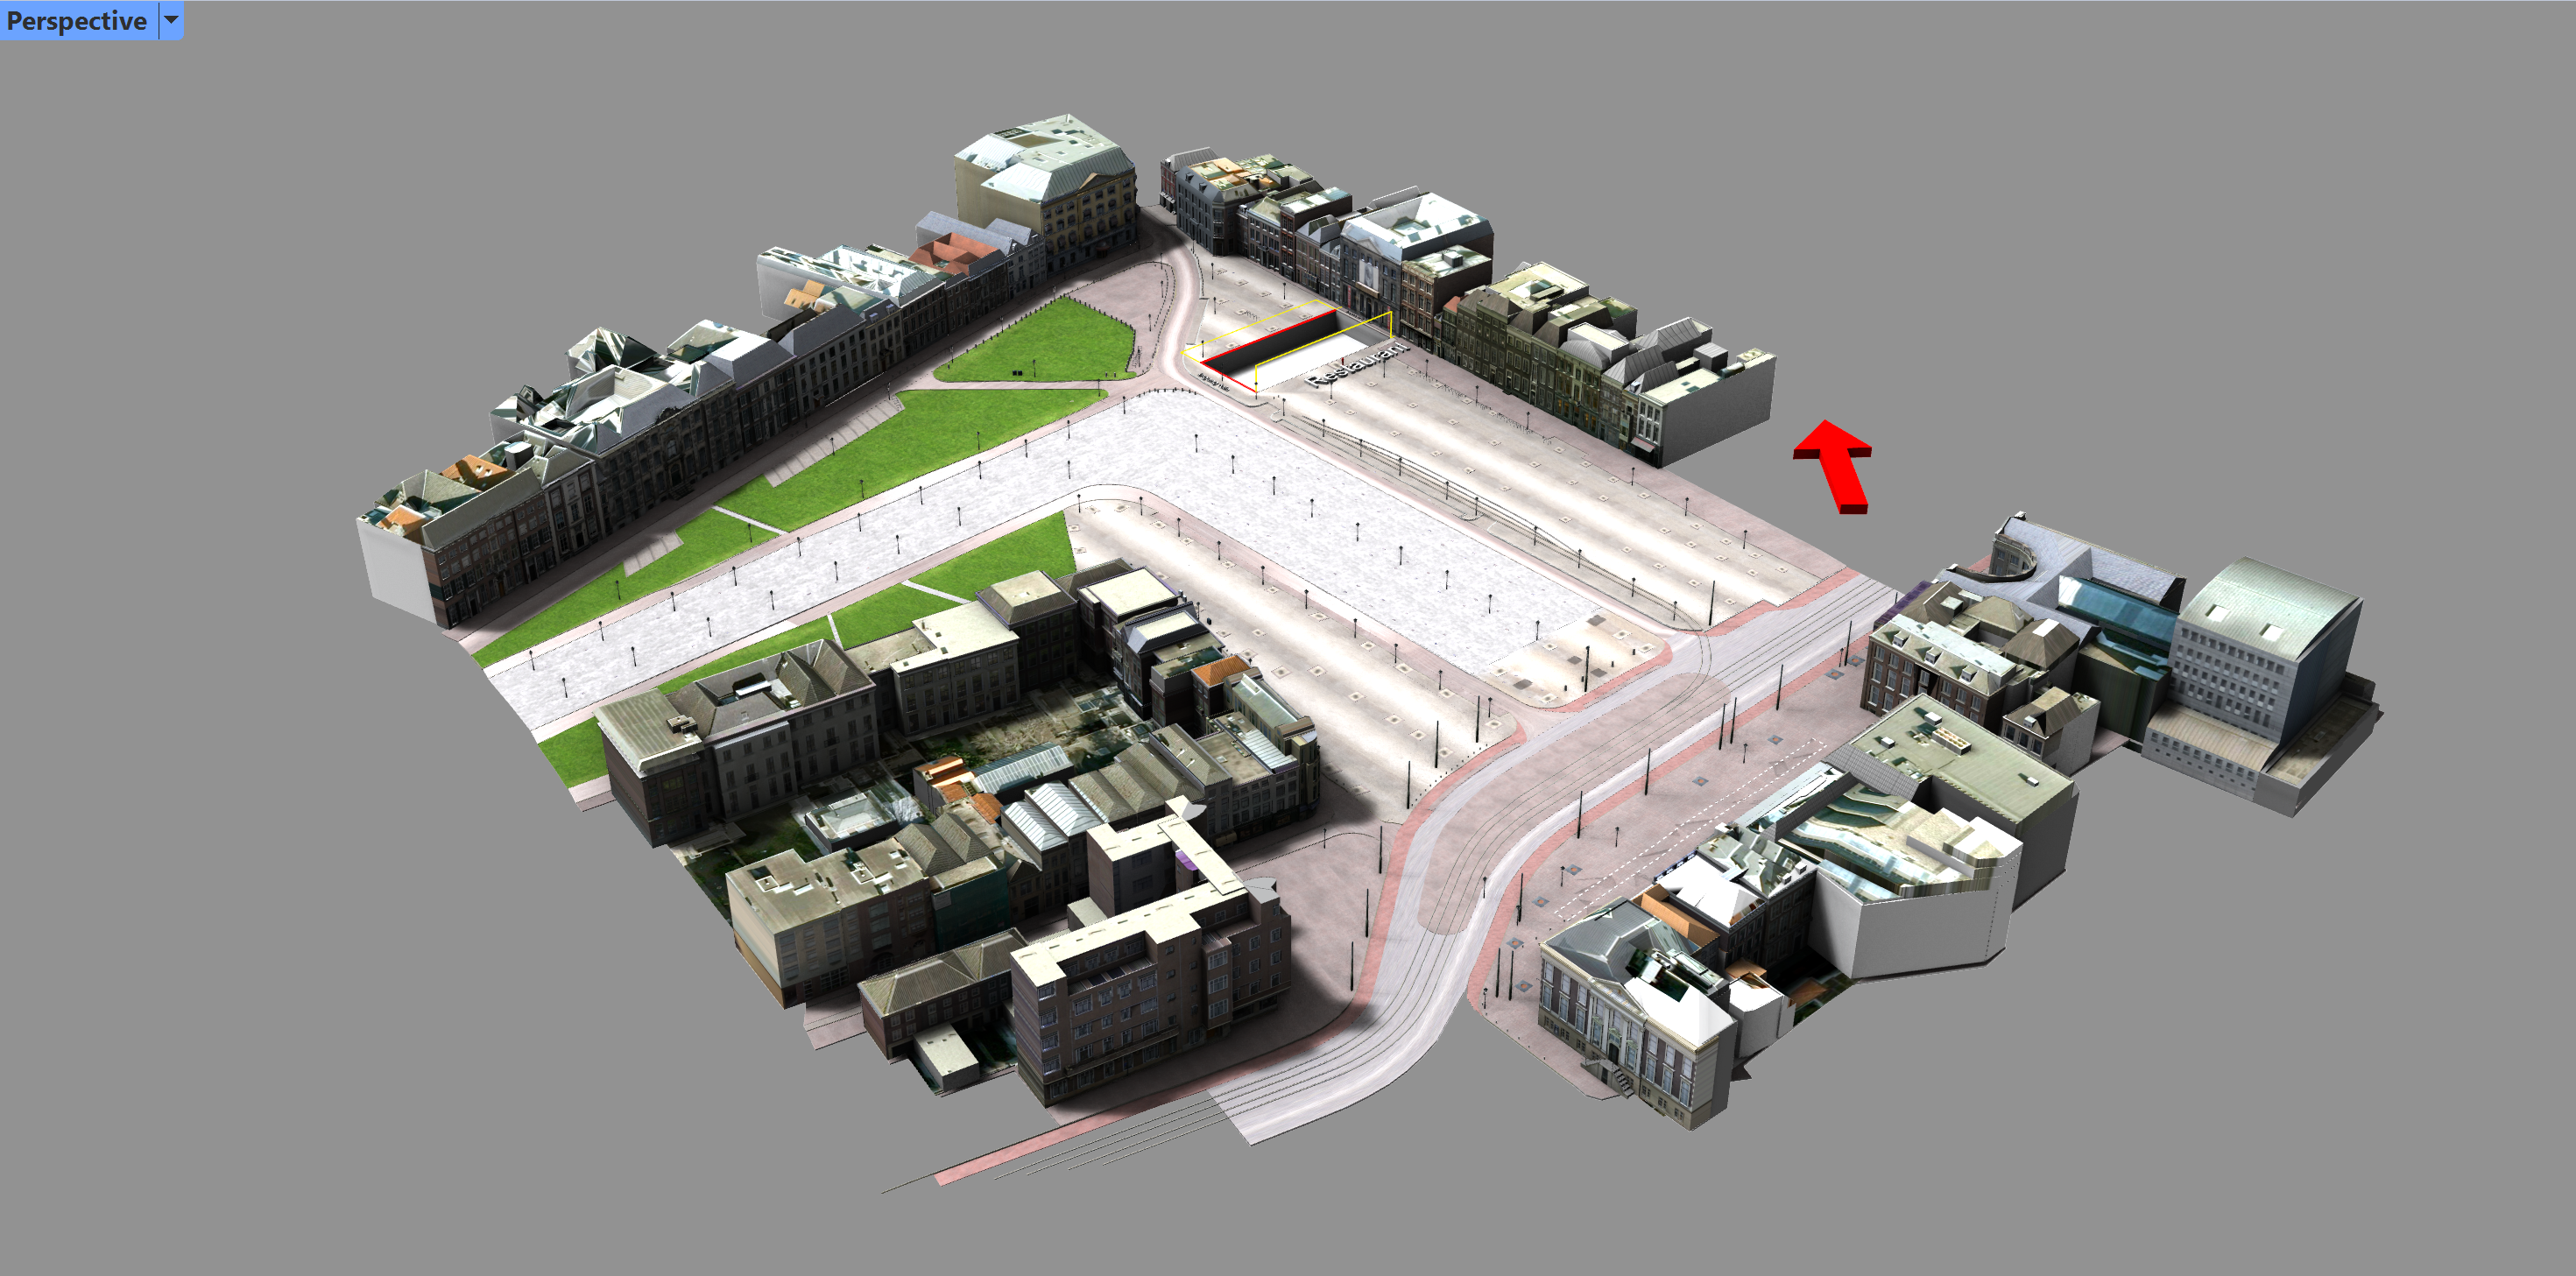
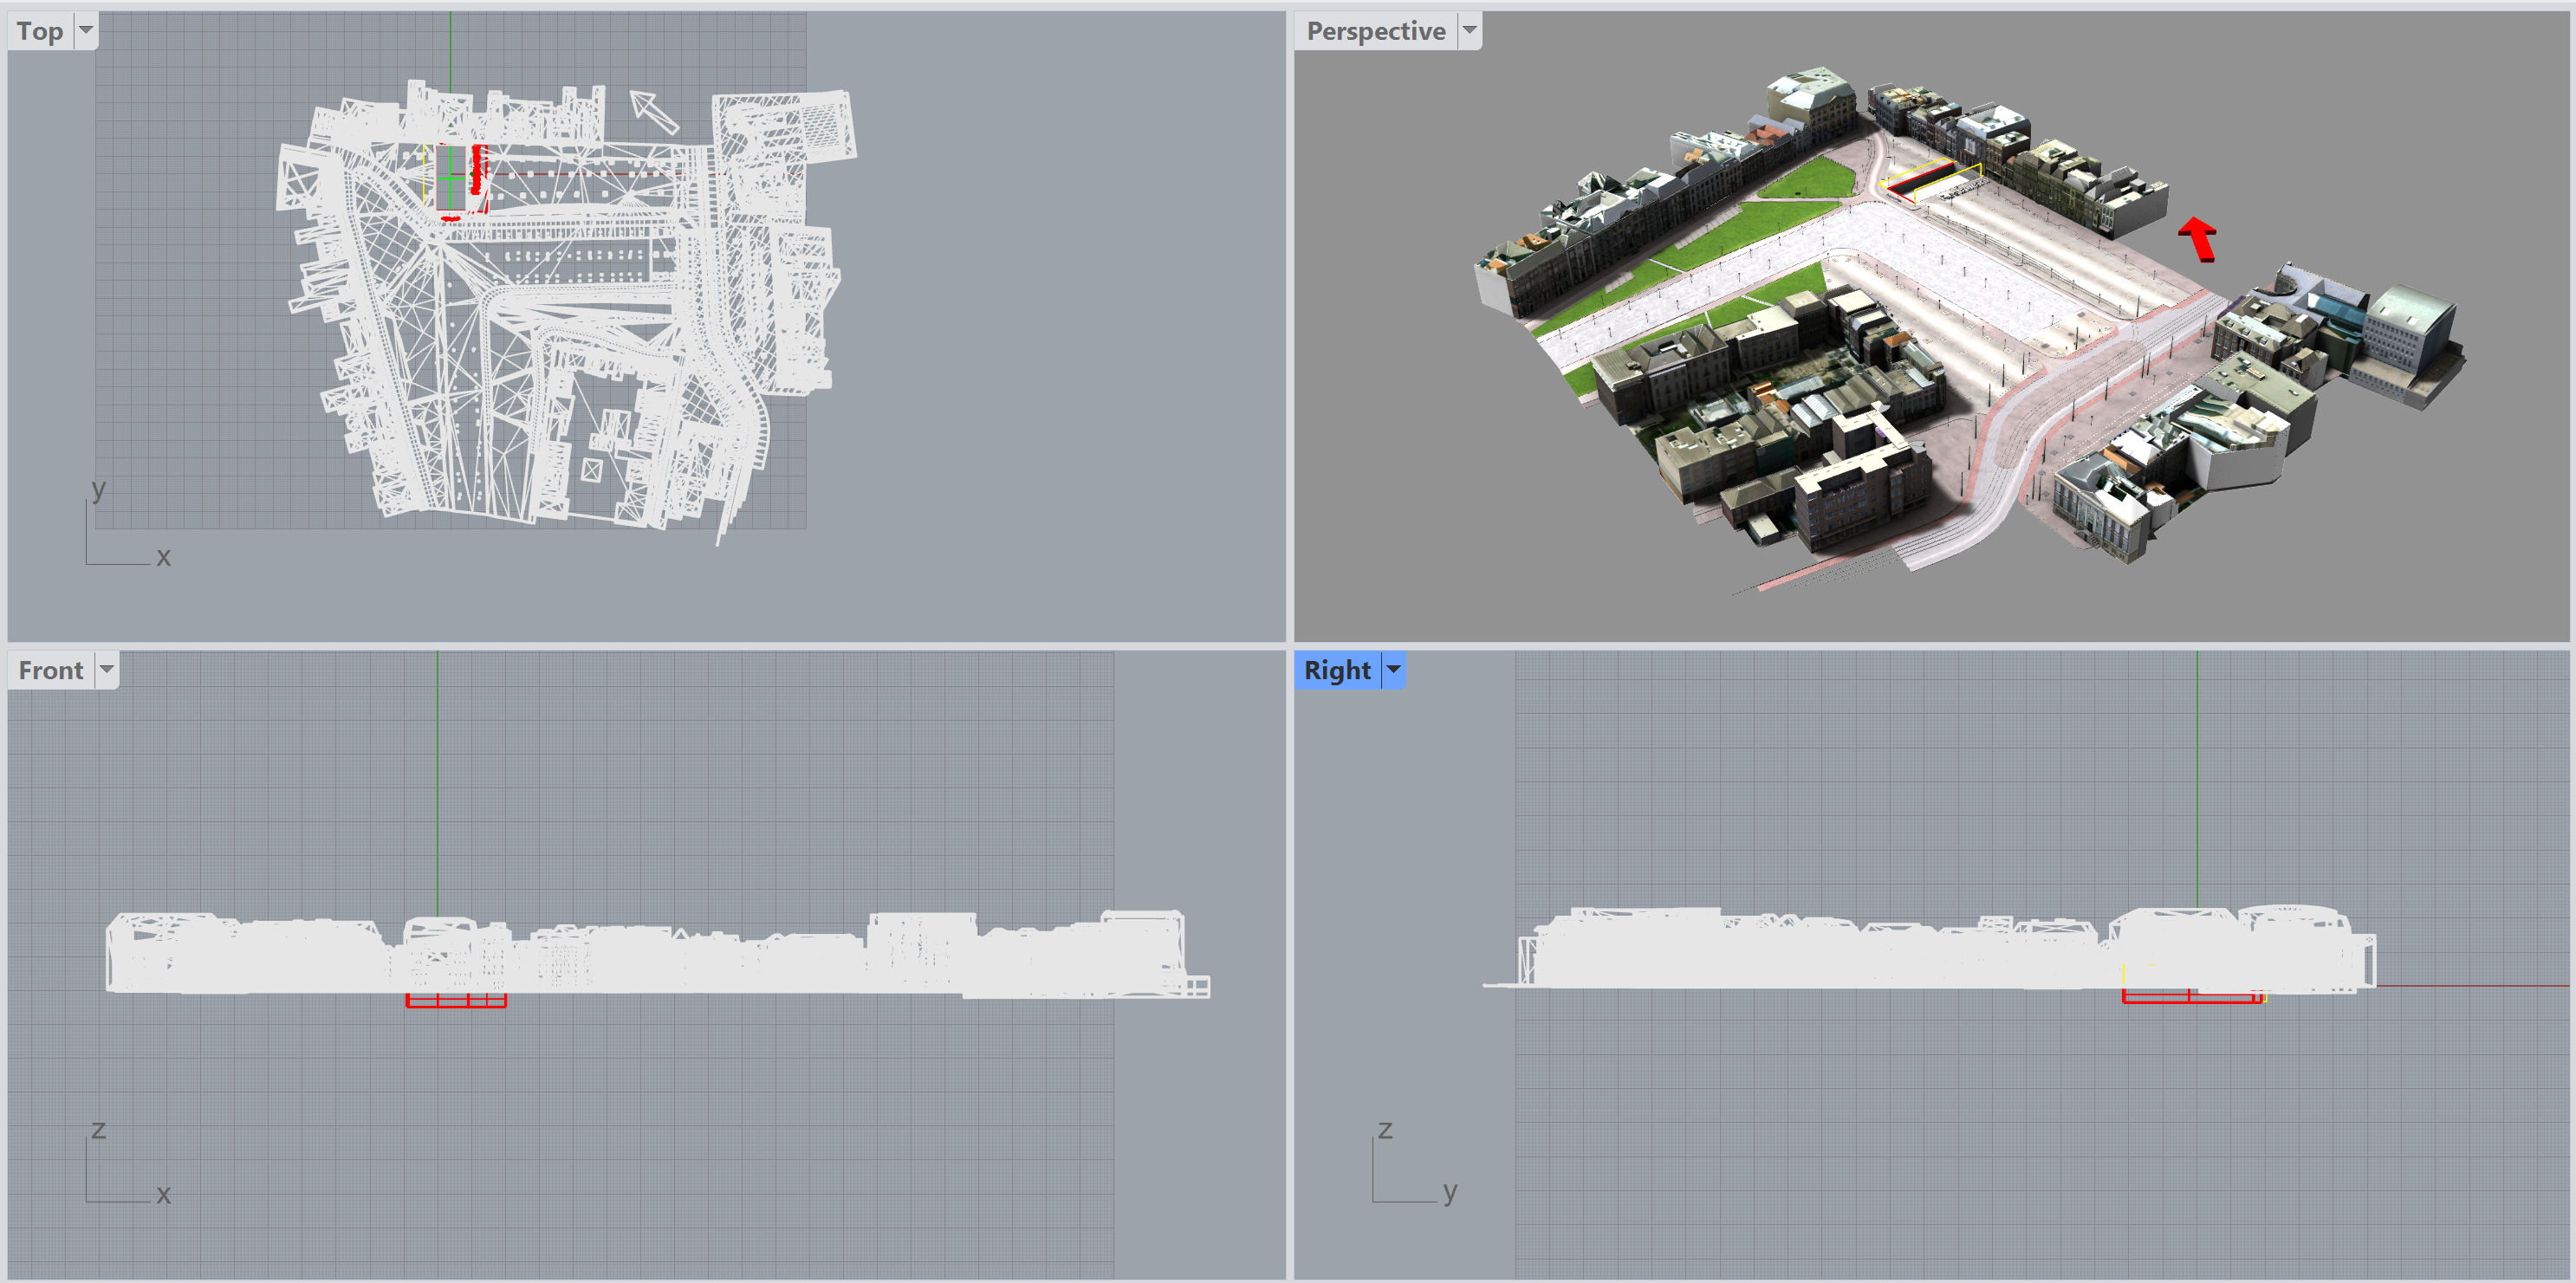
The Rhino graphics area holds the viewports which will display your geometry from various angles. The standard setup for this graphic area is 4 viewports with a perspective view, an orthogonal side, front and top view. Everything you draw will be visible in these viewports; it displays the virtual space.
Coordinate system
This space has a X,Y,Z coordinate system to define positions in virtual space. The axes of this coordinate system can be seen in the left bottom corner of the viewport. Z is Up. The center of the virtual space is the point where the red and green line of the grid meet.

Grid
The grid itself is visual feedback of that coordinate system. The position of viewports can be arranged in different configurations and different camera views.
Viewports
Viewports are the windows in your graphics area that show the different views on your model. The viewport title highlights when it is active. The active viewport is the viewport where all your commands and actions take place
- To move and resize viewports, drag the viewport title or borders.
- To toggle between a small viewport and one that fills the graphics area, double-click the viewport title.
- You can create new viewports, rename viewports, and use predefined viewport configurations by RMB-click on the viewport title or the viewport settings can be changed in the pull-down menu:
Navigation
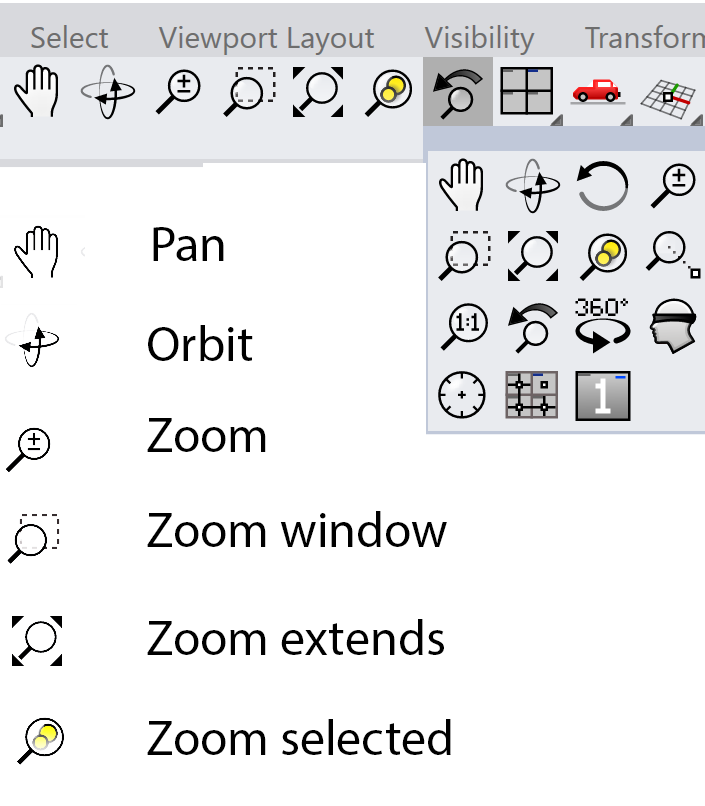
Like any other 3d software Rhino support a whole range of navigation options which enable you to navigate your scene. The most used are the navigation options of Orbiting around an object, Panning and Zoom. This can be done using the mouse and keyboard. Navigation with mouse and keyboard
- RMB = Orbiting around the model (only possible in a 3D view, ie. Perspective)
- RMB + CTRL = Zoom in/out
- RMB + Shift = Panning
Additional tools are available on the Standard Shelf tab.

Rhino Introduction 3/9
Shadinglink copied
Displaying the geometry
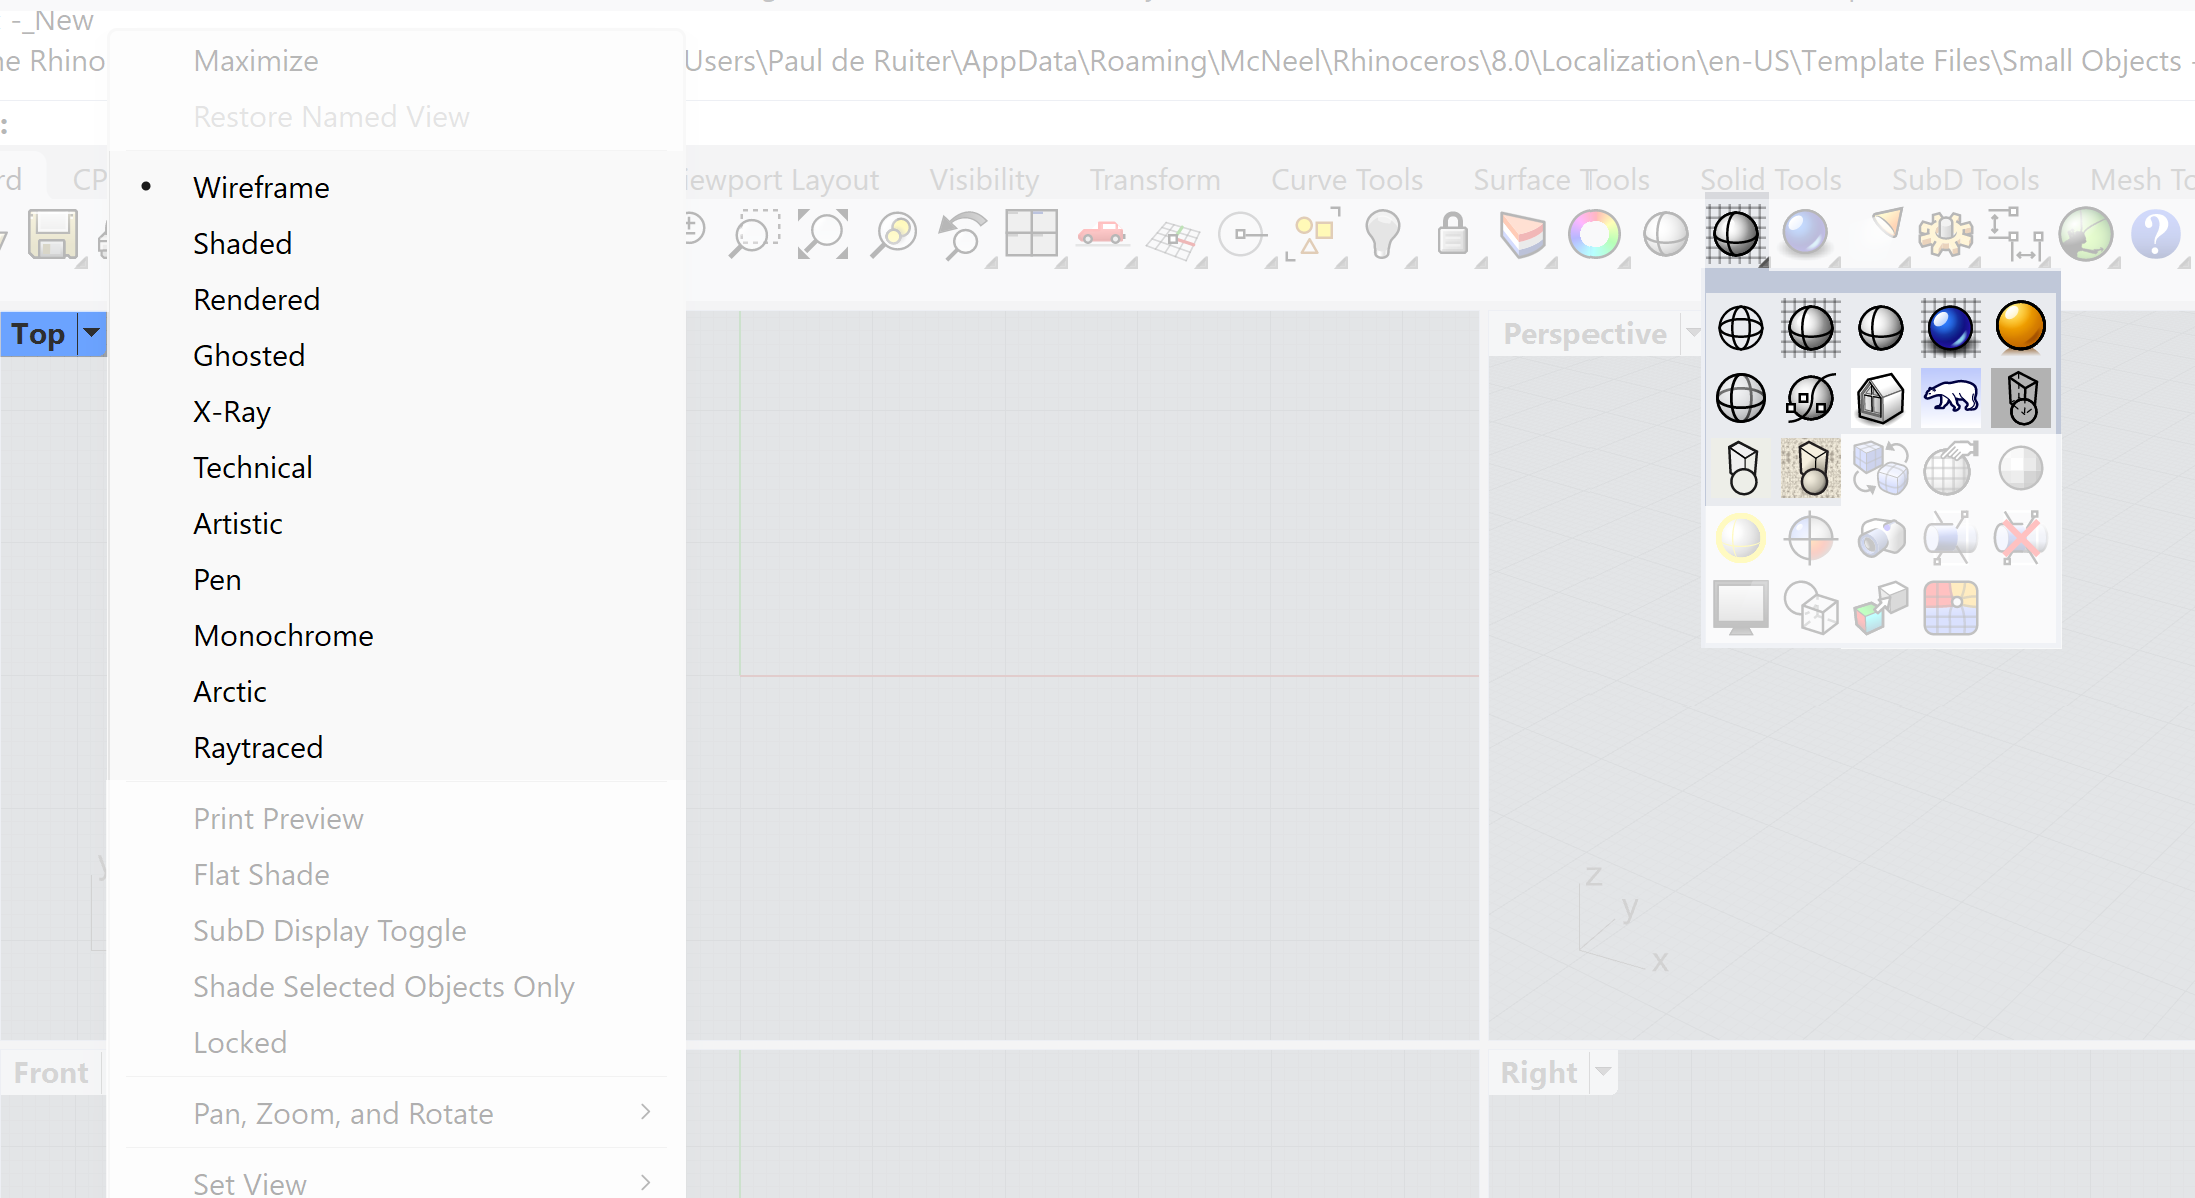
You can not only change the viewports but also how they will display the geometry. There is a whole range of display options from a simple wireframe to realistically rendered.
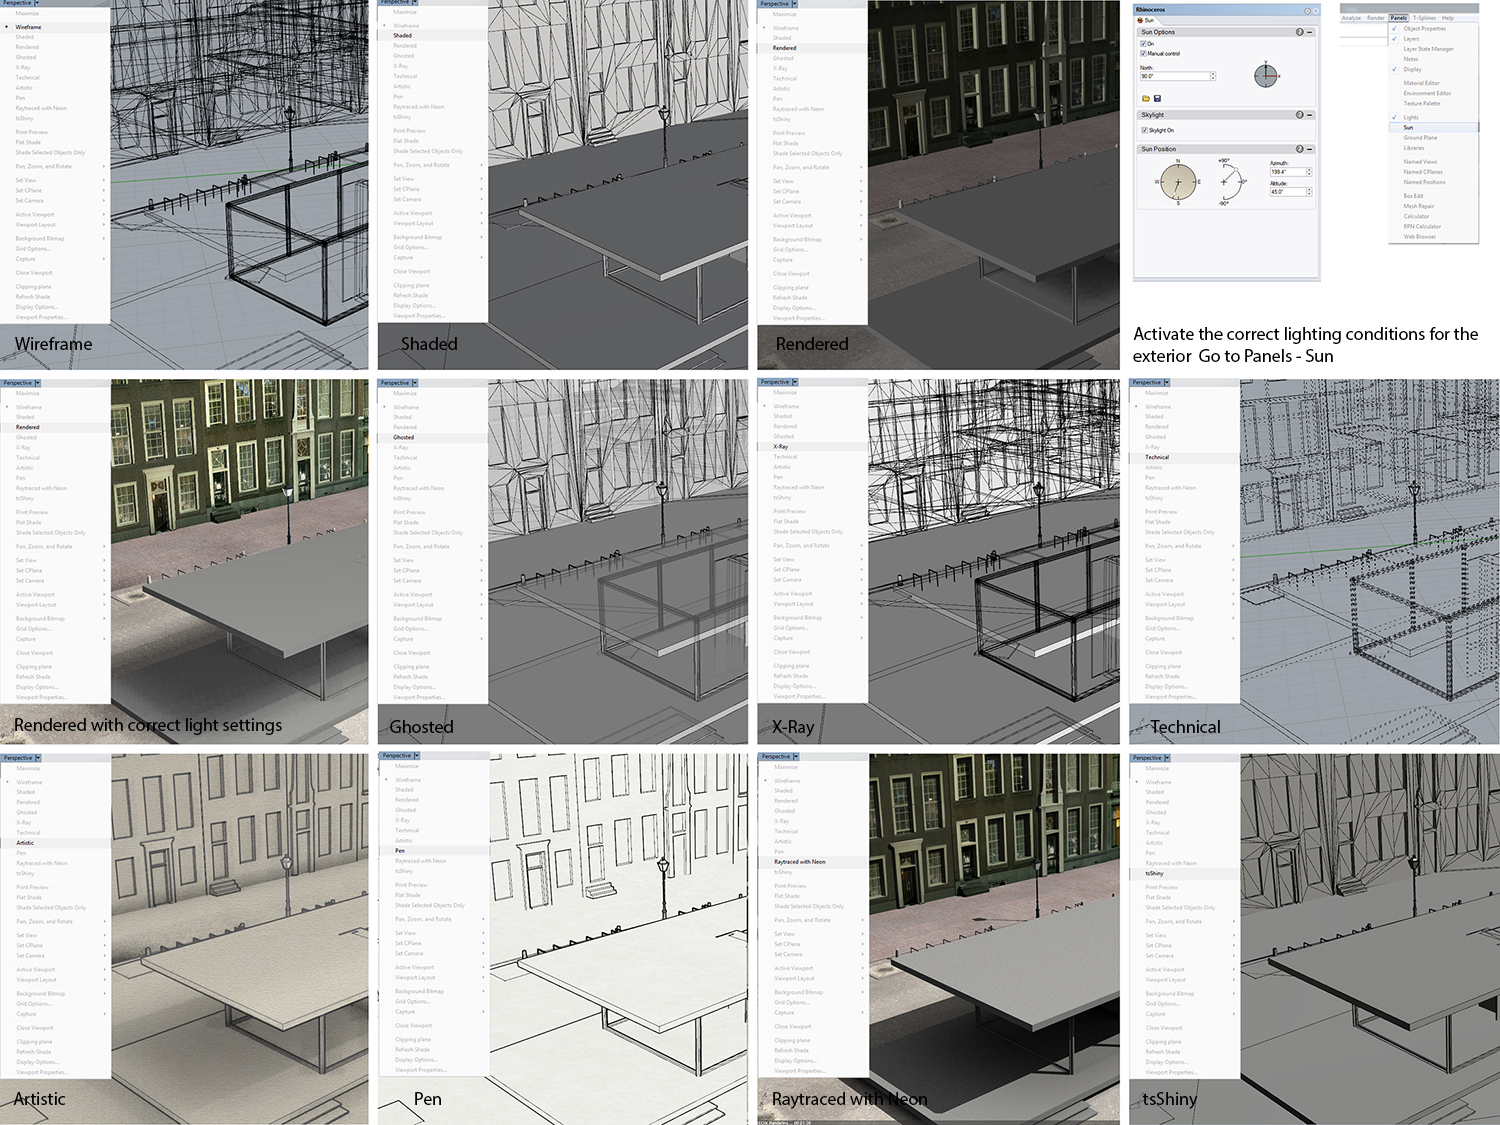
To use the realistically rendered display mode, you need to set up lighting of your geometry. One way to do this is to set up a sky system using the pull-down menu:
Rhino sun and skydome
In this menu you can activate the Rhino sun and skydome. Together they will generate a realistic lighting situation.
Displaying a print preview of a 2D drawing
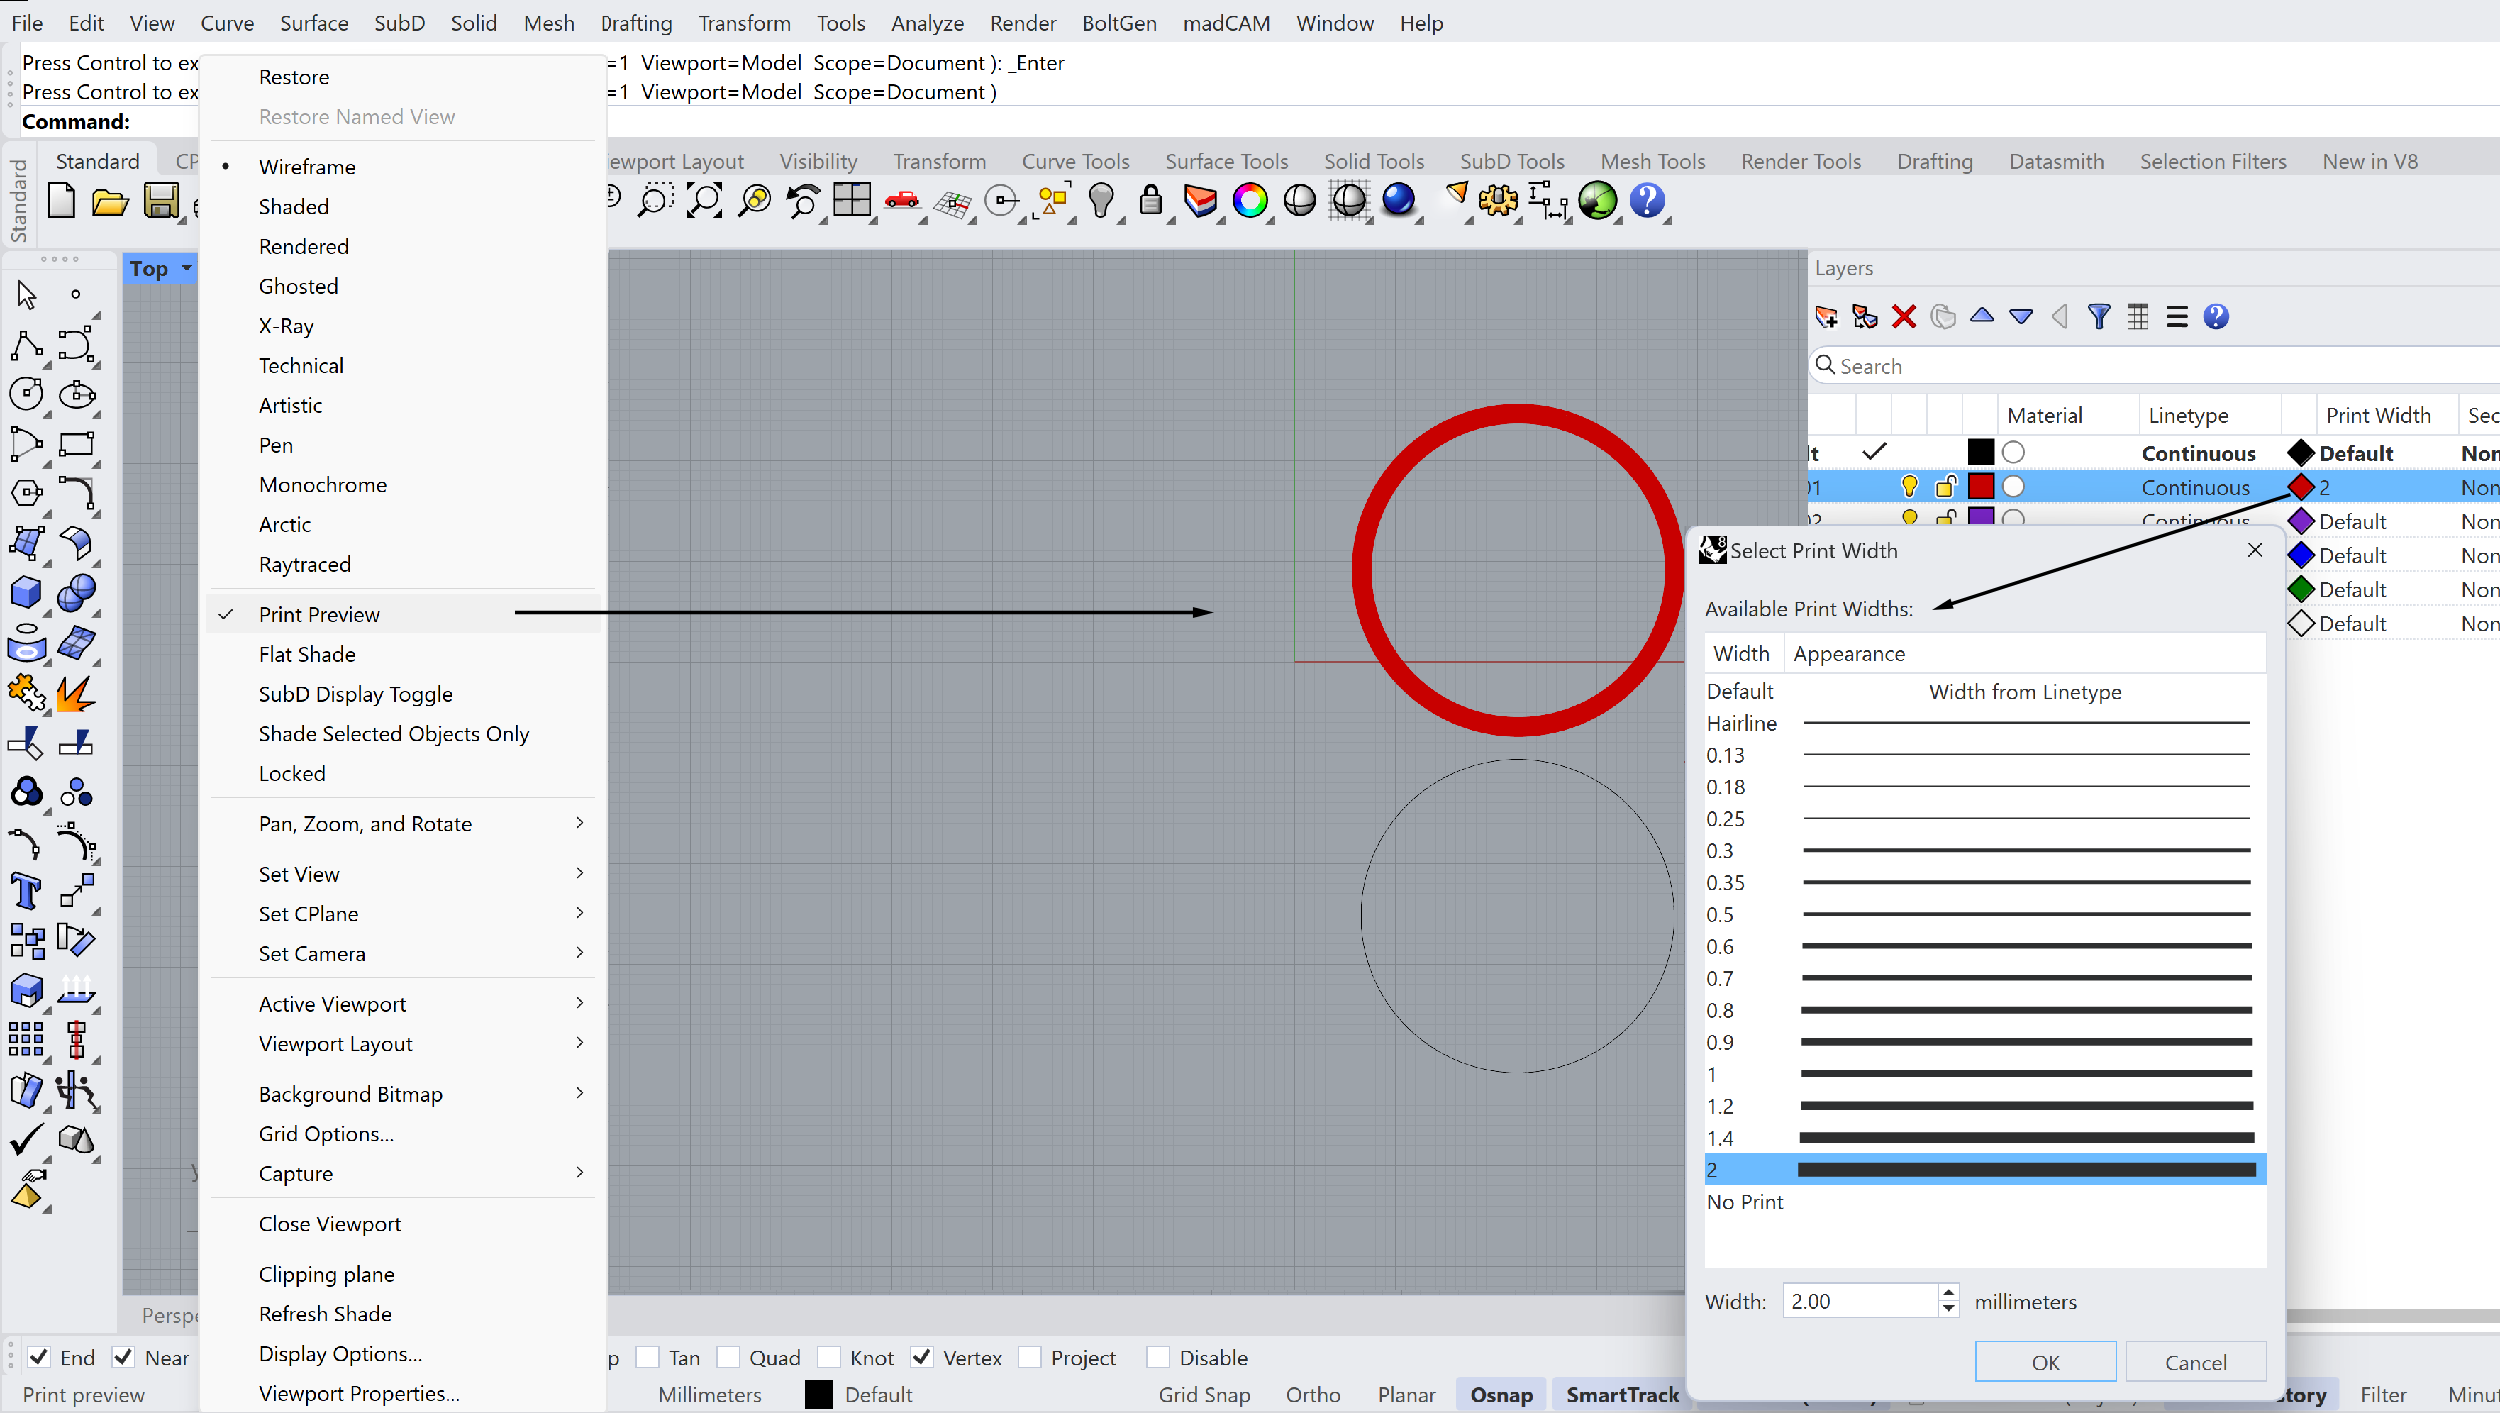
If you are making a 2d technical drawing according to the ruling guidelines, you will know that line thickness is an important part of the readability of a technical drawing. These line thicknesses can be set in the Layer menu for each layer you create. To have an idea how the drawing will look when printed you can activate the Print Preview option in the viewport menu.
Rhino Introduction 4/9
Toolbars and Windowslink copied
Activating Commands
There are four options of activating a command. With each these four options you will have access to almost all the commands available in Rhino. That means that if you choose one option of activating a command you still will have access to all the functionality of Rhino. The reason there are various options of activating a command has partially to do with preference of the user. A skilled user will probably type in the commands, a novice user will use the toolbox or the pull-down menus because they describe the command in the form of an icon or text.
The four options are following:
Menu bar
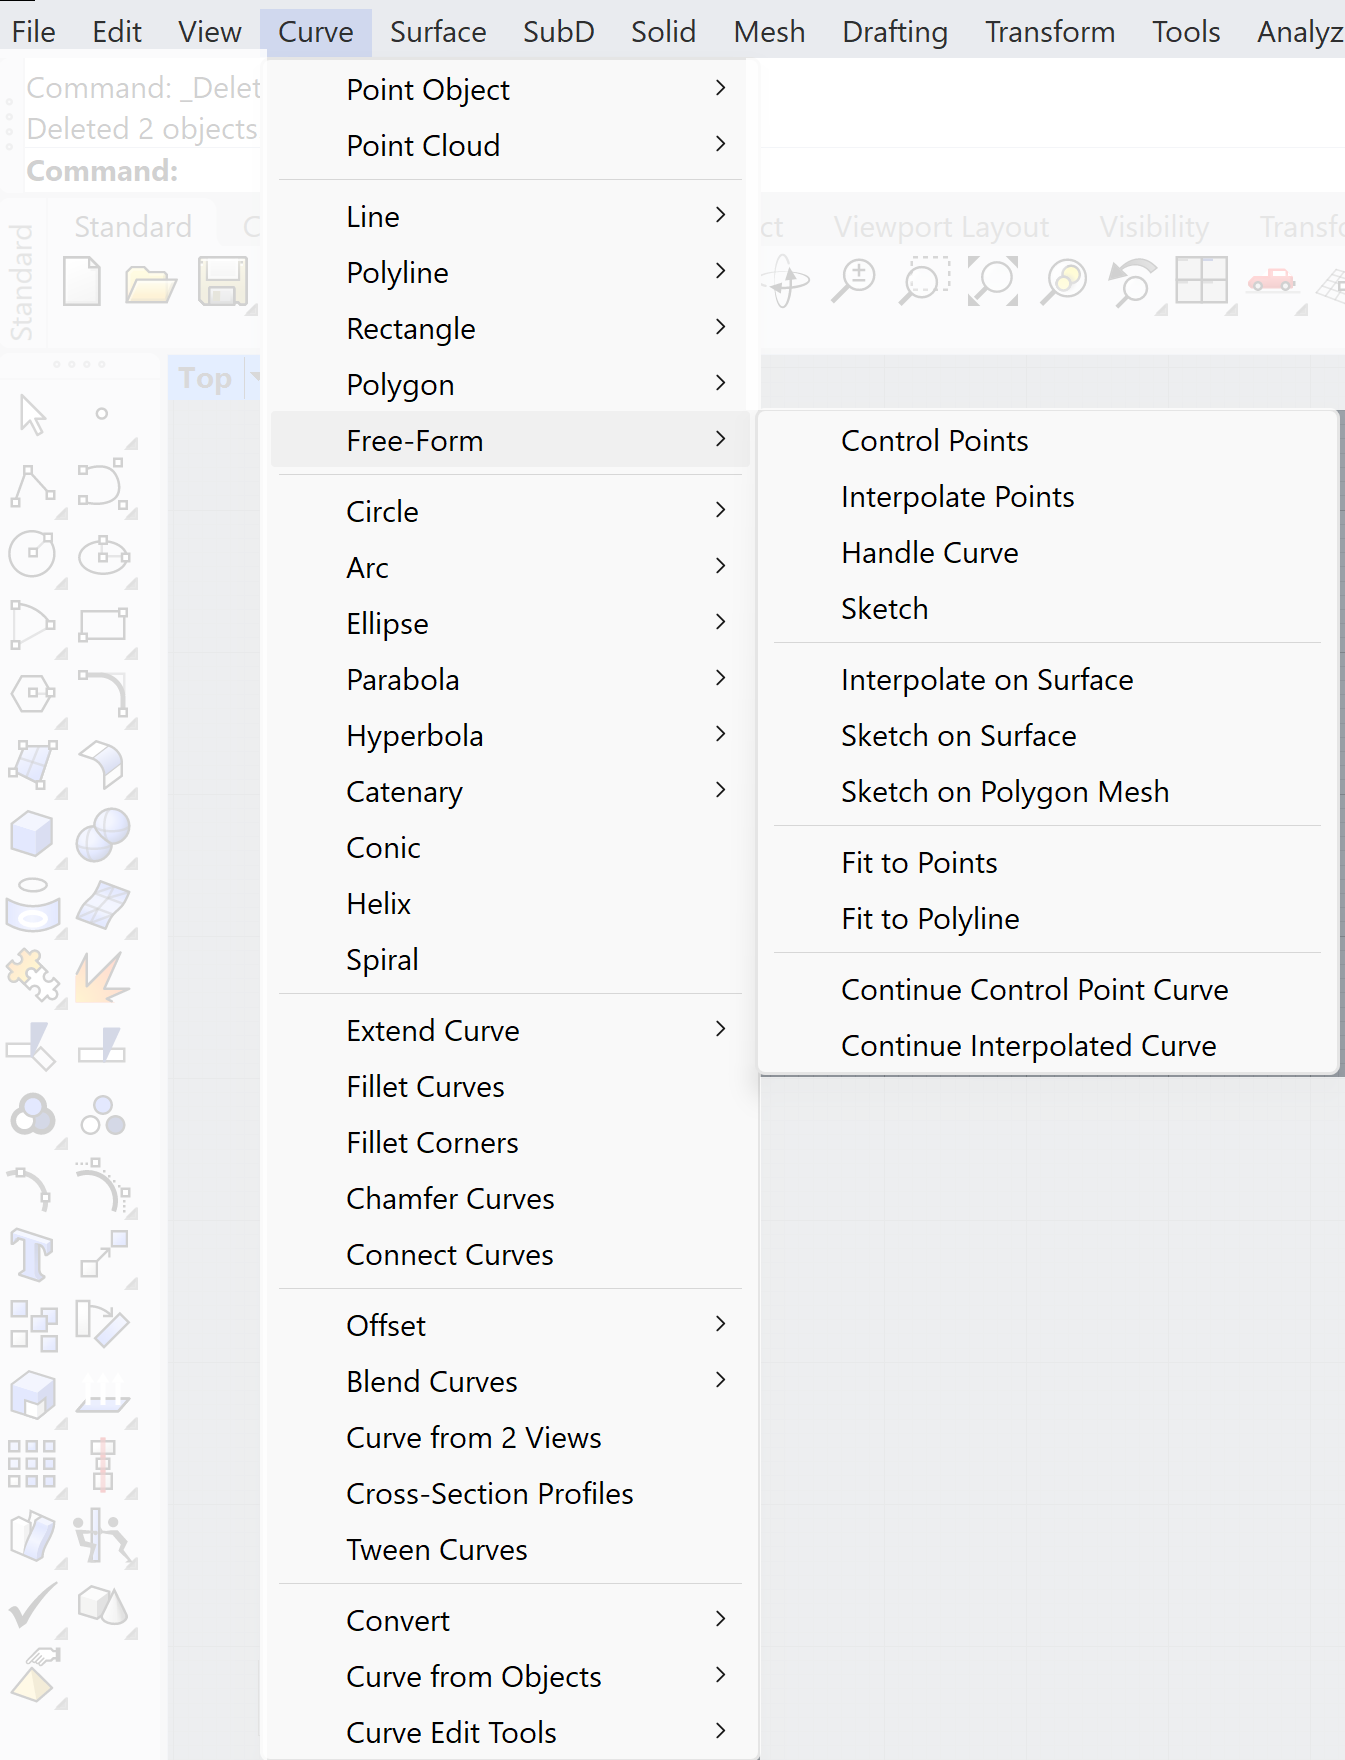
The use of the menu bar. The menu bar gives you access to all the pull-down menus which are available in Rhino. The organization of the commands are such in the pull-down menu’s that you work from left to right and from top to bottom. You start with generating a set of curves, then you generate a surface with the help of the curves, these surfaces can be joined into a solid and the solid can be transformed to a mesh. Although this might sound now unfamiliar, you will recognize this setup once you are start using Rhino.
Command line
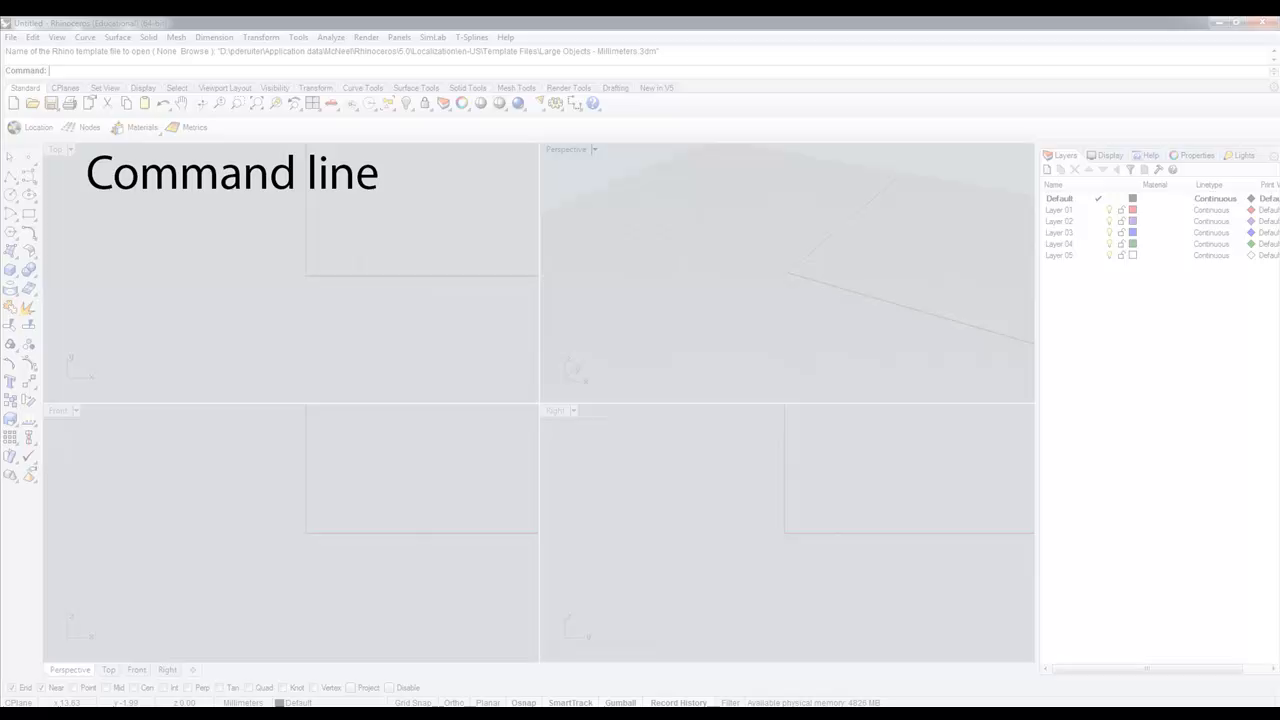
The second option is the command line. It displays commands and command prompts. It is usually docked at the top or the bottom of the screen:
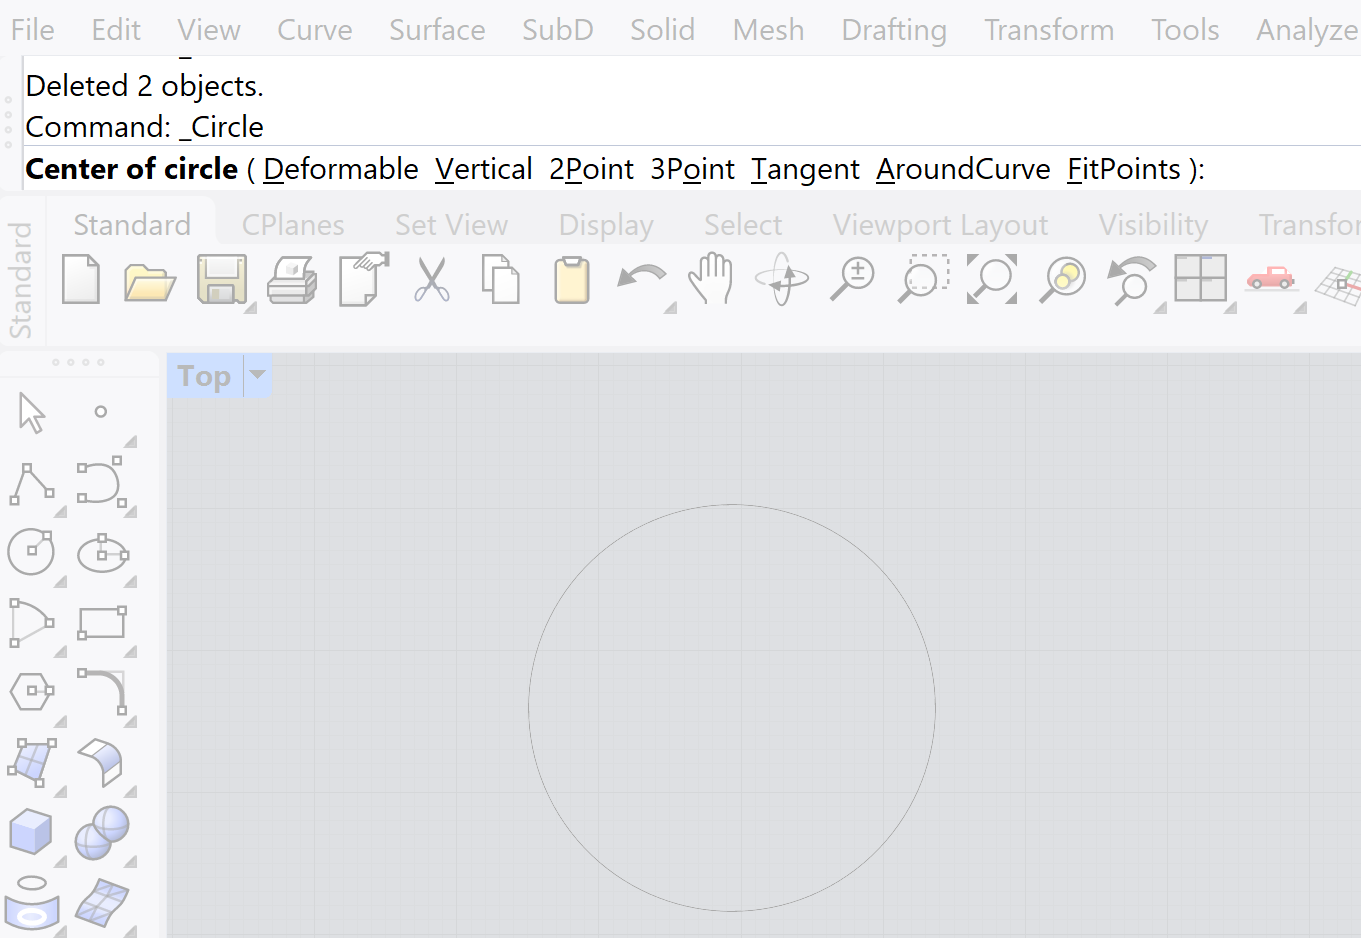
But the command line can float anywhere. The command line is favored by many expert users because it works very fast. However, you need to know the name of the command or you can type the first few letters of a command name to activate the autocomplete command list.
Use the command line to type commands, pick command options, type coordinates, type distances, angles, or radii, type shortcuts, and view command prompts. To enter information typed at the command line, press Enter or Spacebar.
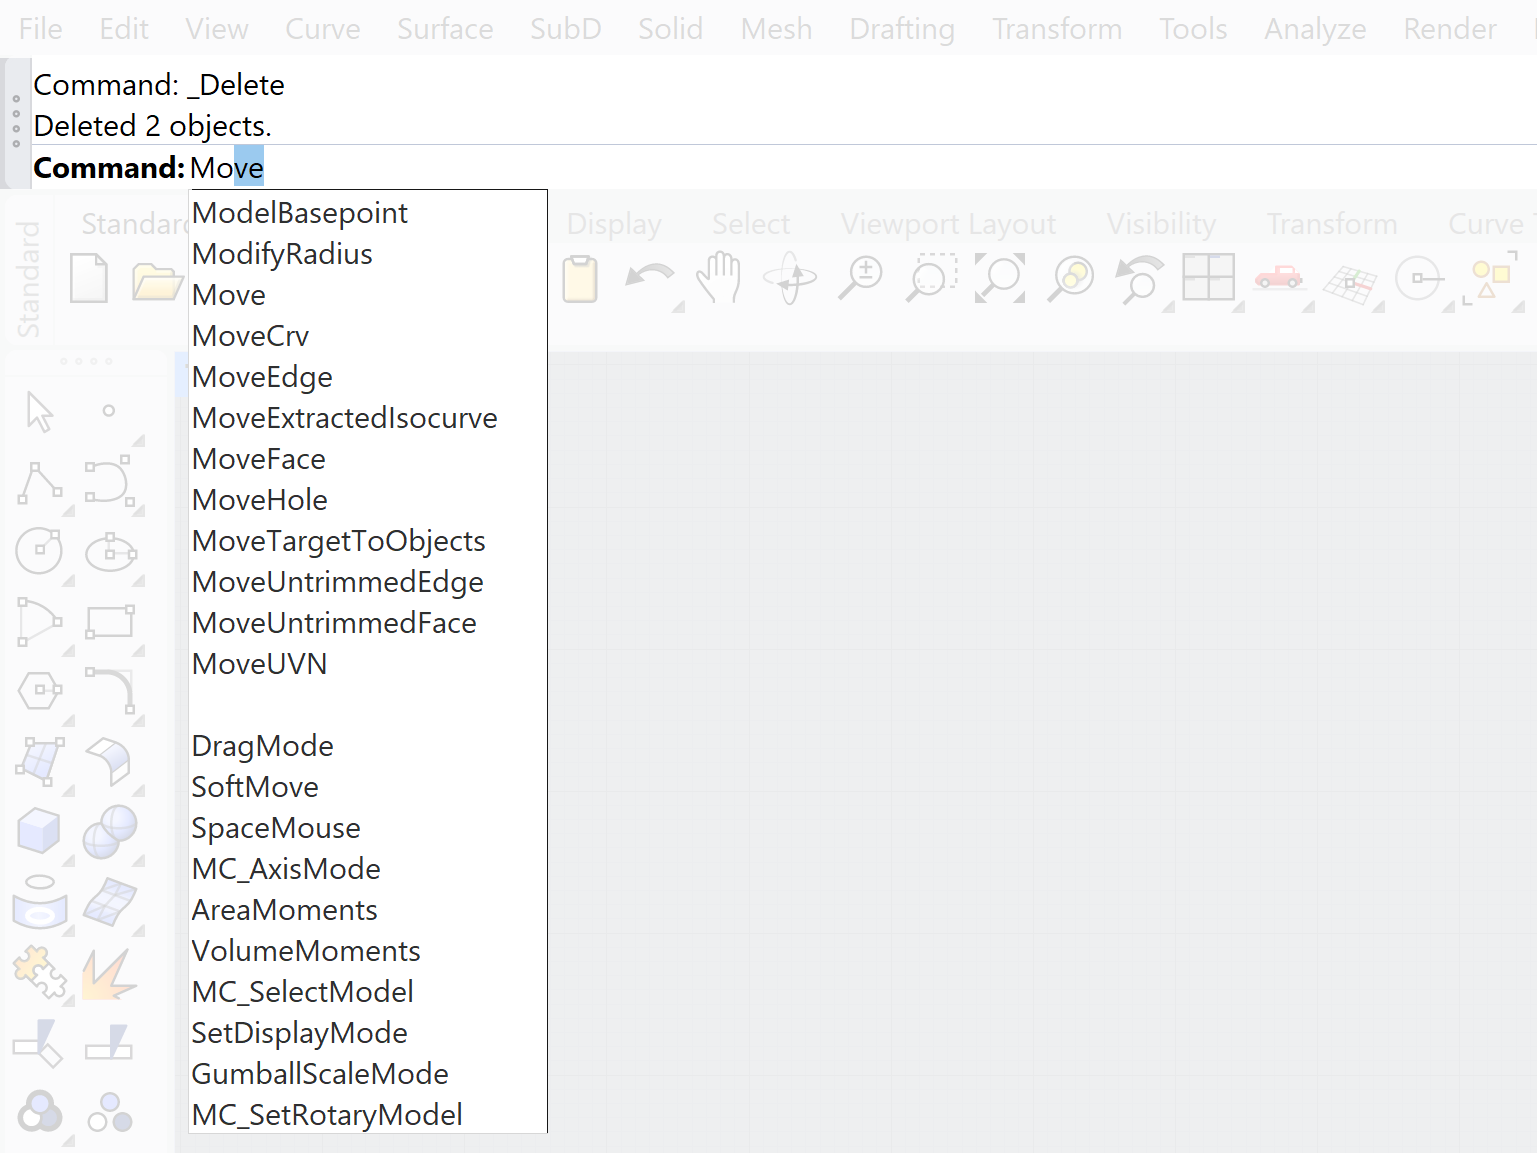
When enough letters of the command are typed so that it is unique, the command name completes on the command line. Press Enter to activate the command once the full command name appears. As you type command names, the autocomplete command list appears. As you type more letters, the list is narrowed down to the possible commands. Left click on the command in the list to start it.
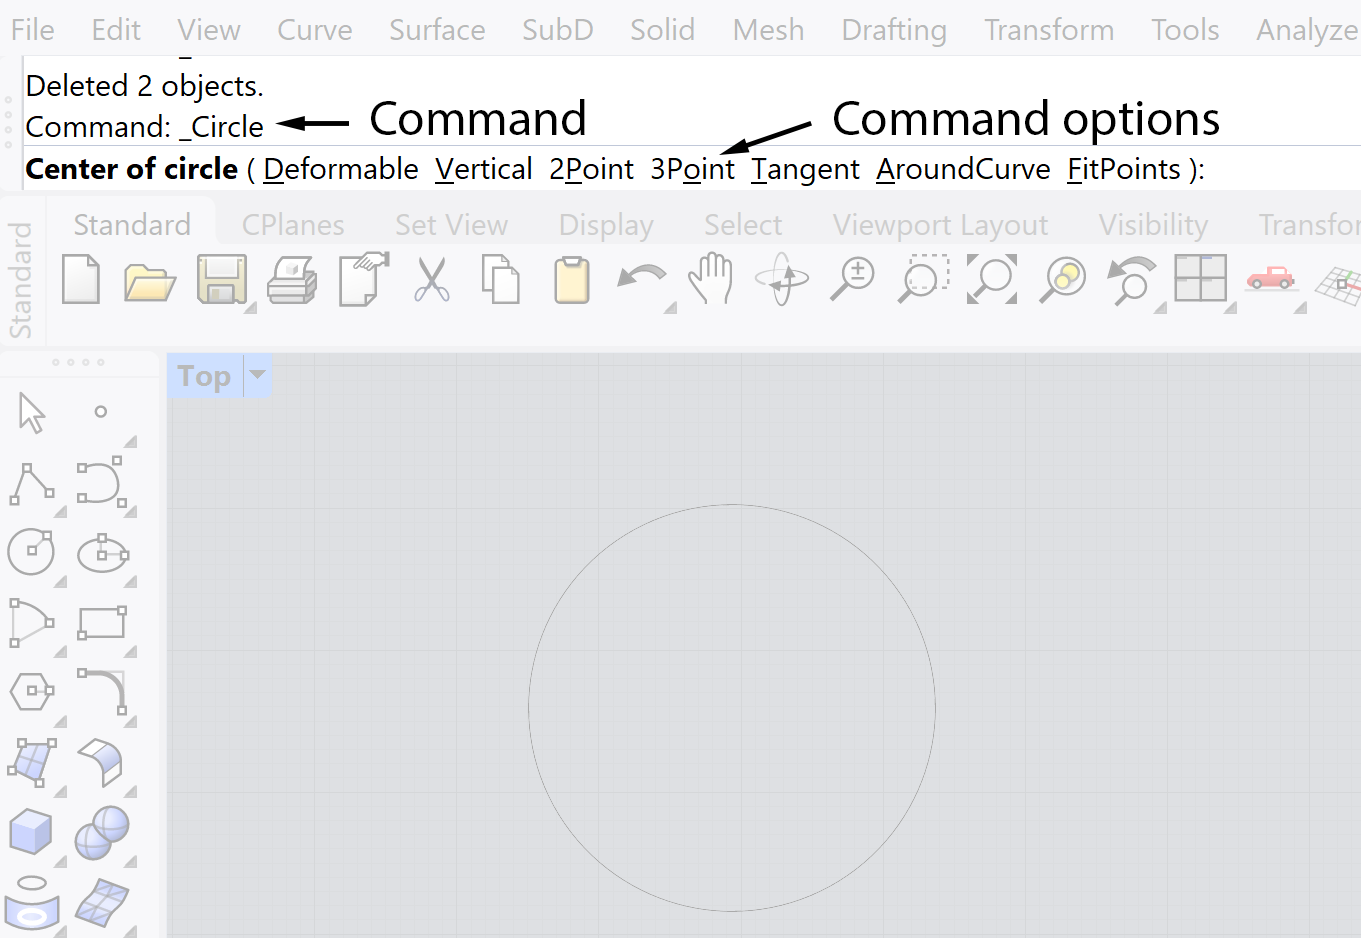
The command window shows two lines by default. To open a window that displays the command history, press F2. The text in the Command History window can be selected and copied to the Windows clipboard. The command area can be compared to the command bar of Autodesk Autocad. The command line is not only there to type in commands but is also gives you access to options of a command when you have given it.
To use command options, click the option on the command line or type the underlined letter of the option and press Ente.
Toolbar
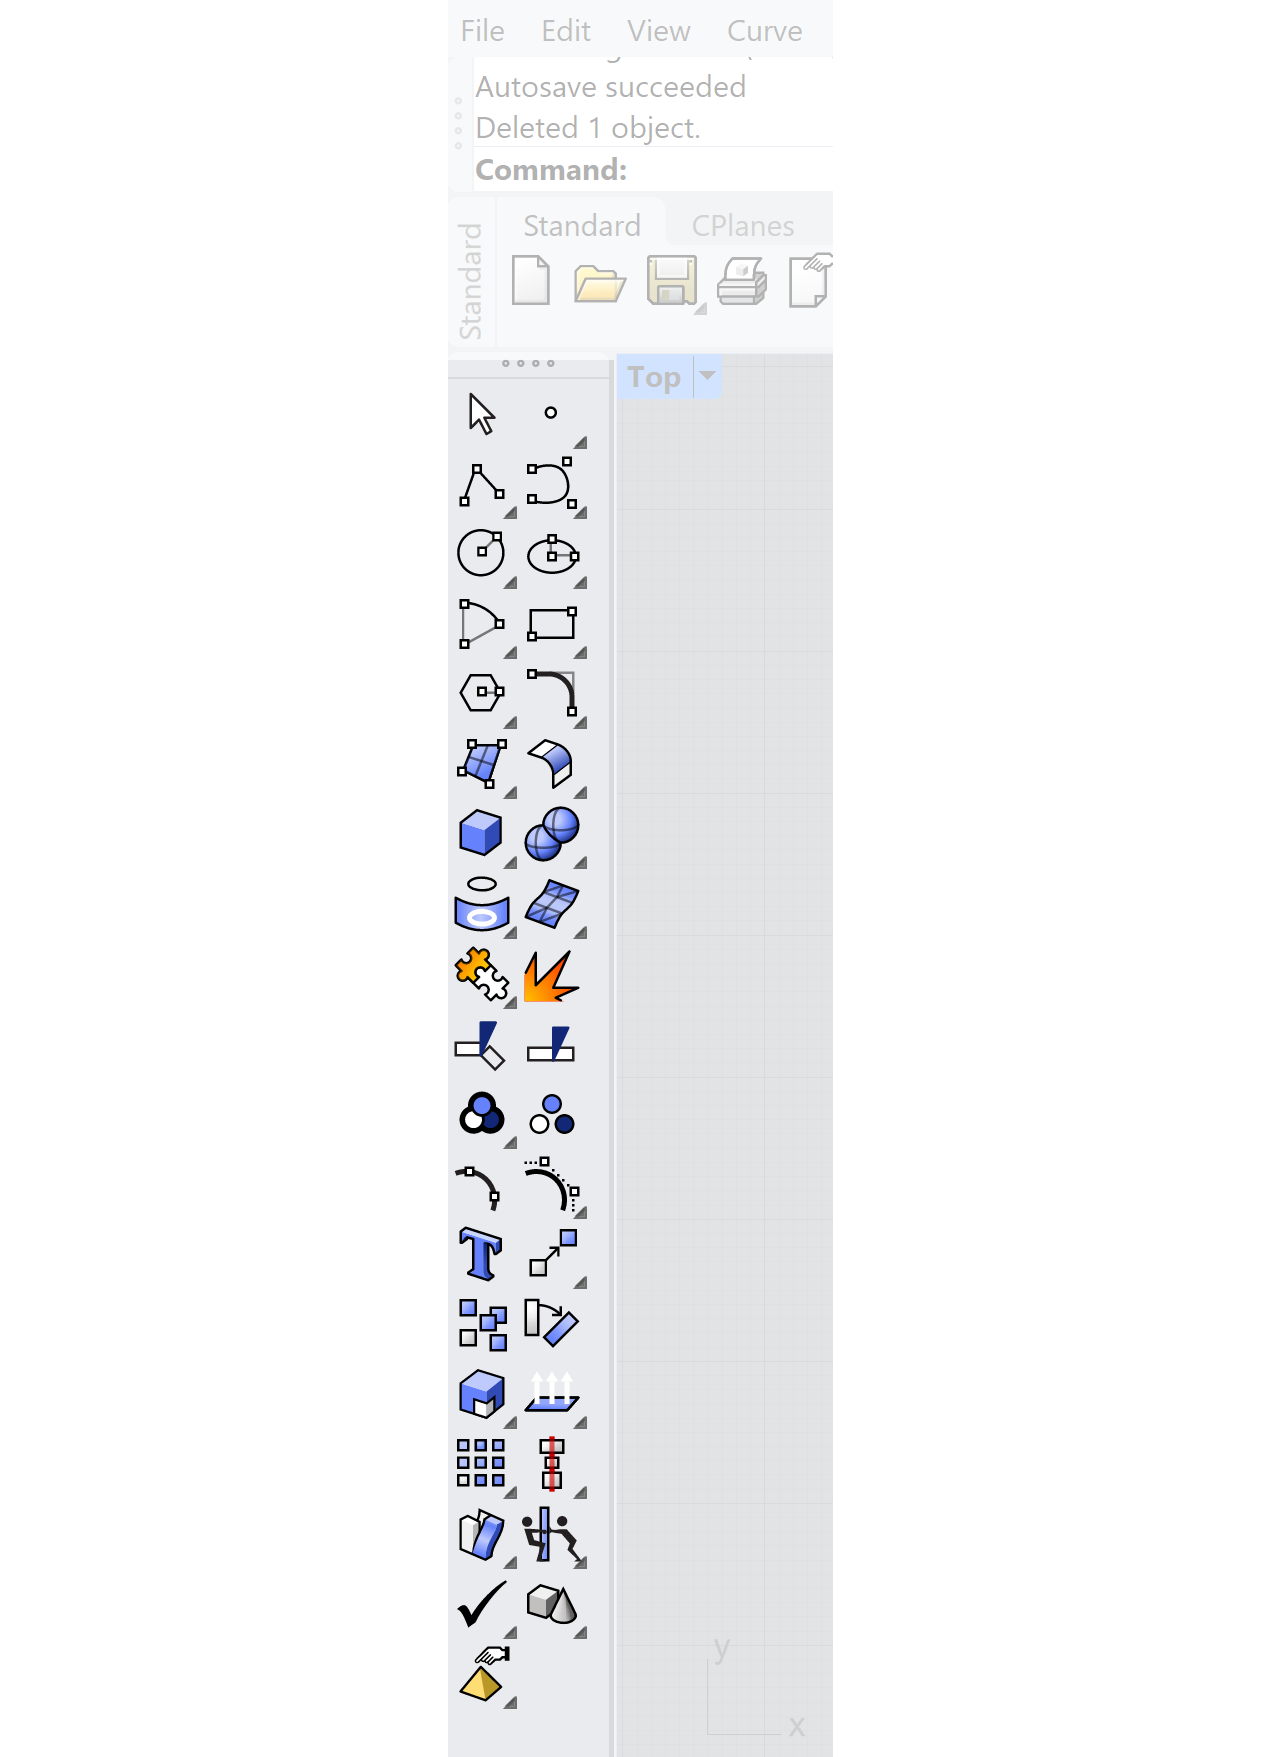
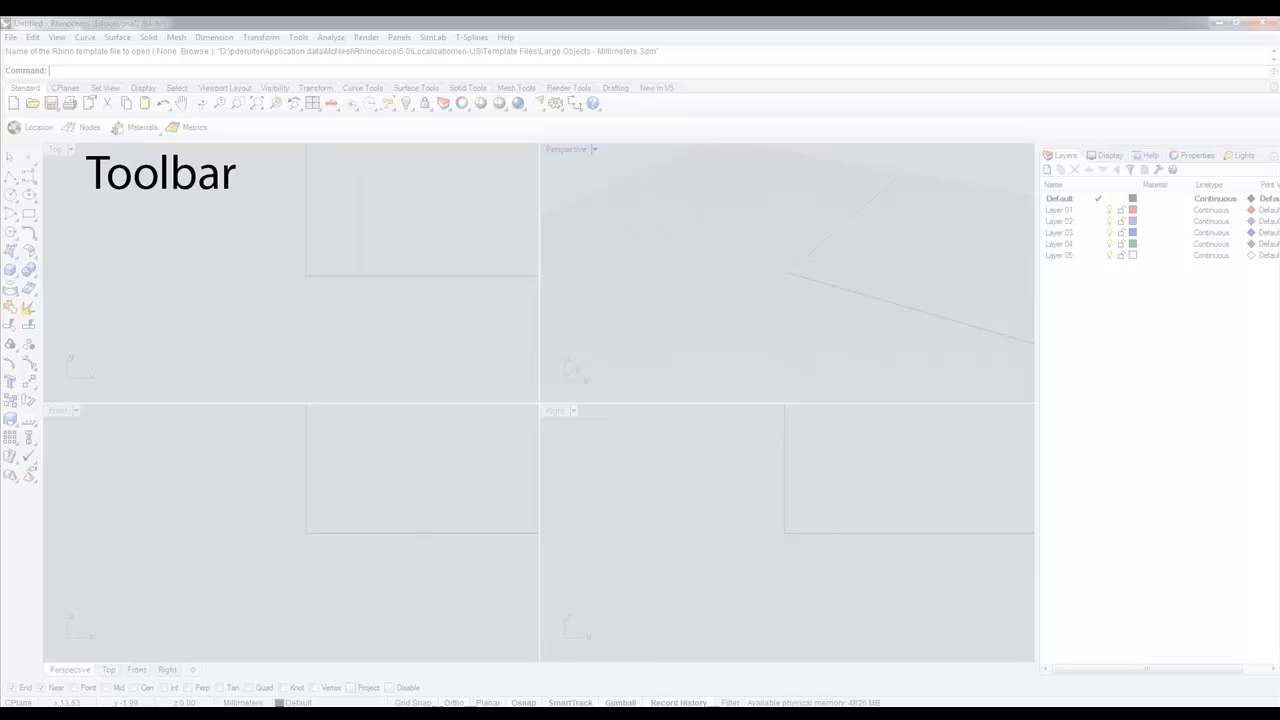
The Third option is the use of the toolbar. Rhino toolbars contain buttons that provide shortcuts to commands. You can float a toolbar anywhere on the screen, or dock it at the edge of the graphics area. This is a very simple access to the commands. Due to its strict and clear organization of the icons this option is ideal when starting to learn Rhino. Most of the commands for generating geometry are available through the toolbox. Rhino starts up with the Standard toolbar docked above the graphics area and the Main1 and Main2 toolbars docked on the left.
Tooltips
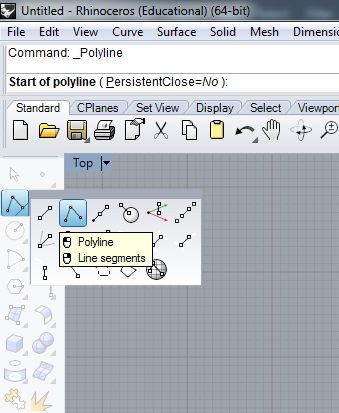
Tooltips tell what each button does. Move your pointer over a button without clicking it. A small yellow tag with the name of the command appears in Rhino, many buttons can execute two commands. The tooltip indicates which buttons have dual functions.
Flyouts
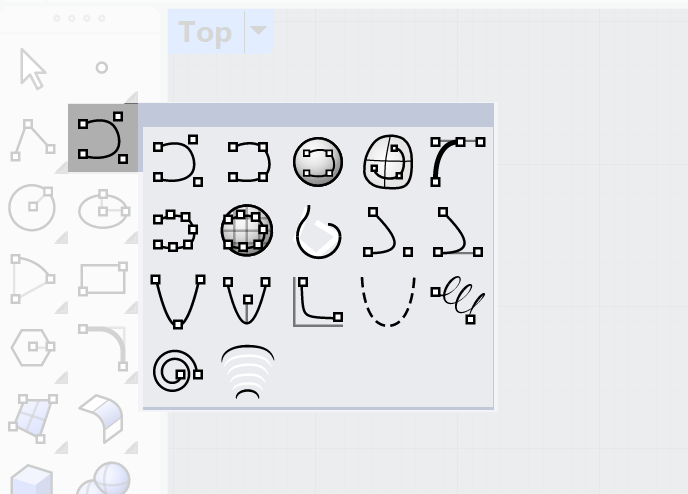
A button on a toolbar may include additional command buttons in a fly-out toolbar. Usually the fly-out toolbar contains variations on the base command. After you select a button on the fly-out, the fly-out disappears.
Buttons with fly-outs are marked with a small triangle in the lower right corner. To open the fly-out toolbar, hold down the left mouse button for a moment or press the right mouse button. The Lines toolbar is linked to the Main1 toolbar. If you hold the left mouse button down over the Line button of the Main1 toolbar, the fly-out Lines toolbar opens.
You can ‘tear off’ any flyout by dragging the top bar of the flyout and position it anywhere for quick access to the buttons.
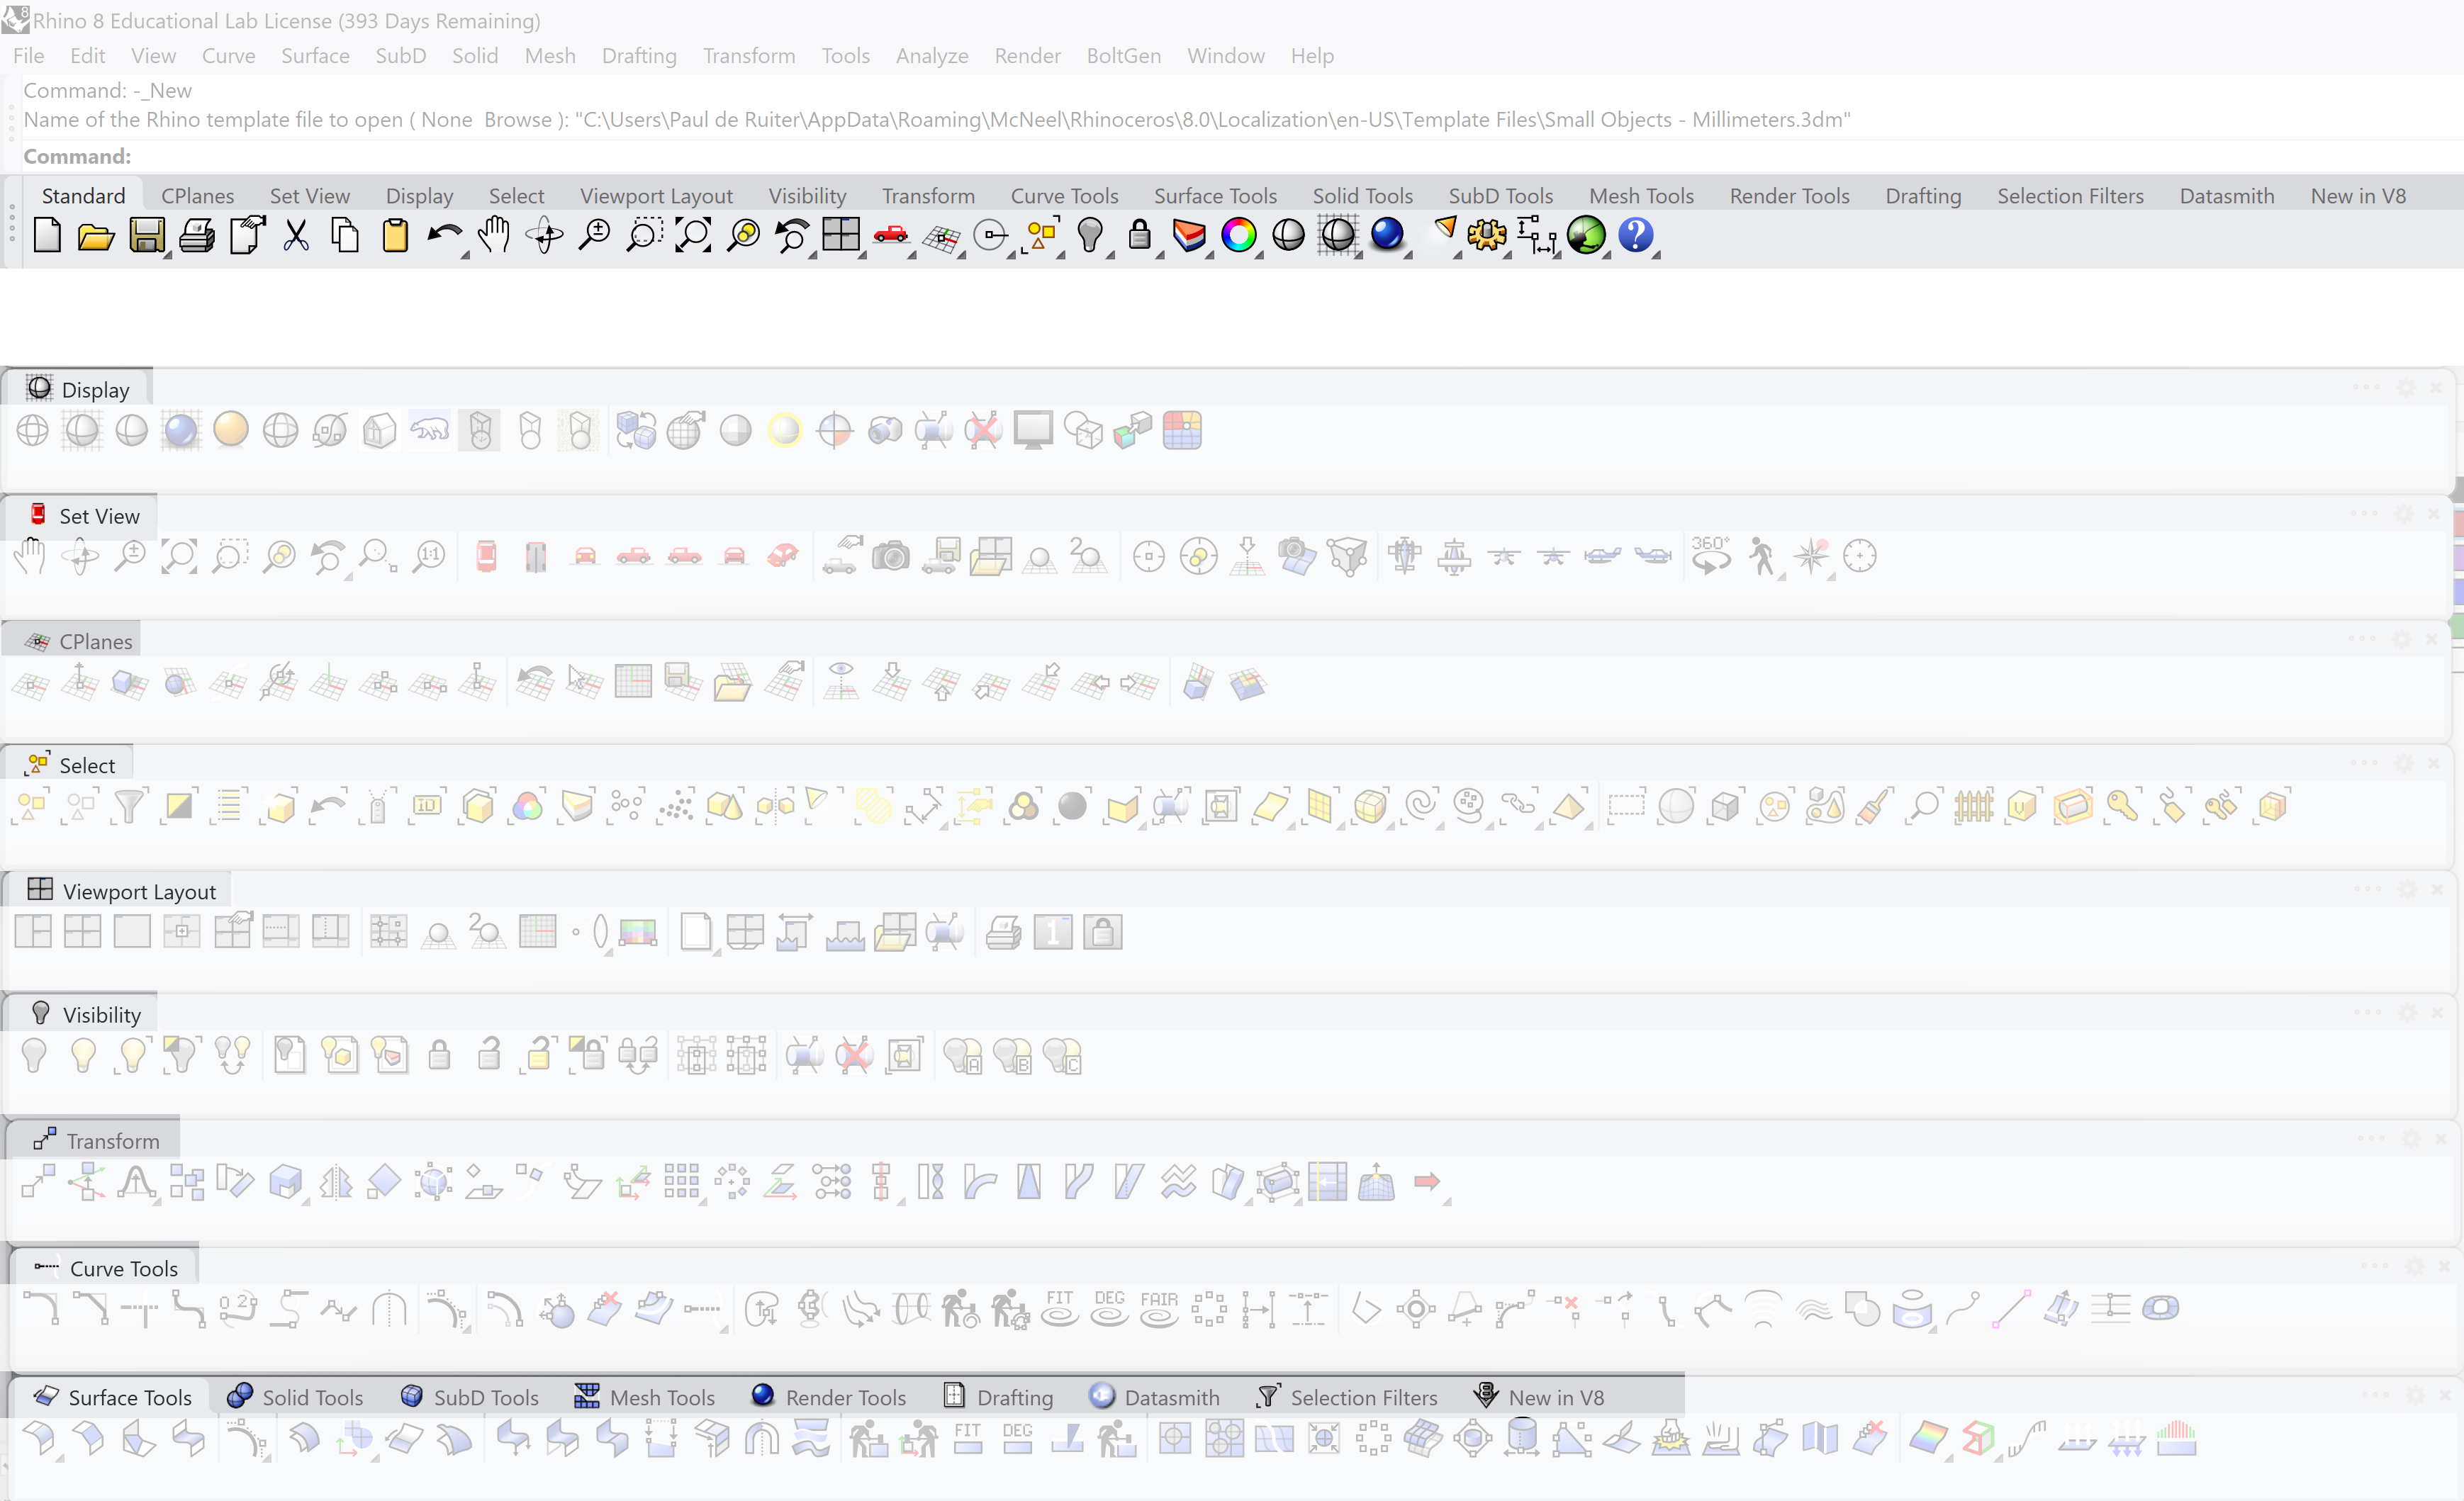
Shelf
The fourth option is the use of the shelf. This looks a bit like the toolbox , except all the icons are visible which are related to the topic of the shelf. The Standard shelf tab contains a set of options which are often used.
For this course we suggest you use the Toolbox in combination with the pulldown menu.
Duplication
Like all software you have the option of copying and pasting objects. This can be done with the standard windows copy, paste option.
The preferred method for duplicating objects, however, is to use the copy command.
- Select the object
- Type Copy in the command line
- Select a reference point
- Click a point or multiple points to create copies.
Array
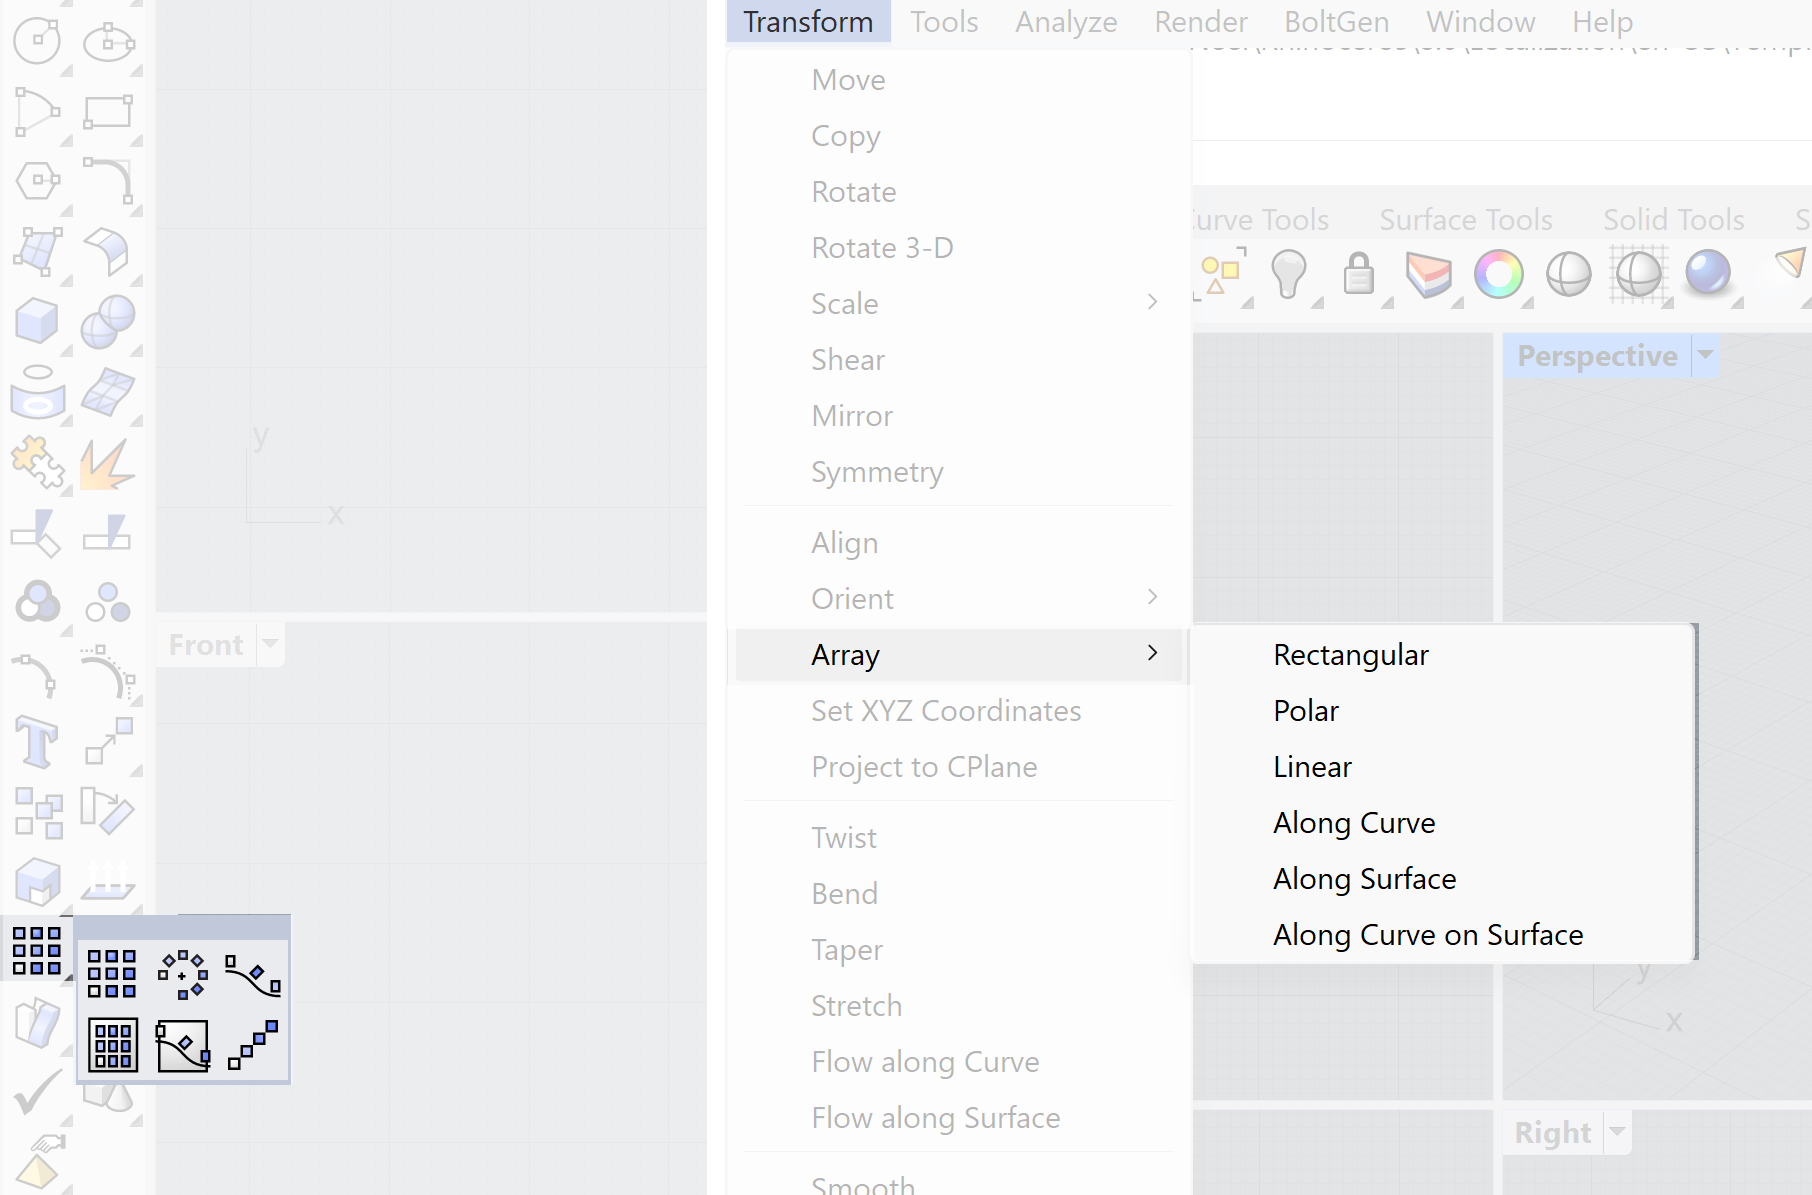
If you need an array of copies, use the Array function:
or click the array icon on the toolbar.

Rhino Introduction 5/9
Using Drawing Aidslink copied
Drawing aids are tools that will help you in the process of creating objects. There is extensive support in Rhino for generating geometry. These drawing aids can speed up the modelling process and will increase the accuracy of the geometry generated. There are a wide range of support tools available which can be found on the status bar.
- Snap
- Ortho
- Planar
- Osnap
- Smart track
- Gumball
- Record History

Snap
When Snap is on, your marker “snaps” between grid snap points, whose distance apart is set by the SetSnap command or by the Options dialog box, Modeling Aids page.
Ortho
When Ortho is on, marker movement is restricted to points at multiples of a specified angle from the last point created. The default angle is 90 degrees. These settings can be changed by the Options dialog box, Modeling Aids page.
Planar
When Planar is on, each point picked in a viewport will have the same elevation from that viewport’s construction plane as the previous point, regardless of where the previous point was picked.

Osnap
When Rhino asks you to choose a point, you can constrain the marker to specific parts of existing objects by turning on object snap modes. When an object snap is active, moving the cursor near a specified point on an object causes the marker to jump to that point. Object snaps can persist from pick to pick, or can be activated for one pick only. Multiple persistent object snaps can be set in the Osnap dialog box. All object snaps behave similarly, but snap to different parts of existing geometry.

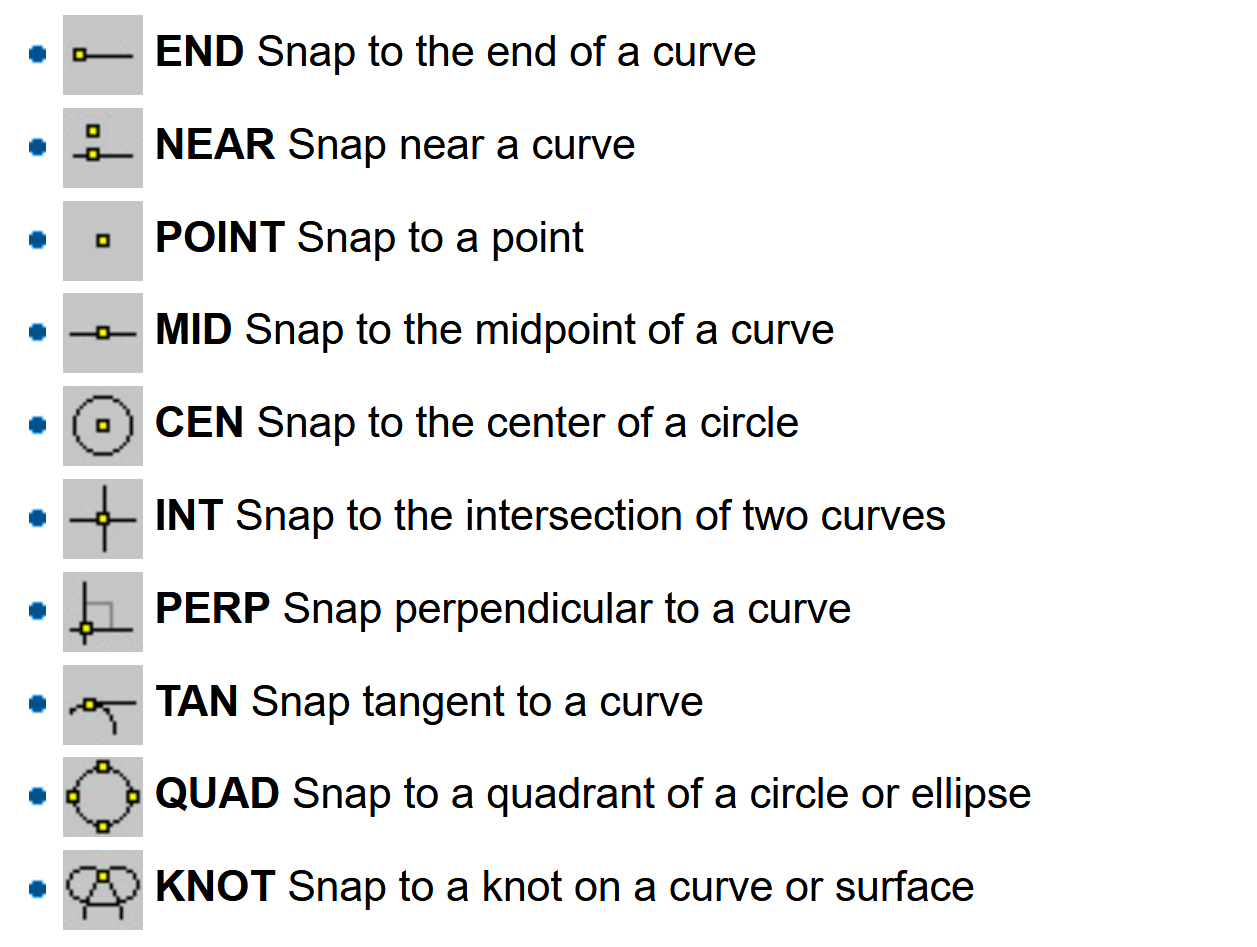
Use persistent objects snaps to maintain an object snap through choosing several points without having to reactivate the object snap. Only the following object snaps can persist.
You can set the radius of influence for object snaps. This means how close you have to move the cursor to the point before the marker jumps to the point.
To display the Osnap dialog box, on the status bar, click Osnap. Select or clear the desired object snap checkboxes. You can disable all persistent object snaps with the Disable button. To clear all persistent object snaps, RMB the Disable button. Press the Alt key to temporarily suspend object snaps. If object snaps are locked, press Alt to toggle them on temporarily.
Tip
A good combination of snaps is end, int, mid and perp
Smart track
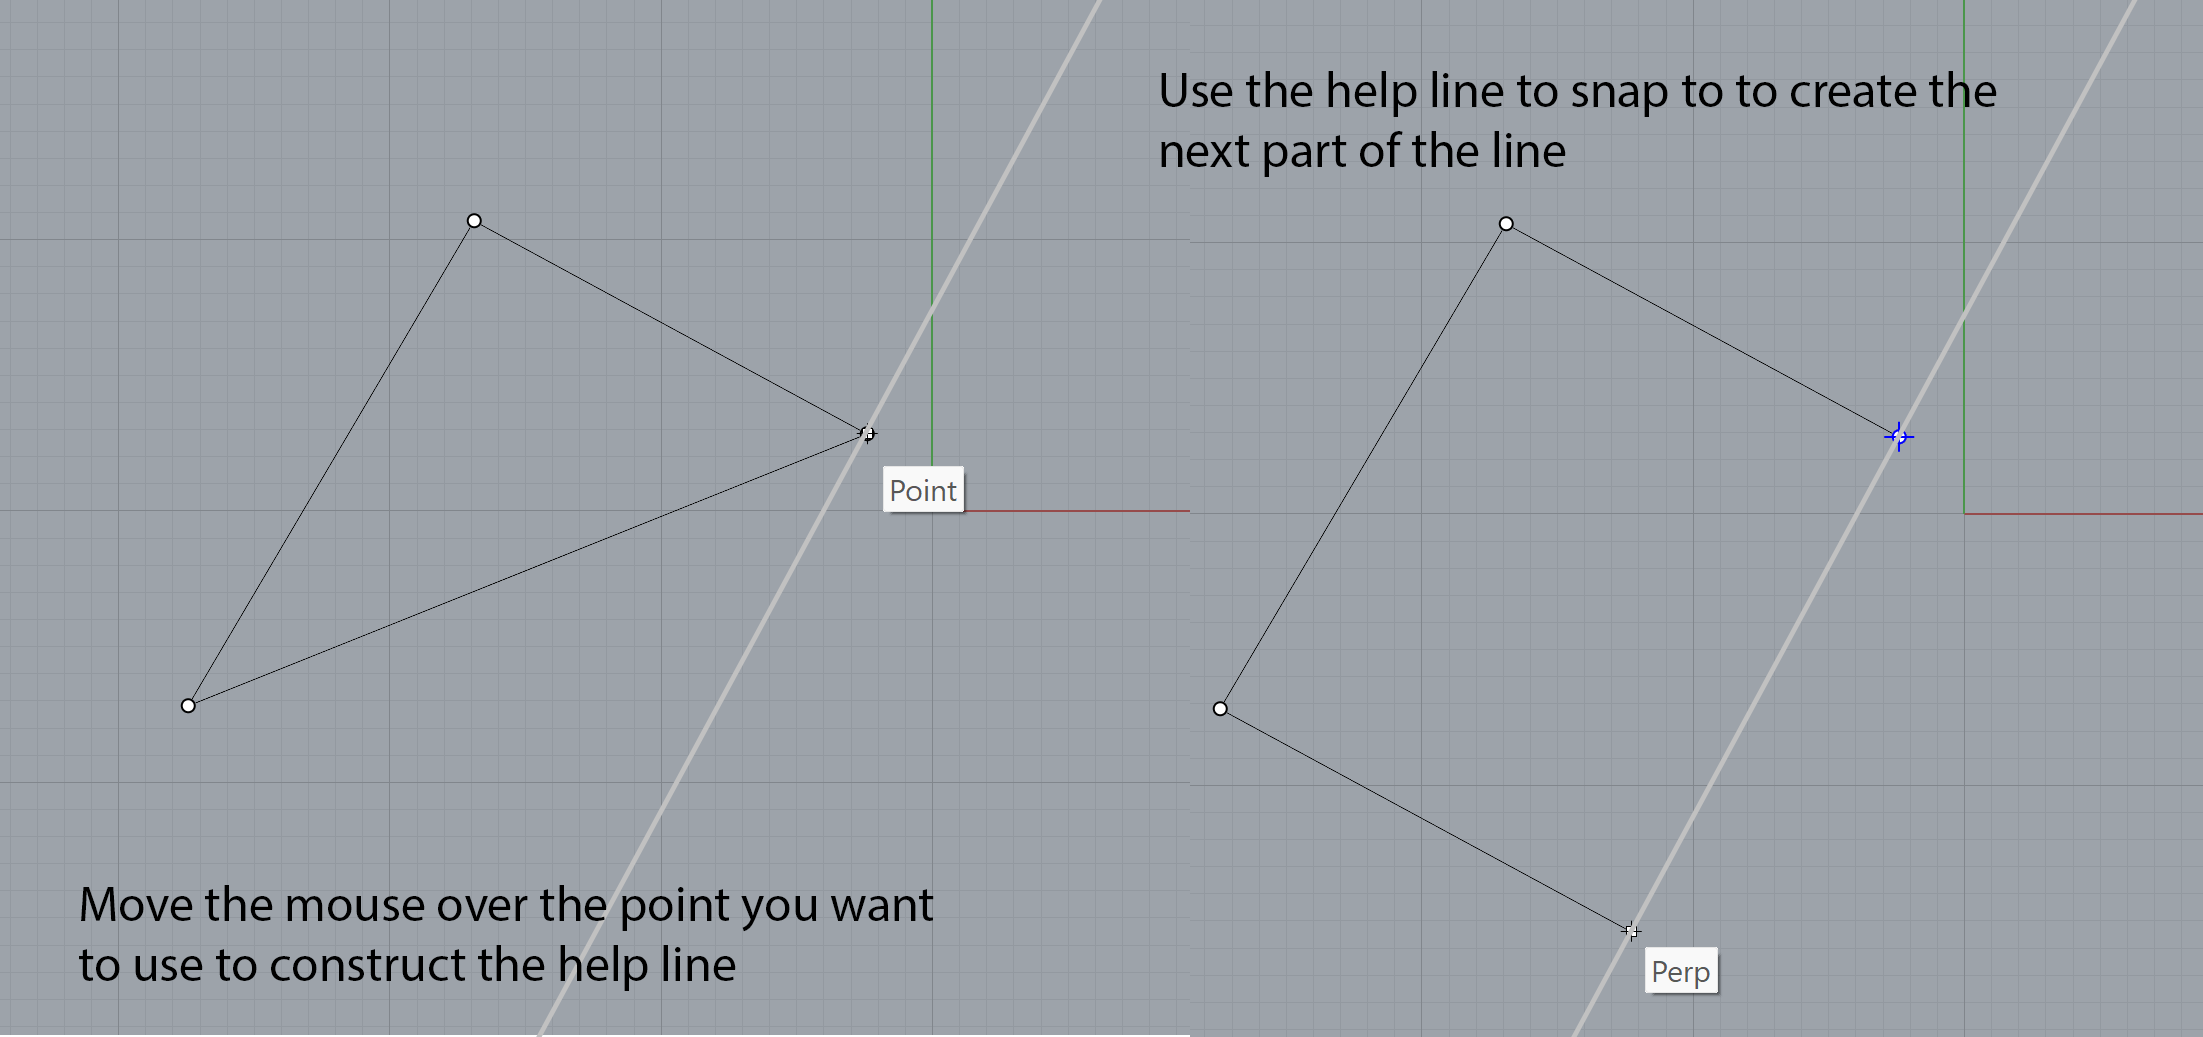
SmartTrack is an option to generate support lines on the fly. These lines can help you to accurately align sections of curves. When the mouse is placed over a corner of a curve it will generate a helpline. This option is very effective when you are generating lines and curves in Rhino.

Gumball
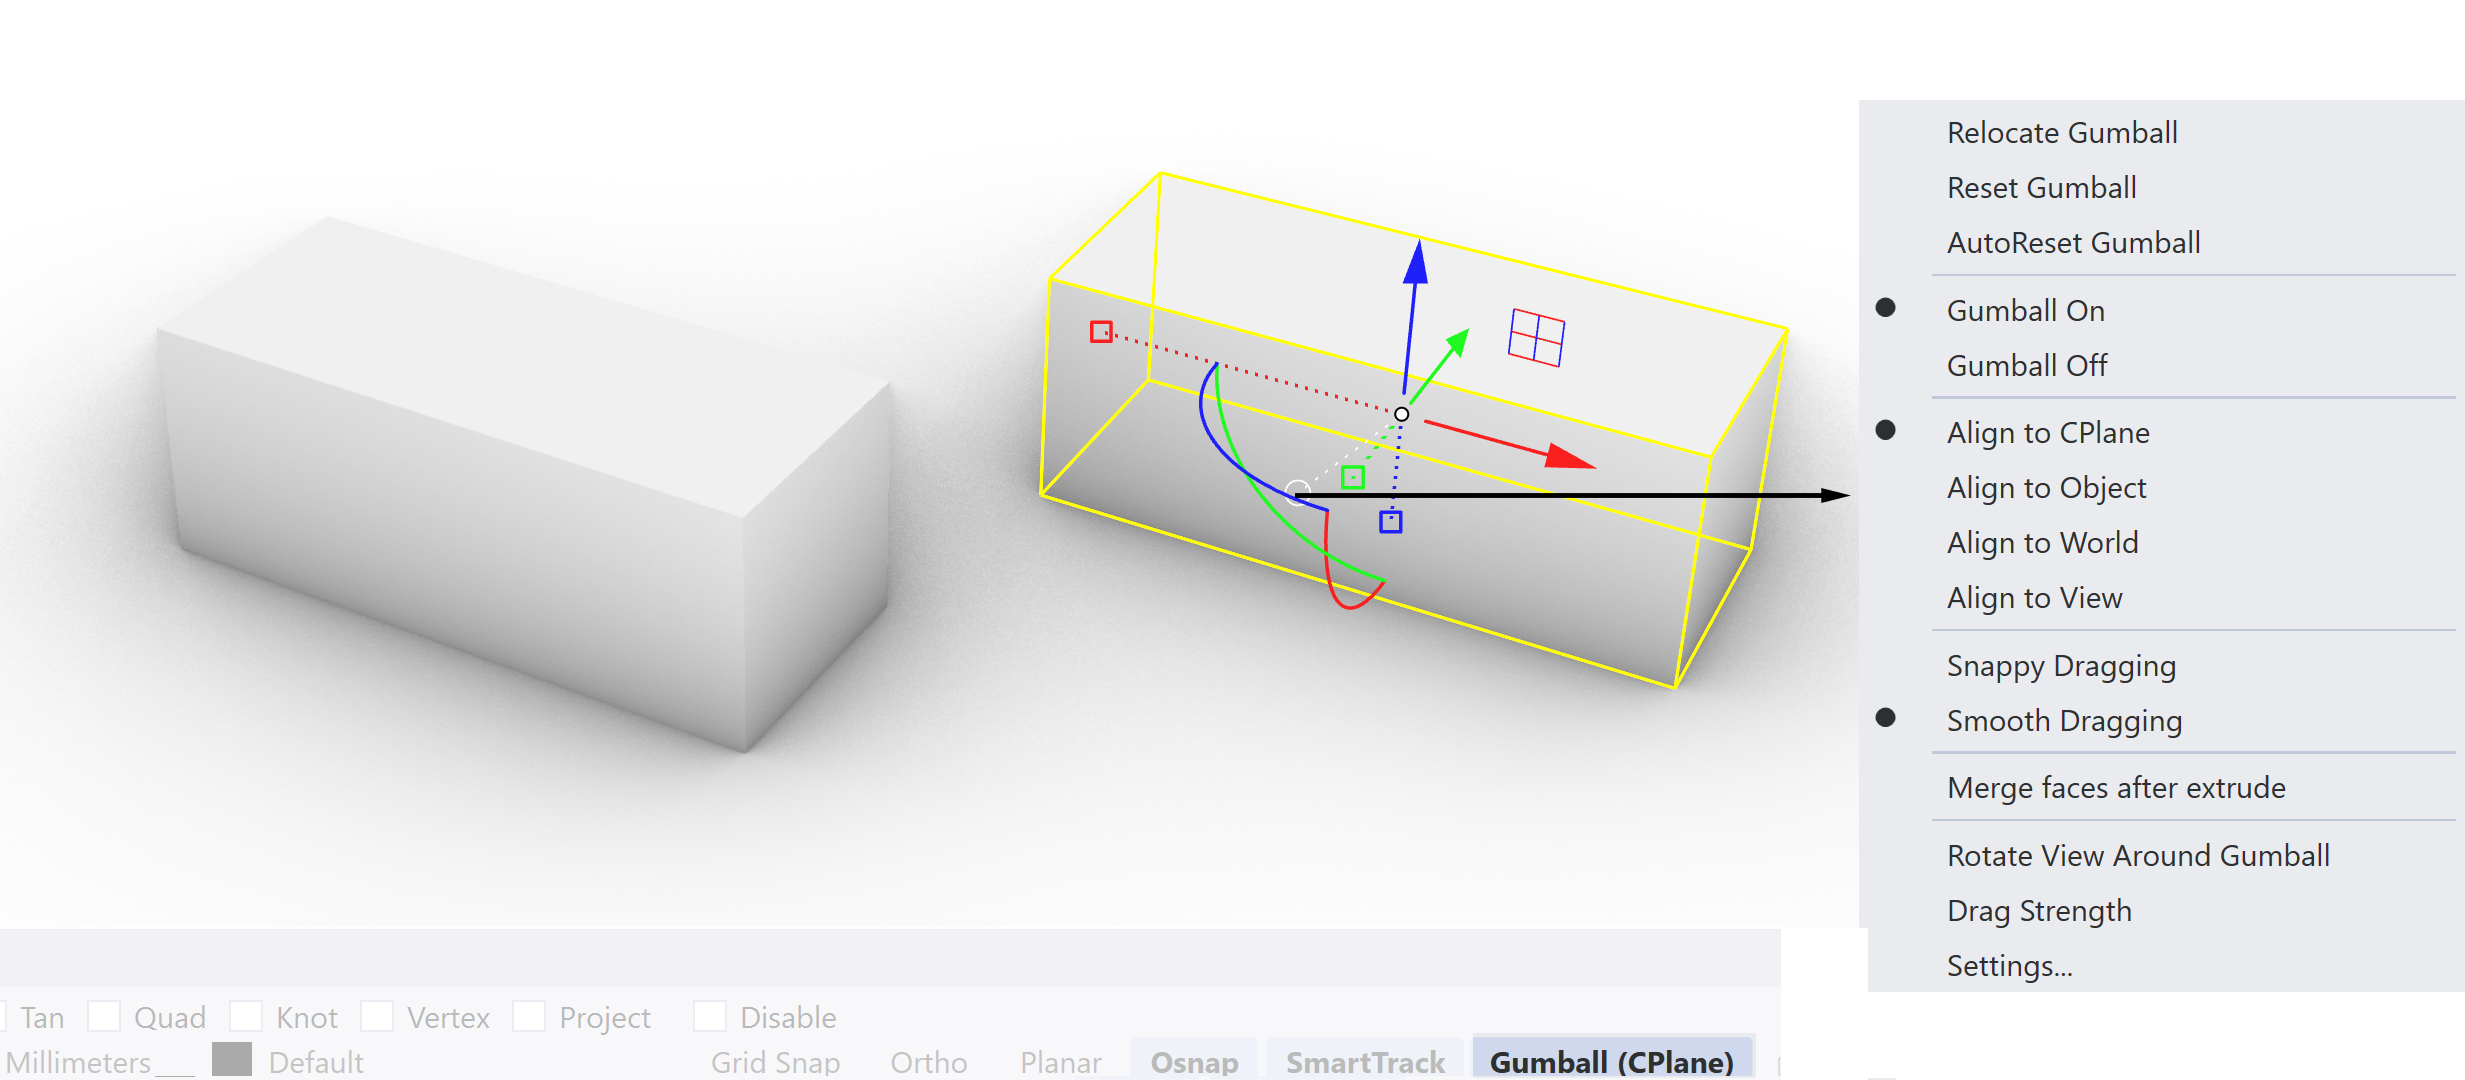
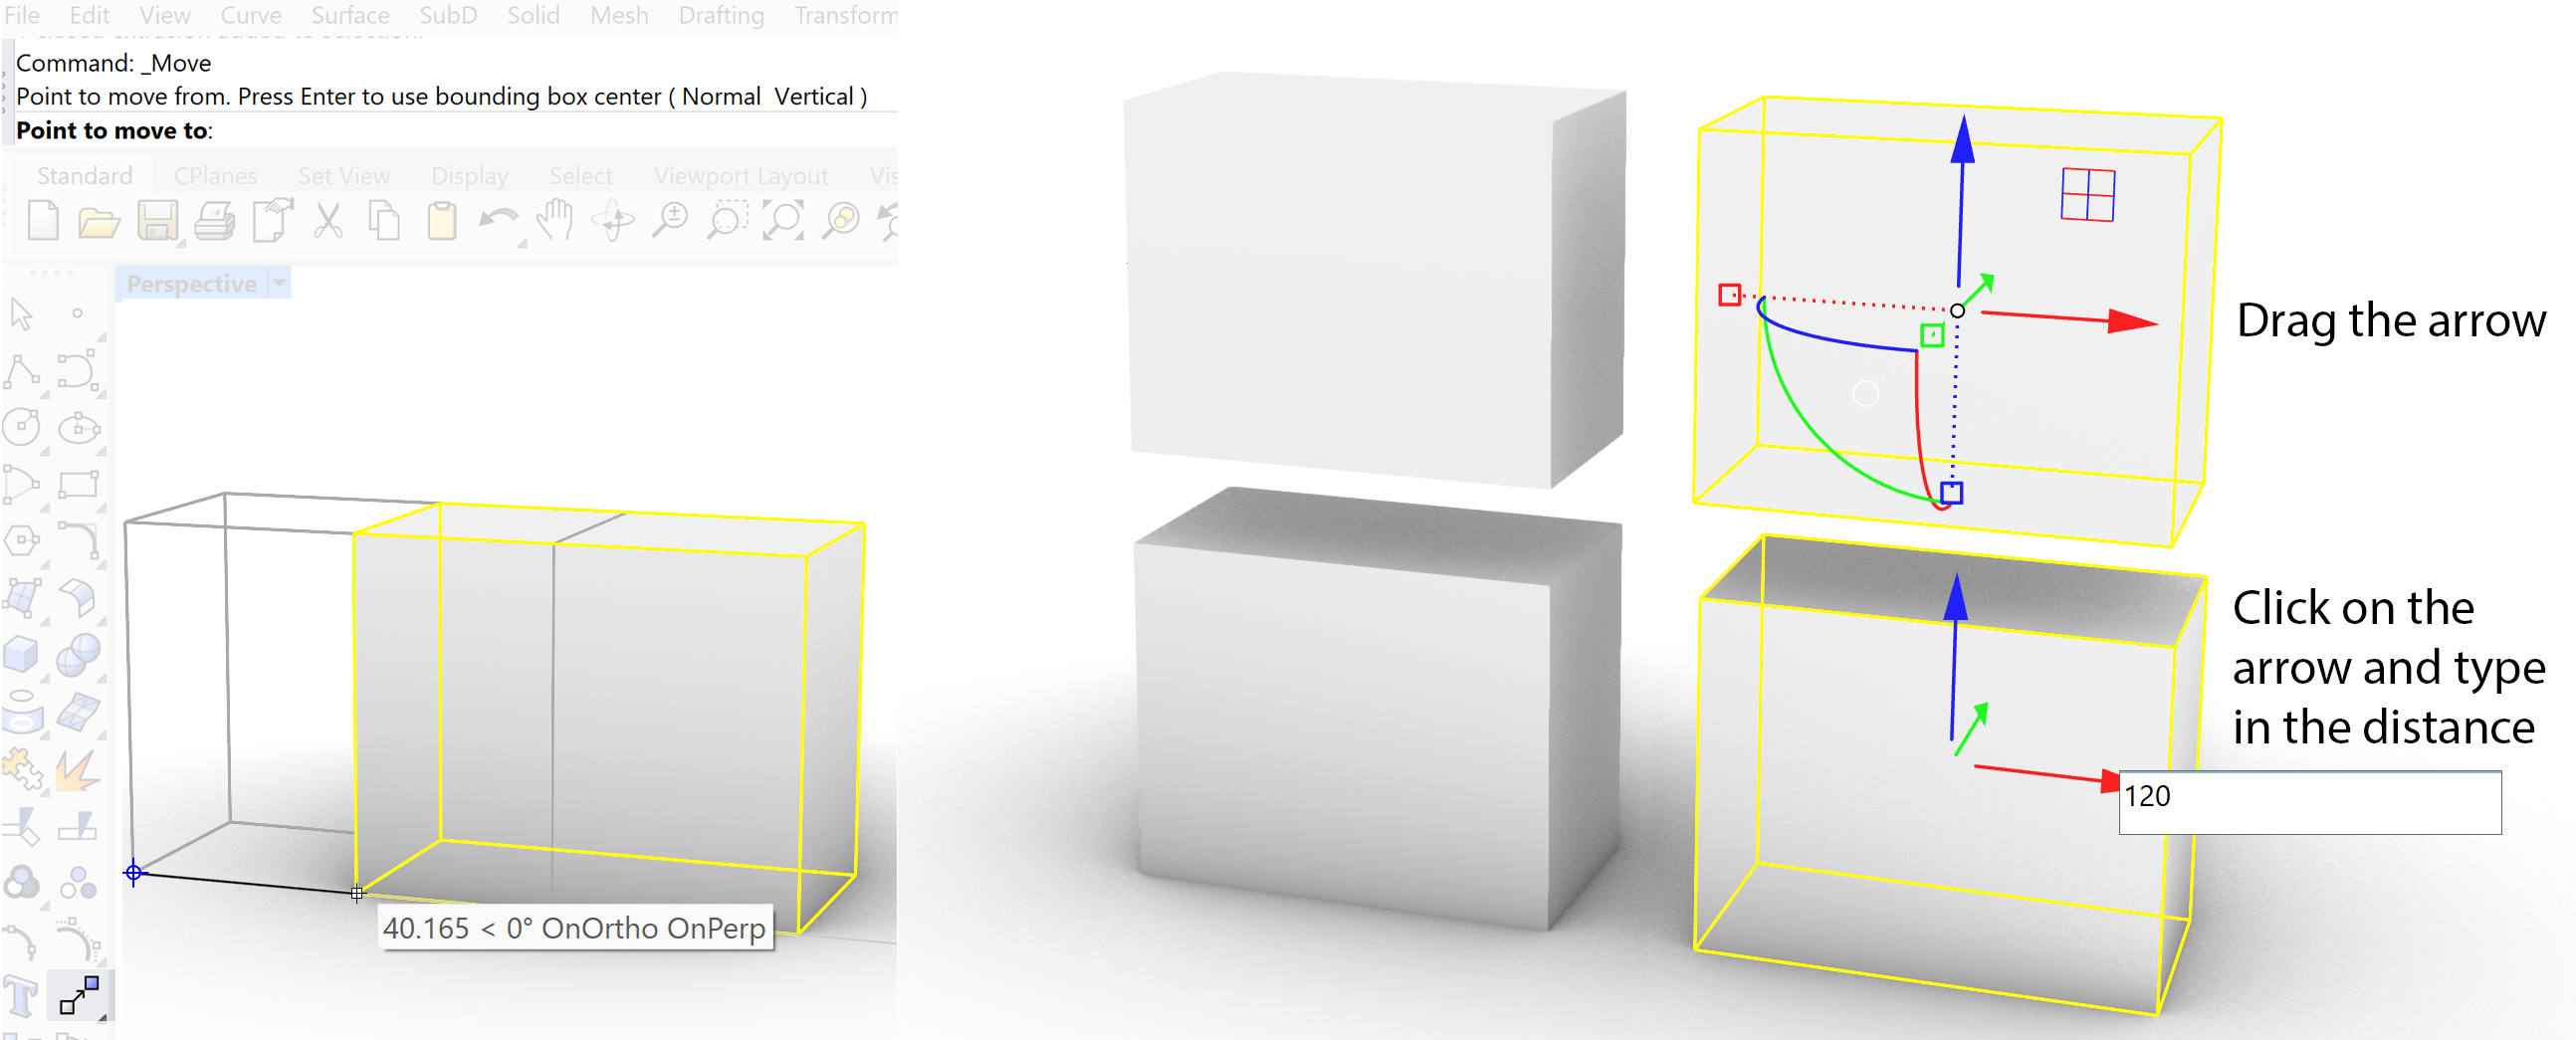
The Gumball is an artifact which enables you to move, rotate or scale a selected object. The move option is defined by the colored arrows. The movement will be constraint to that direction by selecting one arrow with the mouse and hold. If you select the arc you can rotate the object and when you select the cubes you can scale the object. This can not only be done by dragging the Gumball but for more accurate translation you can also type in the value of the translation. To move the Gumball relative to the selected object you can select the white circle. This opens a menu with additional settings for the Gumball. One is the displacement of the Gumball.
Record history
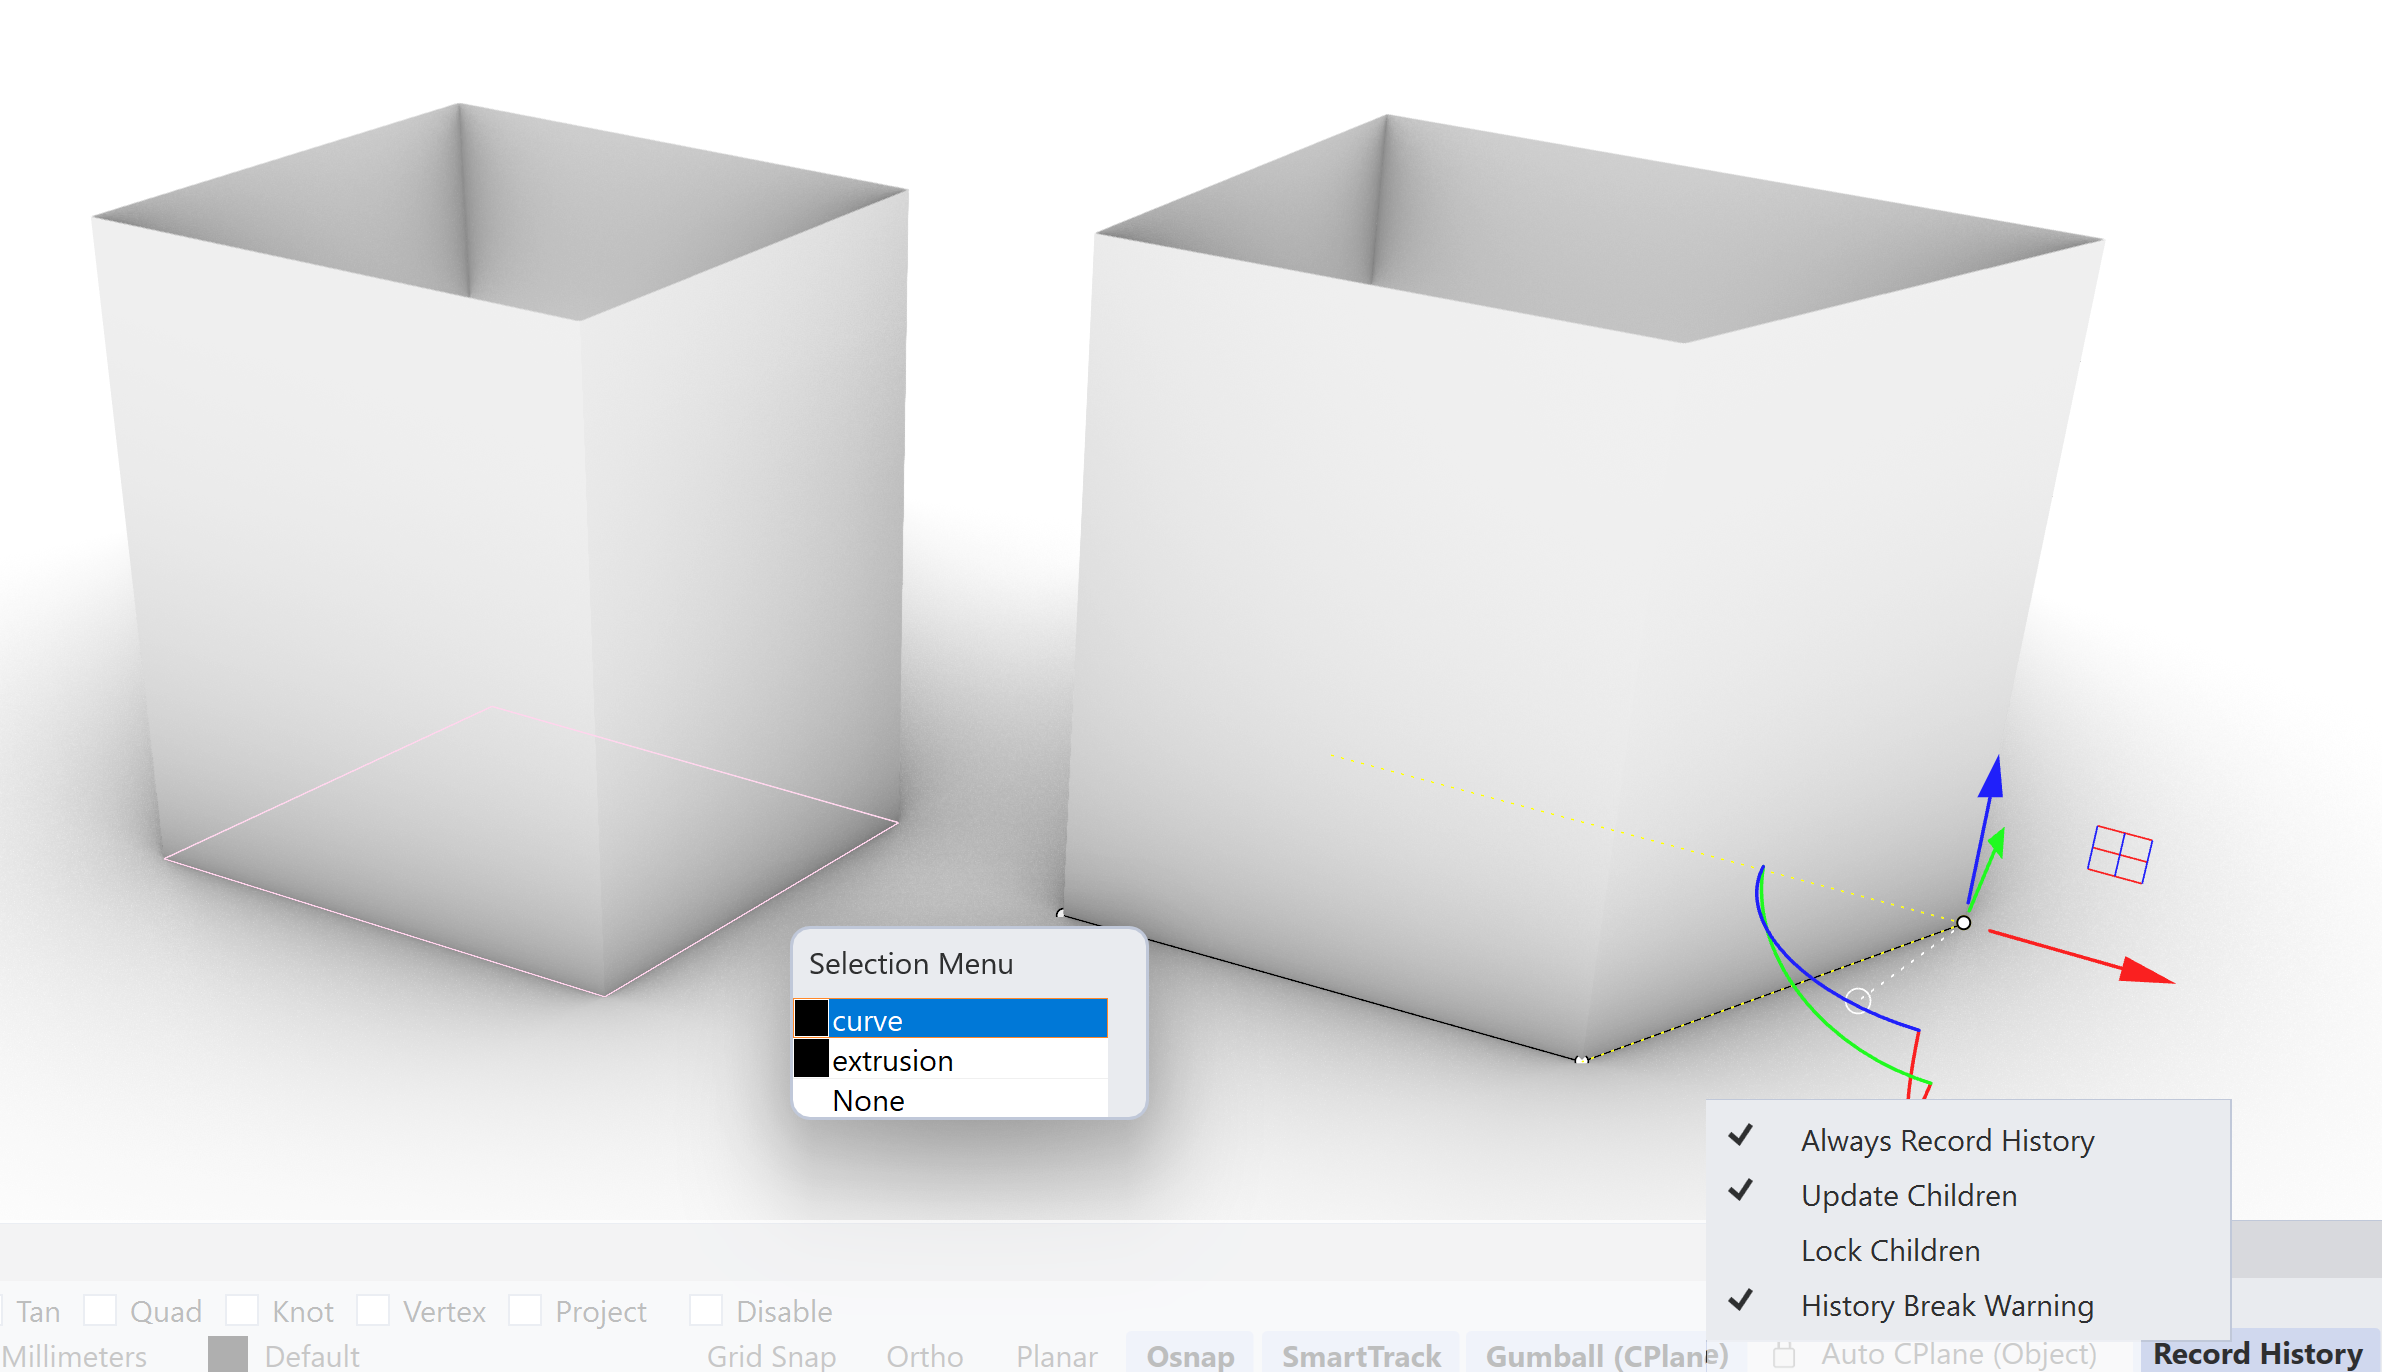
The record history is a feature which available in most design software. The option supports fast alterations of your geometry. Record history is based on principle recording how you generated the geometry. In curve-based modelling we use curves as a basis for form generation. A relation is generated between the curve and the surface is generated when the record history option is activated. This means that if the curve is adjusted the surface which was made from the curve will also be adjusted.
Beware
Don’t leave the Record History option turned on the whole time while working in Rhino; you will link all objects to each other. Imagine what happens if you suddenly move one of the first objects drawn, suddenly all objects will move relative to this object.
Rhino Introduction 6/9
Transformationslink copied
There are several ways of transforming your geometry. The main methods are
Move
Select the object or objects and activate the Move icon in the toolbar. It will ask to define a point to move from, and once define a point to move to. The object will remain within the plane of the grid. If the object must be moved in a vertical direction from the grid, then activate Vertical=Yes in the command line.
Rotate
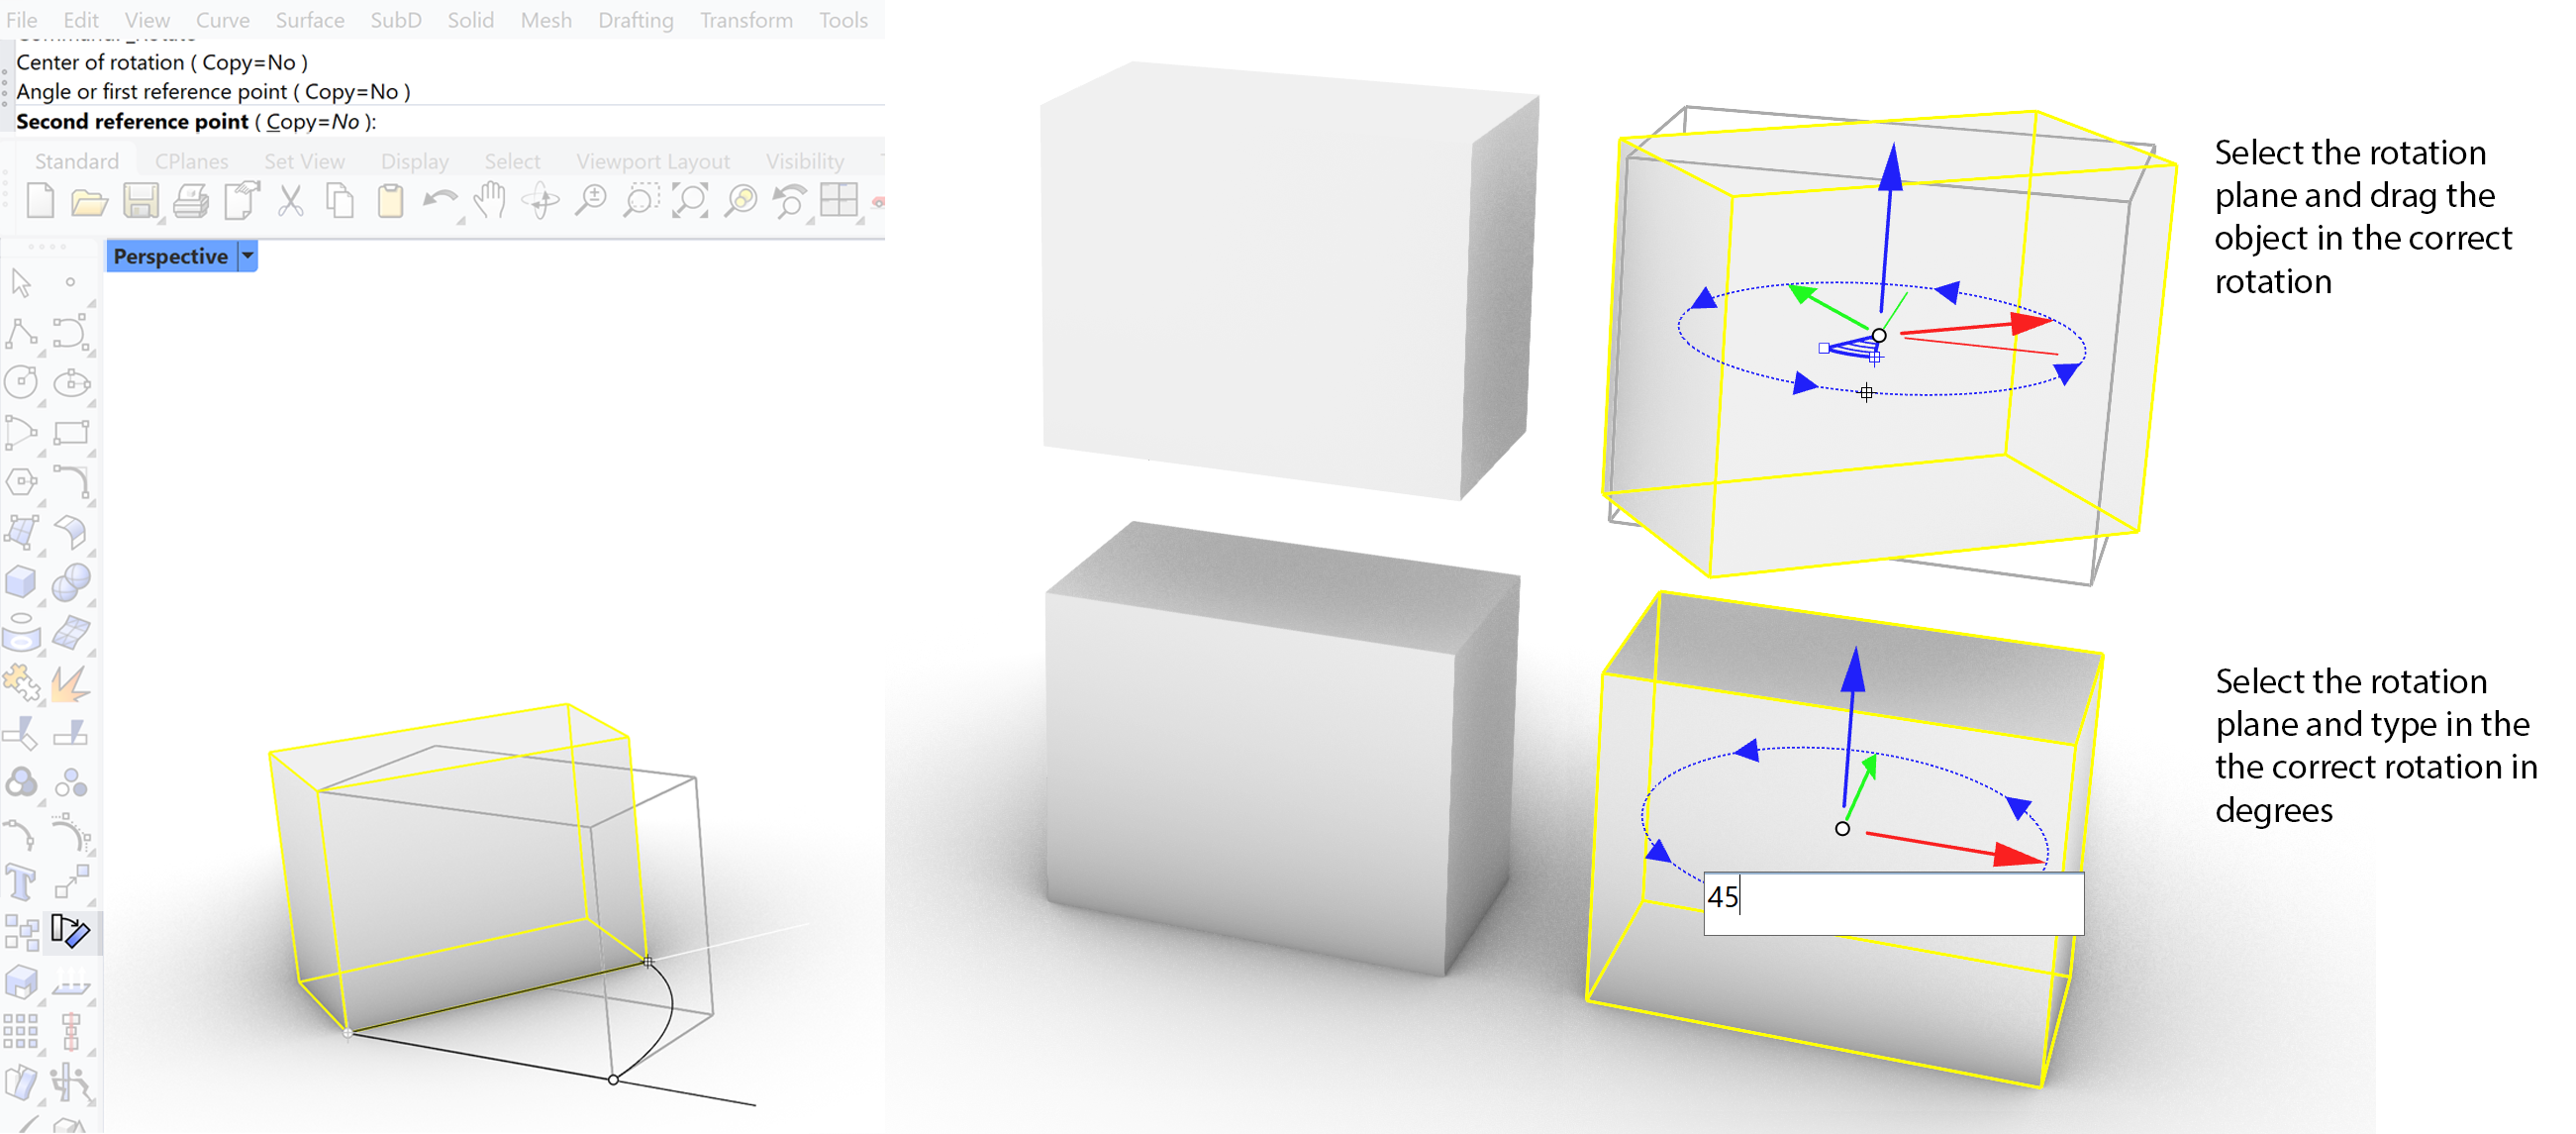
Select the object or objects and activate the Rotate icon in the toolbar. It will ask for a rotation point. The object will rotate around that point. Once defined, an additional point can be defined to generate a reference line which then can be rotated. Or the amount of rotation can be typed into the command line. There is also another option of rotation which is called 3D rotation. In that case the axes of rotation can be defined by the user. With 2D rotation the axes is defined perpendicular to the orthographic views or in the Z axis in the perspective view.
Scale
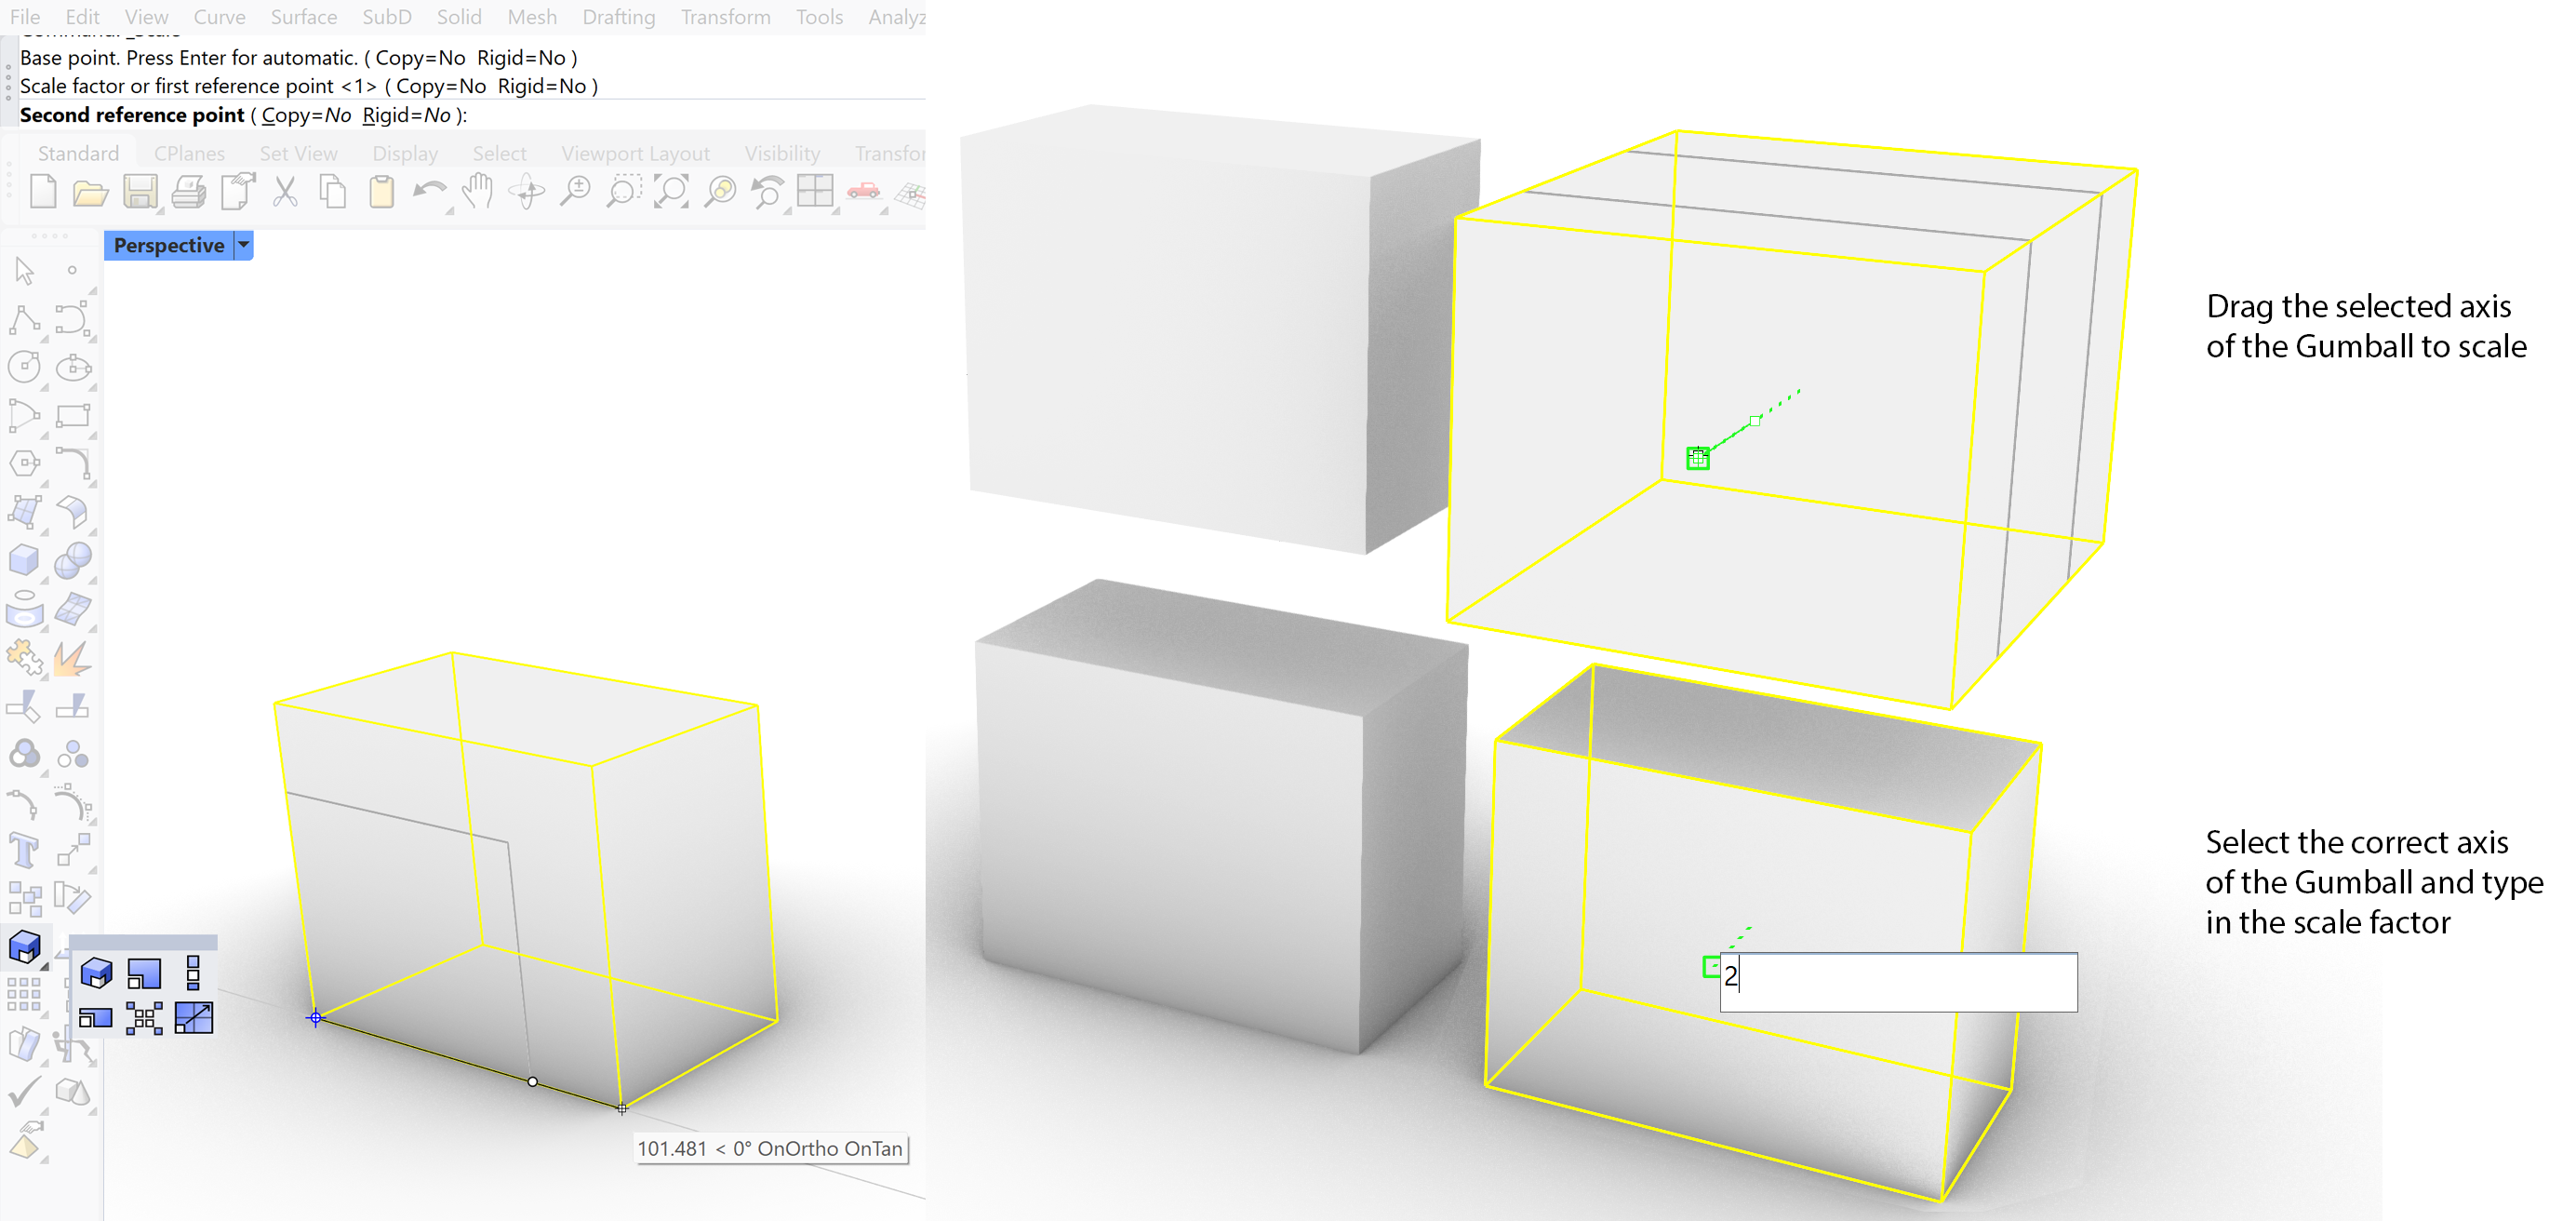
Select the object or objects and activate the Scale icon in the toolbar. It will ask for a origin point. Once defined it will ask for a second reference point or one can type in the scale value. There is also a 2D scale option and 1D scale option available which work in a similar way only the amount dimensions you can scale is limited.
Type in Coordinates
If you want accurately move, scale or rotate an object then you can use the type in option of the command line. This doesn’t only work for translations but also with drawing geometry. For example you can define each edit point on your curve by typing in the absolute ( according to the world coordinate system ) location of the next point or a relative position in relation to the last defined point.
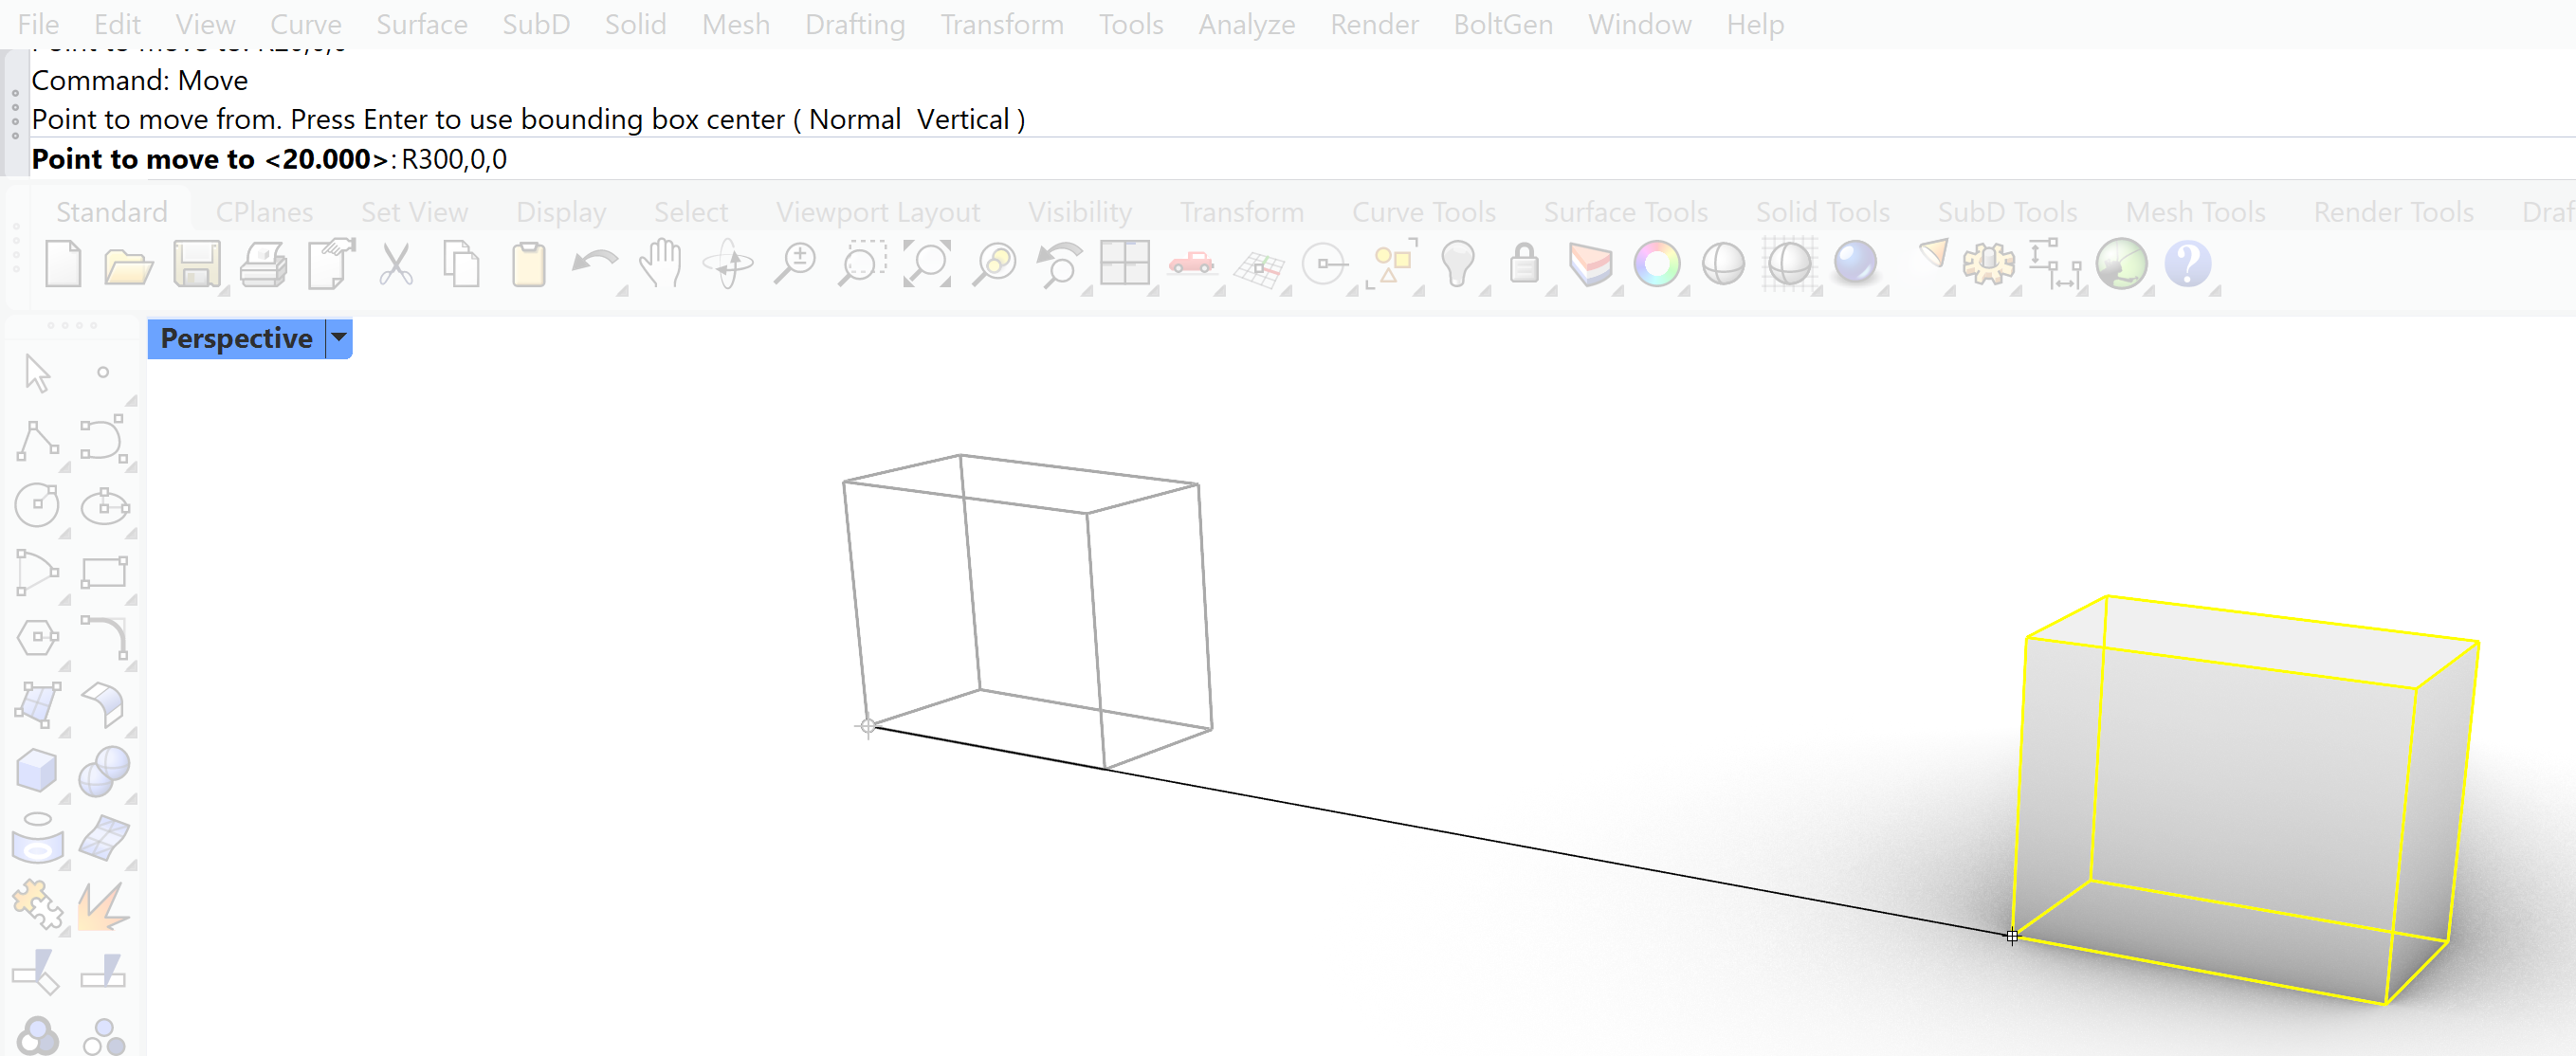
If you want to use the origin as a start point of your object you can type 0 as a shortcut instead of 0,0,0
If you want to continue with a relative coordinate precede your input with a @ or R like @0,5,0.
You can also enter polar coordinates. Absolute polar coordinates start from the origin (0,0,0) and the vector starts at 3 o’clock and changes counterclockwise. Relative polar coordinates also start with a @ or R like @5<30. This means that the next point is 5 units away on 30 degrees from the last point.
You can also enter just <30. The cursor will snap every 30 degrees. If you also enter 5 the cursor will always be 5 units away from the last point and also snap every 30 degrees.
Construction planes
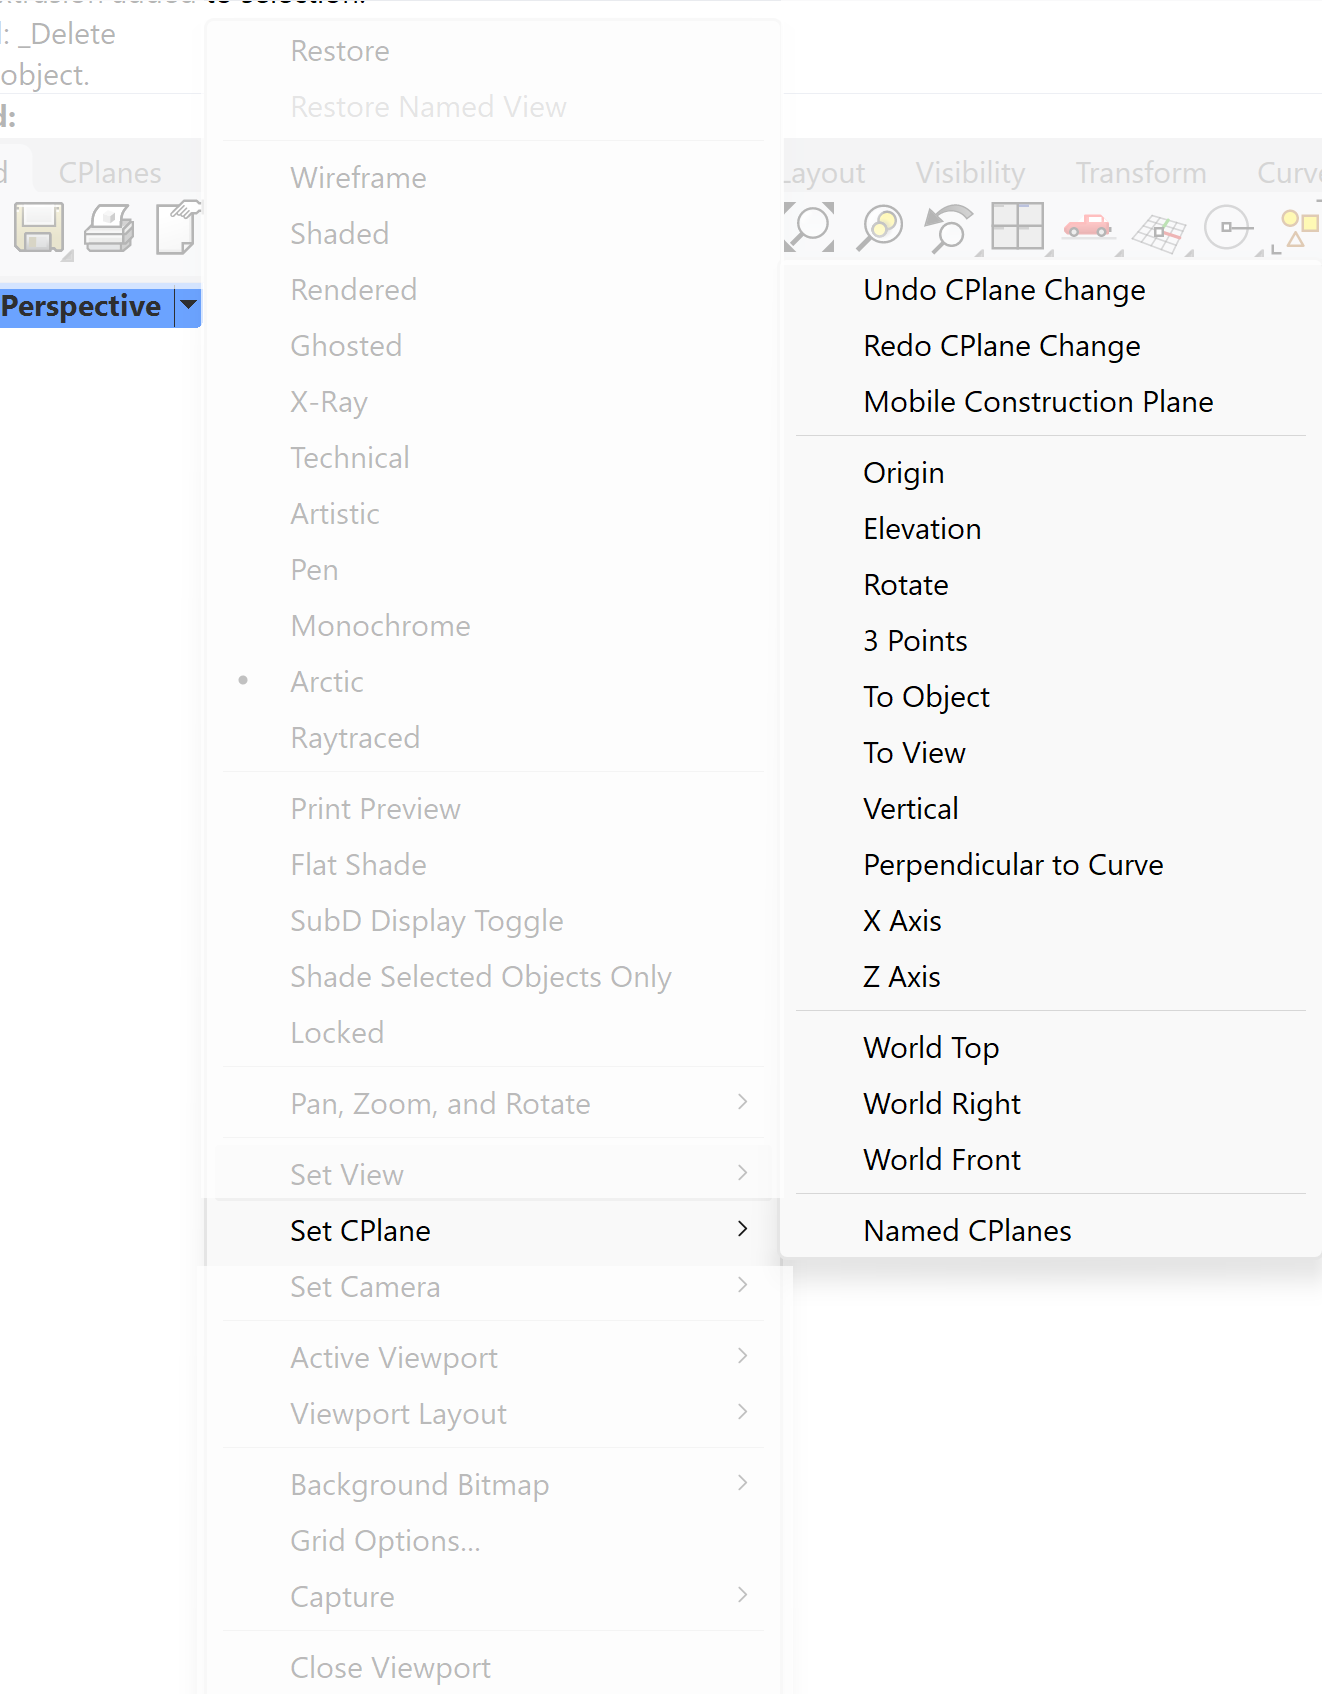
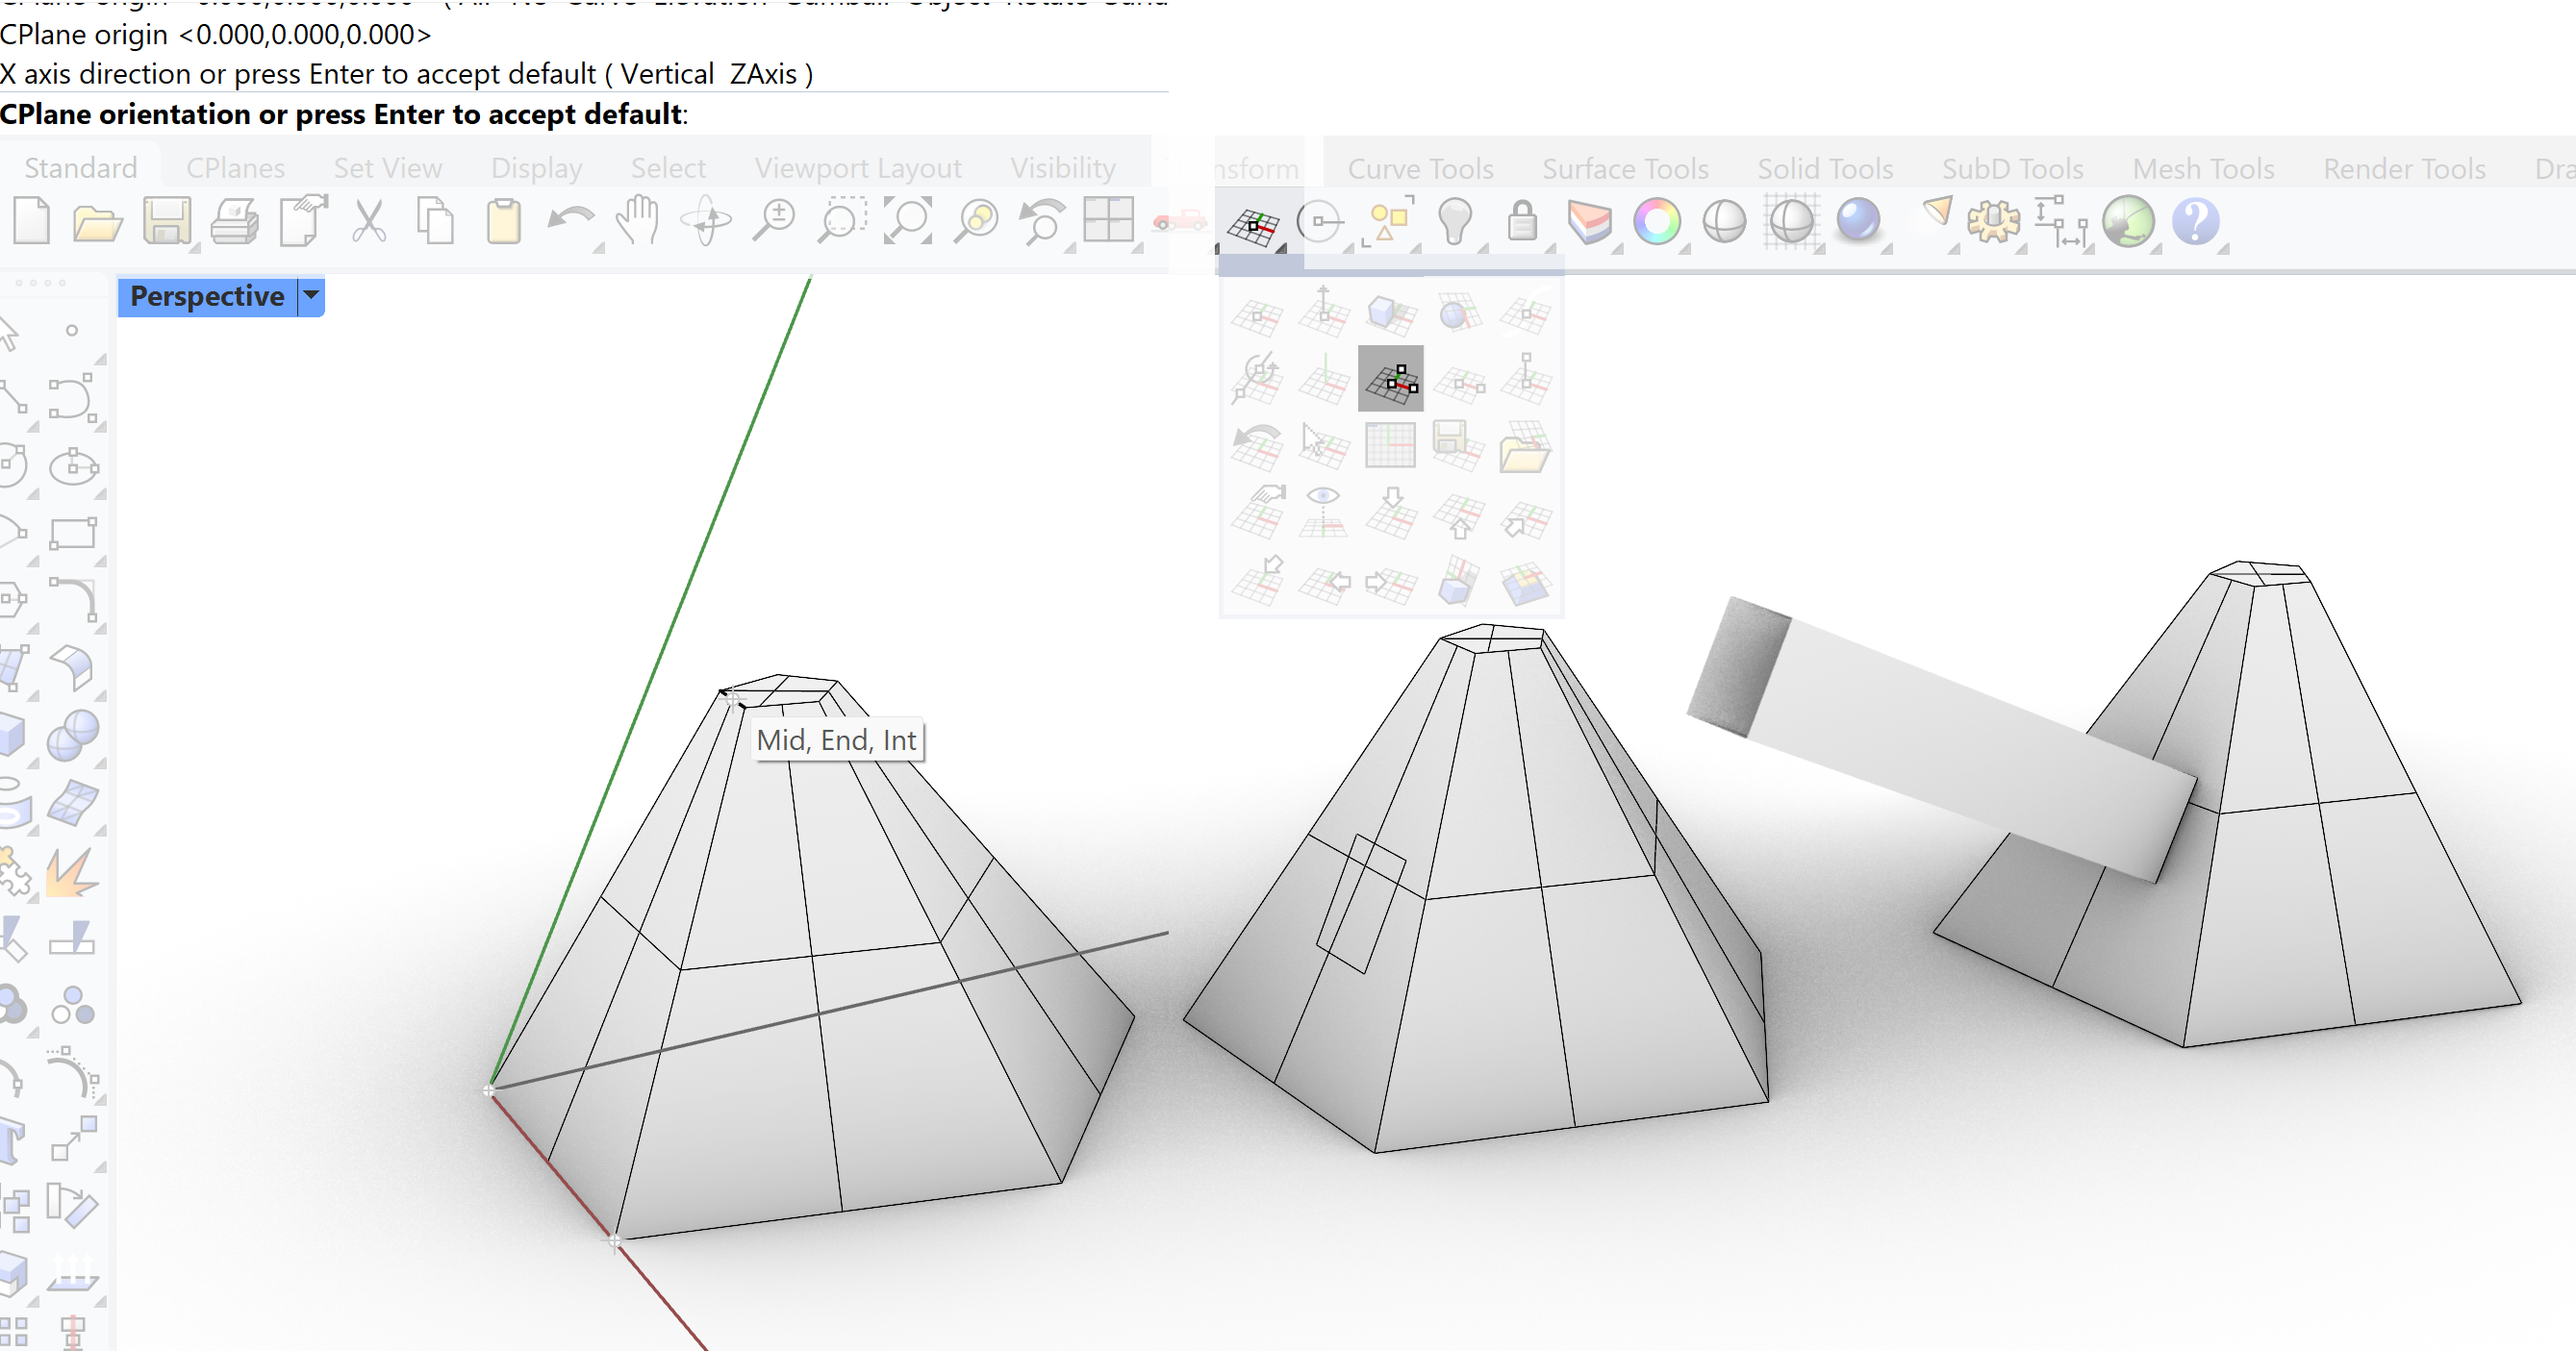
When you make geometry it will be placed on the grid which is visible in the viewport. The grid is therefore your construction plane. This can be problematic if you want to generate an object which should not be aligned with or placed on the standard grid. The grid however can be moved and rotated. In the example you see a pyramid structure with sloped sides. If you want to draw a cube aligned to the side and onto the side of the pyramid then you can realign the grid or also called the Construction Plane You can change the orientation of a construction plane at any time. Changing the construction plane can help you constructing geometry at difficult places and orientations.

Rhino Introduction 7/9
Organization of datalink copied
Selecting objects
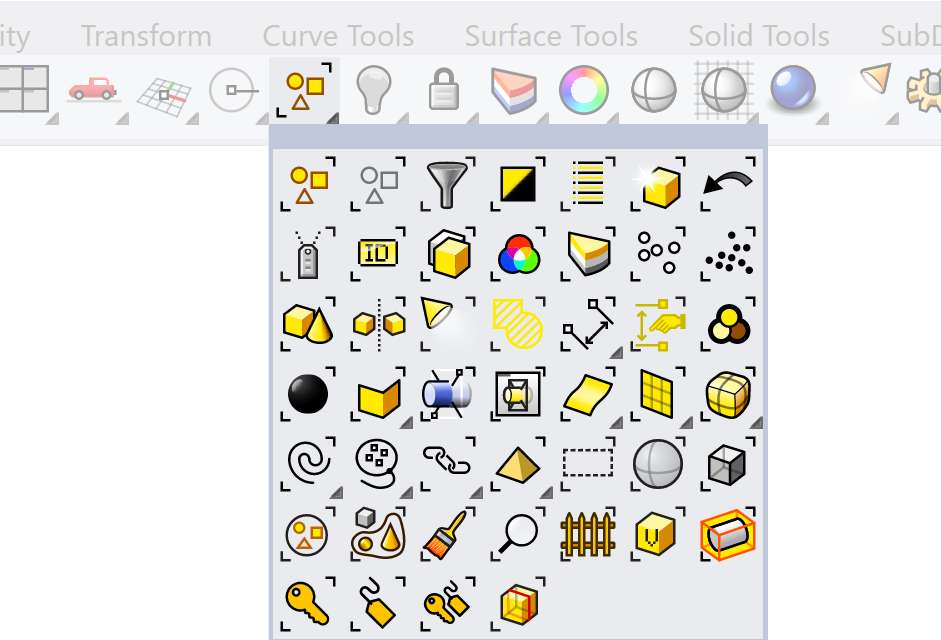
Before you can edit a shape or transform it you will have to select it. There are extensive tools available for selecting the objects and organize them in a way that the objects can be easily tracked in your scene. When you have a complex scene with a lot of objects it becomes important that you can select the right objects efficiently.
To select an object:
- To select an object just LMB- click on the object.
- To add another object to that selection use SHIFT – LMB.
- To deselect an object use CRTL – LMB
To select multiple objects in one sweep drag your mouse with LMB clicked from right to left over the to be selected objects. The geometry it will be selected where ever the mouse crosses. This is called crossing.

If you drag your mouse from left to right then only the objects will be selected which were completely inside the boundary of the selection. This option is called window selection. Additional options for selection can be found on the Standard shelf.

To prevent accidentally moving objects when you select by dragging a window, hold Alt when you drag your selection window.
Once you have selected a set of objects you can start organize them in such a way that they are easily accessible. The simplest method of organization is Grouping.
You can name your selections so you can retrieve them for later use. For more information see Named Selections on the Rhino help page.
Groups
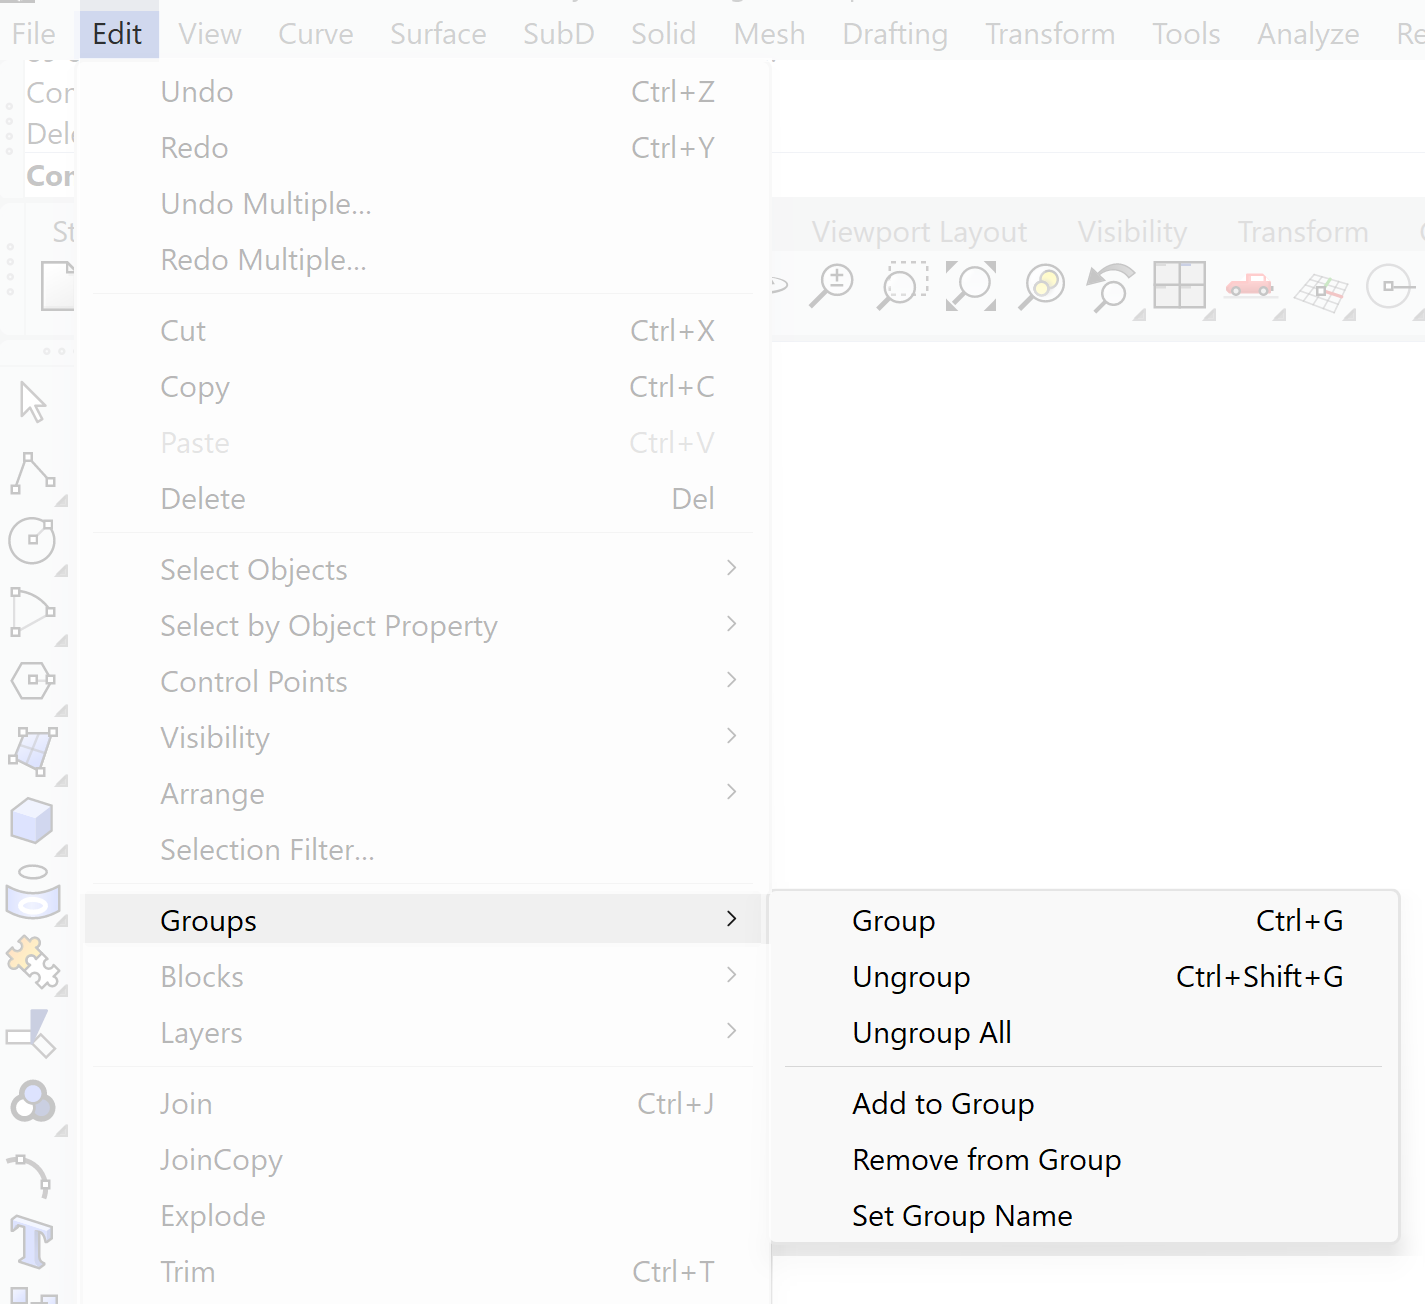
With the group option you can select multiple objects like it is a single object. For example a series of columns can be grouped together so if you want to move them all you don’t have to select each one of them but only one of the group. This saves a lot of time. The Group can also be ungrouped so it converts back to its separate parts. To group objects select them and go to Edit » Groups » Group To ungroup objects select the group and go to:

Blocks
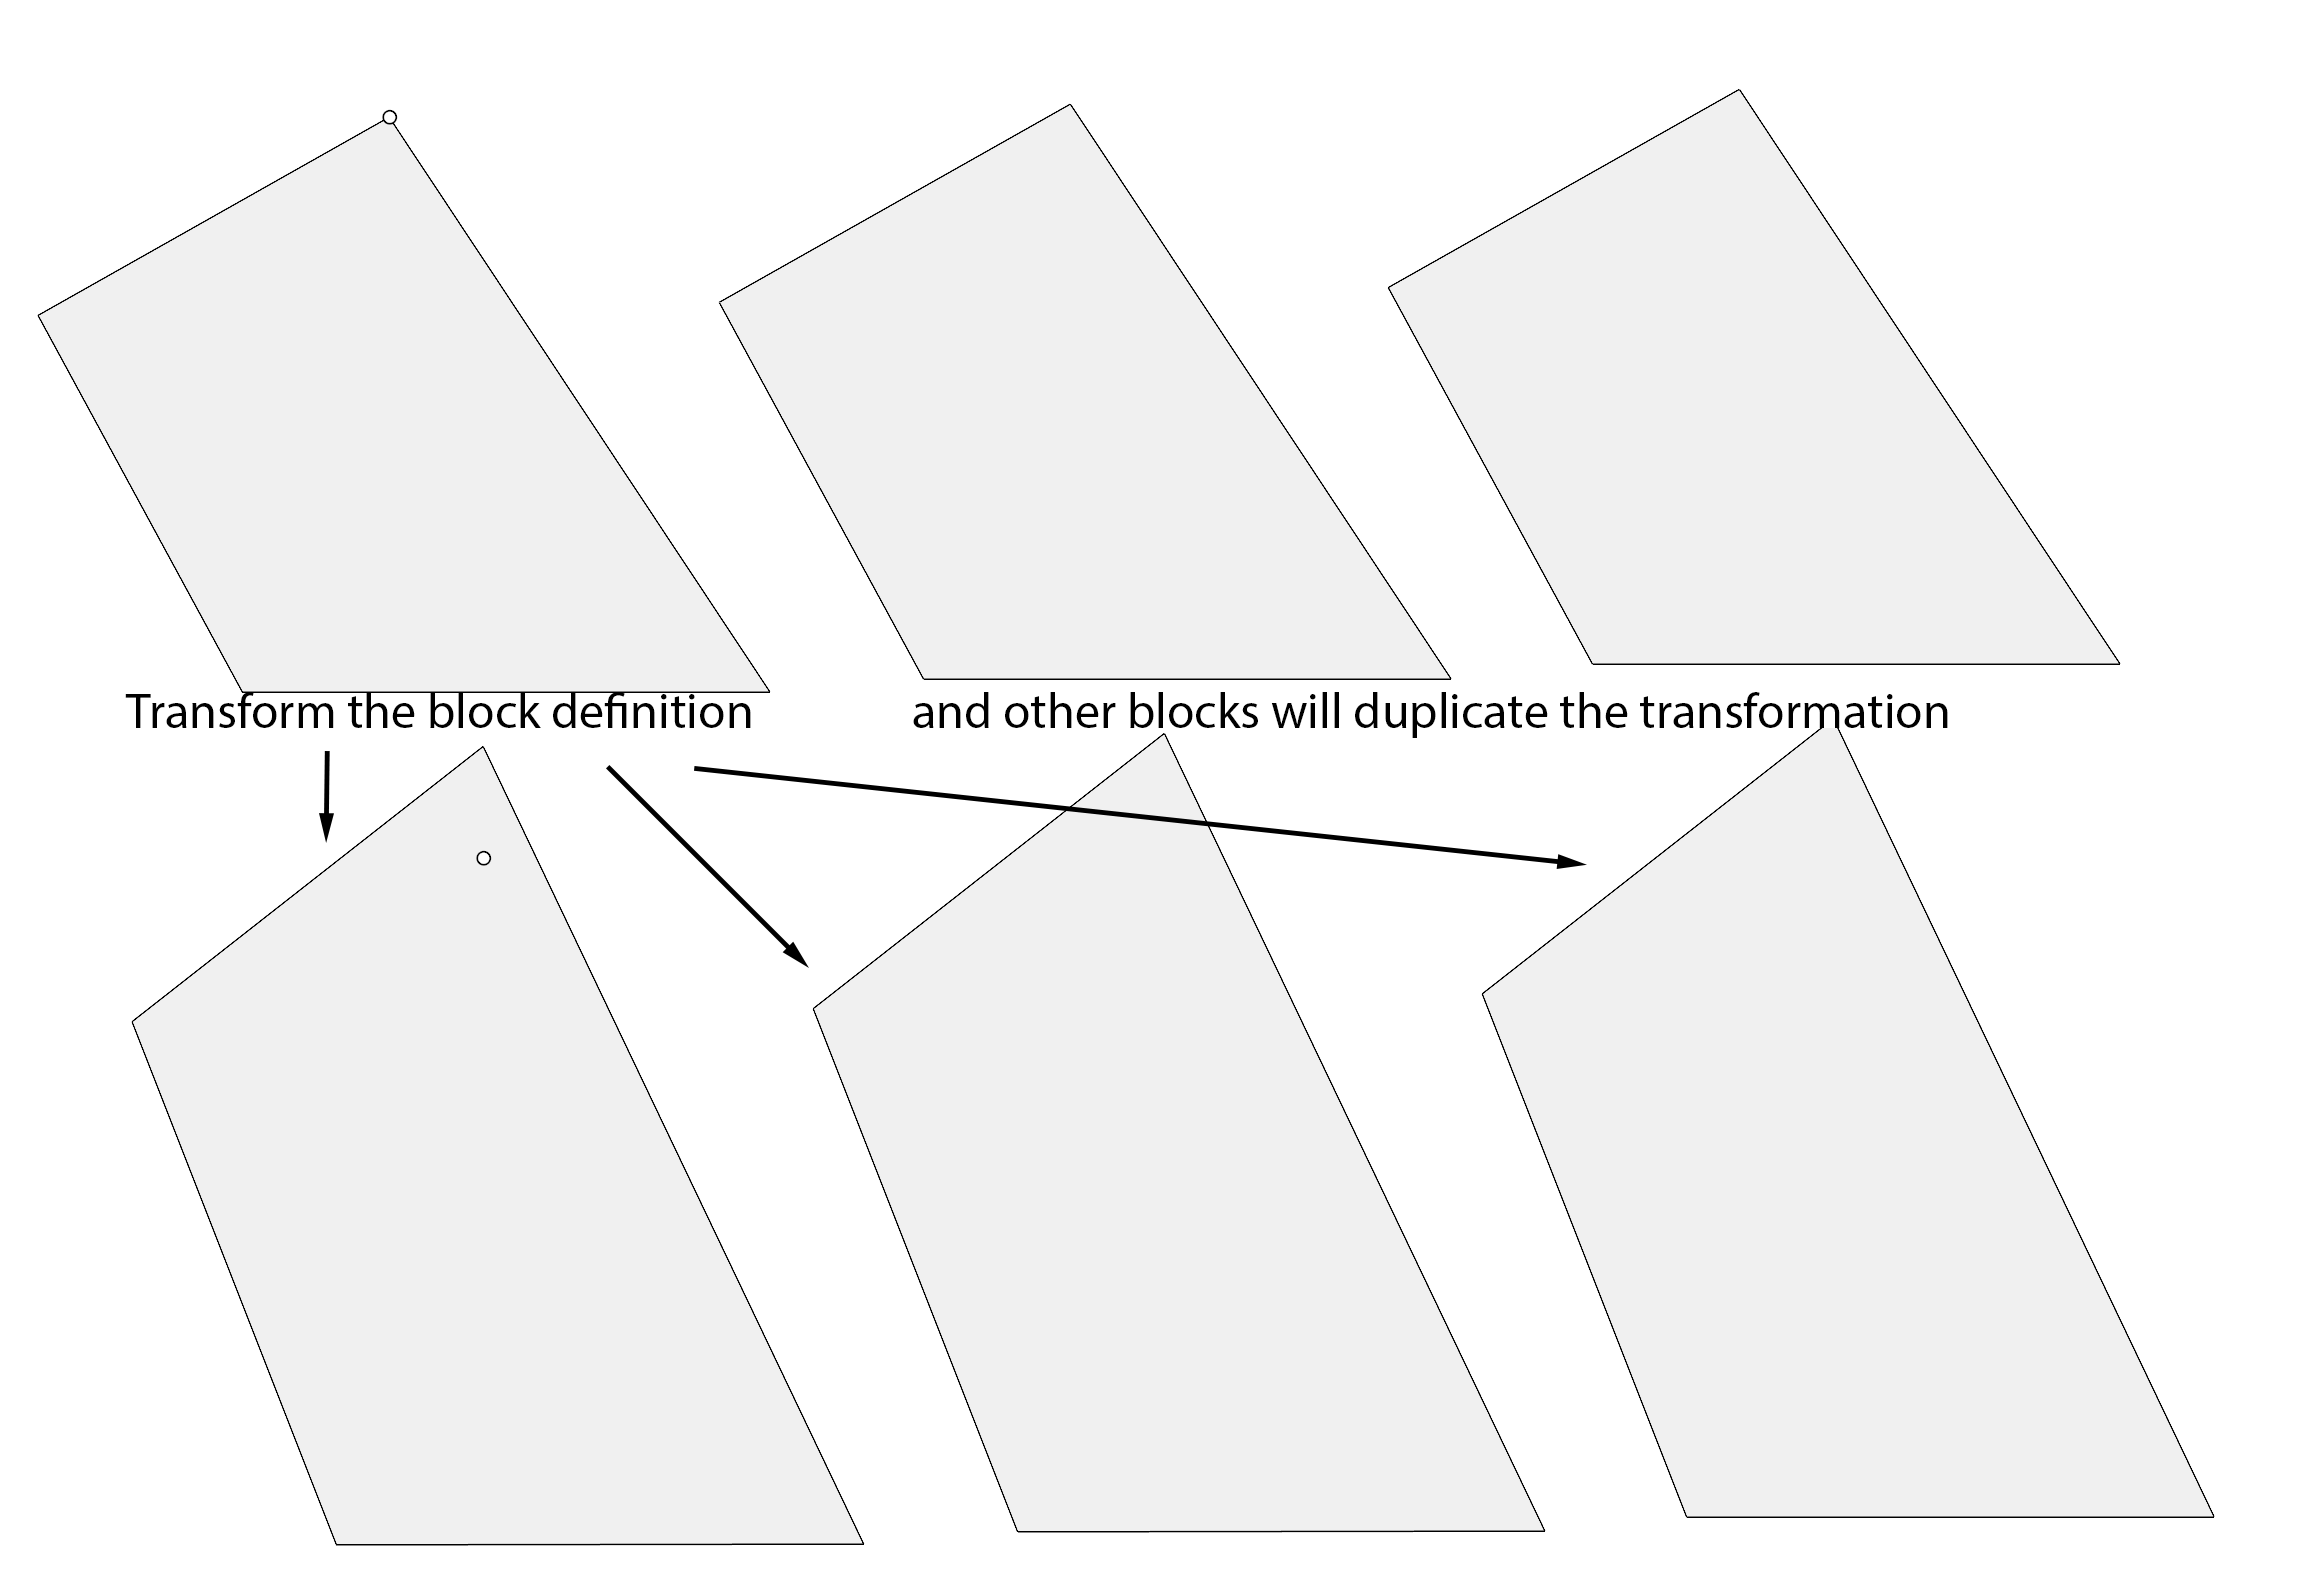
A block is an object which can function as reference. That means that a block, representing curves or geometry, can be placed at several points in the drawing. The several placed blocks are linked to the original block. If the block is changed the other placed blocks will also change. This can be quite useful when similar objects are used in a drawing, like window or door frames. So a block is a mini drawing which you can copy in your scene. If the original block is changed the copies will also change.
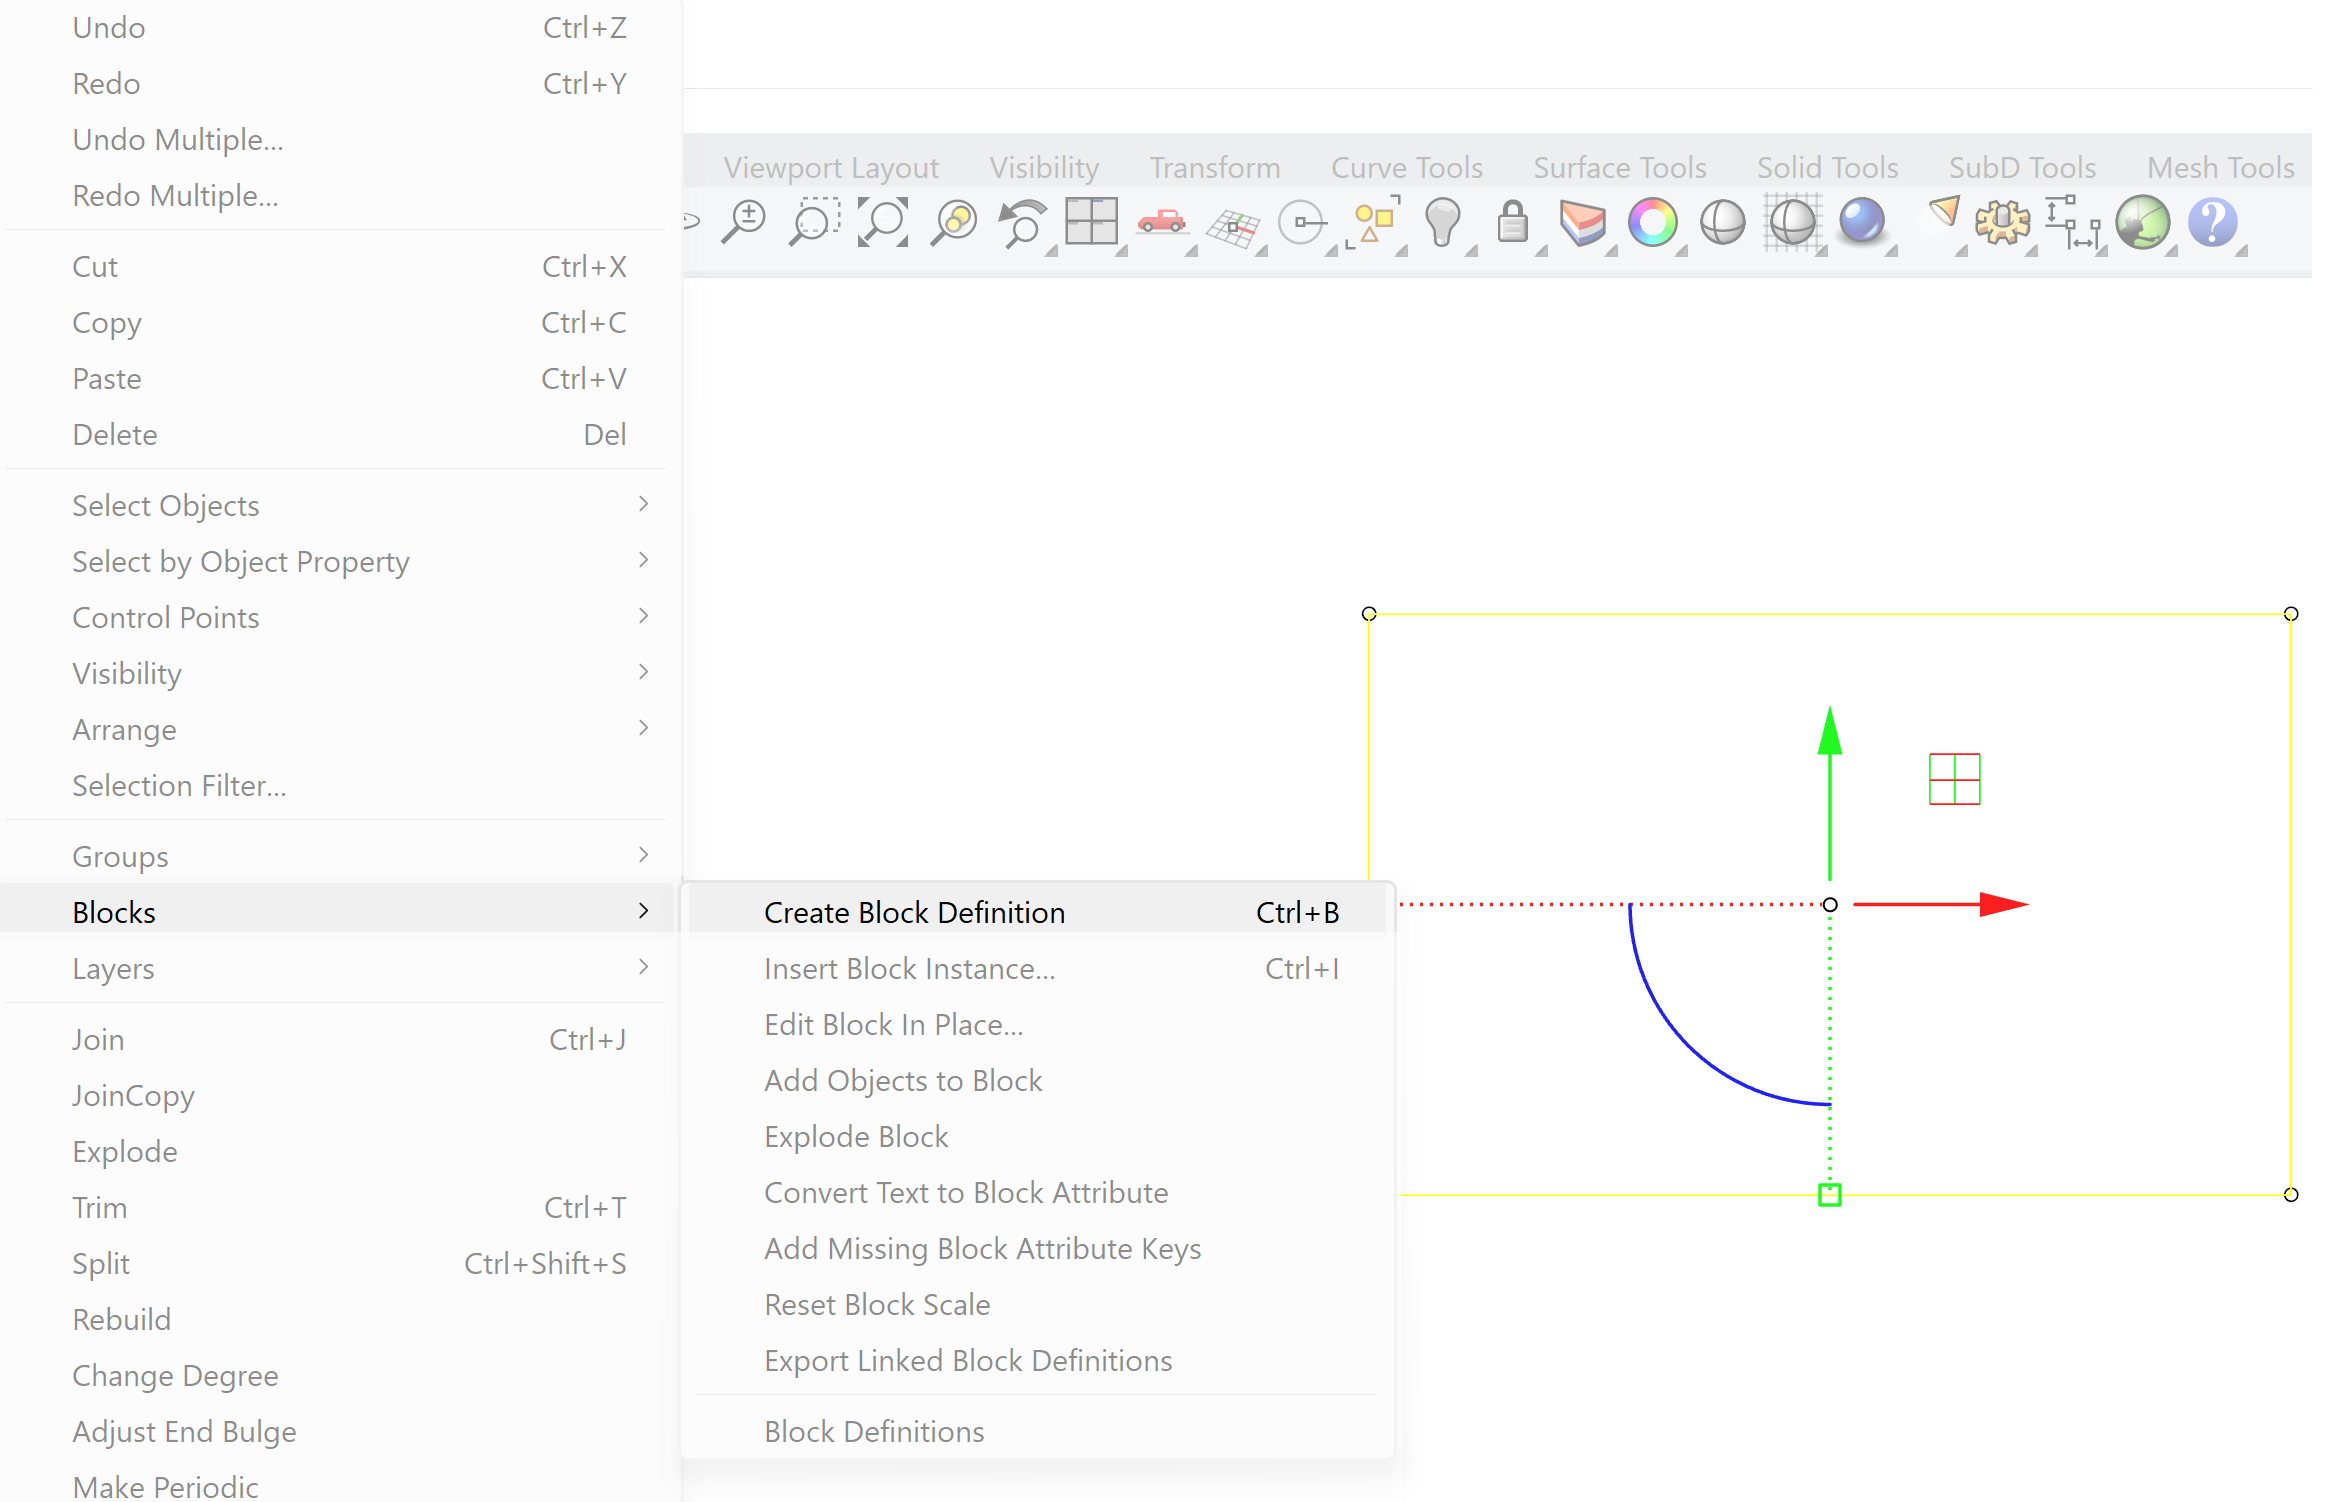
To create a block:
and select the object/s you want to turn into a block. The next thing you will have to define is the insertion point of the block. This is the point which you can use to snap to a wall for example. The menu opens and will ask you the name of the block and a description. Make sure you will use a correct name, because later on you have to select the blocks from a list of existing blocks. If you made a bunch of them, then a correct name can save you a lot of work.
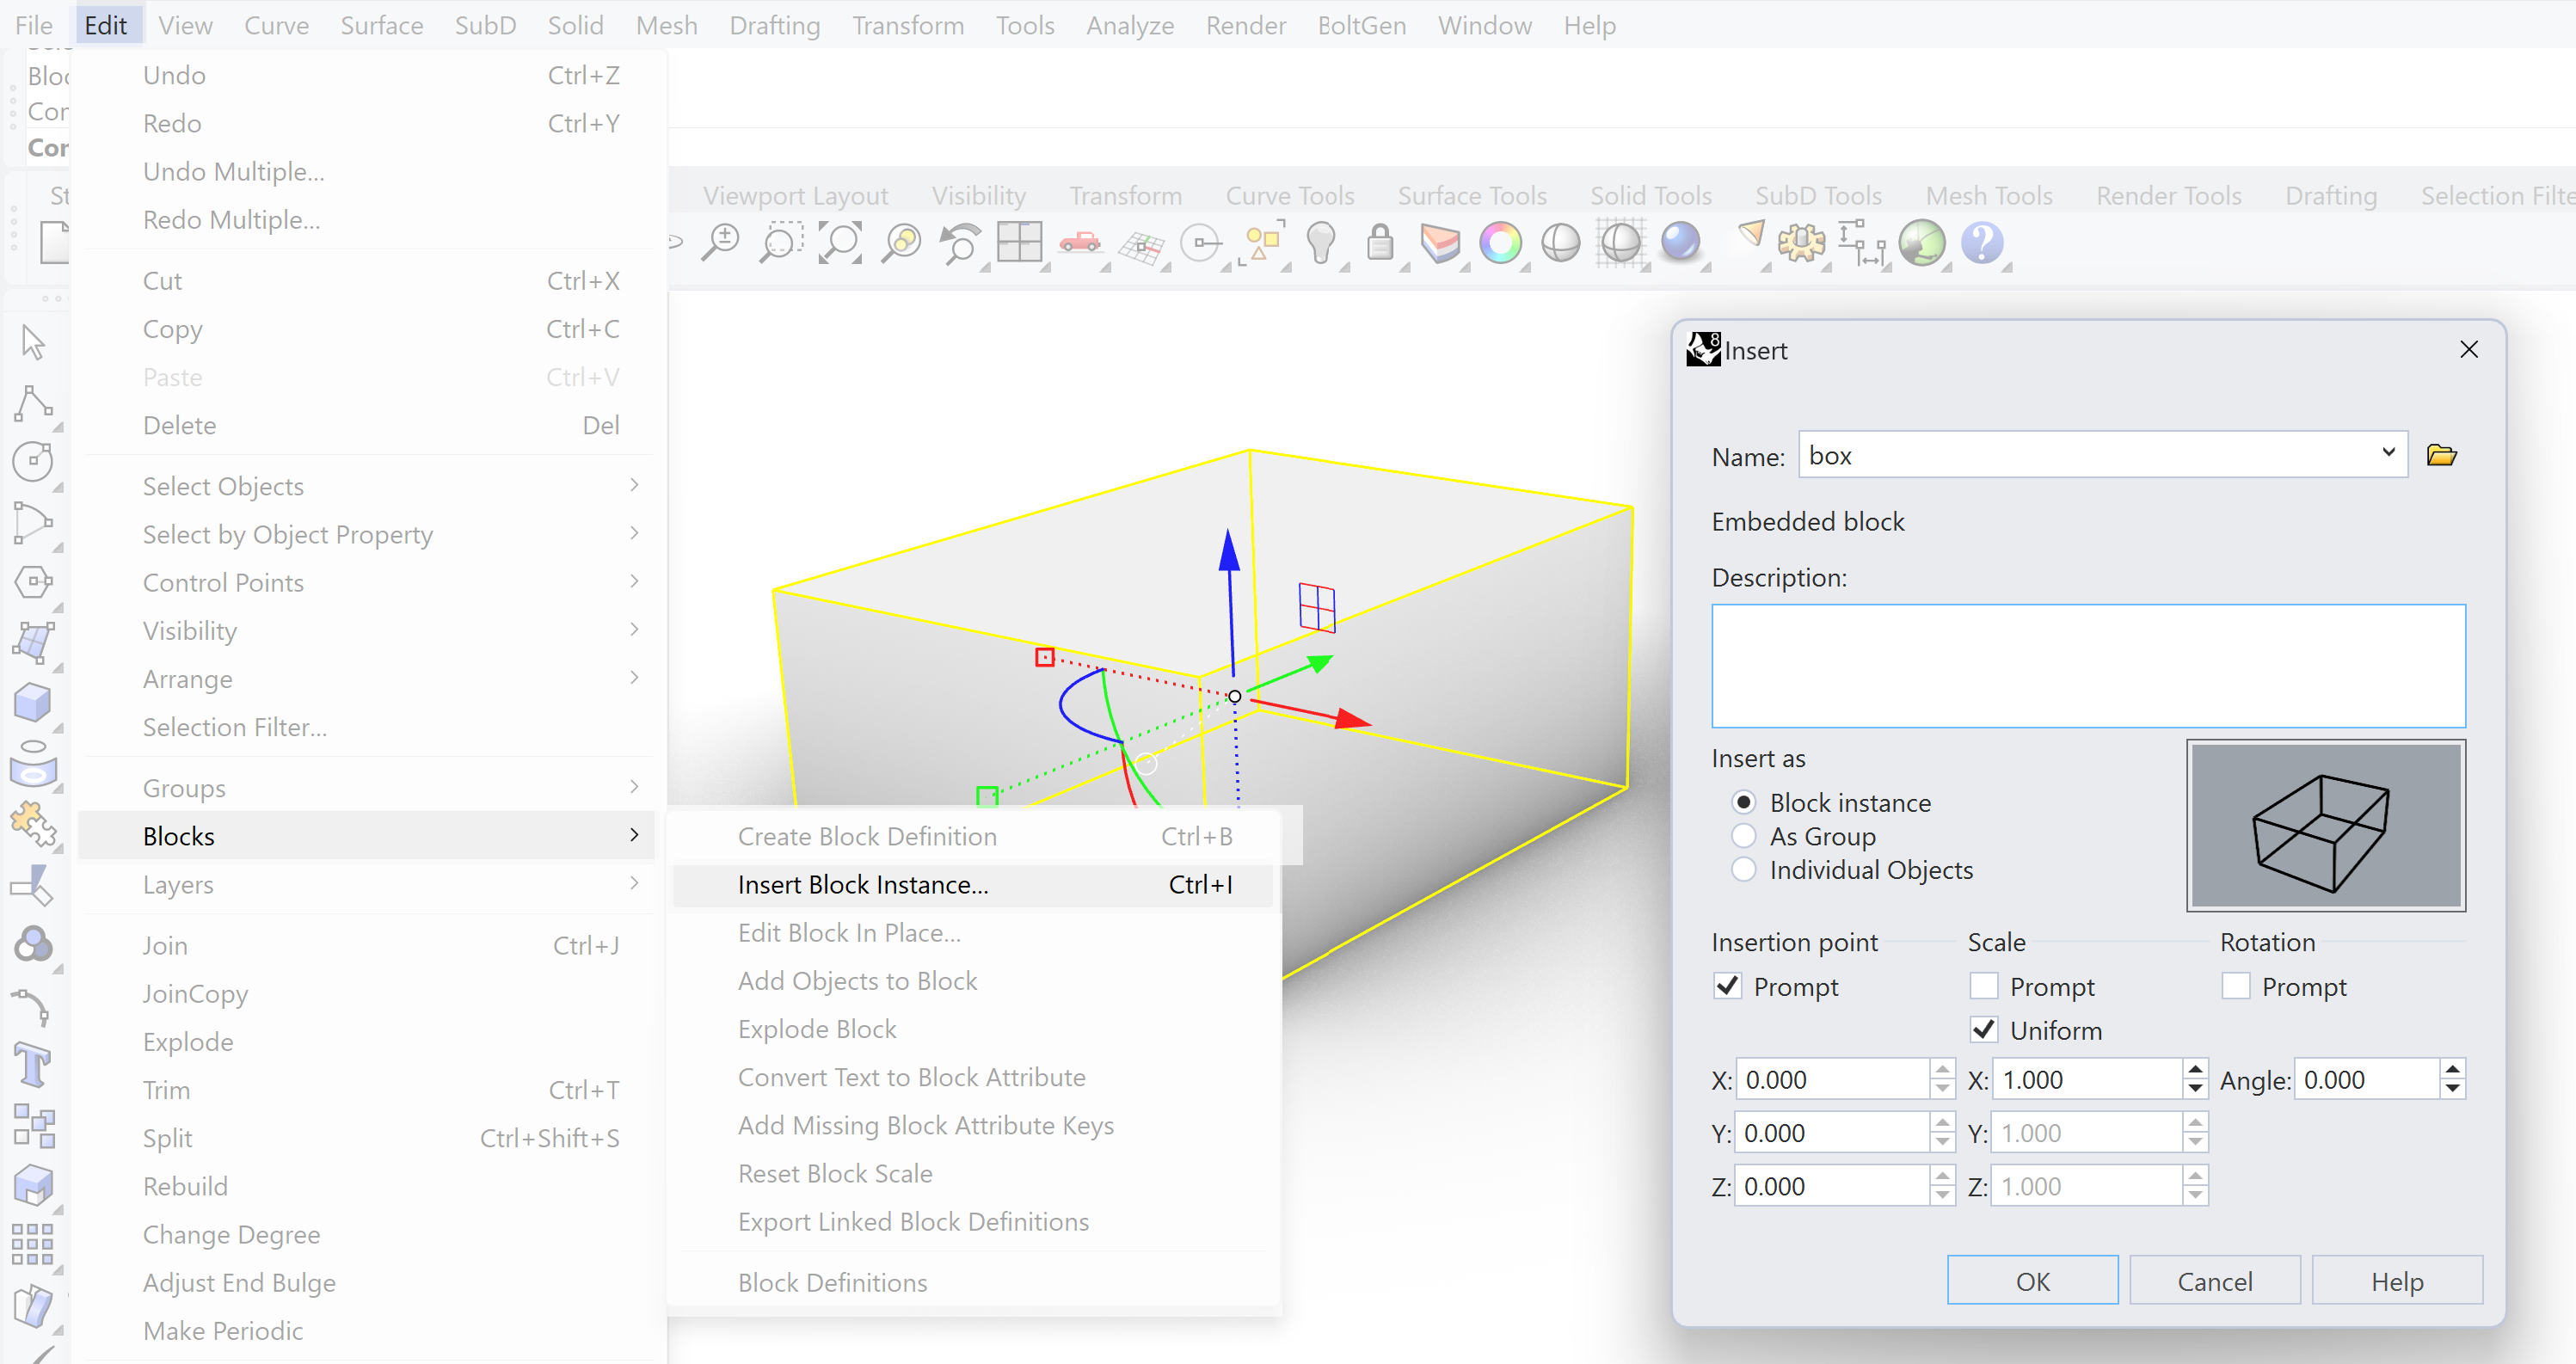
Insert a block
Go to:
and select the blocks name from the menu. You are asked if you want to be prompted when the block is inserted into your scene. This is for the move option useful because it allows you to place the block just by clicking with your mouse. If you have objects which are always on the same location you could use the option of defining the point of insertion. This can be useful for the drawing frame and block with information about the drawing.
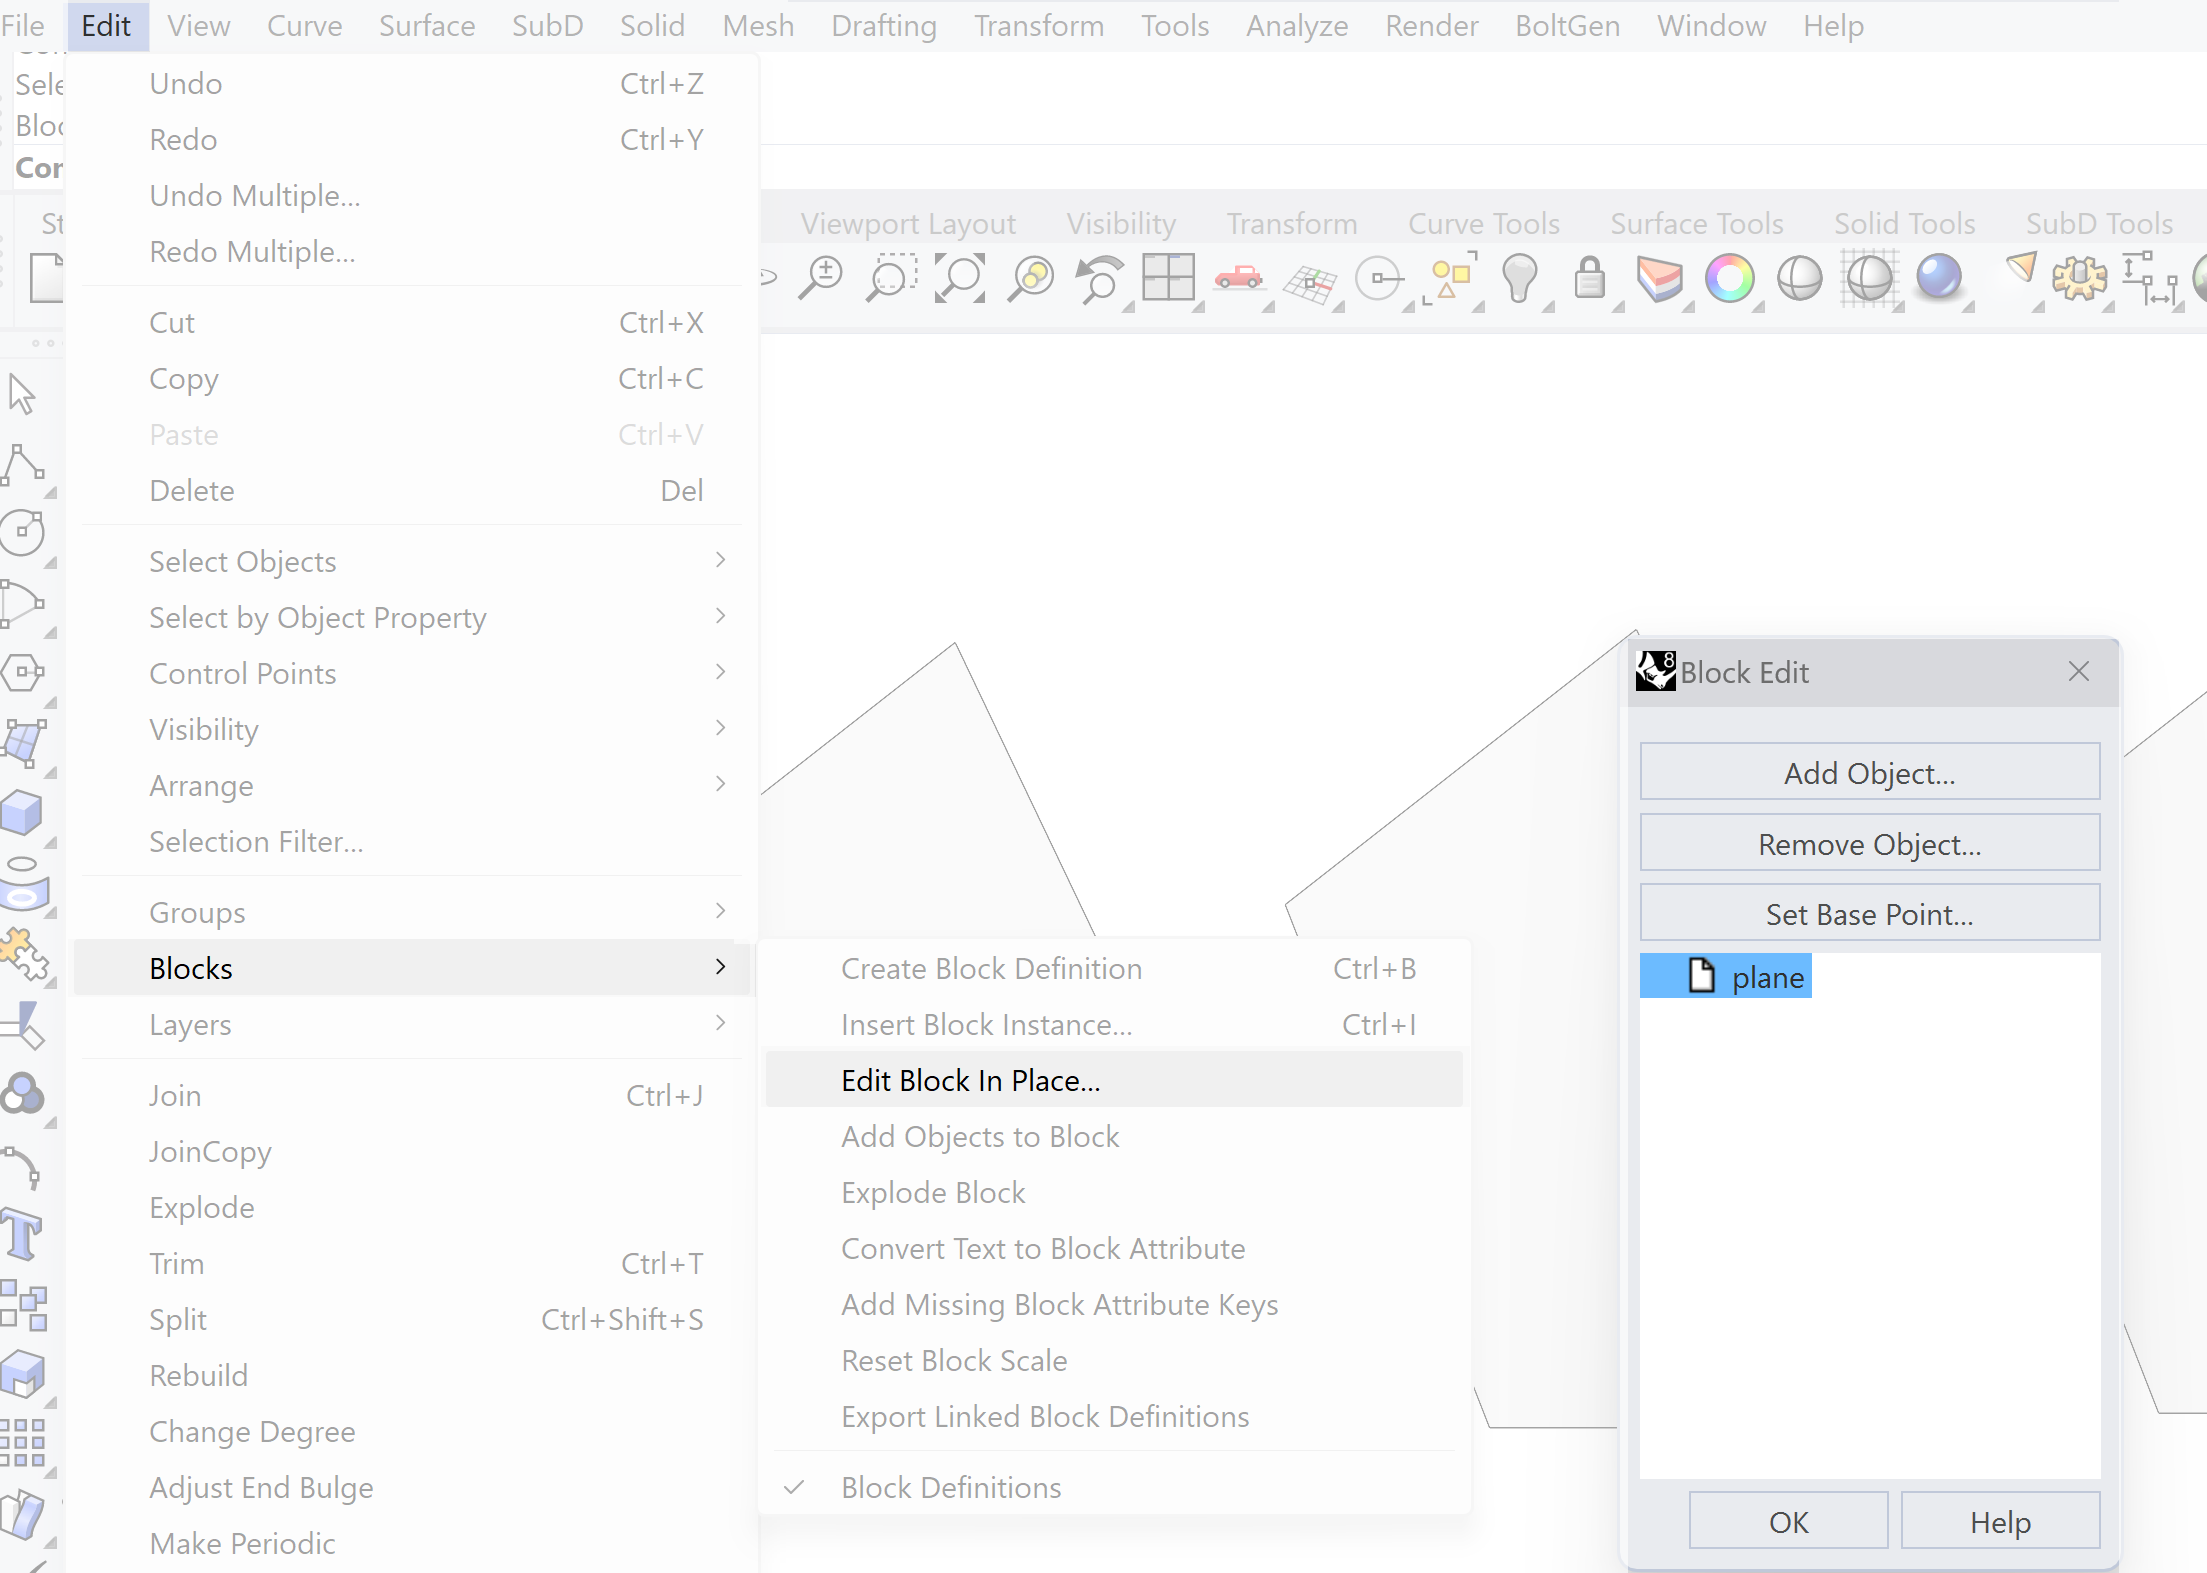
Edit a block
Go to:
and select the blocks name from the menu. You can add additional geometry to the block, move the insertion point or delete parts. The instances of the block will automatically be updated.
Using Layers
Like in most other 2D/3D design programs, Rhino has the ability to use layers. Layers are overlapping views of your scene that can have objects assigned to them. You can assign any objects within a scene to layers. One useful characteristic of layers is that they let you simplify your scene so you can work on specific objects without disturbing other objects. You can choose which objects of the scene you want to assign to a layer and then selectively make them visible or invisible. A color can be assigned to each layer. This color will be the base color of all the objects in that layer.
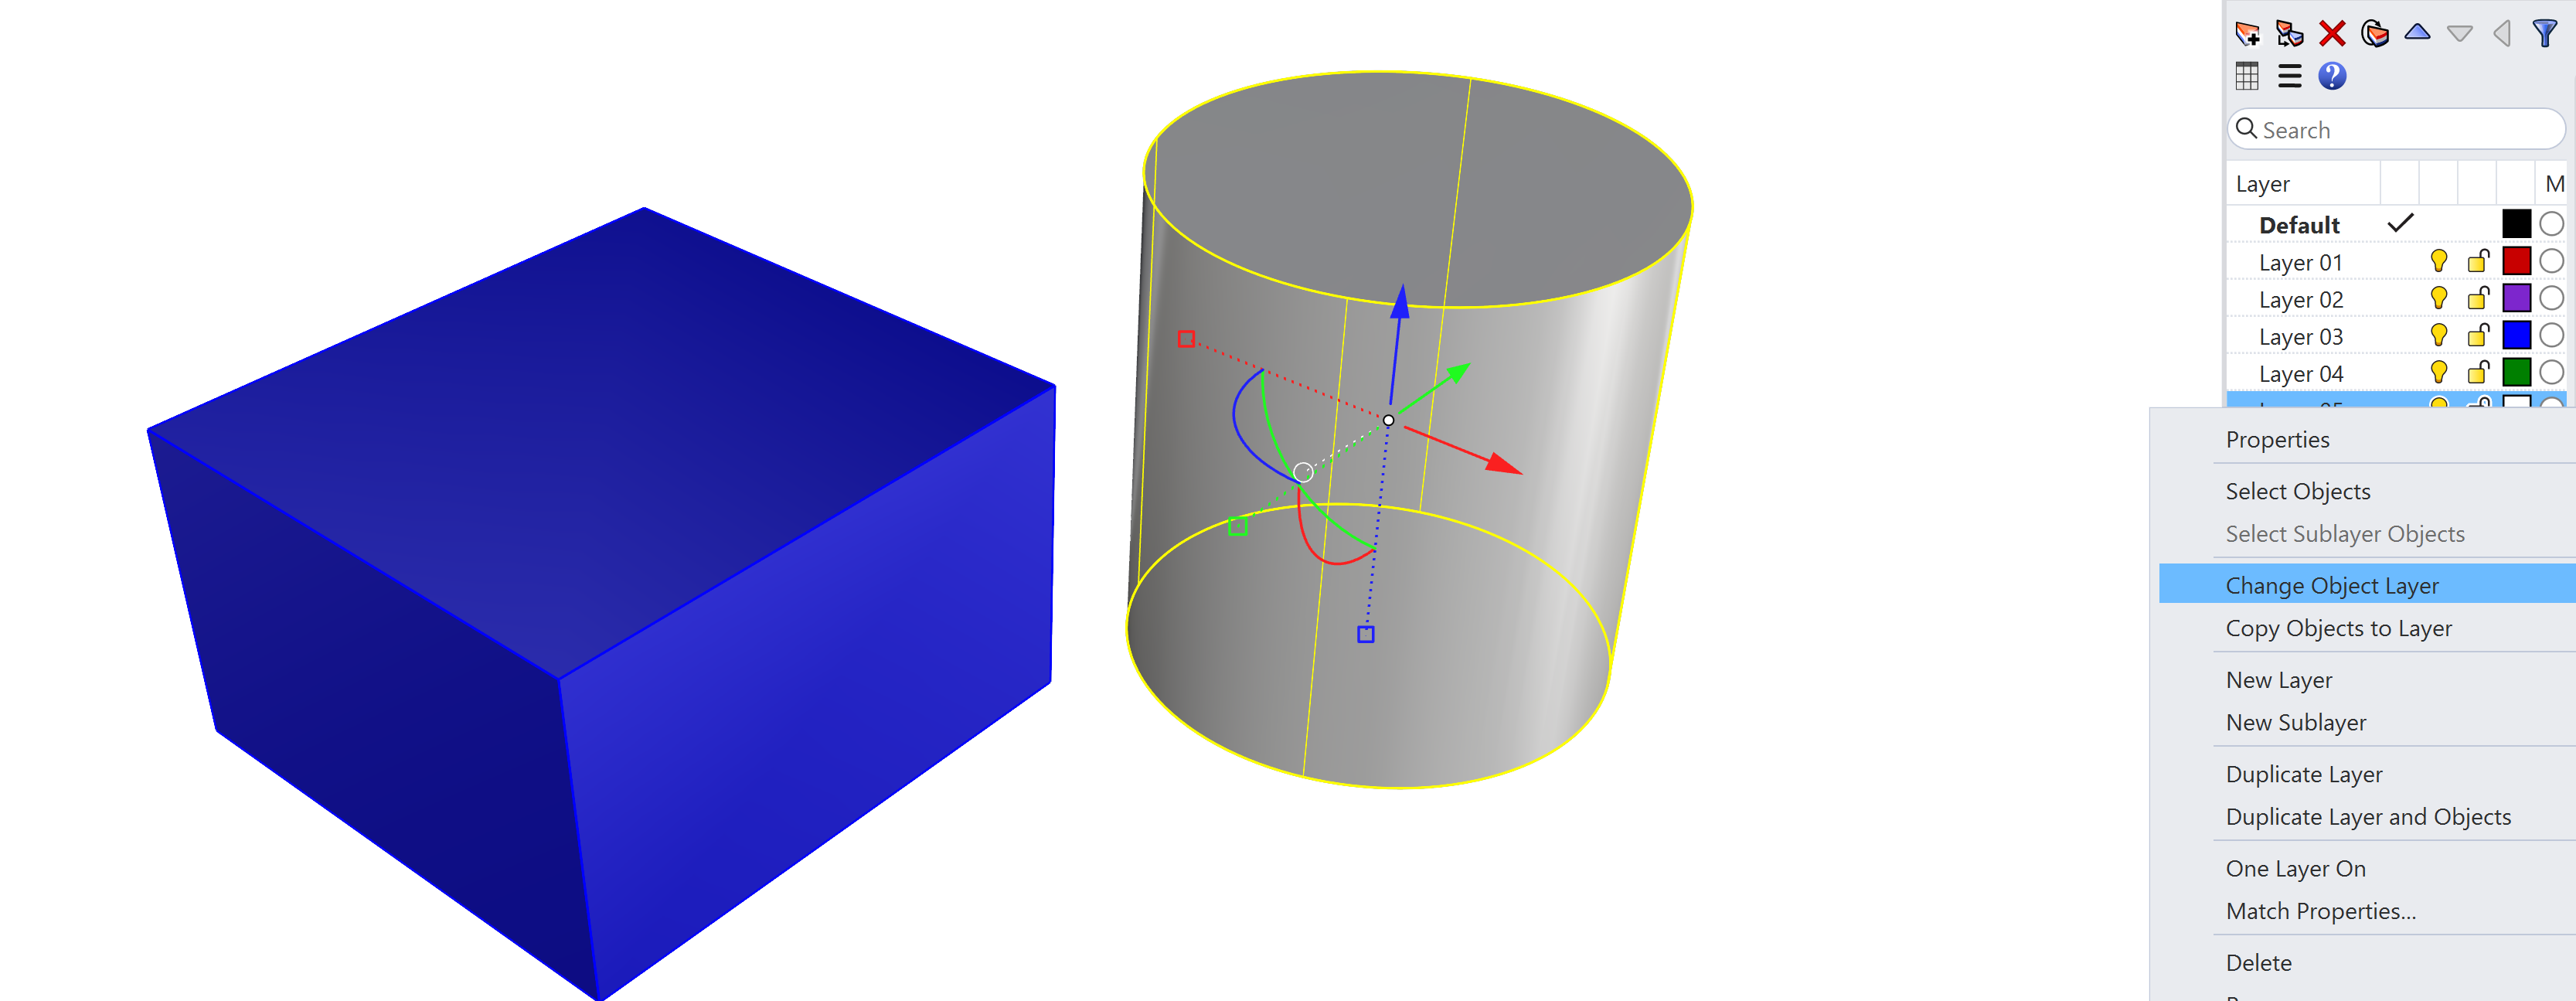
A object can be assigned to a layer by selecting the object(s), RMB on the layer and select Change Object Layer.

Rhino Introduction 8/9
Saving and exportinglink copied
Output of Rhino
You can extract different kinds of files from Rhino. Rhino files are saved in the native file format of .3dm. However, Rhino has a substantial array of options of saving your data in other file formats.
Saving an image
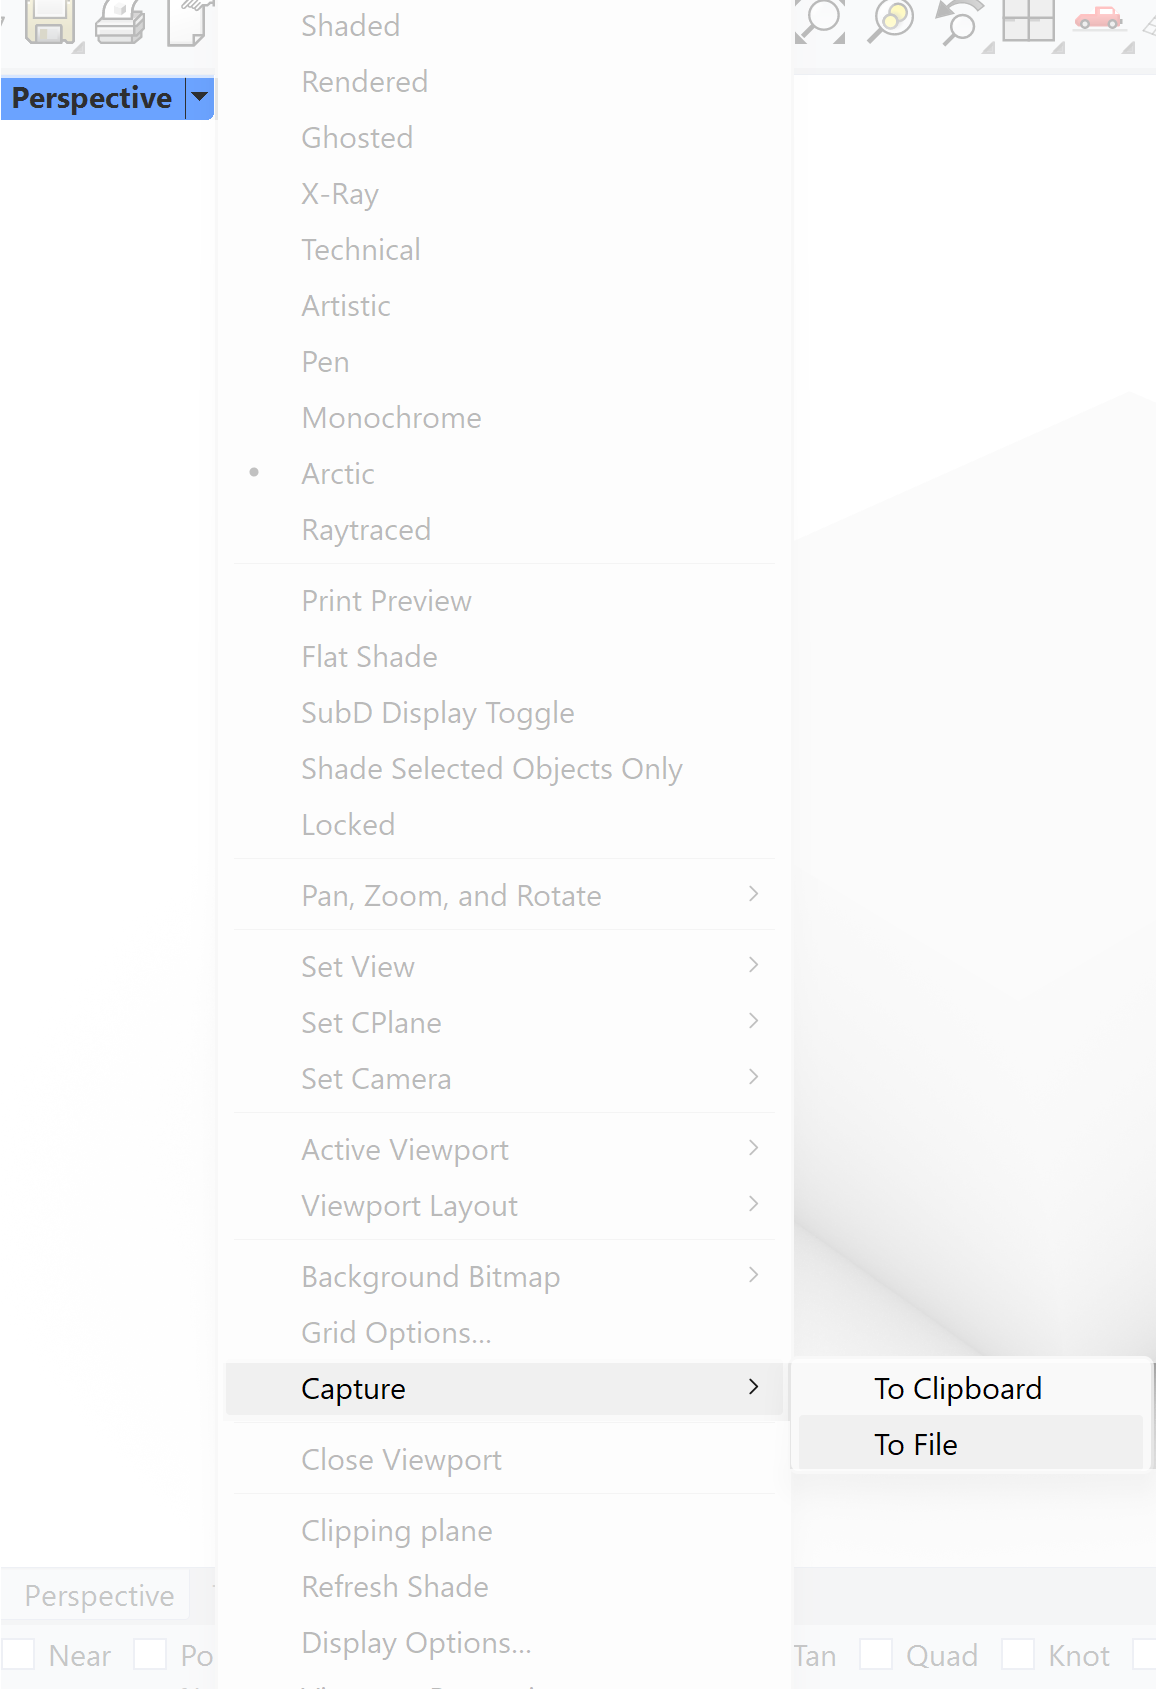
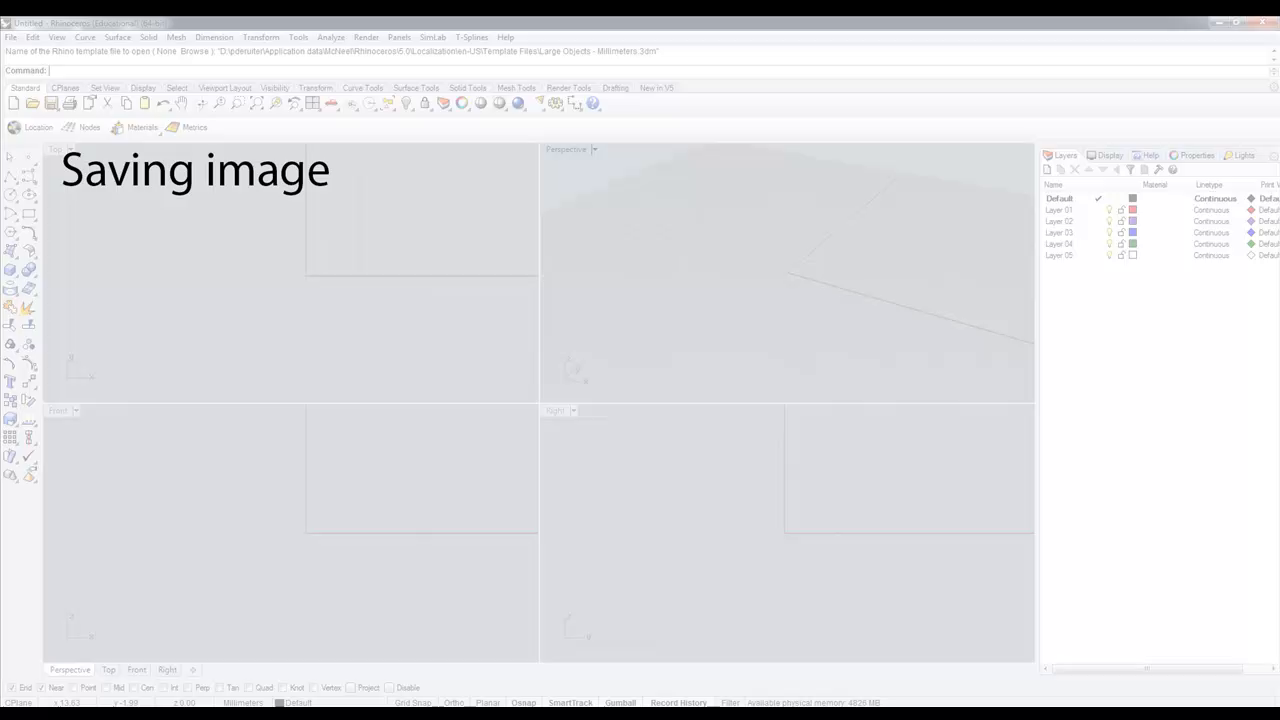
The image of the viewport can be saved by using the Viewport menu. Click on the arrow next to the viewport label to open the options of the viewport. Select:
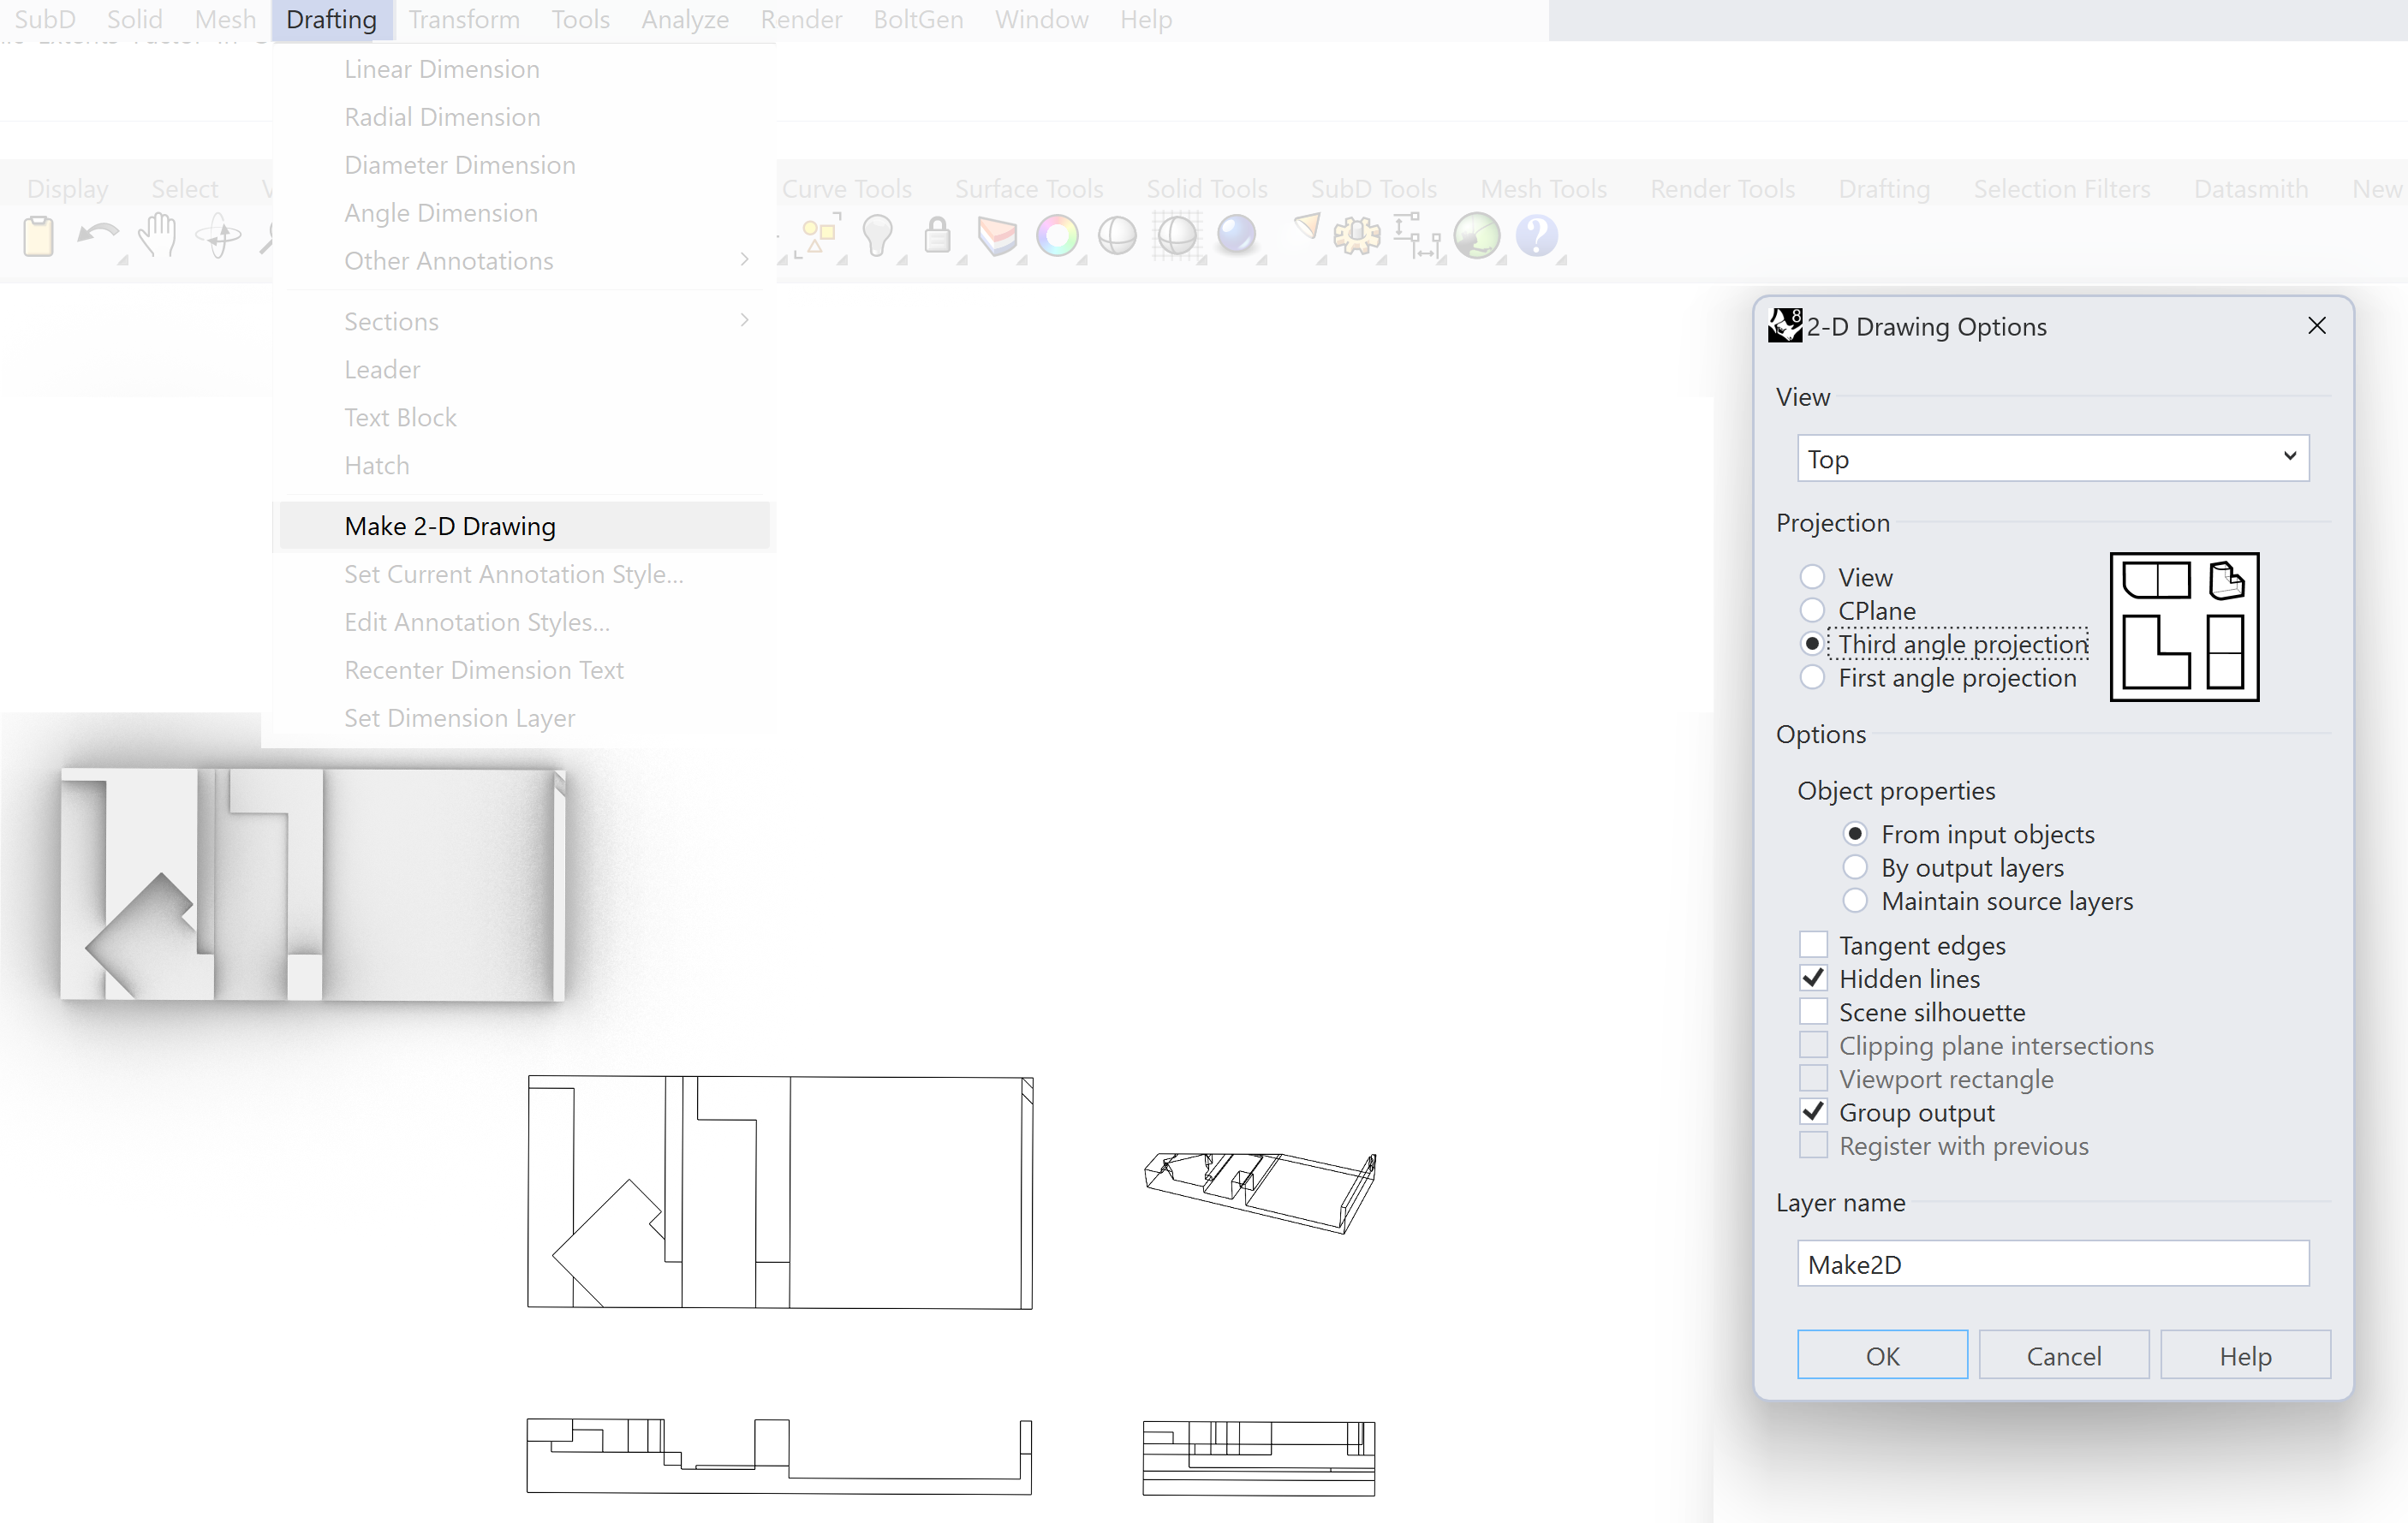
Make 2D Drawings from a 3D design
2D drawings are still widely used in communicating your design. Most 3D software have the option of automatically generating these drawings from your 3D design. In Rhino we can use the Make 2D command. Select:
Adding hatches to a 2D drawing
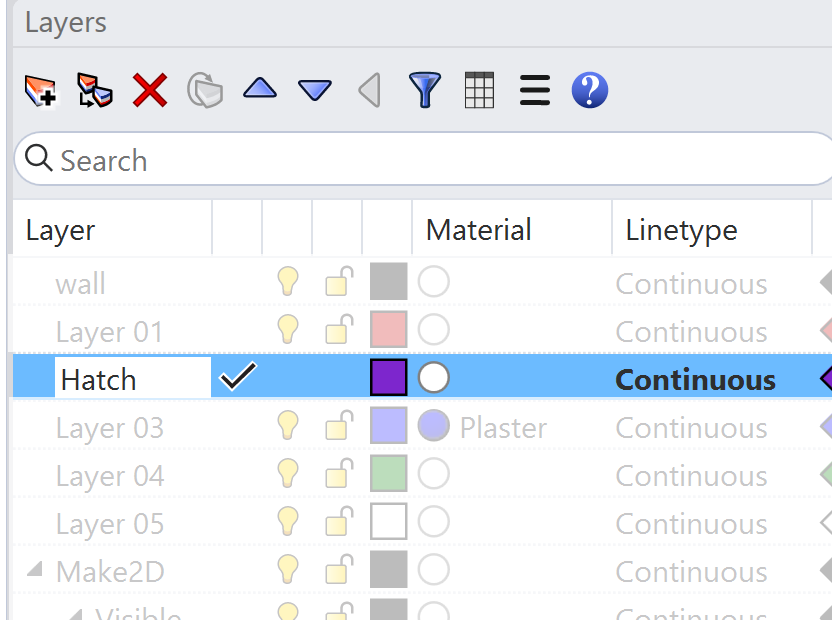
Hatches can be quite useful to define the properties of your geometry. A wall can have another hatch pattern then a floor for example. This technique is widely used in technical drawings where black and white printouts restrict you from using color.
In rhino we have a simple hatch option.
Before we start we have to make a new layer. Good practice is to place the hatch pattern on a separate layer so you can switch it on and off easily.
- Select the Layers tab on the right menu.
- Click twice on the name of the layer you want to convert to the hatch layer, and change its name into Hatch.
- Or make a new layer by clicking on the left icon at the top of the menu.
- Now double click the layer to make it active. Everything which is generated will be place on this layer.
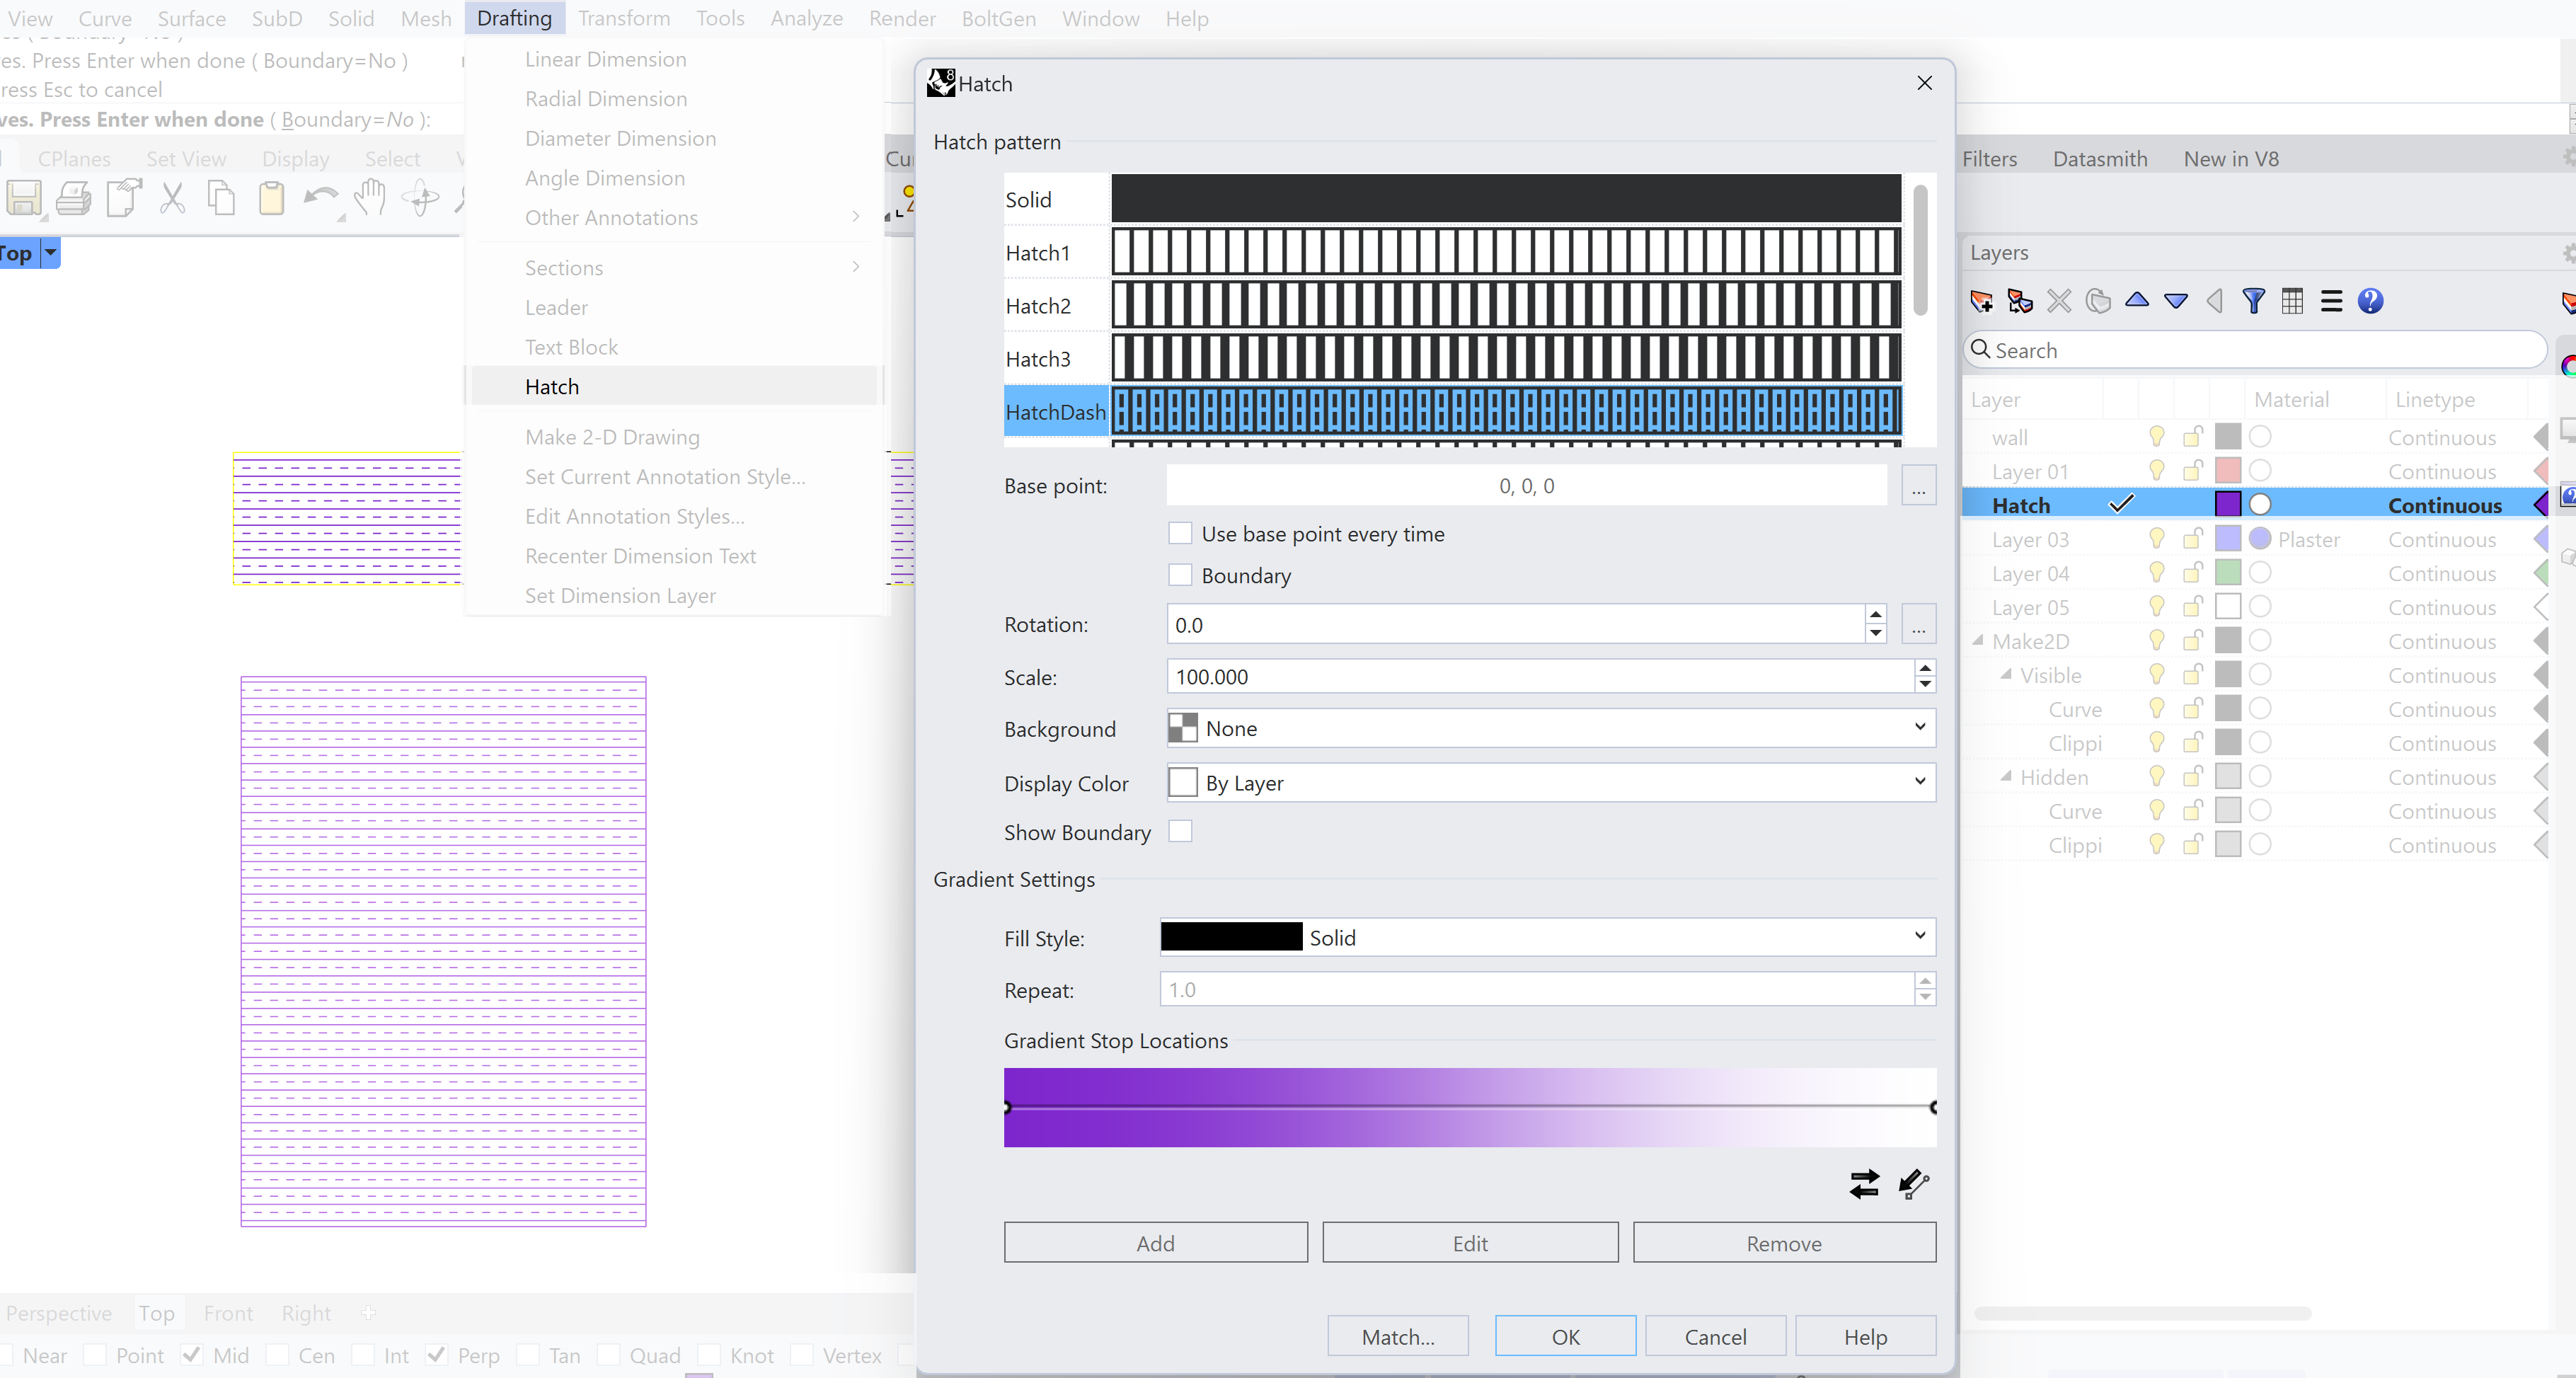
To make a hatch pattern we go to
- Select the option of Boundary yes or no.
- If boundary is selected it will be possible to select overlapping regions within the selected curves
- If boundary is not selected all inner area of the curves will be hatched.
- Select the curves
- Select the hatch pattern and adjust the pattern scale.
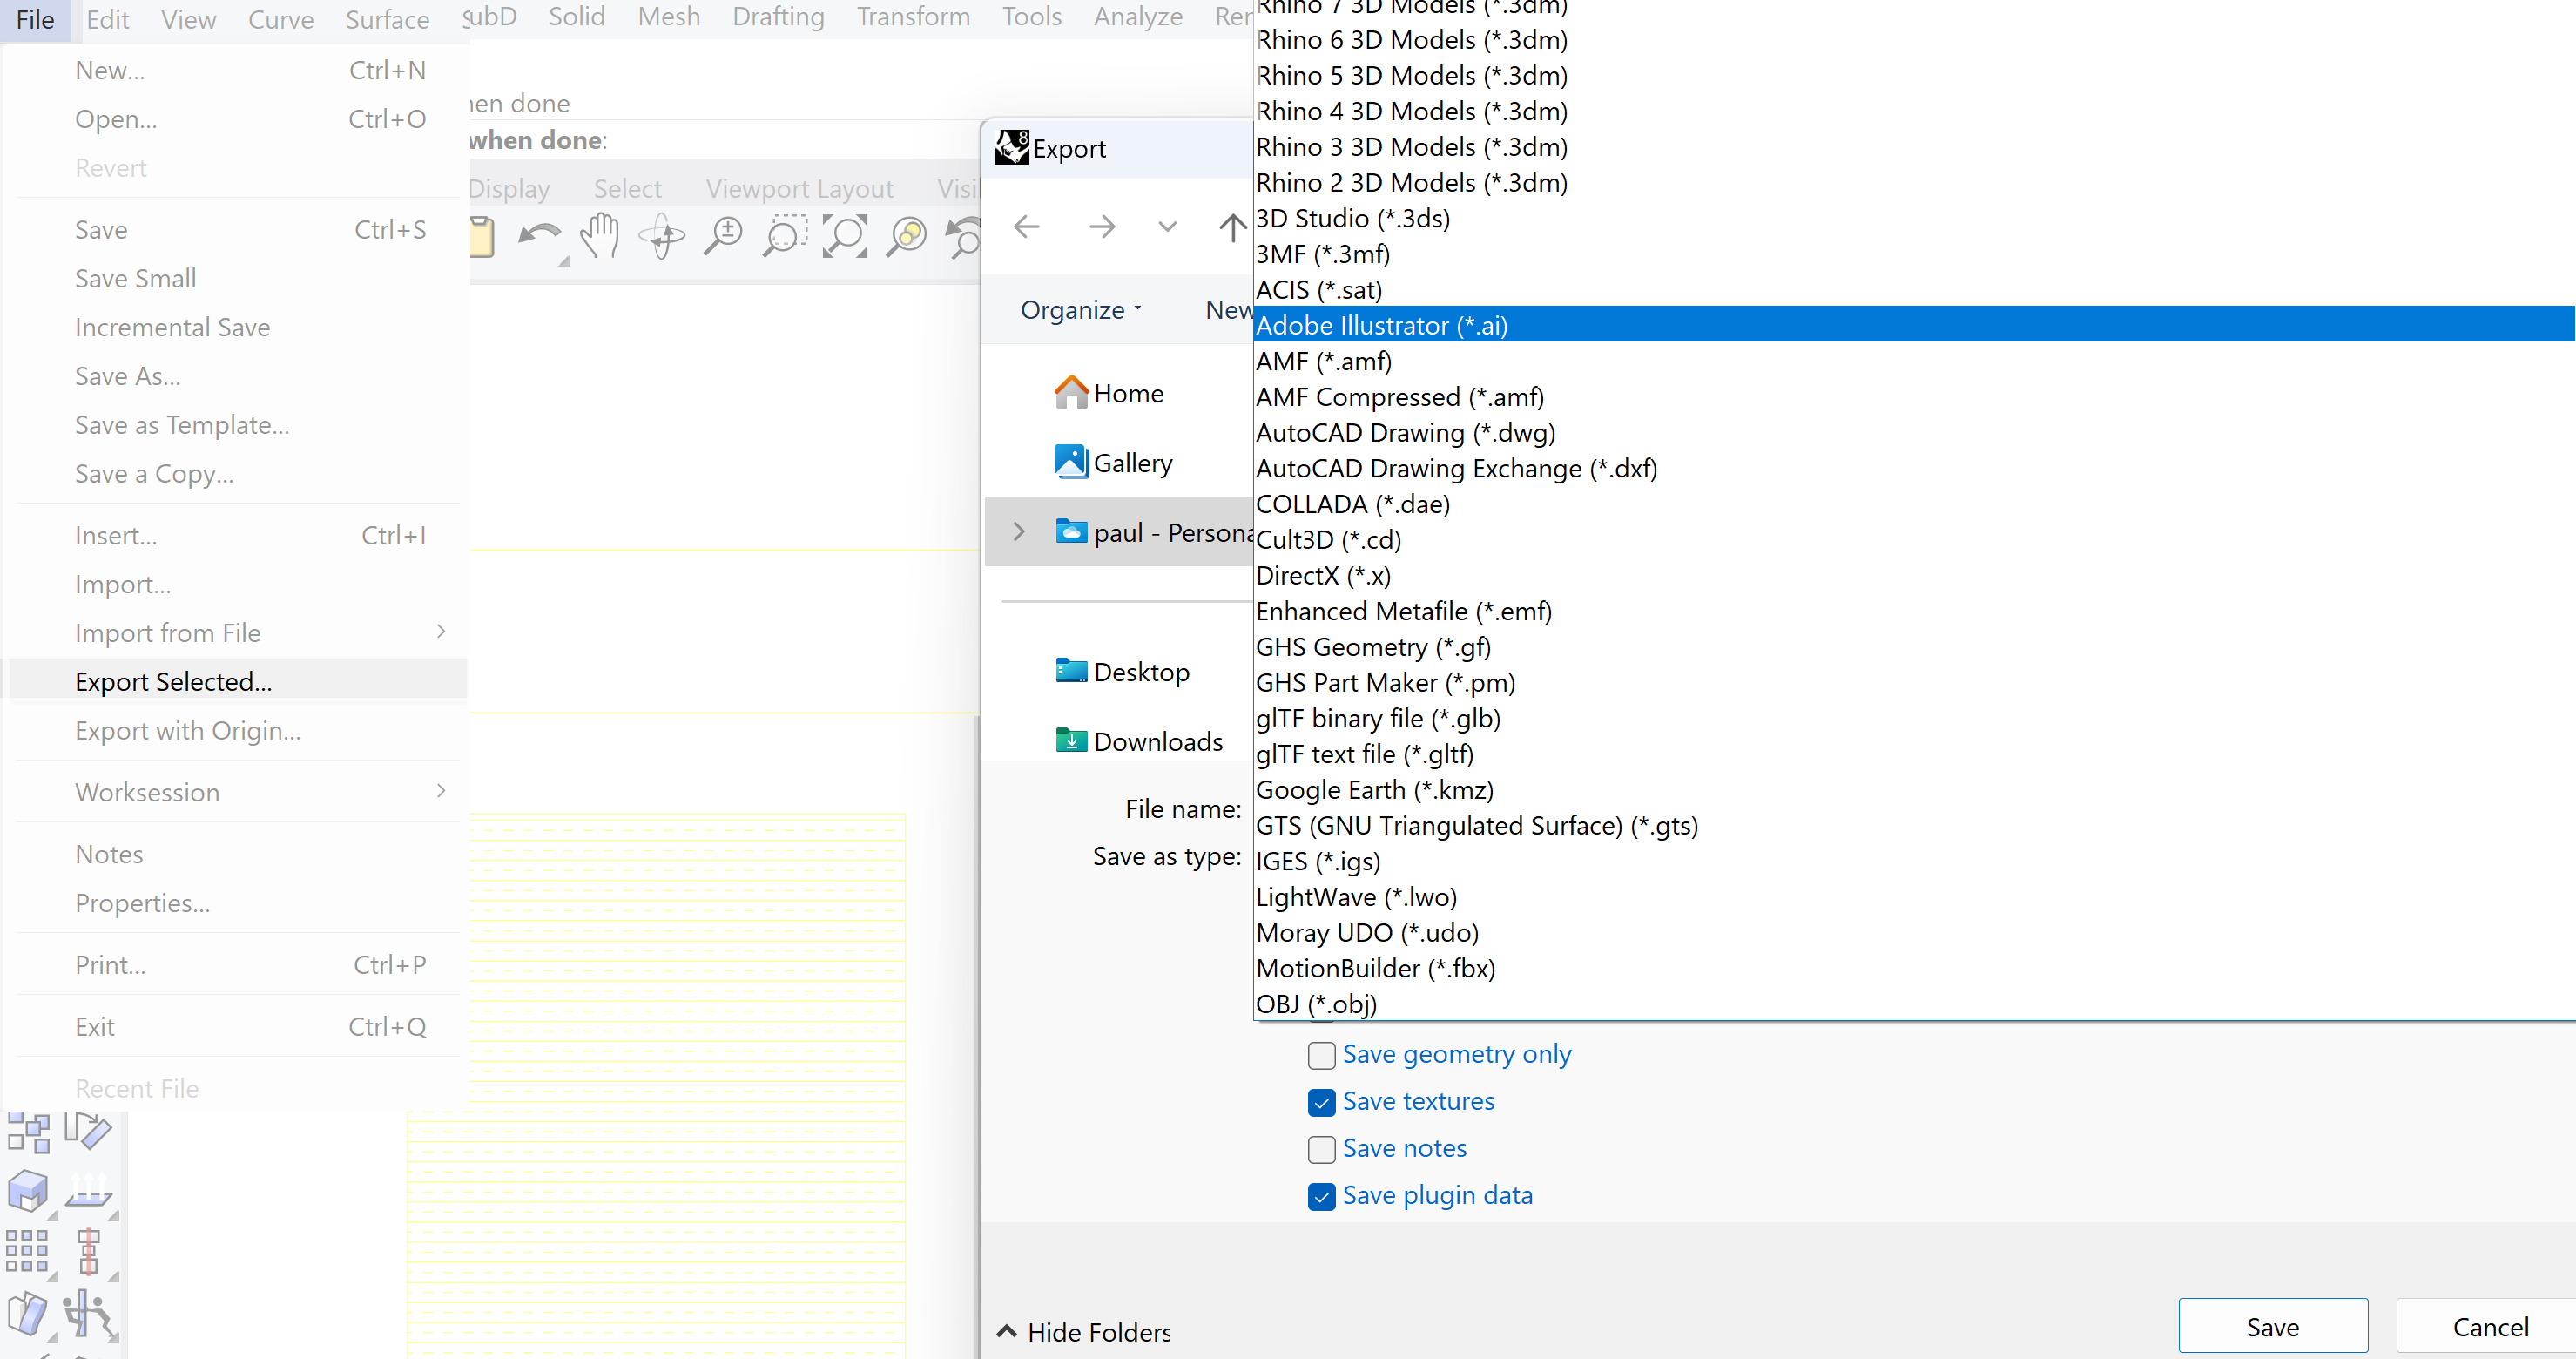
Export lines and curves to Adobe Illustrator
Rhino generates curves which can be saved and imported in Adobe Illustrator. This is very simple. Select the curves and go to:
Rhino Introduction 9/9
Conclusionlink copied
In this tutorial you learned the basics of Rhinoceros software, it’s capabilities, functionalities, and the overall structure of commands or exporting your products to various software.
Write your feedback.
Write your feedback on "Rhino Introduction"".
If you're providing a specific feedback to a part of the chapter, mention which part (text, image, or video) that you have specific feedback for."Thank your for your feedback.
Your feedback has been submitted successfully and is now awaiting review. We appreciate your input and will ensure it aligns with our guidelines before it’s published.
