QGIS – Exporting and saving data
-
Intro
-
GeoPackage
-
Adobe Illustrator
-
Tagged Image File Format (TIFF)
-
Export QGIS data to Rhino
-
Resources for other formats
-
Useful links
Information
| Primary software used | QGIS |
| Software version | 1.0 |
| Course | QGIS – Exporting and saving data |
| Primary subject | 3D Modelling |
| Secondary subject | Geospatial and Geographic Information Systems |
| Level | Beginner |
| Last updated | November 11, 2024 |
| Keywords |
Responsible
| Faculty |
QGIS – Exporting and saving data 0/6
QGIS – Exporting and saving data
This section contains information on how to export and save projects, layers, and styles in different formats.
Projects, layers and styles can be saved and exported in different formats. The following tutorials demonstrate how to do this.
QGIS – Exporting and saving data 1/6
GeoPackagelink copied
GeoPackage is a database container supporting direct use. The data can be accessed and edited without intermediate format translations.
- Save layer in Geopackage
Mariëlle Geers-Plasmans (Geojuffie): “O01 Opslaan van een laag in een geopackage”
you can access this video using this link
Language(s): Dutch
Time: 5m 20s
- Save a project as a GeoPackage
Mariëlle Geers-Plasmans (Geojuffie): “O02 Project opslaan naar geopackage”
you can access this video using this link
Language(s): Dutch
Time: 3m 22s
- Save styles from vector layers in a GeoPackage and use them as default styles
Hans van der Kwast: “Saving styles to a GeoPackage in QGIS”
you can access this video using this link
Language(s): English
Time: 2m 28s
Chapters:- introduction (start-0:11)
- how to save styles (0:11-0:49)
- default styles (0:49-1:05)
- save to GeoPackage (1:05-end)
- Store data, styles and project in a GeoPackage
Hans van der Kwast: “Store Data, Styles and Project in a GeoPackage with QGIS”
you can access this video using this link
Language(s): English
Time: 3m 7s
QGIS – Exporting and saving data 2/6
Adobe Illustratorlink copied
QGIS allows users to use and combine (e.g. urban and civil) databases and generate maps. With the tools available in QGIS you can easily create maps that show specific properties of the urban environment. If you want to present these maps most of the time it is nice to perfectionize it with Adobe Illustrator. This allows you to extract specific data and create clean diagrams.
Export from QGIS to Illustrator
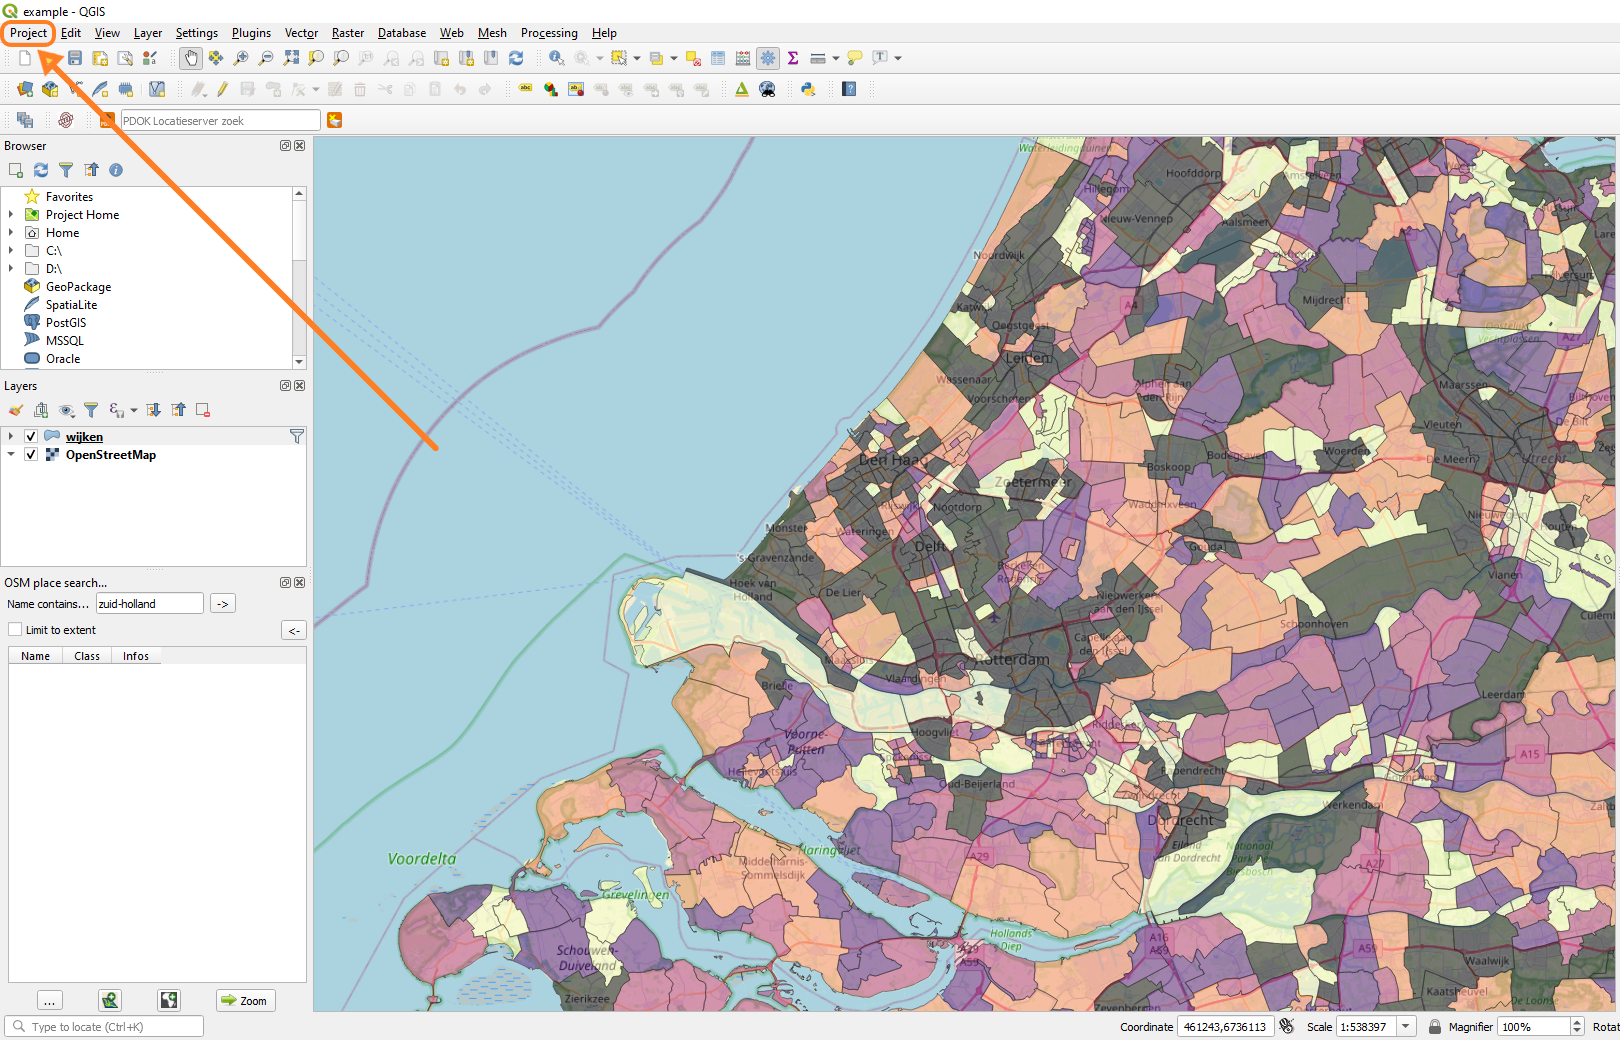
- Step 1: Create your map and make a bookmark at your preferred view. If done, create a New print layout and give it a proper name (see figure 1).
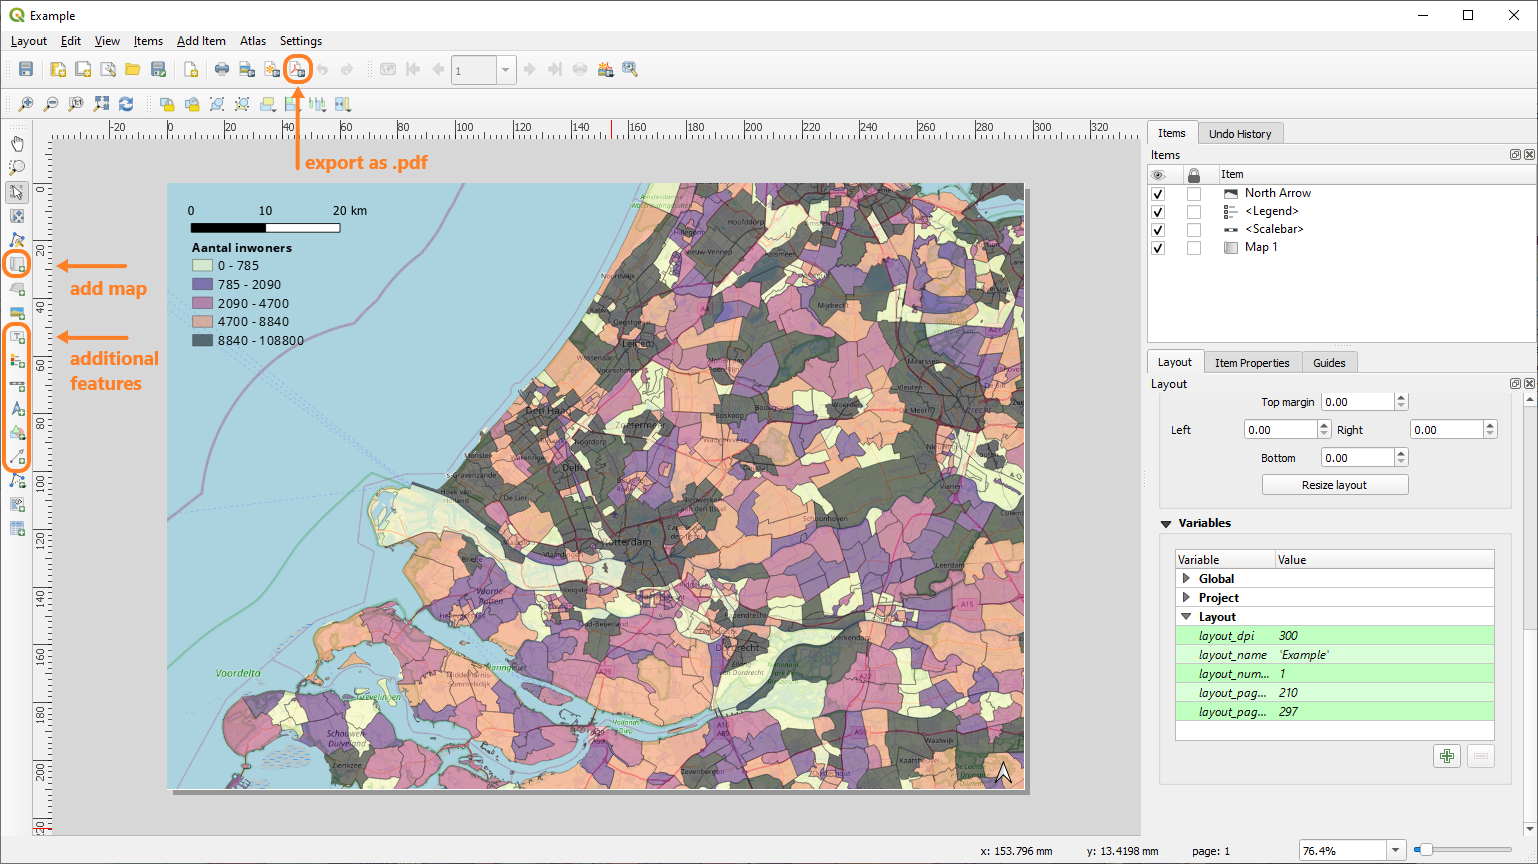
- Step 2: To change the print size go to Page setup…. Now you can add your map to the layout with the Adds a new Map to the layout tool. You can also add additional features such as a scale bar, legend and north arrow (see figure 2).
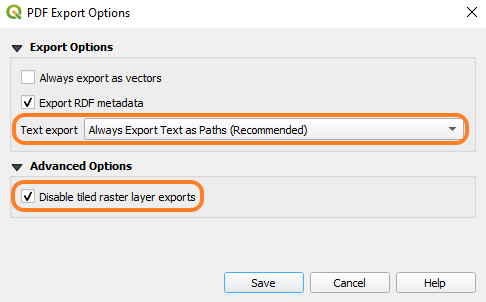
- Step 3: Save your layout and export the page as .pdf (see figure 3), and make sure the Disable tiled raster layer exports is checked under Advanced Options. Check the text export: Always Export Text as Paths if you want to reduce your export size (see figure 4).
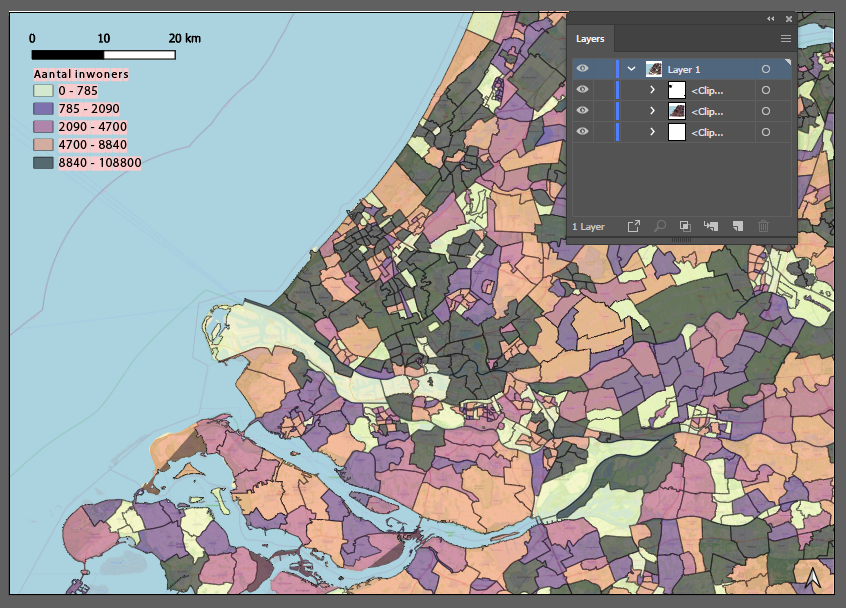
- Step 4: Now you are able to open your .pdf export file with Adobe Illustrator. You can alter the features separately as they are in different layers.
QGIS – Exporting and saving data 3/6
Tagged Image File Format (TIFF)link copied
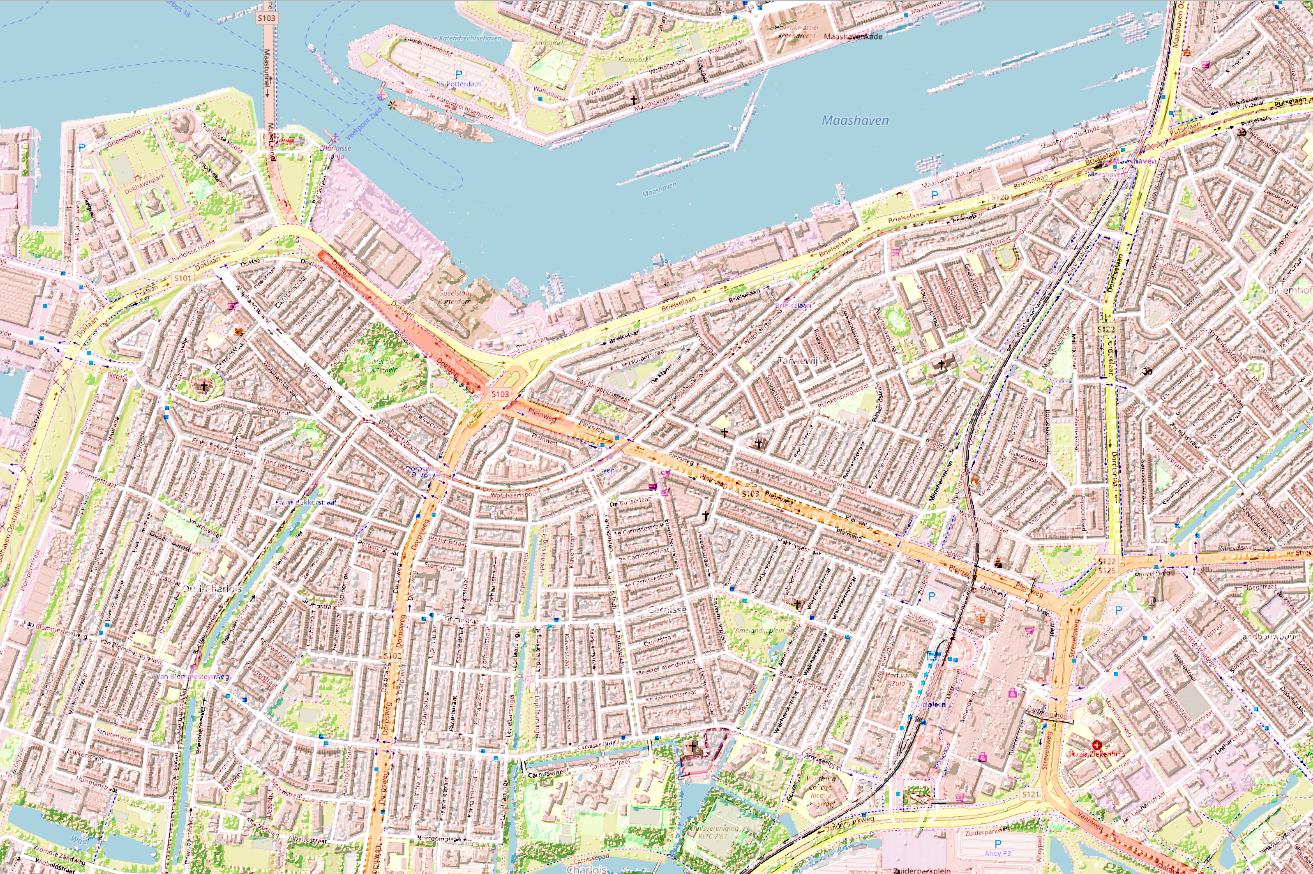
Exporting your maps to a tagged image file format or TIFF (.tiff) can be useful when working with raster layers for example. Using the TIFF format for images is favorable compared to other image formats, as it can store an image without losing any data. Making it an extremely useful image format for scientific data.
TIFF exports do not only have to be full maps such as figure 1, but it can also contain raster specific data such as height per 0.5 by 0.5 meter raster. Importing these TIFF maps (adding image via the Data Source Manager) allows users to do research on several urban scales. Finally, you can export your research map as a lossless TIFF image to share or print. Adding an additional referency system, so it is linked to its location, you create a GeoTIFF.
Exporting QGIS to .tiff
- Step 1: Prepare your map, make sure you use the right CRS (coordinate reference system, check this tutorial). Additionally bookmark at your preferred view.
For TIFF prints follow step 2 and 3
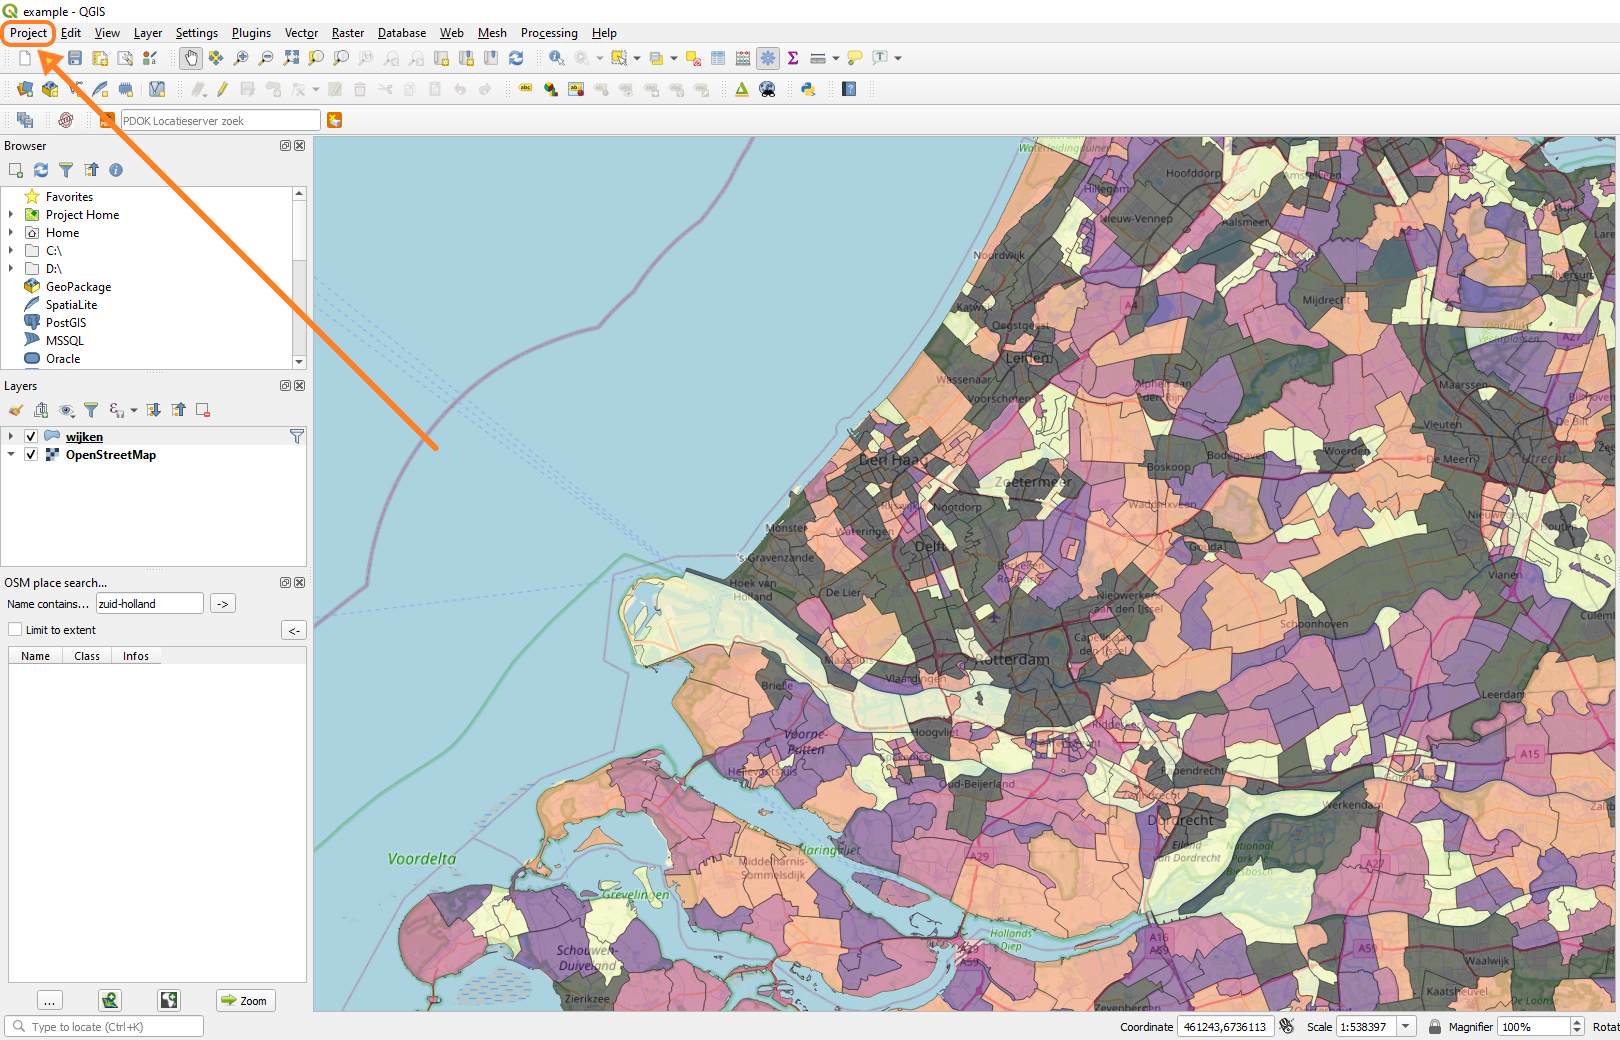
- Step 2: Go to New print layout and give it a proper name (see figure 2).
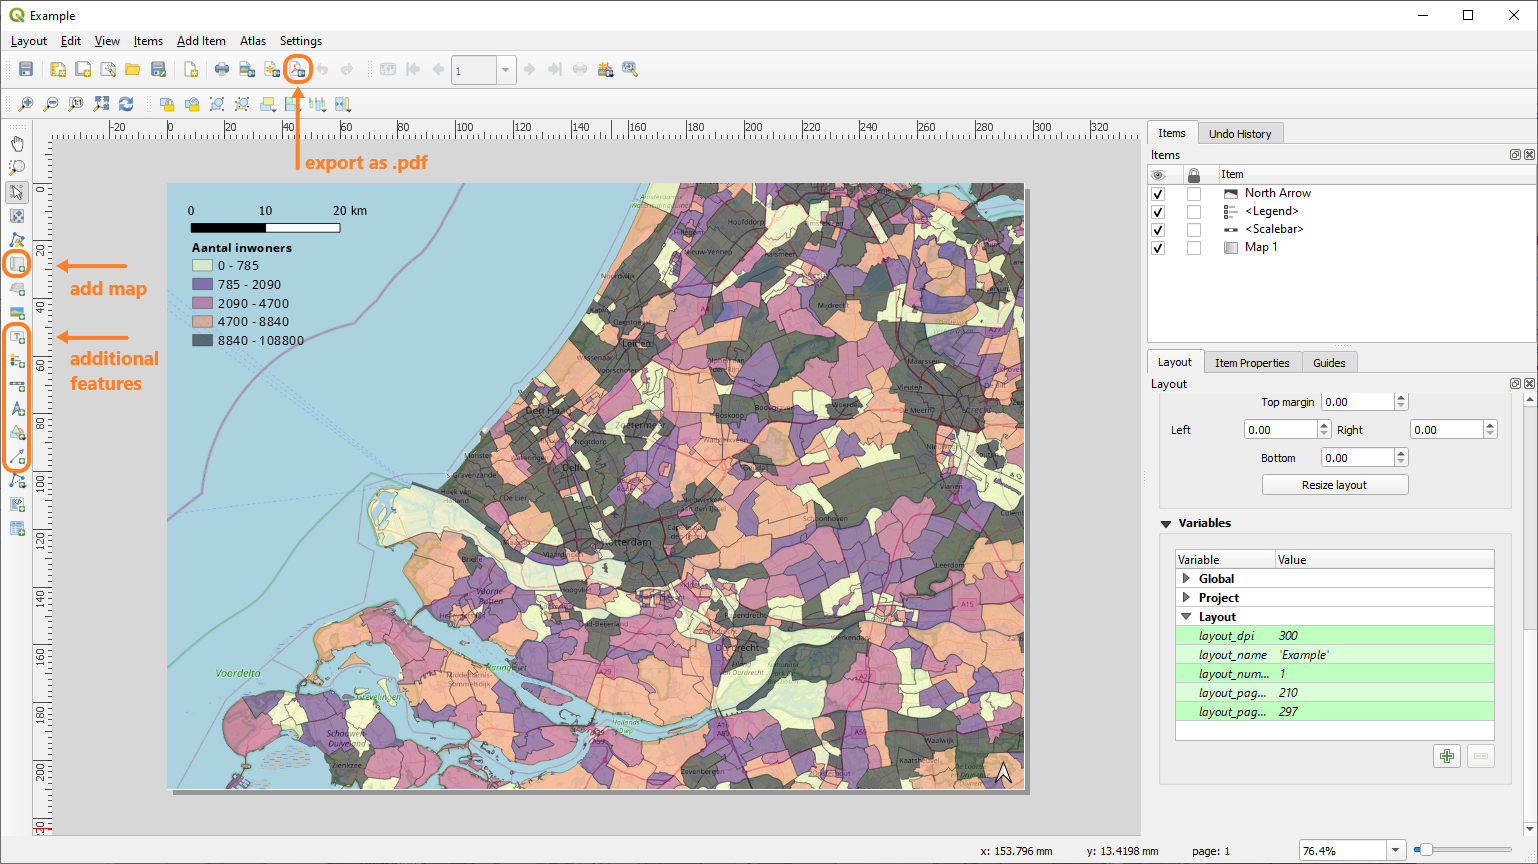
- Step 3: To change the print size go to Page setup…. Now you can add your map to the layout with the Adds a new Map to the layout tool. You can also add additional features such as a scale bar, legend and north arrow (see figure 3).
- Step 3: Now go to Layout and select Export as Image…, you can ignore the message if it pops up. Within the Save Layout As screen select the TIFF format as type, give it a proper name and save the image. Resulting in an image like figure 1.
For GeoTIFF exports follow step 4 and 5
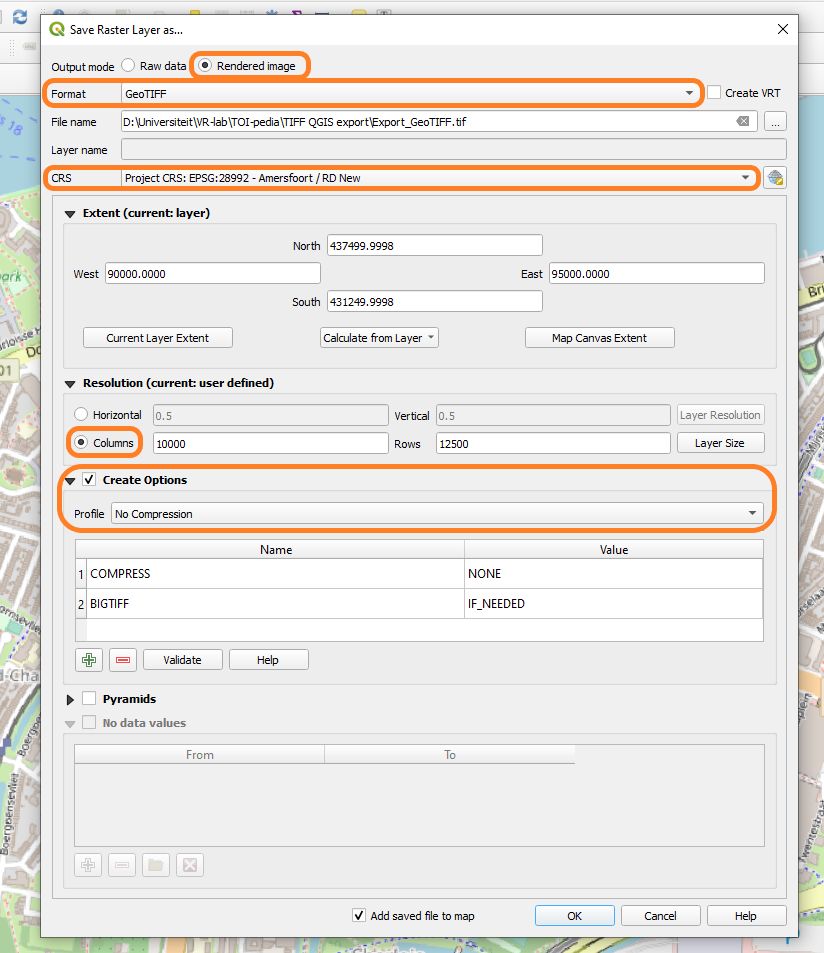
- Step 4: To create a GeoTIFF image right click on the layer that you want to have exported and select Save as….
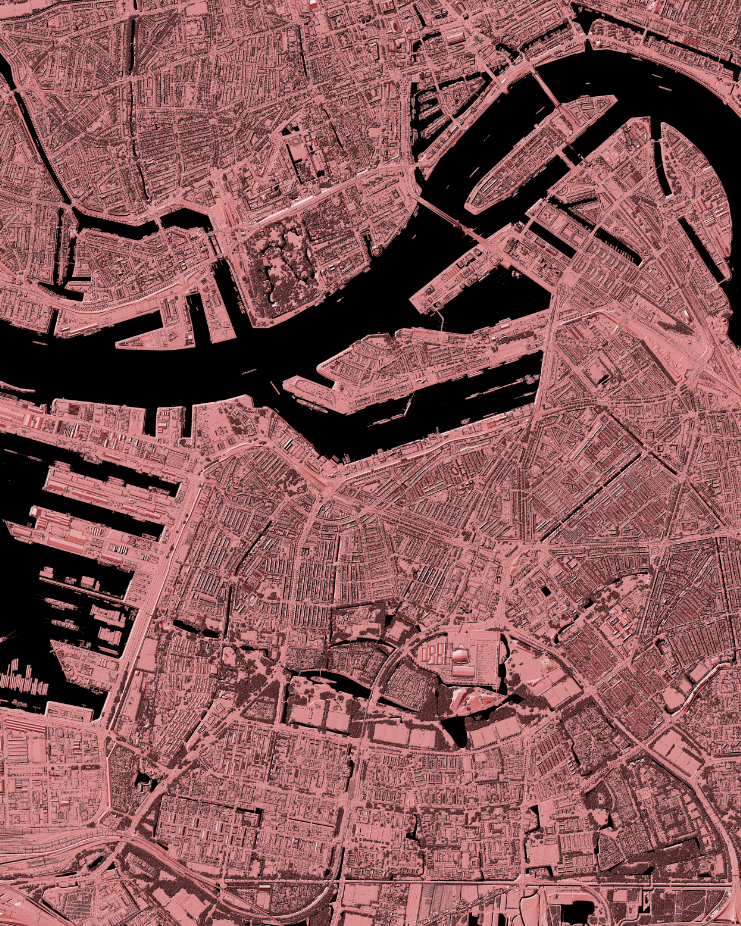
- Step 5: Select the right options shown in figure 4. Make sure you have selected the output mode as Rendered image, the format as GeoTIFF, the correct CRS, resolution as colums and finalles the profile (under Create Options as No compression. Finally click on OK to save the GeoTIFF. This will result in an image such as figure 5.
QGIS – Exporting and saving data 4/6
Export QGIS data to Rhinolink copied
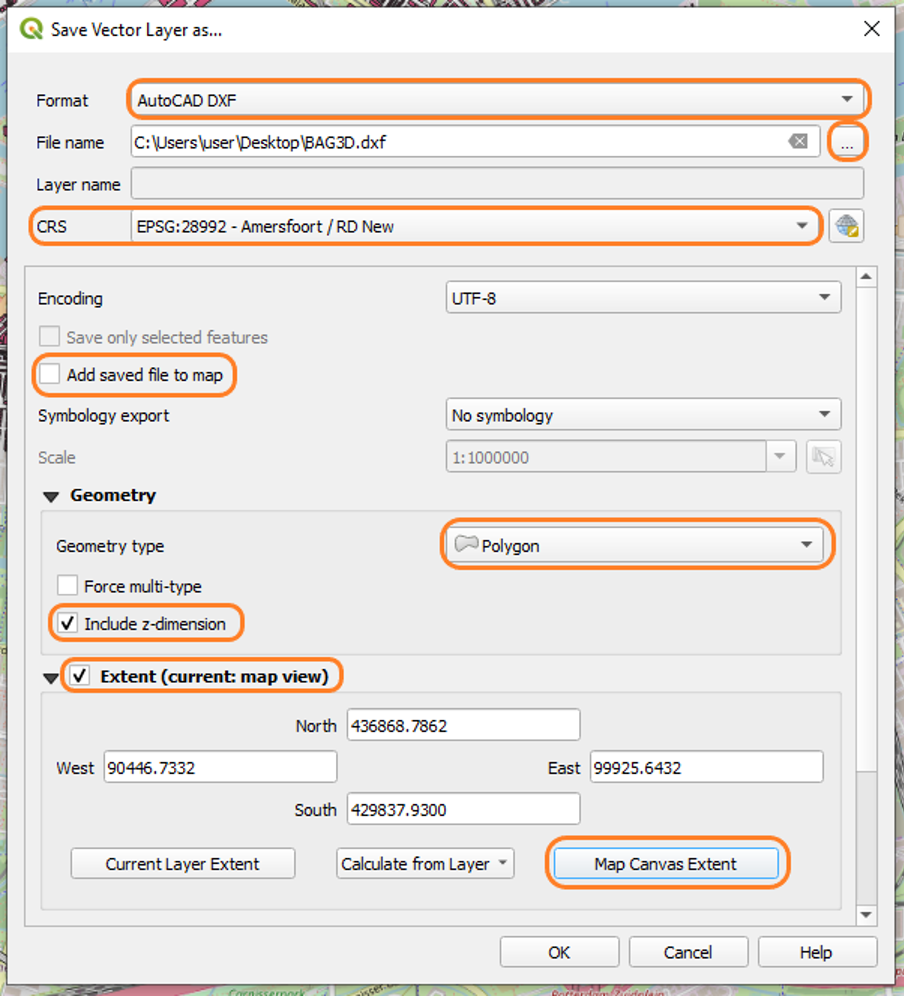
- Right click on the layer(s) you would like to export
- Navigate to Save feature as…
- Set the export options according to the screenshot to the right
-
- Format: AutoCAD DXF
- CRS: EPSG28992 Amersfoort / RD New (for the Netherlands)
- Geometry type: Polygon
- Include z-dimension
- Extent: map canvas extent
Other resources
Prepare QGIS data and export to Rhino
Stefan van der Spek: “MScU Q2 QGIS RHINO PART 1 v201119N”
You can access this video using this link
Language(s): English
Time: 12min 48s
Chapters:
- setting up QGIS
- prepare the data (LOD0)
- export to Rhino
Prepare data in Rhino
Stefan van der Spek: “MScU Q2 QGIS RHINO PART 2 v201118N”
You can access this video using this link
Language(s): English
Time: 7min 49s
Chapters:
- prepare data in Rhino
- extrusion in Rhino (LOD1)
Building a context model (1/5): QGIS setups, plugins, basemap, project boundary, reference point and data import
VR-BK: “Building a Context Model (1/5) using QGIS and Rhino7 | City 3D Model | VR Lab TU Delft”
You can access this video using this link
Language(s): English
Time: 7min 8s
Chapters:
- intro (start-0:20)
- QGIS Setup/Plugins (0:21-1:16)
- basemap (1:16-2:00)
- define project boundary (2:00-4:01)
- reference point (4:01-5:00)
- download and import data (5:00-7:08)
Building a context model (2/5): filter specific data from a layer and clip and merge data
VR-BK: “Building a Context Model (2/5) using QGIS and Rhino7 | City 3D Model | VR Lab TU Delft”
You can access this video using this link
Language(s): English
Time: 8min 22s
Chapters:
- filter bike path data (start-1:49)
- clip data (1:49-2:35)
- merge surfaces (2:35-3:16)
- make layer permanent (3:16-4:07)
- filter several items at once (4:07-7:25)
- filter trees (7:25-end)
Building a context model (3/5): include buildings in 3D methods using QGIS or .obj download and export layers to Rhino
VR-BK: “Building a Context Model (3/5) using QGIS and Rhino7 | City 3D Model | VR Lab TU Delft”
You can access this video using this link
Language(s): English
Time: 10min 1s
Chapters:
- intro: 2 options to include buildings (start-0:42)
- method 1: 3D BAG and QGIS (0:42-1:50)
- method 1: import data (1:50-2:58)
- method 1: calculate building height (2:58-5:38)
- method 1: add z value (5:38-6:34)
- method 1: clean attribute table (6:34-7:37)
- method 2: download files (7:37-9:09)
- export layers (9:09-end)
Building a context model (4/5): import data from QGIS to Rhino, prepare geometry, extrude buildings, add color and depth, create a ground and water planes, add trees
VR-BK: “Building a Context Model (4/5) using QGIS and Rhino7 | City 3D Model | VR Lab TU Delft”
You can access this video using this link
Language(s): English
Time: 21min 12s
Chapters:
- import QGIS layers to Rhino7 (start-2:43)
- hatch to Rhino surface (2:43-5:29)
- extrude buildings (5:20-7:50)
- color and depth (7:50-10:54)
- water below ground plane (10:54-14:00)
- trees in Grasshopper (14:00-20:00)
- final touch-up (20:00-end)
Building a context model (5/5): split up data into tiles, use temporary scratch layers and geo packages, use realistic meshes of trees, distribute trees
VR-BK: “Building a Context Model (5/5) using QGIS and Rhino7 | City 3D Model | VR Lab TU Delft”
You can access this video using this link
Language(s): English
Time: 16min 40s
Chapters:
- tip 1: tiling in QGIS for complex layers / Rhino import error (start-1:15)
- tip 1: create grid (1:15-3:35)
- tip 1: create tiles: batch process (3:35-5:25)
- tip 2: file management: Geo Package and scratch layer (5:25-8:00)
- tip 3: realistic trees in enscape (8:00-8:50)
- tip 3: get trees from asset library in enscape (8:50-10:03)
- tip 3: changes Grasshopper script (10:03-16:15)
- tip 3: rendered view in enscape (16:15-end)
QGIS – Exporting and saving data 5/6
Resources for other formatslink copied
qgz
The qgz format is a compressed file containing a QGS, the original QGIS format, and a QGD file. The QGD file a the sqlite database of the QGIS project containing the auxiliary data of the project.
- Save a project as a qgz
Mariëlle Geers-Plasmans (Geojuffie): “O03 Project opslaan als qgz”
you can access this video using this link
Language(s): Dutch
Time: 5m 3s
QML
Qt Modeling Language is a user interface markup language and is used to render feature geometries.
- Save styles of raster layers in QGIS in different formats
Hans van der Kwast: “Save raster styles in QGIS as QML, SLD and XML”
you can access this video using this link
Language(s): English
Time: 3m 59s
Chapters:- introduction (start-0:35)
- save as QML (0:35-2:21)
- save as XML (2:21-end)
SLD
SLD stands for Styled Layer Descriptor and is an XML format used to specify the display of map layers.
- Save styles of raster layers in QGIS in different formats
Hans van der Kwast: “Save raster styles in QGIS as QML, SLD and XML”
you can access this video using this link
Language(s): English
Time: 3m 59sChapters:
- introduction (start-0:35)
- save as QML (0:35-2:21)
- save as XML (2:21-end)
XML
XML is a markup language and a flexible file format. It stands for Extensible Markup Language.
- Save styles of raster layers in QGIS in different formats
Hans van der Kwast: “Save raster styles in QGIS as QML, SLD and XML”
you can access this video using this link
Language(s): English
Time: 3m 59s
Chapters:- introduction (start-0:35)
- save as QML (0:35-2:21)
- save as XML (2:21-end)
PNG
PNG is an image file format, it stands for Portable Network Graphics.
- Make final adjustments to a map in the print layout and export to PNG or PDF
Hans van der Kwast: “Final Adjustments and Export the Map to PNG or PDF”
you can access this video using this link
Language(s): English
Time: 2m 27s
PDF stands for portable document format.
- Make final adjustments to a map in the print layout and export to PNG or PDF
Hans van der Kwast: “Final Adjustments and Export the Map to PNG or PDF”
you can access this video using this link
Language(s): English
Time: 2m 27s
QGIS – Exporting and saving data 6/6
Useful linkslink copied
Installation
Write your feedback.
Write your feedback on "QGIS – Exporting and saving data"".
If you're providing a specific feedback to a part of the chapter, mention which part (text, image, or video) that you have specific feedback for."Thank your for your feedback.
Your feedback has been submitted successfully and is now awaiting review. We appreciate your input and will ensure it aligns with our guidelines before it’s published.
