QGIS Basics
-
Intro
-
Overview of QGIS interface
-
External tutorials
-
Useful links
Information
| Primary software used | QGIS |
| Software version | 1.0 |
| Course | QGIS Basics |
| Primary subject | 3D Modelling |
| Secondary subject | Geospatial and Geographic Information Systems |
| Level | Beginner |
| Last updated | November 11, 2024 |
| Keywords |
Responsible
| Faculty |
QGIS Basics 0/3
QGIS Basics
This tutorial will provide a general overview of the QGIS user interface.
QGIS is a free and Open Source Geographic Information System that allows geospatial information to be created, edited, visualised, analysed and published. Complete introduction courses are available to learn some basics of QGIS.
- This section shows an overview of the user interface
- The students will learn how to navigate within the map canvas
- The students will learn how to add and delete toolbars
- The students will learn how to get back the layers and browser panel in case they lost them
QGIS Basics 1/3
Overview of QGIS interfacelink copied
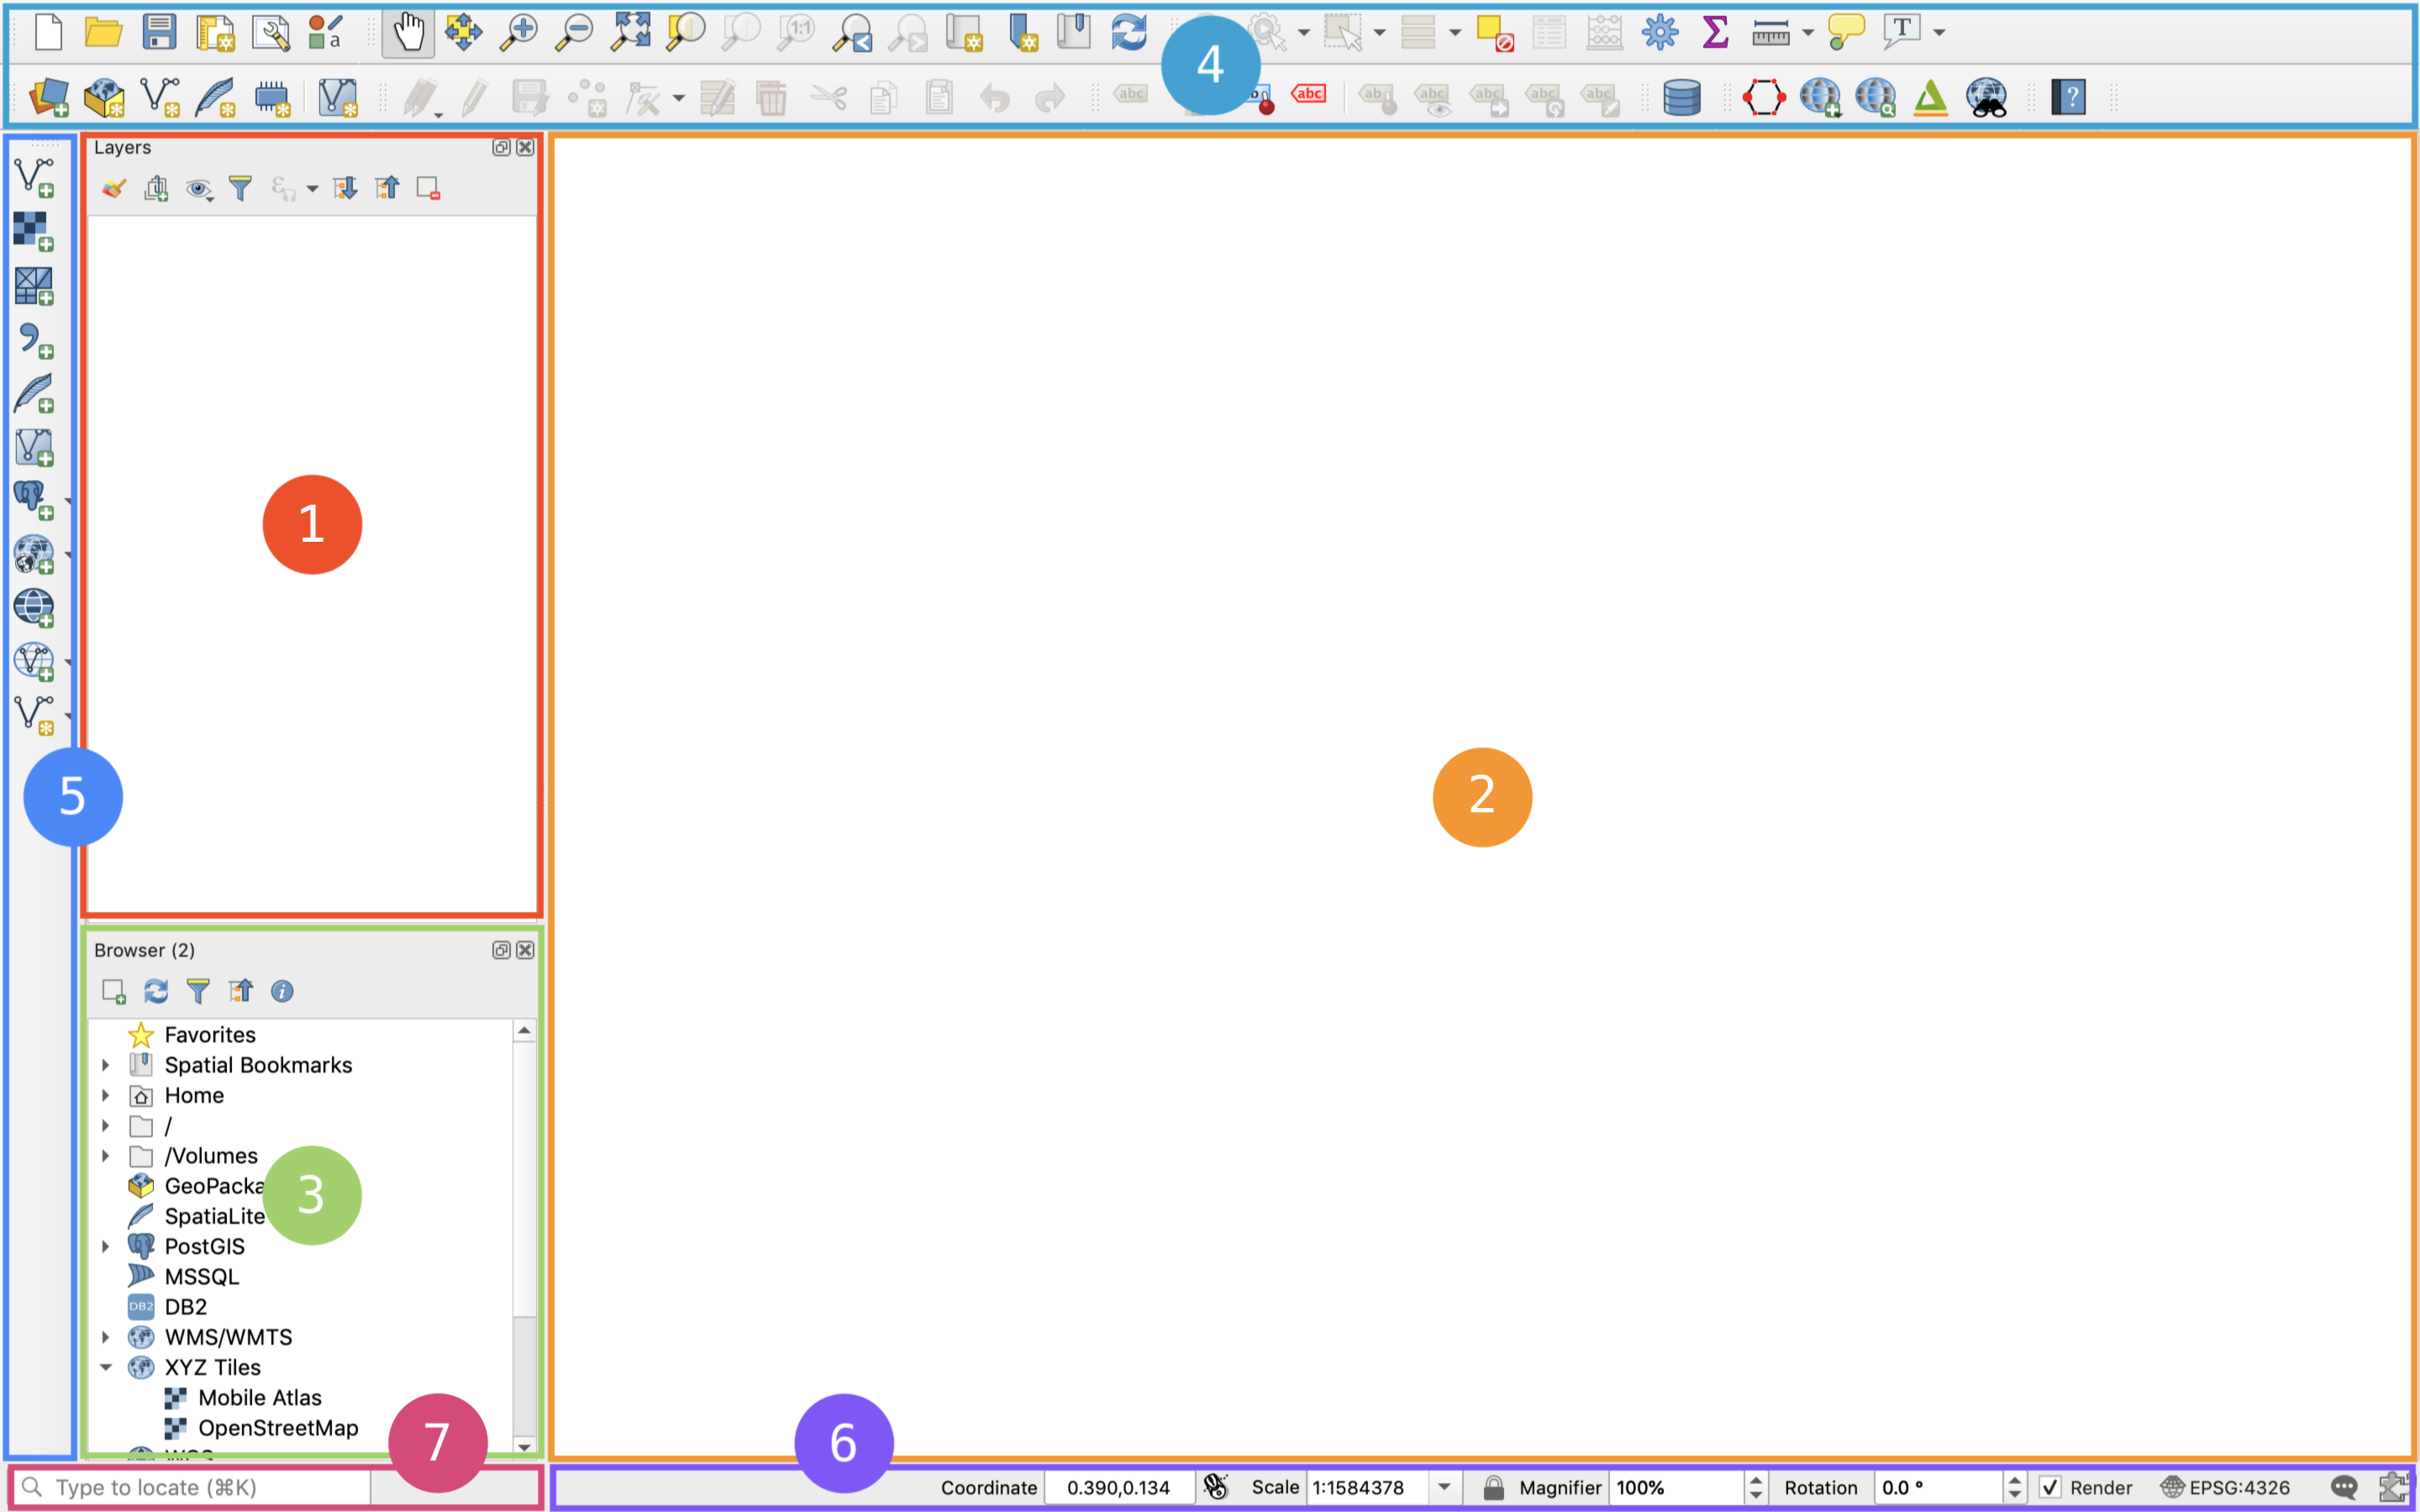
The QGIS user interface consists of 7 main elements:
- Layers list
- Map canvas
- Browser panel
- Toolbars
- Side toolbar
- Status bar
- Locator bar
Layer list
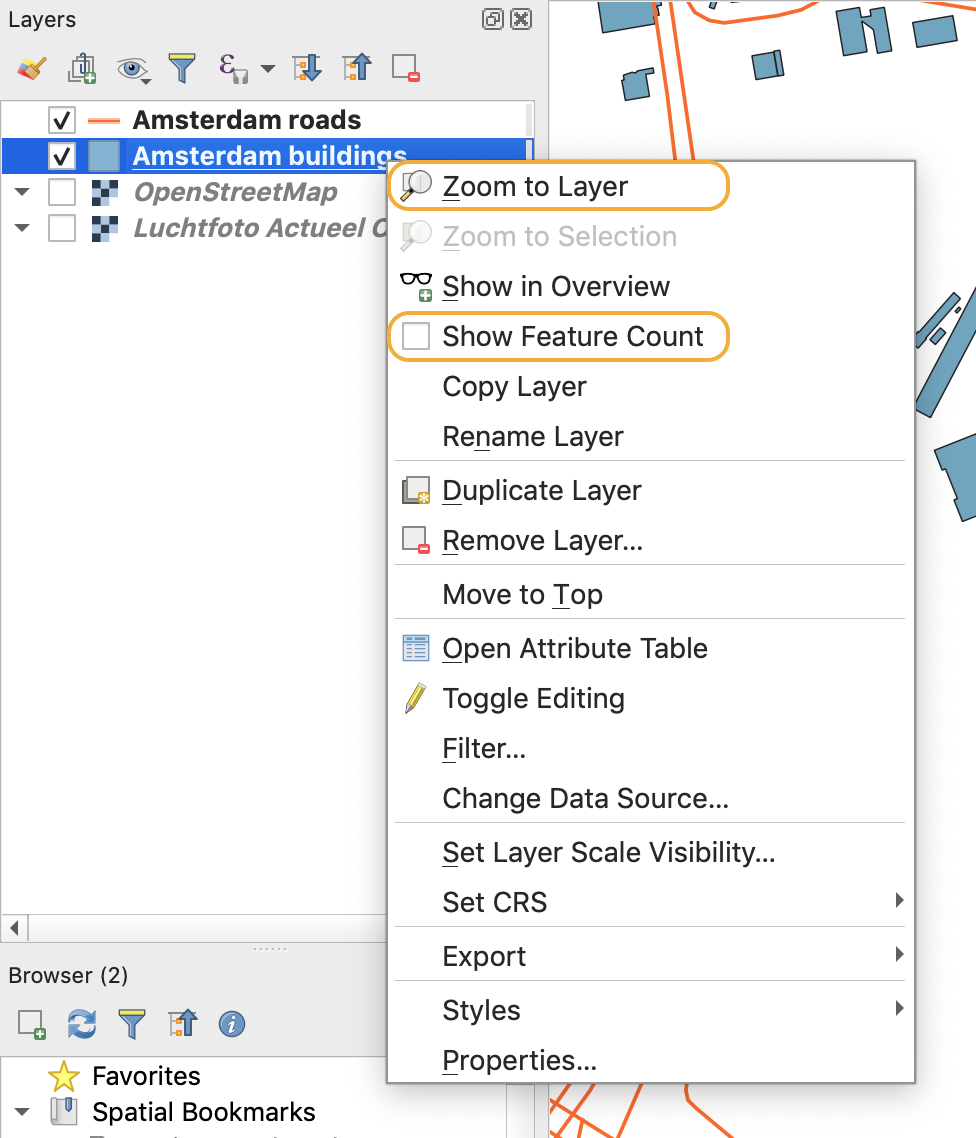
This panel provides an overview of the layers loaded into your QGIS project. Some useful things to know about the layers panel:
- The order of the layers in the list determines which layers will be shown above others on the map canvas. The order can be changed by clicking on a layer and dragging it to the position required.
- Clicking on the tick-box beside the layer name changes whether that layer is visible or not. When the tick-box is unchecked and the layer name is italicised, then the layer is not visible on the map canvas.
- Hovering over a layer provides some basic information about that layer including: the layer name, geometry type, coordinate reference system and file path.
- Right clicking on a layer provides a list of extra options. Some useful basic options include: zoom to layer (which will show the entire layer on the map canvas) and show feature count (which will show the number of features contained in a layer beside the layer name).
- Double clicking on a layer opens a pop-up window with different tabs about the layer’s properties.
- Clicking on the small arrow beside a layer expands a collapsed item containing more information about the layer’s styling.
Map canvas
This is where the map is displayed. Within the map canvas you can perform many different operations. Some of the basics are:
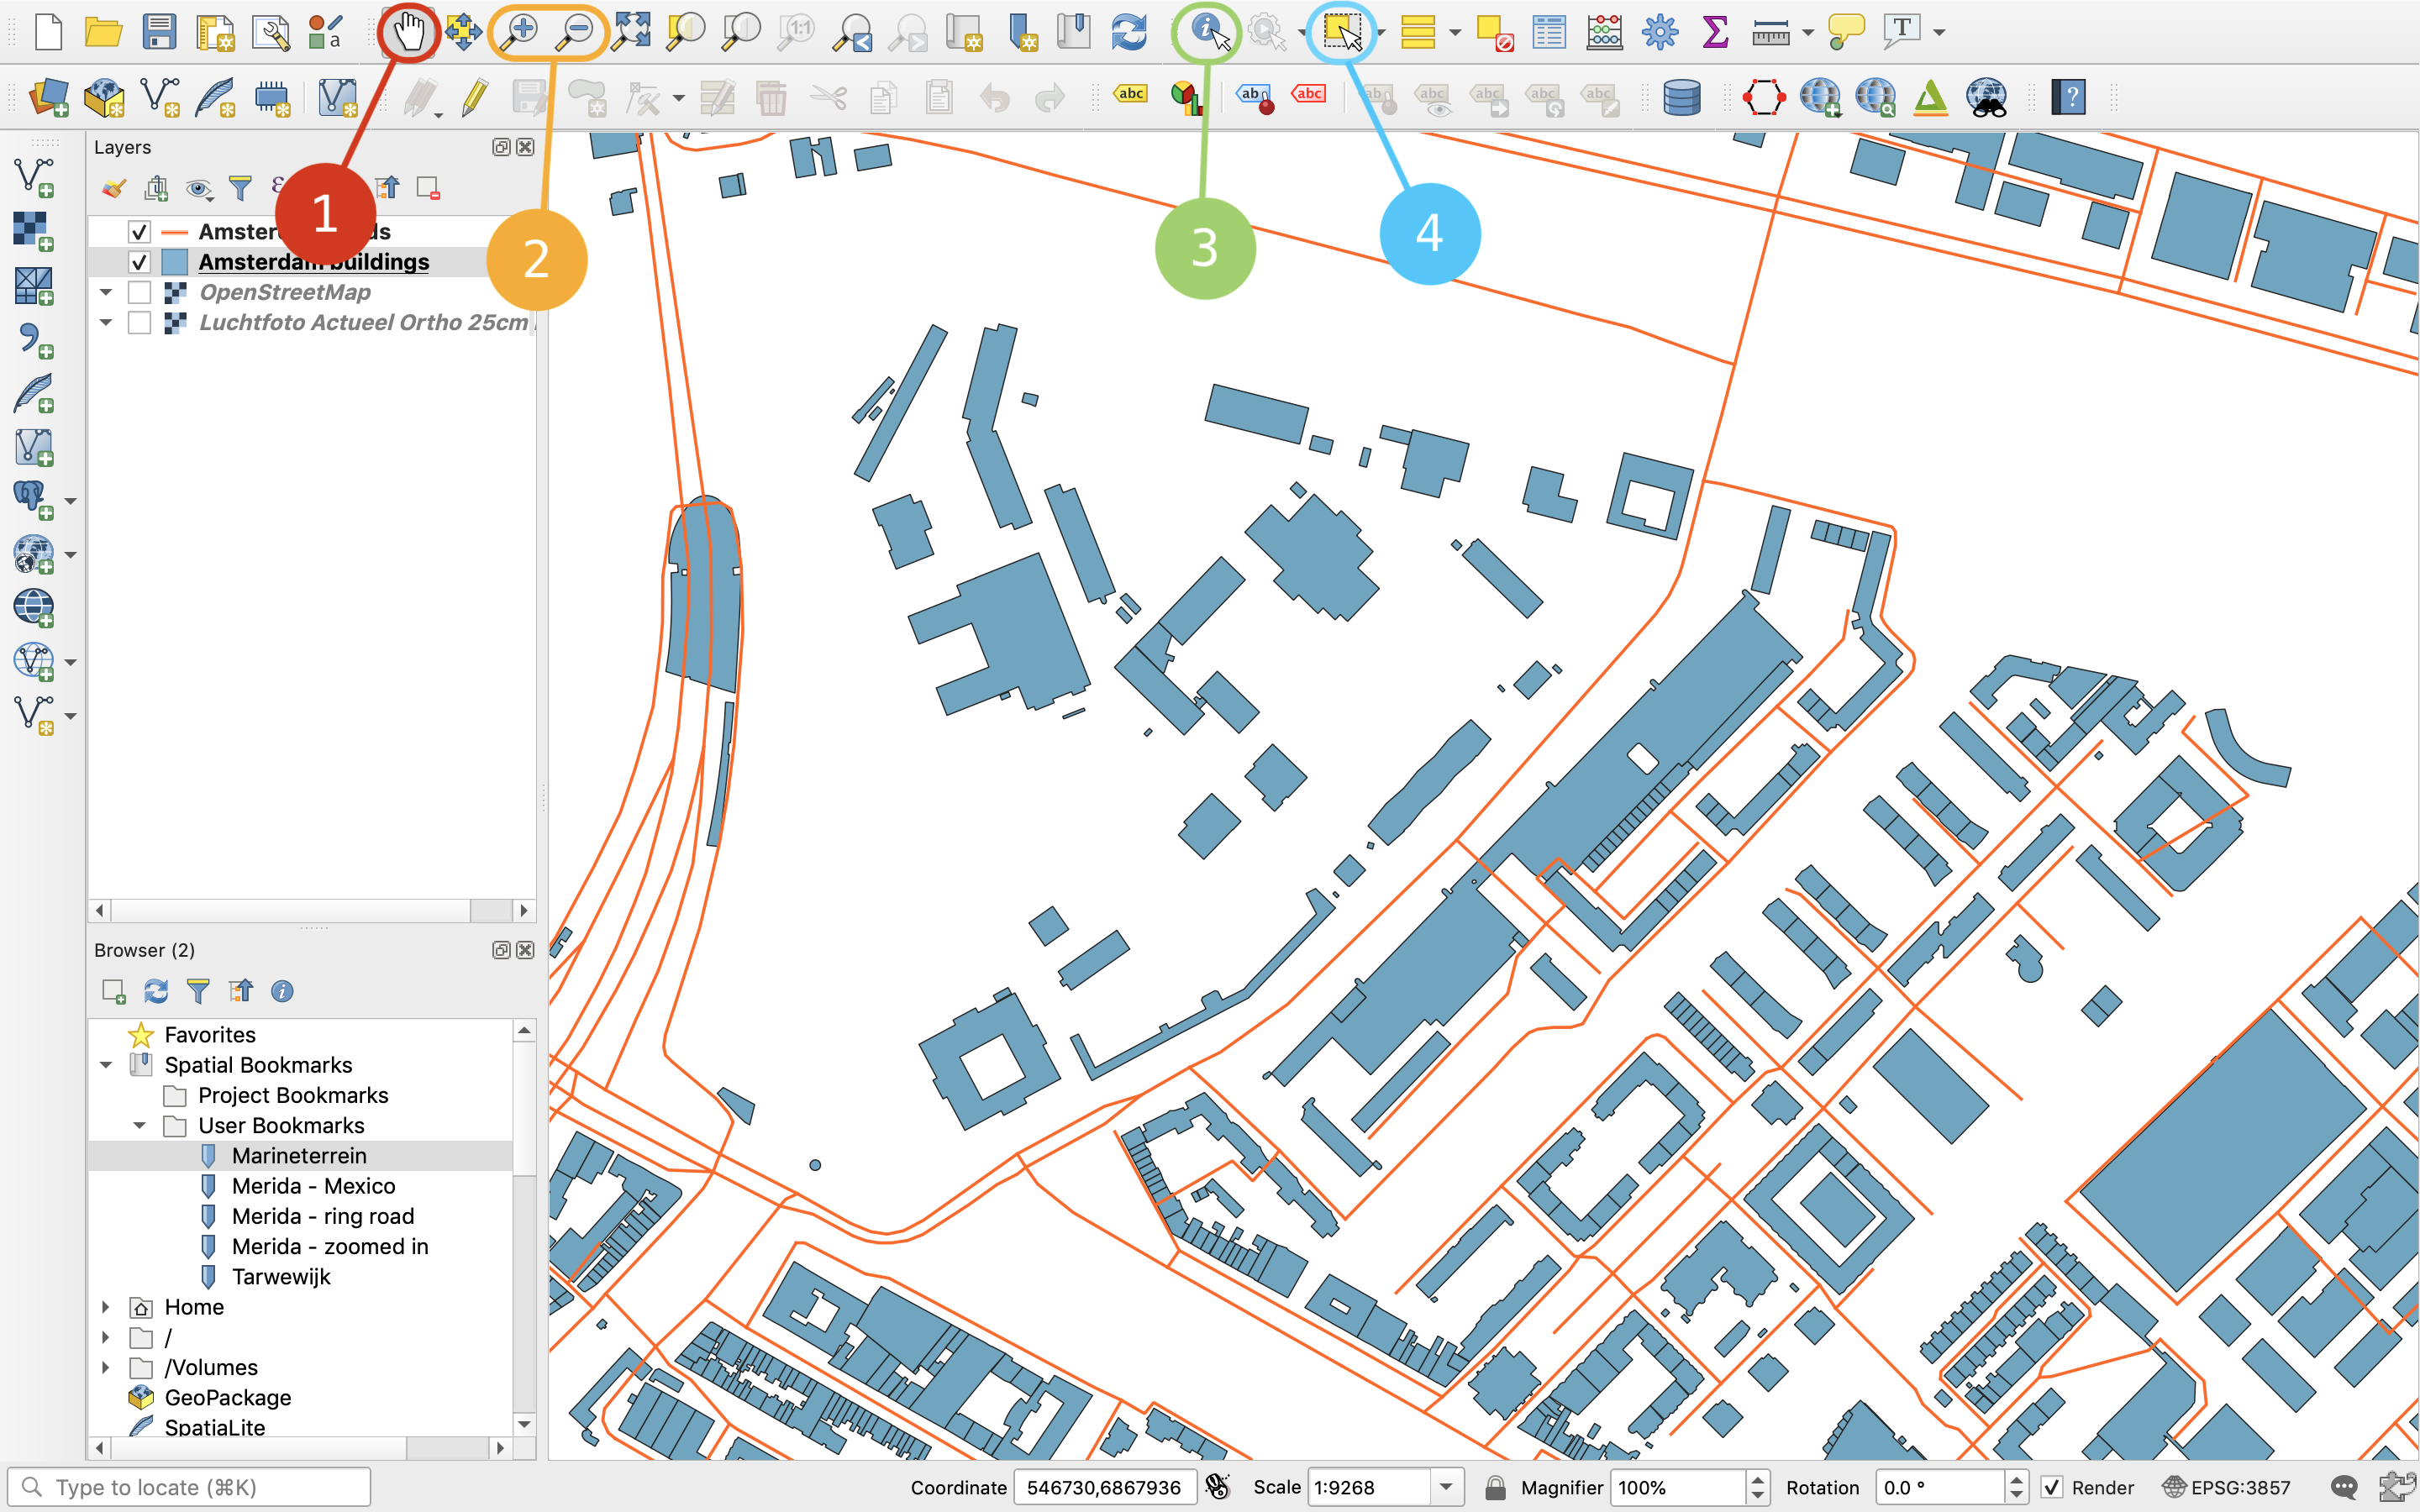
- Pan – to move around the map
- Zoom in and out
- Identify – to identify the attributes of specific features
- Select – to select specific features on the map

Browser panel
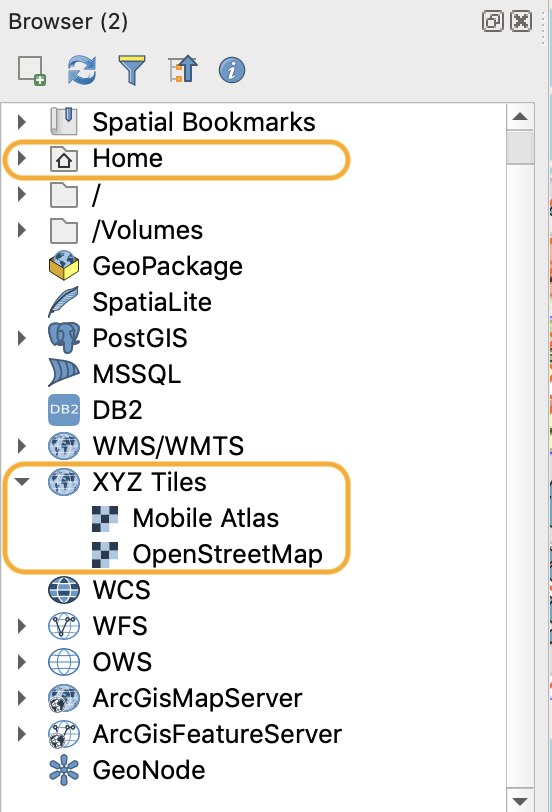
This is a panel that allows you to easily navigate to different datasets. Datasets stored on your own computer can be accessed via “Home”. Other datasets accessed via web services can found here too when you have set up the appropriate connections (explained in further detail in the tutorial about adding WMS/WFS connections). OpenStreetMap can also be easily accessed via the Browser panel under the tab “XYZ tiles”.
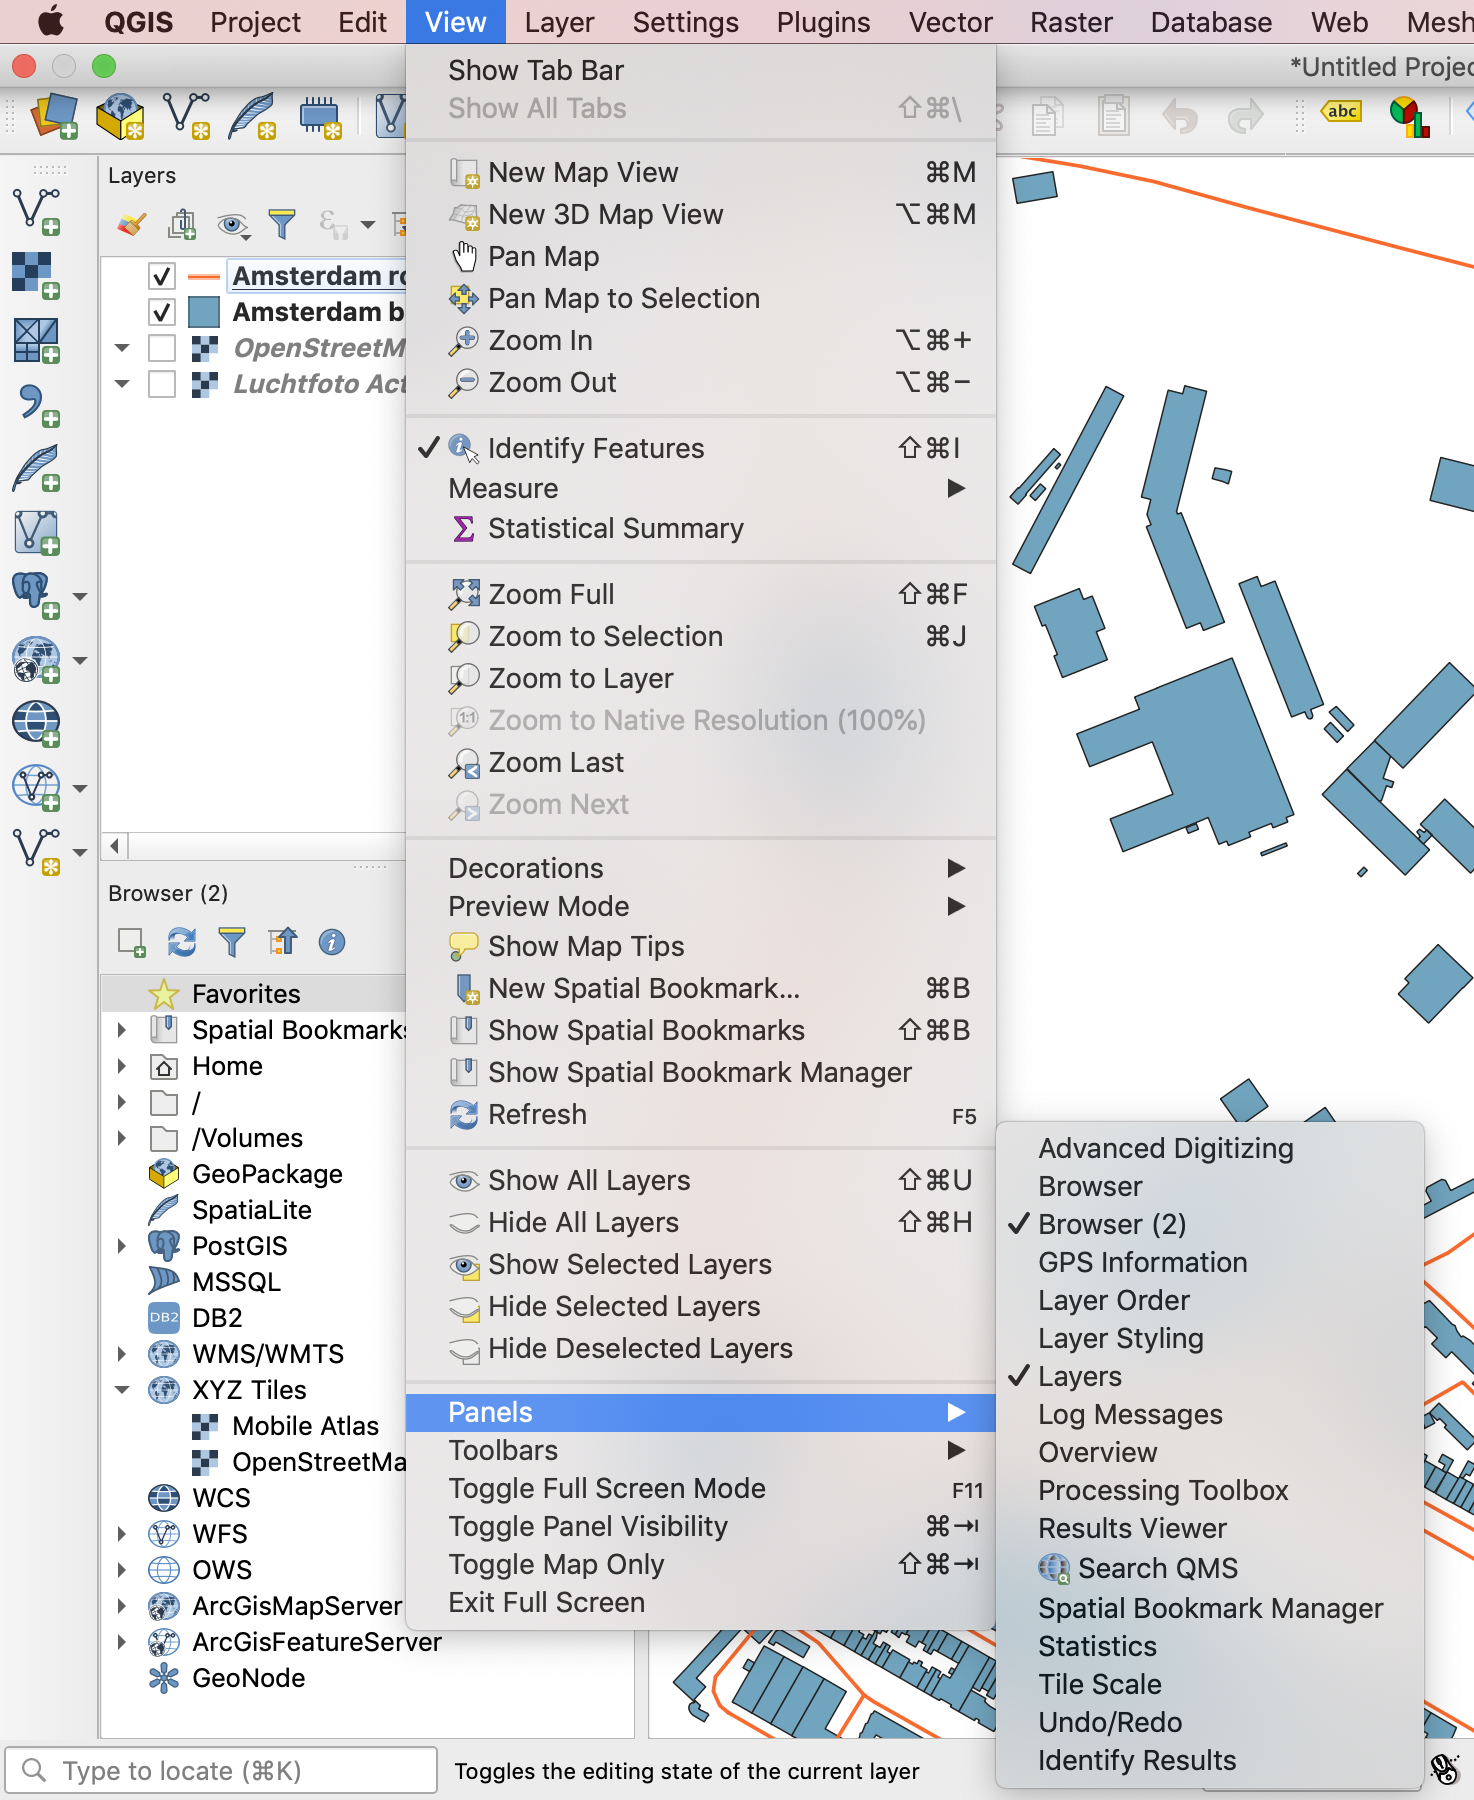
Note: The browser panel is just one of many panels that can be added to the QGIS interface. To remove a panel from the side bar, you can click the cross in the panel’s top right corner. To add new panels, you can navigate to View » Panels and click on the name of the panel that you would like to add.
Toolbars
This is where QGIS tools are displayed. The basic tools are already included in the toolbar by default but you can add more tools to the toolbar by navigating to Toolbars and clicking on the name of the toolbars that you would like to add.
Tools can also be accessed from the drop-down menus. For instance, you can either use the “save” button in the project toolbar to save the project or navigate to Save.
Side toolbar
This is where more tools are displayed. By default this is set to include the buttons which can be used to load layers and create a new layer. You can add more tools to this toolbar in the same way as items in the top toolbar. Toolbars can be moved around the interface by clicking and dragging them to the spot where you would like them to be displayed.
Status bar
This bar shows information about the current project and map. In the bottom right corner you can see the project’s coordinate reference system (recognised by the EPSG code). Next to this, the rotation and magnification of the map. Then, the current scale of the map and, on the very left, the coordinate’s of your cursor on the map canvas. These items are interactive so you can also click on them and fill them with your own values. For instance, if you want to view the map at a particular scale or if you want to centre the map on specific coordinates.

Locator bar

Using this bar you can access almost anything within QGIS including: tools, layers, algorithms, spatial bookmarks and more. See the QGIS user manual for more details.
QGIS Basics 2/3
External tutorialslink copied
The tutorials give an introduction to QGIS and show some basic skills.
QGIS introduction
QGIS basics part 1
- Mariëlle Geers-Plasmans (Geojuffie): “Videotraining QGIS voor beginners”
you can access this tutorial using this link
Language(s): Dutch
Time: 1h 54 min 49 s
Chapters:- T01 QGIS introductie
- T01 Laag laden uit een geopackage
- T02 Punten
- lijnen
- vlakken en rasters
- P01 Plugins installeren
- P02 PDOK Plugin
- I03 Laden van WMS en WFS services
- T03 Verschillen tussen WMS en WFS services
- O01 Opslaan van een laag in een geopackage
- O02 Project opslaan naar geopackage
- O03 Project opslaan als qgz
- S02 Categorieën
- S03 SVG symbolen
- S05 Gradueel
QGIS basics part 2
- Mariëlle Geers-Plasmans (Geojuffie): “Videotraining QGIS voor beginners deel 2”
you can access this tutorial using this link
Language(s): Dutch
Time: 2h 03min 38sChapters:
- T04 Werkbalken
- E01 Expressies gebruiken
- A02 Kolommen toevoegen/verwijderen
- A03 Kolommen editen
- G03 Snappen
- G04 Geavanceerd digitaliseren
- A04 Formulier attributen/Form widgets
QGIS User interface
User Interface basics
- QGIS Training manual: “2.1. An Overview of the Interface”
you can access this manual using this link
Language(s): English
Chapters:- try yourself: the basics (the layers list, the browser panel, toolbars, the map canvas, the status bar, the side toolbar, the locator bar)
- try yourself 1
- try yourself 2
- what’s next
Tools to navigate within the Map Canvas (pan, zoom, map scale)
- QGIS Training manual: “2.3. Navigating the Map Canvas”
you can access this manual using this link
Language(s): English
Chapters:- follow along: basic navigation tools
- in conclusion
Add and delete toolbars
- Mariëlle Geers-Plasmans (Geojuffie): “T04 werkbalken”
you can access this video using this link
Language(s): Dutch
Time: 1min 36s
Get the layers and browser panel back
- Hans van der Kwast: “Oops! I lost my layers and browser panel in QGIS, what now?”
you can access this video using this link
Language(s): English
Time: 45s
How to set the output file name as the layer name
- Hans van der Kwast: “Set Processing Toolbox to output file names as layer names”
you can access this video using this link
Language(s): English
Time: 1min 16s
Introduction to user interface and plugins
- Erik Meerburg (3D geoinformation research group): “Urbanism GIS Course 2: QGIS Settings and Plugins”
you can access this video using this link
Language(s): English
Time: 11min 26sChapters:
- intro (start-0:53)
- user interface (0:52-6:34)
- plugins (6:34-end)
Setting up QGIS after installation
- Erik Meerburg (Geogoeroe): “QGIS inrichten voor Nederlands gebruik”
you can access this video using this link
Language(s): Dutch
Time: 9min 40s
Setting up QGIS after installation (setting up QGIS in Dutch)
- Erik Meerburg (Geogoeroe): “QGIS inrichten voor Nederlands gebruik”
you can access this video using this link
Language(s): Dutch
Time: 9min 48s
QGIS Basics 3/3
Useful linkslink copied
GIS installation
Write your feedback.
Write your feedback on "QGIS Basics"".
If you're providing a specific feedback to a part of the chapter, mention which part (text, image, or video) that you have specific feedback for."Thank your for your feedback.
Your feedback has been submitted successfully and is now awaiting review. We appreciate your input and will ensure it aligns with our guidelines before it’s published.
