Multi-Criteria Roof Optimization with Wallacei X
-
Intro
-
Design (exercise file)
-
Setting Up Second Objective (Fitness Function)
-
Multi-Criteria Optimization for Roof Design
-
Conclusion
Information
| Primary software used | Wallacei |
| Software version | 1.0 |
| Course | Multi-Criteria Roof Optimization with Wallacei X |
| Primary subject | AI & ML |
| Secondary subject | Optimization |
| Level | Beginner |
| Last updated | December 16, 2024 |
| Keywords |
Responsible
| Teachers | |
| Faculty |
Multi-Criteria Roof Optimization with Wallacei X 0/4
Multi-Criteria Roof Optimization with Wallacei X
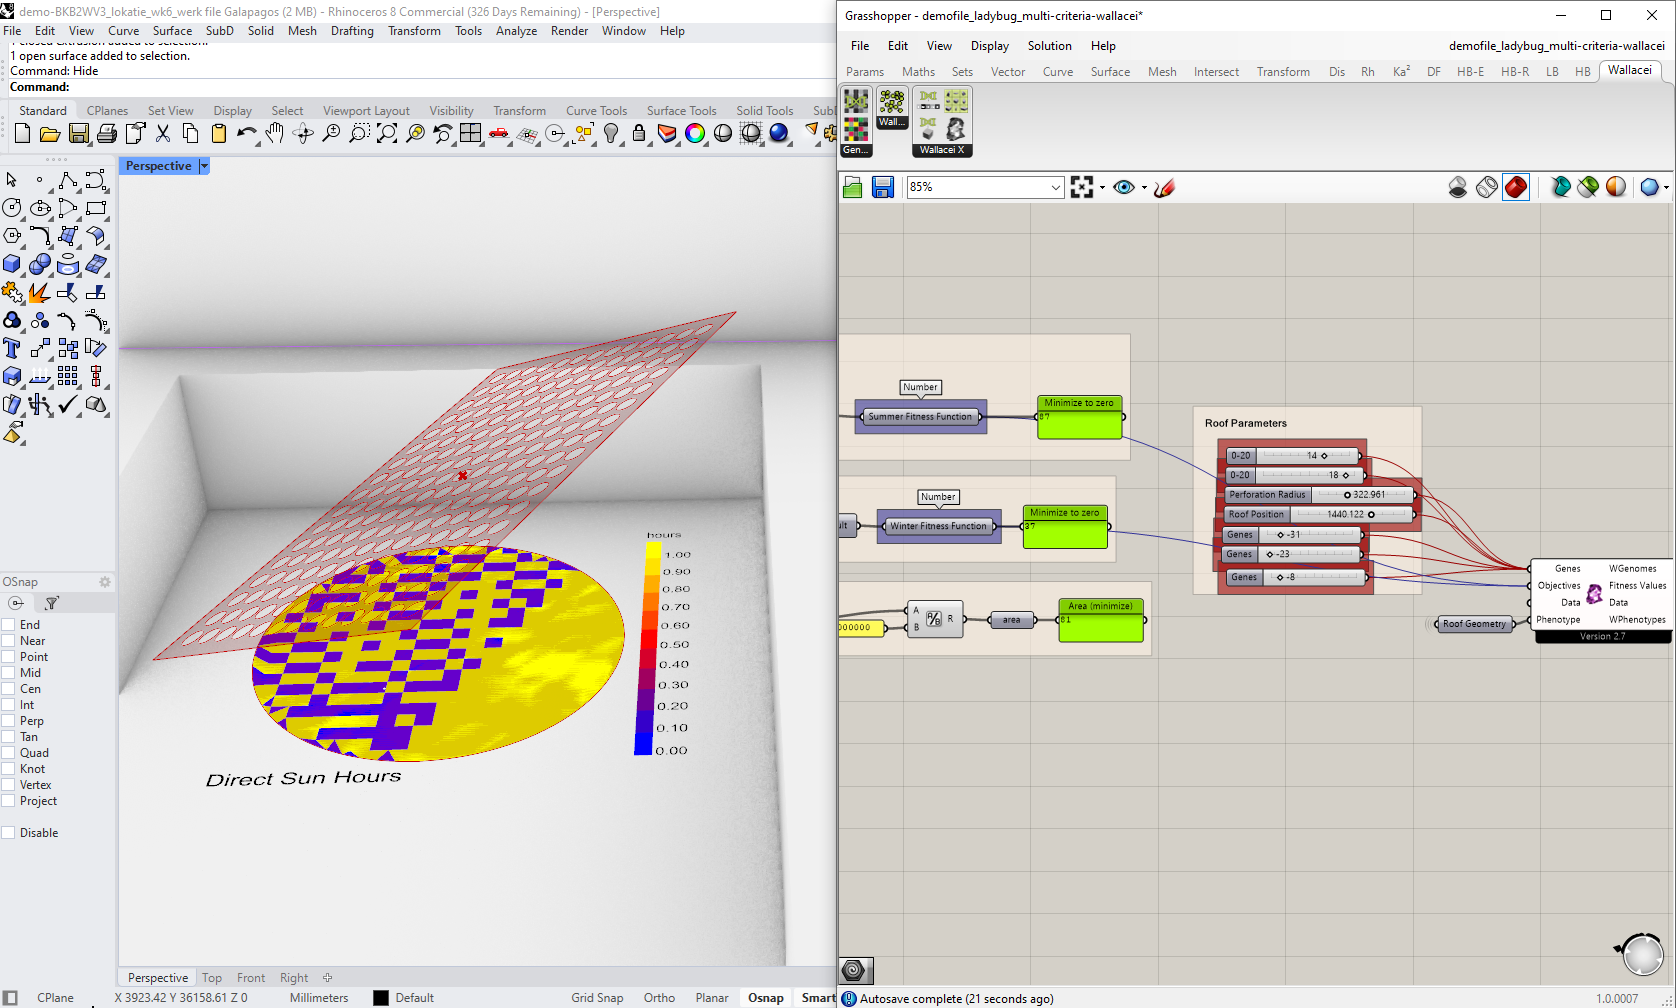
WV3 Workshop: apply basic principles of multi-criteria optimization on a roof design for an outdoor terrace.
This tutorial is a continuation to the previous tutorial where we introduced Ladybug for direct sunlight calculations and using Galapagos to optimize for one criteria, 50% direct sunlight in the summer.
We will use Wallacei X to optimize for two conflicting criteria:
- 50% direct sunlight in summer
- 100% direct sunlight in spring
This is relevant when you are designing a building component, such as a roof and façade, where you want to optimize comfort for more than one criteria. Here we will explore a test roof geometry to explore design variations.
By following this tutorial, you will learn the following:
- Define a second (or more) objective function to optimize your roof design
- Setup multi-criteria optimization using Wallacei X
- View and export your results.
Multi-Criteria Roof Optimization with Wallacei X 1/4
Design (exercise file)link copied
You can download the exercise file to connect your roof geometry
Exercise Files
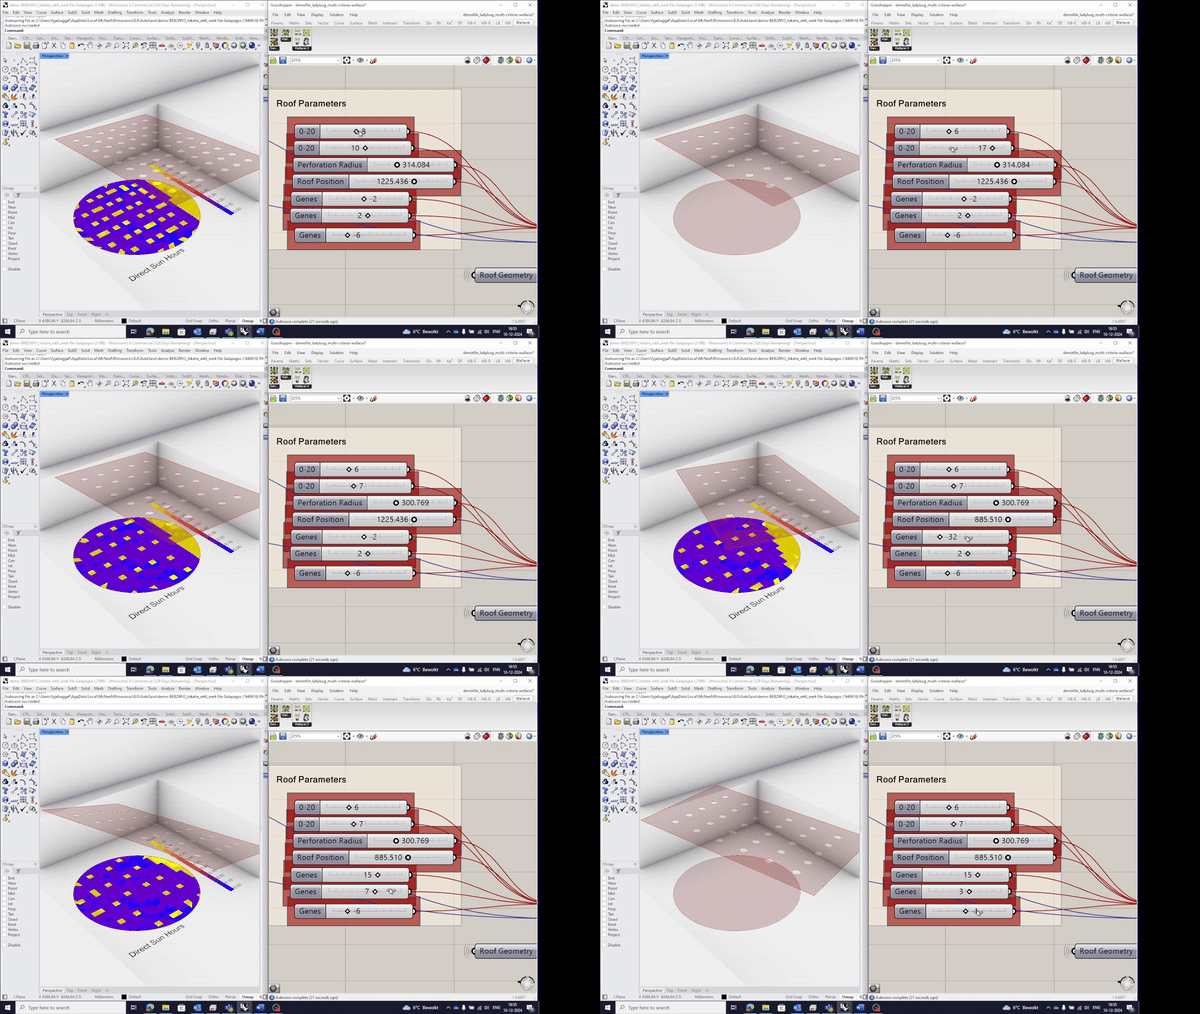
The roof element in the exercise file consists of a flat roof with variable aperture openings. This is included in the exercise model to execute the algorithm. You can connect your own roof geometry in place of this roof and re-connect the genes to the parameters that controls the design output of your roof design.
Multi-Criteria Roof Optimization with Wallacei X 2/4
Setting Up Second Objective (Fitness Function)link copied
We will use the LB Analysis Period from Ladybug to assign two full-day periods, one in the summer, and another in the spring. Then the objective will be to have a design with 50% direct sun hours on the terrace during the summer, and 100% direct sun hours on the terrace during the spring.
The Ladybug model setup is explained in the previous tutorial. In case you have not gone through the first part, you can click this link to go back and complete the other tutorial before continuing with this one.
Setting Up Analysis Period on Ladybug
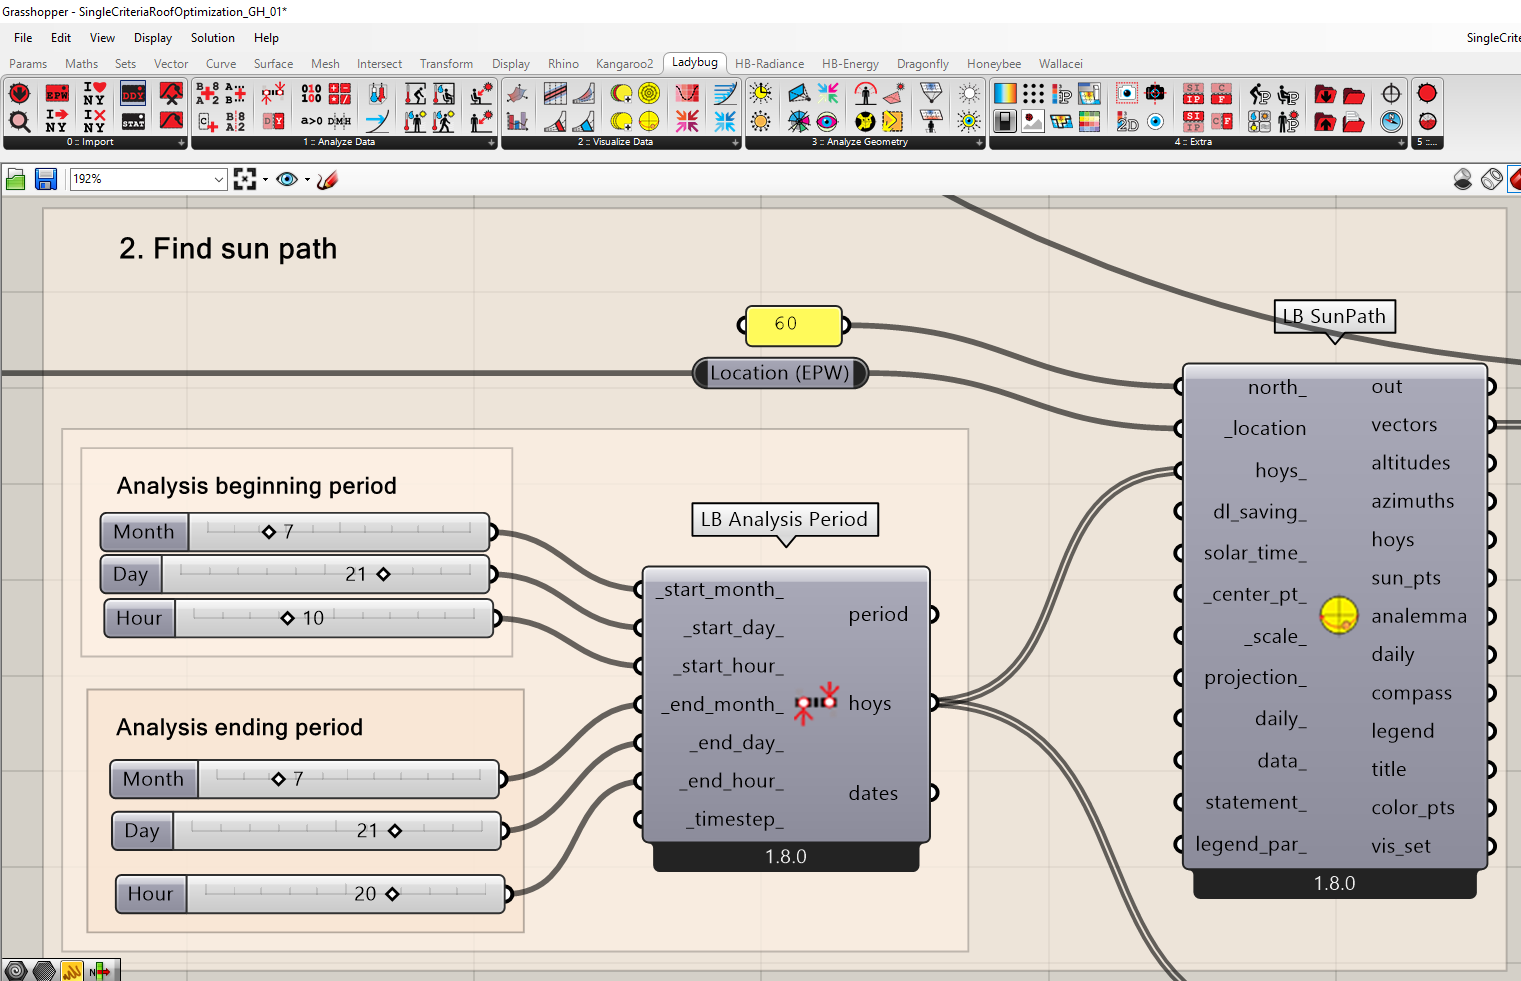
For the rest of the exercise, we will analyze two full (daylight) days to compare, one in the summer and another in the spring. We will use the LB Analyze Period component which will analyze daylight in 1-hour increments. This will be added in place of the single HOY value.
- Add a LB Analyze Period component
- Connect the Number Sliders in the LB Analyze Period:
- Start of the month (7)
- Start day (21)
- Start hour (10)
- End month (7)
- End day (21)
- End hour (20)
- Connect the HOY to the LB SunPath component
- Now the model will analyze hours from 10 to 20.
Adding Spring Day in the Sunpath
We already have the sunpath and results for summer for the summer period. We will want to add a new month variable, March, to the LB Analysis Period component so that we can analyze two days in the year. You can add a new number slider
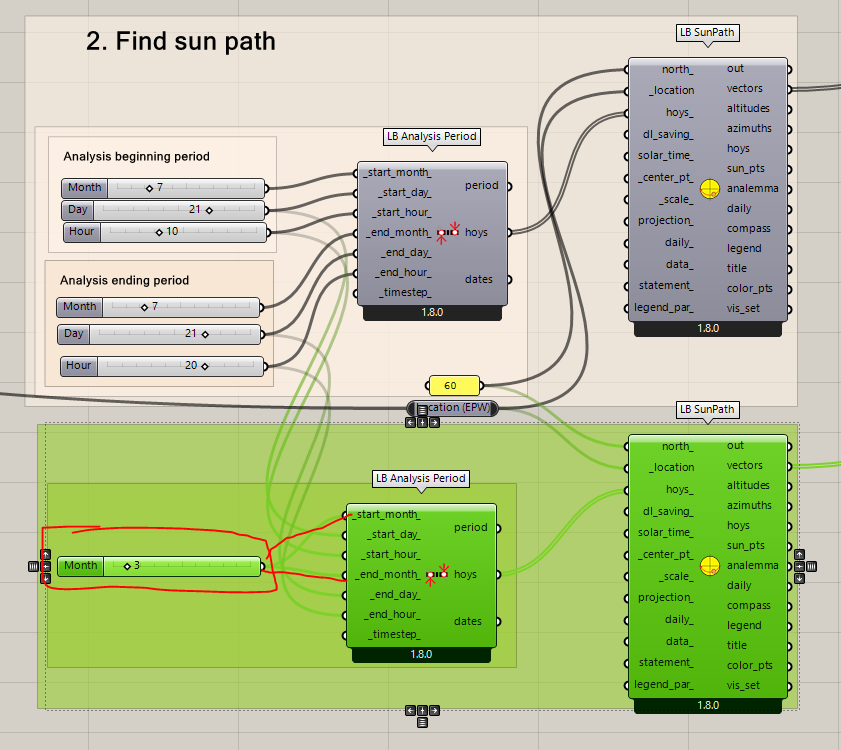
- Duplicate the LB Analysis Period and LB SunPath components (select components, then ctrl+c followed by ctrl+v).
- Add a number slider and set it to 3 (March) which plugs into the ‘month’ input in the LB Analysis Period component.
- Connect the number slider with the value 3 in the second LB Analysis Period component.
- Connect the spring month period’s HOY output to the duplicated LB SunpPath component.
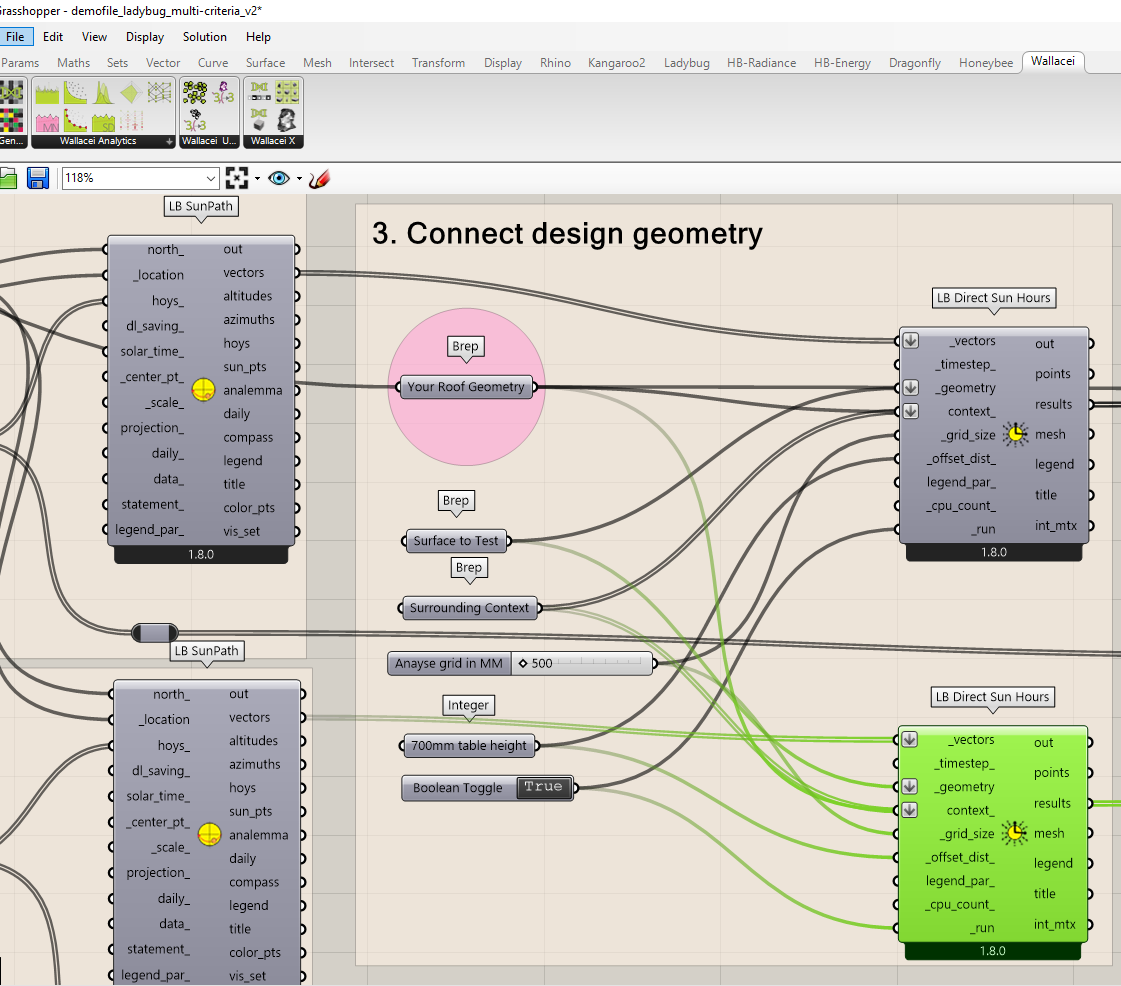
We will also create a separate analysis model to capture the data separately for both the summer and spring days.
- Duplicate the LB Direct Sun Hours component. Keep the same variables.
- Add the new spring sun position output vector into input vector.
Calculate Percentage of Direct Sun Hours
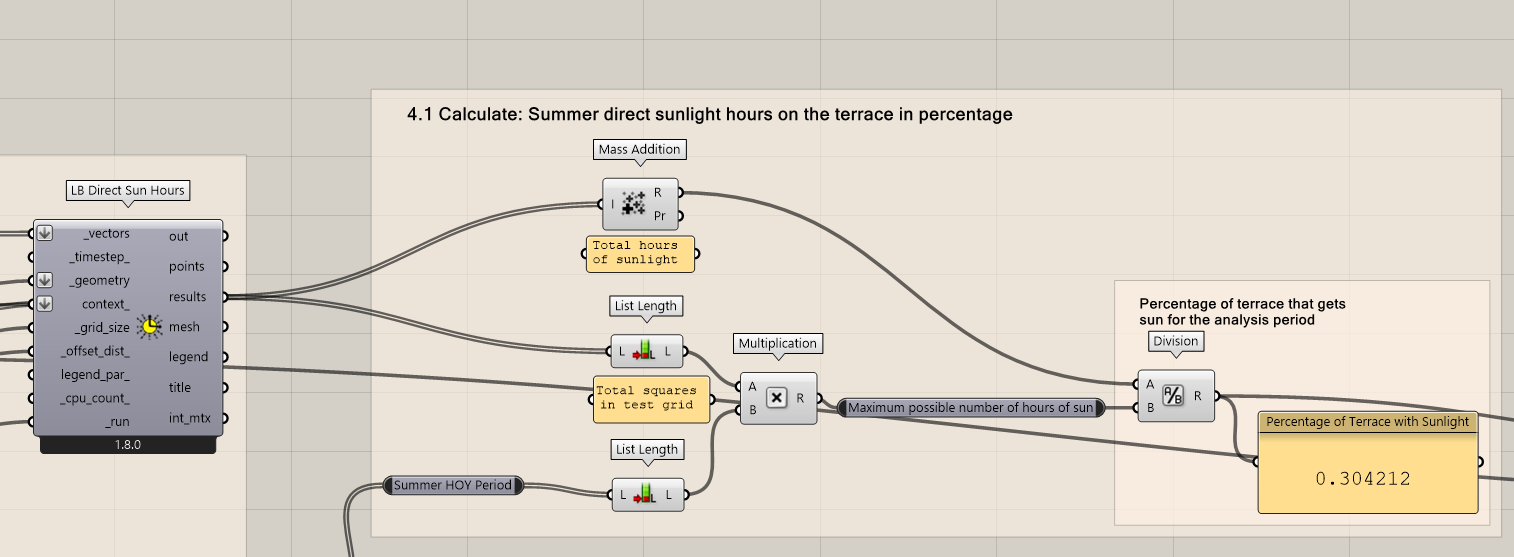
To calculate the percentage of direct sun hours for a period analysis:
- Use Mass Addition component to calculate the number of direct sun hours.
- Add a List Length component and plug the results from LB Direct Sun Hours into it to count the number of test tiles/points.
- Add another List Length component to measure the number of periods in the analysis
- Multiply both List Lengths components together using the Multiplication component. This will give you the number of possible hours of sun.
- Using the Division component, divide the Mass Addition value by the Multiplication output to get the percentage.
- Connect the results to a Panel to display the results as your model updates.
Then finally, extract the test points from the “spring” analysis results and keep them separate so that we can compare those two later.
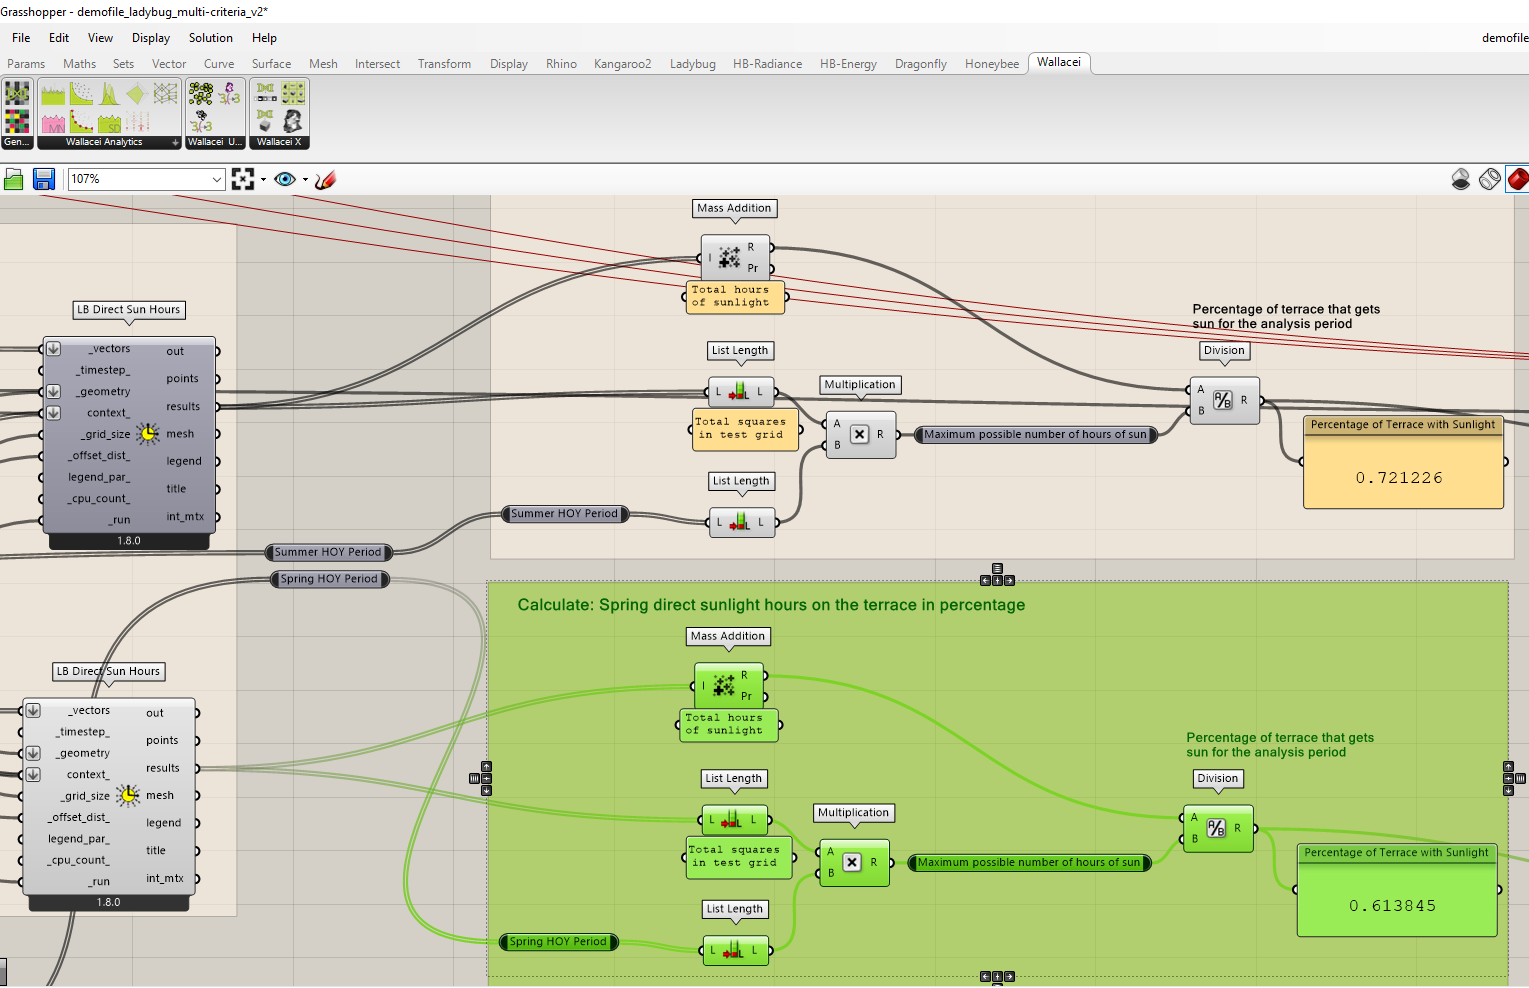
- Duplicate the “calculate summer direct sun hours on the terrace in percentage” components.
- Connect the spring “results” from the LB Direct Sun Horus component into Mass Addition and List Length.
- Connect the spring HOY output from the LB Analysis Period component into the other List Length component.
- You can now see the results of the percentage of direct sun hours for the spring period.
Setting Up the Fitness Function
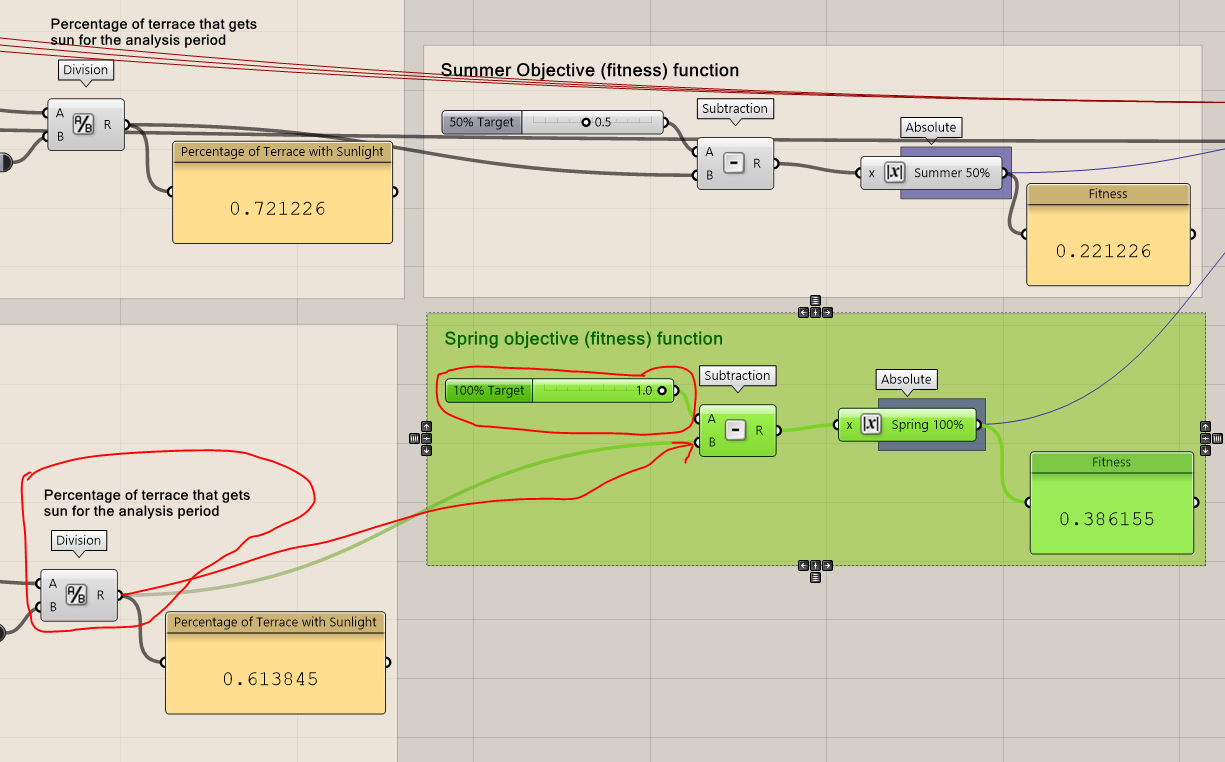
The objective are two: 50% of the terrace received direct sun hours during a summer day, and 100% of the terrace receives direct sun hours during the spring. First we need to setup the script for calculating the percentage of terrace that gets sun for the analysis period:
- Using Subtraction component, connect the target value of direct sun hours with a Number Slider from 0.0 to 1.0 (0.5, i.e. 50%).
- Connect the percentage of terrace receiving direct sun result from the previous calculation into the B input for Subtraction.
- The fitness value is now displayed in the Absolute component.
- You can use a Panel and right-click to rename to “fitness”.
- Duplicate the previous components and setup the spring objective by setting the Number Slider to 1.0.
In the next chapter, we will explain how Wallacei X is used to optimize based on these two design criteria and visual the pareto front results.
Multi-Criteria Roof Optimization with Wallacei X 3/4
Multi-Criteria Optimization for Roof Designlink copied
We will be using the Wallacei X plugin for the optimization. There is an existing tutorial that does into detail what Wallacei is capable of doing, linked below for your reference.
Installing Wallacei X
First thing to do is go to Food4Rhino and download the latest Wallacei X Package.
This will take a few minutes to install but the standard procedure for installing a new plugin is the following:
- Unzip the .zip file.
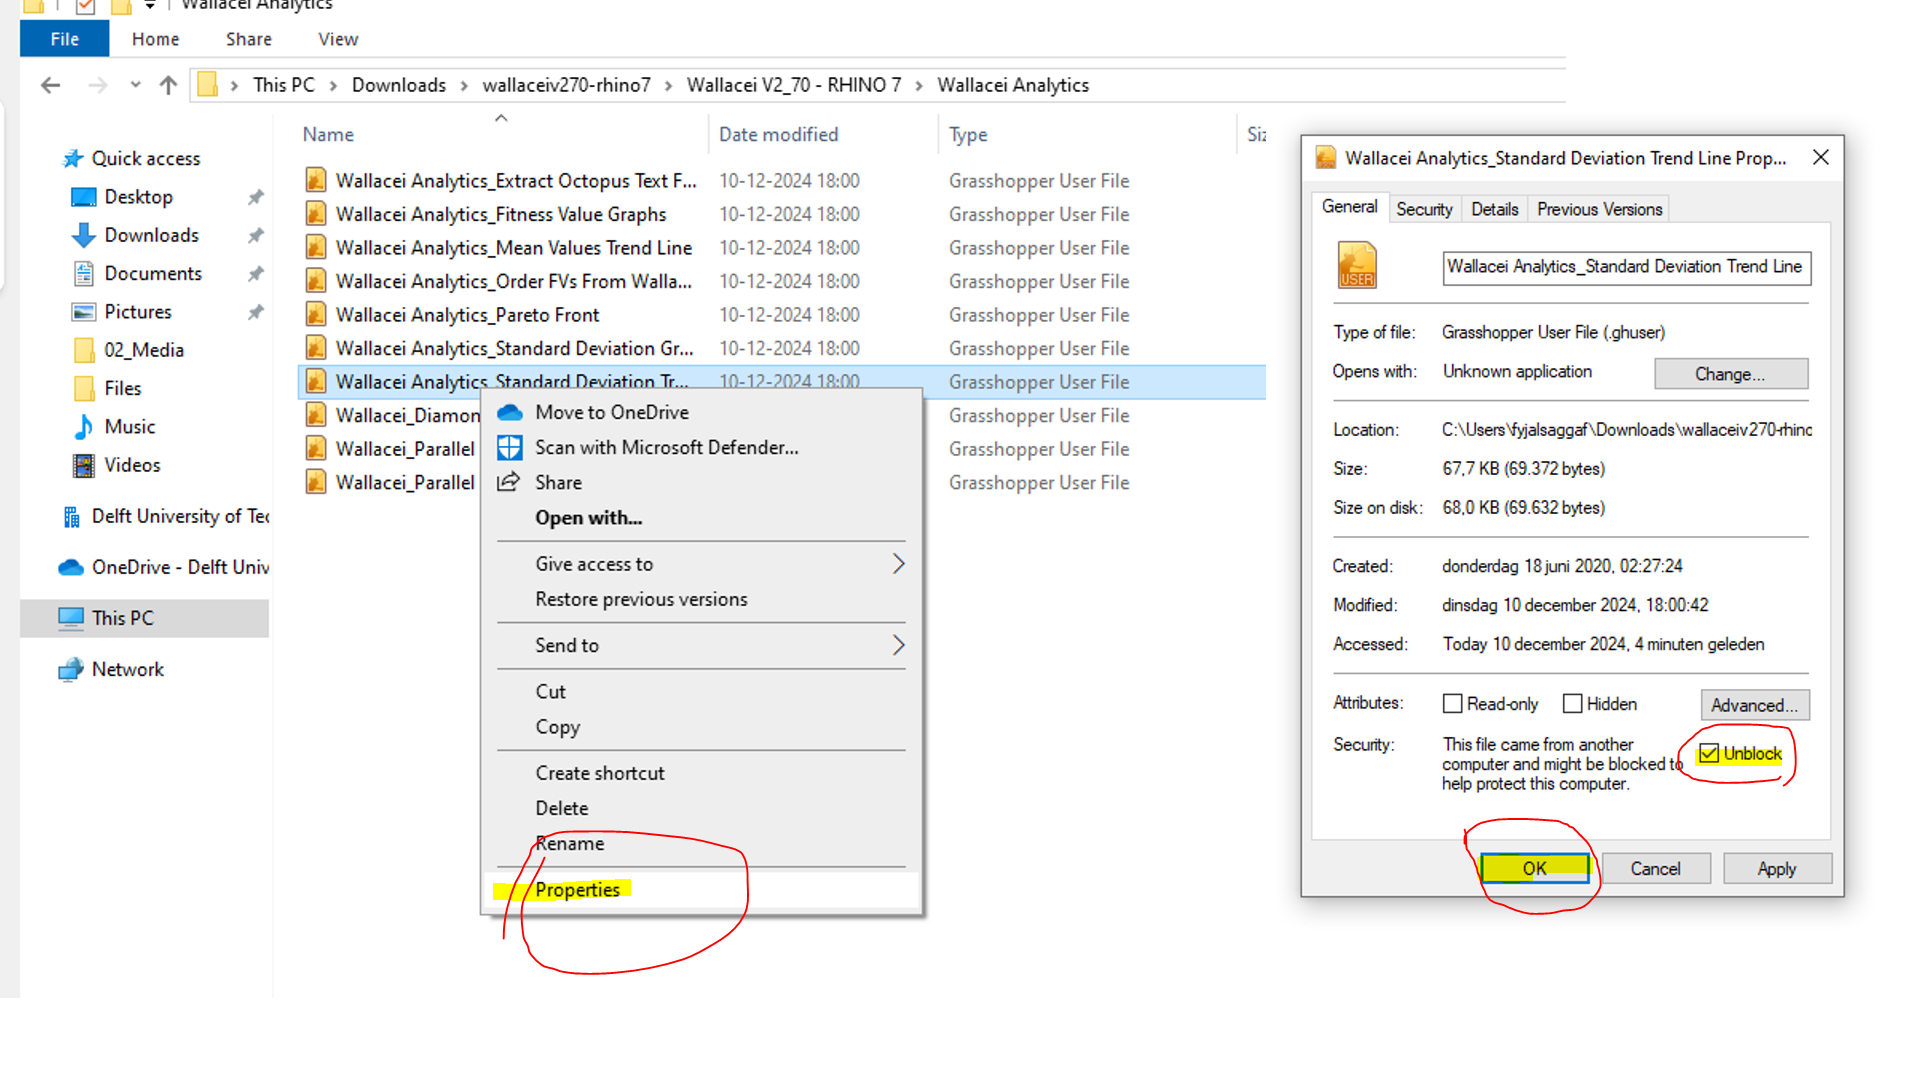
- Go to folder Wallacei Analytics. You will find approximately 11 ‘Grasshopper User File’.
- Right click each one individually, go to properties.
- Check Unblock and then click Okay.
- Do this for every file.
- Repeat this process for folder ‘WallaceiX_2.70_Rhino 7’.
- Restart Rhino and it should now appear in your toolbar.
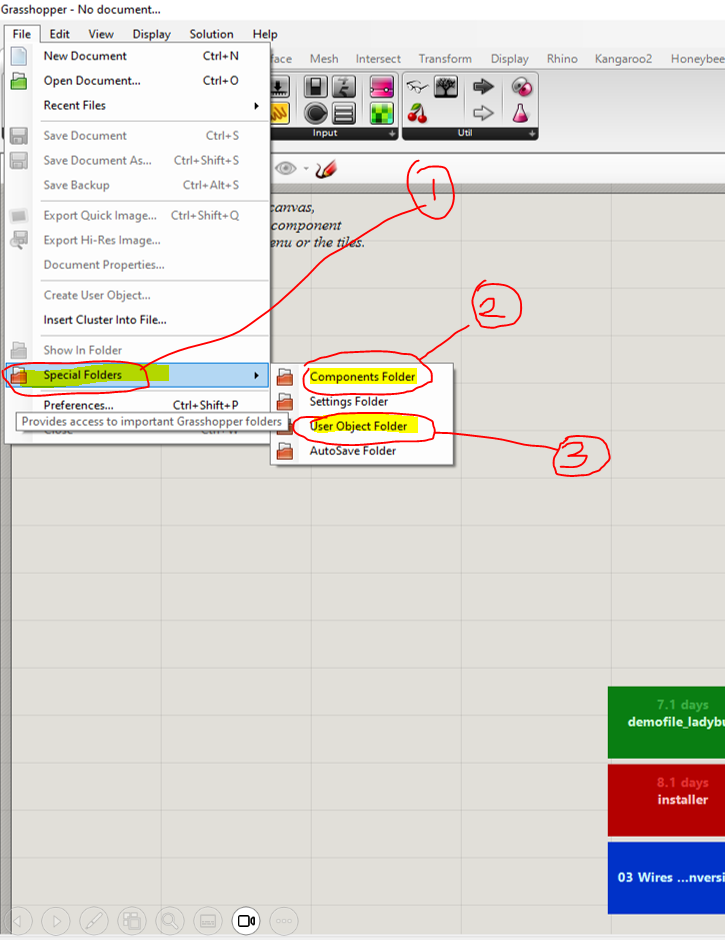
Copy the files inside Grasshopper folders. You can locate the folders from inside of grasshopper by:
1. Go to File >> Special Folders
2. Click ‘Components’ Folder (Libraries)
3. Click ‘User Object’ Folder
4. Copy the WallaceiX folder to Grasshopper’s ‘Components’ (Libraries) Folder
5. Copy the ‘Wallacei Analytics’ folder to Grasshopper’s ‘User Objects’ folder
Restart Rhino to complete the installation.

Setting Up Wallacei XComponent
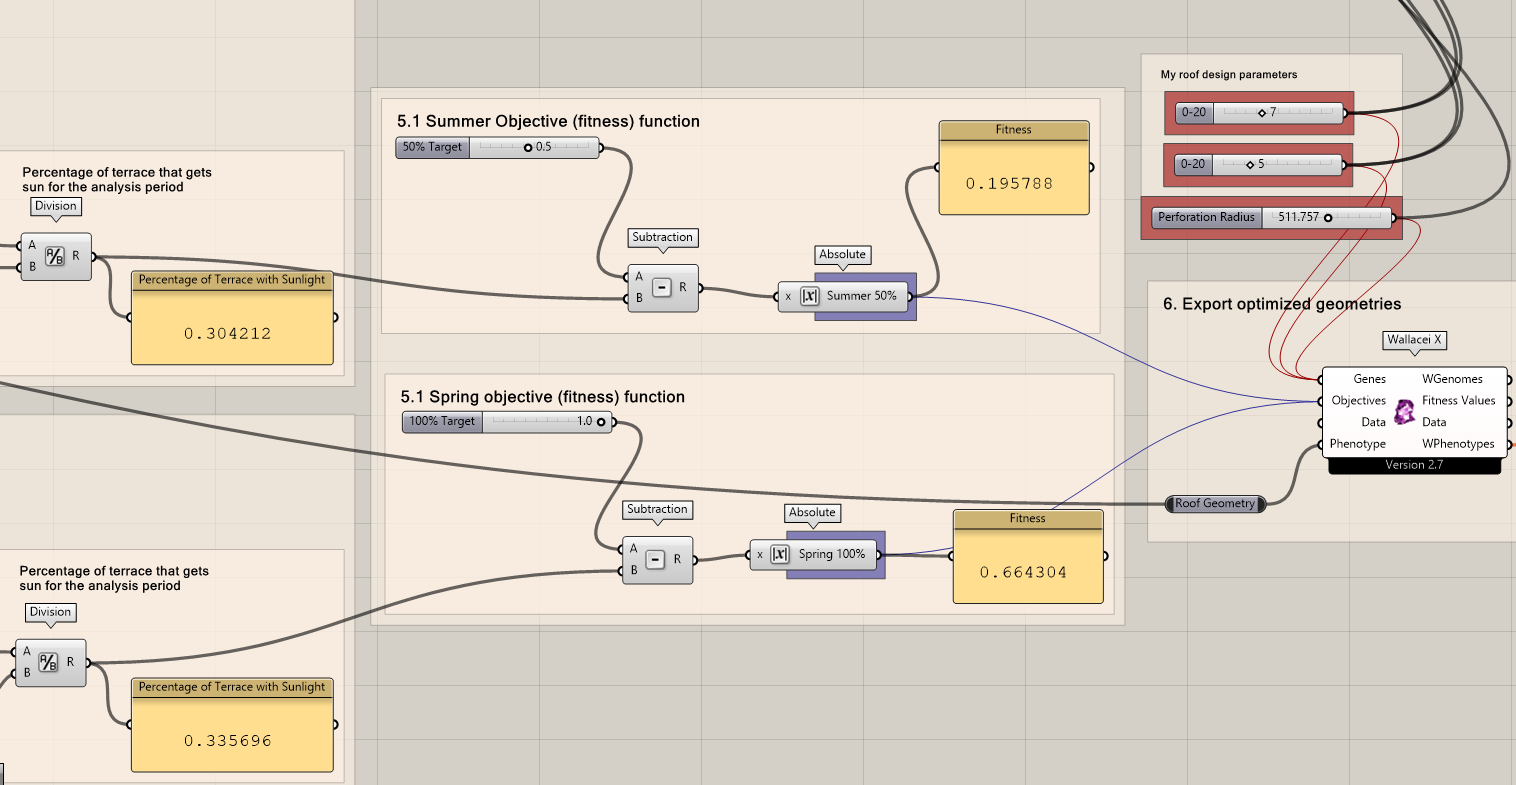
The Wallacei X component can be found in the tool bar. It contains four important inputs:
- Genes: these are the inputs that the algorithm is adjusting
- Objectives: these are the fitness values we defined where the algorithm is by default minimizing this value
- Data: we leave this empty
- Phenotype: this is the geometry of your design, in our case we plug the roof geometry in the phenotype.
Here is what your setup will look like:
Wallacei X Solver Settings
Check this page for more in depth information on all the relevant settings for Wallacei X. In this part, you can see how to open the Wallacei dialogue, change the population size, and run the solver.
- Double-click the Wallacei component.
Set the population size to 25 to reduce computation time - Change the generation size to 10. If the results are finishing fast, you can increase the generation count to 25 or higher.
- Click on start to run the solver. Your rhino viewport will be minimized so give it some time.
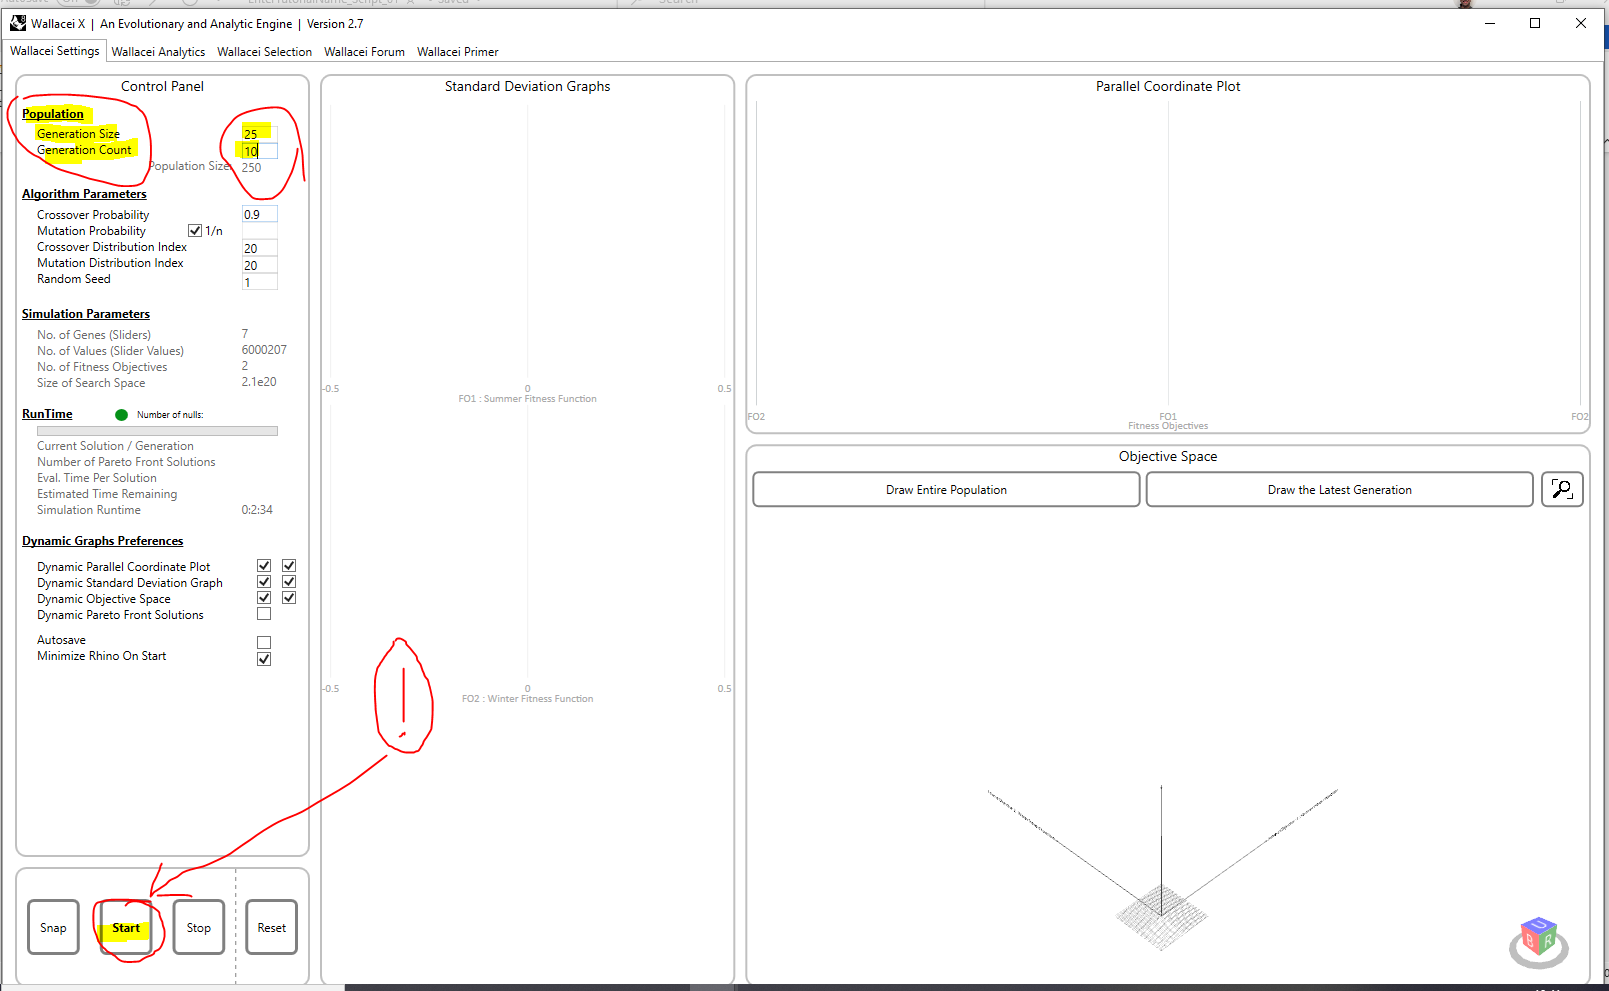
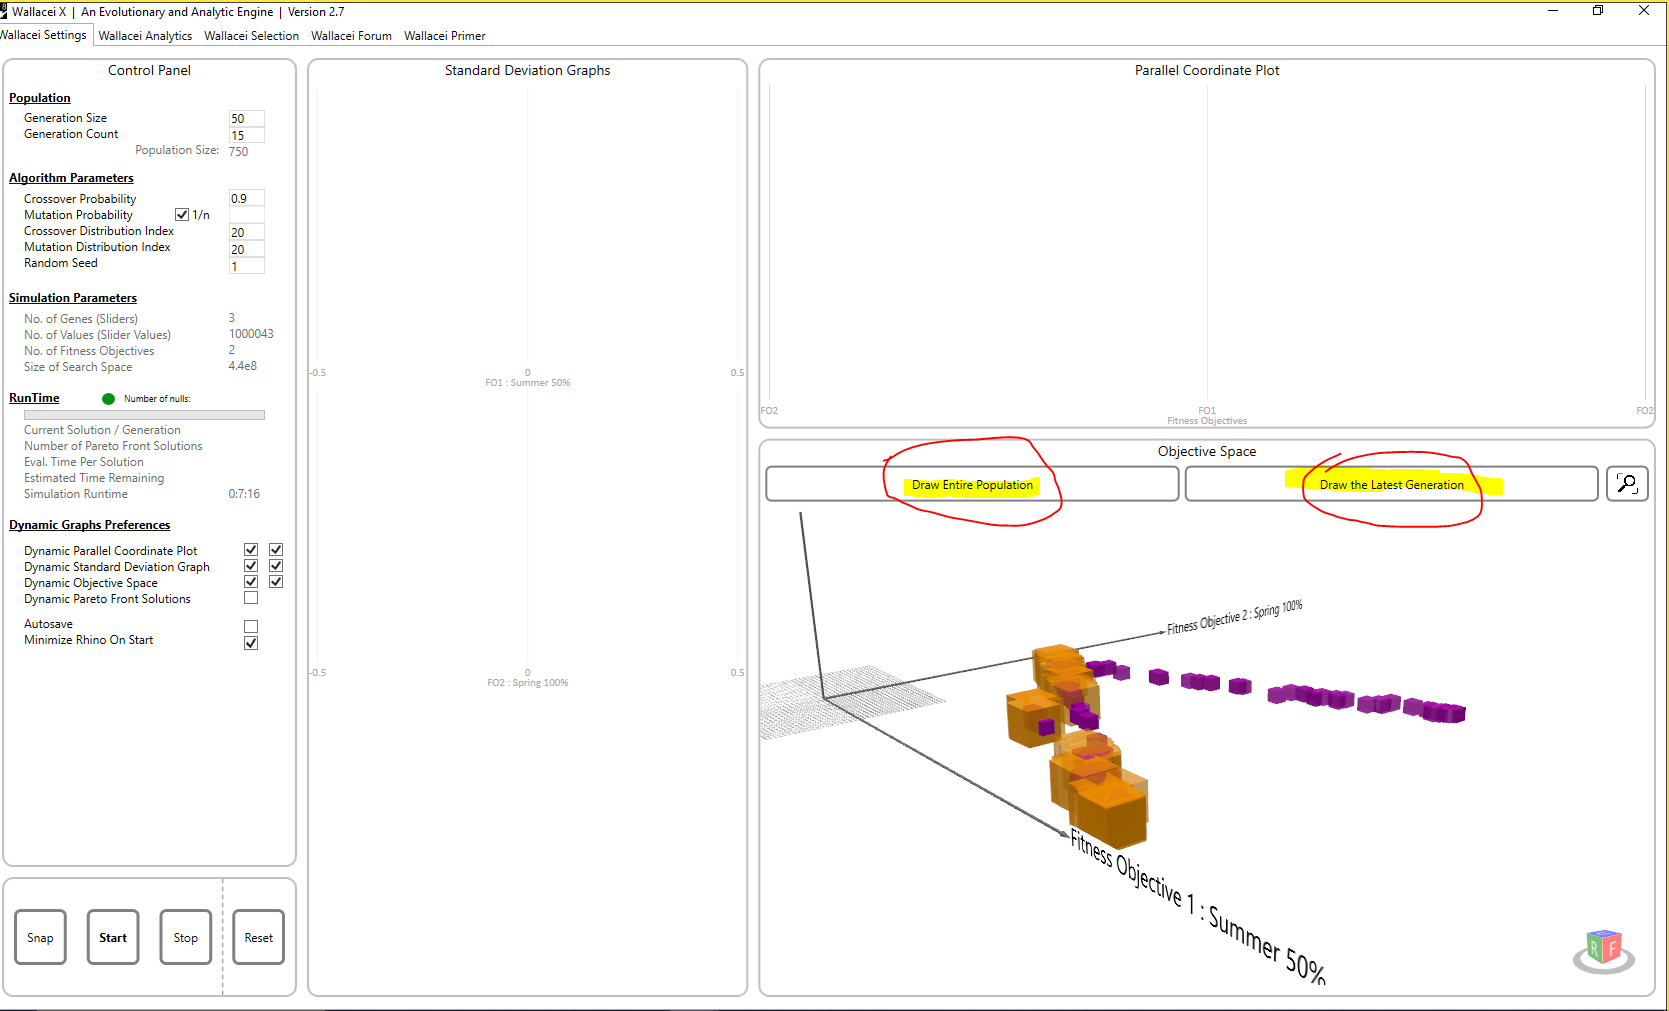
Once complete, you can click on Draw Entire Population or Draw the Latest Generation to view your solution space in the 3D viewport within Wallacei X.
Since we have two objectives, will notice that there are two labelled axes for each objective. Each box represents a solution, a design variation for the roof, and how it scores in comparison to other designs in the solution space.
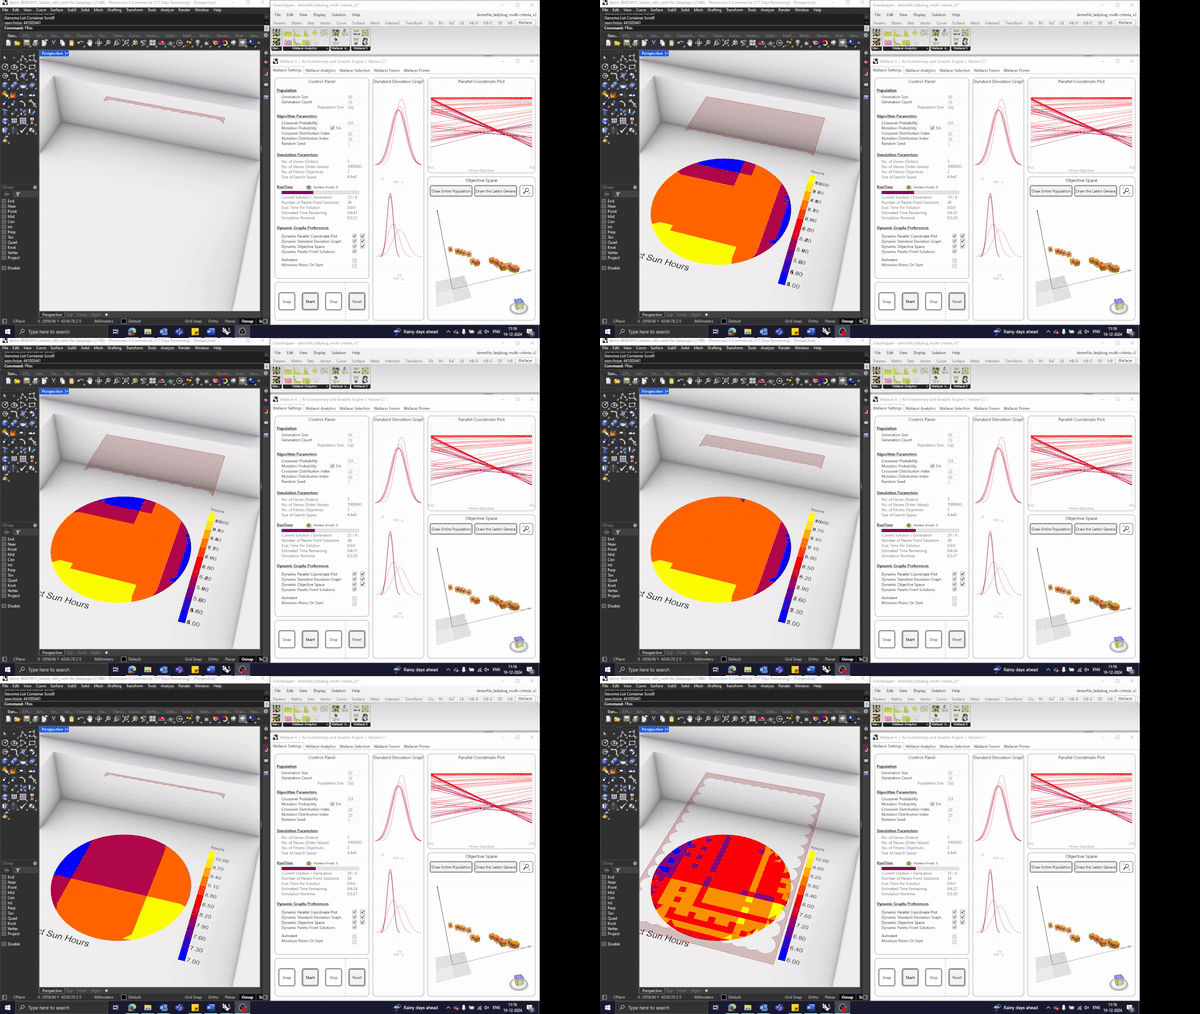
Since we have two objectives, will notice that there are two labelled axes for each objective. Each box represents a solution, a design variation for the roof, and how it scores in comparison to other designs in the solution space.
Exporting Pareto Front Solutions
You can export the pareto front solutions to use it in the rest of your project including baking it into Rhino. To export the pareto front solutions:
- Click on Draw Parallel Coordinate Plot
- Check the Pareto Front Solutions
- Select all Pareto Front individual solutions
- Click Add
- Click Export
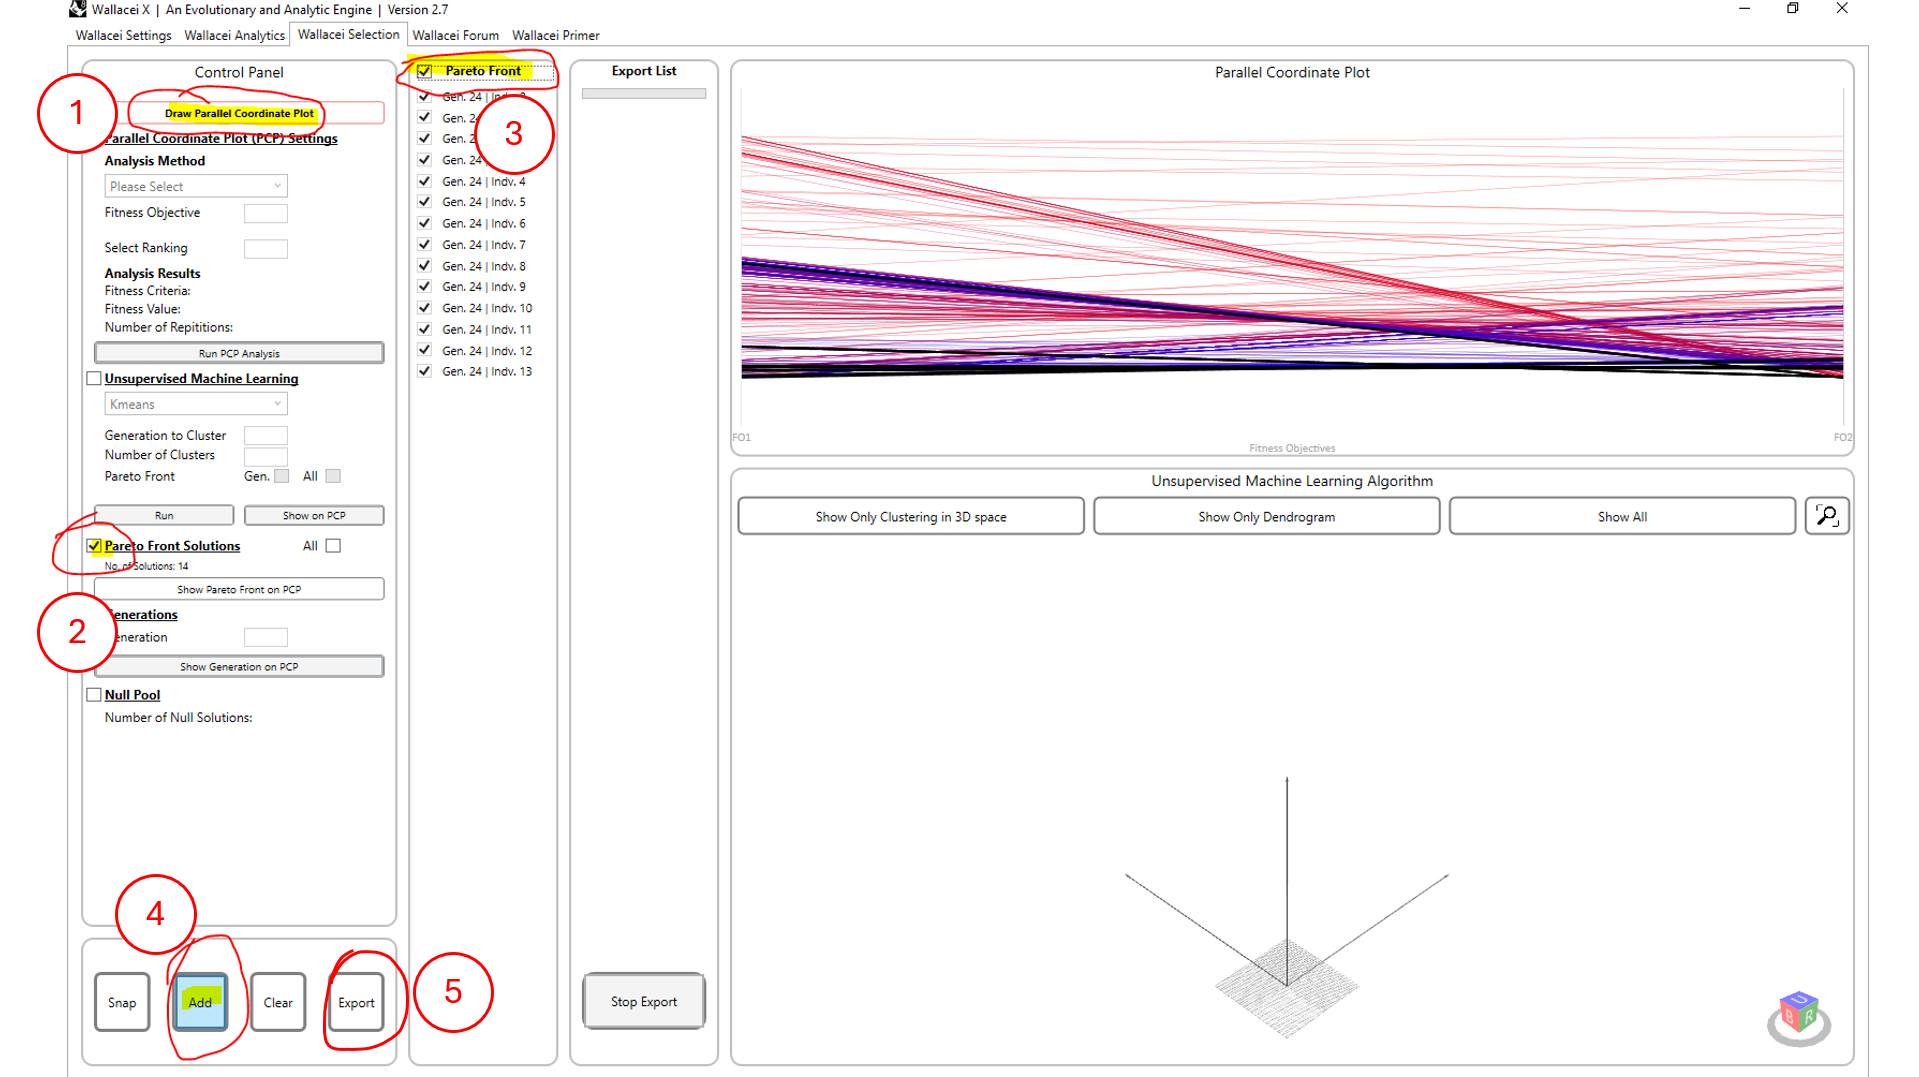
It will take a few moments and then Wallacei will prepare the geometry for all these solutions in the phenotype output.
To extract the phenotype output from Wallacei X component:
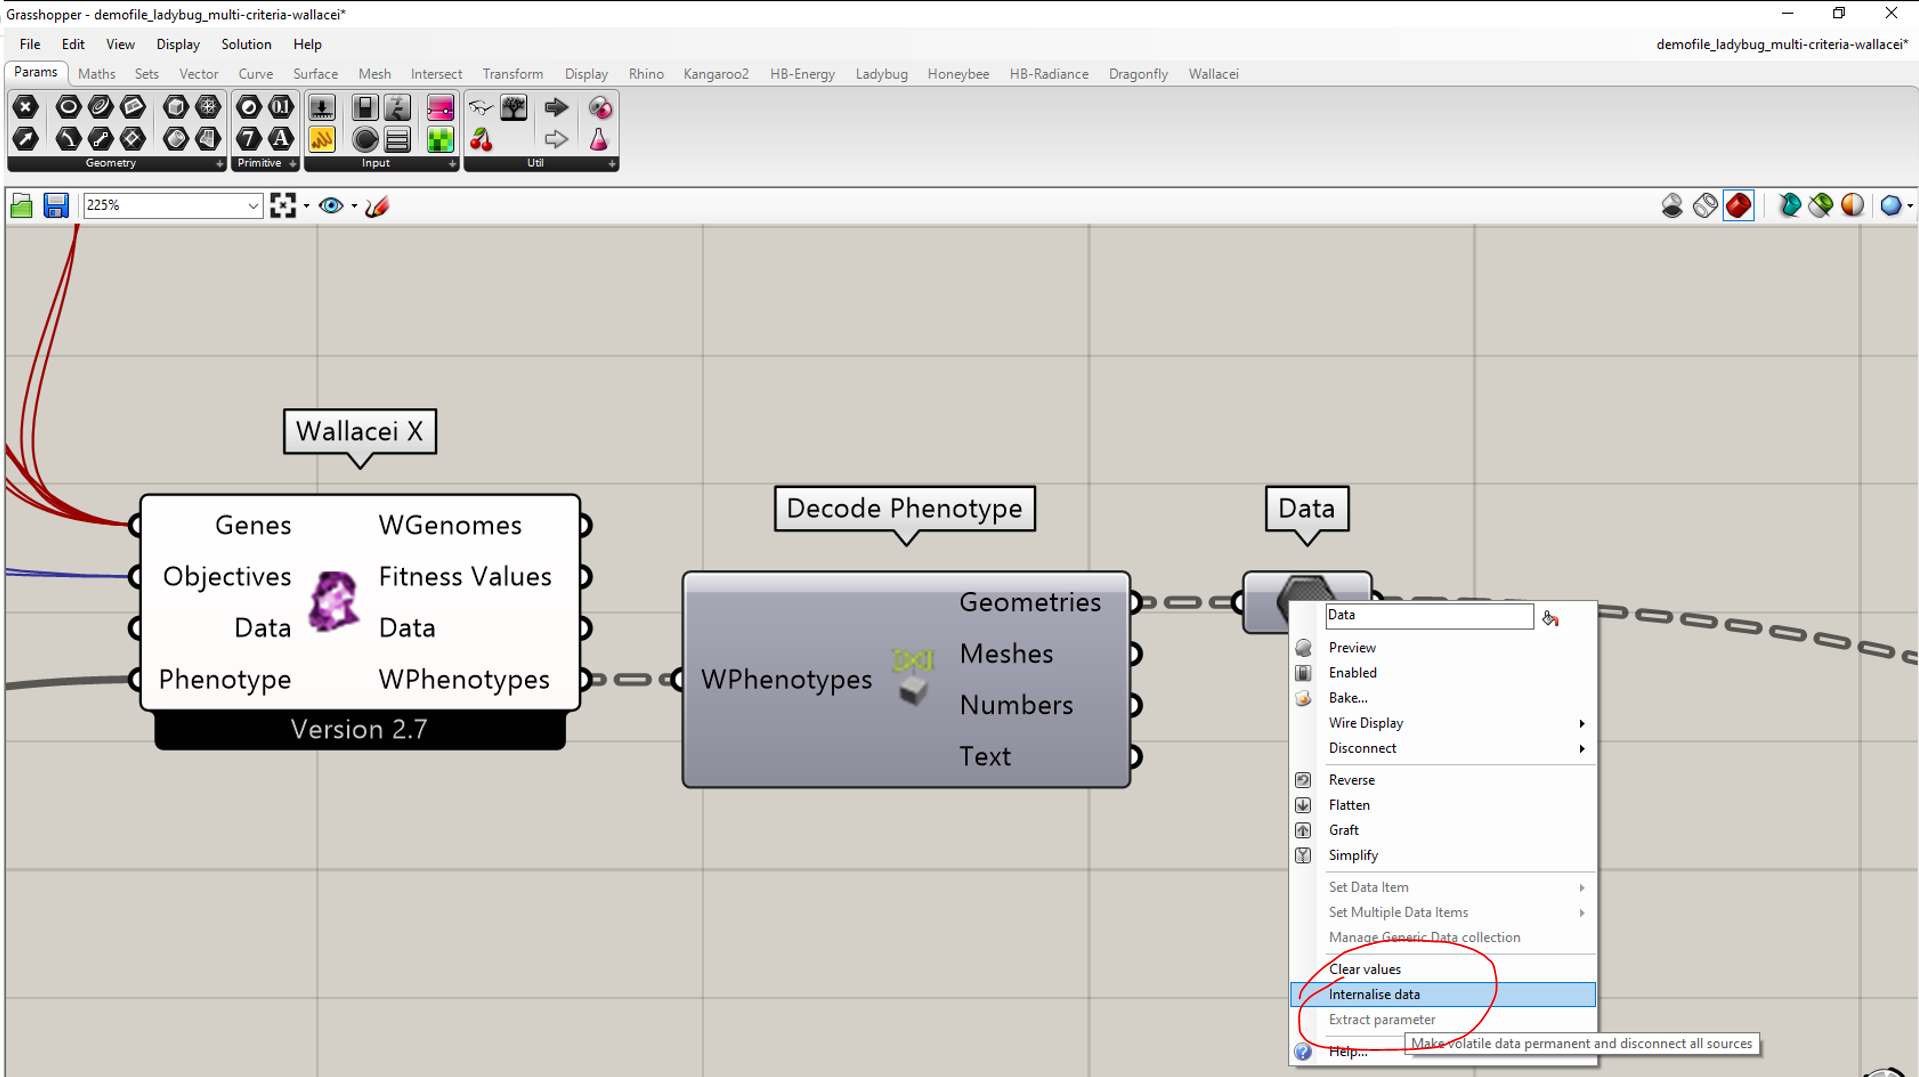
- Use the Decode Phenotype component and connect the output WPhenotypes to the input of WPhenotypes component.
- Connect the Geometries output from the Decode Phenotype component into a new Data component.
- Right-click the data component and choose Internalize data. This will save the geometry in the Grasshopper file.
- Use Tree Statistics to extract the paths for each geometry.
- Connect the paths output to a List Item component
- Connect a Number Slider to the List Item component and set it to integers (whole numbers) with minimum value of zero and maximum value corresponding to the number of phenotypes you have exported.
- Using Tree Branch, connect the Geometries output from the Decode Phenotype component and add the List Item output in the Path input for the Tree Branch.
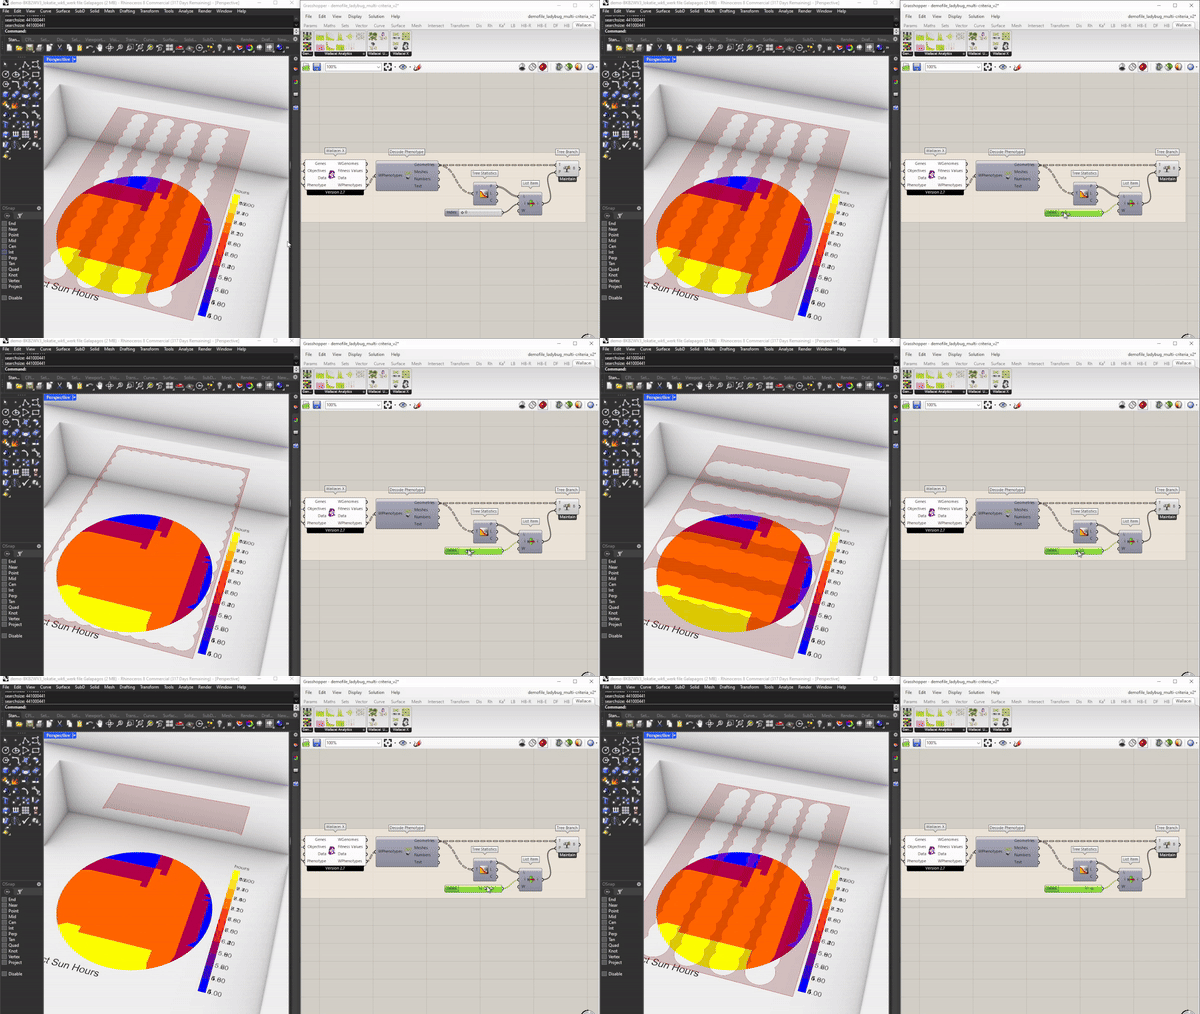
- Now move the Number Slider to view the results individually.
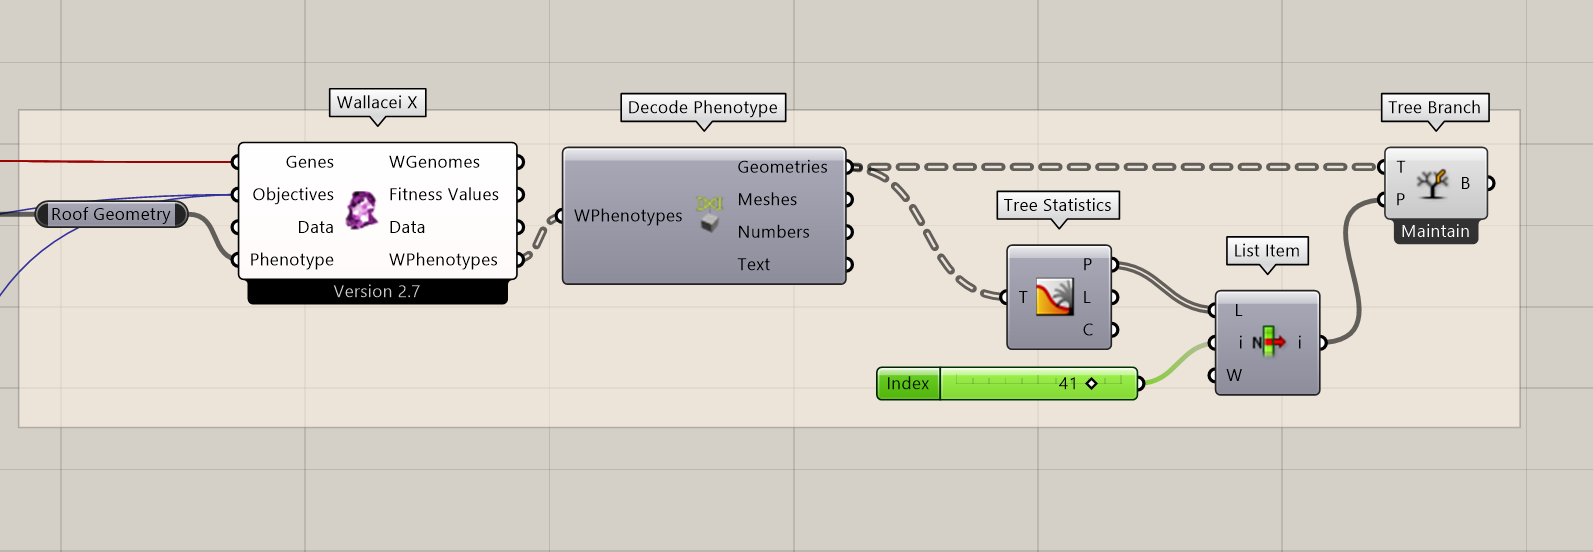
View the results by changing the number slider value of the list and you can make decisions as the designer on which roof you want to continue forward with. You can add the new geometry in the Ladybug model for final verification as needed.
Multi-Criteria Roof Optimization with Wallacei X 4/4
Conclusionlink copied
Optimization of the roof was done using two design criteria and the pareto front solutions were exported and saved inside of Grasshopper.

Useful links
Previous Tutorial:
Relevant tutorials:
Other useful links:
Food4Rhino, download Wallacei X: link
Write your feedback.
Write your feedback on "Multi-Criteria Roof Optimization with Wallacei X"".
If you're providing a specific feedback to a part of the chapter, mention which part (text, image, or video) that you have specific feedback for."Thank your for your feedback.
Your feedback has been submitted successfully and is now awaiting review. We appreciate your input and will ensure it aligns with our guidelines before it’s published.
