Basic list action
-
Intro
-
Generating a List
-
List basic actions
-
Cull Actions
-
Advanced list editing tools
-
Data Matching
-
Conclusion
-
Useful Links
Information
| Primary software used | Grasshopper |
| Course | Basic list action |
| Primary subject | Parametric Modeling |
| Secondary subject | General |
| Level | Intermediate |
| Last updated | November 27, 2024 |
| Keywords |
Responsible
| Teachers | |
| Faculty |
Basic list action 0/7
Basic list action
Grasshopper organizes objects in data tree lists with indexed branches and provides tools for editing and selecting list content.
Grasshopper uses, in contrast to a programming environment, no object names to define an object. This may sound trivial, but it is one of the most fundamental differences from a traditional modelling environment. In Grasshopper the object or objects are placed in a list. The different lists of data are organized in a data tree structure where every branch and data content of the branch have an index number. Accessing the object is therefore more problematic then in a scripting environment. Grasshopper has various tools to remedy this problem. These tools support the editing and selecting the content of the lists. Knowledge of these techniques are essential for the effective use of Grasshopper. These skills will be explained in this tutorial. To keep the examples simple, a panel with numbers or text is used. These numbers/text can represent many different things, for example: points, curves or surfaces.
What is a list?
Lists are fundamental data structures that are used to store a collection of items. A List is composed of several items that are connected and are written consecutively, each obtaining a specific index. Essentially a list is a sequence of data elements that is organised in a specific order. In grasshopper a list can be anything including curves, breps, names, numbers…etc.
Index number

Each element in a list can be accessed by its index. The index is the position of the item in the sequence, starting from zero. So, the index number of a list starts always with 0, therefore when we talk about the third item in the list, we mean the item with index number 2.
Basic list action 1/7
Generating a Listlink copied
A list can be created by manually typing the list values in a panel, a list can be obtained from a previous function in the code, or a list can be generated by using Grasshopper components. There are several ways to generate your own list.
Series
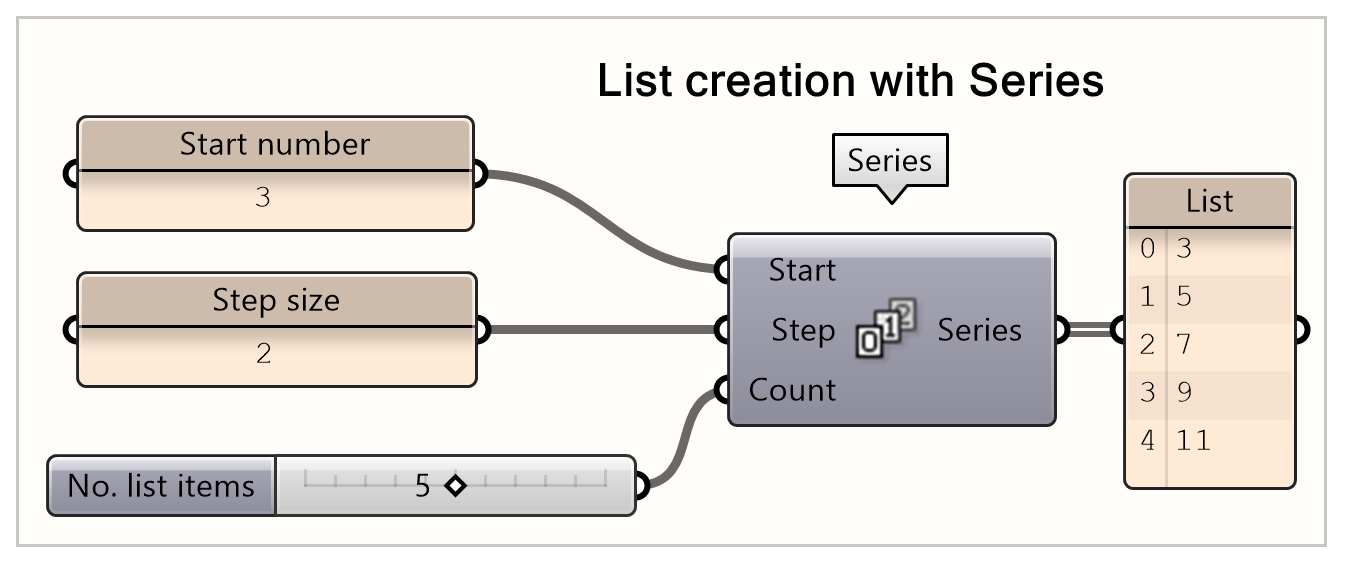
A series is used to generate a list of numbers starting from a specific number, increasing by a step size and continuing until a certain count. Start is the number the list starts from. Step is the step size for each successive number. The count is the length of the list. By default, the start is set to 0, the step to 1 and the count to 10. In this example, the list started at 3 and the next number is always 2 higher. The total list length is 5 items; therefore, the highest index is 4.
Range
A list can also be generated by setting a range. By inputting the minimum and maximum numbers in the list, a range is defined. The steps input is used to define the number of items needed to reach that maximum number. Be aware that the number of steps is not the same as the length of the list, the number of items in the list is 1 more than the step size. In this case: a list of 11 items is created when the number of steps is set to 10. There are different ways to specify the domain for the range: by only defining the end of the domain, by manually defining the domain in a panel or using the construct domain component.
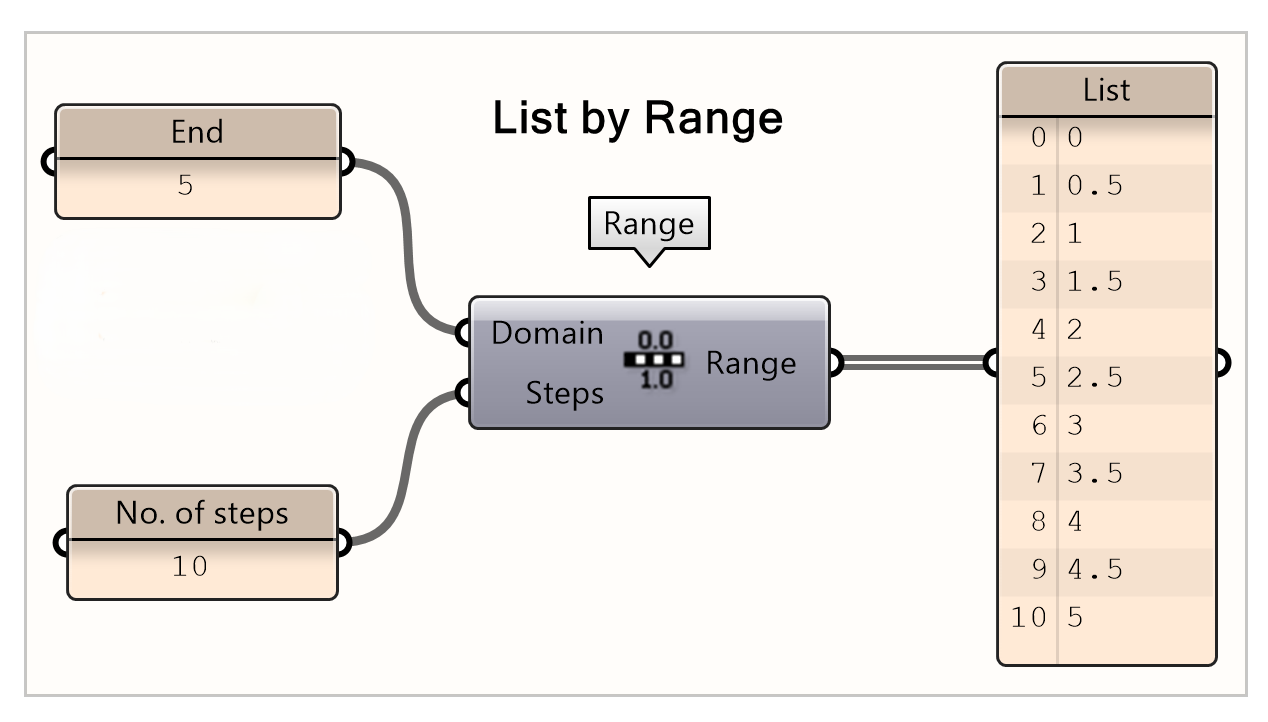
If you only specifying the end of the domain will automatically start the domain from 0. In this case, by setting the end of the domain to 5 the domain will be from 0 to 5.
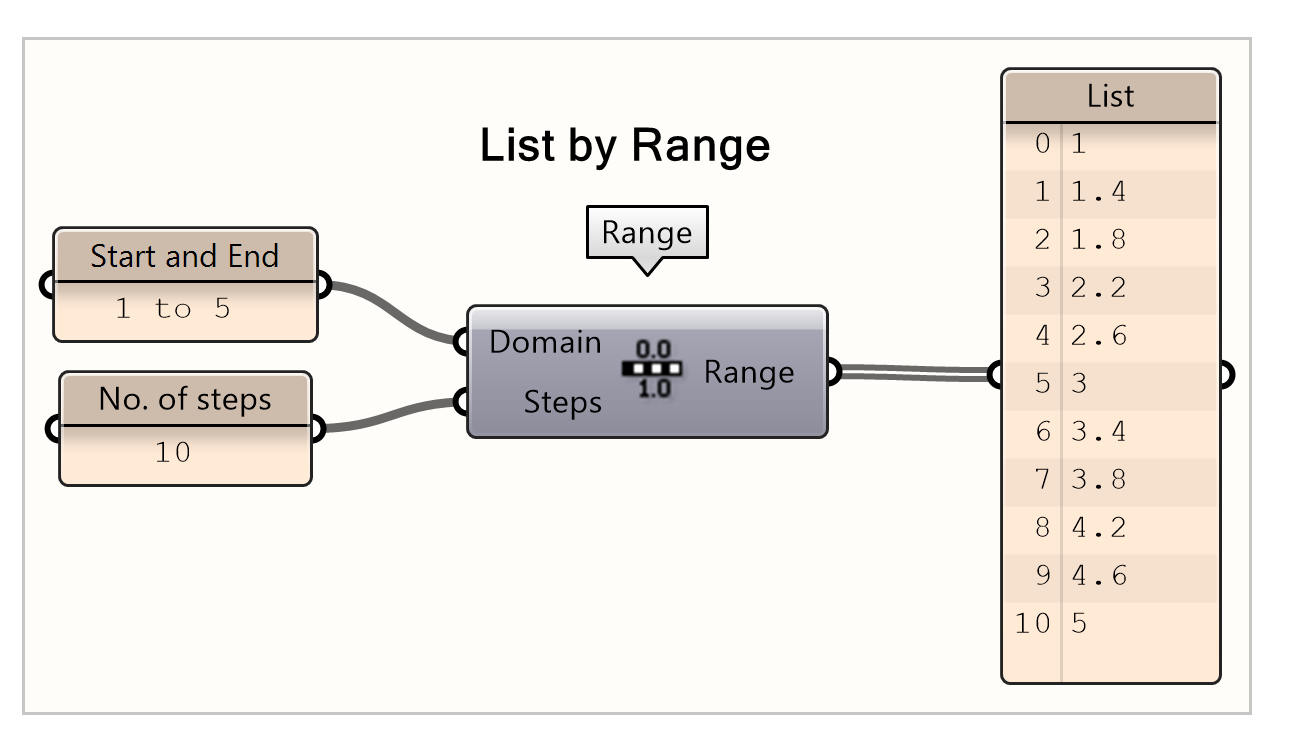
If you don’t want your domain to start from zero, you have to specify the end and start of the domain. You can do this by using a panel and manually defining the domain. In this case, we write down ‘1 to 5’ in the panel to let the domain start from 1 instead of 0.
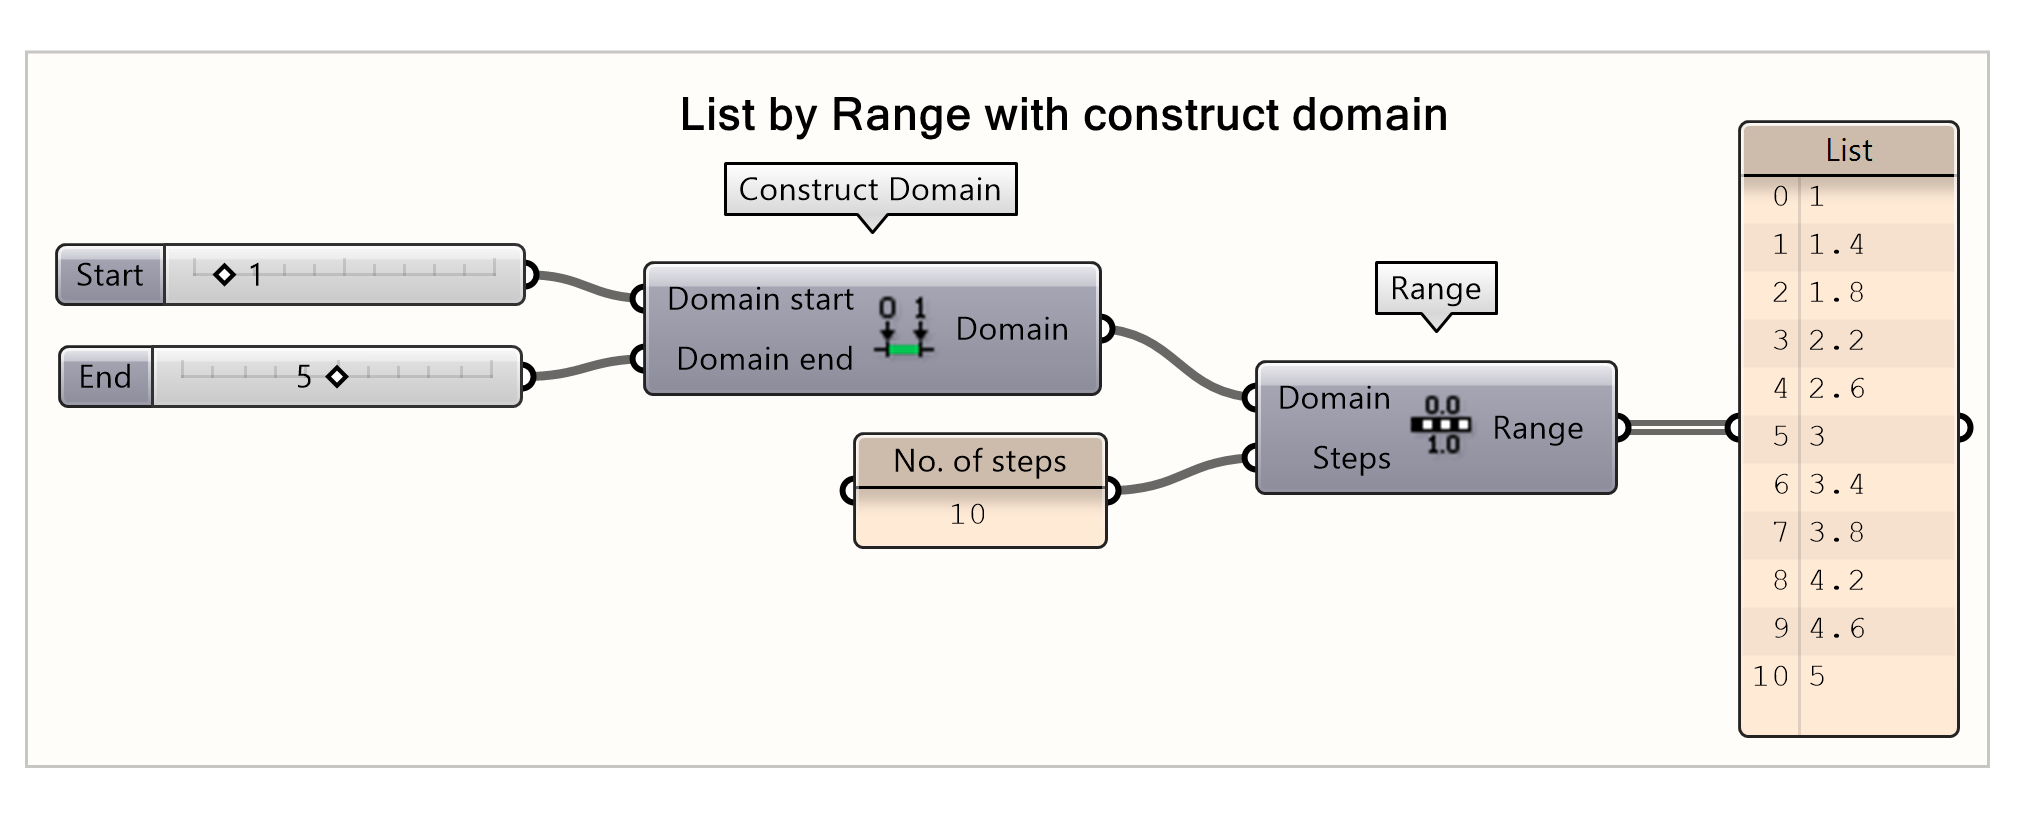
A more parametric way is to use the construct domain component and use number sliders with the start and end value to create the desired domain. In this way, you can easily change the sliders and the list will change accordingly, which could be beneficial for later applications.
Random
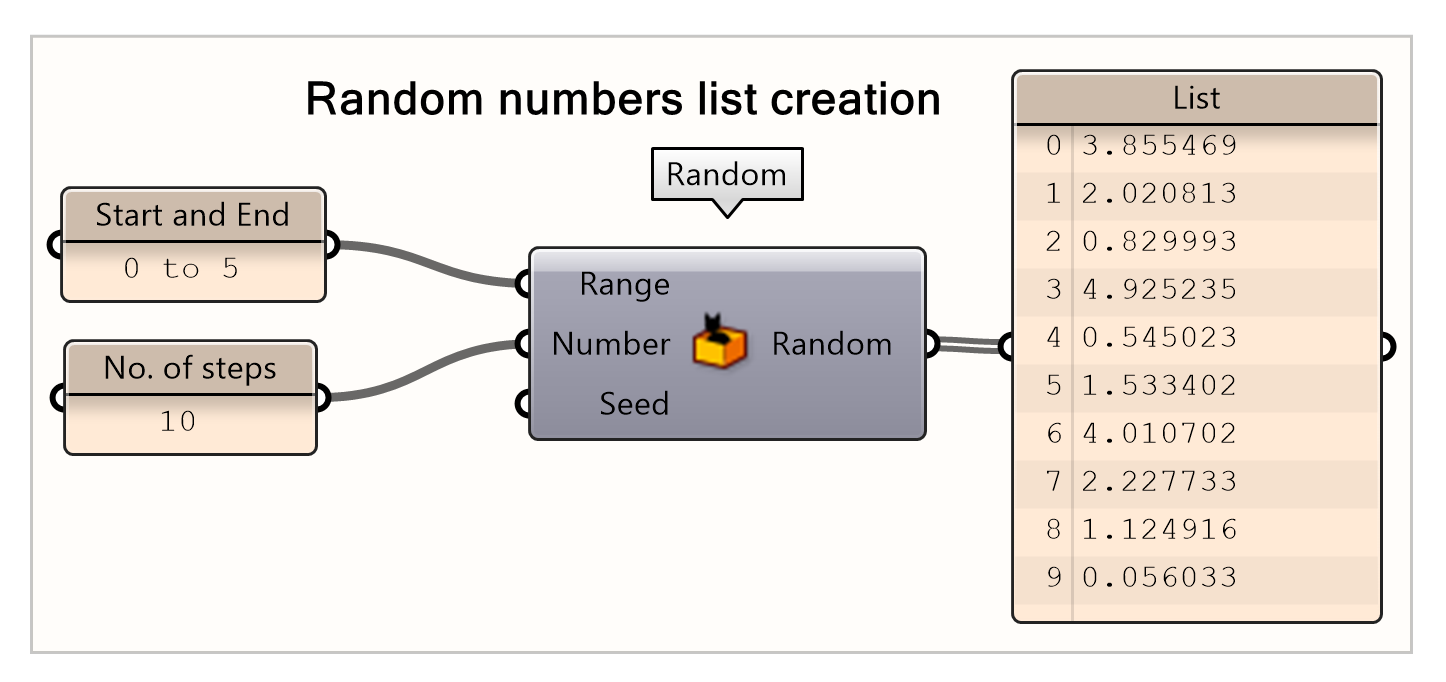
The random component generates a series of random numbers within the defined range, by defining a range and number of items needed in the list. As computers cannot create true randomness an algorithm is used to produce a sequence that appears to be random. You can define the seed value, which is the initial value that starts the random number algorithm, by default this value is set to 2. If you would create a random component with the same inputs you will get the exact same list. By altering the seed a different sequence will be created with ‘random’ numbers.
Duplicate Data
Duplicate Data is used to generate a list based on a set of specific data inputs. The component duplicates a specific input list a number of times. Data is the list to be duplicated. Number is the number of times you want the list to be duplicated. The order input determines how the data in the new list will be structured. The order input can be set with a Boolean toggle to True of False which results in a different list organization.
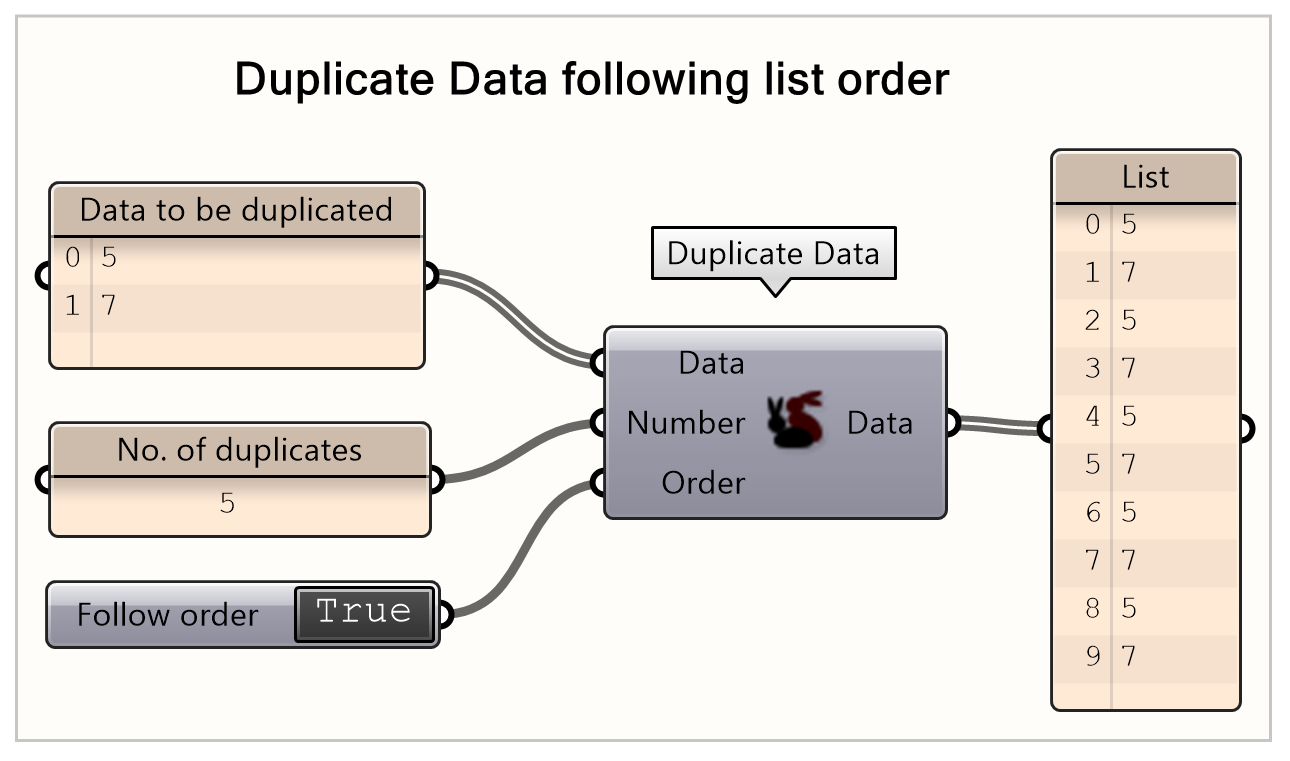
When “Order” is set to true, the data inputted is duplicated sequentially according to the specified count. Thus, the input list is duplicated as a set. By default, the duplicate order is set on True. In this case, the set (5,7) is duplicated 5 times.
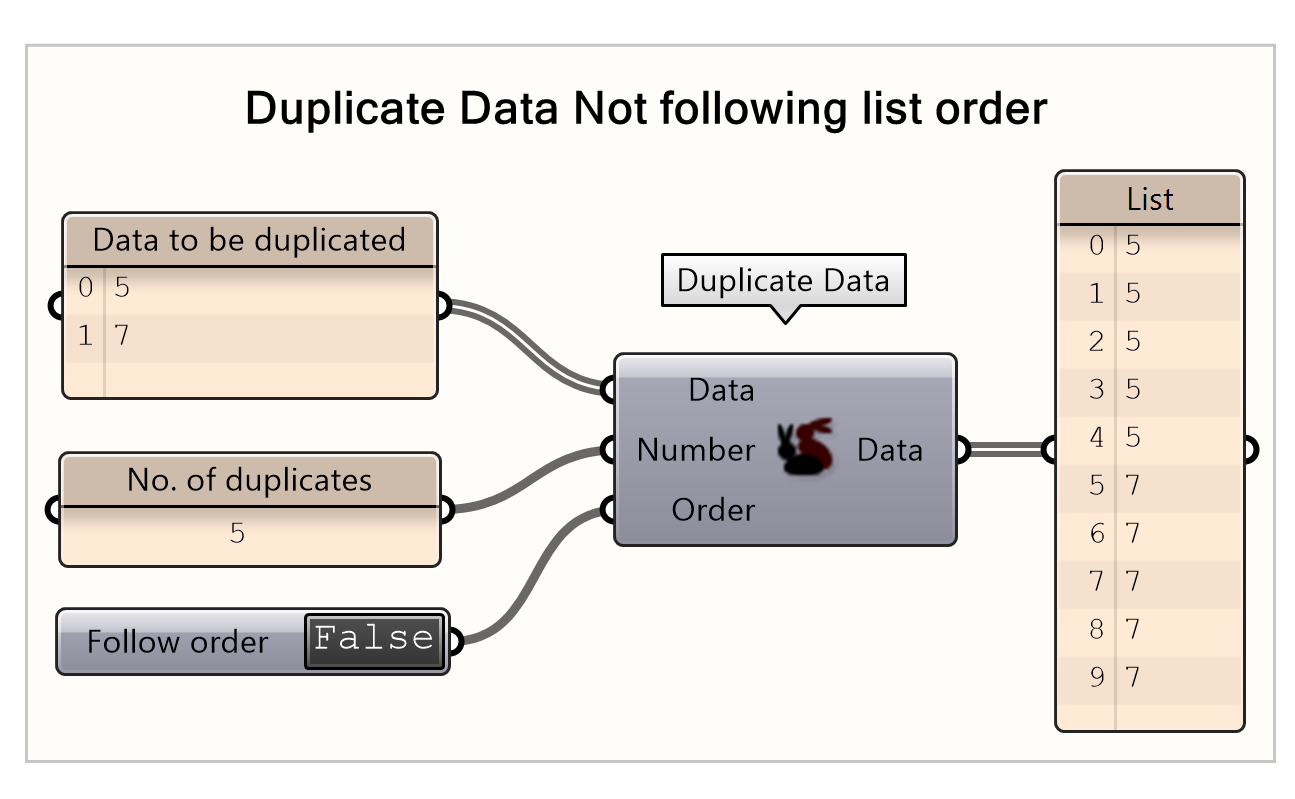
When “Order” is set to false, the initial item is duplicated according to the specified count, followed by the duplication of the subsequent items. Thus, each item in the list is duplicated separately. In this case, first the 5 is duplicates 5 times and then the 7 is duplicated 5 times.
Repeat Data
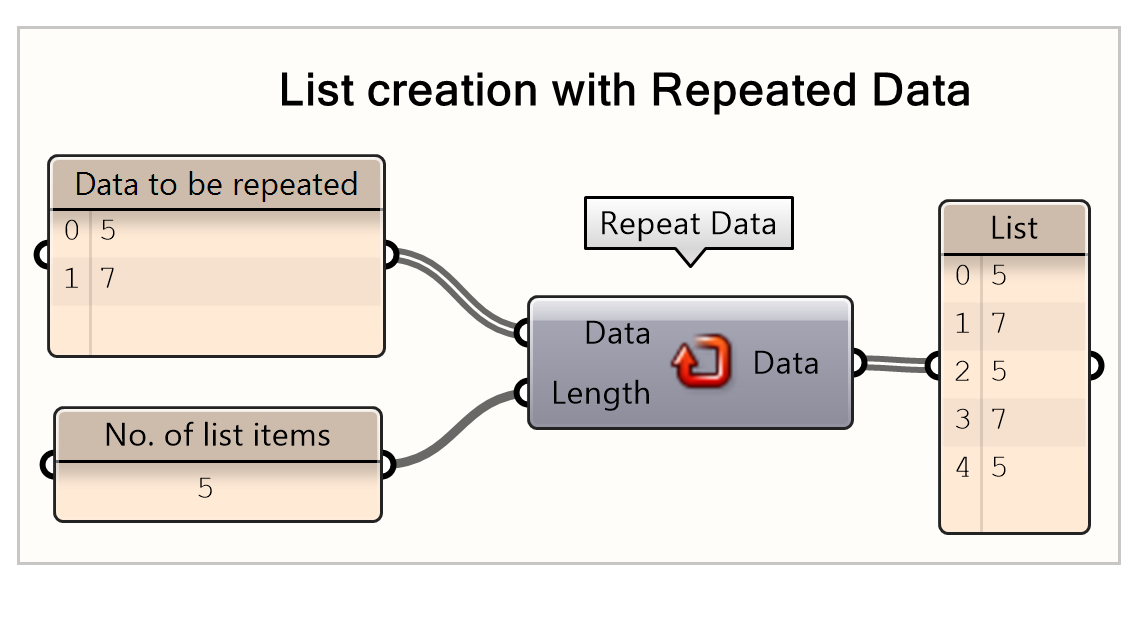
This component repeats the data in the provided list according to a defined list length. The elements in the list are repeated until the number of items match the required length. The data is the input list to be repeated and the length is the number of items in the requested list. In this case, the numbers 5 and 7 are repeated until a list with 5 items is created. Therefore, the number 5 is repeated 3 times, while the 7 is repeated twice.
Stack Data
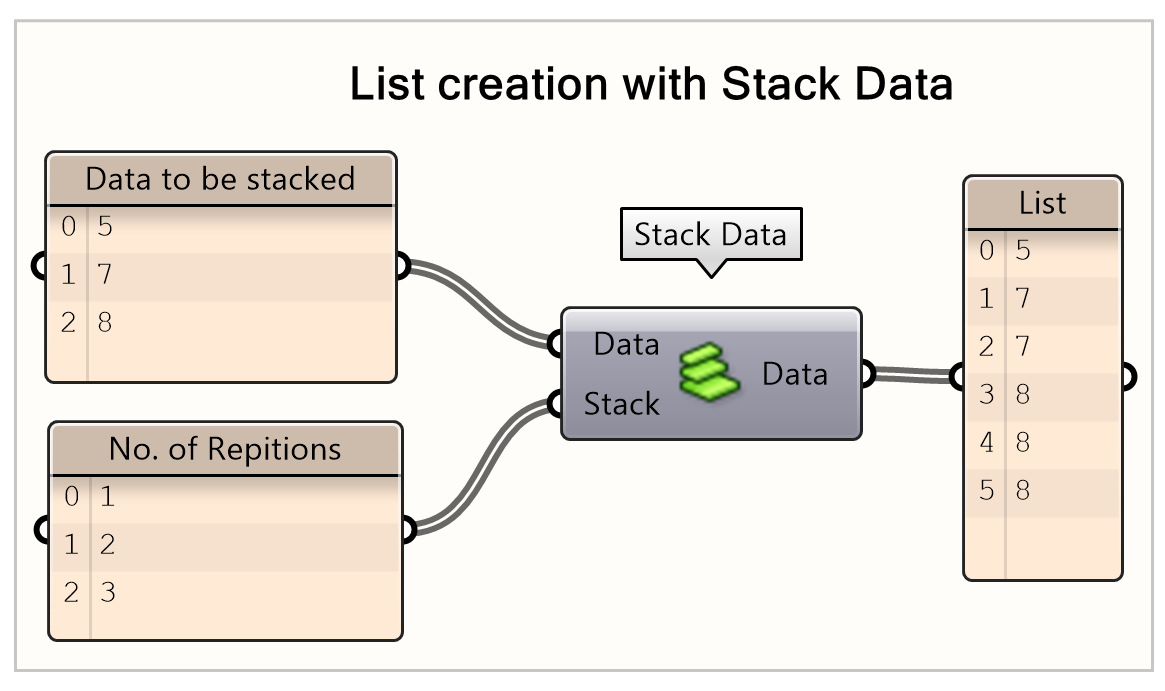
Using the Stack Data component, it allows the specification of the number of duplications for each individual item in the list. In this case, the number 5 is repeated once, the number 7 twice and the number 8 is repeated three times in the generated list.
Char Sequence
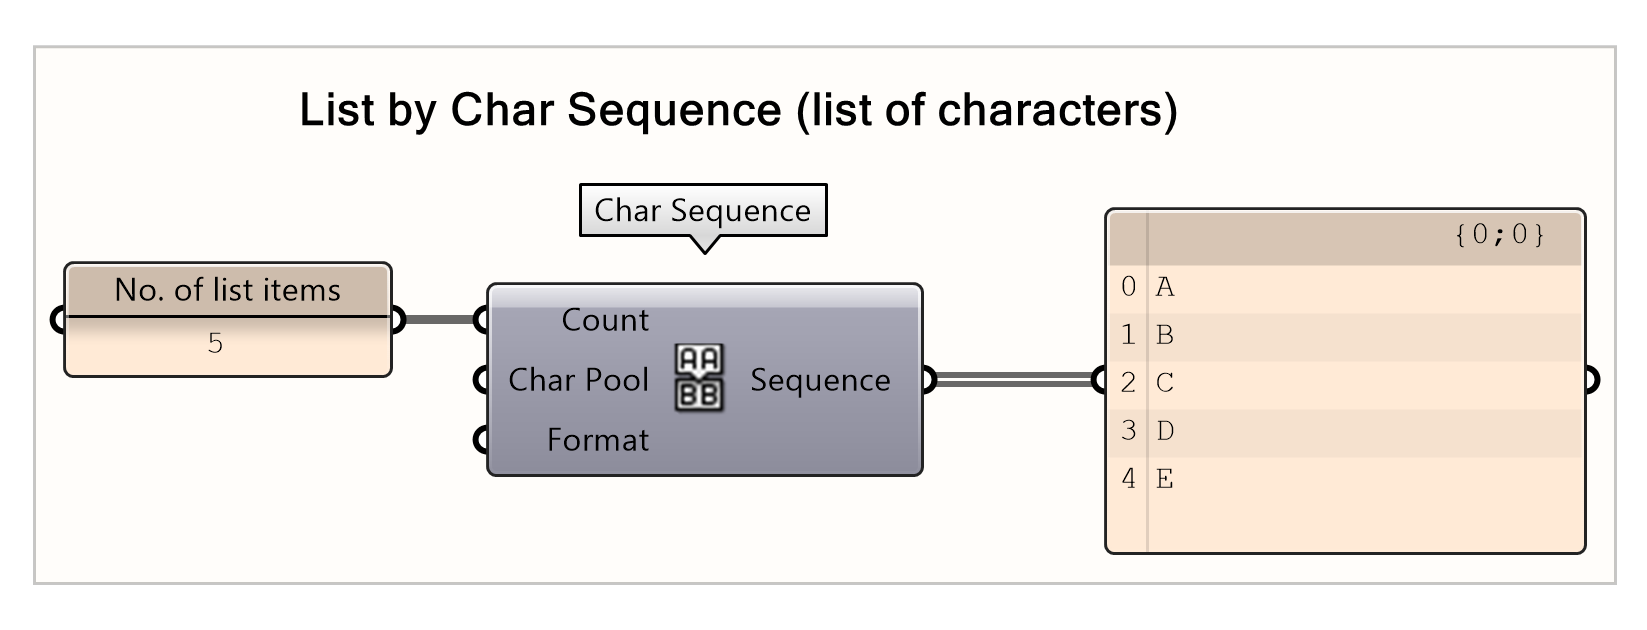
This component is used to generate a list of characters or letters. The count is the number of characters in the list. The Char Pool it the data list of characters that is used and is automatically set to the alphabets. Alternatively, you can create a list of specific characters in a panel as input to Char Pool, to use a sequence of other characters.
Basic list action 2/7
List basic actionslink copied
After creating or generating a list you might find that you need to change it, edit it, separate it, or adapt it in a certain way to get the output you need. In this section, you will find the basic actions you need to extract items quickly and easily or change your list. The basic list actions components can be found under:
List item
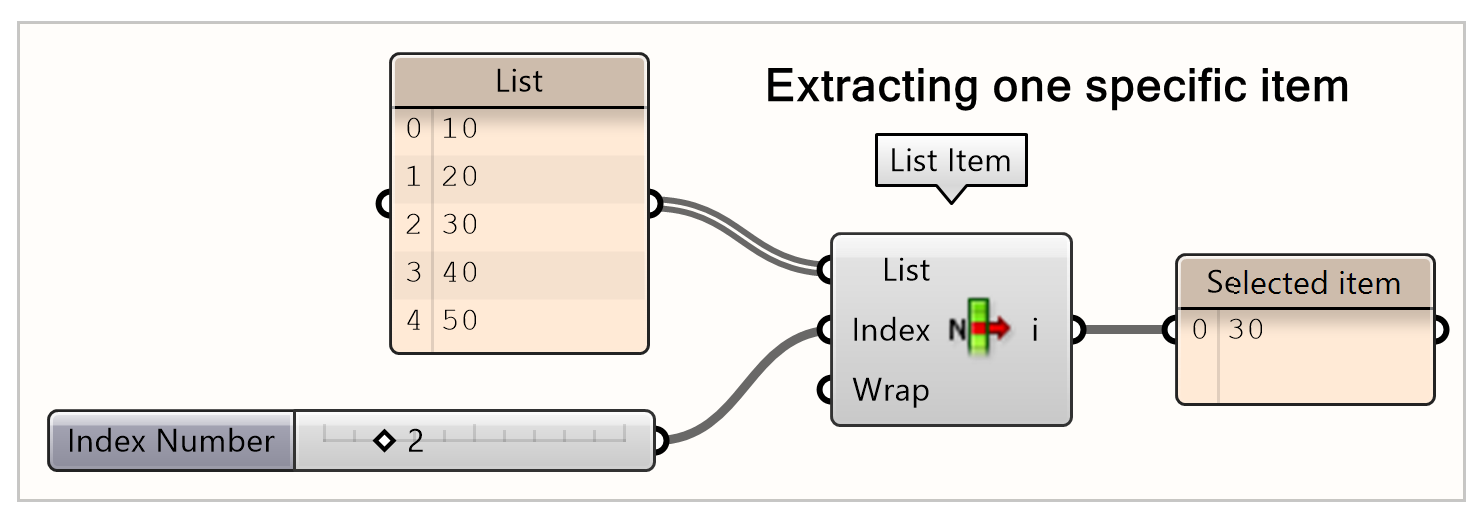
The List item selects an item or multiple items from the list. Input you need to define your list and the index of the specific item you want to select. An index is the number that indicates where an item is in a list. Take note that the indices (numbers in front of the value) in a list start at 0, not at 1. Therefore, by setting the index number on 2 you will select the third item in the list.
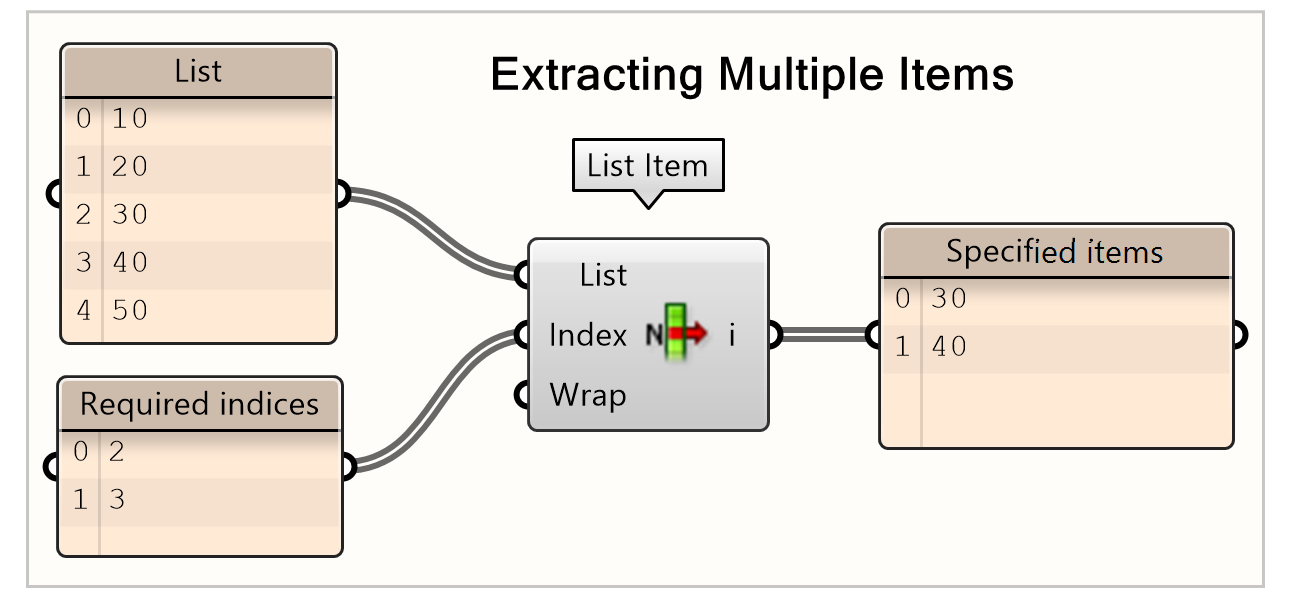
You can also take multiple items from a list by creating a list of indices that you want to select. In this case, we want to select the items with the second and third index. To do that, we create a panel, and we right click to change it from a basic panel to a multiple line panel. Each index we want must be placed in a single line as shown in this example.
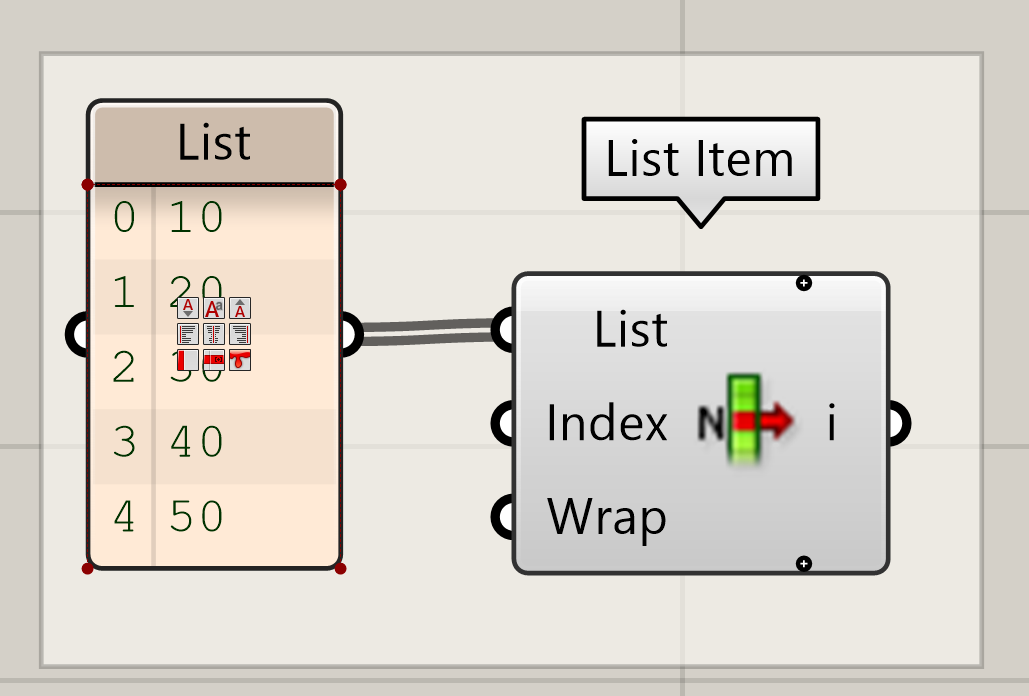
If you want to select multiple items separately you can add list items to select by zooming into the component and clicking on the + icon to insert another parameter (output stream). You can also click on the + icon above the I, then you will get i-1, this is the last index in your list.
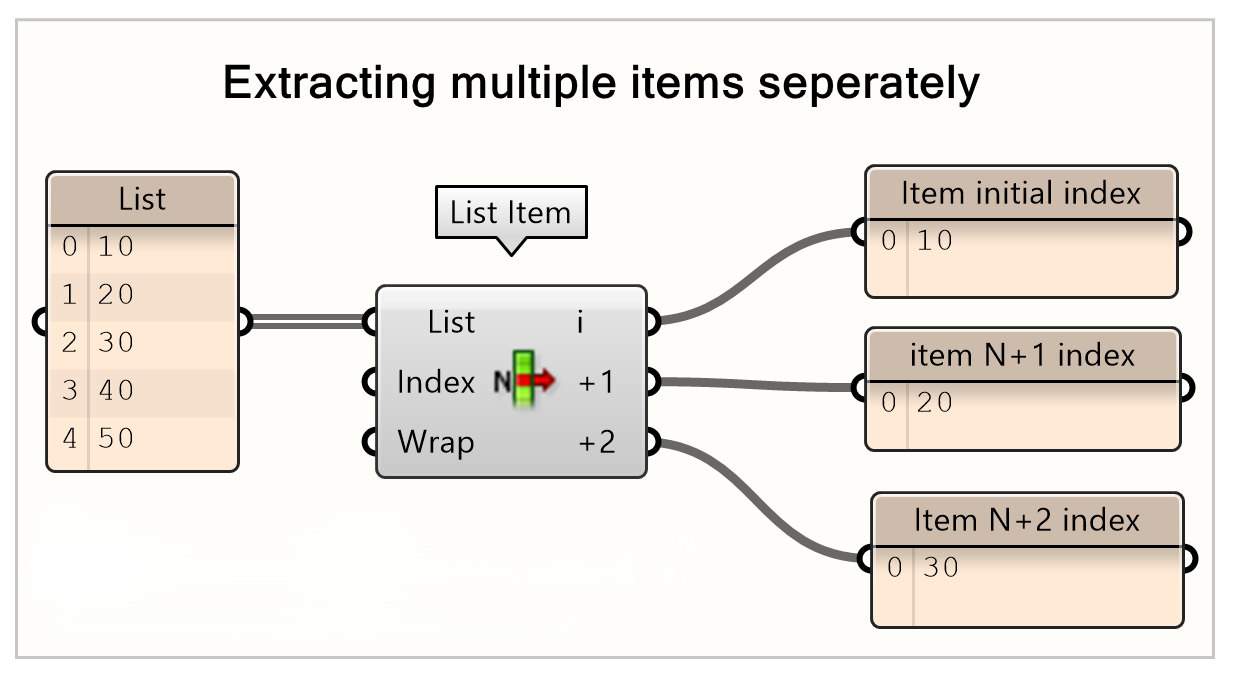
After inserting the number of parameters you want, you can add the panels and visualize which item it is. Usually in list item, the first index corresponds to the first index and item in the original list, the second index corresponds to the second index and item, and so on as shown in this example. You can change the I to be corresponding with the index 0 by inputting a different index number, for example if you input 2 in index then I becomes index 2 and i+1 index 3.
List Length
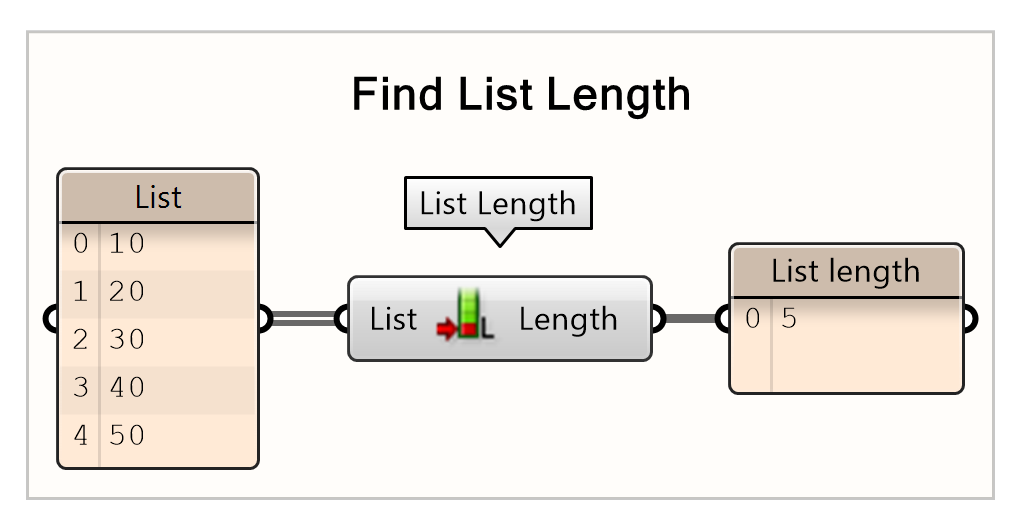
The list Length component returns the number of items in a list. In the second example List Length is used to obtain the last item in the list, regardless of the number of values. This makes this definition parametric.
Note: If you want to work with indices, you need to subtract 1 from this list length. Remember that the highest index is one lower than the total list length as a list index starts from zero.
Reverse List
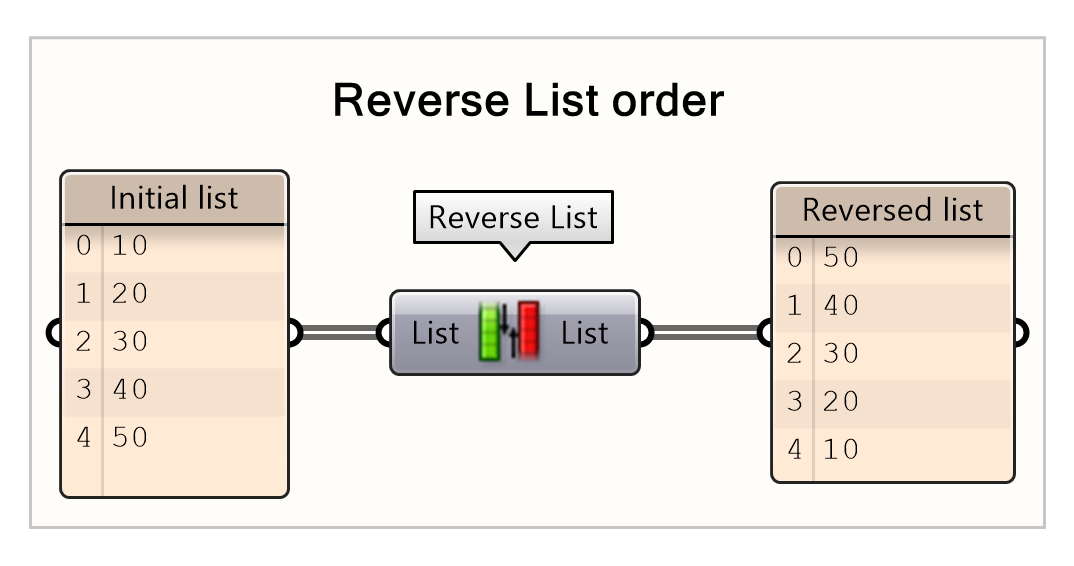
Reverse List is used to reverse the list so then the item in the final index becomes the item in the first index. As shown in the example, the items are now reversed so instead of going from 10 to 50, it now goes from 50 to 10.
Shift List
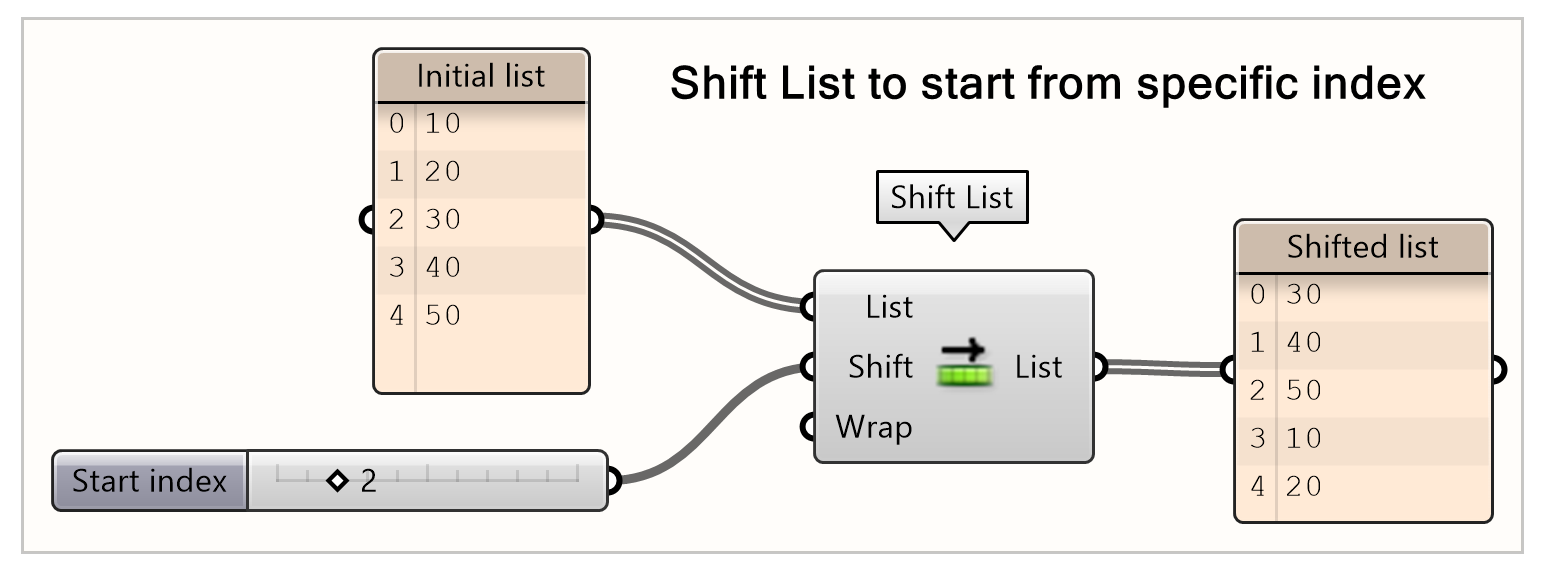
Shift list moves the items in the list by the shift value (S). A positive (S) moves the items up in the list and a negative (S) down. By default Wrap around (W) is set to true, this means that it prevents items from “falling off” the list by moving them to the other end.
Sorting list
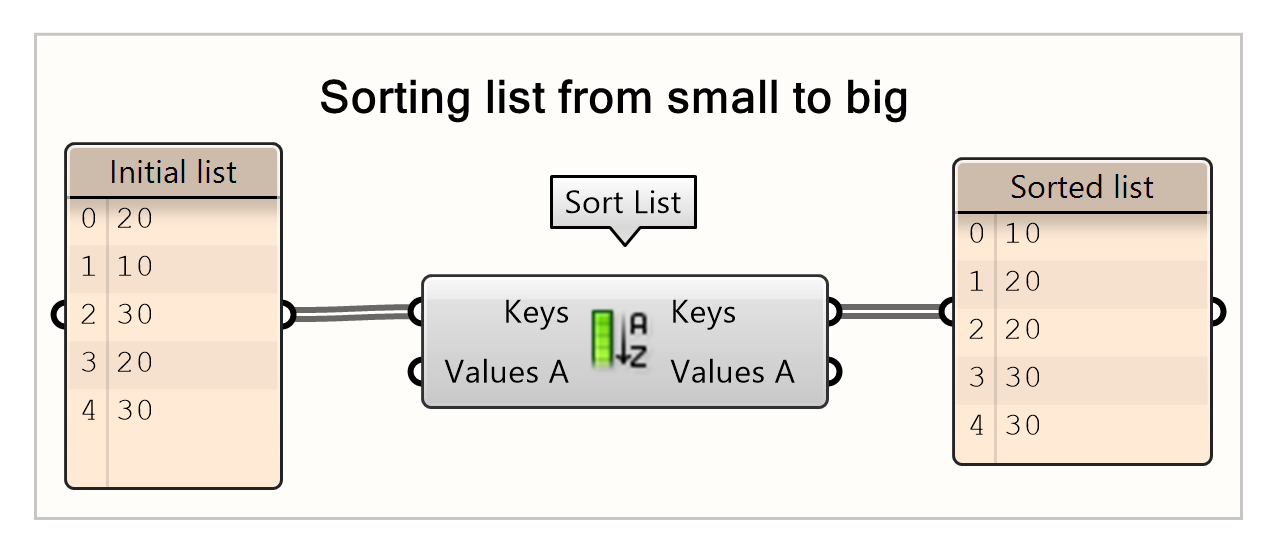
The sort list component can be a very powerful one. Its default functionality is to sort the list (K). Keys is the list that is used to sort, and it is always a numeric list. By default, this component sorts the list from small to big values.
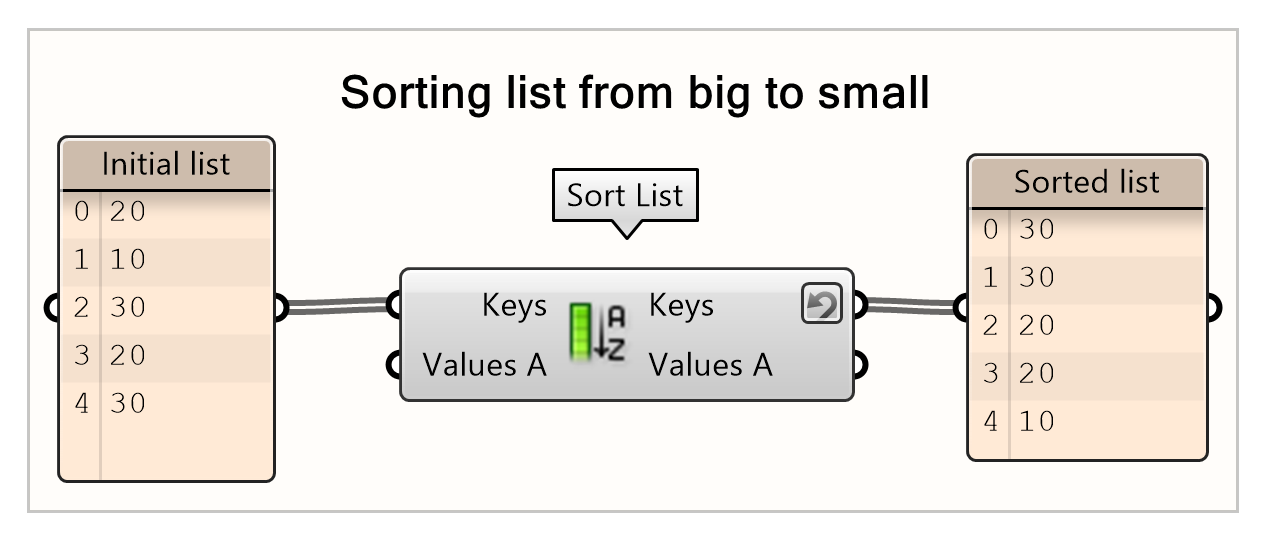
However, you might want the opposite, for the list to be sorted from big to small. By right clicking on the output keys, you can choose the reverse option, which is used to invert any list. In the case of sort list, the list is automatically sorted from big to small.
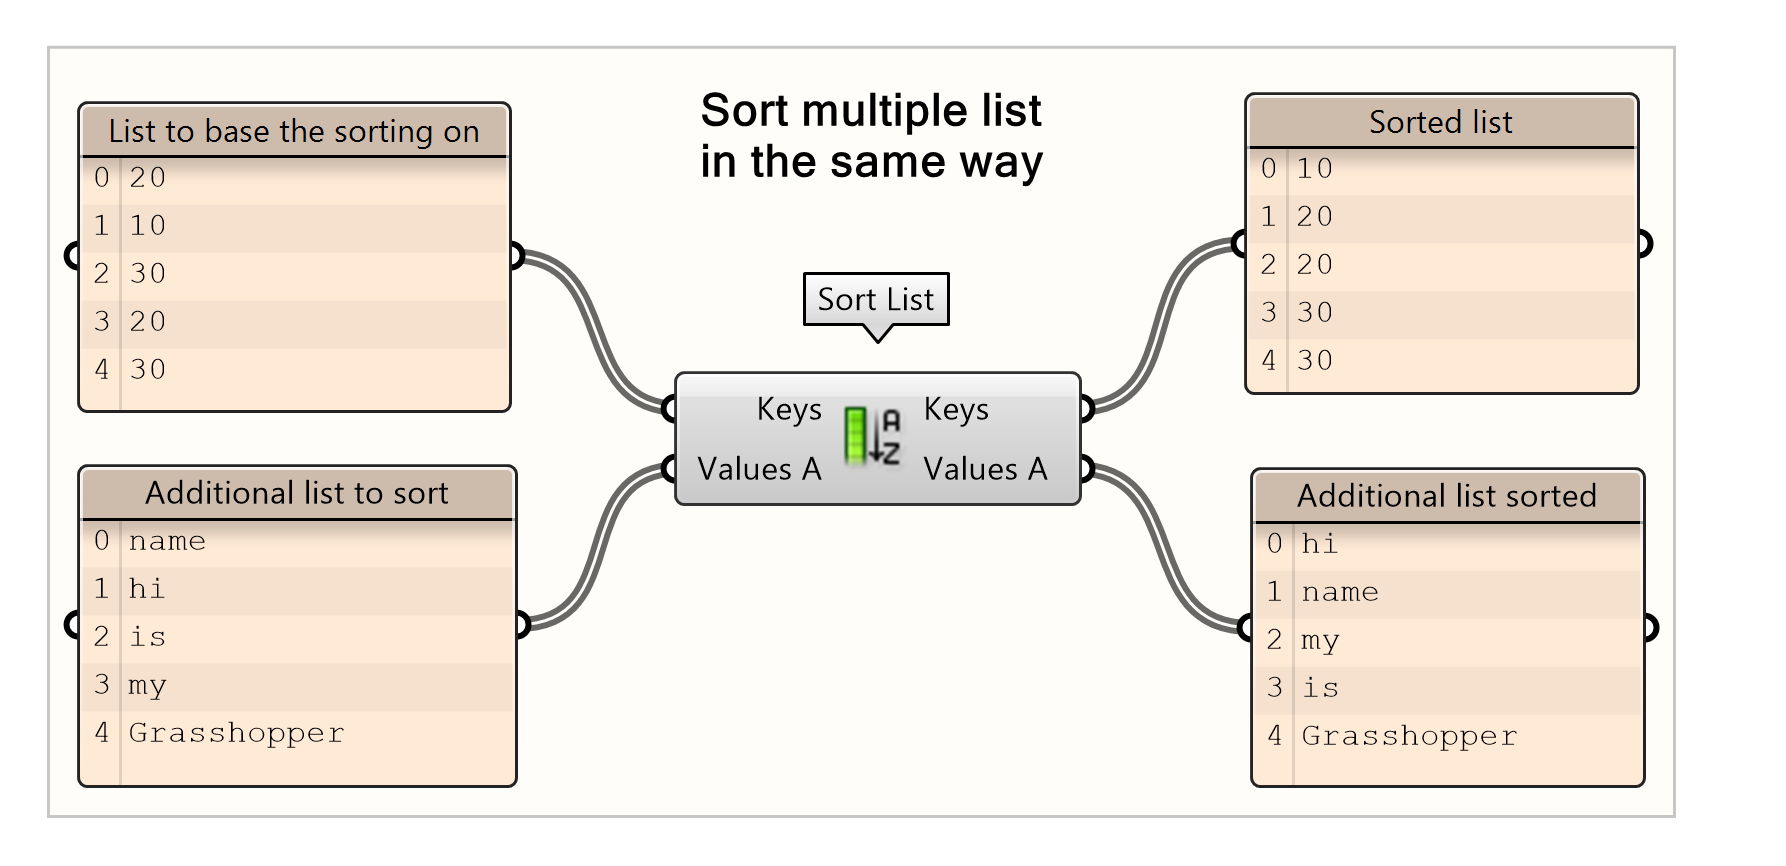
Aside from that input there is the possibility to attach more lists (A, B enc.) These lists will be sorted in the same order as the first list. The content of the secondary lists doesn’t need to be numeric as the first list (K) should be. The second list can be geometry, text etc. For example, you can sort a group of lines based on their length, in this case the length of each line is used as keys (the value to sort) and in input values A goes the list of curves. The output of values A is in this case the list of curves sorted from small to big length as a list of curves.
Note: The other list you want to sort simultaneously as the keys list, has to be the same length as the keys list
Split list
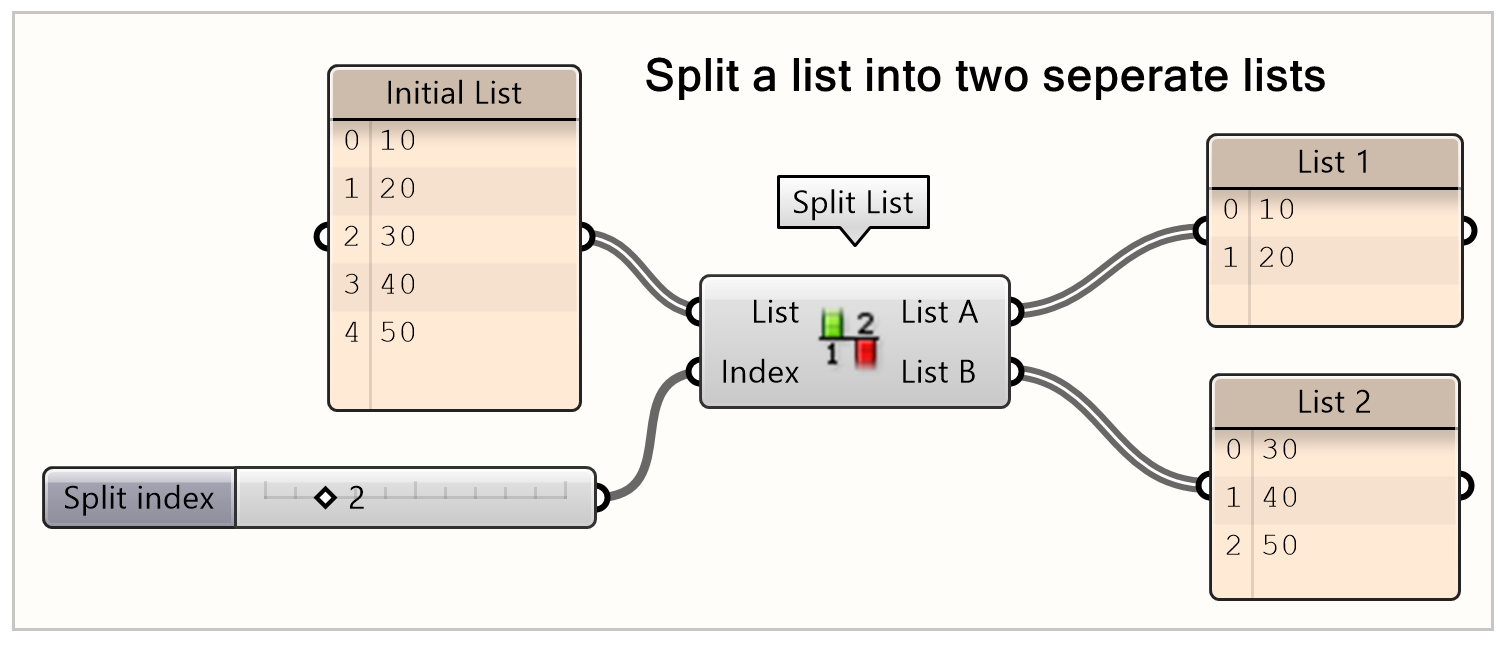
Split list splits a list into two separate list. This can be achieved by choosing the index you want to split from. The second list starts with the index (i). In this example, we want to have the first two items together in a list. The index input is number of the item on the list, which is 2 in this case, then the list is split from the second index. So, we split the list from the second index, which is index 1.
Note: The index number 1 means the first item, which will always be index 0, as lists always start with index 0. So, if you want the third index in the list, you then choose 4 to split from.
Sub List
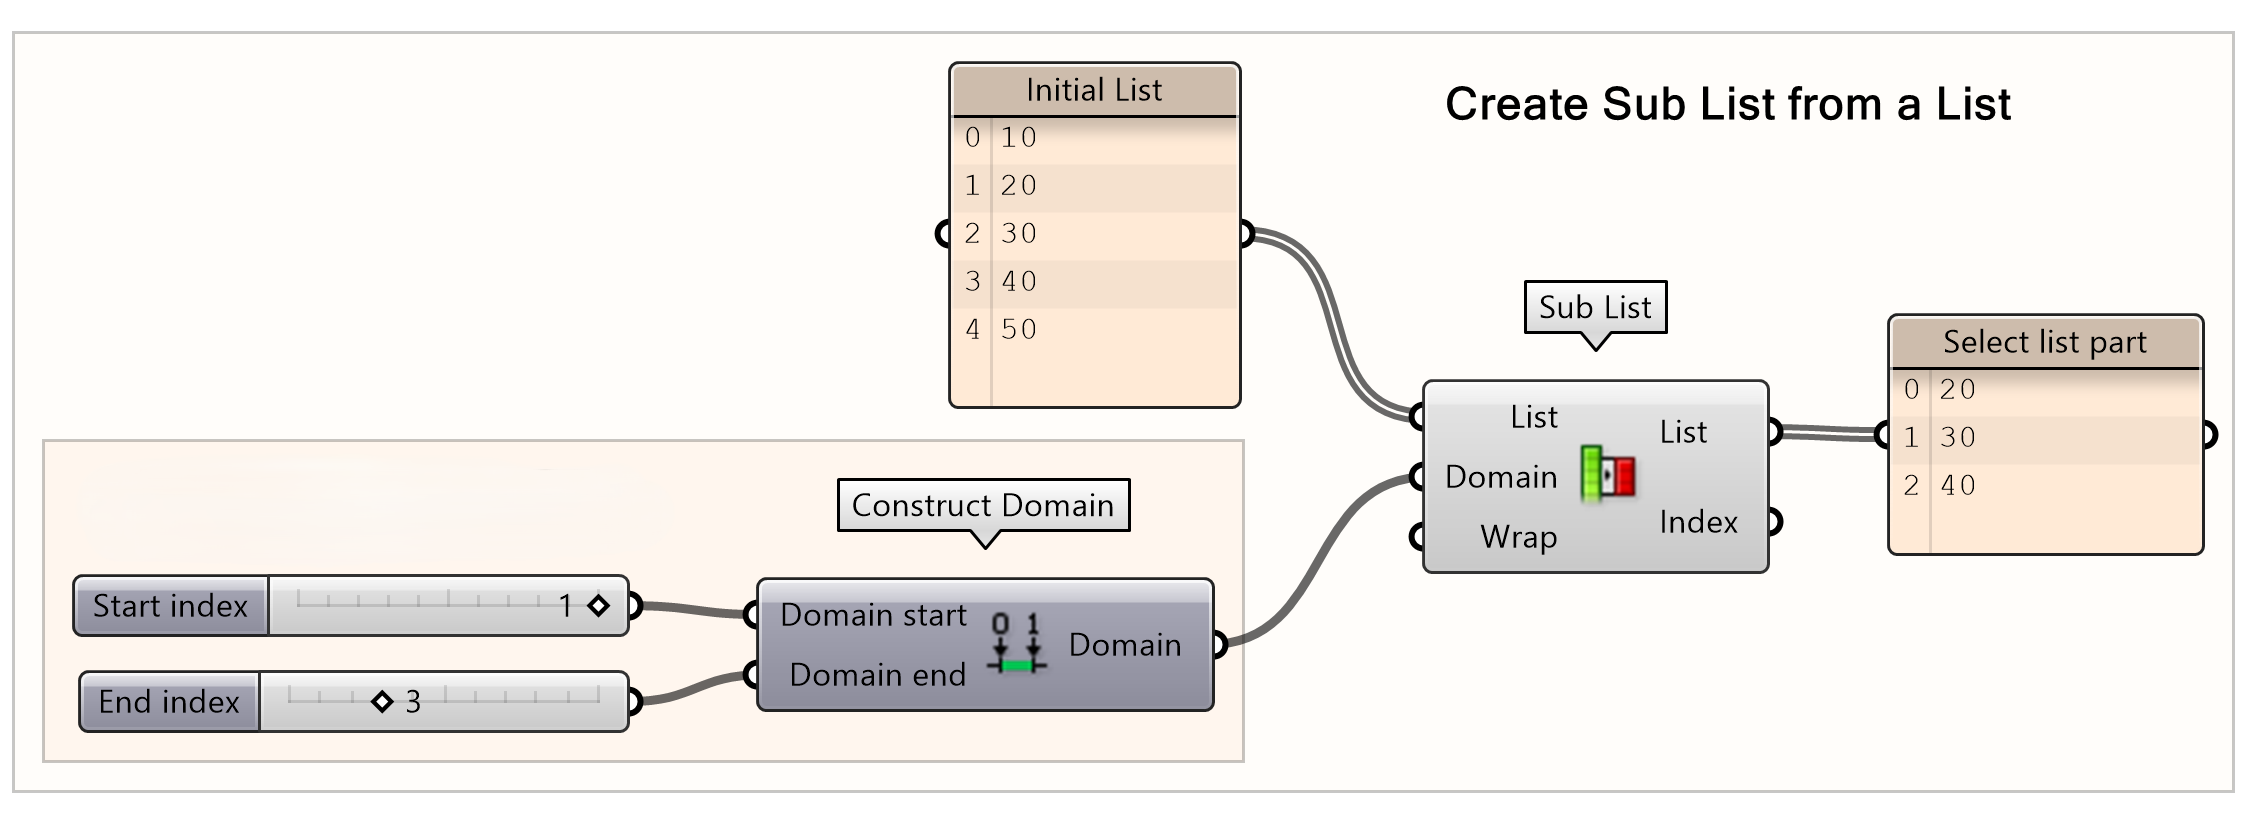
Sub list is a component used to take out a certain part from the list. To do that, a domain needs to be created. The domain is created using the construct domain component. Using this component, you define your minimum and maximum indices. This means the index you want the new sub list to start from and the index you want to end at. Elements outside the specified domain will be eliminated from the output.
Partition list
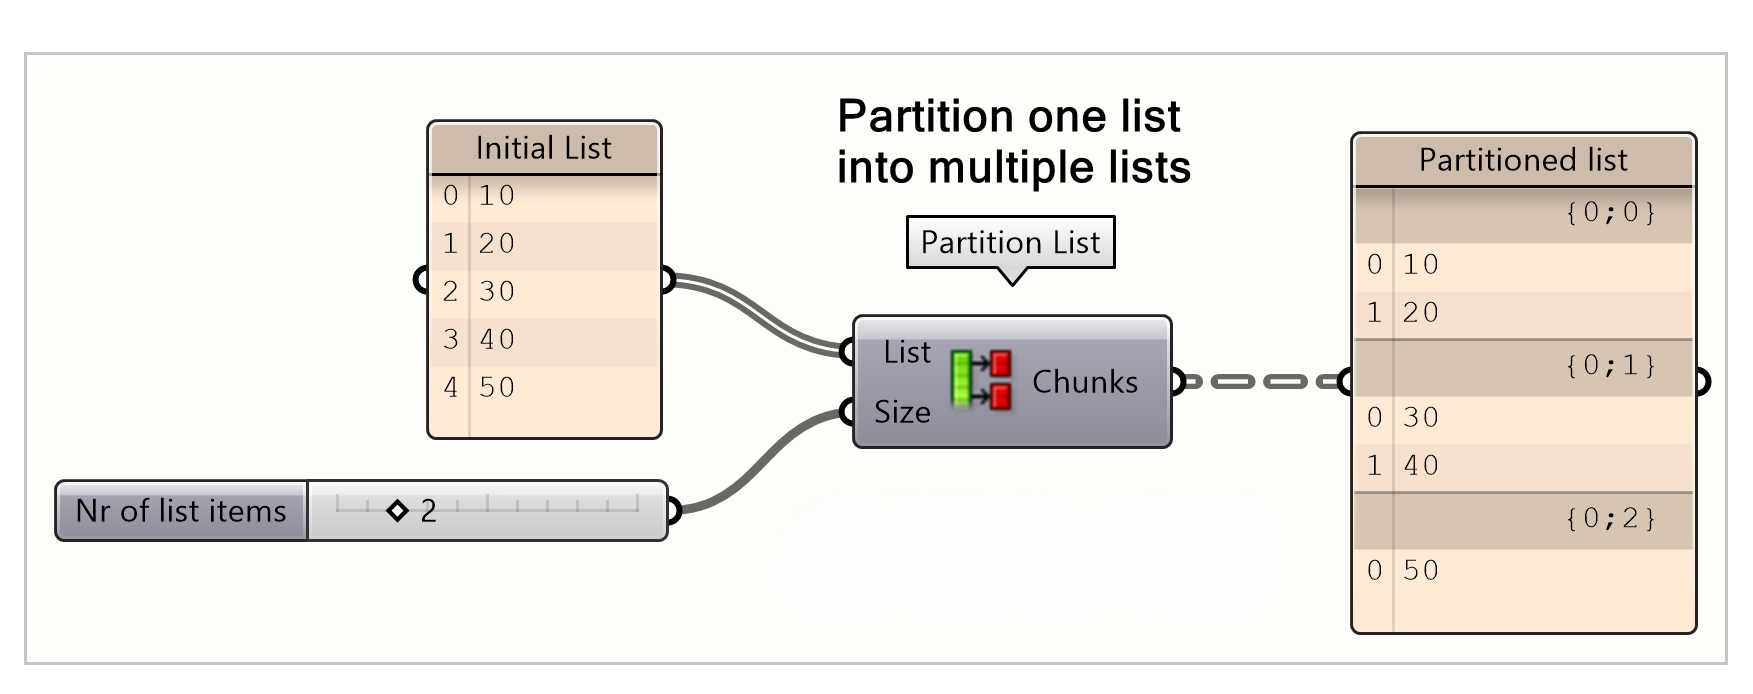
Partition list works as a combination of the “split list” and the “sub list” components. Input (S) sets the split pattern by the number of items each list should contain. This pattern will be repeated until all items are placed. In this example, we want to separate the list into chunks of 2 items. The output is then 3 separate lists all containing two items, except the last one because there are not enough items to continue it.
Note: Note how each partition is outputted as separate lists each first number in a list has the index 0 and each second number has the index 1.
As you can see with the partition list, there are two numbers in between the braces before each chunk. This means that a data tree is created. If you want to learn how to use data trees, follow this tutorial.
Replace Items
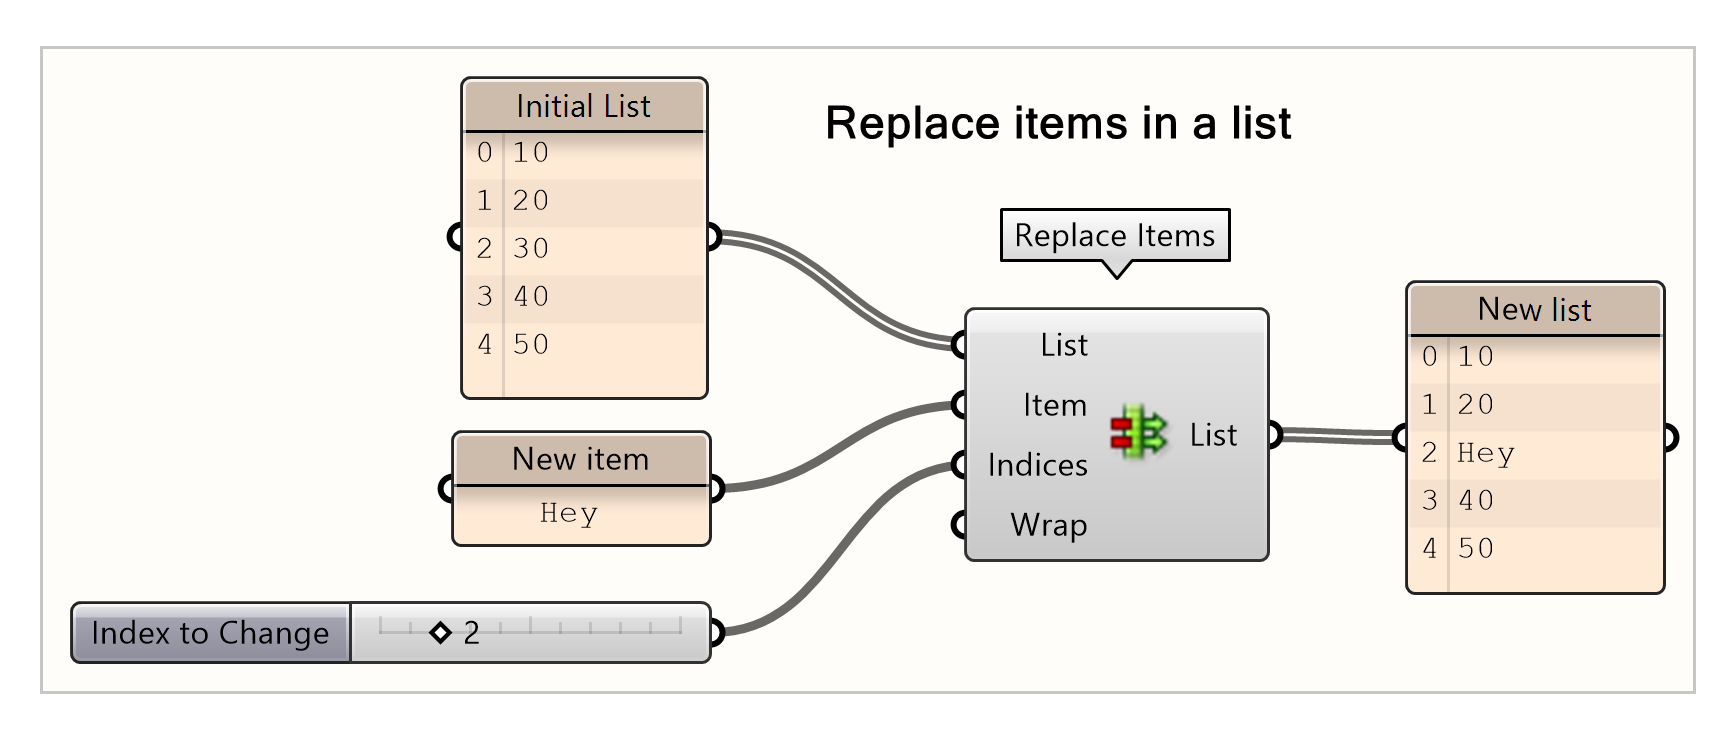
The replace item component replaces a specific index with a different value or string. The item input defines what the item in the specified index should be replaced with. In this example, index 2 is defined to be changed. The item in index 2 is then changed from a number,40, to a string, ‘Hey’, according to what is connected to the item input.
Basic list action 3/7
Cull Actionslink copied
Now that we have discussed the methods to change lists by moving items, it is important to look at the cull options. Cull nodes are used to remove one or multiple items from a list. The cull components can be found under:
Cull Index
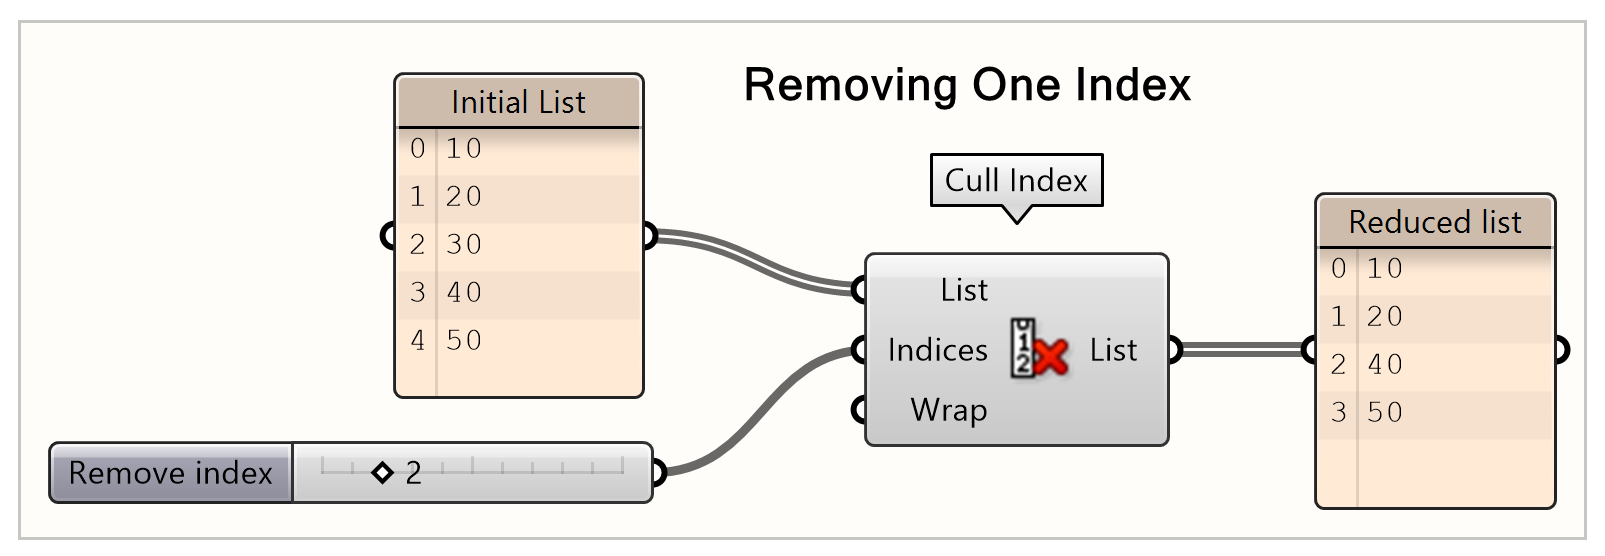
Cull index is a component used to remove the item of one or multiple indices of a list. In the first example, the item with index two is selected so be removed. The output is then a list without that item, and the list gets shorted.
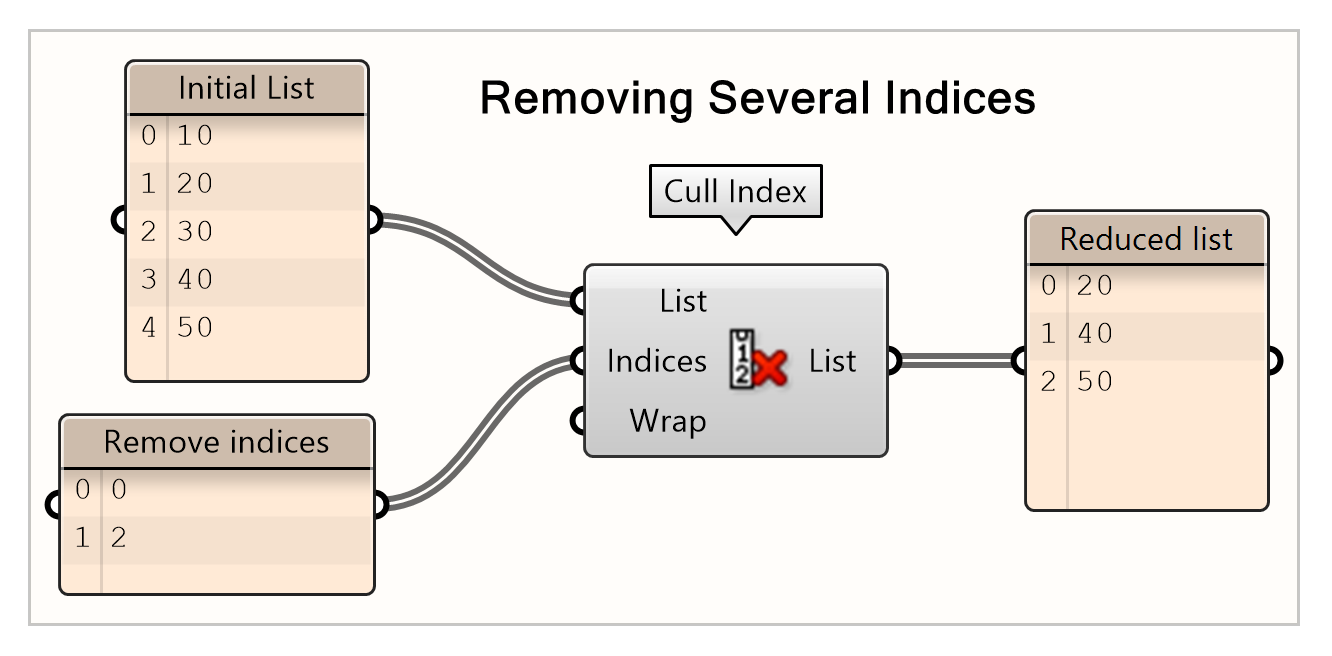
Alternatively, you can remove multiple items from a list. In this example, indices 0 and 2 are selected to be removed from the list by inputting a multiline panel.
Cull Nth
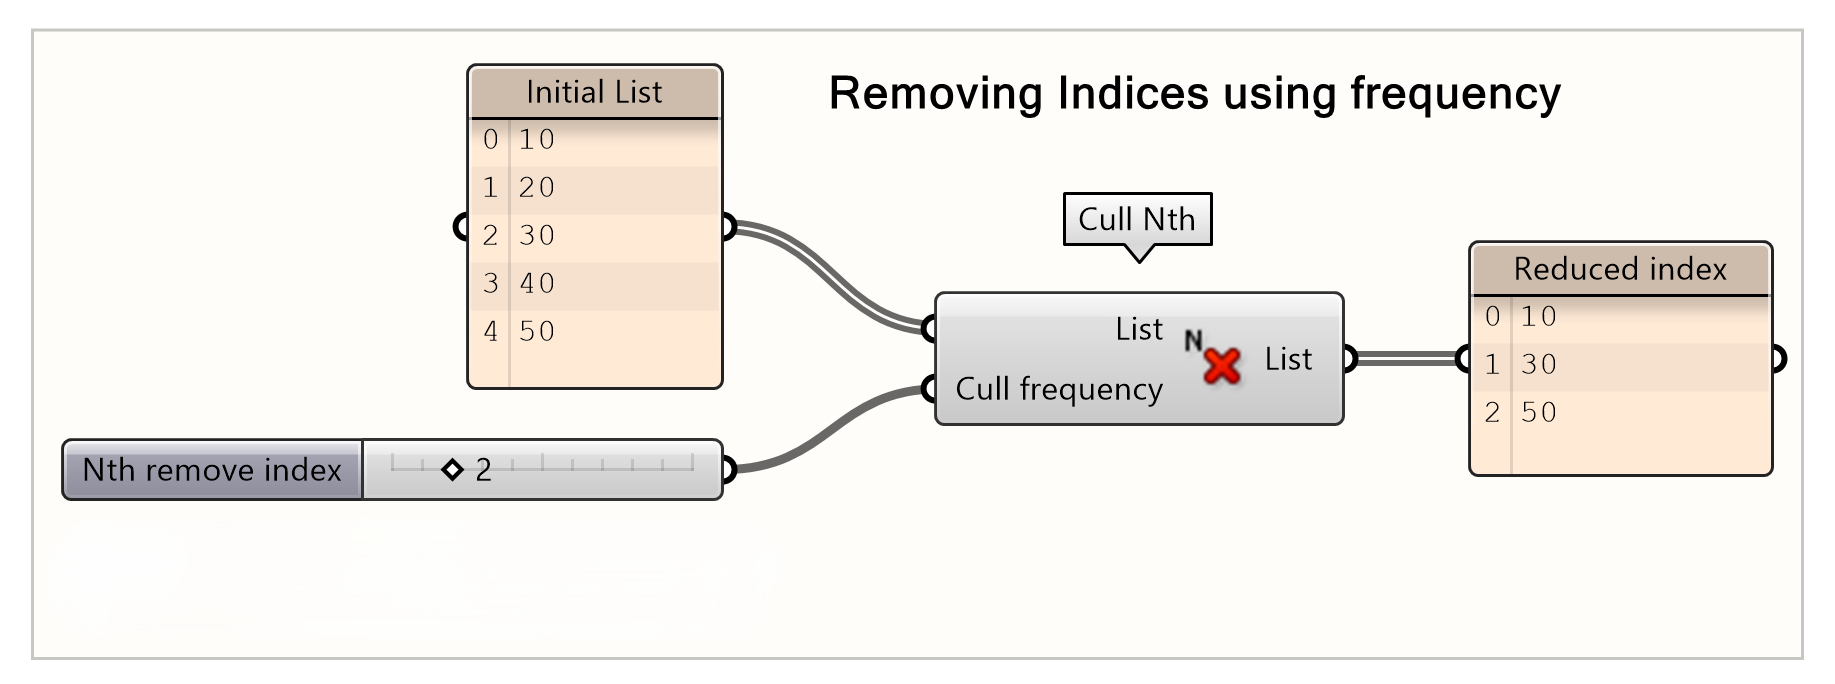
Remove every Nth item of a list. The Cull frequency holds the N input. In this example, every 2nd number is removed from the list. So, indices 1 and 3 are removed from the list.
Cull Pattern
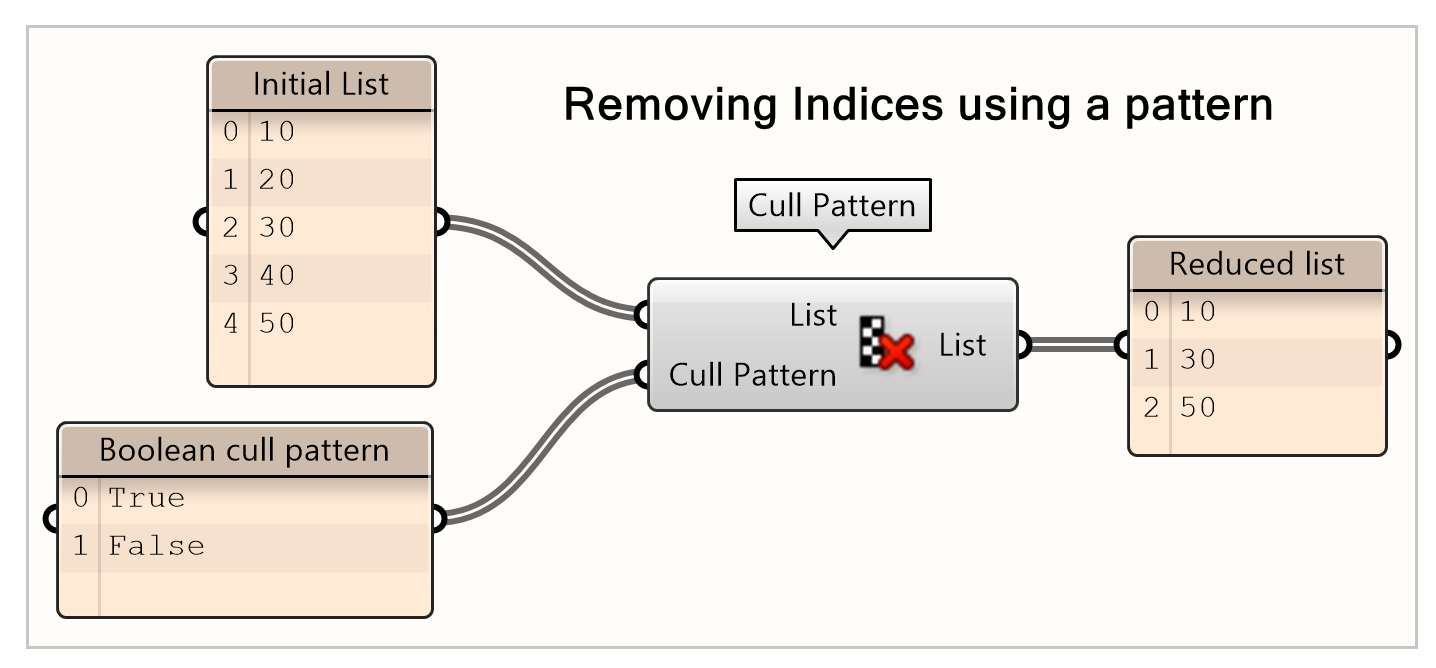
Cull pattern is a component used to remove items from a list according to a specific pattern. The cull pattern can be indicated with a True-False Boolean pattern. For example, the pattern: keep, remove. Which can be indicated with True, False.
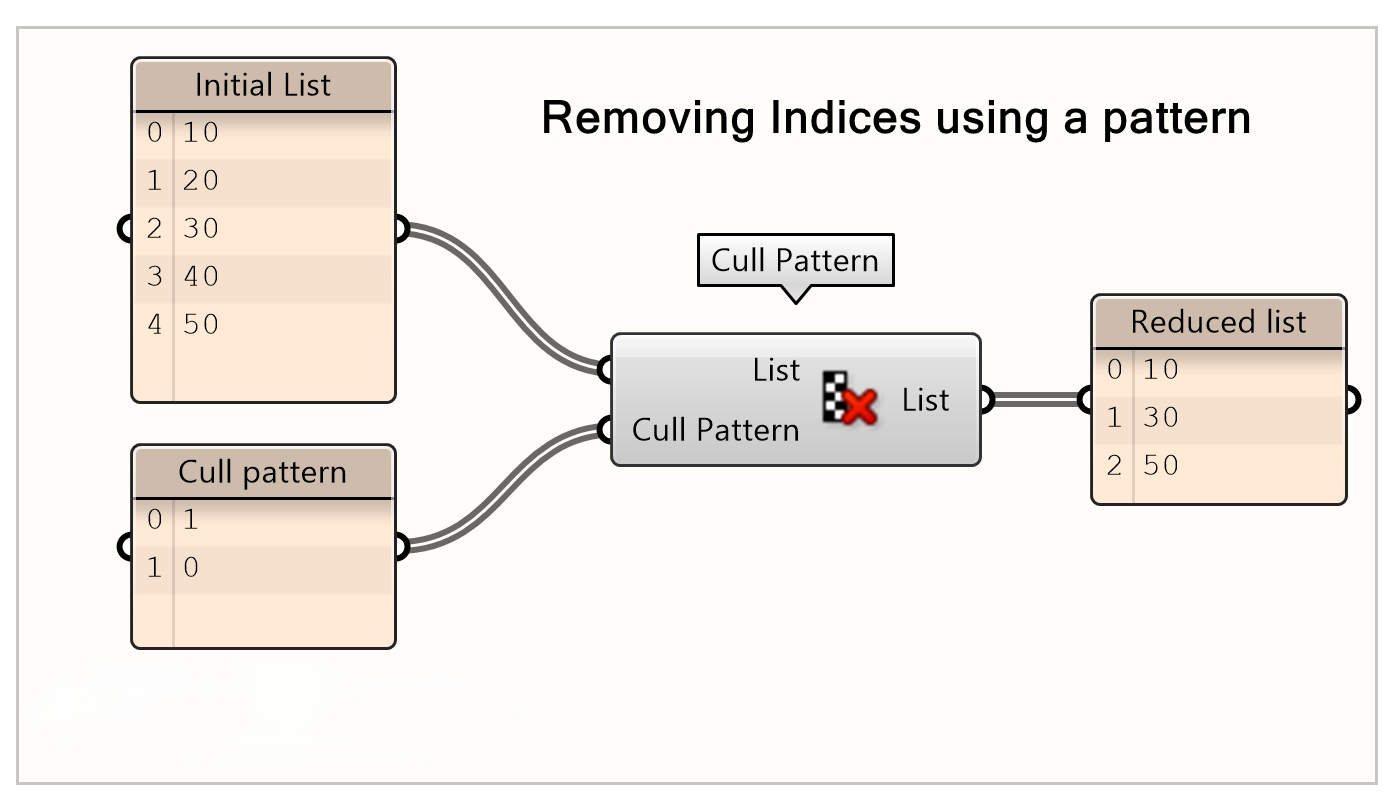
Any pattern can be used as long as it indicates whether or not the item should be removed. The method of 0 and 1 can be used to indicate a pattern. Whereas 0 being False and 1 being True. In this example, you can create the exact same pattern as before, being: keep, remove by making a panel with 1, 0.
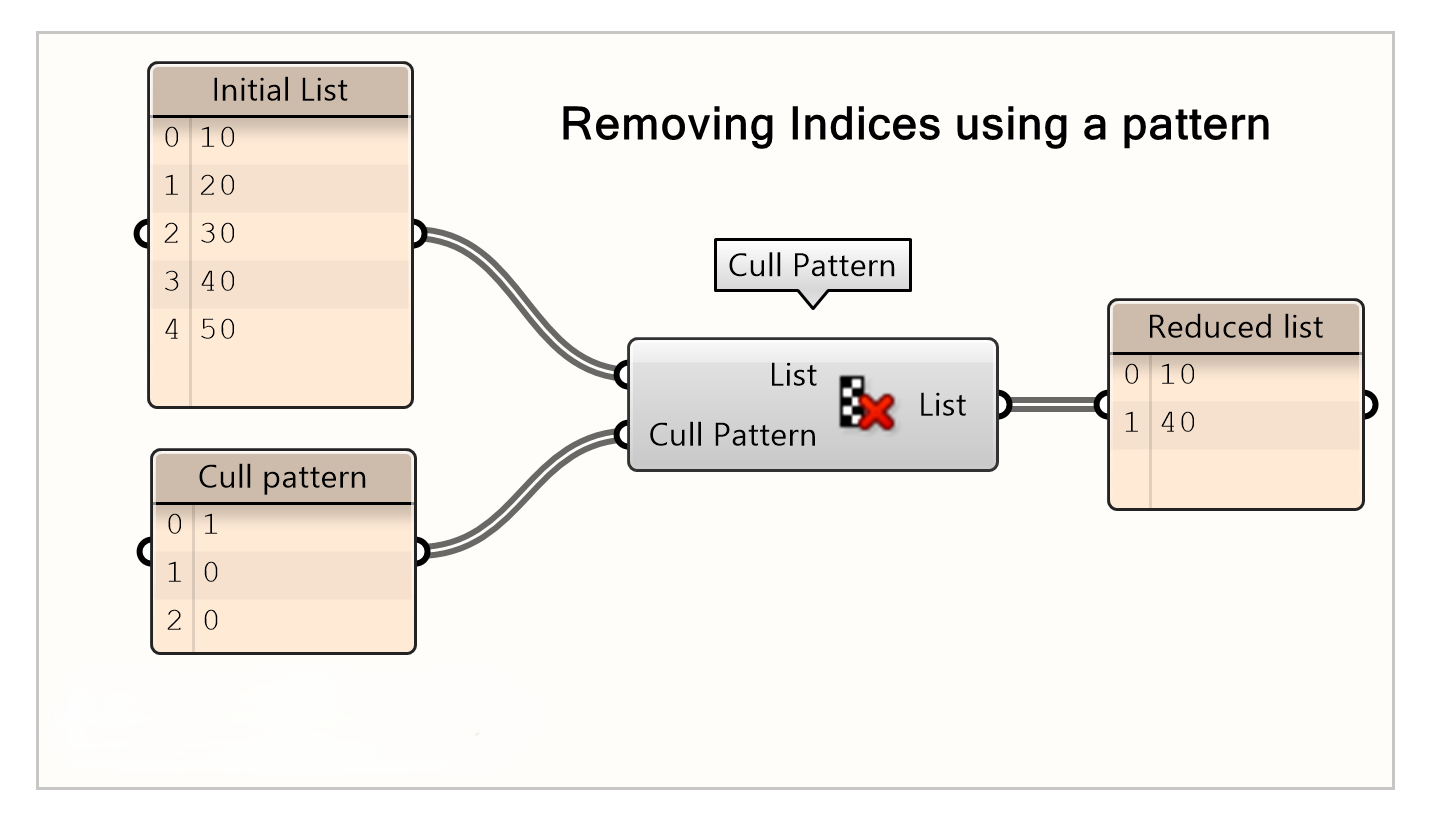
The cull pattern you want to indicate can be of any length. For example, you can create a pattern where you want to keep an item and remove the following 2 items. In this case, the cull pattern will be 1, 0, 0.
Basic list action 4/7
Advanced list editing toolslink copied
After creating or generating one or more lists you might find that change, combine, or adapt your lists according to specific rules. In this section, you will find the advanced actions you need to set the rules required to adapt your lists to the functions you need. The advanced list actions components can be found under:
Dispatch
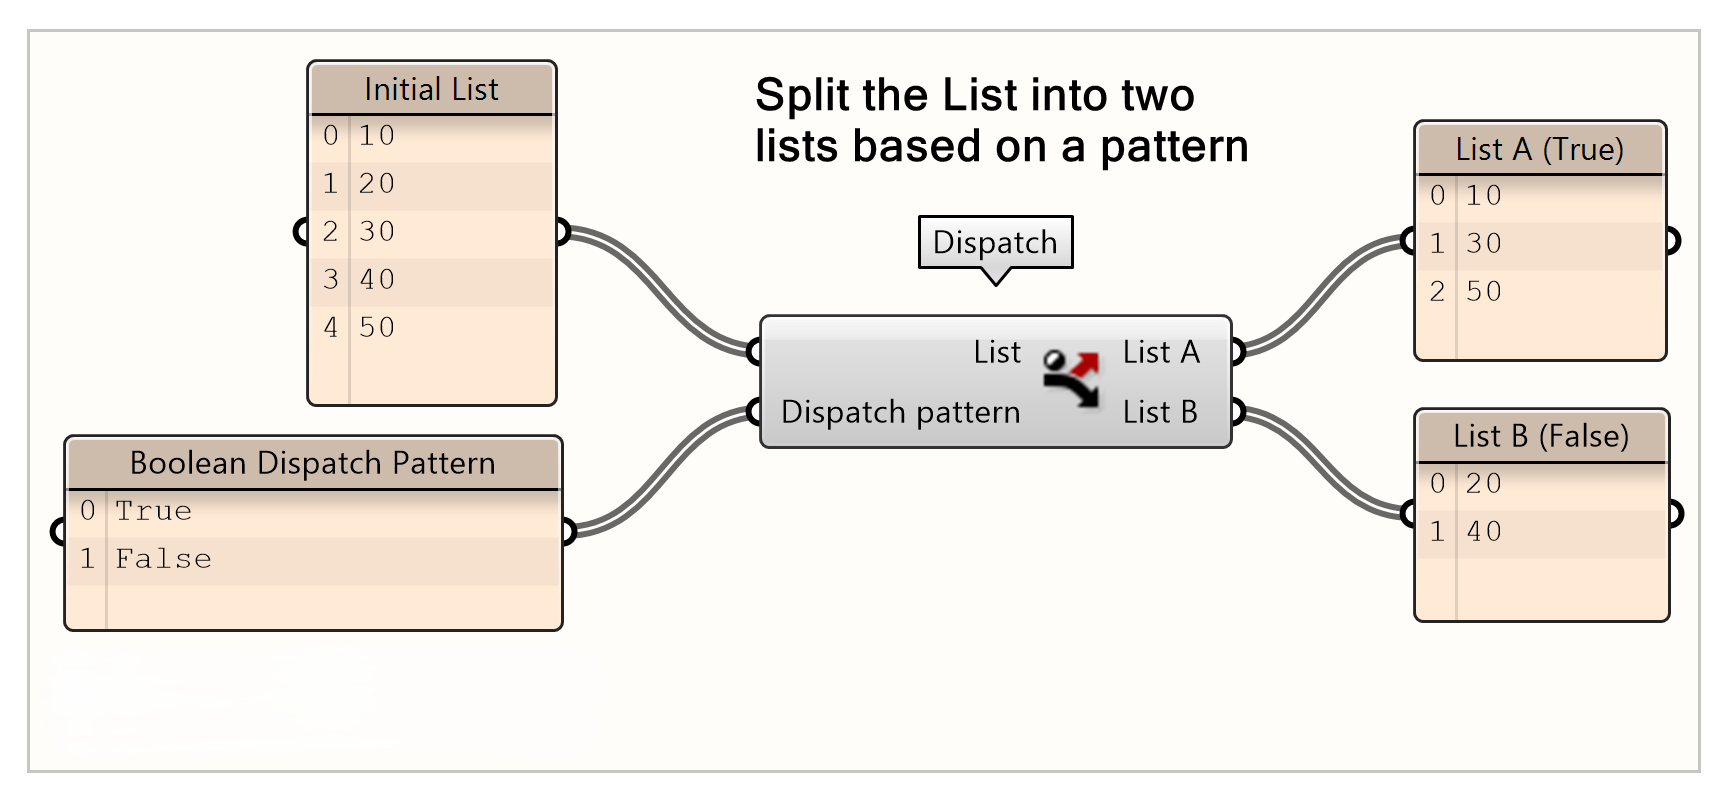
The Dispatch component allows you to separate a list into two separate list according to a pattern. If the items in a list are true according to the pattern provided, then they will fall under list A. Otherwise, they will fall under list B. In this example, we use a direct Boolean pattern.
Sift Pattern
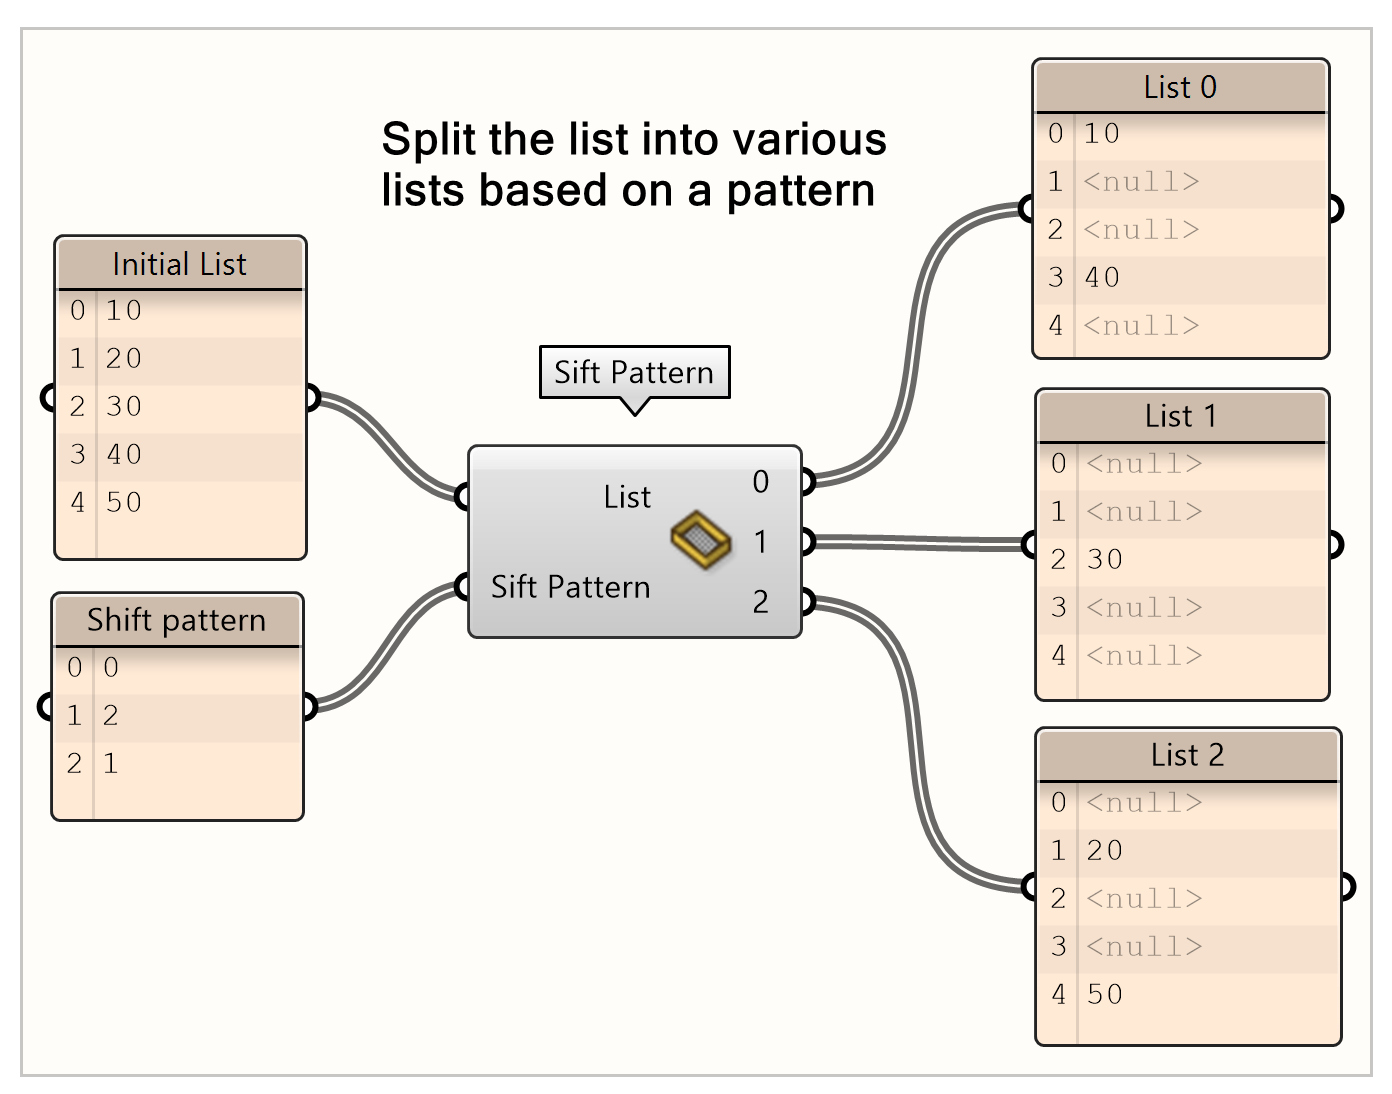
Sift pattern can separate items in a list by creating multiple lists according to a pattern. In this example we separate one list into three different lists: List 0, List 1, and List 2. In the sift pattern input, we assign each index from the initial list to one of the output lists.
Merge
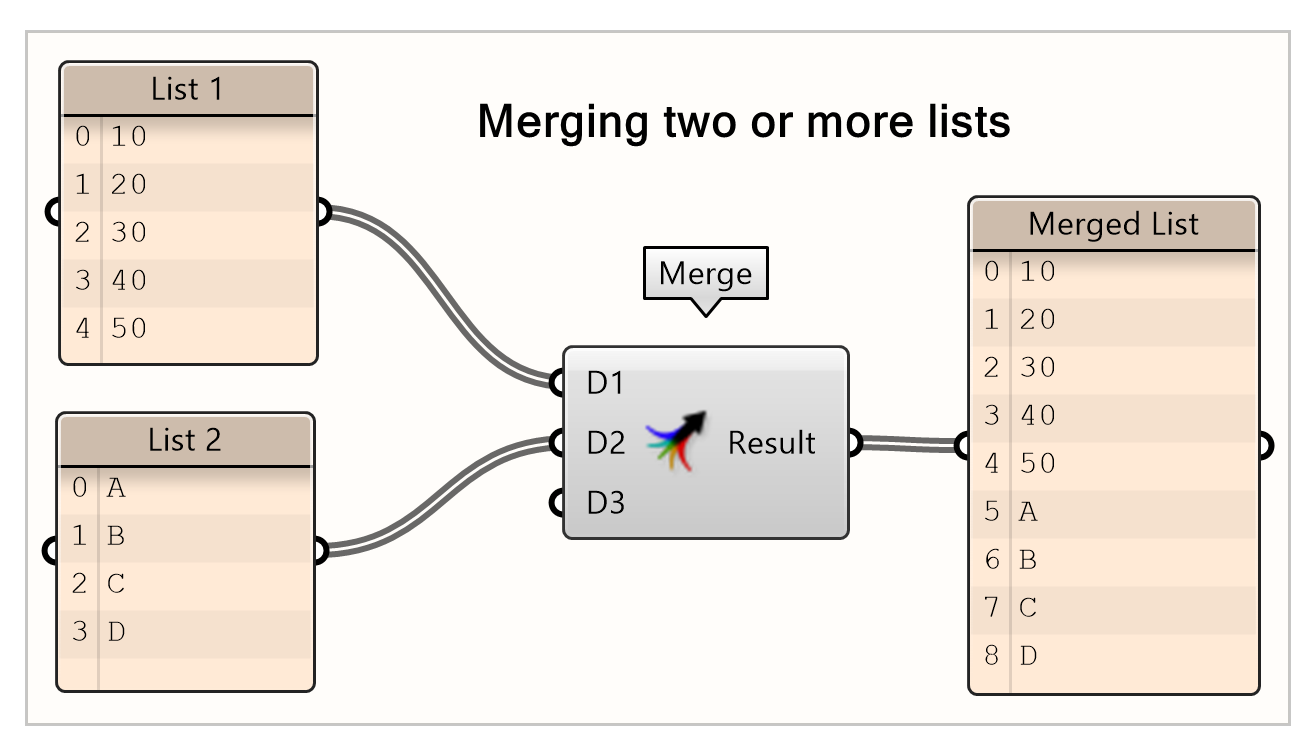
The merge component is used to merge two or more different lists. By default, it first places the first full list and then after that the second list.
Weave
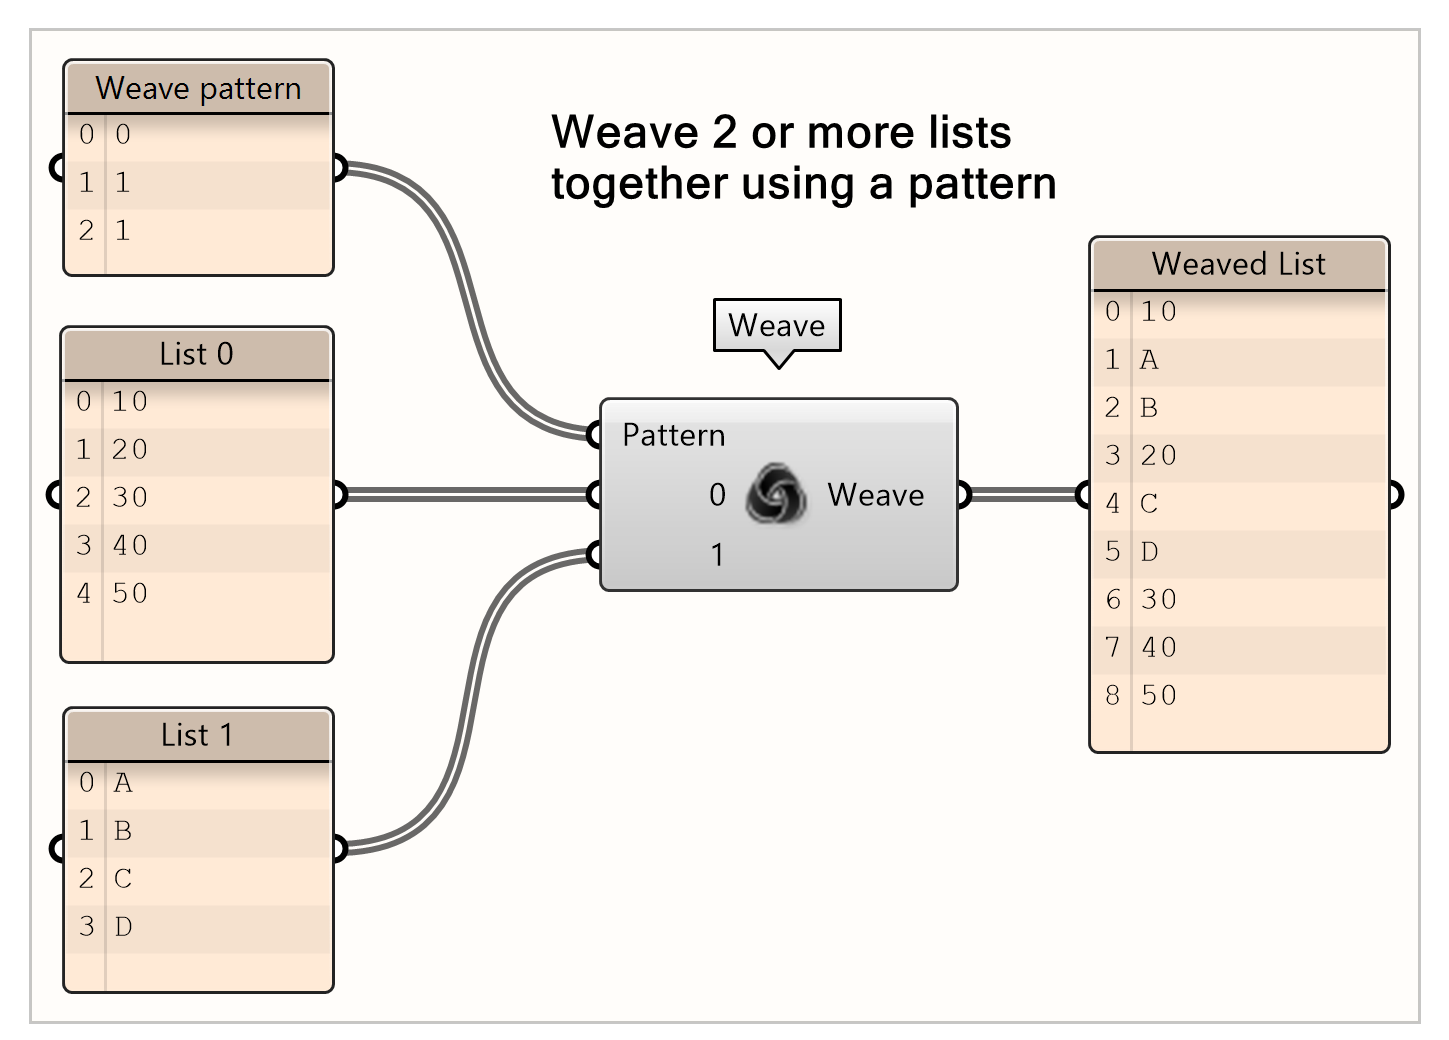
Weave does the opposite of dispatch. Weave combines two or more lists into one, also based on a pattern. This component can combine lists of different types of items. In this example we combine a numerical list and a string list according to a specific pattern.
Pick ‘N Choose
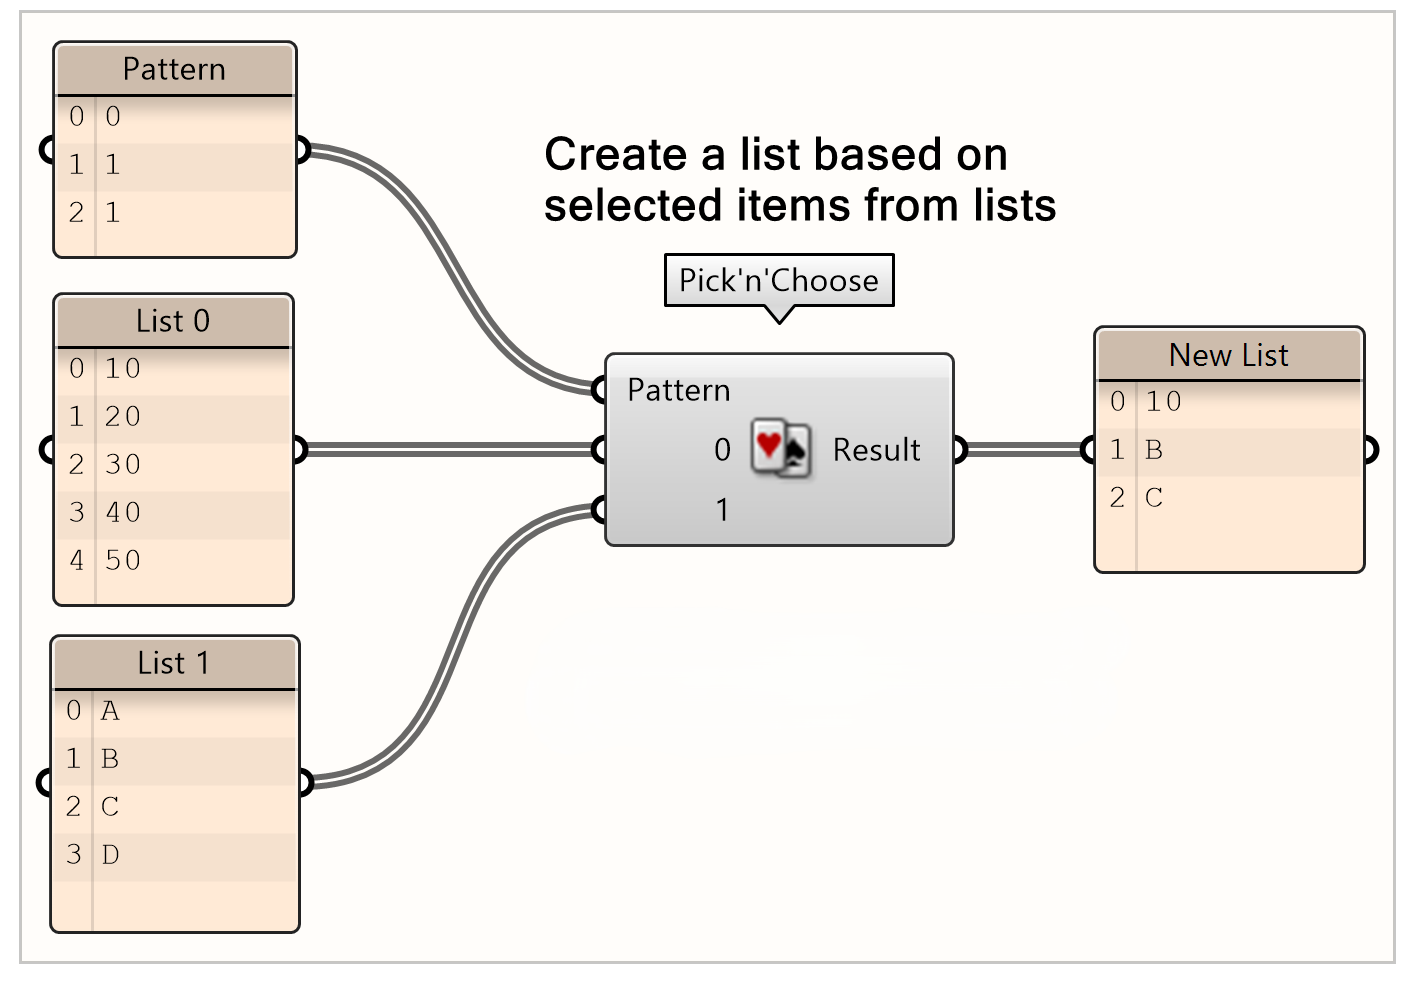
The Pick ’n Choose component creates a new list from two or more lists using a pattern. In this example, the pattern indicates that the first index will be taken from the first list, while the following two indices will be taken from the second list.
Note: The index in the pattern corresponds to the index in the list. Ex: index 1 in the pattern is item B in the second list.
Stream Filter
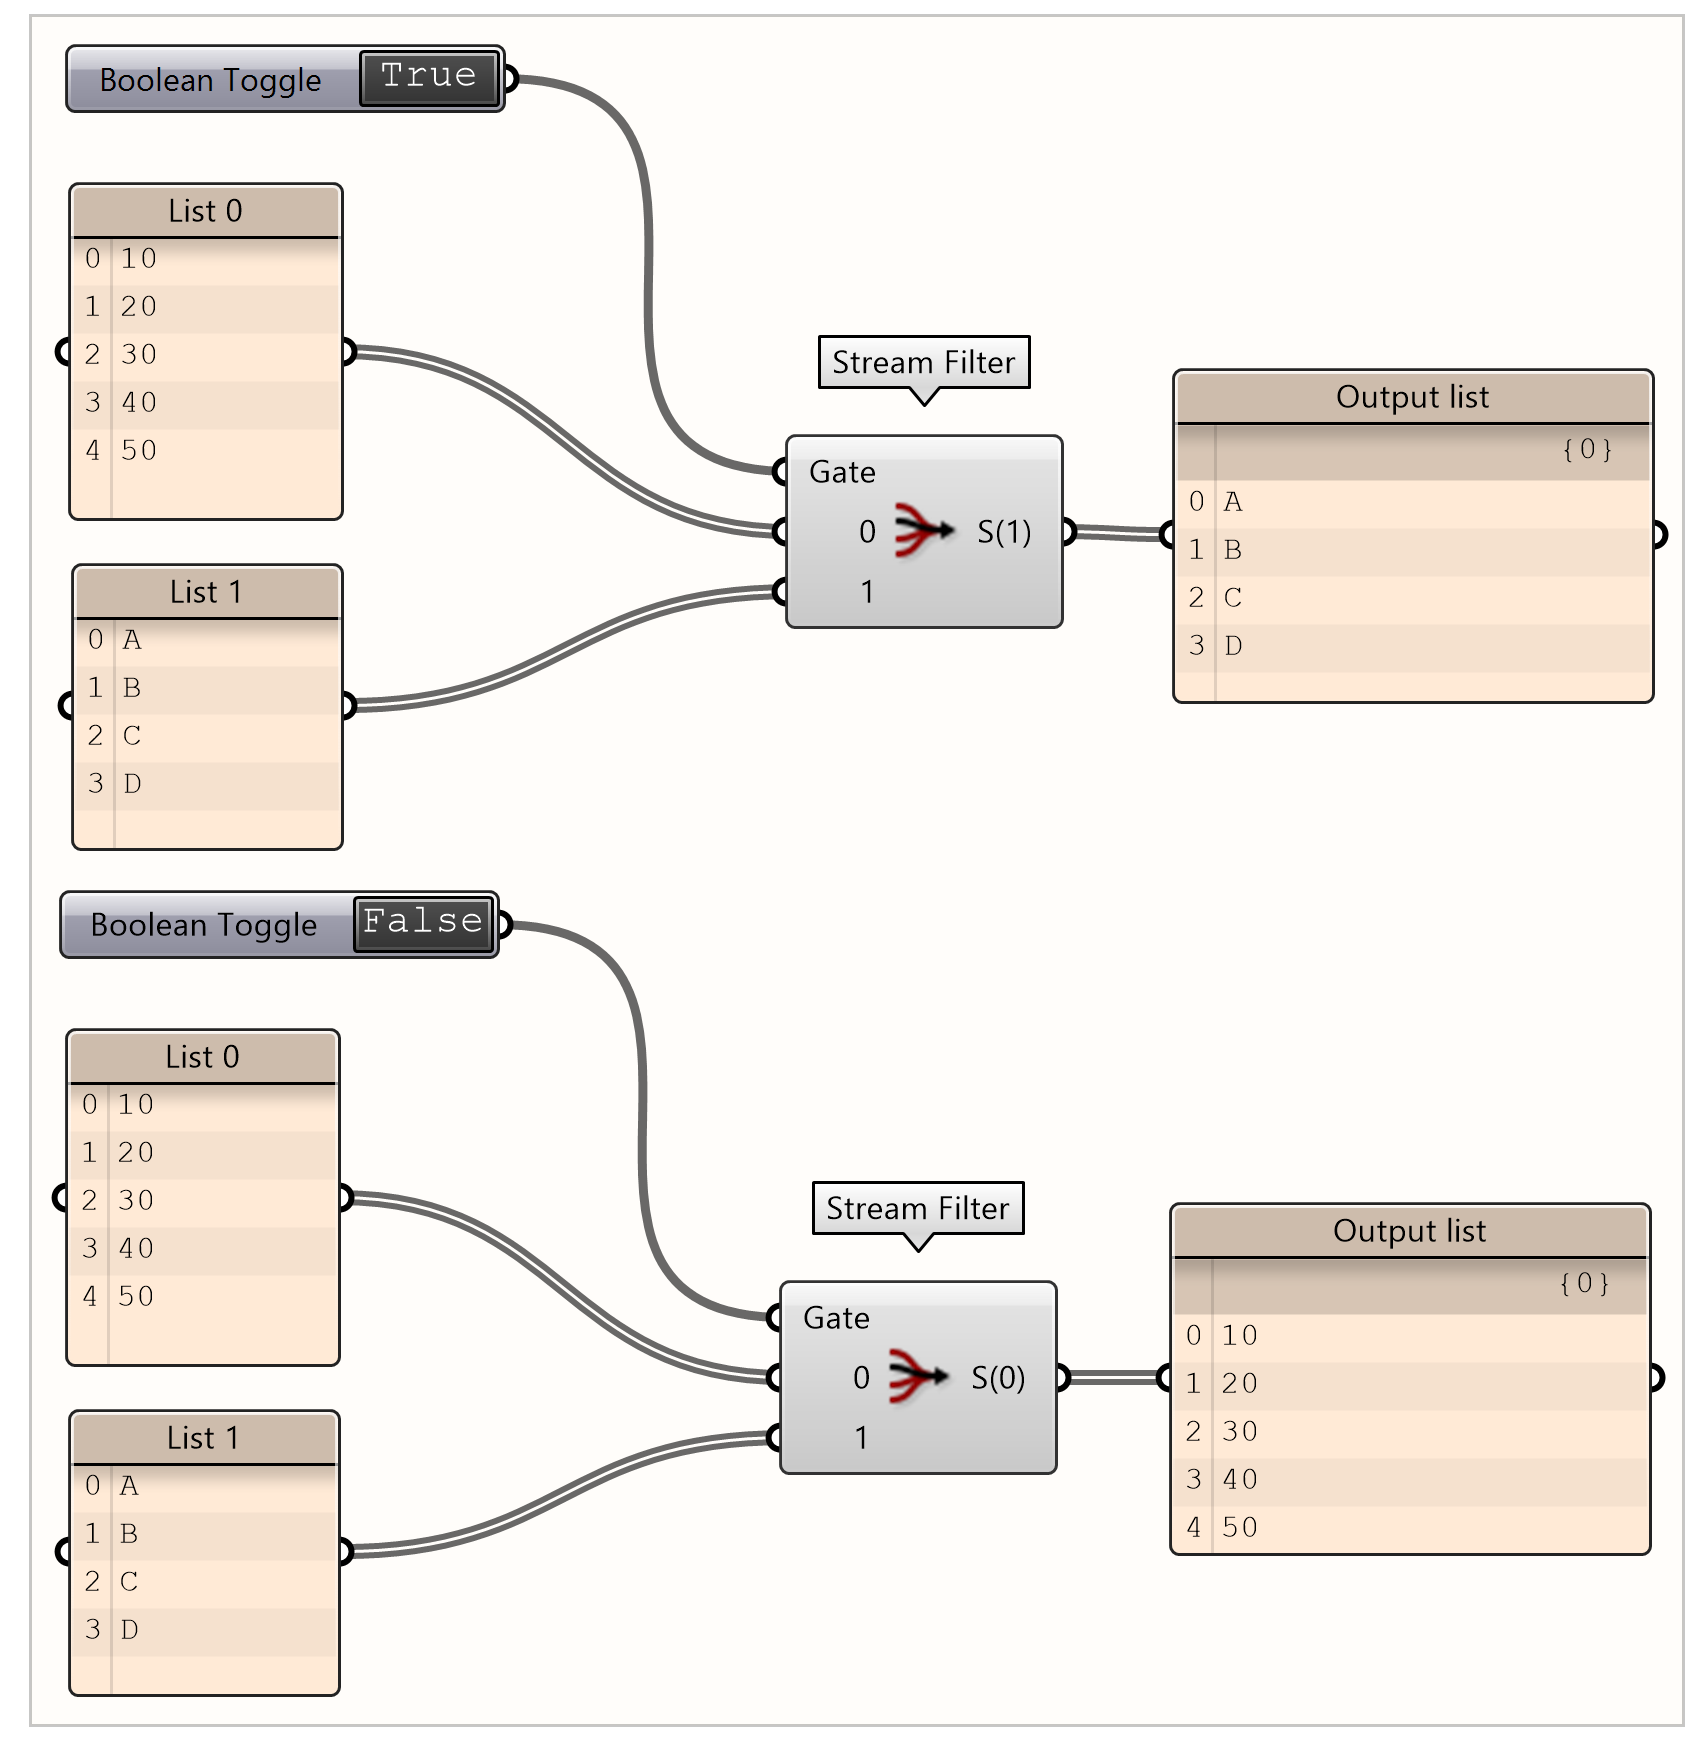
The stream filter is a simple method of switching between two or more lists by simply selecting the wanted list by its input number. This input number can be defined within the network and thereby can change depending on a variety of settings influencing which list is passed through the filter.
Stream Gate
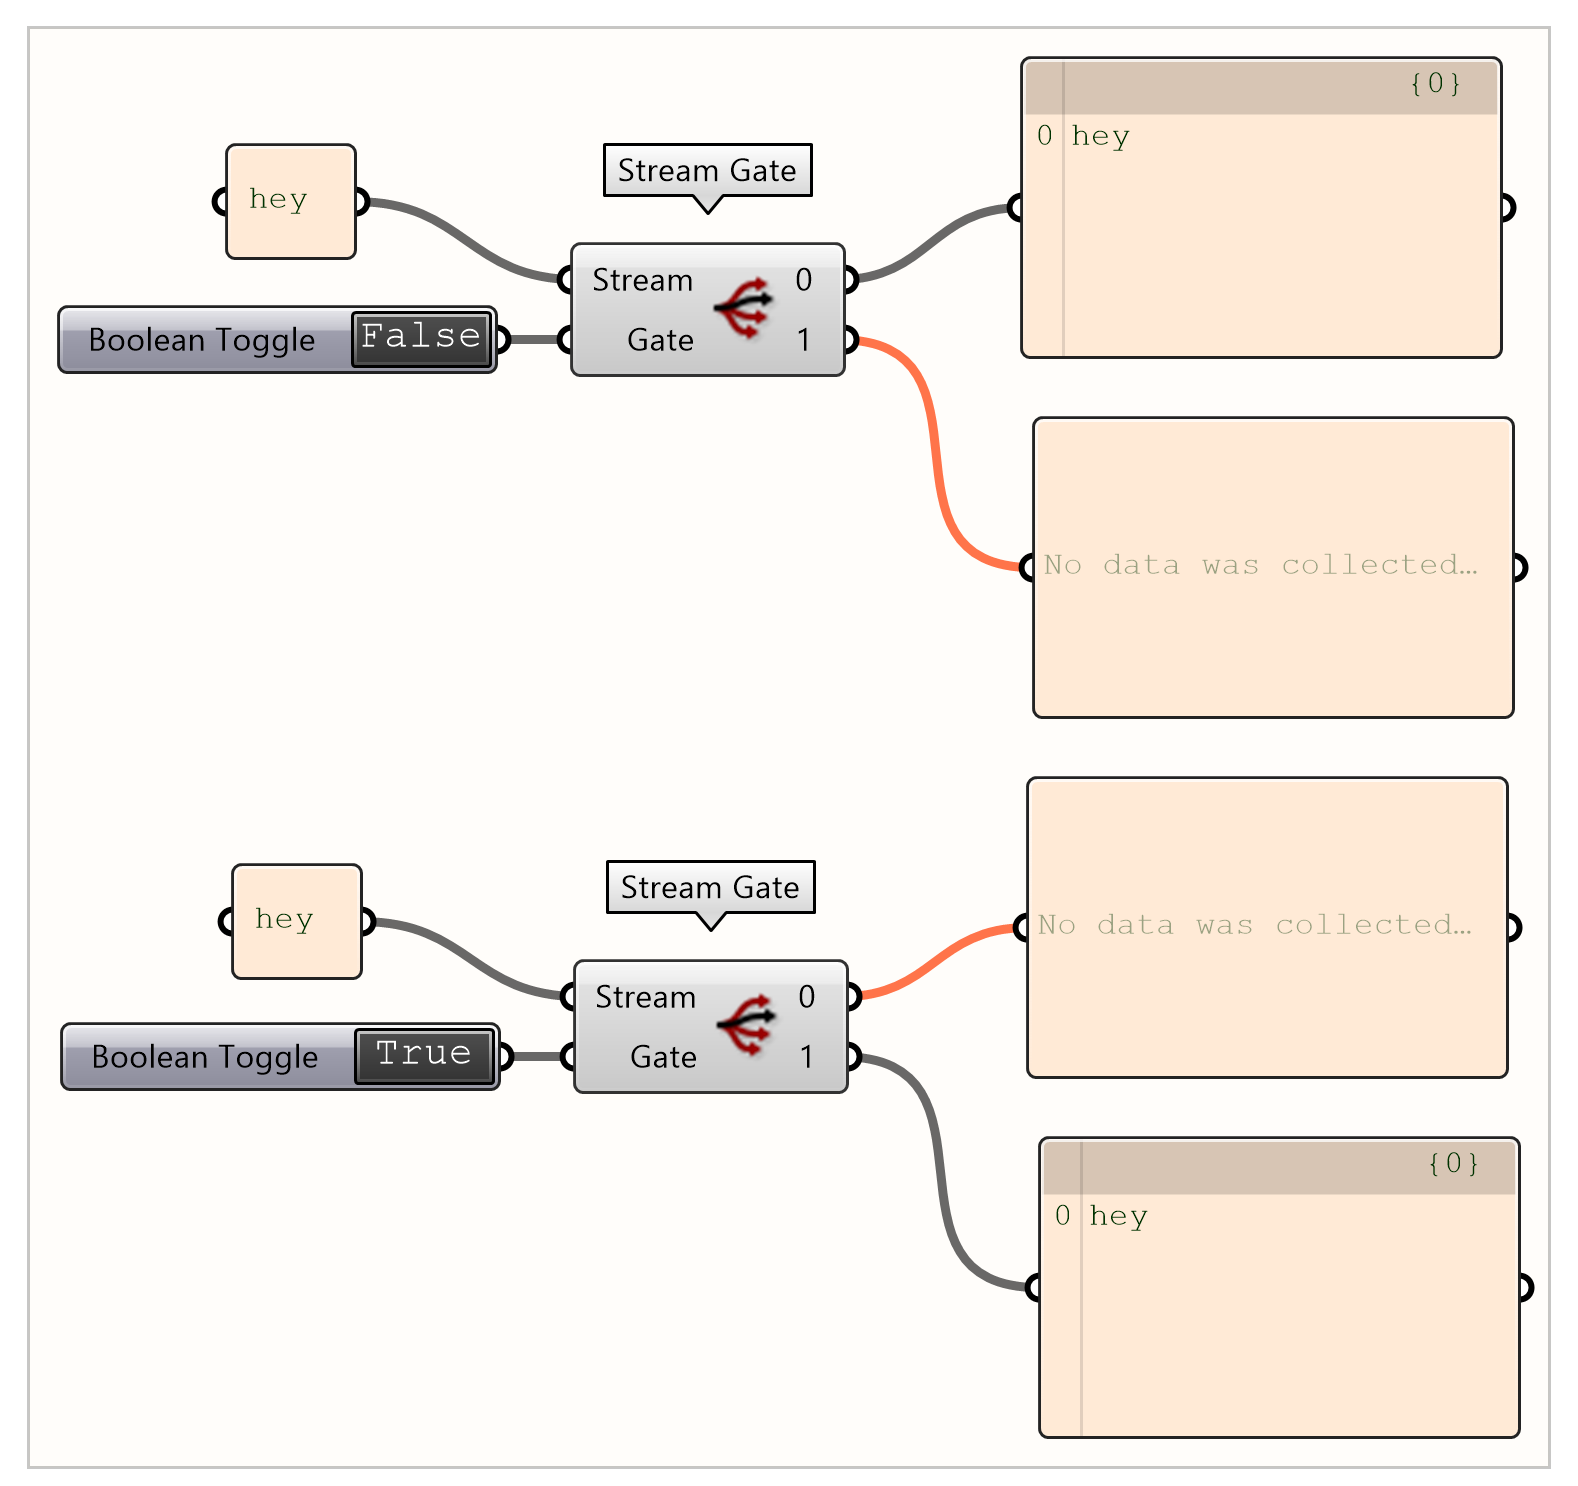
The stream gate works like the stream filter option. The difference however is that we have only one input list. An index number defines to which output channel the list is gated. The selection if therefore focussed on which channel the list is gated.
Random Reduce
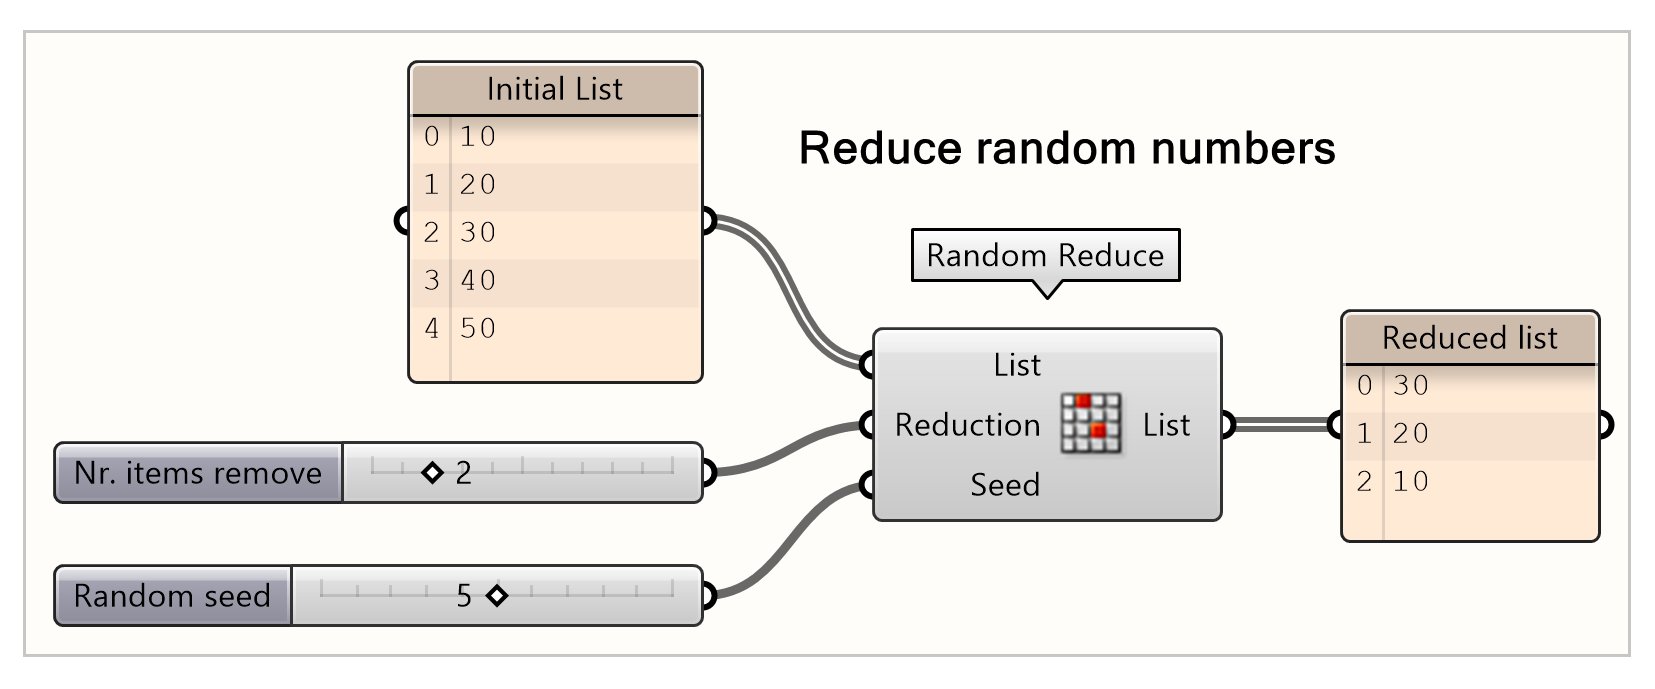
The Random reduce component allows you to randomly remove one or more items of the list. The number of items to be removed is indicated in the reduction input. The seed input generates different outcomes by randomly selecting the indices of the items to be removed. In this example, two items are randomly removed from the list.
Jitter
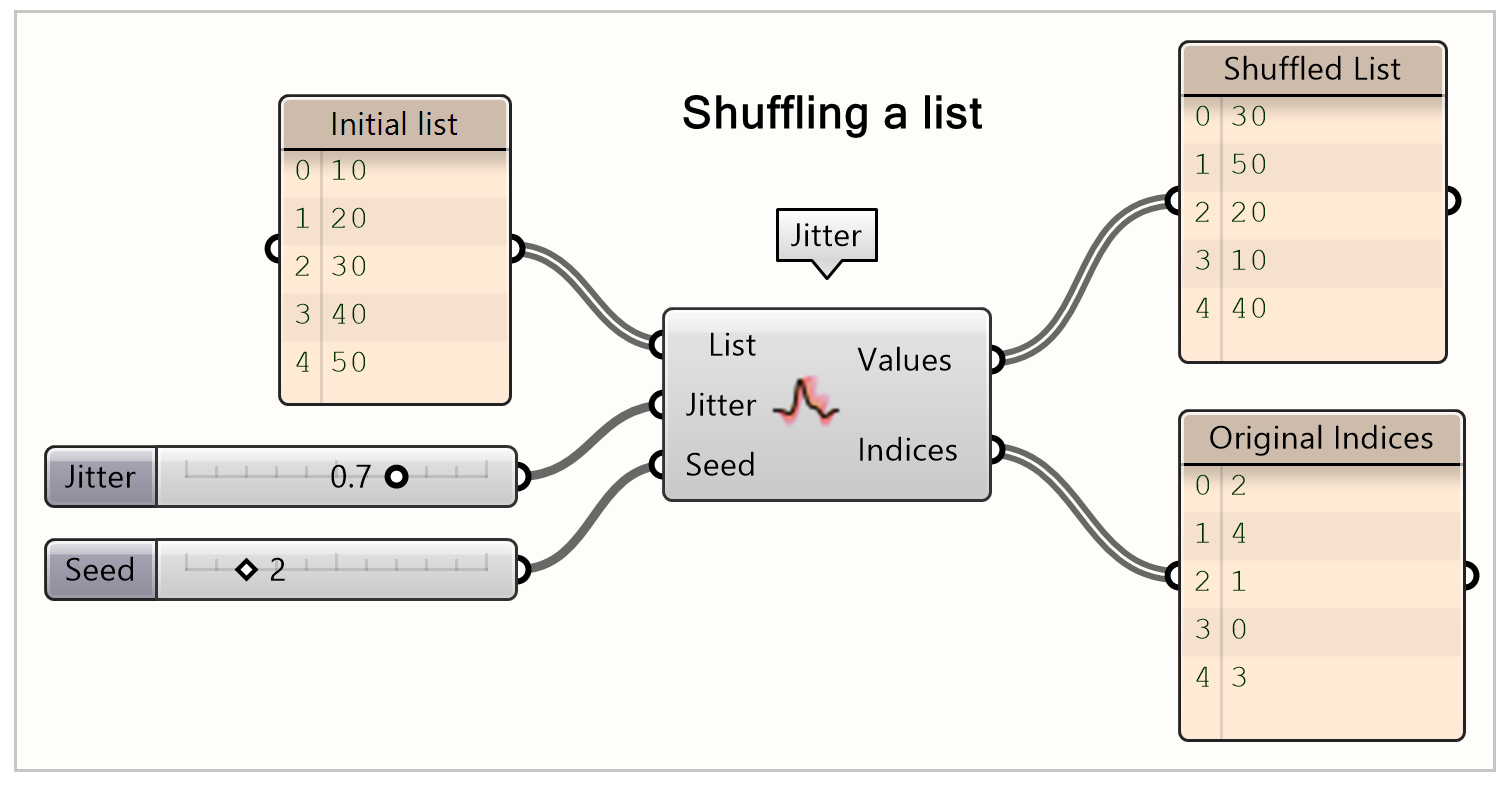
Jitter is used to randomly shuffle a list. The seed affects the randomness of the shuffling. The jitter is the shuffling strength, 0 indicates no shuffling, while 1 indicates extreme shuffling. The seed input generates different outcomes. The values output is the shuffled list and the indices output is the original index of each item.
Basic list action 5/7
Data Matchinglink copied
Sometimes, you are working with lists in Grasshopper that do not have the same length. If you want to use a function that has both lists as input, it is important that they work together in the correct way. By using the data matching nodes, you can alter the length of a list, based on another one. This gives you the possibility to combine the data more easily in a later stage. There are three methods to do this, the data matching components can be found under:
Shortest List
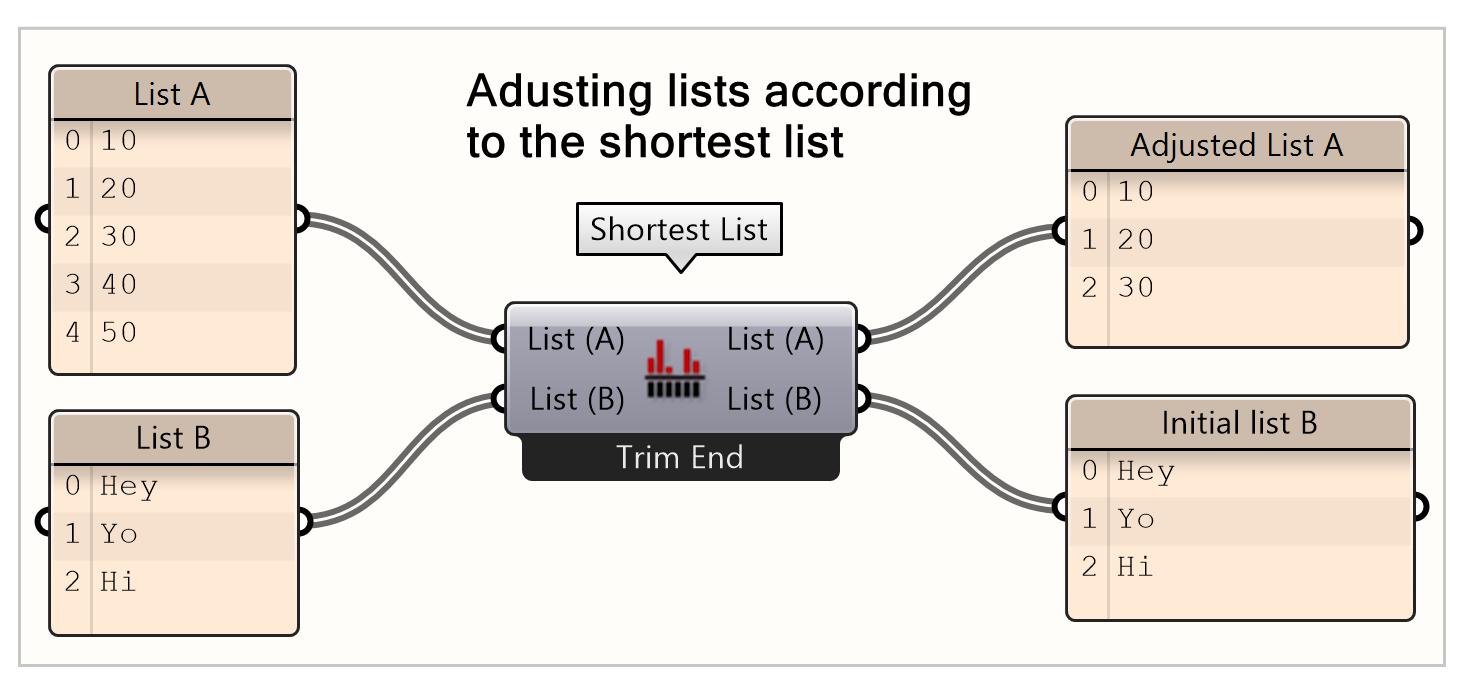
This component shortens the longest list based on the length of another list. This can be done in different ways, by trimming the start or end, or by interpolation. List (A) and List (B) have a different length, as can be seen in the right picture. By using the shortest list component with the trim end setting, output list (A) is shortened to the length of list (B) by removing the last 2 indices.
Longest List
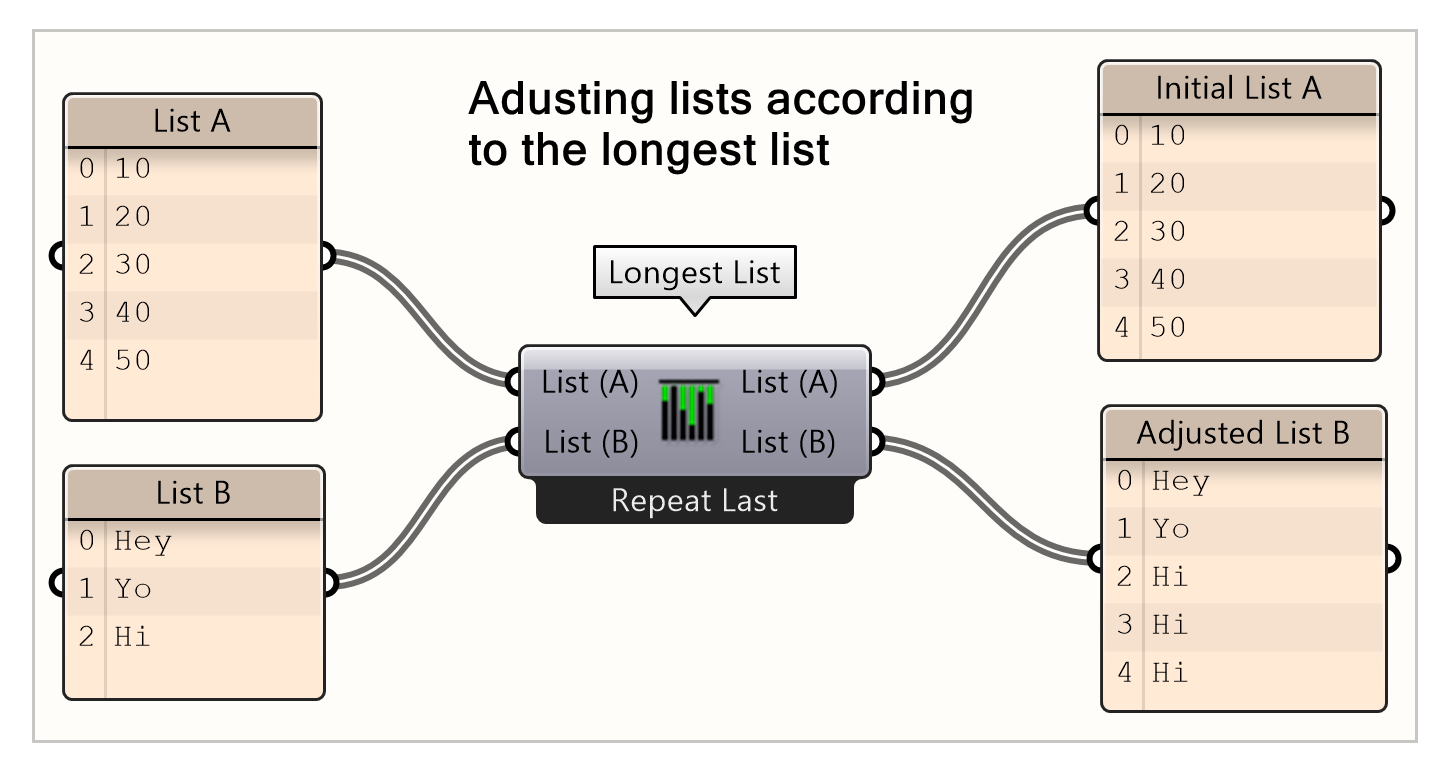
This component makes the shortest list longer based on the length of the longest list. This can be done in multiple ways: by repeating the first or last items, by interpolation, by wrapping or flipping. List (A) and List (B) have a different length, as can be seen in the right picture. By using the longest list component with repeat last item setting, the output list (B) is grown to the length of list A by repeating the last item twice at the end.
Cross Reference
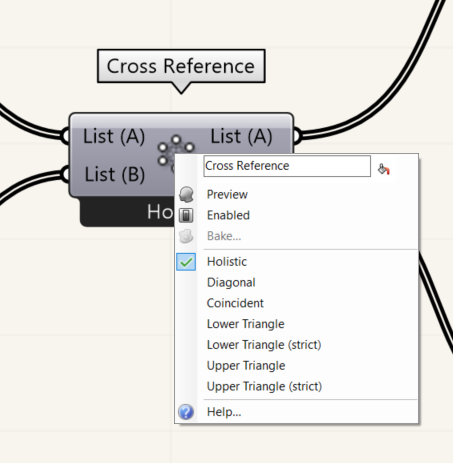
Cross reference combines two list by multiplying both lengths. The used variables depend on the output you choose. By right clicking on the Cross Reference Node, you can choose different outputs. The options are: holistic, diagonal, coincidence, lower or upper triangle. By default the cross reference is done ‘holistic’ Experiment with them to see the different results.
You can find more information about cross reference and the different methods in the chapter of data stream matching from the Grasshopper primer.
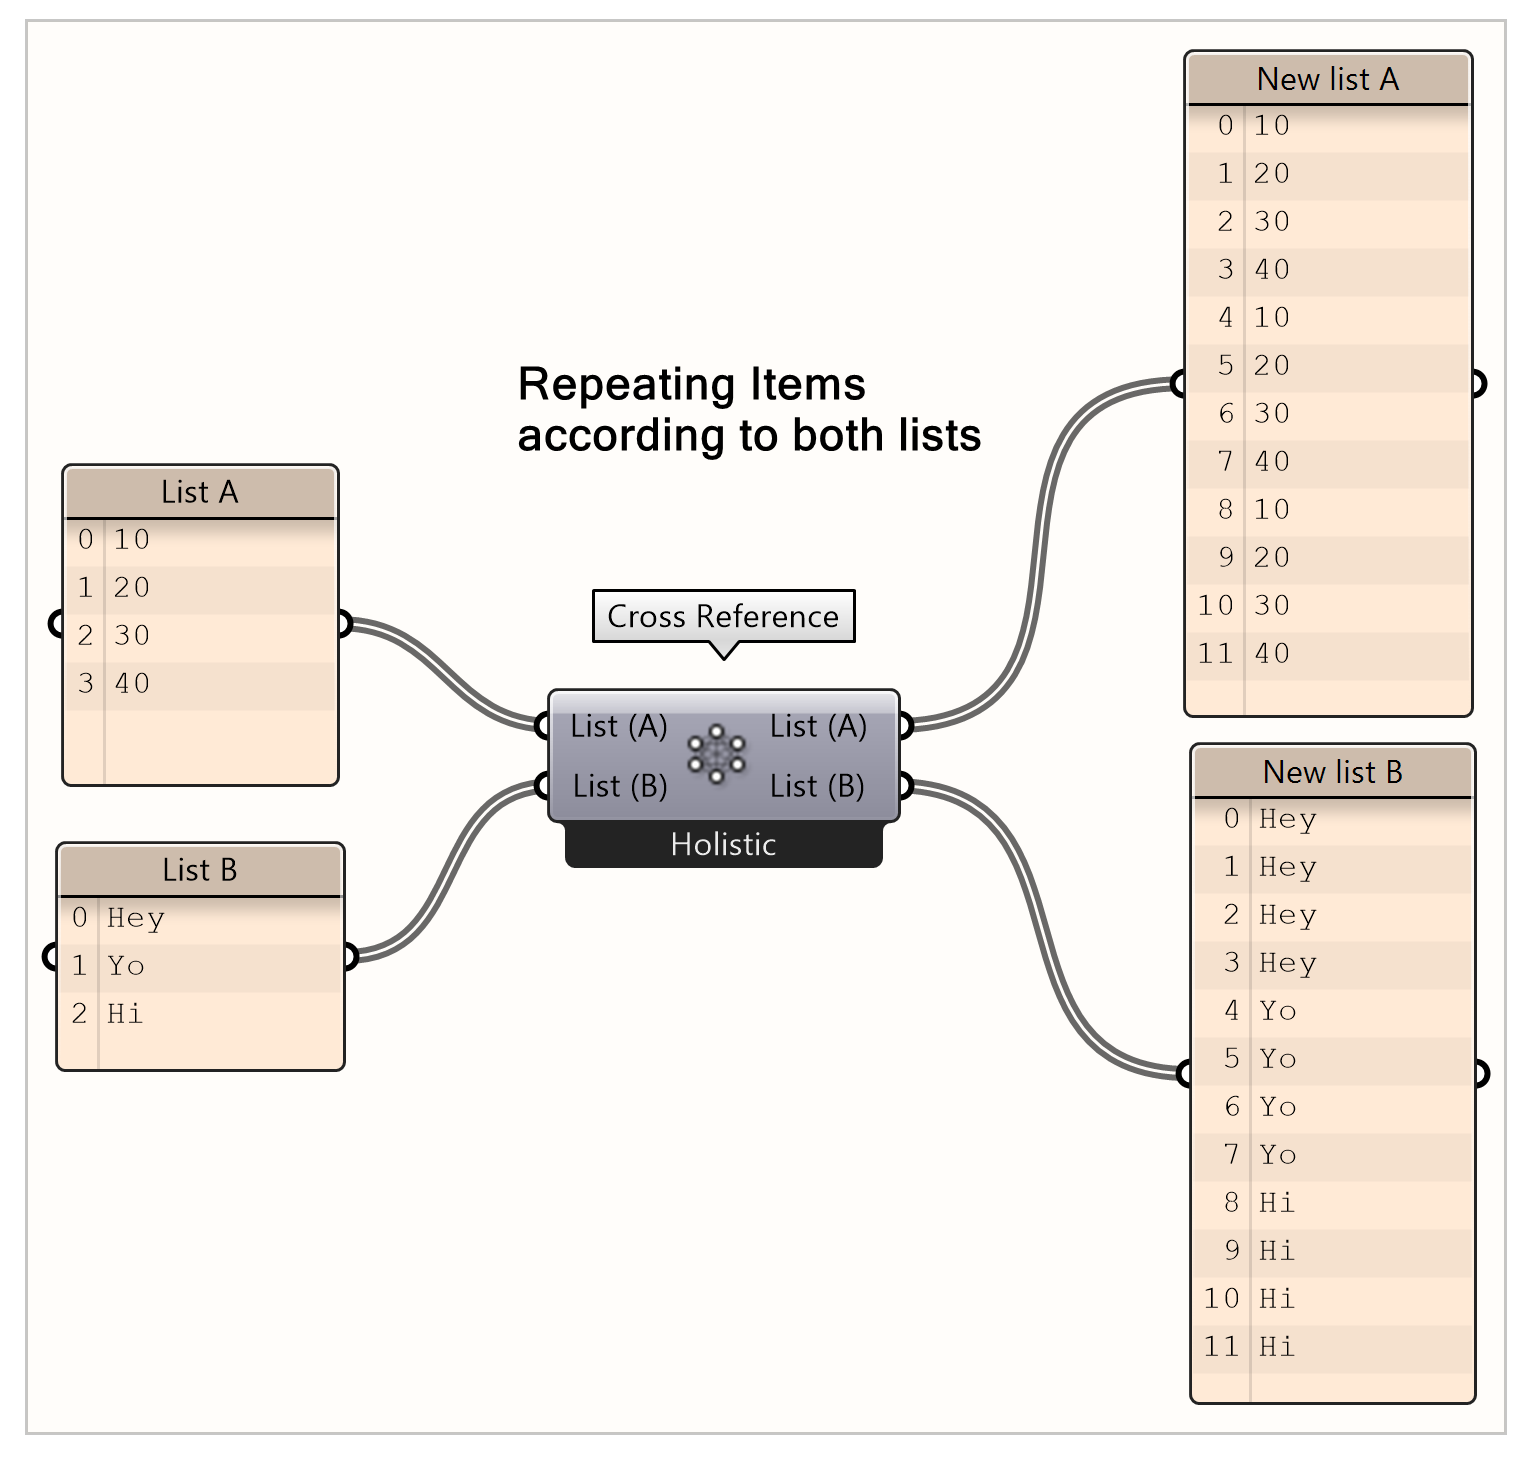
Using the holistic approach of cross reference, a new list is created by combining two lists and multiplying both lengths. In this example, there is a list of 4 and a list of 3 items, therefore the new list has 12 items in total.
Basic list action 6/7
Conclusionlink copied
This tutorial aims to give you an overview of all the basic tree actions, so you can easily tailor your design and script however you need. After trying out all these list action components, you should be able to create, change, edit, adapt any list in grasshopper. A general tip is to always hover over each component, input, and output if you are confused on what you should connect. These examples give you a basic overview of what you can do. Try to generate your own lists and experiment with each component.
Complete tutorial code

Basic list action 7/7
Useful Linkslink copied
Follow up tutorials
Now that you know how to work with lists in Grasshopper, the next steps is to understand data trees. All the basic data tree actions are explained in the following tutorial.
External links
For more information on how to work with lists you can look at the Grasshopper primer from ModeLab, chapter 1.4 is about designing with lists.
Write your feedback.
Write your feedback on "Basic list action"".
If you're providing a specific feedback to a part of the chapter, mention which part (text, image, or video) that you have specific feedback for."Thank your for your feedback.
Your feedback has been submitted successfully and is now awaiting review. We appreciate your input and will ensure it aligns with our guidelines before it’s published.
