Basic data tree action
-
Intro
-
What is a Data Tree?
-
Different Methods of Using Data on the Branch
-
Changing data tree structure
-
Interaction Between Data Trees
-
Recommended Data Tree Components
-
Advanced Data Tree Components
-
Tree actions with operator syntax
-
Conclusion
-
Useful Links
Information
| Primary software used | Grasshopper |
| Course | Basic data tree action |
| Primary subject | Parametric Modeling |
| Secondary subject | General |
| Level | Intermediate |
| Last updated | November 27, 2024 |
| Keywords |
Responsible
| Teachers | |
| Faculty |
Basic data tree action 0/9
Basic data tree action
For an effective use of multiple data trees it is necessary to make sure that the data is at the same branch level at the different trees. If this is not the case you will have to edit the tree structure.
Grasshopper uses, in contrast to a programming environment, no object names to define an object. This may sound trivial but it one of the most fundamental differences from a traditional modelling environment. In Grasshopper the object or objects are placed in a list. The different lists of data are organized in a data tree structure where every branch and data content of the branch have an index number. Understanding how to edit them is crucial for effective use of Grasshopper.
Basic data tree action 1/9
What is a Data Tree?link copied
The data tree is the hierarchical organization of the data. Multiple data will be stored in a data tree. Each branch of the tree can contain data. This can be a variety of data, surfaces, curves, points etc. To effectively use Grasshopper a sound understanding of this structure and how to manipulate it is paramount. This structure and handling of data is fundamentally different then when we use an environment where the name of the object can be used to define a selection. In the case of Grasshopper, the data can’t be accessed by its name but only as a part of a list of data. Although the lists have an index number for every data element the separate data element can’t be defined or recognized by any kind of reference other than the index number.
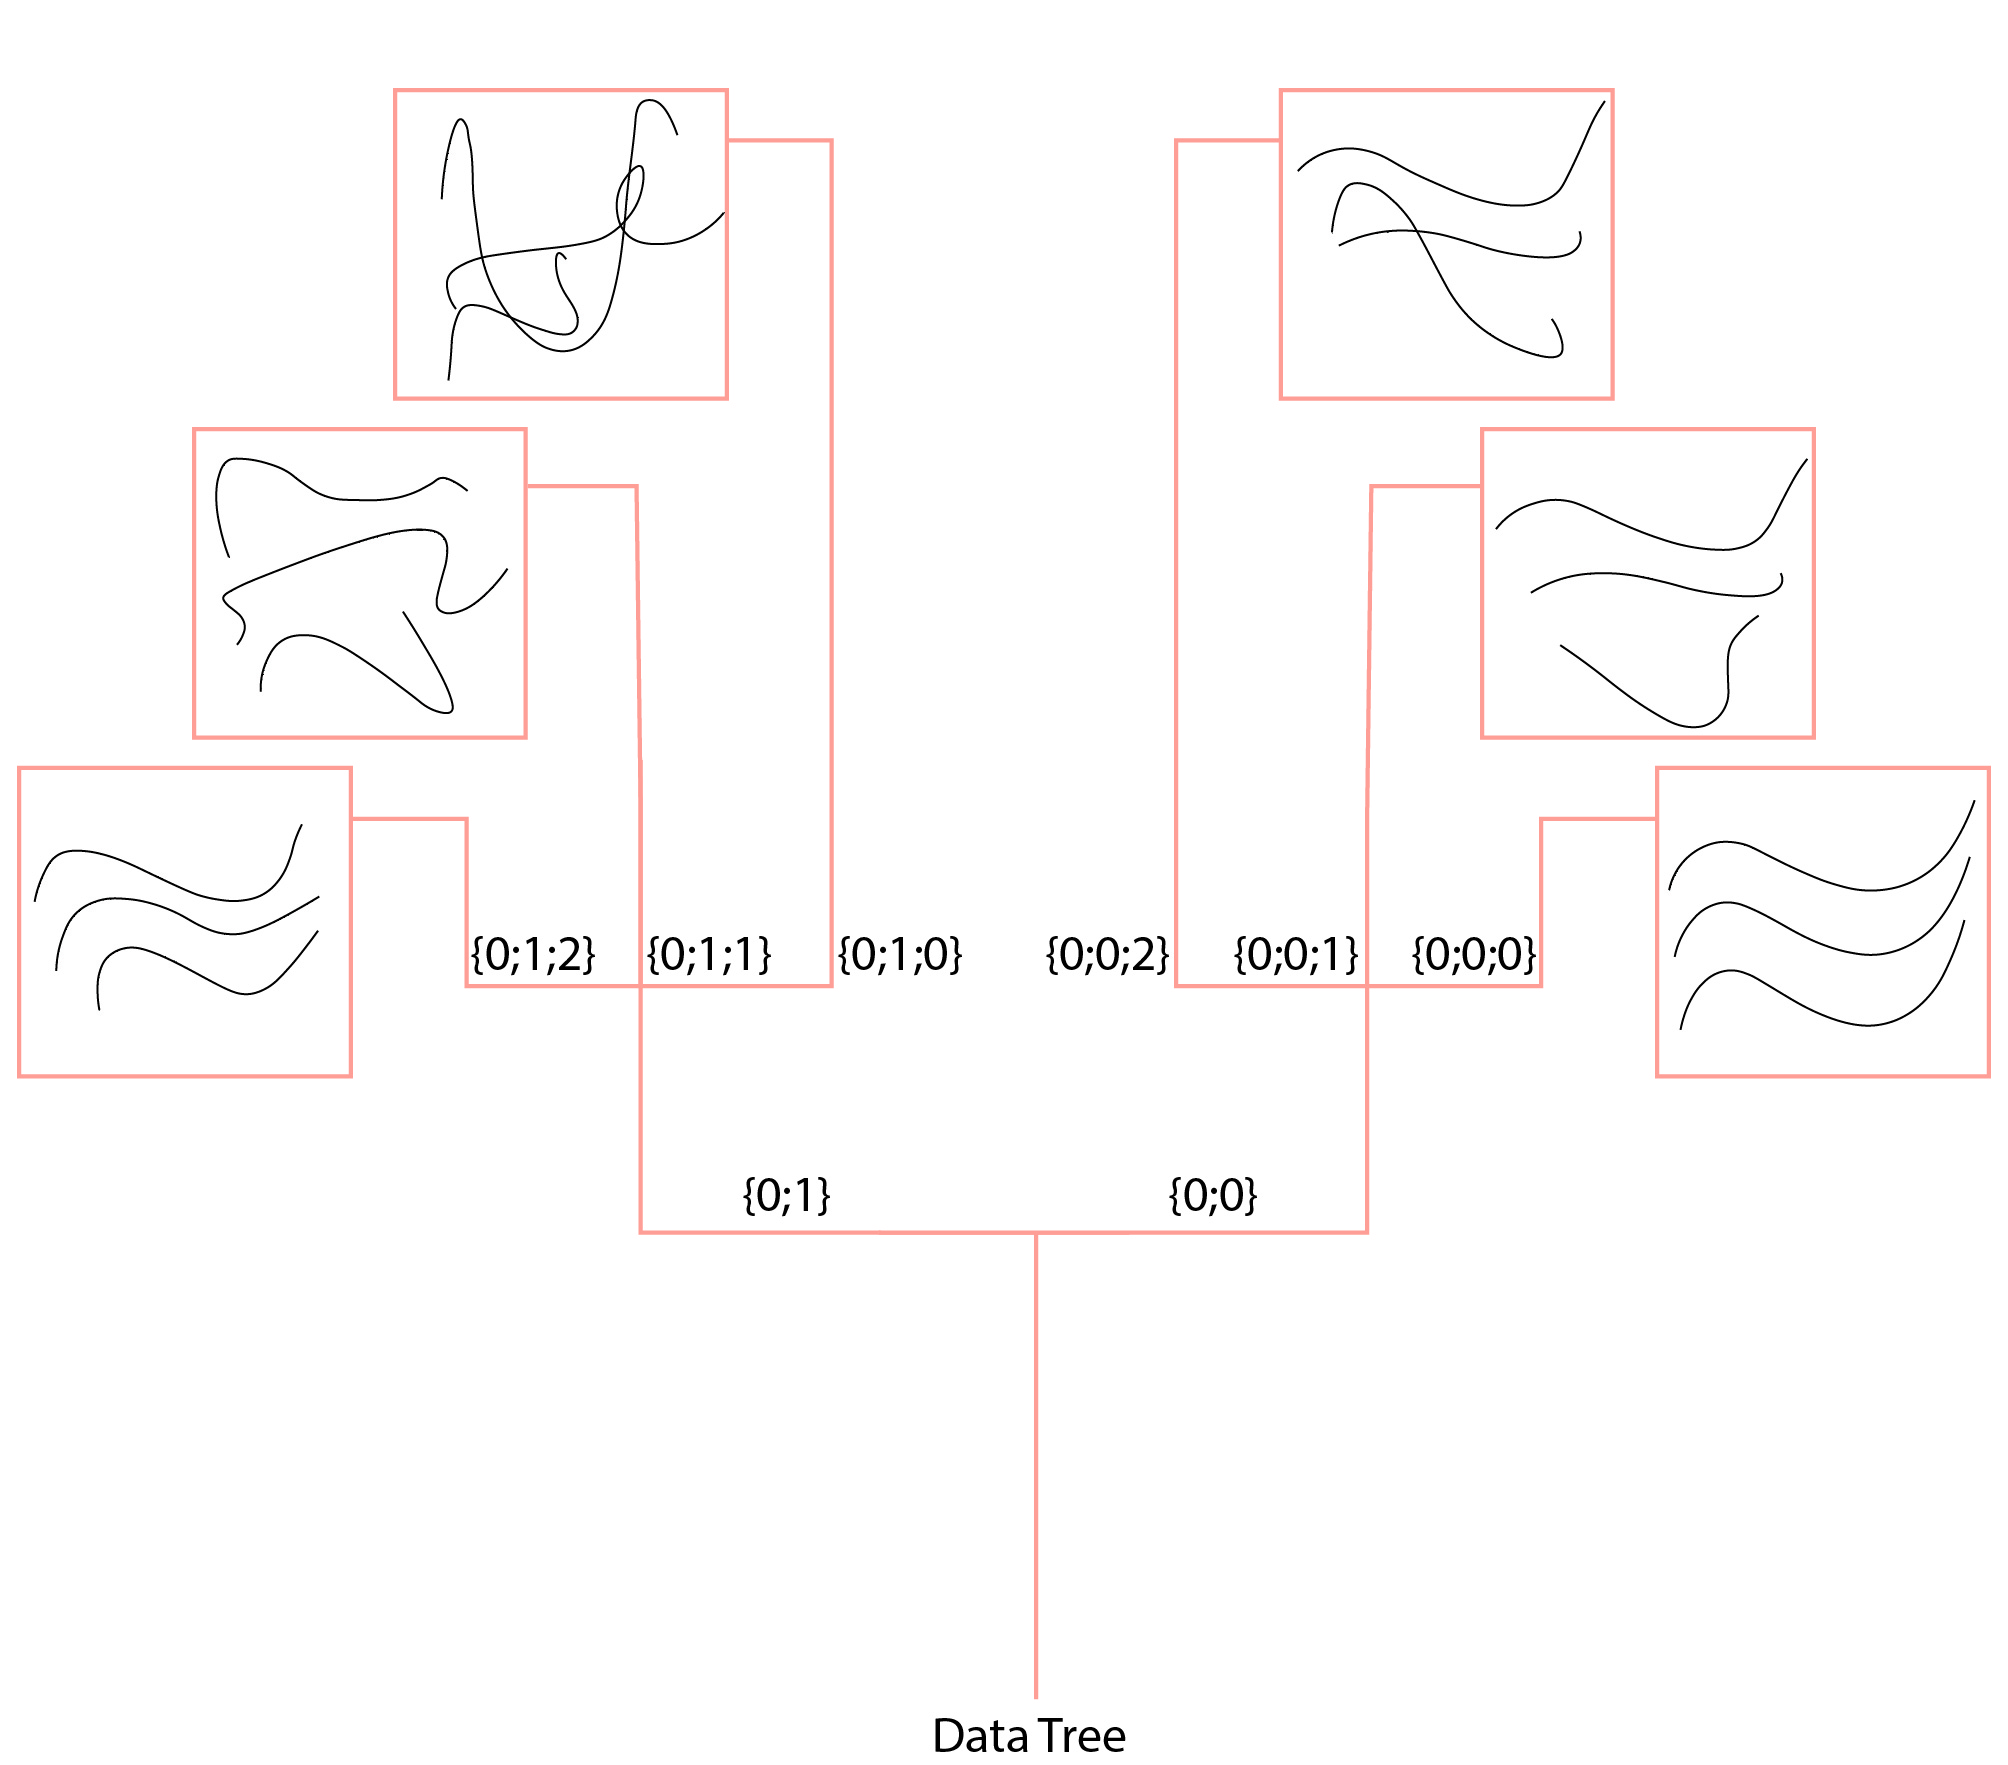
The data list is stored on a branch of the data tree. Each branch can hold data. The interaction of data will only take place if the data lists are at the same level of the data tree or trees. This means that to effectively access the data in a data tree structure you will have to know how the data must access and the tree structure can be manipulated.
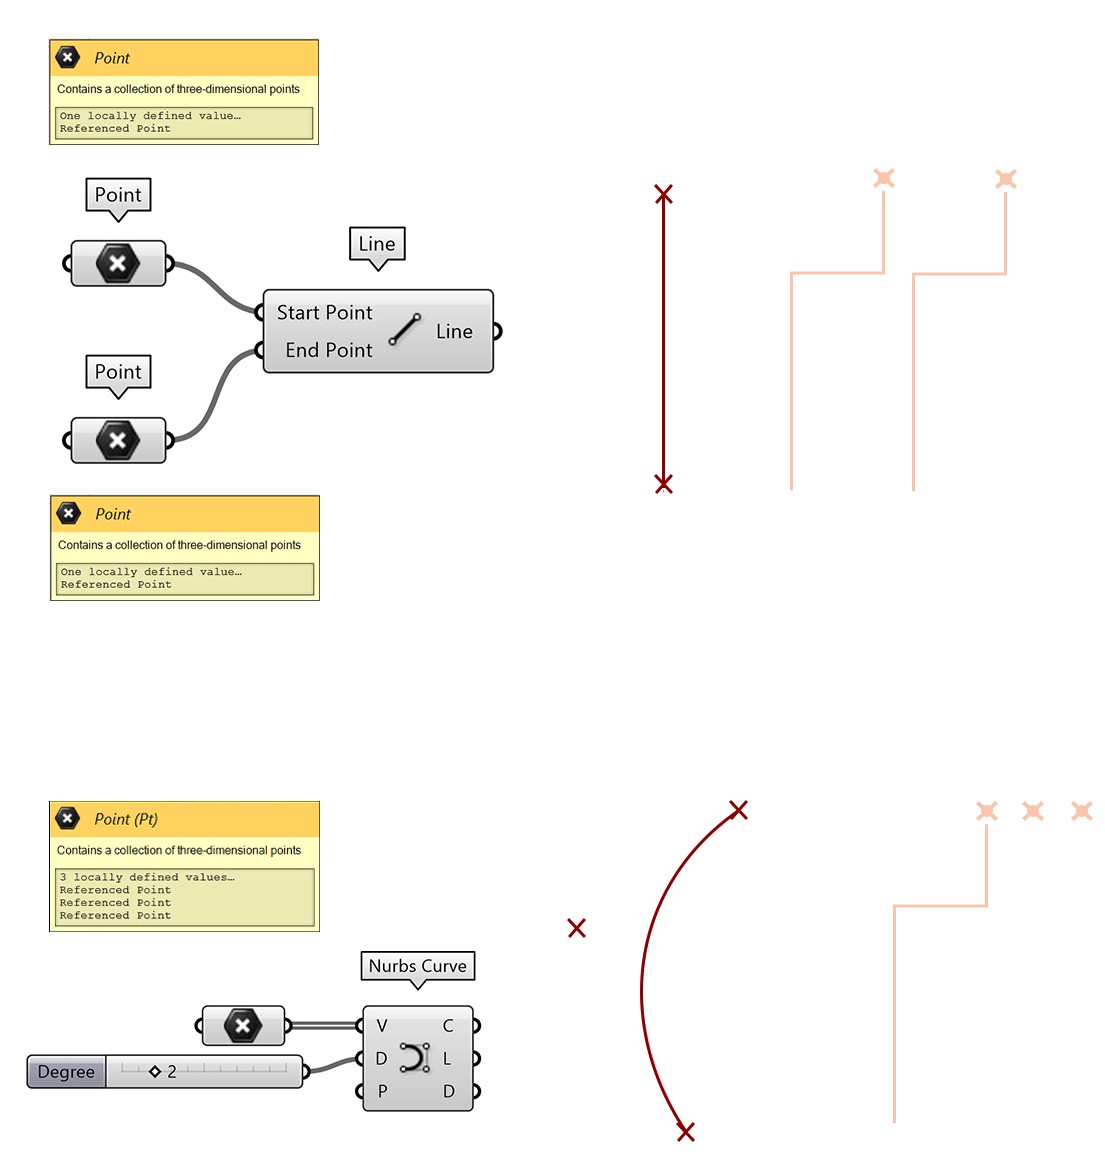
Data from the same level, say {0;0;1}, {0,0,2} or {0;1;3} can interact with each other when the correct component is used. Like the Line component which needs more than 1 input stream. However, the data of different level branches can’t interact. If we have a data structure where one set of data is placed on the {0;0;1} branch and the other on the {0;1} branch they can’t be used for a line for example because the data is not on the same branch level. The problem with this system is therefore the need to be able to manipulate where the data is stored in the data tree structure so that the data from different data trees can interact (in essence the data is stored at the same level).
Data tree structure
Data trees in Grasshopper are built from three different structures:
- Branches
- Lists
- Items
Branches are defined by a numerical structure between brackets, like {0;0;0}. The amount of numbers between the brackets, indicates the depth of the tree.
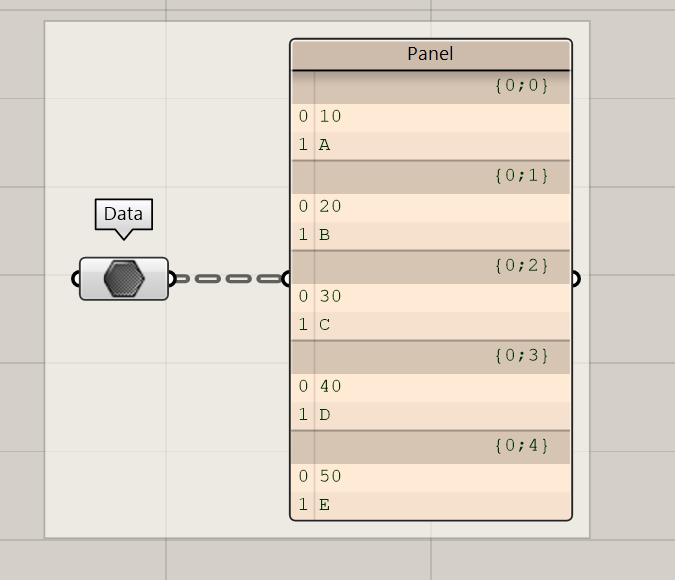
In this example, the data tree has three levels. One branch, which splits in a branch, which splits in a branch again. The branch of a tree can be found in the grey lines of a panel.
Within a branch of a data tree, sometimes a list can be found or just one item. As explained earlier, these items can have different data types.
To access a specific item in a data tree, we use the index in front of the item. This is a crucial difference to normal programming languages: instead of using the name of the item, we are using an index in a branch.
When we have multiple data trees in script, which is the case in most algorithms, the data trees need to interact with each other in the correct order. Therefore, you will need to learn how to manipulate data trees in Grasshopper.
Basic data tree action 2/9
Different Methods of Using Data on the Branchlink copied
There are 2 main options of using data on a branch or data branches. The options will depend on the component which will be used as output of the data. The options can be easily recognized by the amount of input connections for the data
Option 1

The first is the component will work only on the data on the same branch within the same tree. For example, a Polyline uses the data of series of points on a single branch to define the polyline. So, from the content of a branch a polyline is generated and therefore for each branch 1 polyline. There is only 1 input channel for the points needed to define the polyline. Another example is the Loft component. It also uses only 1 channel for curve input.
The same functional combination of data can be obtained with two or more data trees by connect the different data trees to the same input channel. The trees are merged, and the data is placed on similar branches.

In the example two data trees with each 100 branches containing each 1 curve of data are merged into a single tree with 100 branches and 2 curves on each branch. Because there are now two curves on a branch the loft will be based on these two curves. This will repeat itself over the rest of the 99 branches.
If, however, the data structure is not similar because there are additional branches in one list, the data won’t be combined and handled as separate lists. So, getting the data on the right level of branches can be one prerequisite of a successful merger of data.
Option 2

The second option is the use of a component which needs multiple inputs. An example is the line. The line needs 2 points. If a data tree structure is offered as data input for 1 of the two points the content of each point on the branch is seen as a separate input. This point will interact with a point of the same branch in the other data tree. The fundamental difference with the first option is that you always need two inputs and therefore two data structures which will interact on the same branch level.
In the example we can see a difference of the number of points on the branch of one input and the amount of the other branch of input. In one tree structure the number of points defined on a branch is 4 in the other tree structure 1.

Grasshopper will generate in this case a line from one point of the four from one list to the 1 of the other lists. It will then generate a line from the second point of the four to again the 1 in the other list, and so on. If all the four points are calculated, Grasshopper switches to a new branch and start calculating the lines between the four point and the single point of the other list. The lines therefore have a similar end point per branch. The way the lists are combined is depending on which option is selected in the option menu of the component.
Basic data tree action 3/9
Changing data tree structurelink copied
Accessing objects in a data tree structure is more problematic then in a scripting environment. Grasshopper has various tools to remedy this problem. These tools support the editing and selecting the content of the lists and editing the data tree structure.
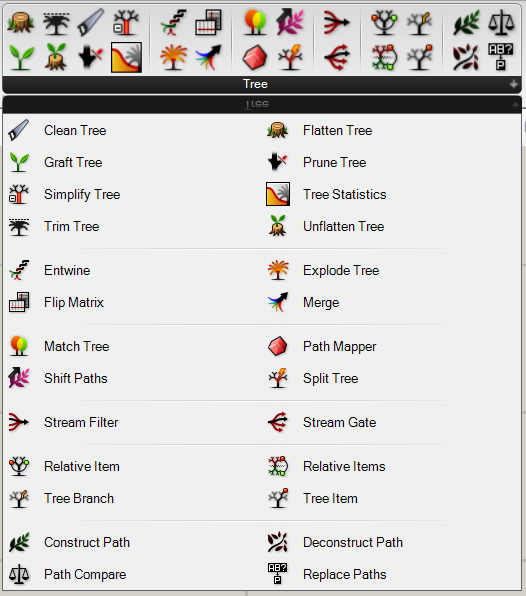
For an effective use of multiple data trees, it is necessary to make sure that the data is at the same branch level at the different trees. If this is not the case, you will have to edit the tree structure. There is a wide range of options for editing the data tree. This already indicates that there is a wide range of problems you can encounter with the data structures.
Most data tree component can be found under:
Flatten Tree
The flatten tree option is one which is often used to restructure the data tree structure by deleting the branch information and put all the data together in the root of data tree. It a drastic option and often forms the basis for restructuring the Data Tree from scratch.
Flattening a tree deletes all the information of where the data comes from. Therefore, you should only use flattening techniques, when the origin of data is not relevant for later steps in a script.
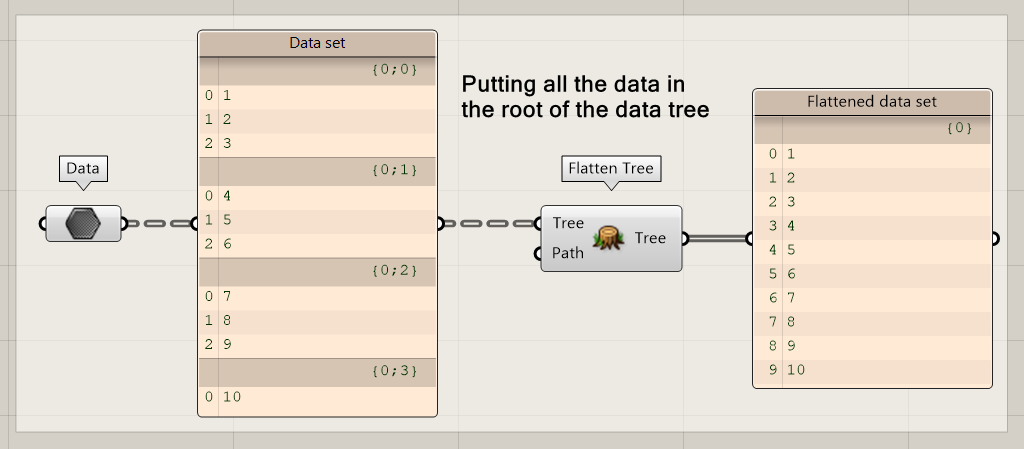
Flattening can be done using methods:
- Flatten data with the flatten tree node
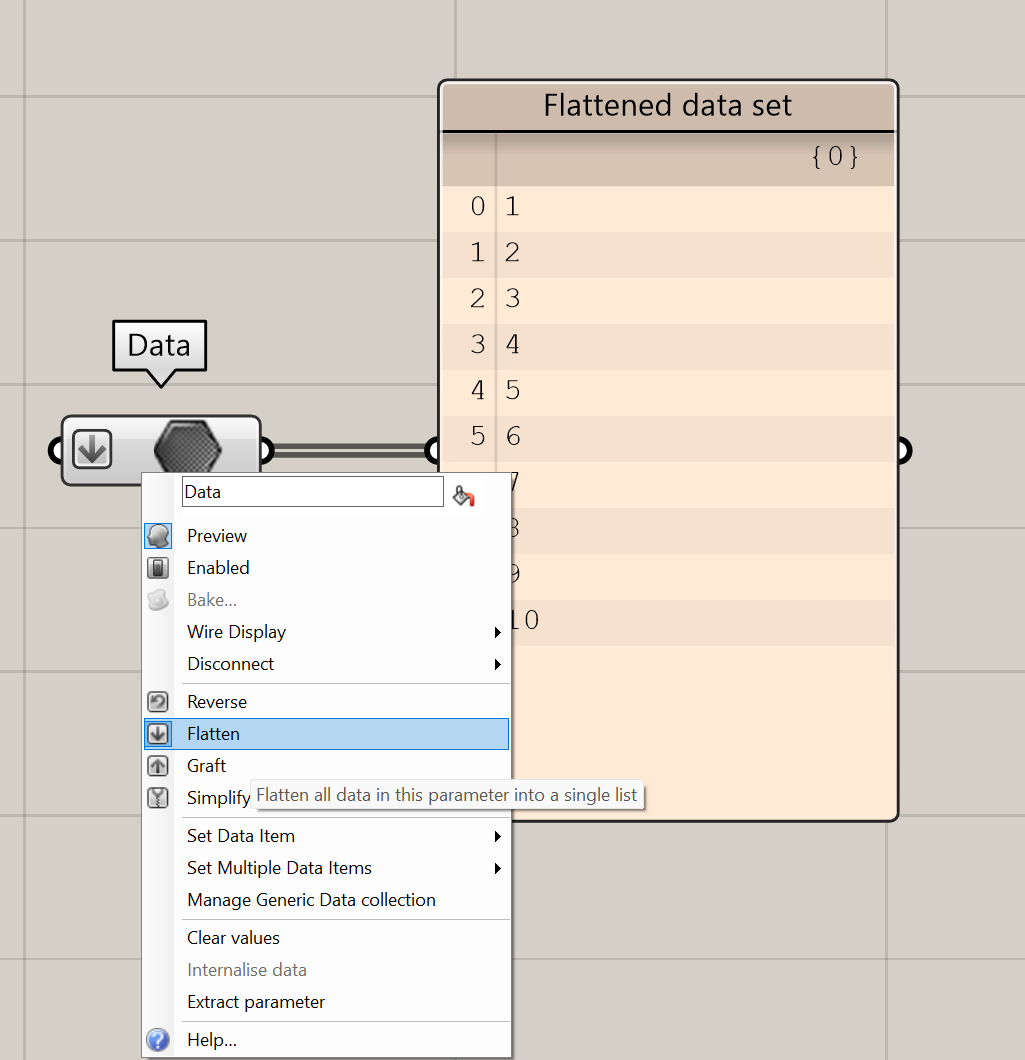
- Right-click on the output of a node and click on flatten.
Graft Tree
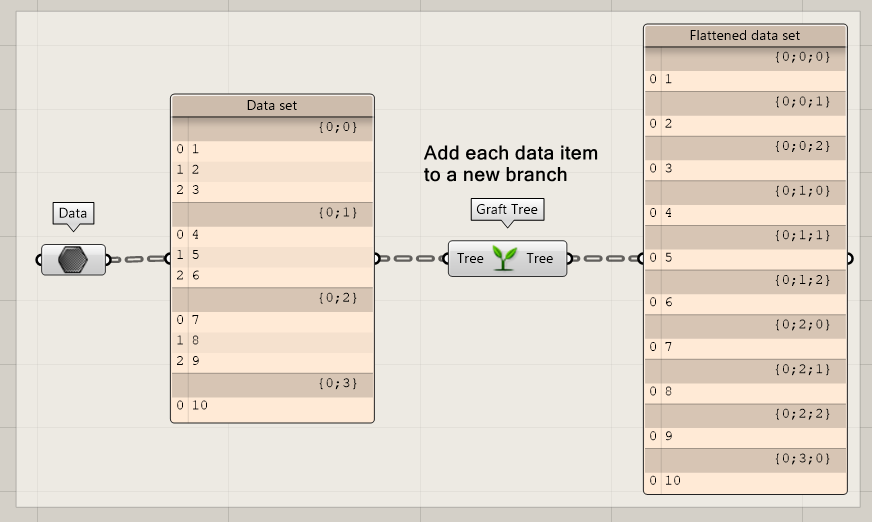
Grafting a tree adds complexity to a list of data. Each data item is added to a new branch. This can help you to repeat a certain procedure on each item or let specific items in a list interact with specific items of another list.
Grafting can be done using two methods:
- Use the graft node
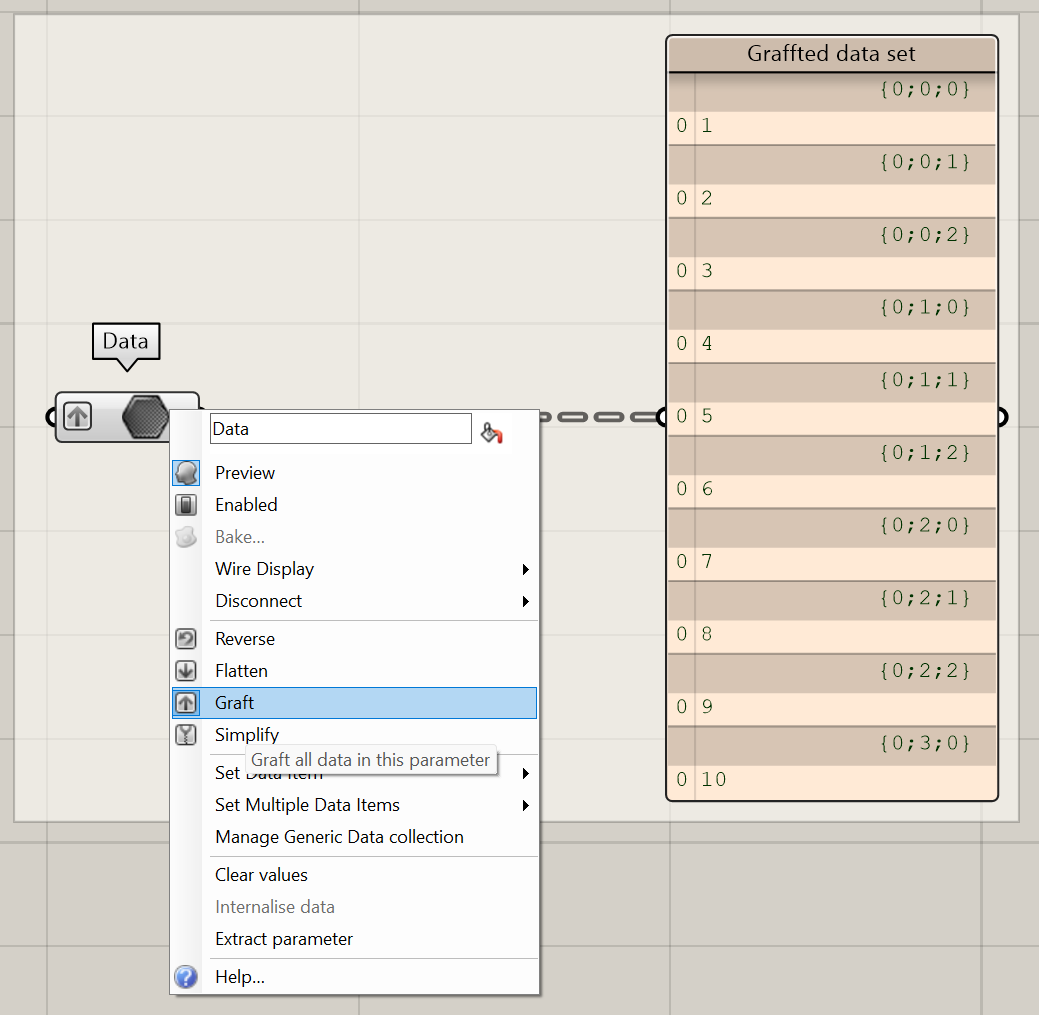
- Right-click on the output of a node and click on graft.
Simplify Tree
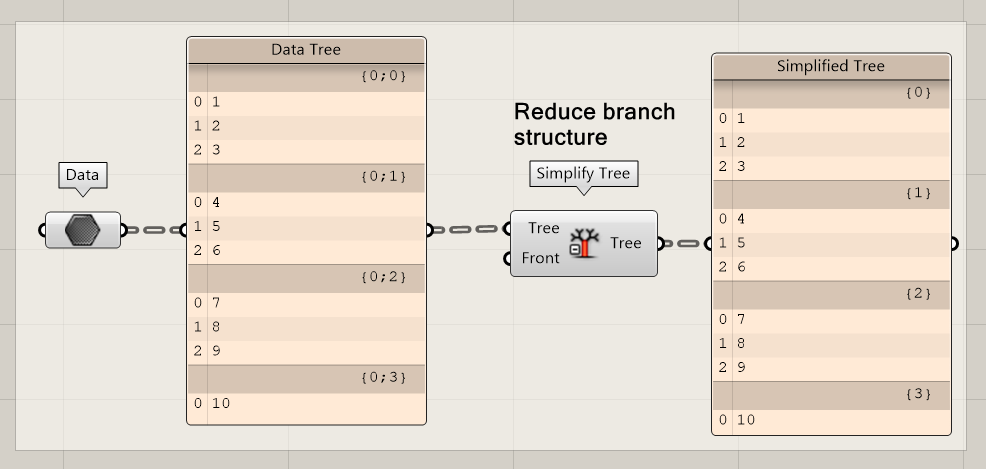
Simplifying reduces the complexity of a tree but keeps the branch structure. For example, a branch with the structure {0;0;0;1} will be reduced to {1}.
Like flattening, try to avoid simplifying data trees. Although the zeros in the previously mentioned example may seem irrelevant, they tell us something about the origin of data. Only simplify when it is necessary for the interaction with other data trees.
Similarly, to grafting and flattening, simplifying can also be done by right-clicking on an input or output.
Basic data tree action 4/9
Interaction Between Data Treeslink copied
In the following chapter we will discuss several examples of data tree interaction. In the first scenario we have data tree that contains numbers. For each item in the data tree, we want to increase the value by 1. In the second scenario, each branch will contain items that are increased by different amounts. Finally, we have the most complex situation where data manipulation really is important: a data tree with numbers where each item is increase by a different amount.
Data tree interacting with one item
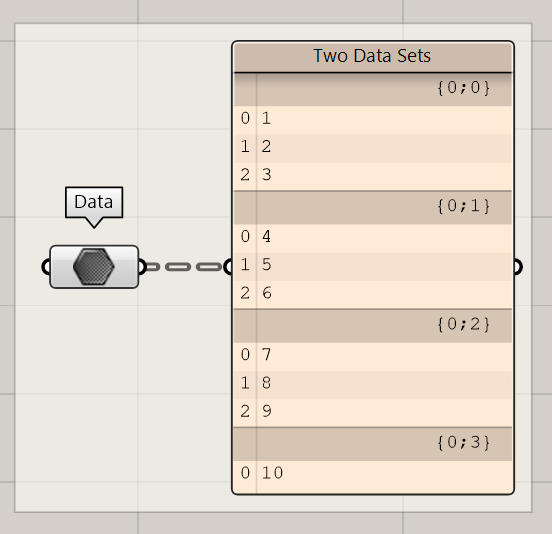
The first scenario starts with two data sets. The first data set contains a complex data tree with four branches. All branches start with {0;x} which indicates that the data comes from the same origin. Each branch also contains a list of values. The last branch only contains on single item.
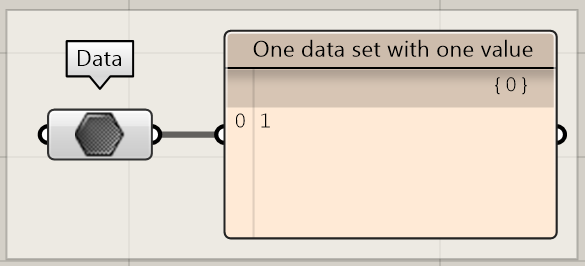
The second data set only contains one value. Although it may seem a bit misleading, this structure is in fact also a data tree. As you can see, the data set only has one root branch, called {0}.
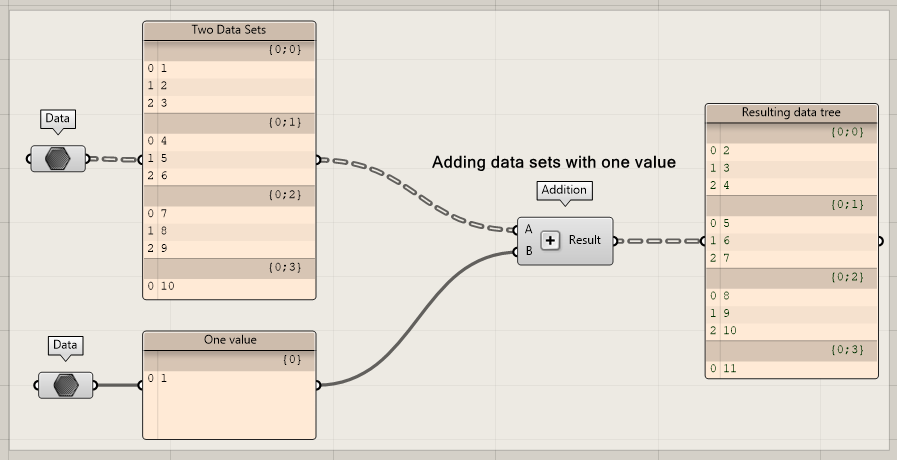
Now we will add these data sets together. First, imagine what you think will happen. As you can see, each branch interacts with the same item, since it only has one value.
As you can see, changing the name of the second data set does not matter. The tree only contains one item and therefore interacts with all the branches of the first tree.
Data tree interacting with a list
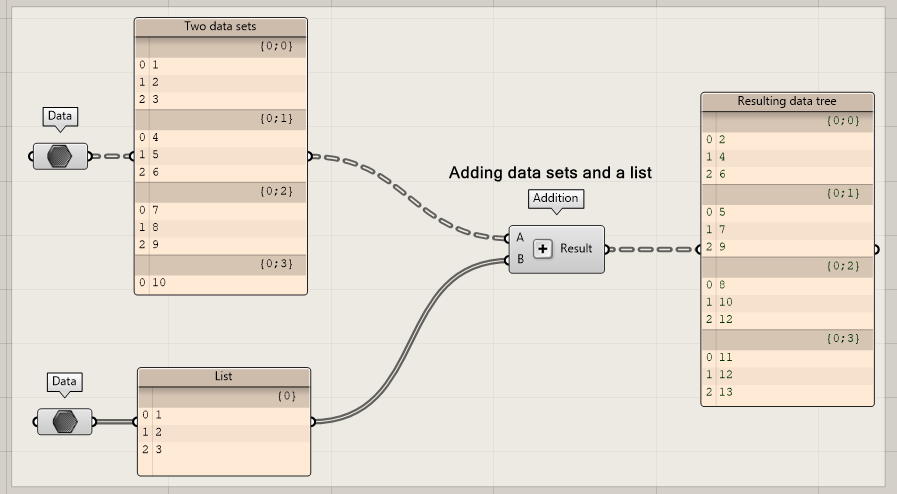
In the second example, instead of using a single item in the second data set, we are using a list of values. If we repeat the addition from the last example, you can see that corresponding indices of a branch interact with each other. Item 0 of data set 1 add together with item 0 of data set 2.
You may notice that in the last branch two items are added. This has to do with the fact that each item in the branches must be counted. Therefore, in the last branch, to all numbers 10 is added.
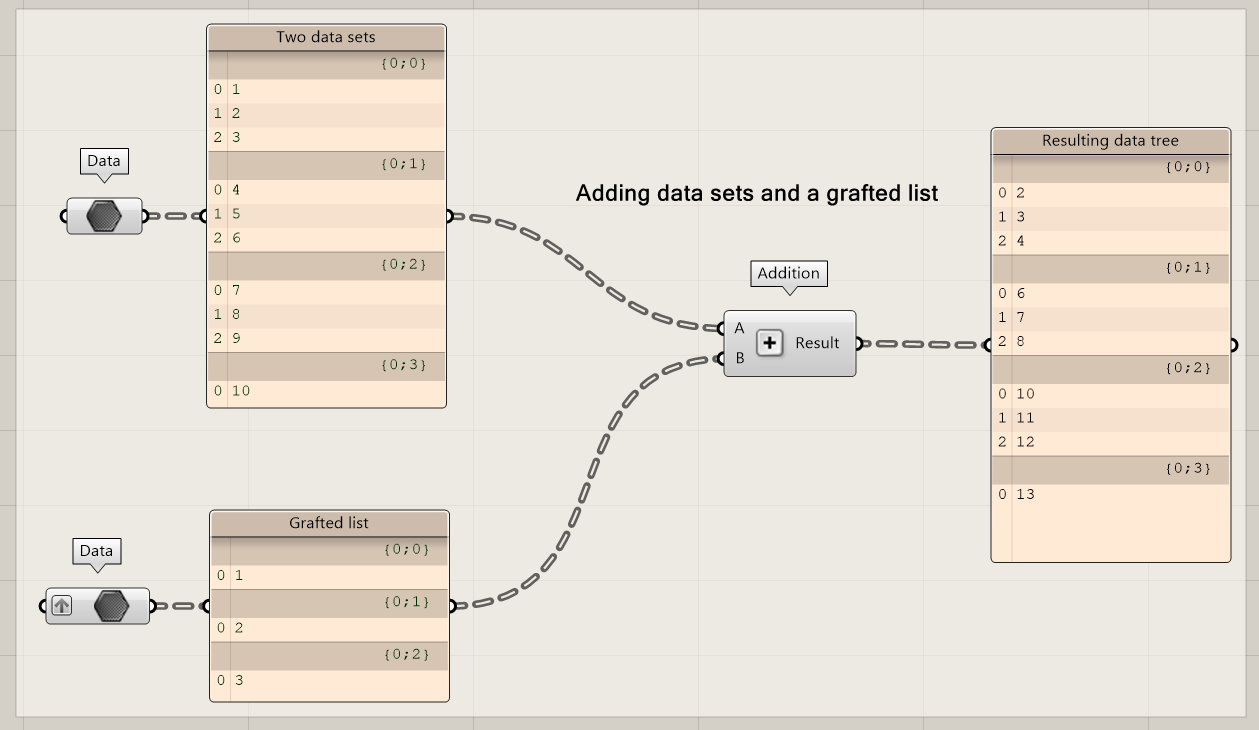
Now let’s experiment and change the structure of data set 2. Instead of using one list, we add each number to an individual branch. What happens? Each branch interacts with its corresponding branch, with an exception for the last branch. No data is available for the last branch in the second data set. Therefore, the data of the previous branch is used.
Data tree interacting with another data tree
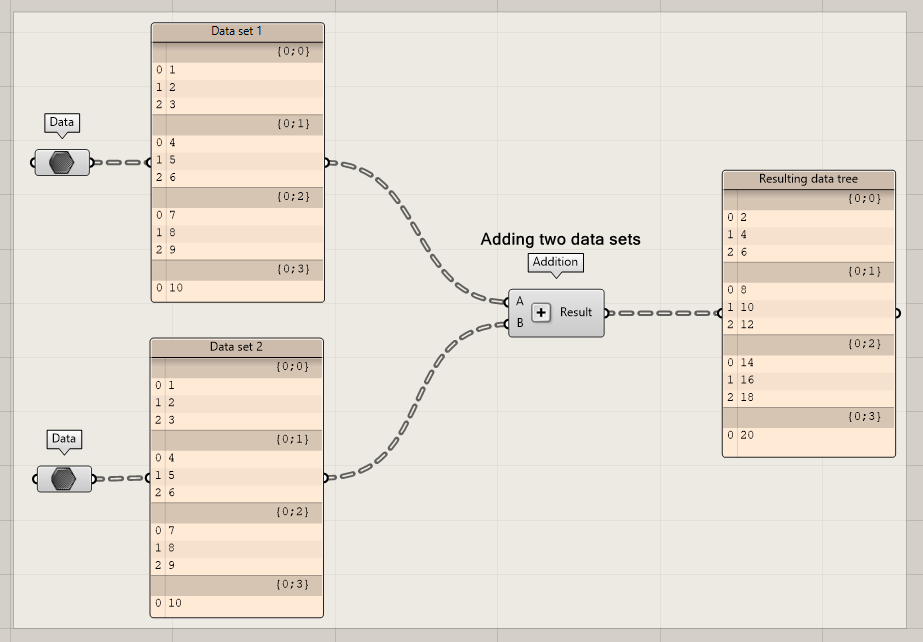
Based on the last experiment in the previous chapter, we can expect what will happen when we are adding two complex data trees together. Each corresponding items in the corresponding branches add together.
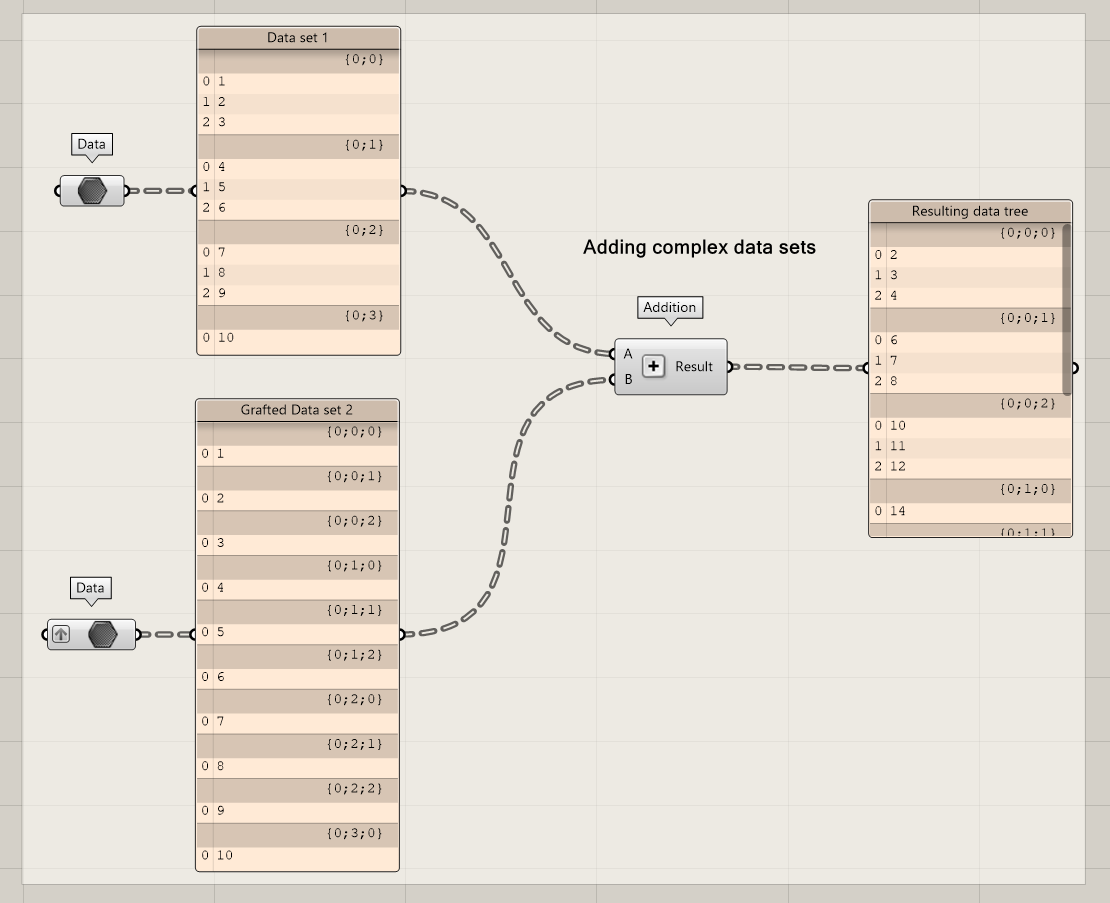
Now what happens if we add another depth level to one of the trees. The result will be based on the tree with the highest depth. Therefore each branch structure contains three values like {a;b;c}. Branch {0;0;0} interacts with the first branch of data set 1, which results in a list of three values. The process continues until {0;0;2}. Now a problem occurs: there are not enough branches in data set 1 to interact with all the extra branches of data set 2. Therefore, the last branch of data set 1 is used to interact with all other branches of data set 2. This results in branches with the items 14, 15, 16, 17, 18, 19 and 20.
Basic data tree action 5/9
Recommended Data Tree Componentslink copied
Trim Tree
The trim tree component merges the smallest lists in the data tree. For example: {0;1;2} and {0;1;4) is combined to {0;1}. Simply said, trimming a tree works like flattening, however, it only flattens the smallest branches.
Besides the Tree input, the component also has a Depth input. This Depth input indicates how deep the data tree should be flattened. For example: {0;1;2} and {0;1;4} with depth 2, will result in a data tree with {0} as only branch.
Shift Paths
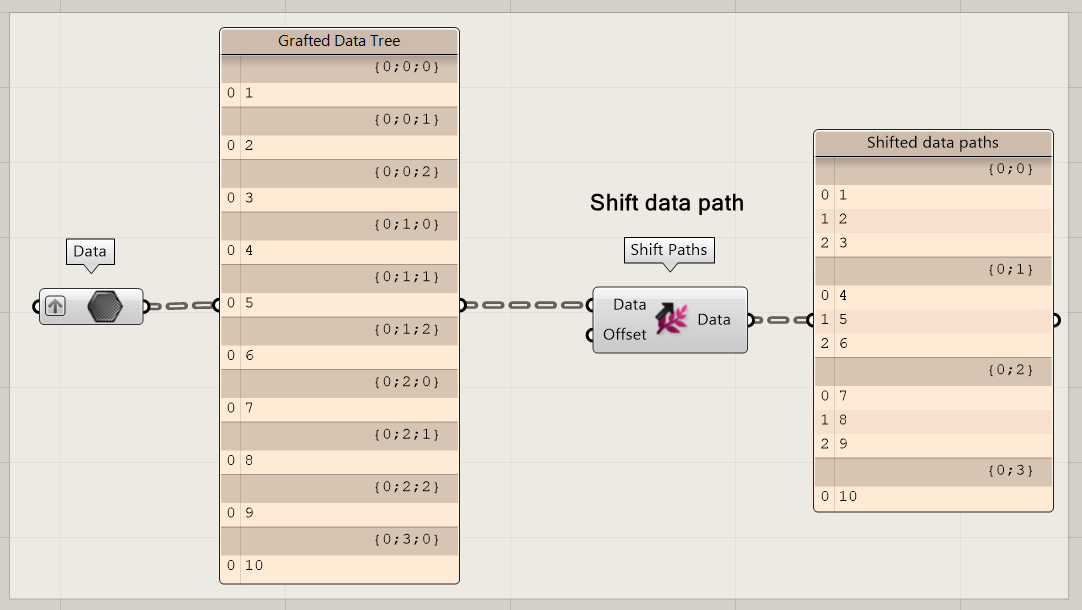
The Shift Path option looks a bit like a controlled Flatten option. It gives you the possibility to move the data one or more branches lower or to collapse the data into a single branch similar like the Flatten option, however, now placed on a single branch.
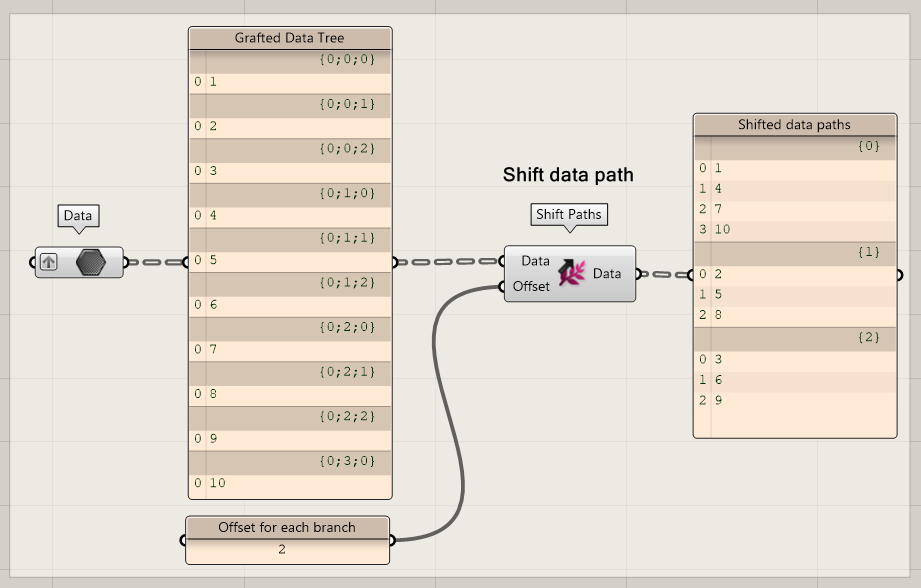
The offset value can be positive or negative. Negative numbers give results like the Trim Tree component. Positive numbers approach the Data Tree differently. The component re-orders the data tree based on the smallest branch in a tree. For example: {0;0;0) and {0;3;0) (both structures end with a 0) with Offset 2 are combined into {0}.
Tree Branch

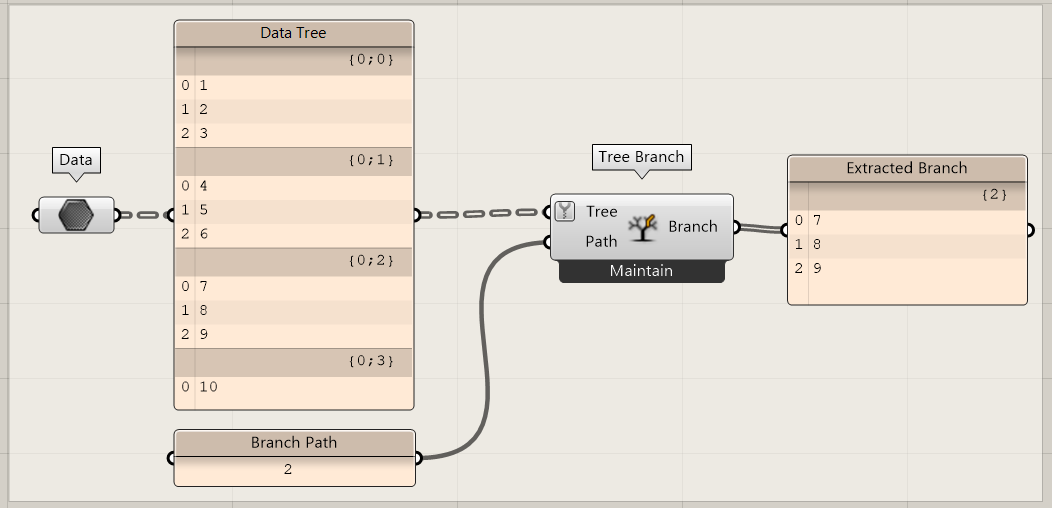
The tree branch component is useful when you need a specific branch of a tree. In most scripts, a data tree is first simplified, and then a specific branch is selected.
Explode Tree
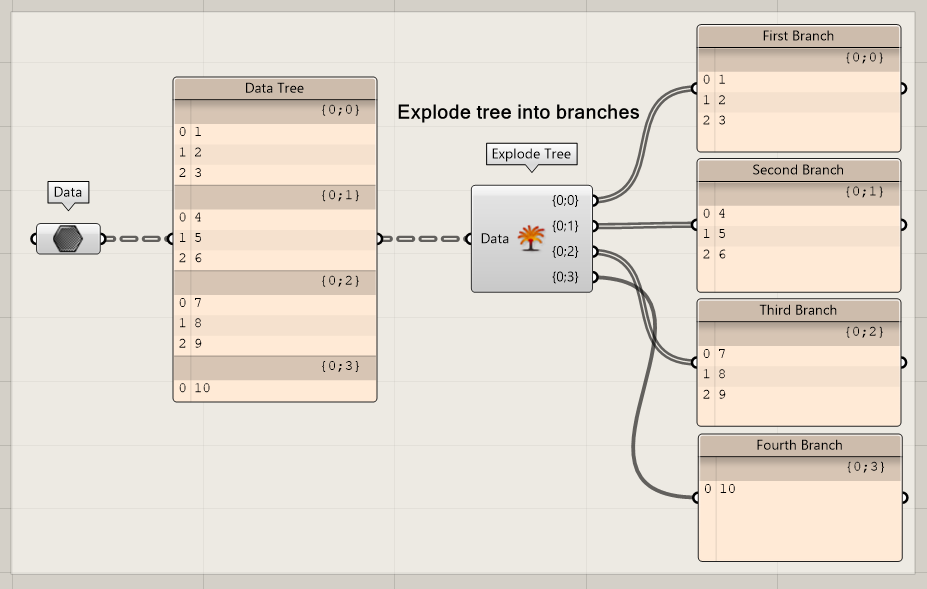
When you need more than one branch, the explode tree component can be useful. By clicking on the + and – icon, you can add or remove branches.
The explode tree component has some limitations:
- The component does not change parametrically if the data tree structure changes during execution.
- Branches are only available in a specific order.
Tree Statistics
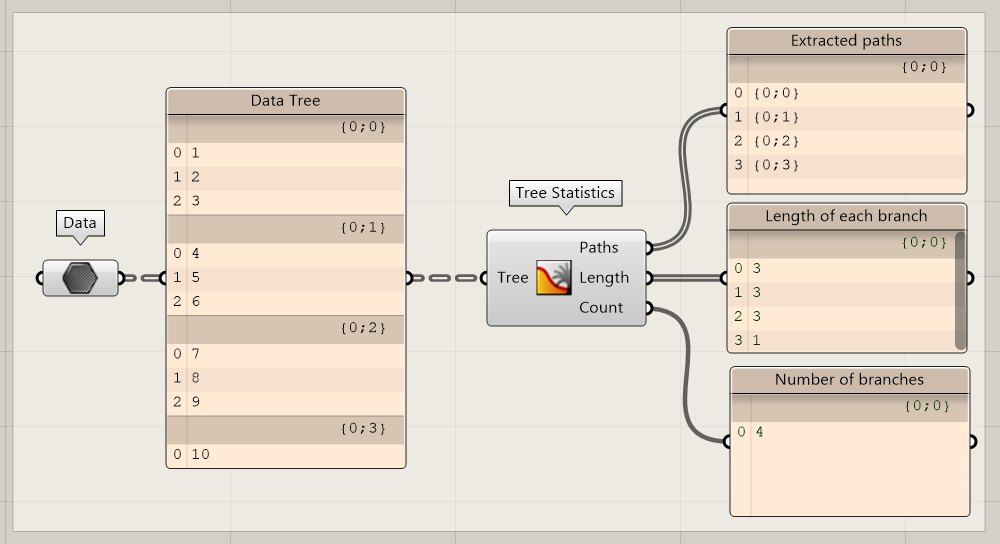
Sometimes, data trees can have complex structures of which it is not easy to extract a specific branch. To get some information about the branches (paths), depth and length, you can use the Tree Statistics component.
Entwine
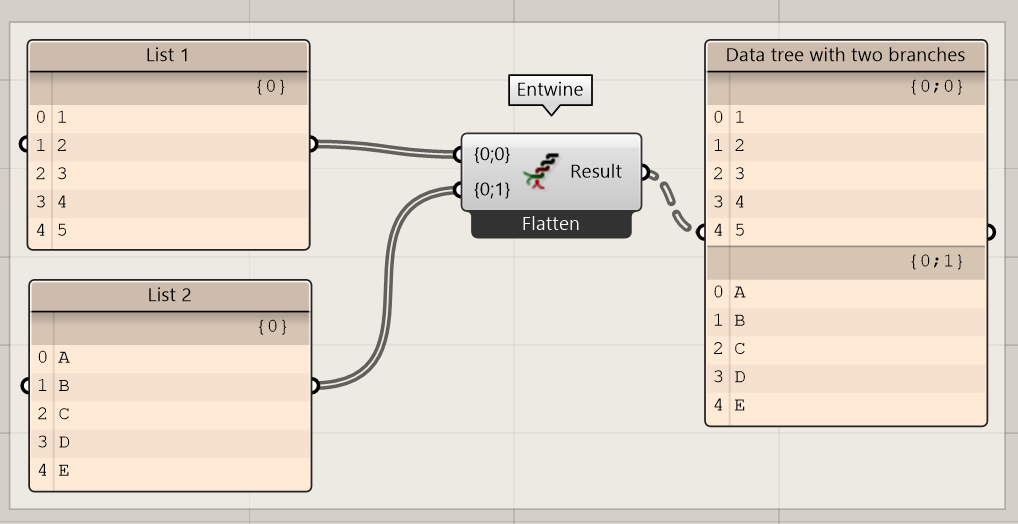
When you want to combine two lists into on data tree, but you want to have the lists in different branches, you can use the entwine component.
By right-clicking on the entwine icon, you can specify if you want the data to be flattened or grafted.
Prune Tree
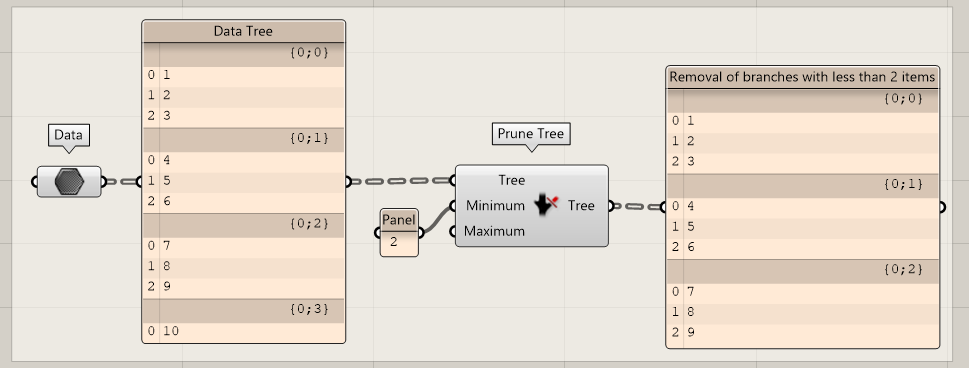
If you need to cull branches that have less, or more, than a certain number of items, you can use the Prune Tree component.
For example: if the minimum is 2, all branches with less than 2 items will be removed.
Clean Tree
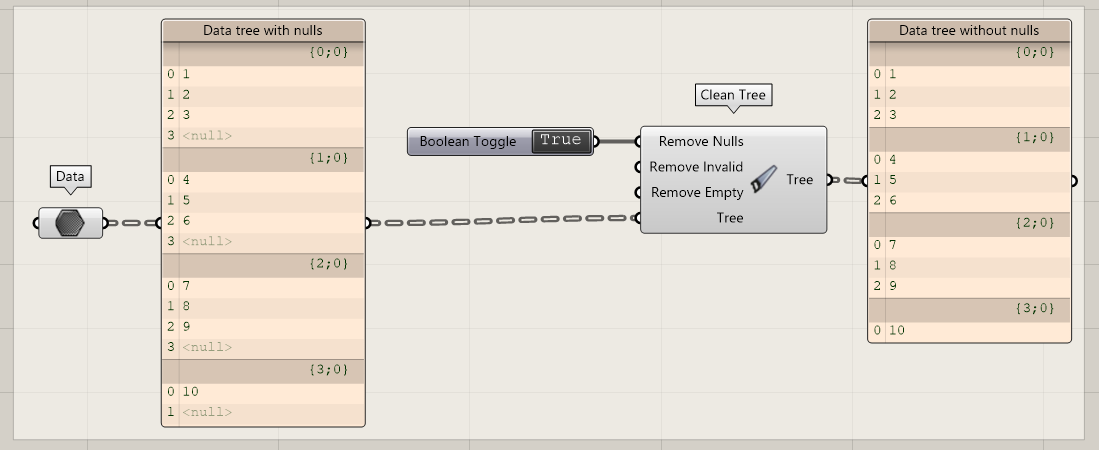
When you want to remove Null data, invalid data, or empty branches, you can use the clean tree component. Which data should be removed, is based on a Boolean input for each category.
Basic data tree action 6/9
Advanced Data Tree Componentslink copied
Match Tree
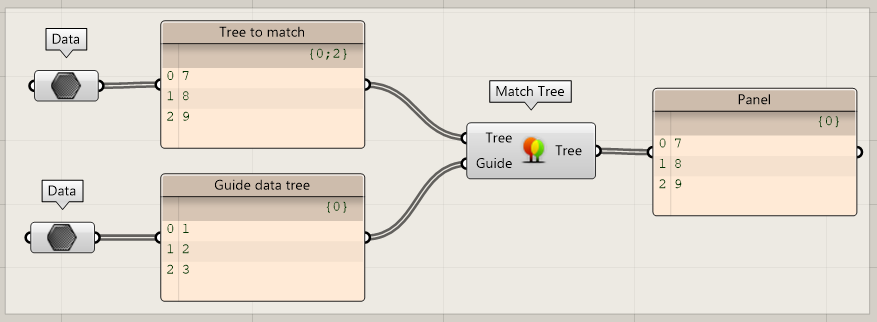
When two trees have the same number of branches, but the structure of the branches is different, you can match the trees. For example: a tree with branches {0;0;0} and {0;0;7} that should match {0;0;0} and {0;0;1} will result in {0;0;0} and {0;0;1).
Flip Matrix
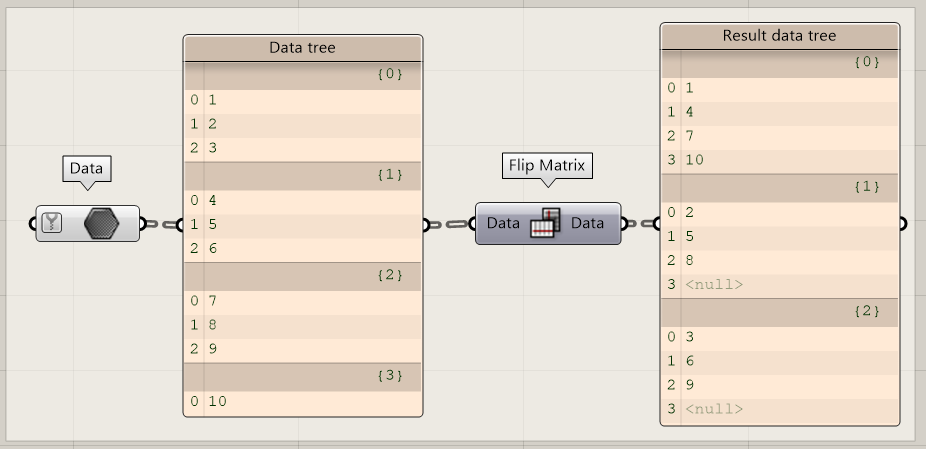
If we compare a data tree to a matrix, the branches can be considered columns, and the items in the branches’ rows. Using the flip matrix node, you can flip the columns and the rows of a data structure.
Unflatten Tree
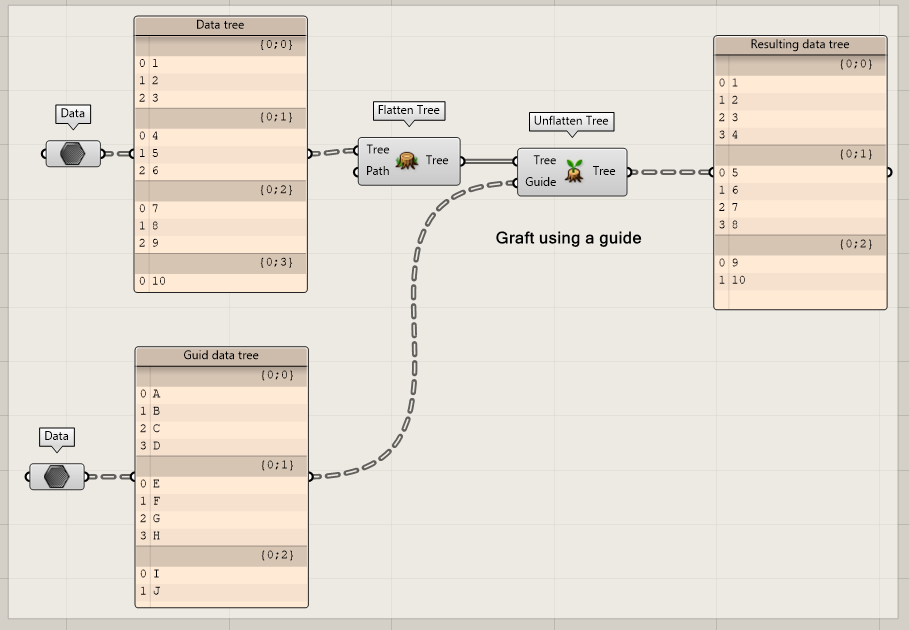
Based on a guide tree, you can unflatten a tree. Unflattening a tree is very similar to the graft component. However, this component allows you to “graft” using a guide or pattern. This is useful if you need to change certain values based on a pattern that should continue no matter the branch an item is on.
(de)Construct Path
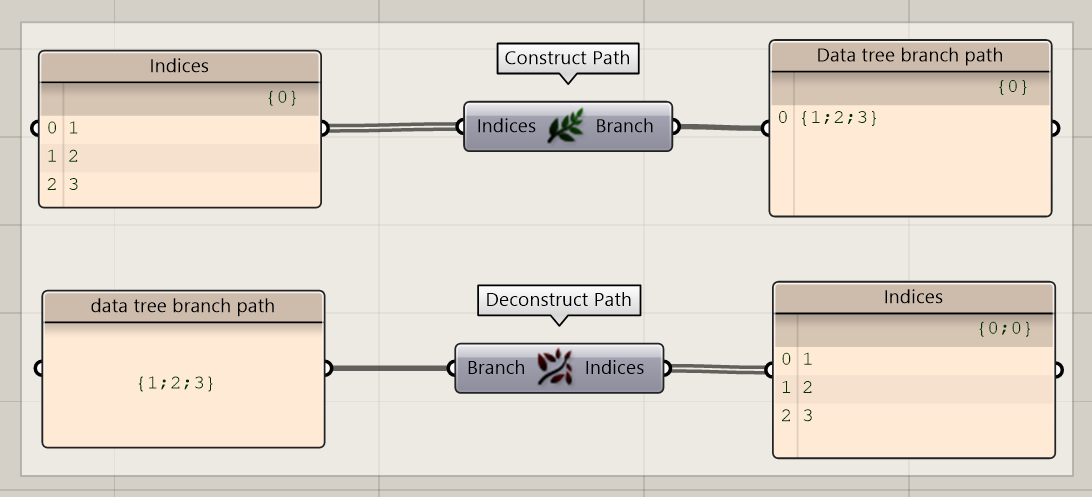
The construct path component allows you to create data tree branch paths, which can be very helpful when accessing or organizing data in a data tree. Using the construct path function, you can construct a path out of a series of numbers. With the deconstruct path function, you will achieve the opposite result.
Basic data tree action 7/9
Tree actions with operator syntaxlink copied
One of the most powerful advantages of grasshopper is the use of operator syntax. This is crucial for performing calculations and manipulating data within the script. The operator syntax ranges from arithmetic operators to comparison, logical operators. By understanding the flexibility of these operators, it is possible to create dynamic parametric designs in grasshopper.
Operator syntax
To specify certain rules related to paths/branches, in most cases you can use all the following operators:
| Sign | Operation |
| * | Any number or integer in a path |
| ? | Any single integer |
| ! | Anything except this item |
| (x, y, z) | One of the items between the brackets |
| (x To y) | Any number in this range |
| [x To y] | All numbers in this range |
| “or” | Choose between two structures |
| “and” | Include both structures |
| <, <=, >, and >= | Any number that follows this rule |
Path Compare

Using the path compare you can check if a path follows certain rules. You can use operators to like *, <, > etc. to specify the rules.
Replace Paths
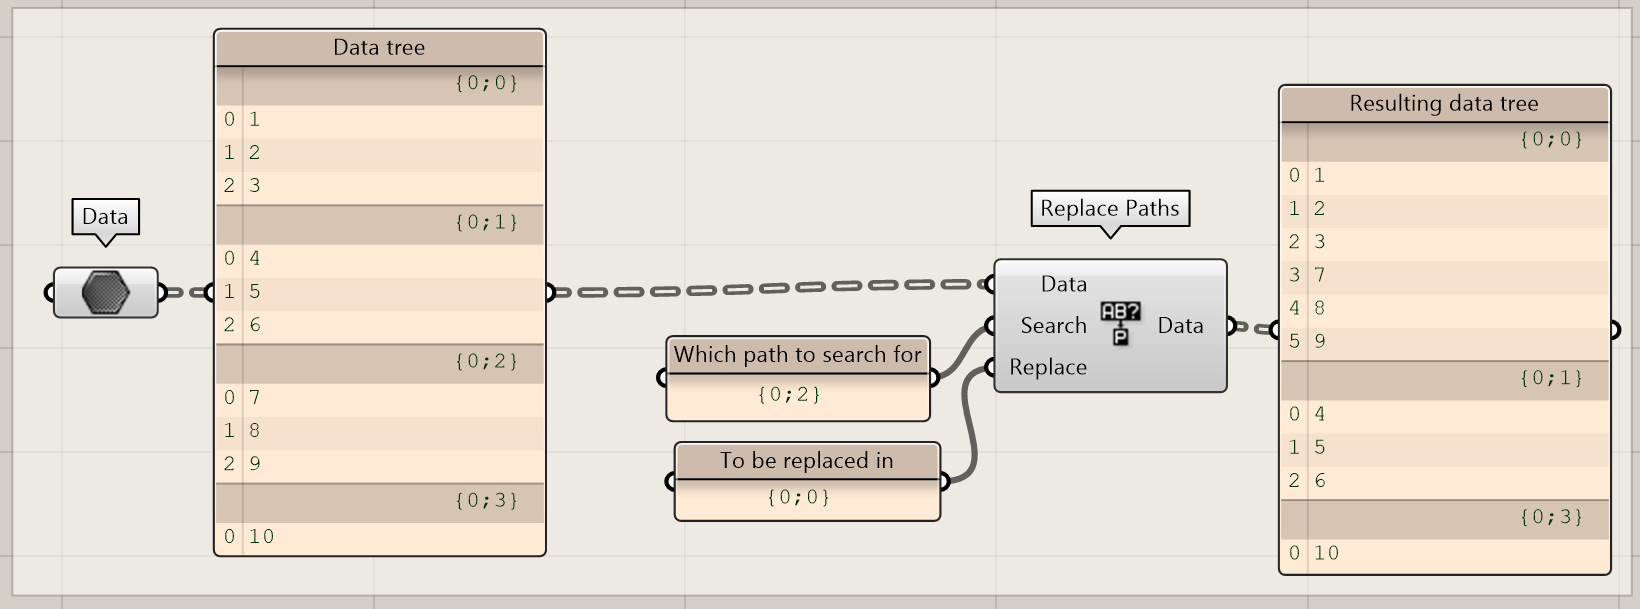
Using this node, you can merge or replace certain branches in a data tree. It is possible to use operators like *, <, > etc. in the mask to specify which paths to search for. In this example, we have merged branch {0;0} and {0;1} because we replaced all branches that follow the {0;<2} rule for {0;0}.
Relative Item(s)
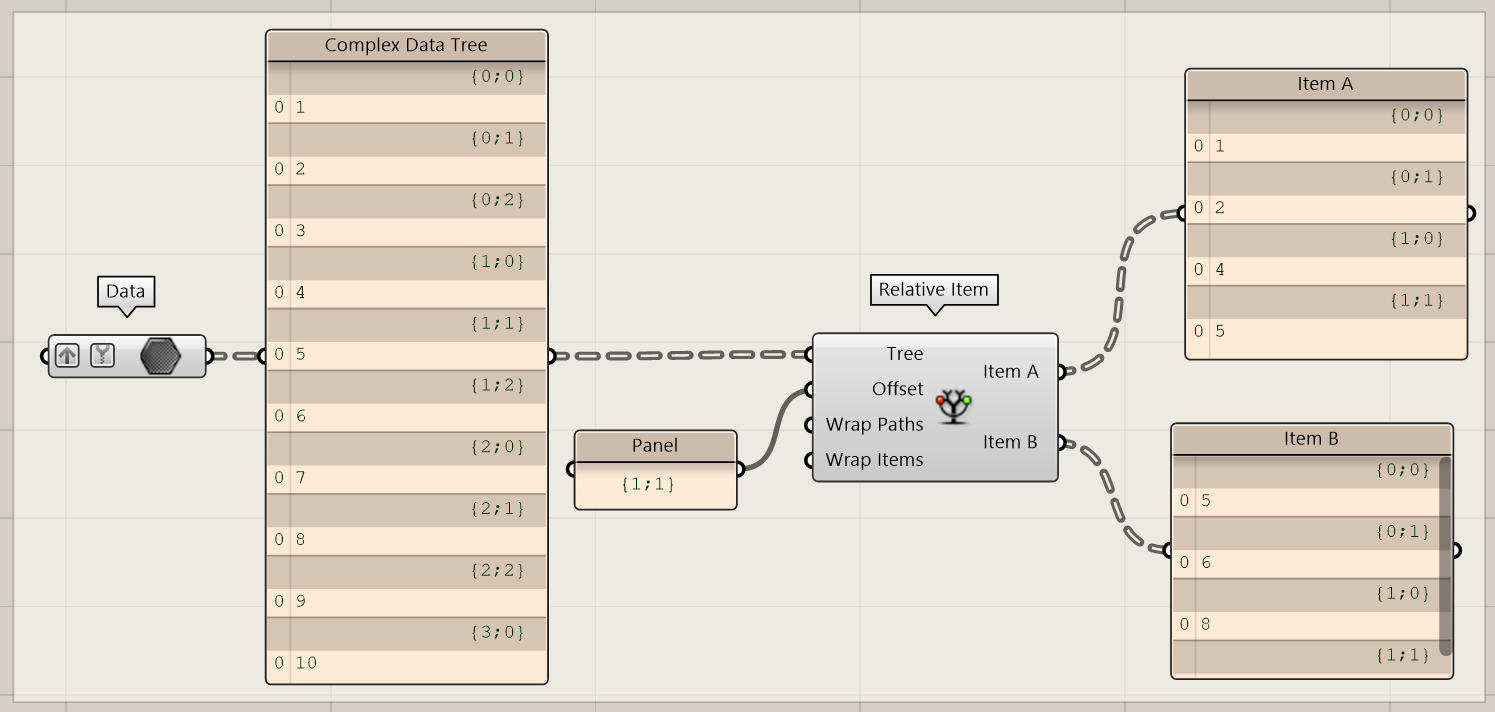
The relative item node is all about relations between items in a data structure. The function can split a tree in two parts where output A has a repeating relation with output B. For example: if we have one item in branch {1;0} and one item in branch {2;1}, the offset (difference) between these items is {1;1}. The relative item function can retrieve all these relations for each item in the data structure.
Sometimes, a relation is not available. For example: if we have an item in branch {5;5} and we are asking for offset {2;2}, but the branch {7;7} does not exist, this relation will not be included in the output. You can change this by setting the Wrap Items or Wrap Paths to true.
Furthermore, it is possible to create an offset within a branch. This can be done by adding (item) behind the path. For example: the offset {0;0} (1) will find the relation by retrieving the next item in each branch.
Split Tree
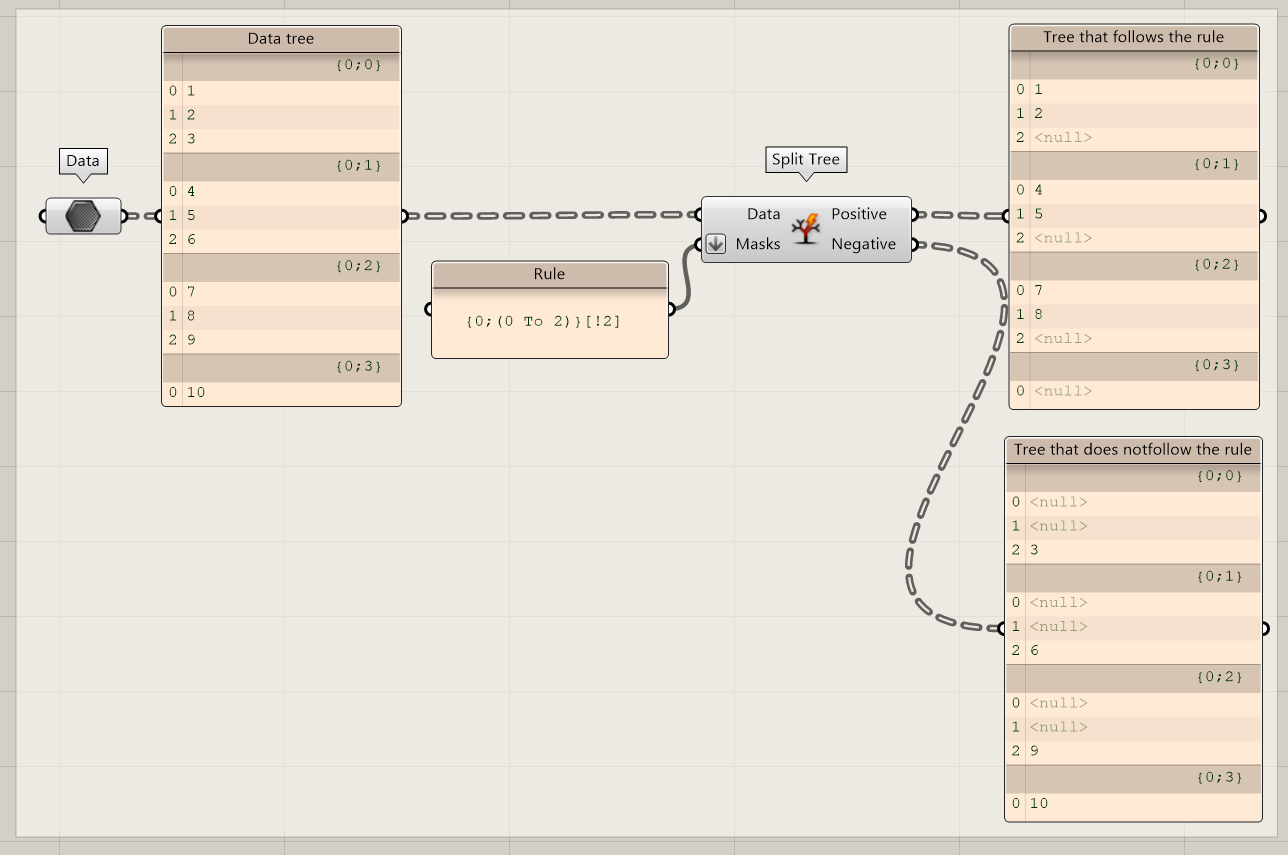
Based on a mask you can split a data tree. For example, you can split a tree where the indices 0-5 go to a first list, and all other indices go to another list.
Suirify
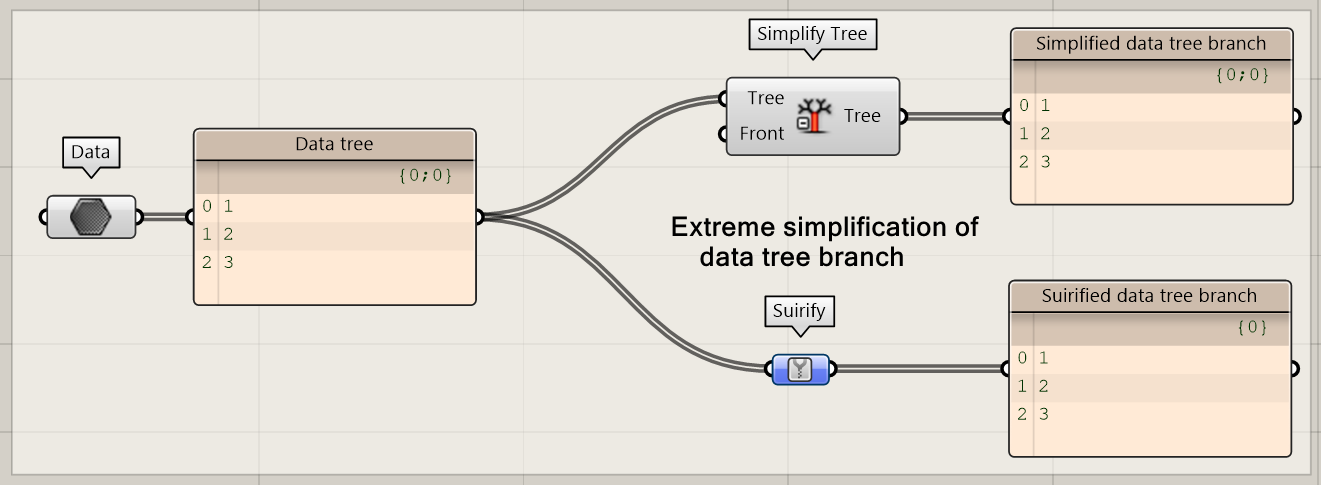
Sometimes you need to simplify a complex data tree, the suirify component allows you to remove unnecessary branches or levels in a data tree. This will work most of the time, except for the situation when a data tree only has one branch. The suirify node can be used as an extreme version of simplification. However, this node is only used in very specific situations.
Note: The suirify node is only available in Rhino 7.
Path Mapper
The path mapper is a logistical operator that can do almost all the above-mentioned procedures. Double-click on the icon of the node to set the parameters. The basic options can be divided into the following categories:
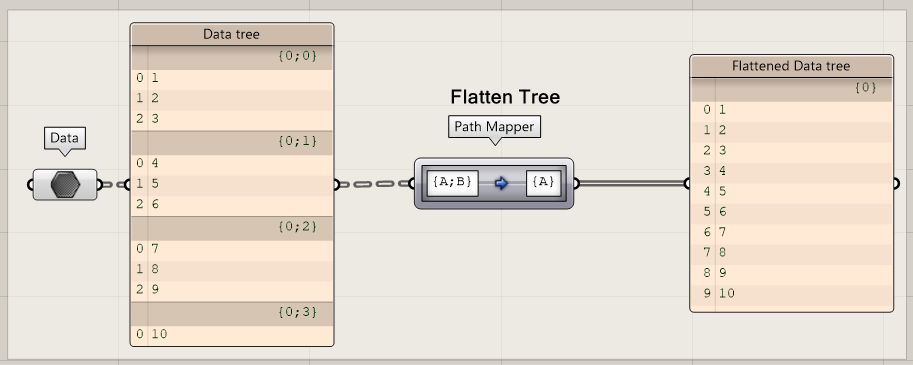
Flattening the data: remove all small branches that are not relevant anymore.
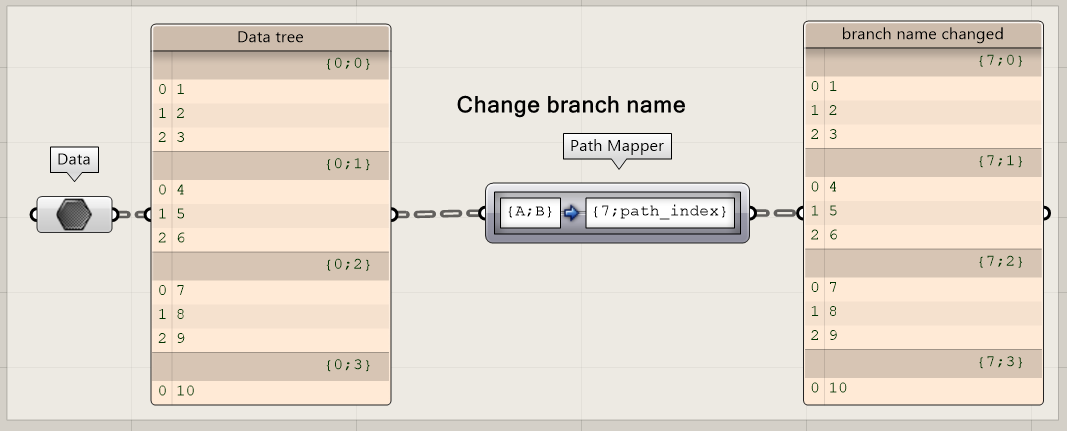
If you only need to change the names of the branches, use the path_index indicator.
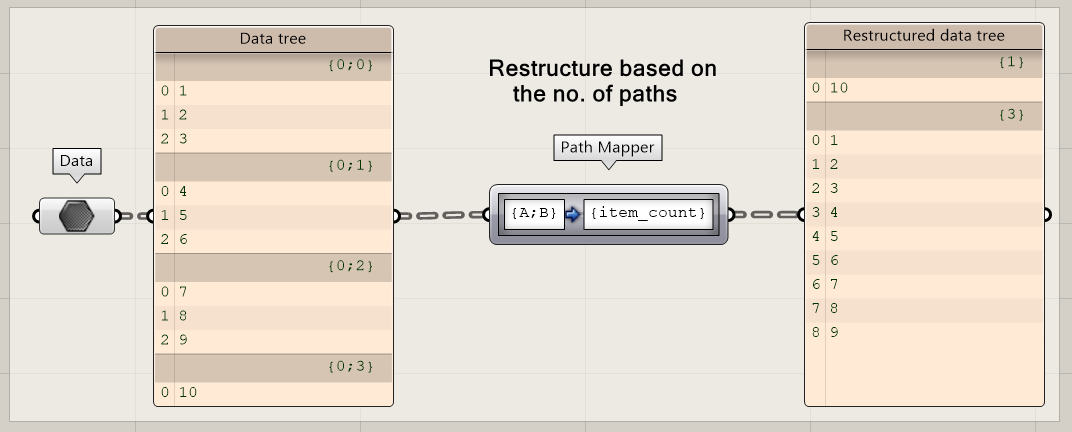
Similarly, you can use the path_count and item_count to restructure based on the number of paths or branches.
Basic data tree action 8/9
Conclusionlink copied
This tutorial aims to give you an extensive understanding of data trees and how to use and edit them. By following this tutorial, you unlock another level of grasshopper that allows you to use it to its full potential in a more efficient and effective manner. After trying out and understanding the data tree logic and actions, you will be able to easily tailor, create, edit, and adapt your own data trees in grasshopper.
Complete tutorial code

Basic data tree action 9/9
Useful Linkslink copied
Linked tutorials
Learn more about basic list action in this tutorial:
External Links
Write your feedback.
Write your feedback on "Basic data tree action"".
If you're providing a specific feedback to a part of the chapter, mention which part (text, image, or video) that you have specific feedback for."Thank your for your feedback.
Your feedback has been submitted successfully and is now awaiting review. We appreciate your input and will ensure it aligns with our guidelines before it’s published.
