Grasshopper Getting Started
-
Intro
-
Adding Nodes to the Canvas
-
Inputs
-
Sequences
-
List Actions
-
Random and Jitter
-
Baking
-
Conclusion
Information
| Primary software used | Grasshopper |
| Course | Grasshopper Getting Started |
| Primary subject | Parametric Modeling |
| Secondary subject | General |
| Level | Beginner |
| Last updated | November 27, 2024 |
| Keywords |
Responsible
| Teacher | |
| Faculty |
Grasshopper Getting Started 0/7
Grasshopper Getting Started
This tutorial explains how to create scripts for beginner tutorials in Grasshopper.
In this tutorial you will learn the basic actions needed to create the scripts of the beginner tutorials. First you will need to know how to add nodes and geometry to your Grasshopper canvas. Next, some basic functions will be discussed that are important to understand before you continue learning Grasshopper.
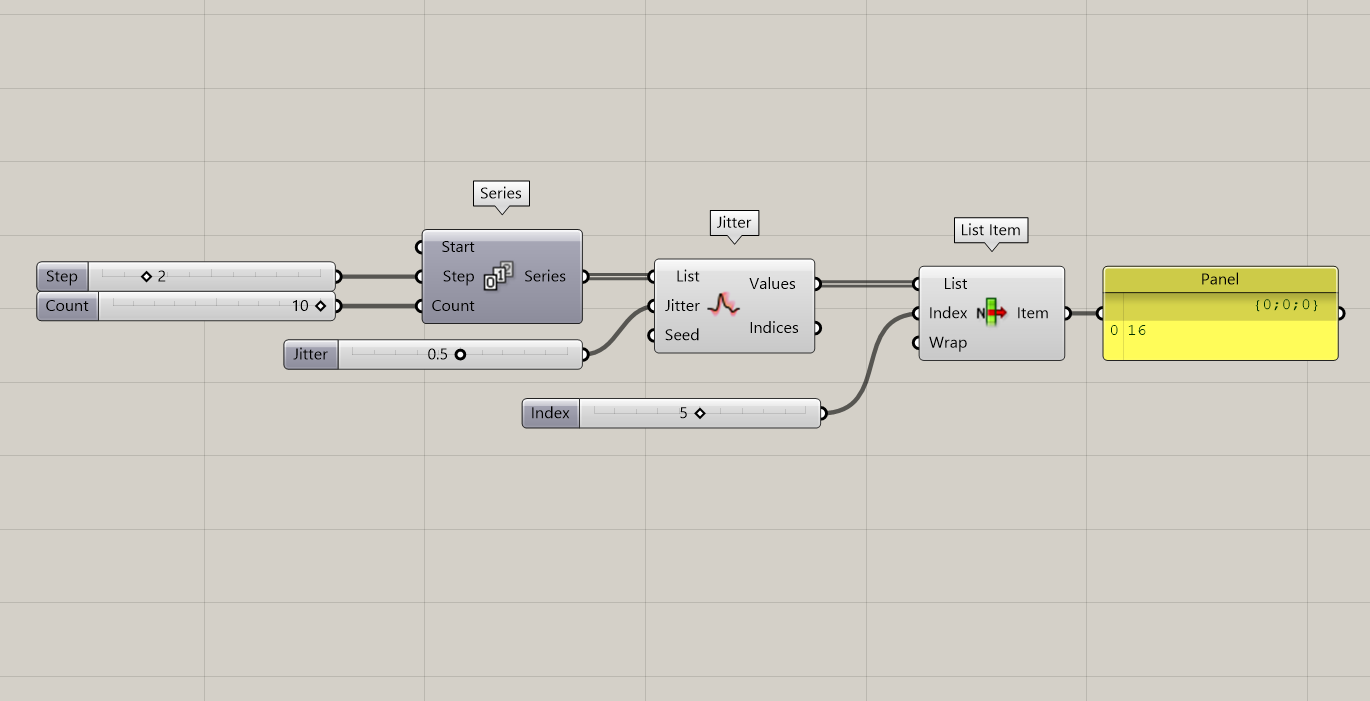
During Grasshopper tutorials, several images will display how you should create the script. You may notice that the input and output names of the Grasshopper components are full names, not just one character, which may be the case when you first open Grasshopper. If you want a similar display, take a look at the Display tab and turn on “Draw Full Names”.
Grasshopper Getting Started 1/7
Adding Nodes to the Canvaslink copied
Place a component through the menu
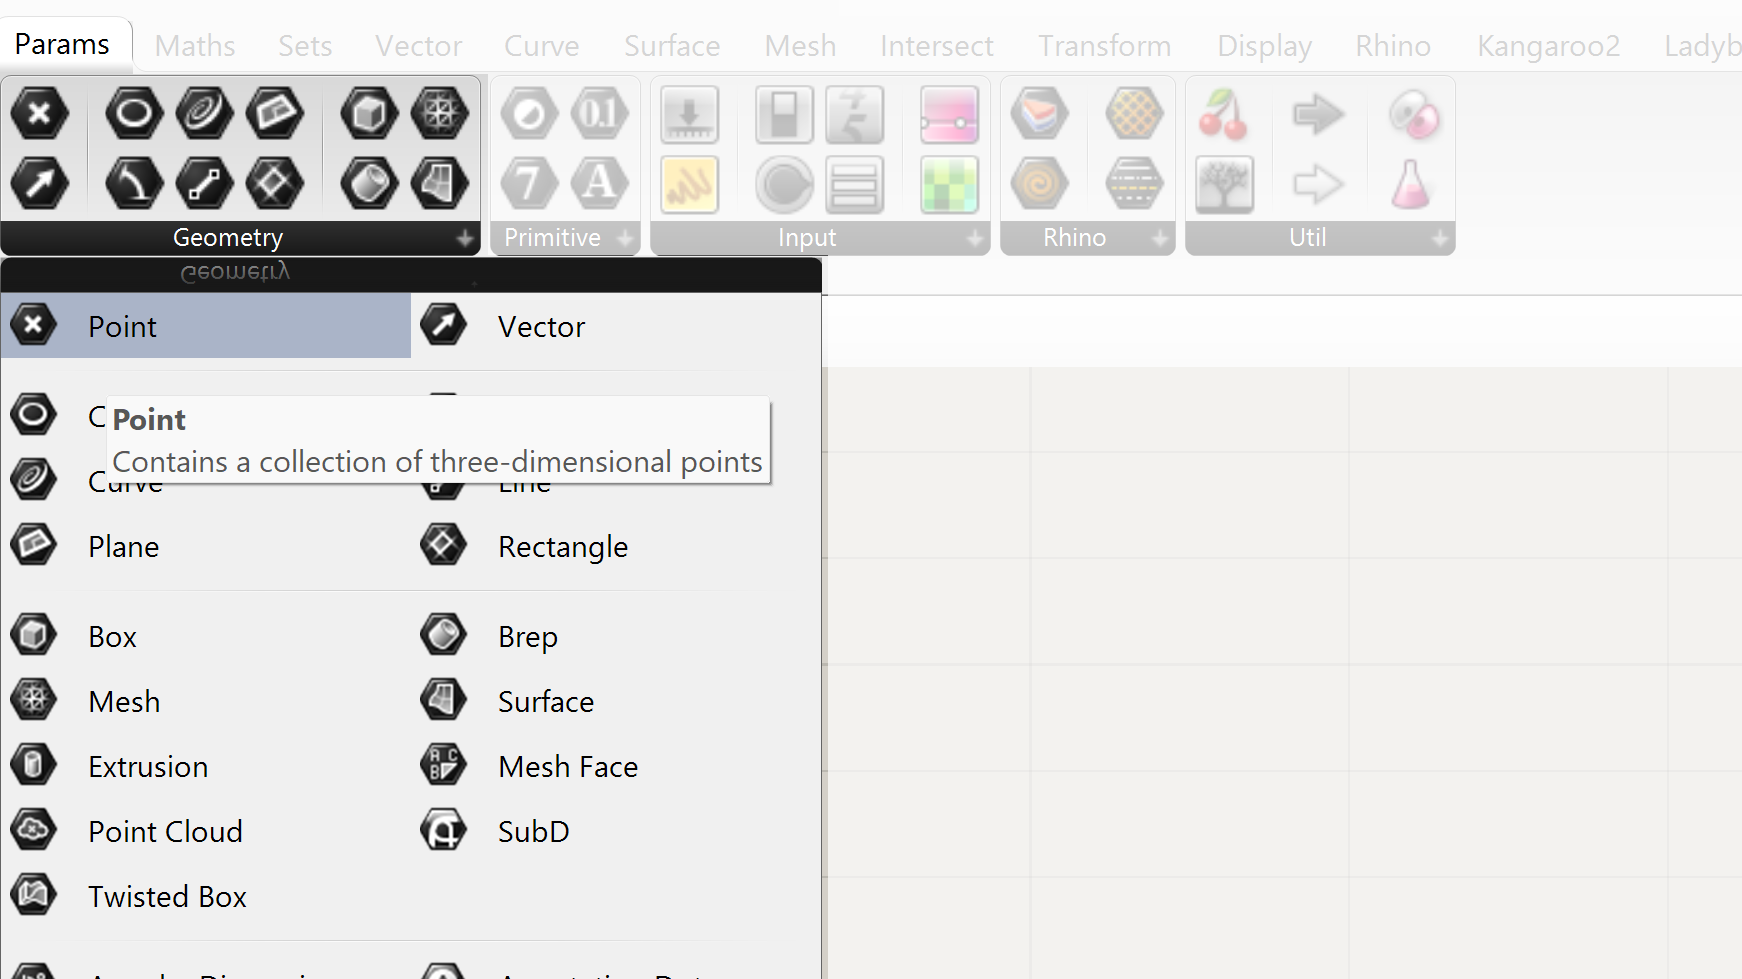
Generally speaking, there are two ways to add nodes to the canvas of Grasshopper. First you can select a node by clicking on one of the pull down menus at the top. For example: if you want to add a point to the canvas of Grasshopper, click on geometry and select point:
Create a point parameter

Reference Rhino Geometry
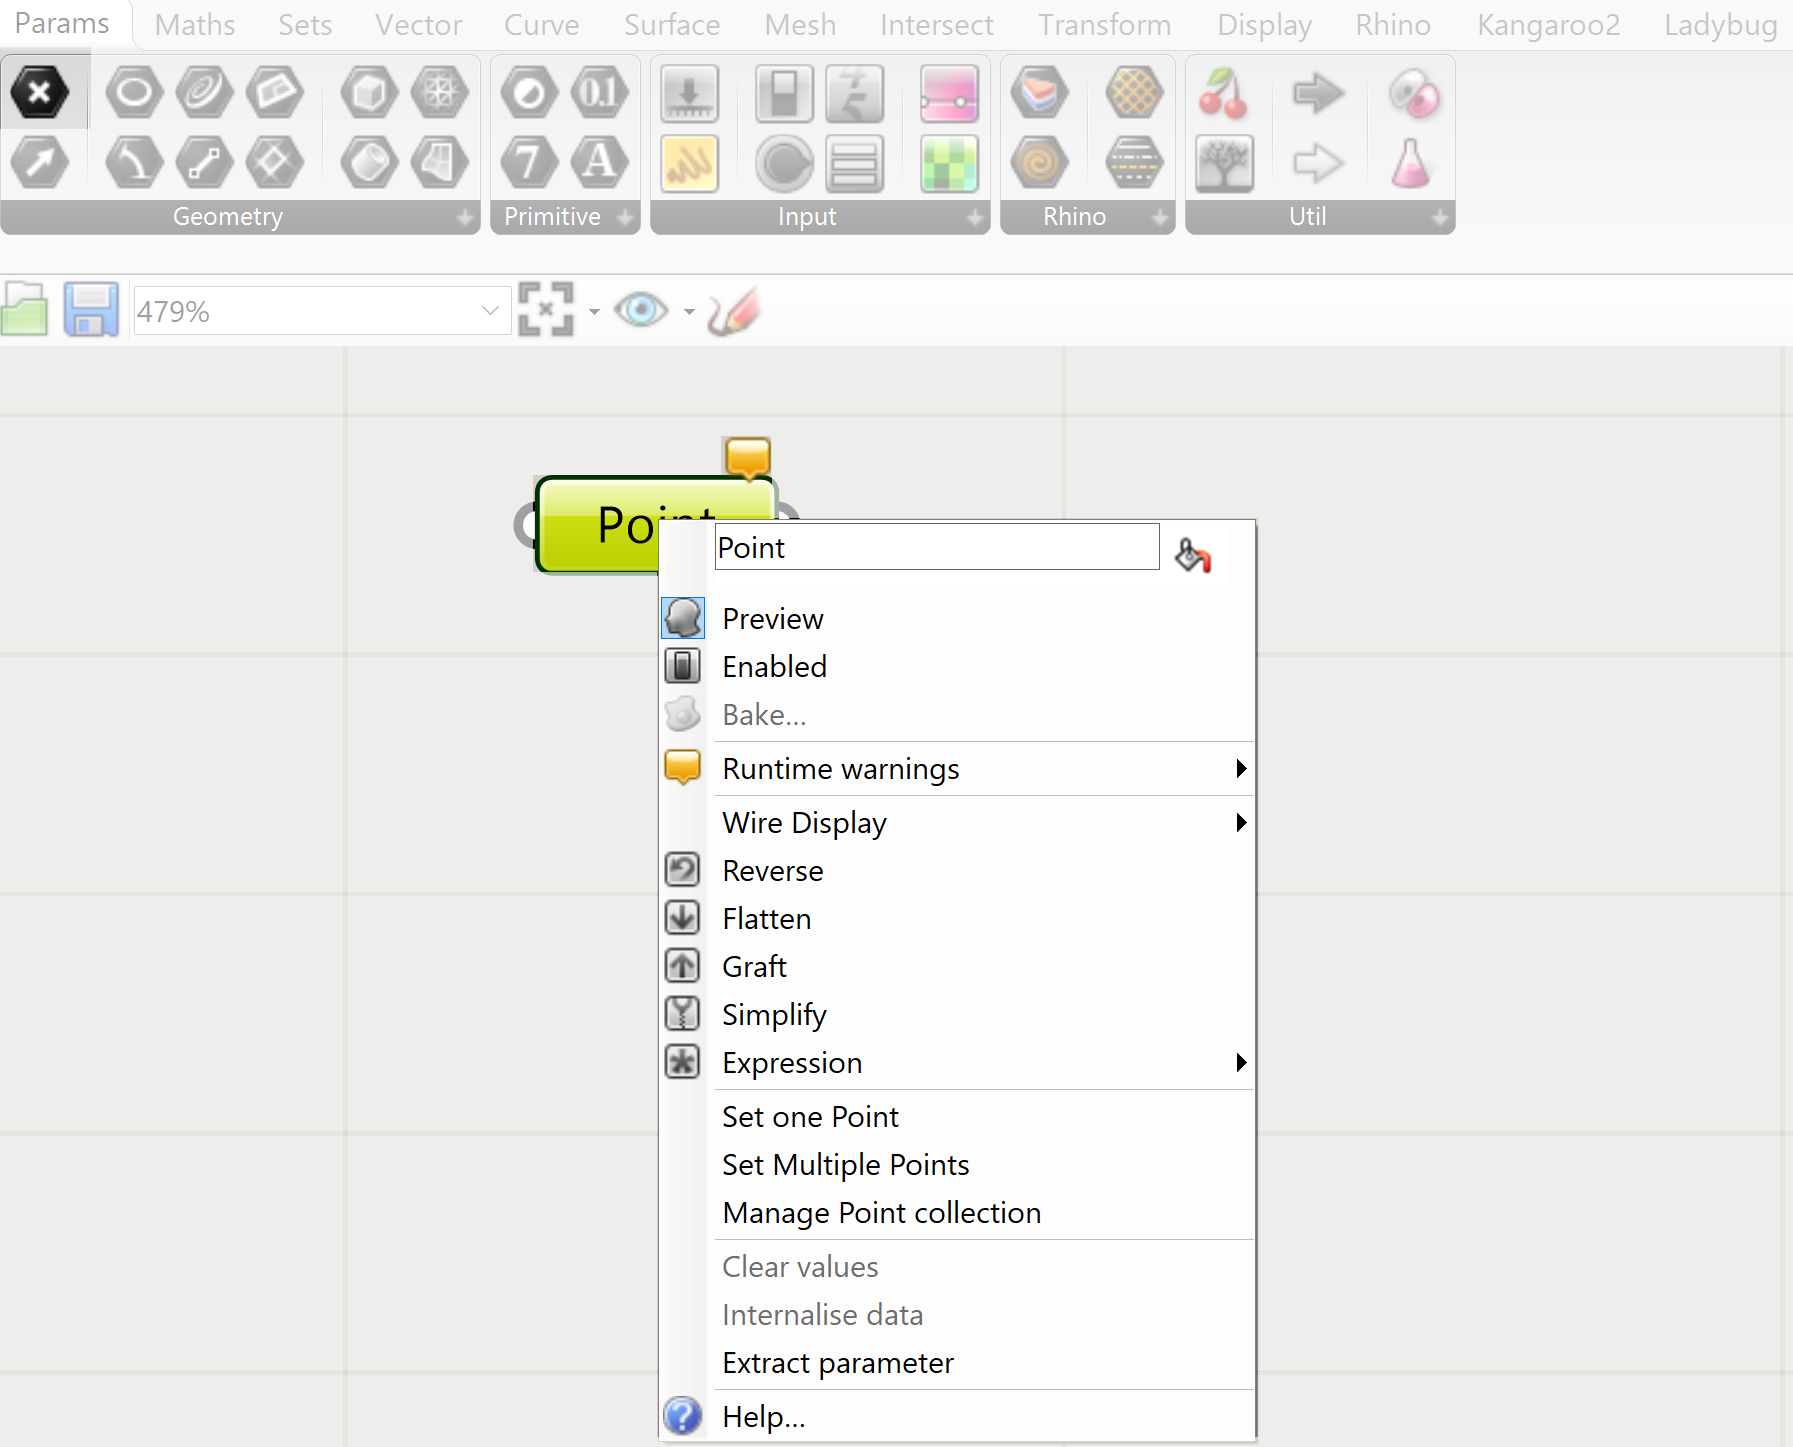
Now you have added a point parameter to the canvas. By right clicking on the point in the canvas. The Rhino viewport is now visible. You can select which point in Rhino you want to add to this parameter.
To set one point from Rhino – set a Rhino point on the Grasshopper parameter.

Placing a component by double-clicking.

A second method of creating a Grasshopper node is by double clicking on the canvas. This method is used most often by designers who are familiar with the Grasshopper interface. However it does mean that you have to know what node you are looking for.
Create a node by double clicking on the canvas.

Where is this component located?
If you want to know to which tab a node belongs to, hold ctrl+alt and click on the node. This can be useful when you are looking for a function that does something similar, but with a slightly different operation.
Find a component in the toolbar.
Grasshopper Getting Started 2/7
Inputslink copied
Types of numeric inputs
One has access to so called “numeric inputs”. For numeric inputs the user can select from a predefined range of numbers. The most used numeric input is the “number slider”. The slider can be set to any range of numbers, with a predefined precision and whole, odd or even numbers. For this tutorial it is advised to check out the following numeric inputs:
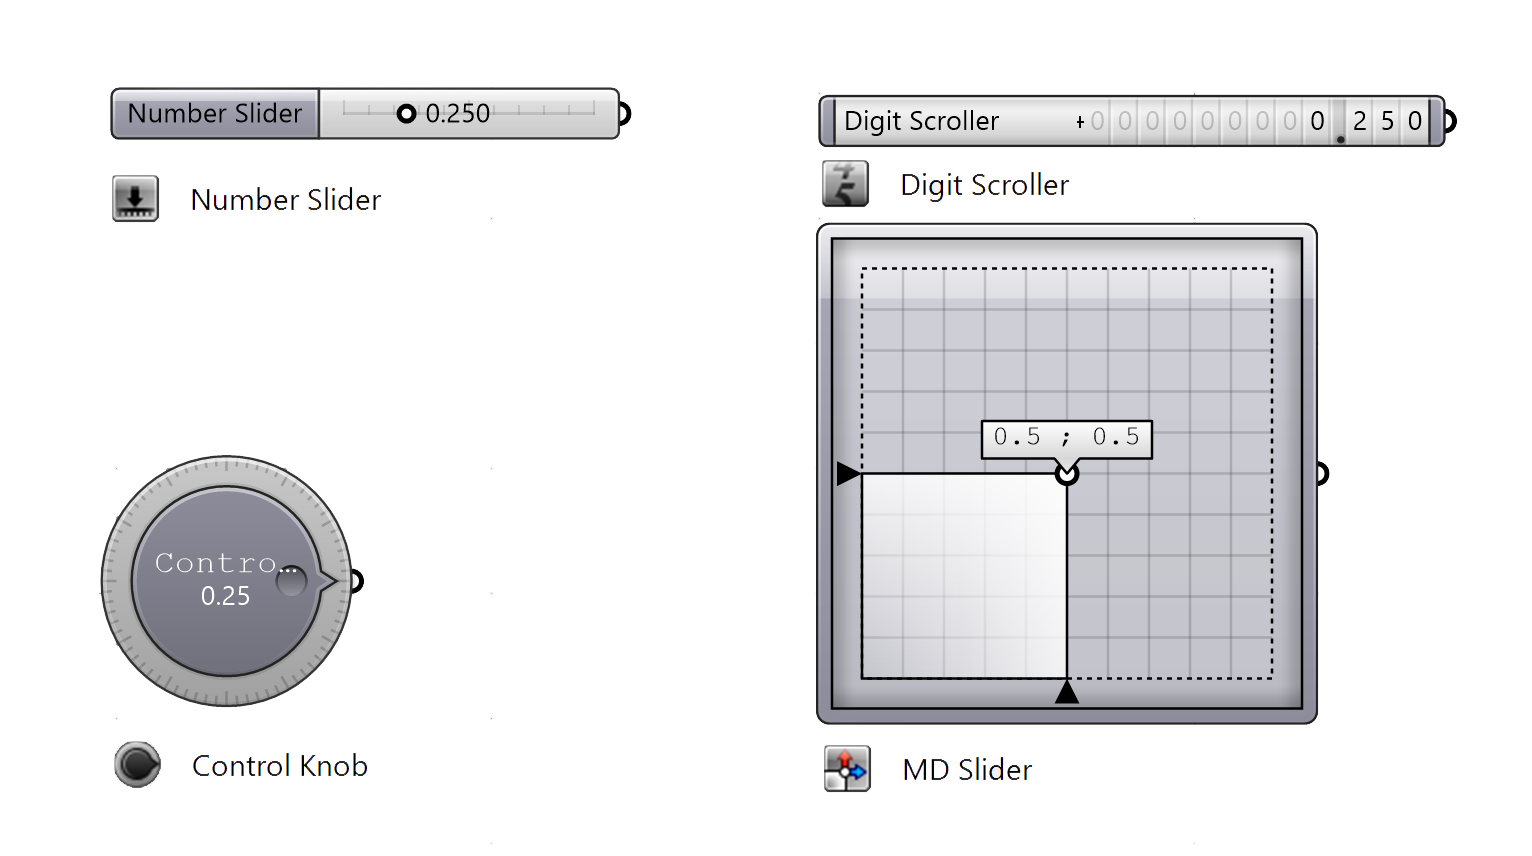
Number slider:
Digit scroller:
Control knob:
MD Slider:

Input Range
The ranges of the different numeric inputs can be changed by double clicking on the input.
- Try changing the slider or scroller to get another output.
Seeing the output.
To be able to see the output of the values you have to connect a panel to it. This can be done by drawing a connection line between the output of the numeric input and the input of the panel.
Add a panel to the canvas
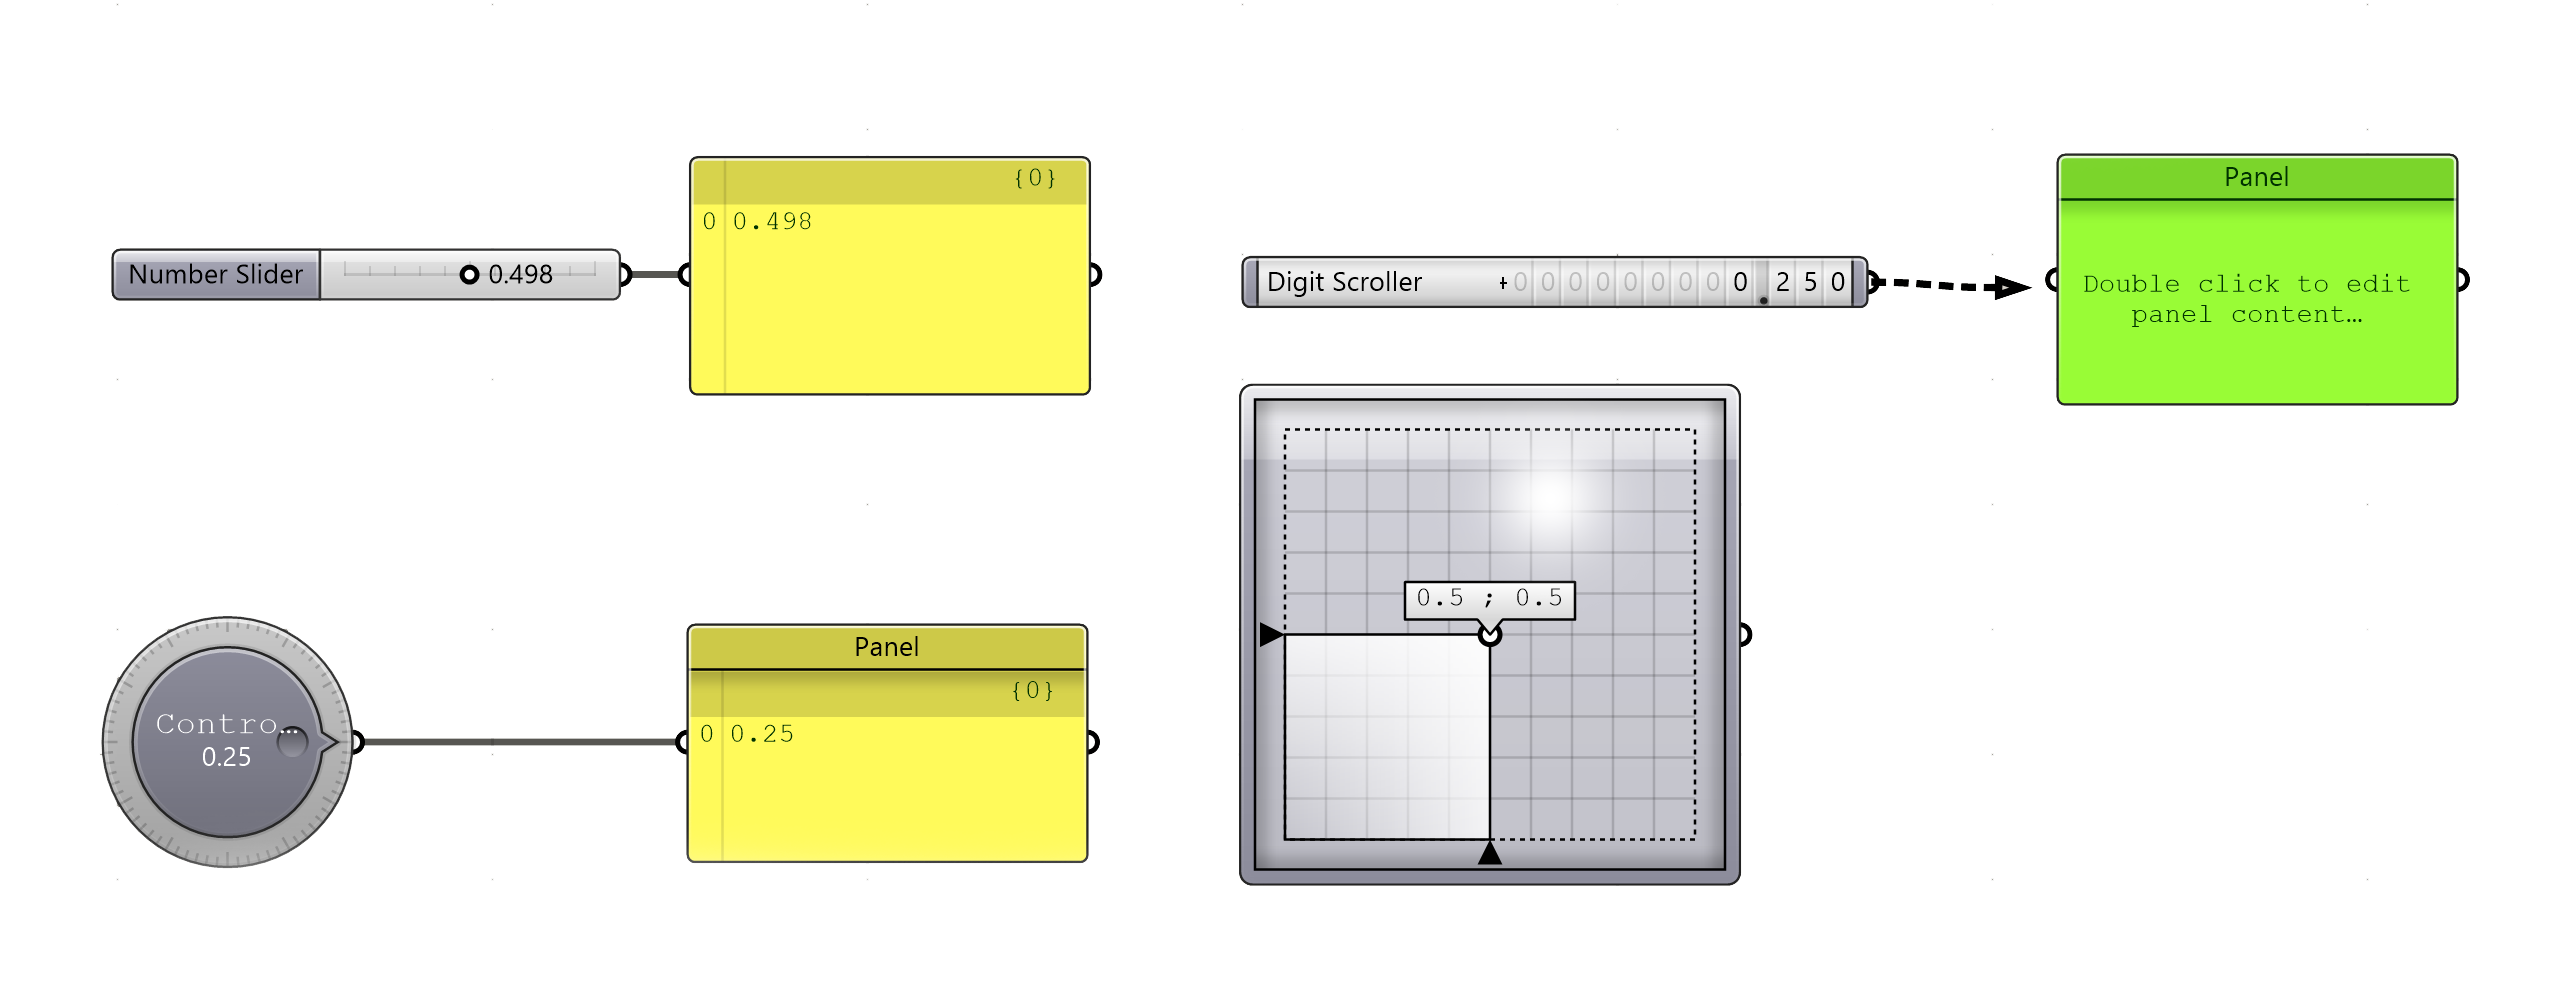
The panel is one of the most used components of Grasshopper. With the panel you are able to see what geometry/points/numbers etc. are generated by a function, or a set of functions.
You can disconnect two nodes by holding CTRL and draw the connection again. Another method is right clicking on the input/output of one of the nodes and select disconnect.

Disconnect a wire
Grasshopper Getting Started 3/7
Sequenceslink copied
In addition to numeric inputs, you can also generate a sequence of numbers. If you connect a panel to such a function, you will not only see one output, but a list of outputs. Lists are the main way information is transferred between functions. Therefore it is important that you understand the way a node generates an output.

For the “beginner tutorials” of the Digi-Pedia, you have to be familiar with three sequence functions:
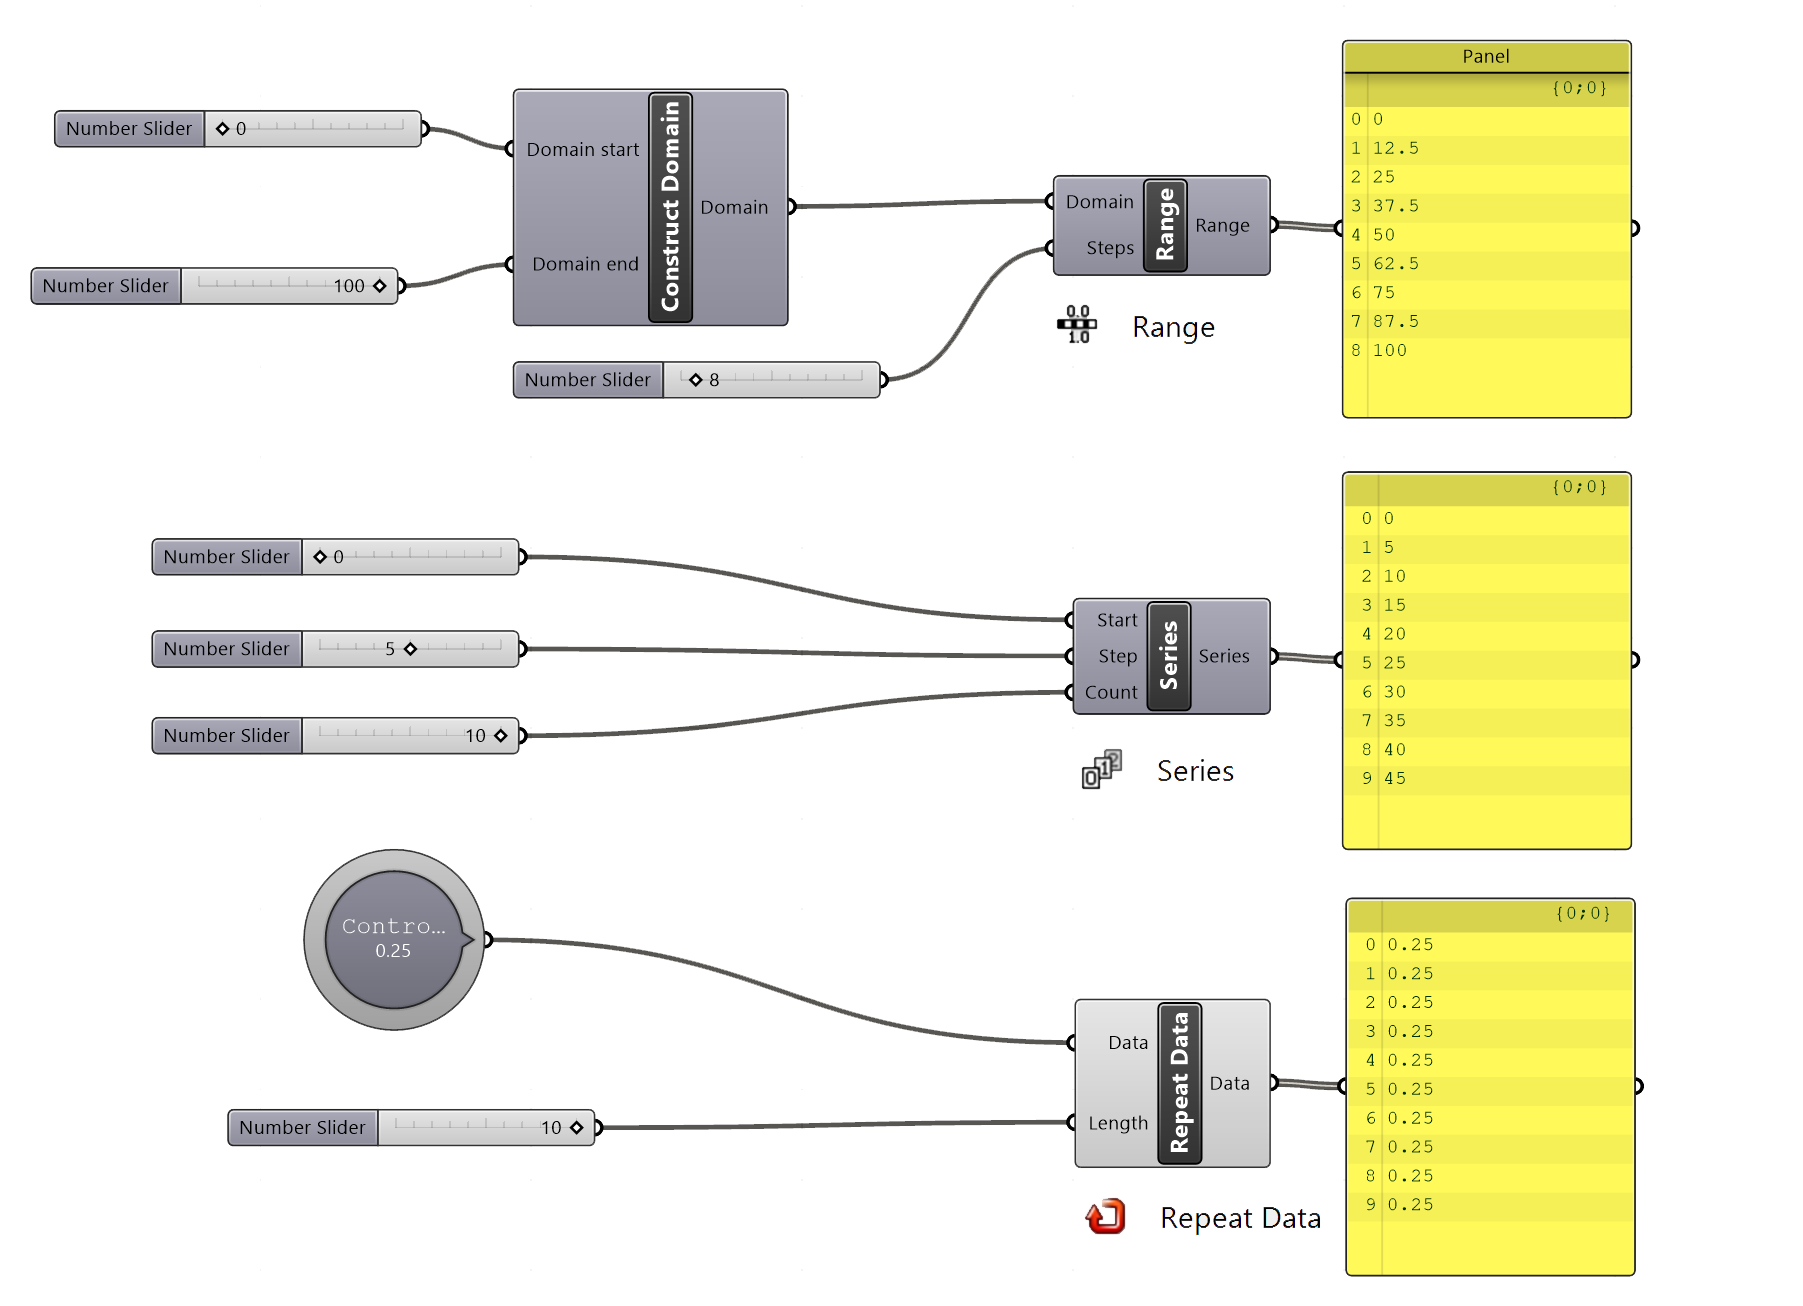
Range:
The range works by setting a domain (D) and the amount (N) of subdivisions into which the domain will be split. Notice the different names of domain types.
Construct a domain
Create a Range of numbers
A range node can also be generated witch just a number slider as input to the domain. In this, your domain will automatically start at the value 0.
Series:
The most basic way to build a number sequence. Specify the start (S), Size (N) and the amount of values (C) with a numeric input. For this example, connect three different number sliders.
Create a Series component
Repeat Data:
With repeat data the input (D) is repeated until the set number of items (L) is satisfied. The data input, can also be a previously generated list of information that will be repeated.
Repeat the data
List of information at the essence of parametric design
After reading this chapter you might ask yourself why you would be interested in generating lists of numbers. For designing architecture, are we not supposed to focus on geometry and surfaces? Yes, in a certain way you should focus on geometry. However, Grasshopper is a visual way of building scripts to generate geometry. For example, a list of numbers could lead to a list of points, which then leads to a curve you use for your design.
Generating lists with information, and having the ability to change it easily leading to different geometry is the essence of parametric design.
Grasshopper Getting Started 4/7
List Actionslink copied
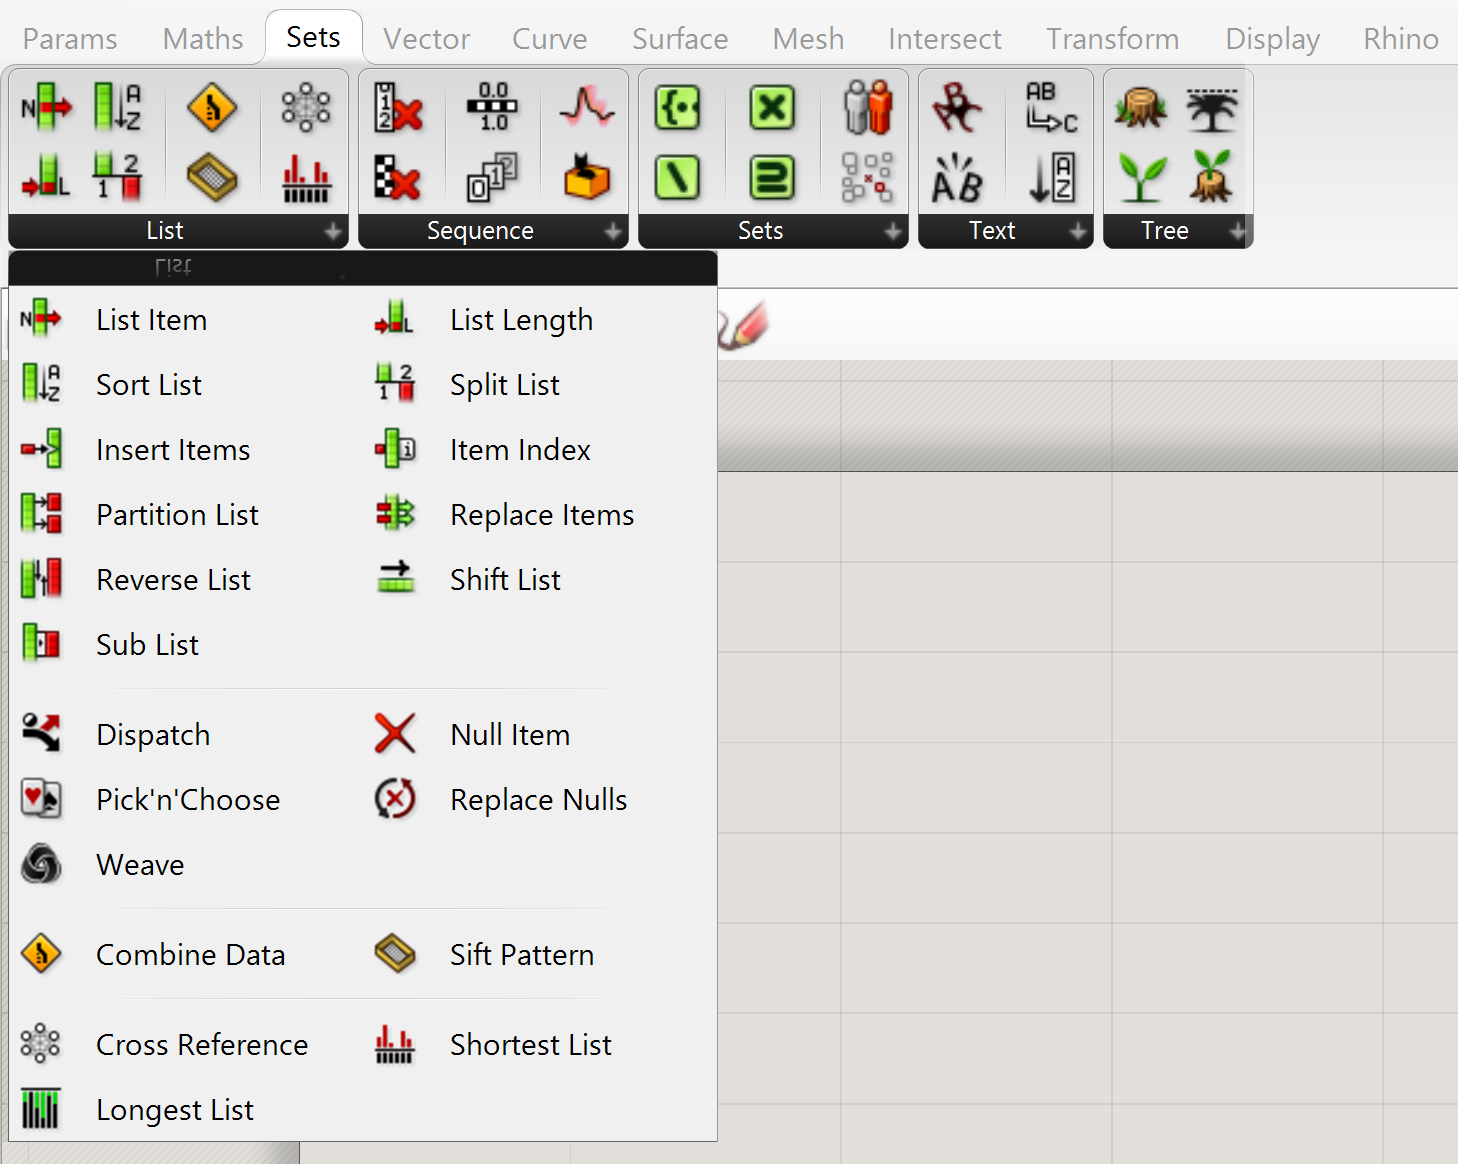
After you created a list with values in Grasshopper, it is important to learn about list actions. Let’s say you have created a list of 100 points and now you want to change the height of one of the points. This means you have to be able to edit the list. We call this: list editing.
When you start learning Grasshopper, it is recommended to take a look at the list section in the sets tab. Here you find all the functions you can use to alter your data.
Take a look at the list commands
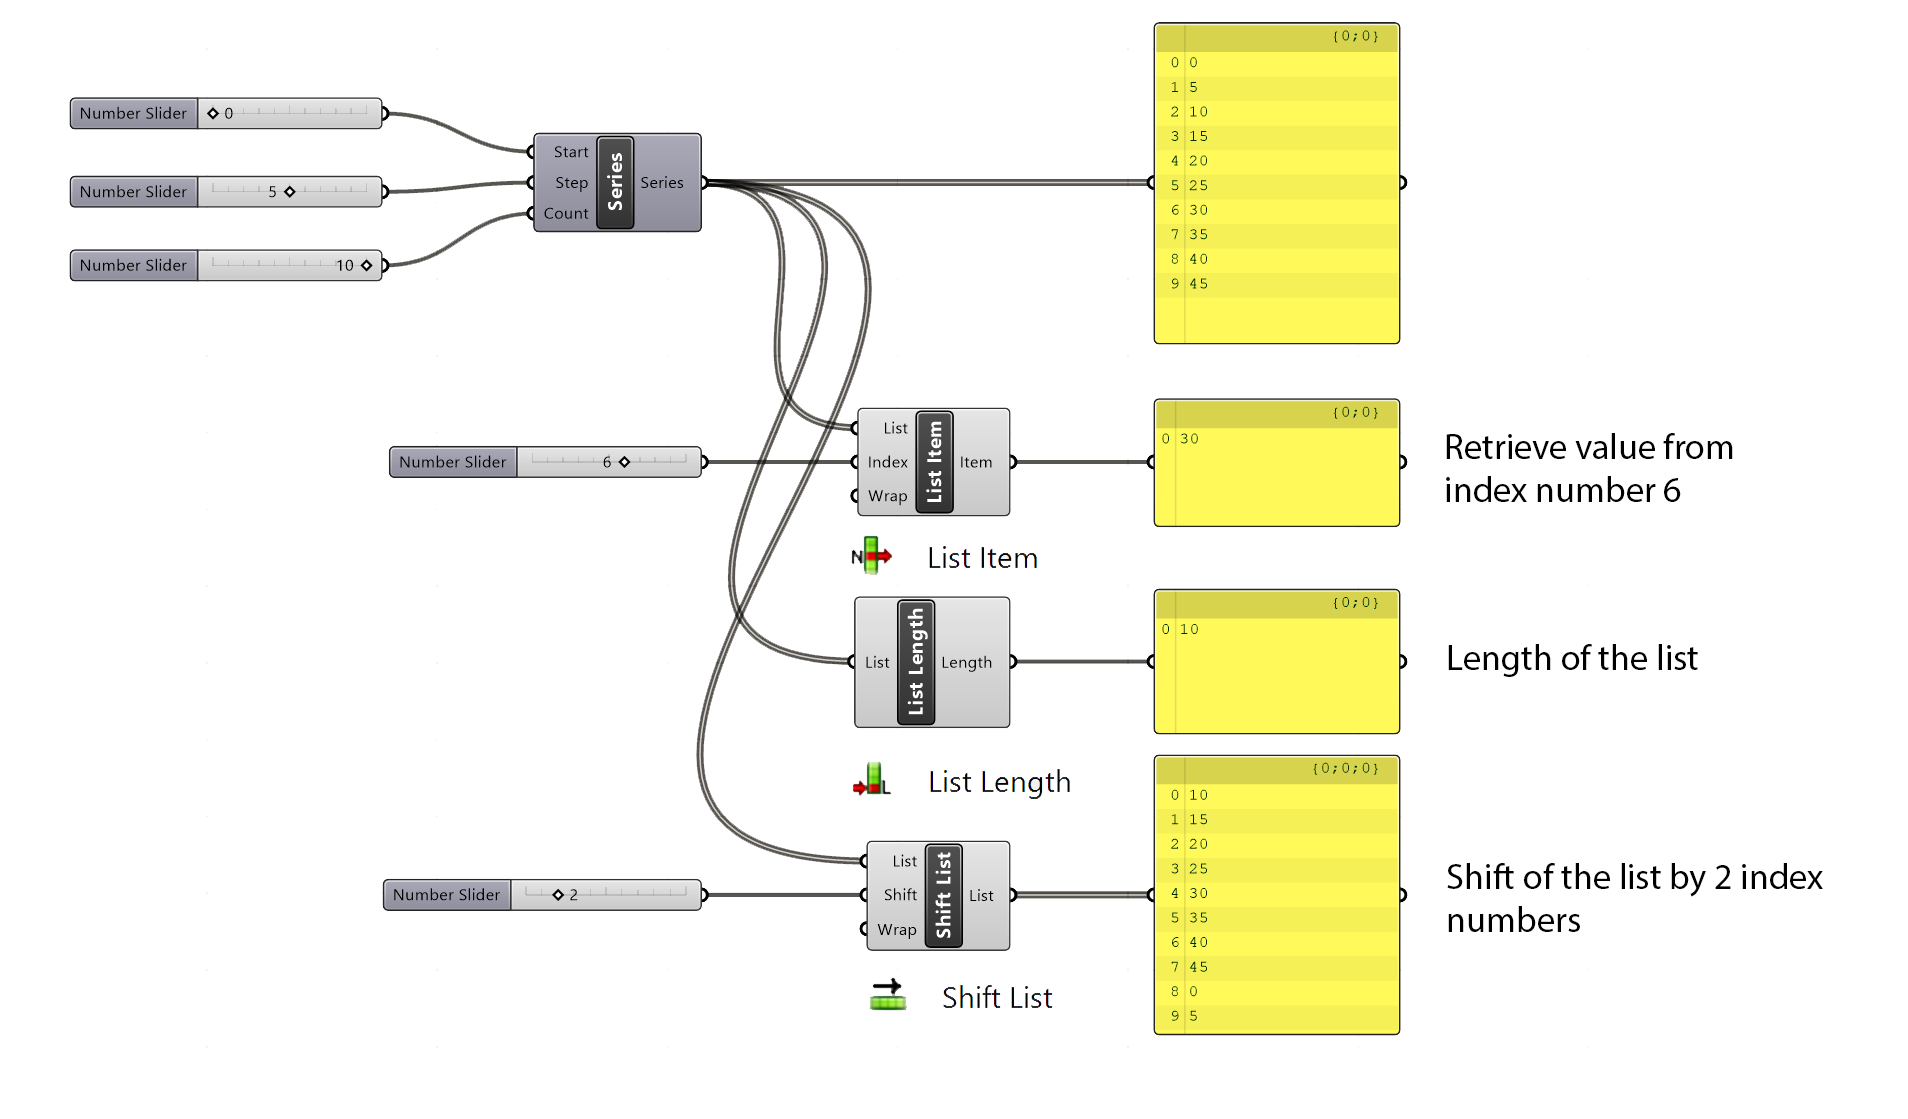
In this chapter you will learn three list options that are important for the “beginner tutorials”, namely: List Item, List Length, and Shift Length.
List Item
The list item extracts one item from the list. Take note of the indices in the input list (number in font of the value in the first panel). The indices start at 0. This means, that if you want to retrieve the first number with the list item function, add the number 0 to the Index (I).
Create a List Item
List Length
This function returns the length of a list with values. Note that the last number in the list always is 1 lower than the list length. This is because of the fact that the list start at index 0.
Calculate the length of a list
Shift List
Shift list moves the items in the list by the shift value (S). A positive (S) moves the items up in the list and a negative (S) down.
If you want to learn more list editing functions, take a look at the following page: Grasshopper Basic List Actions.
Grasshopper Getting Started 5/7
Random and Jitterlink copied
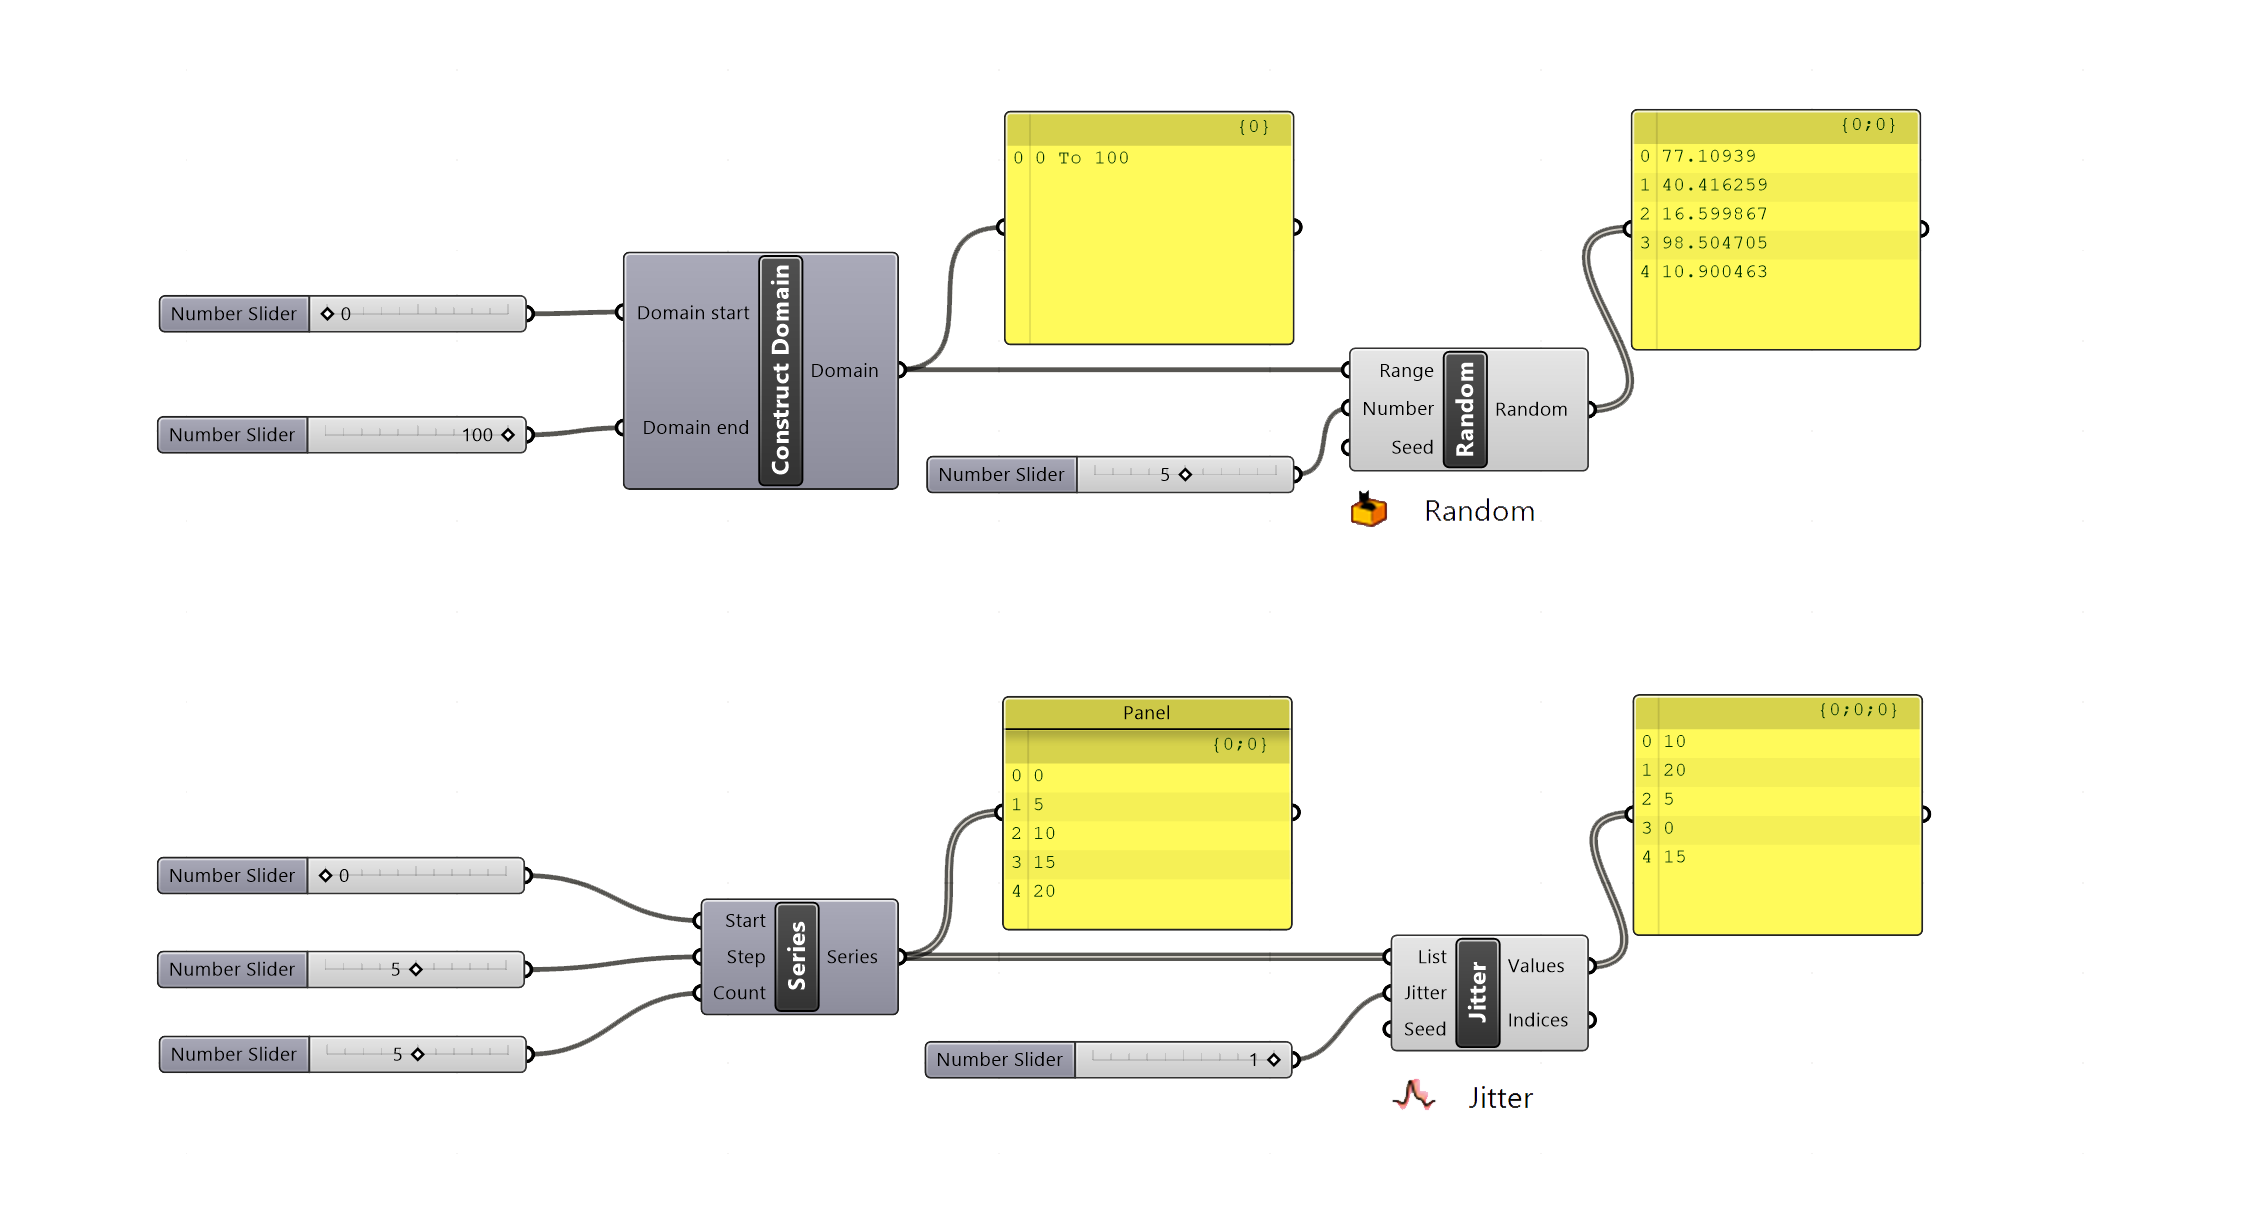
One of the nice aspects using the computer to create a design, is that you can use pseudo-random numbers to change it. This can be useful, for example, if you want to populate a surface or plane with objects on random locations. In this chapter you will learn two nodes that are used most often.

Random
This function creates one or a range of pseudo-random numbers in a range (R). The first input is a domain, similar to the Range component we discussed in the sequence chapter. Next, the function asks for an amount of Random numbers (N) between that domain. Finally you have the possibility to add a seed to the function. The seed is, what we call, the internal state of you computer. This state determines what the outcome of the function will be. By right-clicking on the random node, you can change the output to whole numbers, which are called integers in programming language.
Generate a list of random numbers
Set the random generator to integers
Jitter
The jitter function is able to shuffle a list (L). This list can contain any type of data. The node also asks for a jitter value between 0.0 (no shuffle) and 1.0 (complete shuffle). Finally, you can again define a state by changing the seed.
Create a jitter
Grasshopper Getting Started 6/7
Bakinglink copied
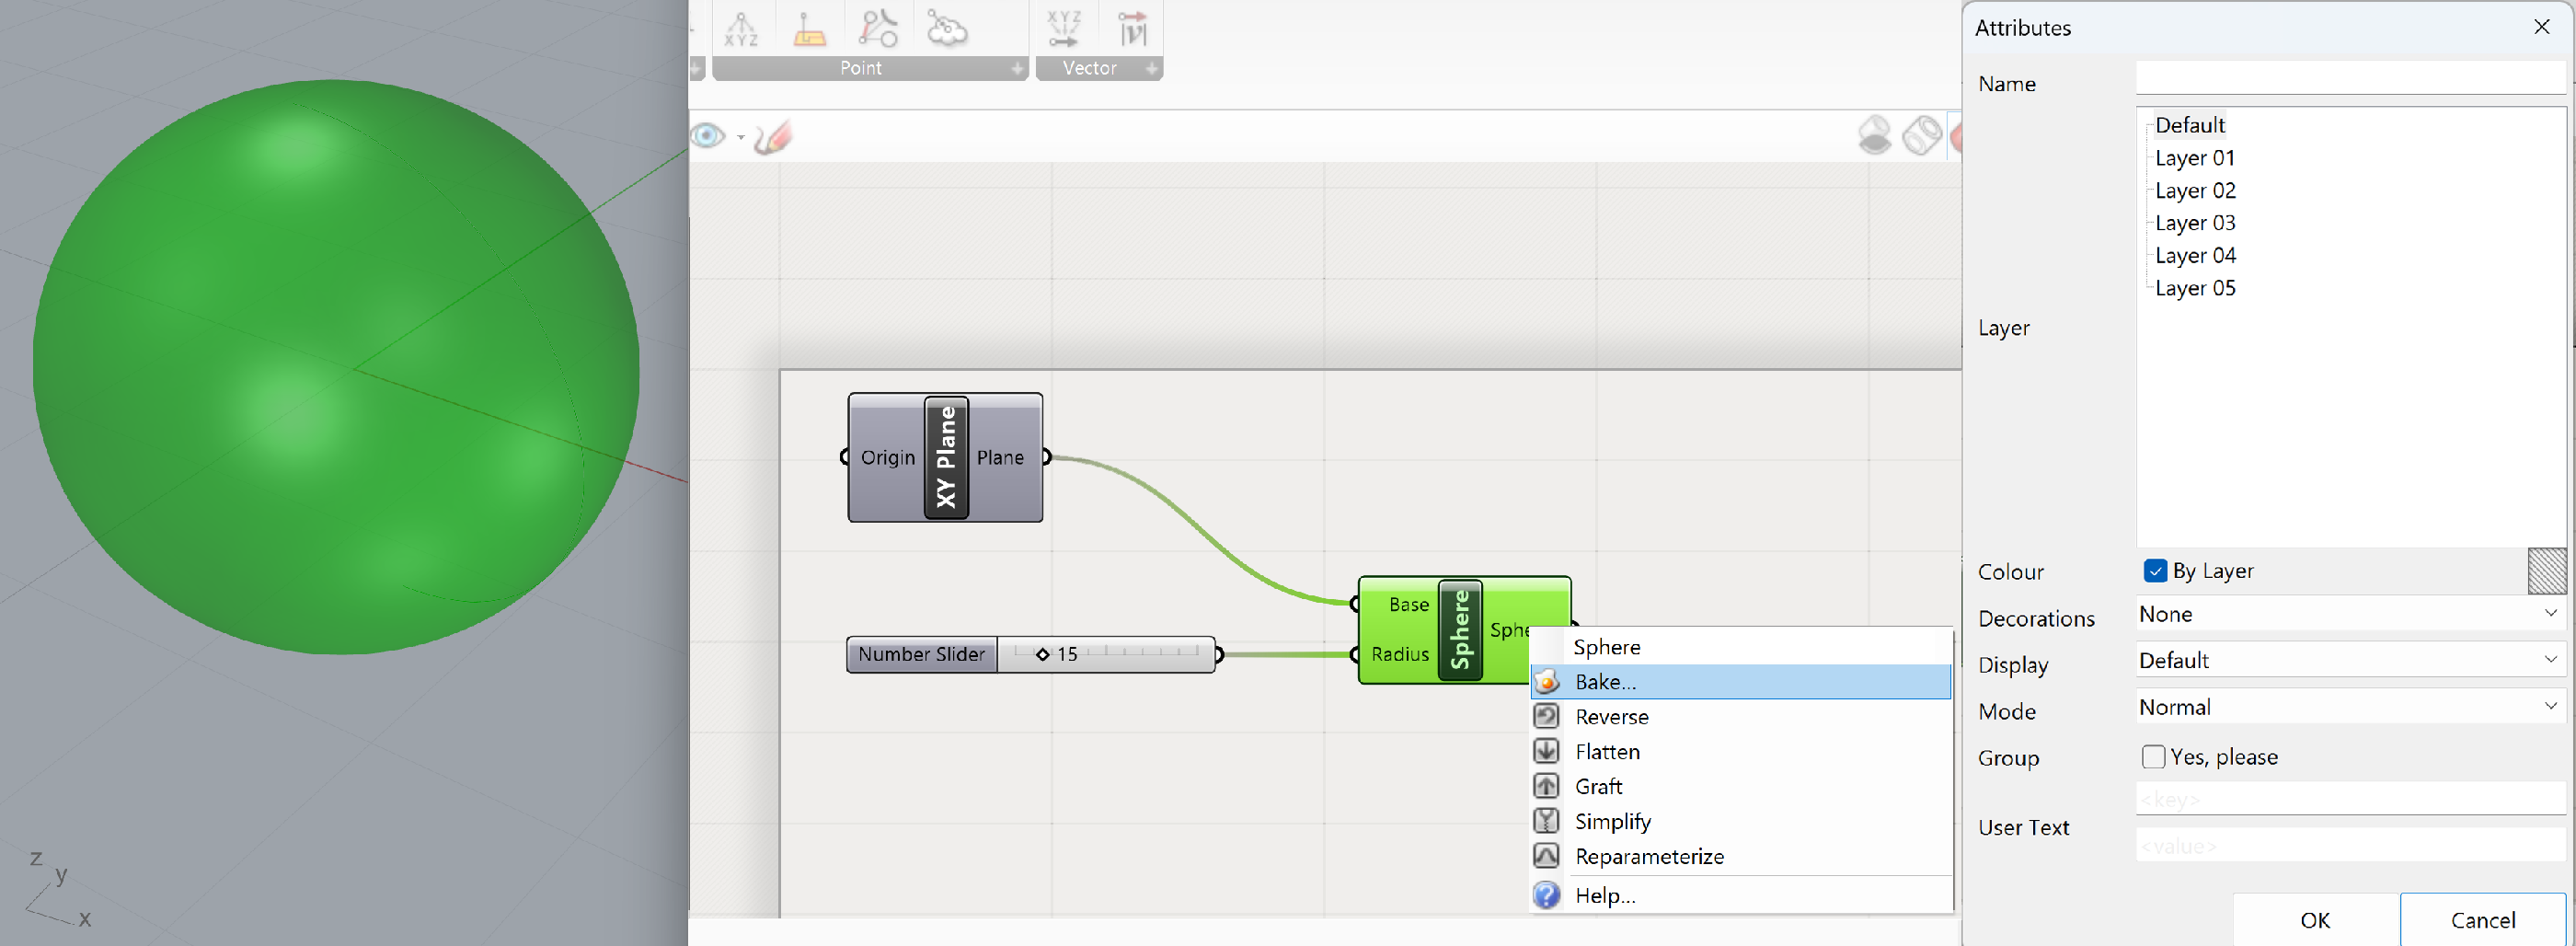
As you may notice, the geometry from Grasshopper is always red or green. Green indicates that the object is selected in Grasshopper. If you want to be able to move or change the object in Rhino, we have to bake it.
Right click on the final node and click on bake. This function will create geometry in Rhino. Disable the preview of the nodes to make sure you don’t see the transparent Grasshopper version.
Bake the geometry
Grasshopper Getting Started 7/7
Conclusionlink copied
In this tutorial you learned the basics of Grasshopper – placing components, input numerical parameters and operations on lists. This will help you progress further. Go back to this tutorial multiple times, as understanding how lists and data structure works is the foundation of being efficient in Grasshopper.
Good luck on further learning!
Write your feedback.
Write your feedback on "Grasshopper Getting Started"".
If you're providing a specific feedback to a part of the chapter, mention which part (text, image, or video) that you have specific feedback for."Thank your for your feedback.
Your feedback has been submitted successfully and is now awaiting review. We appreciate your input and will ensure it aligns with our guidelines before it’s published.
