QGIS Installation
-
Intro
-
QGIS Installation (Windows)
-
QGIS Installation (Mac)
-
Useful links
Information
| Primary software used | QGIS |
| Software version | 1.0 |
| Course | QGIS Installation |
| Primary subject | 3D Modelling |
| Secondary subject | Geospatial and Geographic Information Systems |
| Level | Beginner |
| Last updated | November 11, 2024 |
| Keywords |
Responsible
| Faculty |
QGIS Installation 0/3
QGIS Installation
This section explains how to install QGIS. Different installation procedures are showed.
This section explains how to install QGIS. QGIS can be installed on Windows, macOS and Linux (also on Android and iOS, but they will not be addressed). There will also be an overview of existing tutorials on how to install QGIS. In addition, it contains also information on how to update QGIS.
QGIS Installation 1/3
QGIS Installation (Windows)link copied
- Step 0: If you want to install a newer version of QGIS make sure to uninstall your old version. Simply go to the Add or remove programs function in Windows (search) and select QGIS and unistall.
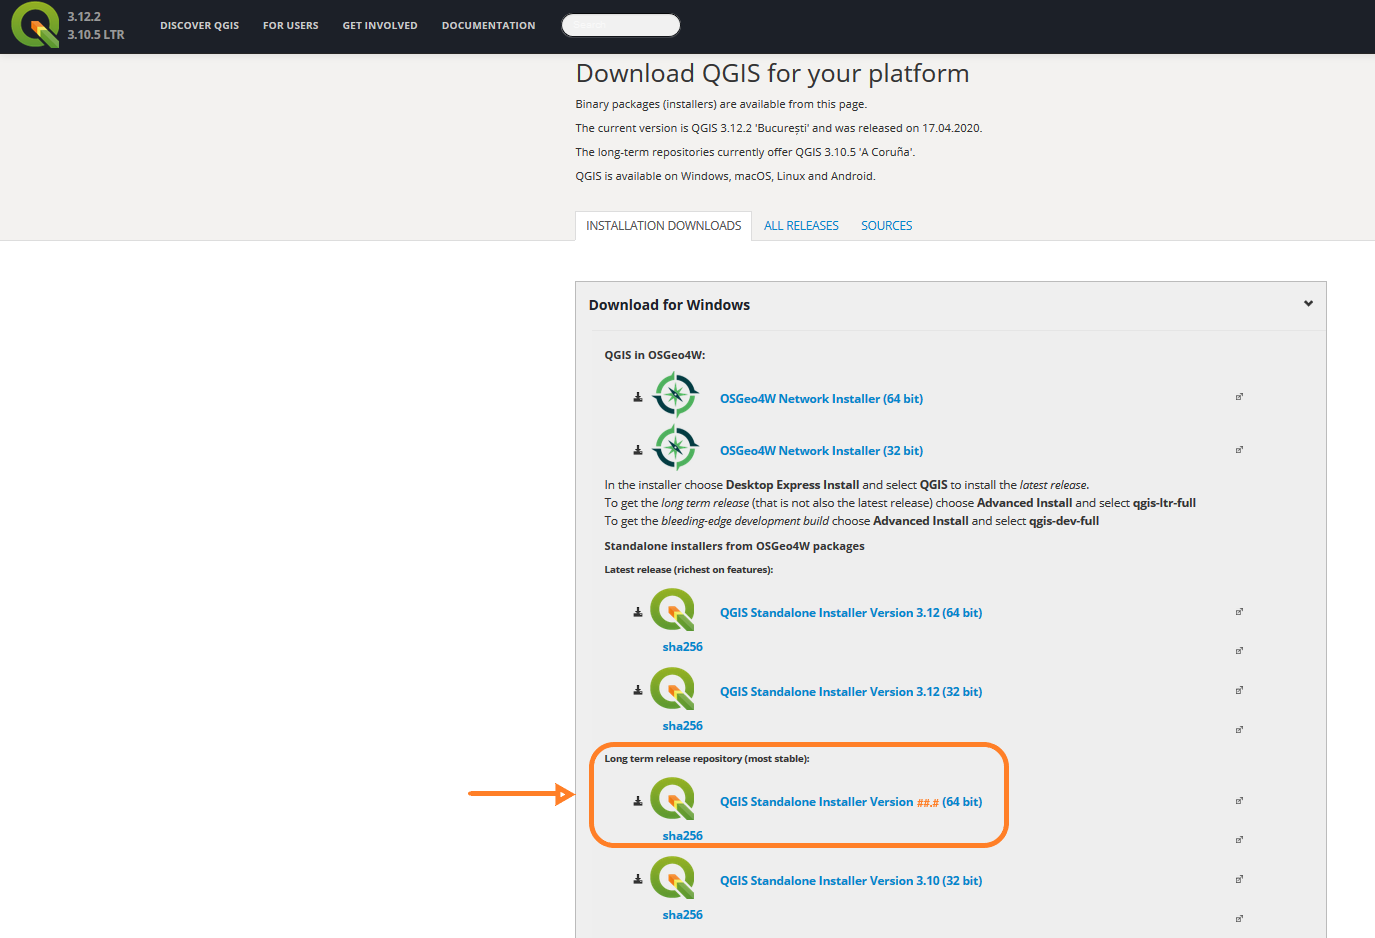
- Step 1: Go to this link and download the 64 bit QGIS Standalone installer under the “Long term release repository (most stable)” header (see figure 1). This will be the most stable and updated version of QGIS. Currently that is QGIS 3.10, but this will change as newer versions are created.

- Step 2: Run the installer and select your installation folder (normally on your C:// drive). Next, the installer will ask you if you want to download additional datasets (only USA), you can leave those unchecked.
- Step 3: After the installation you can run QGIS and start making maps. To start QGIS look for the QGIS folder on your desktop and click on QGIS desktop. If the installation succeeded QGIS will open.
- Step 4: You can add extra functionality to QGIS by installing free plugins. See this tutorial for a list of useful plugins and how to install them.
Other resources
Windows: install QGIS with a QGIS standalone installer (the easiest way)
Using a QGIS standalone installer is the easiest way to download QGIS. One of them can be downloaded from this link
- Install the QGIS LTR version and short introduction of the interface Hans van der Kwast: “QGIS LTR install on Windows and quick overview”
you can access this video using this linkLanguage(s): English
Time: 6min 57s
Windows: install QGIS with the OSGeo4W Installer (more advanced)
The OSGeo4W Installer is a Windows installer for open source geospatial software such as QGIS, GDAL/OGR, GRASS. It allows to install multiple QGIS versions in parallel and updates can be performed more efficiently.
- Install QGIS with the OSGeo4W installer
“QGIS Installation with OSGeo4W”
you can access this installer using this link
Language(s): English
Chapters:- installation steps
- upgrading steps
Windows: install QGIS with Ubuntu (more advanced)
QGIS can also be installed on Windows by using Linux. First, the Windows Subsystem for Linux (WSL) needs to be installed. WSL allows to install Ubuntu, which enables to install QGIS.
- Install QGIS by using Ubuntu
Hans van der Kwast: “Install Ubuntu and QGIS on Windows 11 using WSL”
you can access this video using this linkLanguage(s): English
Time: 5min 5sChapters:
- introduction (start-0:12)
- install Windows subsystem for Linux (0:12-0:57)
- install Ubuntu on Windows 11 (0:57-1:36)
- troubleshoot error (1:36-2:39)
- install QGIS on Ubuntu (2:39-end)
Windows: update QGIS with the OSGeo4W Shell
QGIS can be updated with the OSGeo4W Shell, which is a Windows installer for open source geospatial software.
- Update QGIS with the OSGeo4W Shell
Hans van der Kwast: “Update QGIS versions with OSGeo4W Shell”
you can access this video using this linkLanguage(s): English
Time : 2min 43s
QGIS Installation 2/3
QGIS Installation (Mac)link copied
The steps for Mac are essentially the same as for windows:
- Step 0: If you want to install a newer version of QGIS make sure to uninstall your old version. Simply go to your Applications folder and drag the QGIS app into the trash.
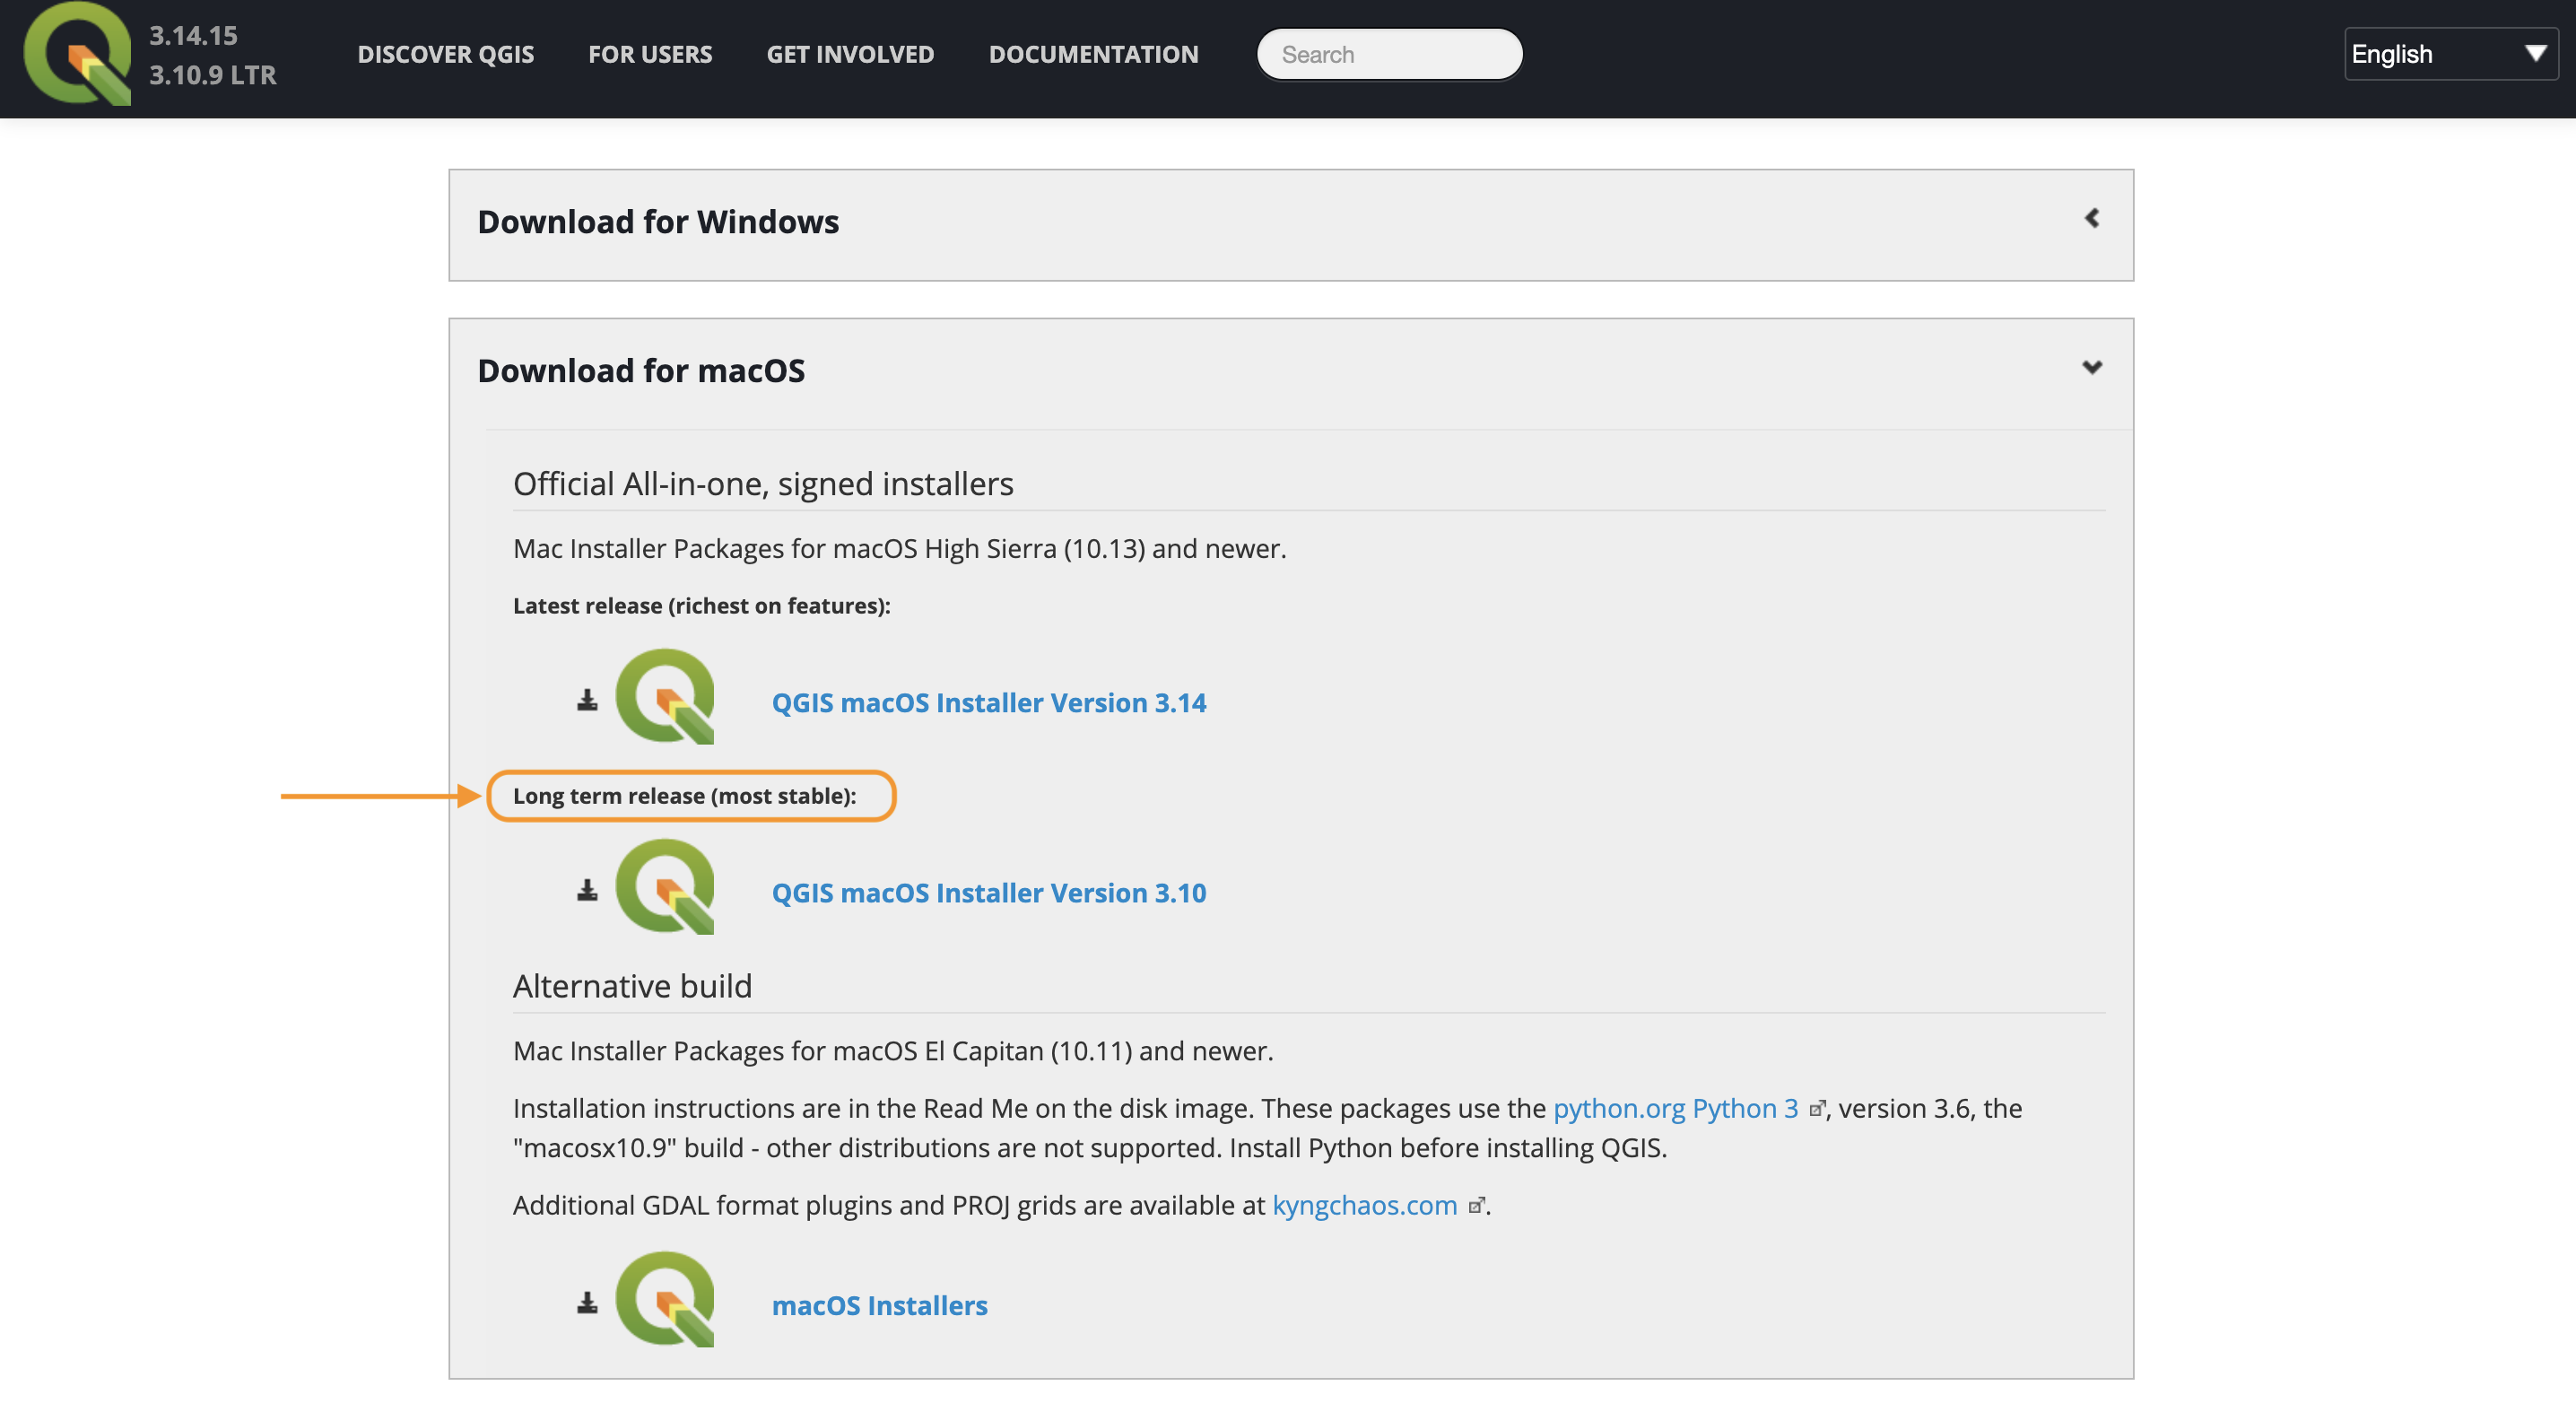
- Step 1: Go to this link and download the QGIS version under the “Long term release repository (most stable)” header. Currently that is QGIS 3.10, but this will change as newer versions are created.

- Step 2: Run the installer. It will ask you if you want to download additional datasets (only USA), you can leave those unchecked.
- Step 3: After the installation you can run QGIS and start making maps. To open the programme look for QGIS in your applications folder. If the installation succeeded QGIS will open.
- Step 4: You can add extra functionality to QGIS by installing free plugins. See this tutorial for a list of useful plugins and how to install them.
QGIS Installation 3/3
Useful linkslink copied
- QGIS Training Manual
- QGIS User Guide
- GIS OpenCourseWare
- OsGeo4W: osGeo4W
(Language(s): English, Japanese, French, Polish, Deutsch) - Hans van der Kwast YouTube Channel
Write your feedback.
Write your feedback on "QGIS Installation"".
If you're providing a specific feedback to a part of the chapter, mention which part (text, image, or video) that you have specific feedback for."Thank your for your feedback.
Your feedback has been submitted successfully and is now awaiting review. We appreciate your input and will ensure it aligns with our guidelines before it’s published.
