3D Printing with Bambu Lab X1 Carbon
-
Intro
-
Using Bambu Studio Slicer Software
-
Print your 3D Model
-
Conclusion
Information
| Primary software used | Bambu Studio |
| Software version | 1.0 |
| Course | 3D Printing with Bambu Lab X1 Carbon |
| Primary subject | Prototyping and Manufacturing |
| Secondary subject | Additive Manufacturing |
| Level | Beginner |
| Last updated | September 23, 2025 |
| Keywords |
Responsible
| Teachers | |
| Faculty |
3D Printing with Bambu Lab X1 Carbon 0/3
3D Printing with Bambu Lab X1 Carbon
File preparation, slicer software adjustment, and tips for a successful print with Bambu Lab X1
In this guide you will go through all the steps needed to finalize a successful 3D print, in this case using a Bambu Lab X1 Carbon 3D printer. It is assumed you already have a curated STL file ready, using the previous tutorial on file export using Rhino.
You will learn how to:
- Use the Bambu Studio slicer software (download for free) to prepare a final gcode file.
- Set up the printer and print the model, properly monitoring the process

3D Printing with Bambu Lab X1 Carbon 1/3
Using Bambu Studio Slicer Software
Bambu Studio is the dedicated slicer for the Bambu Lab printers, including Bambu X1 Carbon. But it can also be used for other manufacturers 3D printers. We use this slicer for the FDM printers we have in the lab. This tutorial will focus on the use of the Bambu X1 Carbon 3d printer.
Printer
Because LAMA uses several different 3d printers with different nozzle sizes, it is necessary to select the right machine settings in the Bambu Studio slicing software in line with the 3d printer which will be used.
- To begin your project: open Bambu Studio.
- Go to: File >> New Project and select the correct 3Dprinter and build plate.
- Printer Selection: On the left sidebar, use the arrow to select the “Bambu Lab X1 Carbon” from the lists of 3d printers. This will load the right size of the 3d print area, the nozzle size and various other settings for this machine. We use a 0.4mm nozzle in our Bambu Lab X1 Carbon 3D printer.
- You can edit the machine setting by hovering your mouse over the 3D printer icon and click on the edit button. This allows you access to the machine settings. You can alter here for example the nozzle size.
- Build surface: On the left sidebar you can select the build plate which is used in the 3D printer. Wrong selection can lead to poor 3d print adherence to the build plate. The plates can vary in surface material. The Bambu Lab X1 Carbon we have at the lab uses a “Cool Plate” (be aware the build plate has two sides for different materials, check the text on the edge of the build plate to select the right side up) The build plate will be visualized in the work area of Bambu Studio.
- Diameter: This setting allows you to quickly change the nozzle diameter without changing the other machine settings. It does the same thing as changing the settings in the machine settings menu.
- Flow: Change the amount of material extruded.
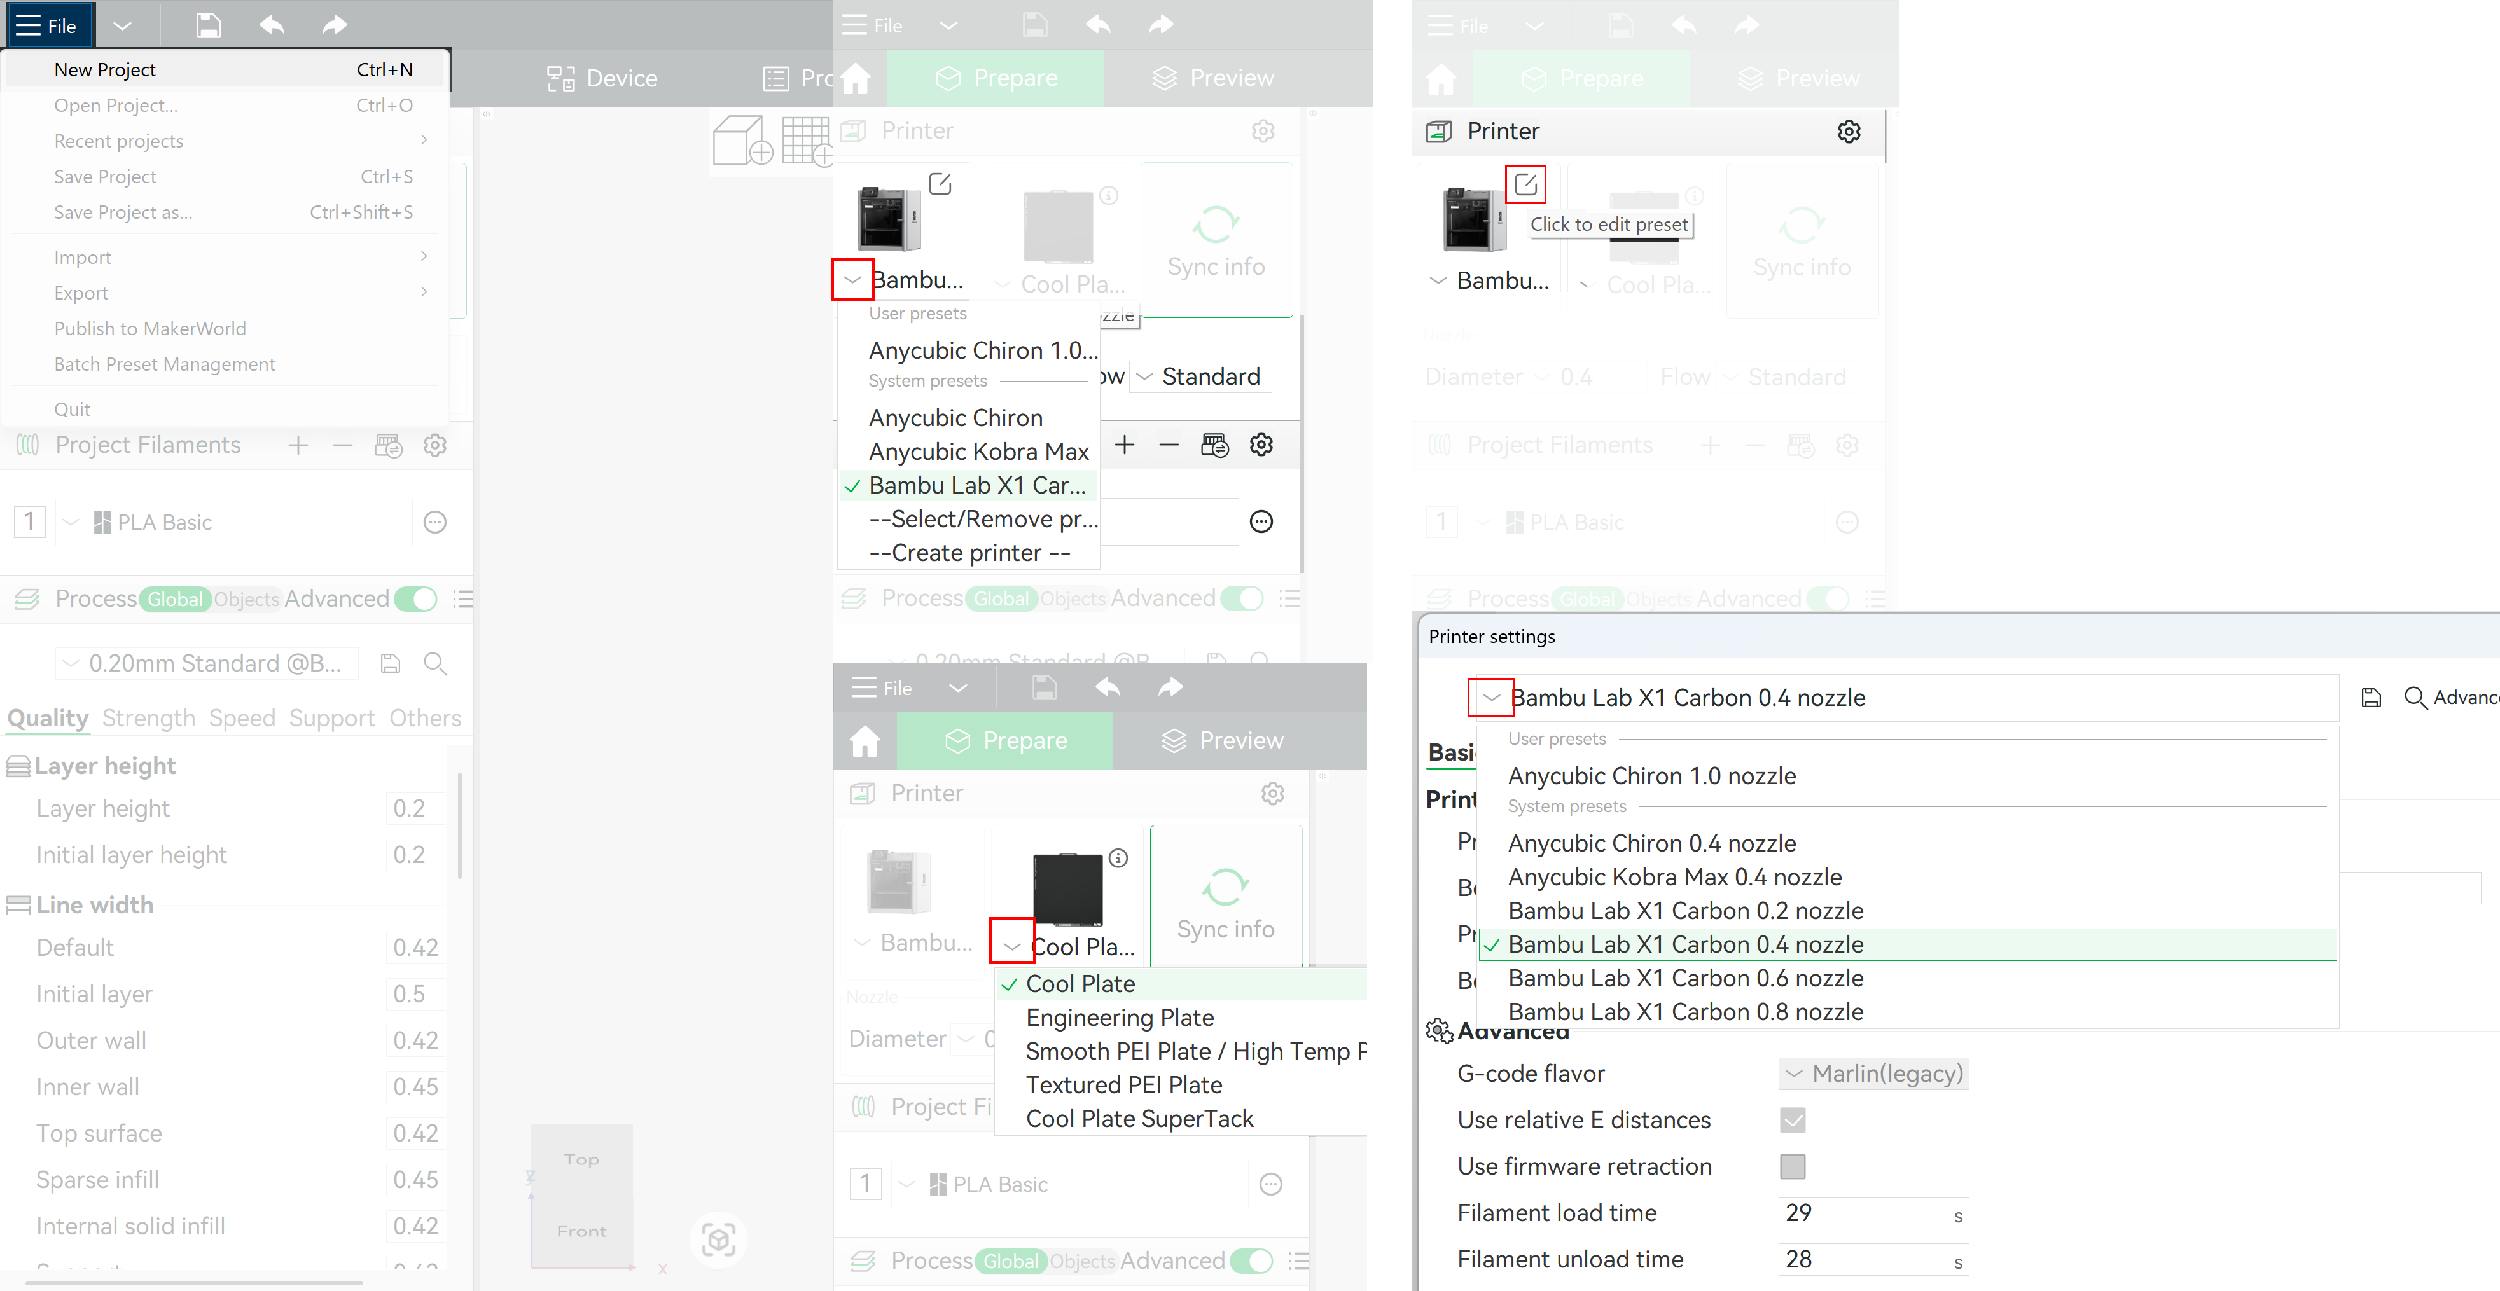
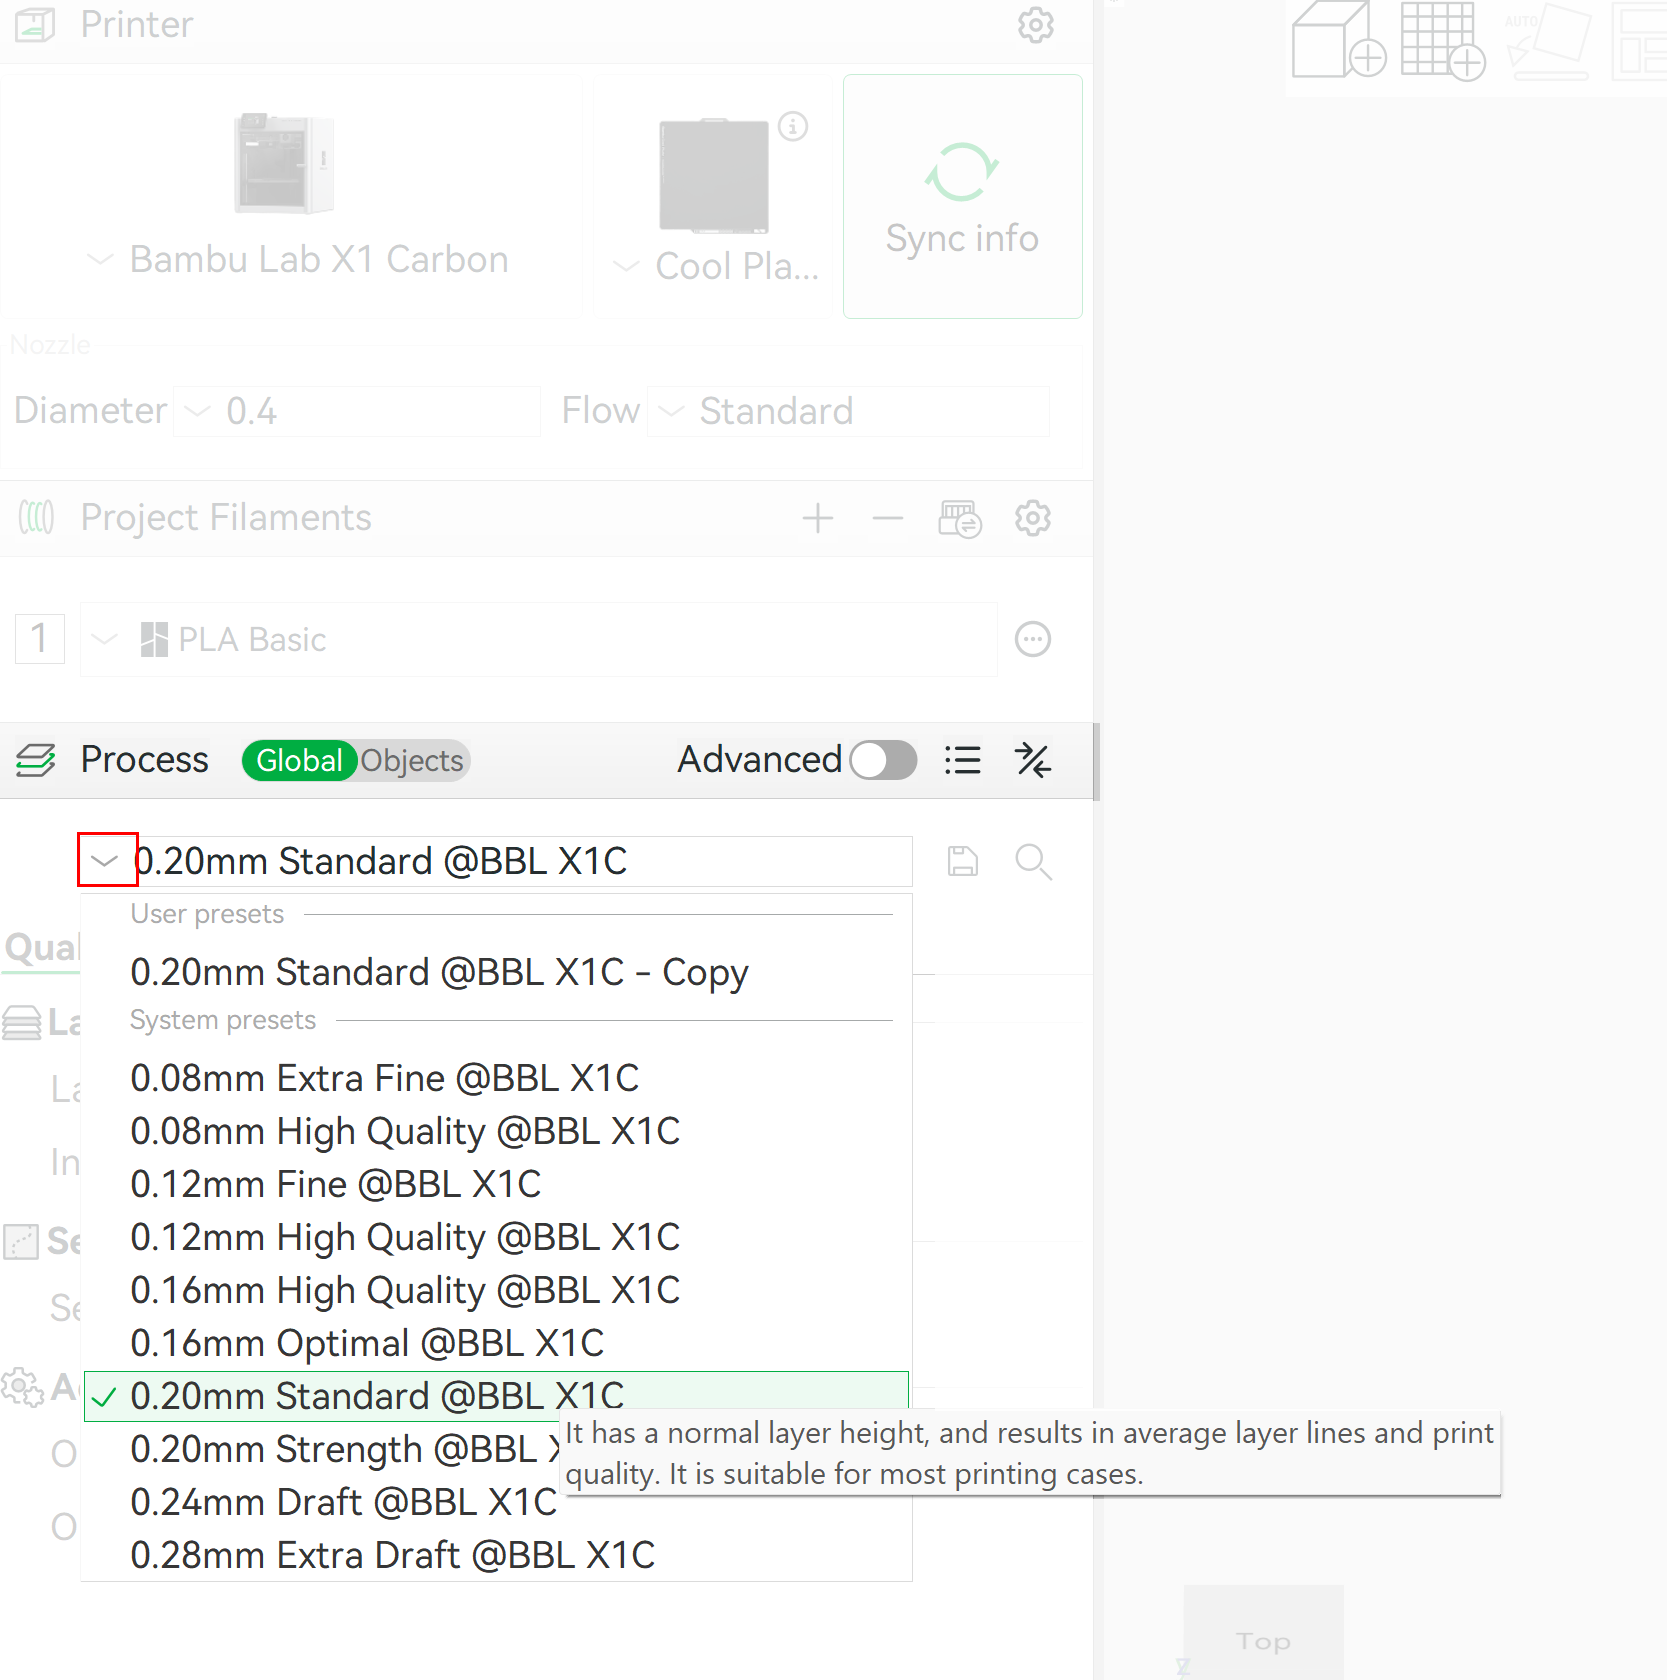
Project Filaments
Bambu Studio has a large library of filament settings. This makes it easy to quicky define the settings for the material which you will be using. Keep in mind, these settings can be a good starting point, you still might to change them depending on the size of the nozzle used and for example the form of the 3d printed object.
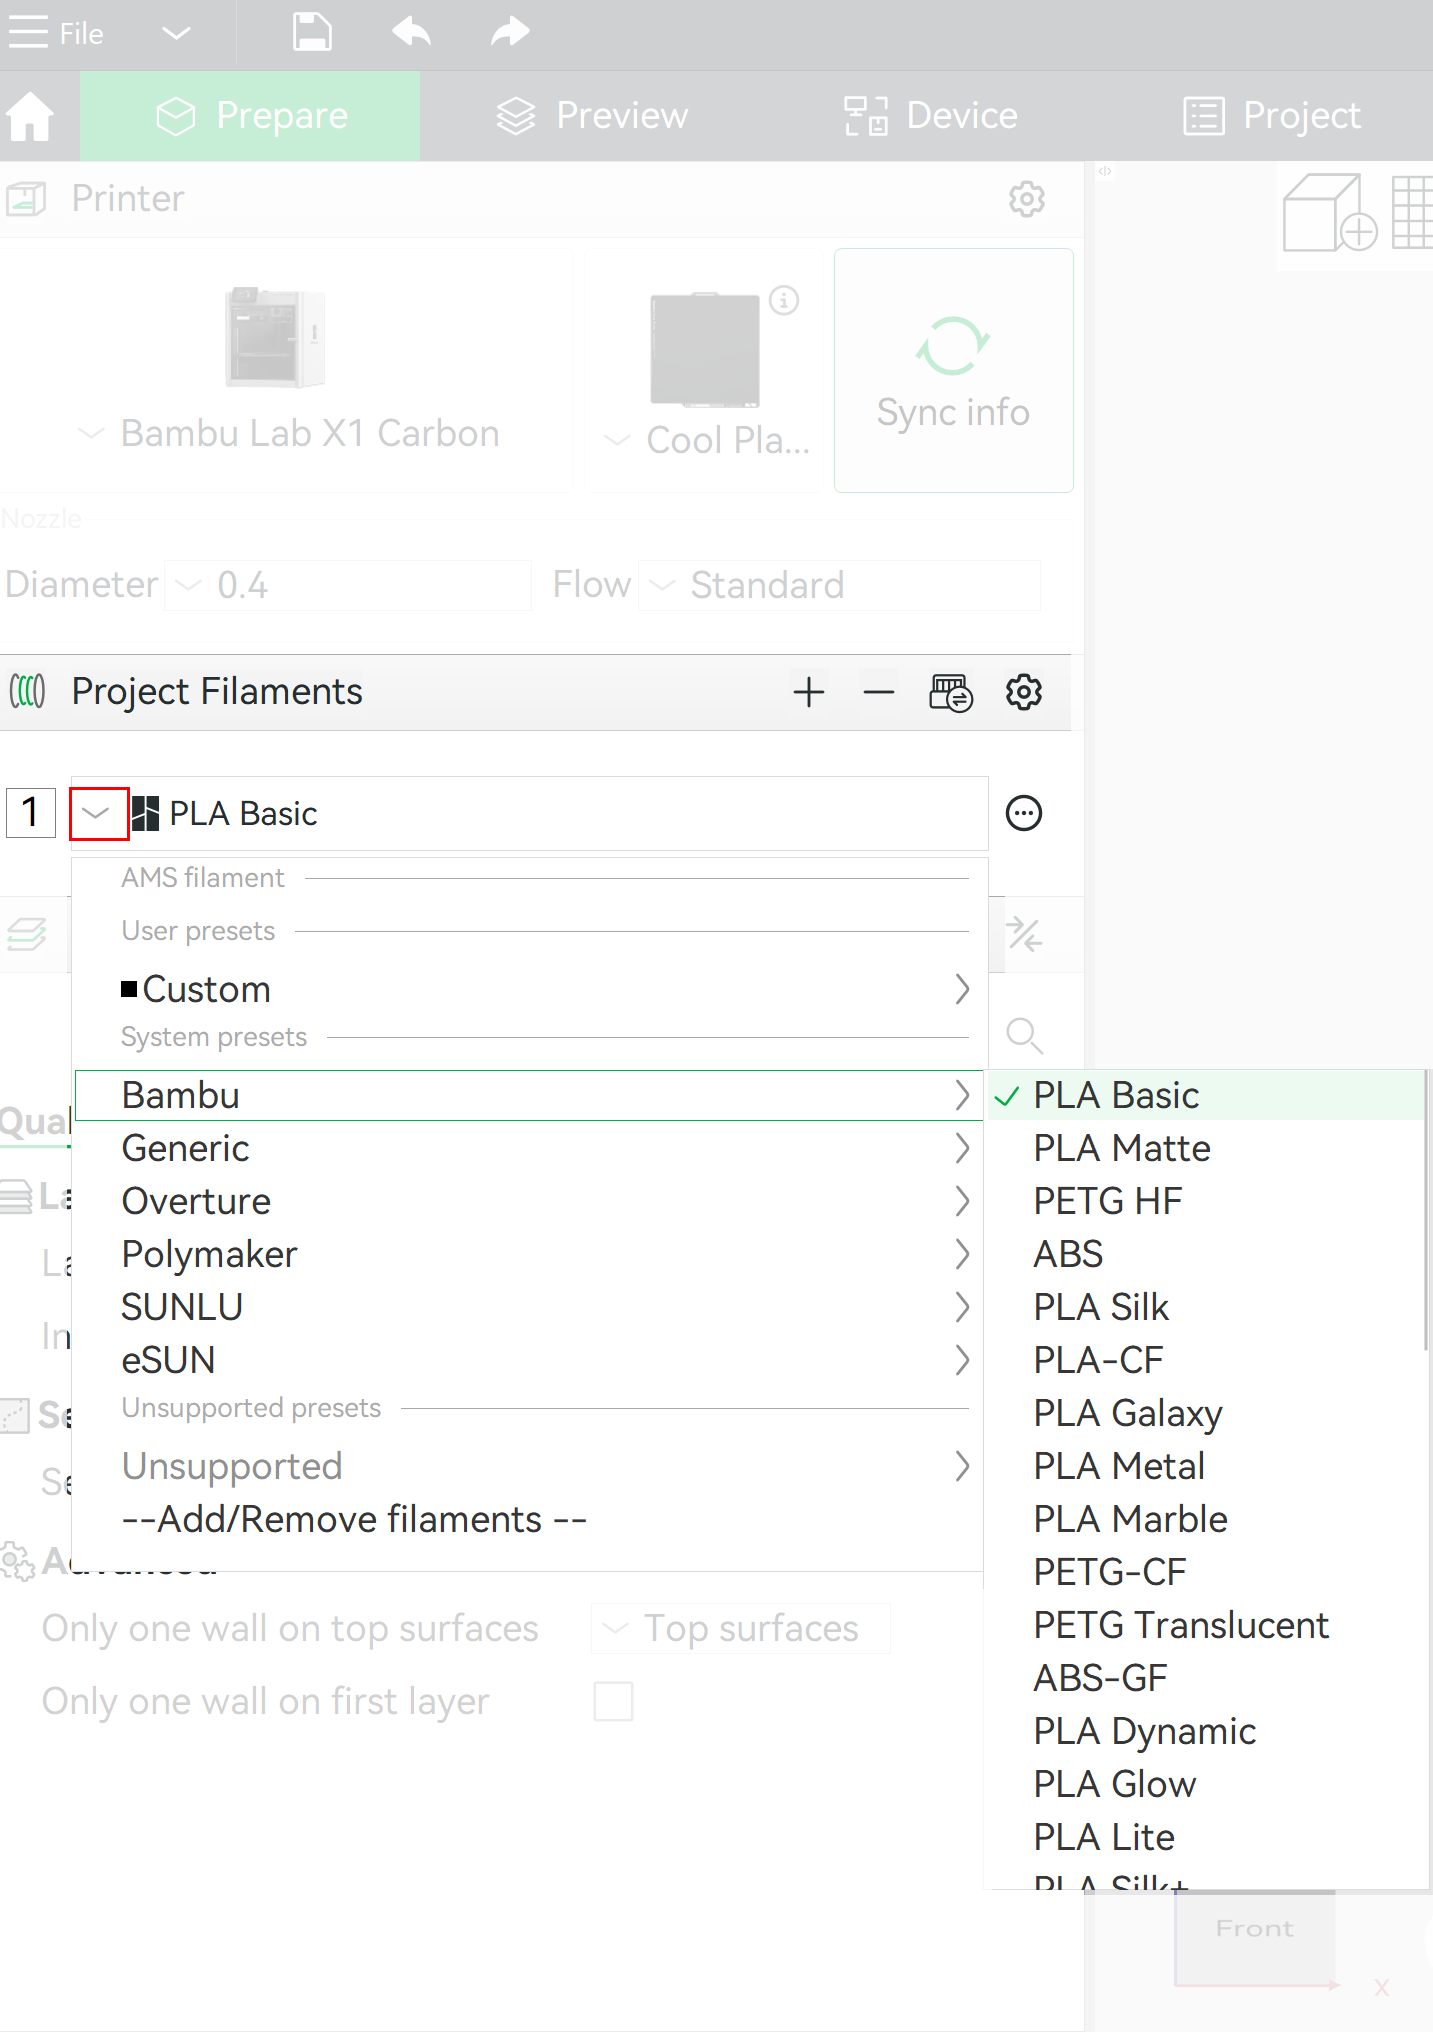
- Project filament menu bar: You can define several materials for your project. That doesn’t have to mean that you will use multiple materials in one print. It can also be useful to have the different materials for different objects of your project saved into your project file, so they are easily accessible. The settings option allows you to select the filament profiles you might want to use for your project.
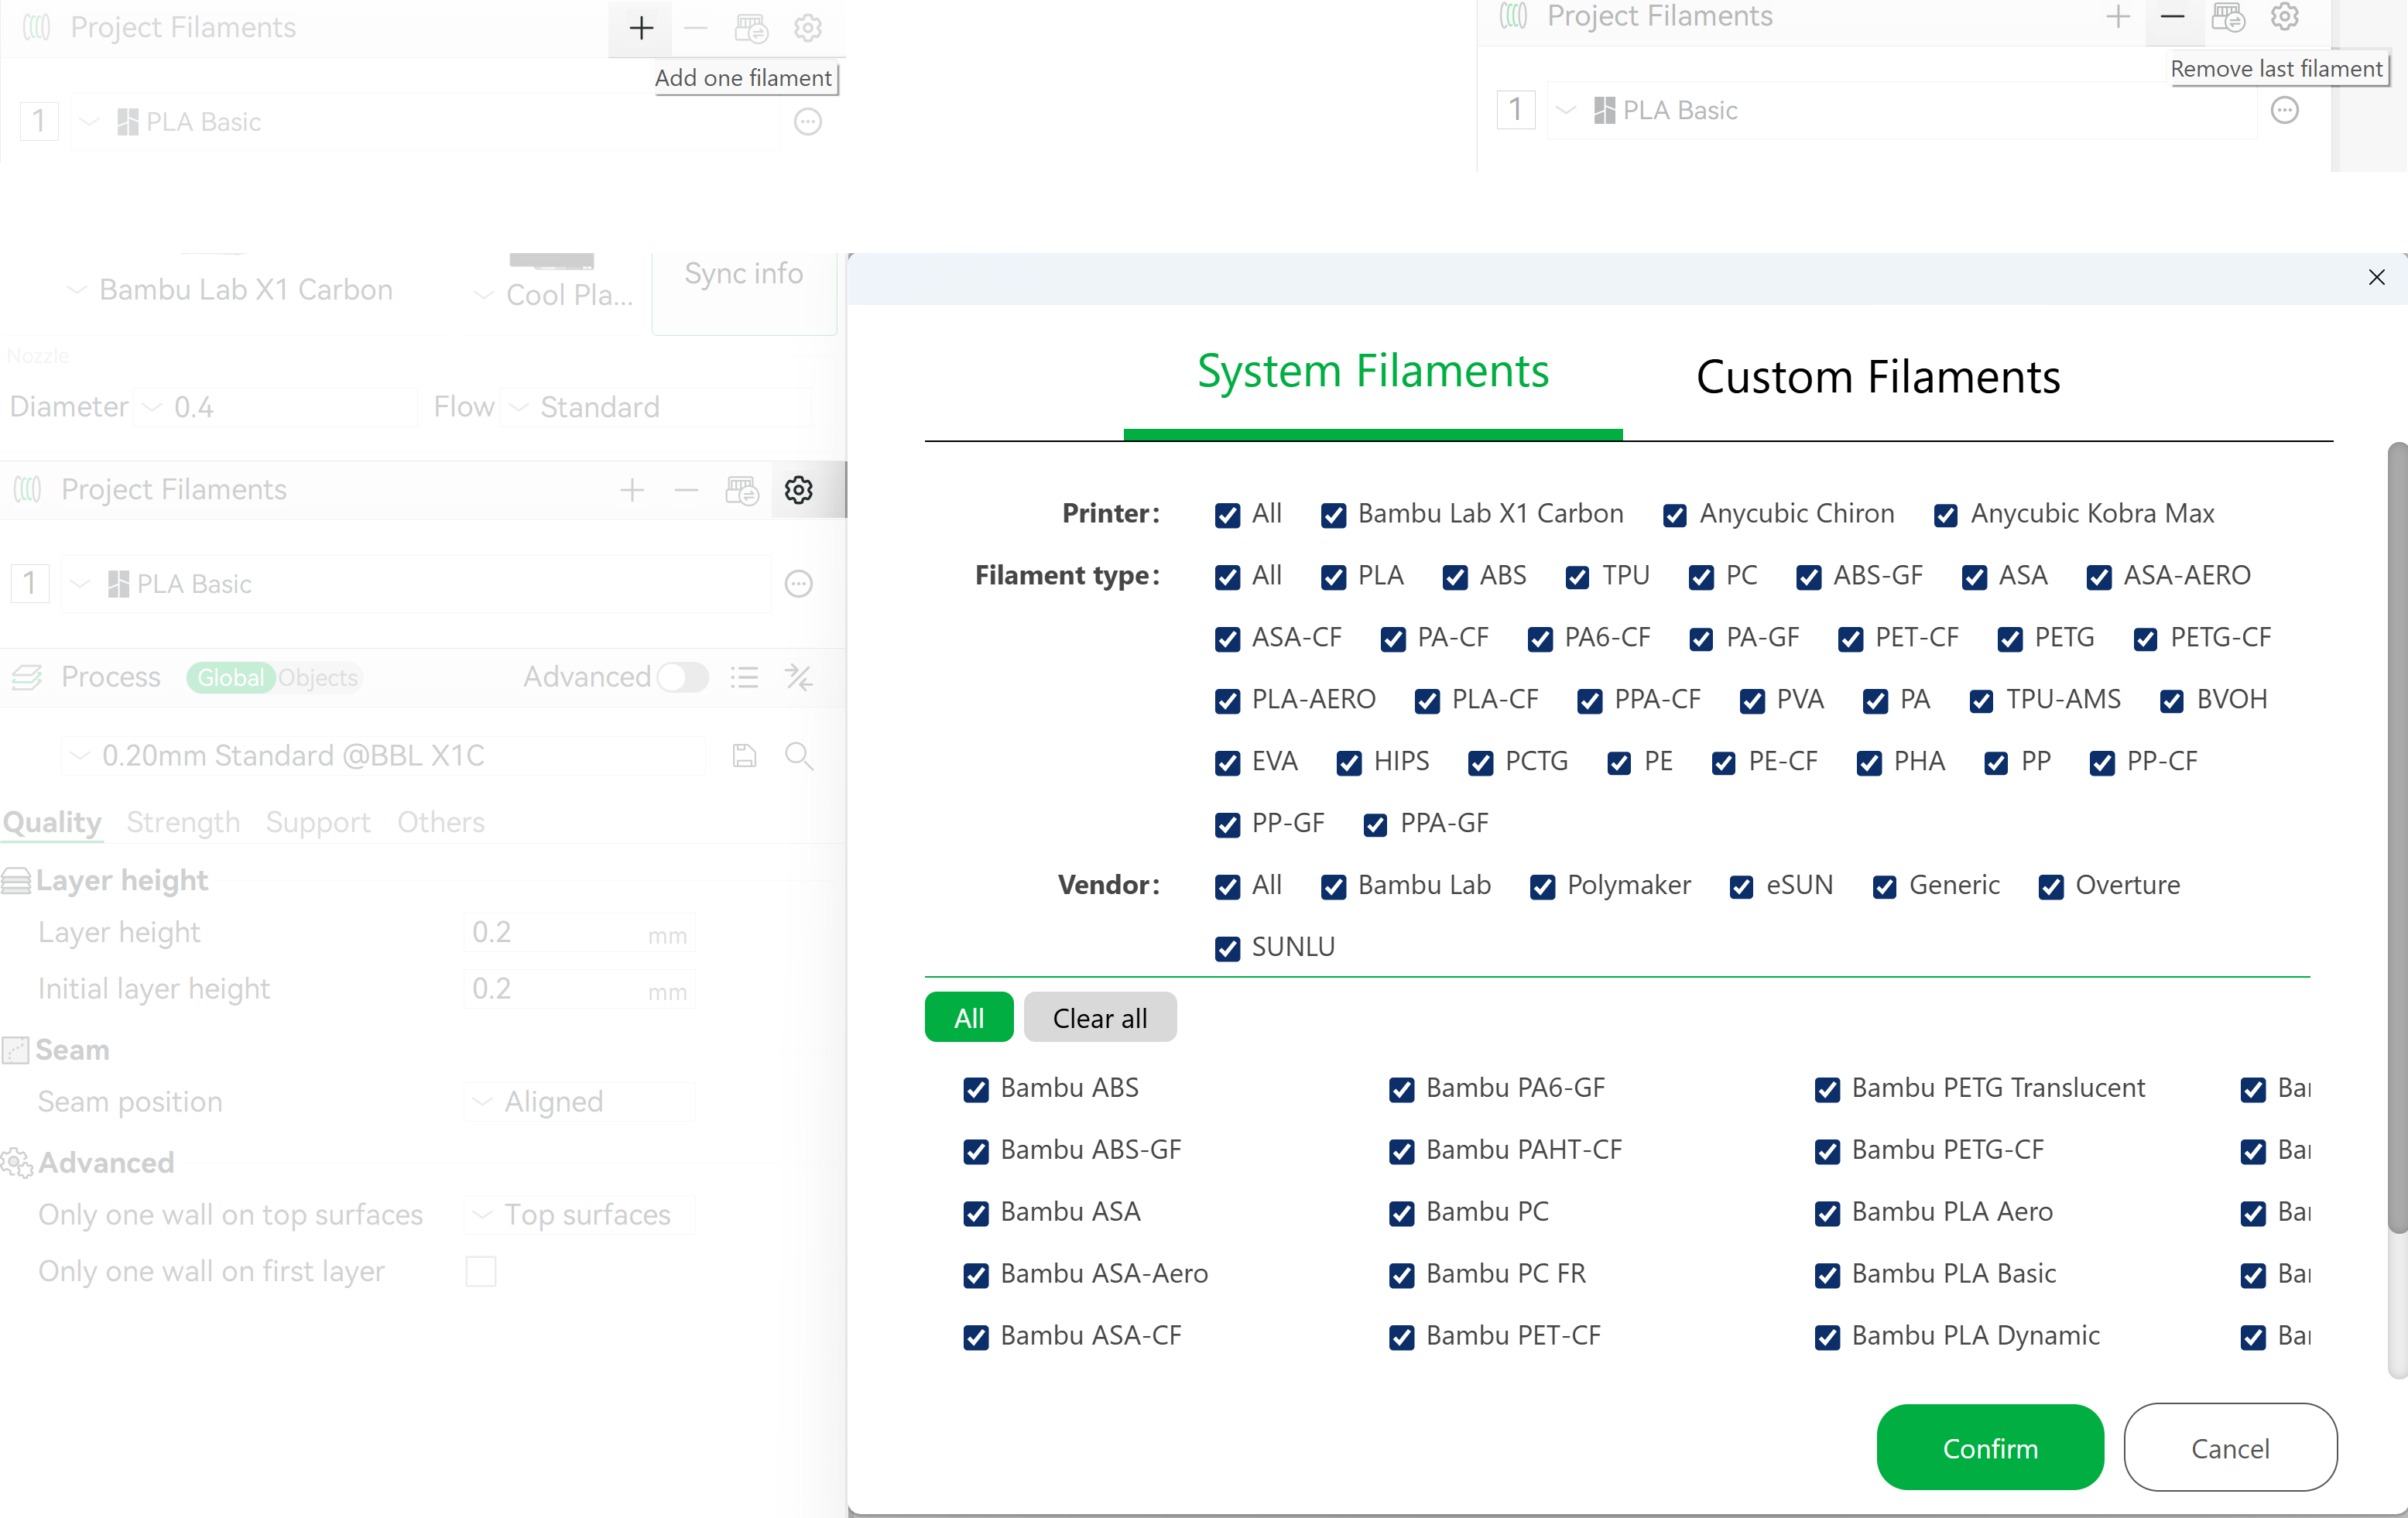
Project filament: Choose the filament type you want to use by selecting the arrow next to the filament defined in the menu. This will give you access to a wide range of material settings of various vendors. The settings for the same material but from different vendors can differ, keep this in mind. Ask a staff member of the LAMA lab if you don’t know who the vendor is of the filament. Normally we use Bambu filament for the Bambu printer.
- If you want to use any other filaments, discuss this with the Lab staff first to see what options are available.
Project settings
Next to the 3D printer and filament settings we have the process settings. The process settings will define how the model will be sliced. These settings highly depend on the shape of your object and will define the quality of your 3D print. For the Bambu Lab X1 Carbon the default presets of the process settings are already well defined and will suffice for most projects.
- Process Bar: The process bar has some options which relate to the general setup of the print process.
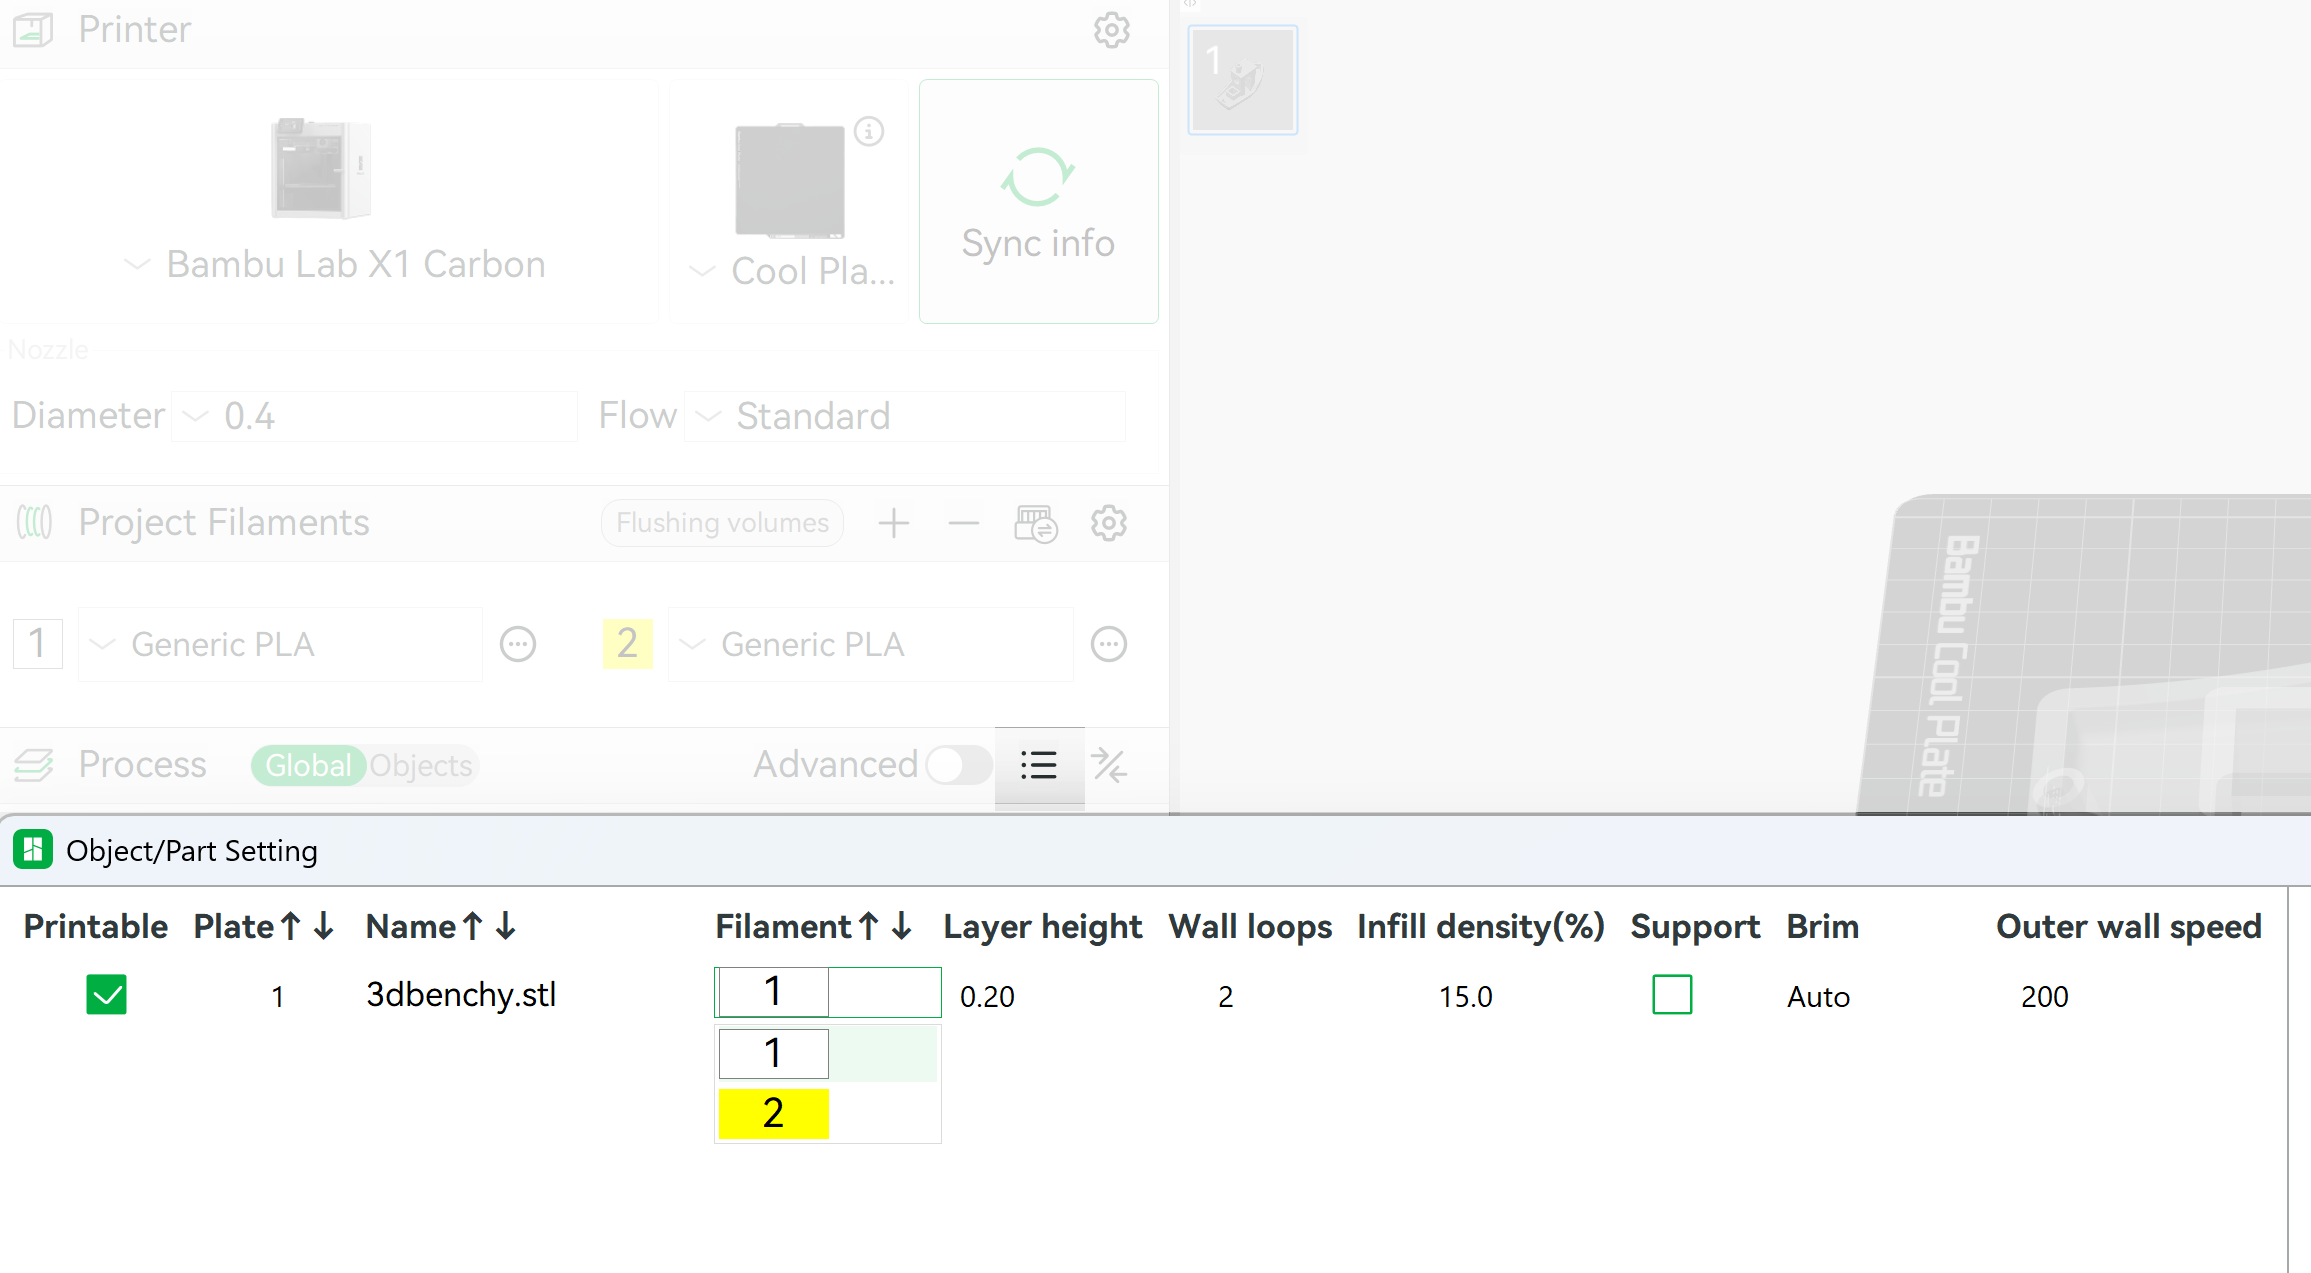
- The Global/Objects setting: The global setting gives access to option of organizing multiple prints. The object setting allows the user to define multiple objects to print, this by printing them one by one or distribute them on multiple build plates. The global setting gives access to the slicing setting. You can select a preset of these setting, as described below.
- The Advanced setting: The advanced setting gives you access to more settings for slicing the 3d objects. The presets for the Bambu Lab X1 Carbon most of the time will suffice.
- View all document settings: A useful tool for checking the settings of the sliced 3D model. If you have multiple materials defined it can be wise to check this option to make sure the correct material is selected. Double clicking on the Filament box to show the different materials.
- Process Selection Preset (Quality): Under “Process,” choose your desired print quality. If you hover your mouse over the various selection options, it will display a text with an explanation of the setting. The layer height of a 3d print has a large influence on the quality of the print. It is however also a major factor in the time it takes to 3d print an object. Finding a correct balance is important.
- Ultra Fine (0.08mm): Very High detail, longer print time. Only suitable for producing small very accurate models
- Fine (0.12mm): Higher detail, long print time. Suitable for producing very accurate models.
- Accurate (0.16mm): High detail, long print time. If accuracy is important.
- Standard (0.2mm): Good balance of speed and detail, suitable for most models.
- Draft (0.24mm) : Fast 3d print with less detail.
- Draft (0.28mm): Fastest print, lowest detail. Great for fast checks or prototypes.
Using these presets are for the Bambu Lab X1 Carbon often good enough to generate a good print.
Importing Your Model
Once you have selected the right printer, filament and process settings you can import your 3d model. This can be an STL or any of the other file extensions shown in the Import menu.
- Click the “Add” button (looks like a plus sign) or go to File > Import > Import File(s)… and select your .stl file.
- Your model will appear on the virtual print bed.

Navigation:
The navigation in Bambu Studio is straight forward
- Pan: – Right mouse button
- Rotate: – Left mouse button
- Zoom: – Scroll wheel mouse.
Model Placement and Manipulation
How you place your model can greatly affect its quality and print time. Below are some tips and things to consider first. More detailed tips can be found in the next sub-chapter. If your model is very simple, you can skip to “Slicing your Model” sub-chapter.
- Single model per plate is recommended, though multipart prints are manageable if arranged and supported properly.
- It is always recommended to avoid supports.
- Orient your model to minimize overhangs and maximize flat surfaces against the build plate.
- Lay parts flat or at shallow angles instead of vertically. Consider cutting models into pieces when feasible.
- Print at max ∼45° can reduce support area, though it may require small adhesion features (“kickstands”) to prevent the print detaching early.
You can perform quick adjustments inside Bambu Lab Studio with commands like:
- Move (M): Click and drag your model to reposition it on the build plate.
- Rotate (R): Use the rotation handles to orient your model.
- Scale (S): Adjust the size of your model, if needed.
- Auto Arrange: If you have multiple parts, select them all and click the “Arrange” button (the checkerboard icon) to automatically optimize their placement on the build plate.

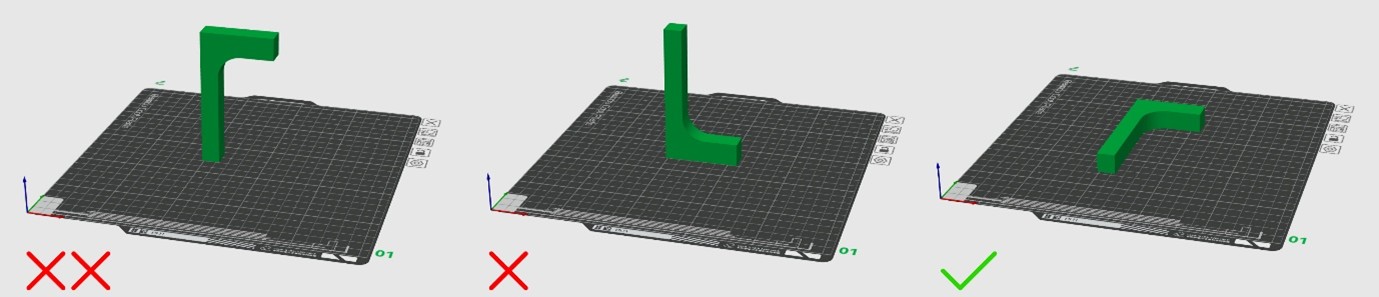
Strategic Model Orientation – Avoiding Supports
This is a critical step for clean prints and saving material! The X1 Carbon handles bridging well but supports are still to be avoided where possible. The printer builds layer by layer from the bottom up. Any part of your model that “hangs in the air” with no material directly beneath it will require supports. Here are some tips on how to Minimize Overhangs and a need for supports:
- The “45-Degree Rule”: The X1 Carbon can typically print overhangs up to about 45-60 degrees from the vertical without supports. Anything steeper will likely need support.
- Flat Bases: Always try to orient your model so its largest, flattest surface is in contact with the build plate. This provides maximum adhesion and minimizes the need for supports.
- Bridge Gaps: For small horizontal gaps (bridges), the X1 Carbon performs well and can go to around 30mm bridge length without visible bend.
- Split Complex Models: For very complex architectural geometries with many unavoidable overhangs, consider splitting your model into smaller, more easily printable parts in Rhino. You can then print them separately and assemble them later using glue for example. This often results in much cleaner prints than trying to support every complex angle.
- Think About the Print Path: Imagine how the layers will be laid down. Can you rotate the model, so a previously overhanging feature is now supported by the layers below it?
If you cannot avoid supports, you can find useful the tips in the following sub-chapter.
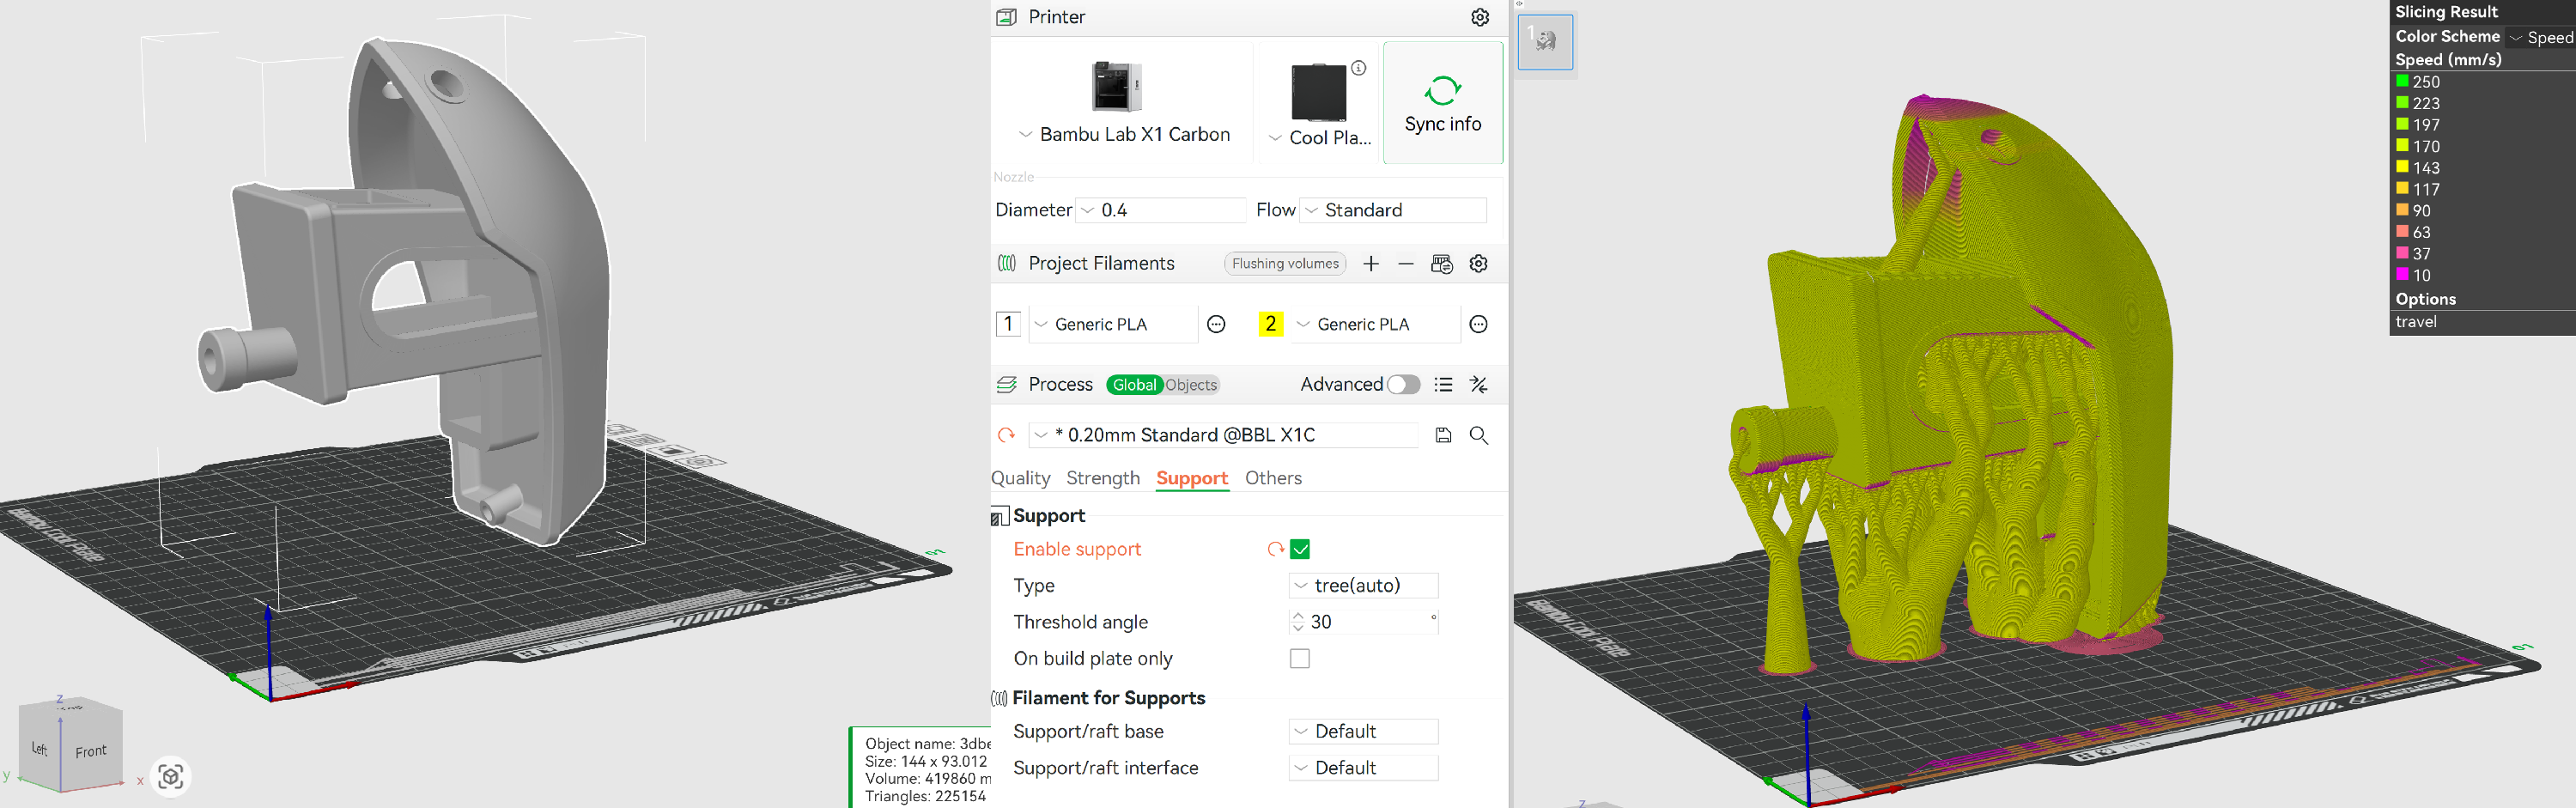
Support Settings (If Unavoidable)
You can find the “Supports” tab on the left sidebar. The support options are effective in supporting complex geometry with overhangs. Here are some options worth considering:
- Enable Support: Check this box if your model requires supports.
- Support Type:
- Normal (Default): Generates standard supports.
- Tree (Recommended): Generates tree-like structures that are often easier to remove and leave fewer marks, especially for complex geometries.
- Support Structure:
- Auto: Let the software decide.
- Everywhere: Generates supports even on the print bed if needed.
- On Build Plate Only: Only generates supports that start from the build plate, not from other parts of your model. This is often preferred for cleaner surfaces.
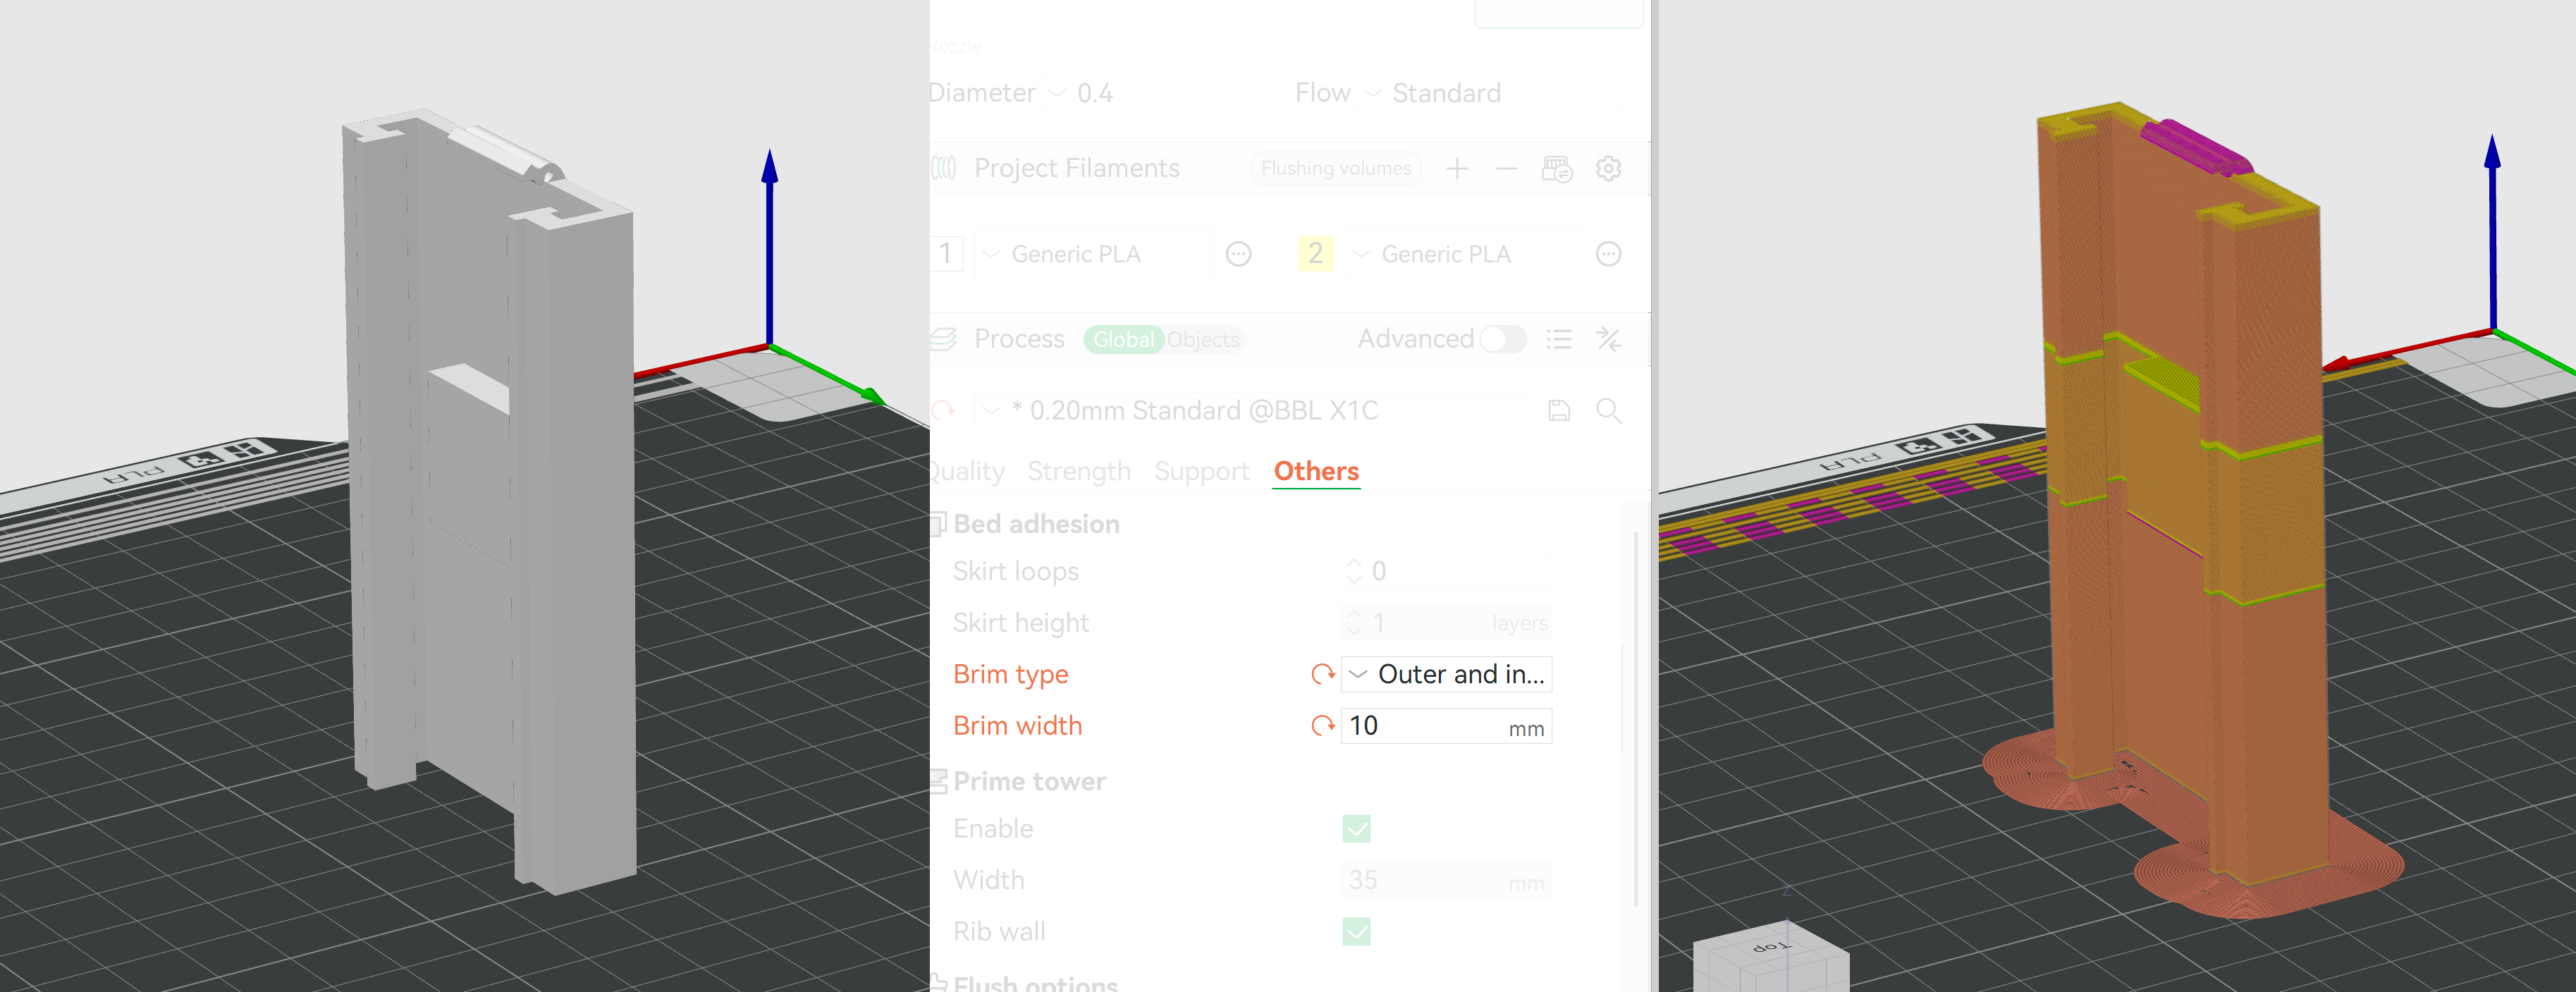
Problems with sticking to the bed
If the contact surface area of the object with the bed is too small, the part can detach from the bed and be dragged around by the nozzle. This result is not only that the print fails but also that the extruder will be covered with extruded material. This has to be avoided. Luckily the Bambu printer has a camera which recognizes this problem and automatically stops the print. You can increase the surface area of the object by adding a raft or a brim to avoid this problem.
- Raft/Brim/Skirt:
- Raft: Layers printed under your model to improve adhesion. Can be difficult to remove. Generally, avoid unless you have severe adhesion issues.
- Brim: An extension of the first layer around the base of your model to increase bed adhesion. Recommended for models with small footprints or tall, thin features to prevent warping.
- Skirt: A few lines printed around the model on the first layer, but not touching it. Used to prime the nozzle and check flow. This “pre-extrusion” makes sure that when the print starts with the actual object the material is already following through the nozzle. Always good to have.
Other Important Settings (Advanced)
In the presets these values are already defined. You might want to increase the strength of an object. Be aware that when you print an object the object is generated with an outer surface and a partially hollow core. Because the material is quite strong a completely filled core can be overkill. It uses a lot of material and will take additional time to print. Therefore, all slice software has an option to reduce the amount of material in the core. It uses a pattern which partially fills the core. The choice of pattern and amount of infill of the core will dictate the strength of the object.
- Infill: In the “Strength” tab. Determines the internal structure of your print.
- 10-20% Infill: Sufficient for most architectural models, providing good strength without excessive material or print time.
- Infill Pattern: Grid, Gyroid, and Lightning are common. Gyroid offers good strength in all directions. Lightning is good for speed of printing, and for architectural models in general when only the outer shell needs support.
- Walls: In the “Strength” tab.
- Wall Loops: Typically, 2-3 loops are sufficient for good strength and surface finish. More loops make the part stronger but increase print time.
- Speeds: In the “Speed” tab. Generally, leave these on default unless you are an advanced user troubleshooting specific issues. The X1 Carbon is very fast already!
Slicing Your Model and saving the G-Code file
Once you’re happy with the placement and settings, click the “Slice Plate” button (looks like a slicing blade) at the top. Bambu Studio will now calculate the toolpaths and generate the G-code.
Preview: After slicing, you will enter the “Preview” tab.
- Layer Slider: Use the vertical slider on the right to scrub through the layers and visualize how your model will be printed.
- Line Type: The coloured lines indicate different types of print moves (walls, infill, supports). Pay close attention to where supports are generated and if there are any unsupported areas you missed.
- Check for Issues: Look for areas where supports are inadequate, or where you could have reoriented the model to avoid them. Go back to the “Prepare” tab if necessary and re-slice.
- Estimated Print Time & Material: The bottom left corner will show you the estimated print time and material usage.
After reviewing the preview, click arrow beside Print Plate, choose “Export plate sliced file” (or “Export all” if more than one object) select this option and select the SD card destination. Then, with your g-code file ready on an SD card, you can remove it from your computer and proceed to the printer. Printing steps can be found in the next chapter.
3D Printing with Bambu Lab X1 Carbon 2/3
Print your 3D Model
In order to print your G-code a number of small steps are needed.
Preparation and upload file.
- Ensure the build plate is clean and free of debris. Use a small amount of glue stick where the model will be printed.
- Locate the micro SD card slot and insert it (usually near the screen on the right).
Starting the print
Starting the Print
- On the printer’s touchscreen, navigate to the “Files” tab.
- You should see a list of .gcode files on your SD card.
- Select the .gcode file you want to print.
- The printer will display a preview of the model and estimated print time.
- Deselect the “stop-motion” check box, as it will only take up space on the SD card.
- Press “Print”. The printer will now perform its self-calibration routines (bed leveling, flow calibration, lidar scanning) before starting the print. This is normal and ensures a high-quality print.
- Monitor the print at start! At least for a couple of initial layers, ensure the filament is adhering well to the build plate and lines are consistent. If it’s not adhering, stop the print and troubleshoot (clean bed, glue stick, adjust Z-offset if available on the printer or in settings). Or ask someone from the lab!
Removing the print
Removing the Print
- Carefully remove the build plate from the printer. It is magnetic.
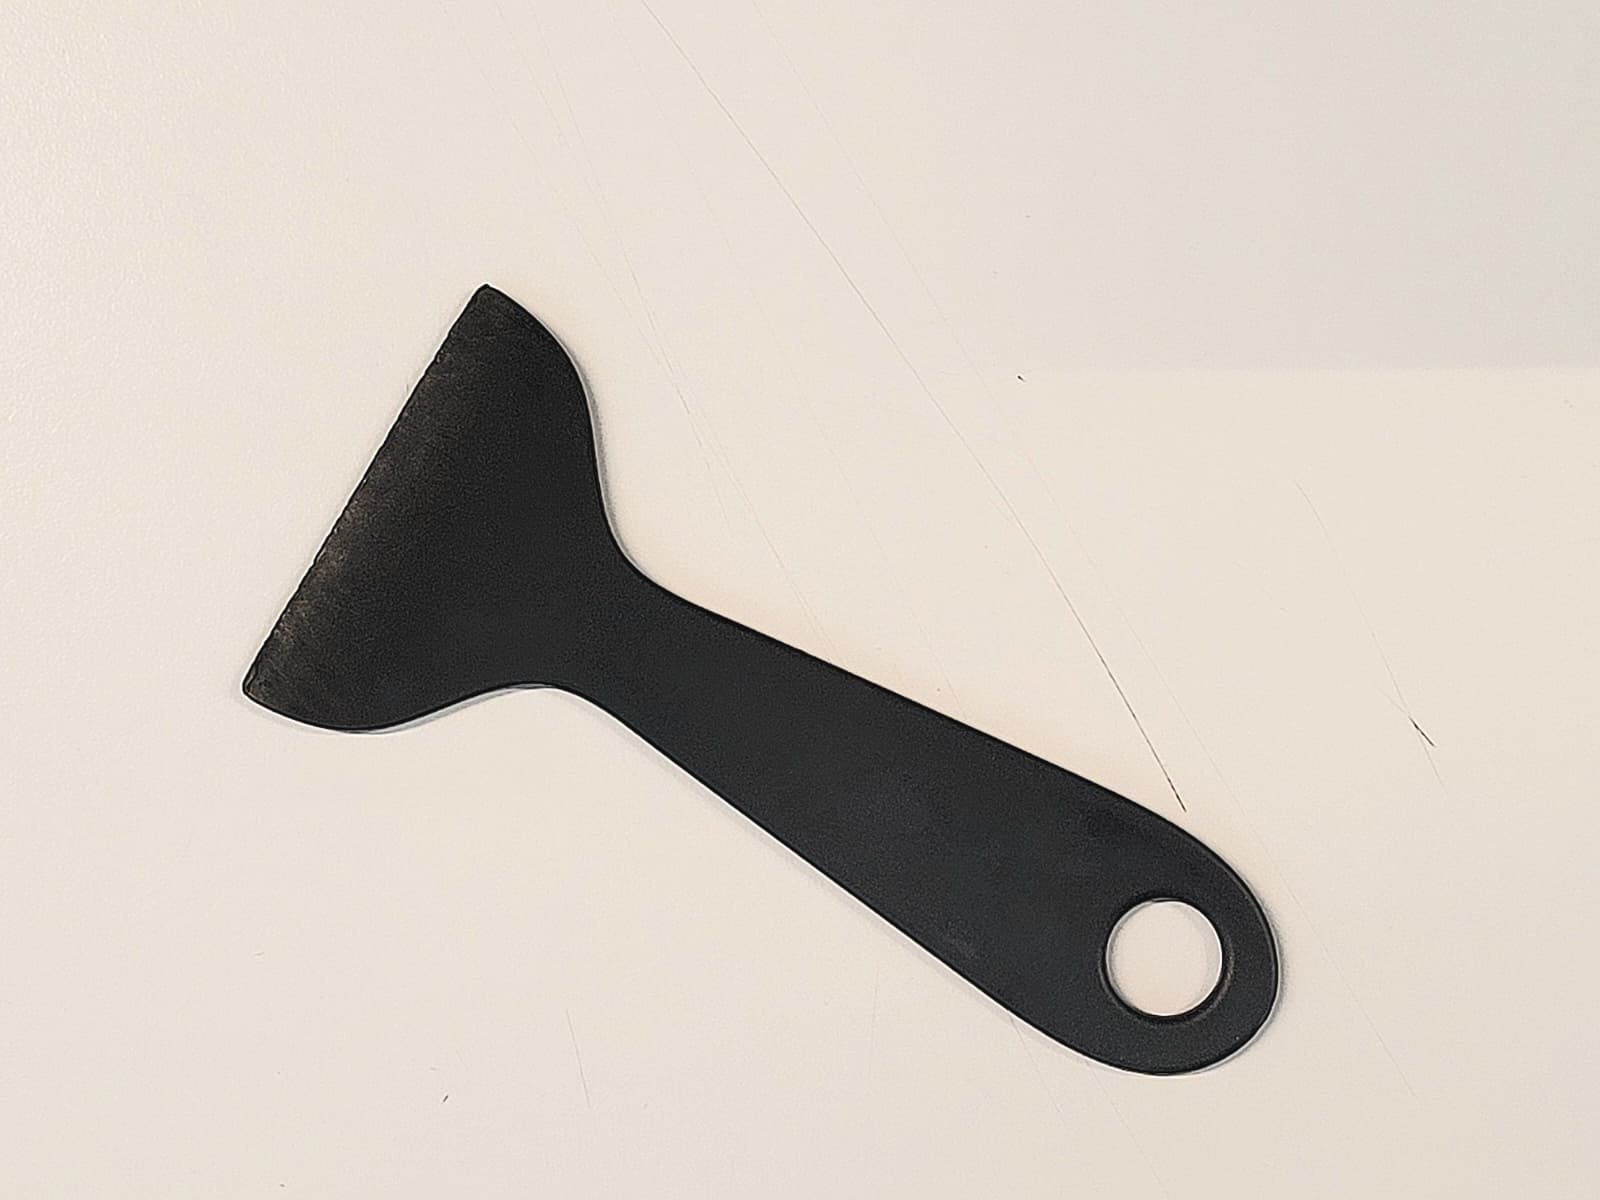
- Gently flex the plate to pop off the print. You might need a spatula tool to carefully pry the print off. Use the plastic spatula, DO NOT use the metal spatula. Avoid excessive force to prevent damaging the plate.
- Remove any remaining supports or brims with flush cutters or a deburring tool.
3D Printing with Bambu Lab X1 Carbon 3/3
Conclusion
Congratulations! Now you can prepare files for successful 3D printing. The guide can also be helpful for printing with other printers in our LAMA Lab, as the Bambu Studio slicer software is mostly nicely compatible with other manufacturer printers.
Ask someone in the lab for some tips and directions 😊
Write your feedback.
Write your feedback on "3D Printing with Bambu Lab X1 Carbon"".
If you're providing a specific feedback to a part of the chapter, mention which part (text, image, or video) that you have specific feedback for."Thank your for your feedback.
Your feedback has been submitted successfully and is now awaiting review. We appreciate your input and will ensure it aligns with our guidelines before it’s published.