Create Your First Programming Project Directory (Python, Jupyter Notebook)
-
Intro
-
Install Python
-
Visual Studio Code (VS Code)
-
Setting up Your First Directory
-
Create a Jupyter Notebook
-
Create a Virtual Environment (recommended)
-
Conclusion
-
Next Workshop: Programming Crash Course
Information
| Primary software used | Python |
| Software version | 1.0 |
| Course | Create Your First Programming Project Directory (Python, Jupyter Notebook) |
| Primary subject | Prototyping and Manufacturing |
| Secondary subject | Robot Programming |
| Level | Beginner |
| Last updated | September 1, 2025 |
| Keywords |
Responsible
| Teachers | |
| Faculty |
Create Your First Programming Project Directory (Python, Jupyter Notebook) 0/7
Create Your First Programming Project Directory (Python, Jupyter Notebook)
Getting started in Jupter Notebook using VS Code editing environment.
Getting started with programming projects requires a bit of a setup to get you started in the best way possible. Organizing your files in a neat directory can help make your work a lot easier to manage. This tutorial will show one way to start your very first programming project on your local computer device.
Visual Studio Code (VS Code) will be used in this tutorial as the editing environment for your project. It is an open-source program that makes it easier to create and debug files all in one place. There are many alternatives to editing environments, and you can of course explore alternatives that suit you best. But for now, this is a great starting point.
Additionally, this tutorial will explain an easy way to install Python and run it locally on your computer (if you have not already). If you have not yet installed Python and unsure how to tackle it, you can follow the steps provided here in the next chapter, otherwise skip to next chapter.
After completing this tutorial you will be able to:
- Setup your first project directory (folder structure)
- Create and run ‘interactive python Jupyter Notebook’ locally with VS Code
- Optional: create a virtual environment in VS Code
The tutorial is written for Microsoft Windows operating system, the process may vary slightly to macOS and Linux OS.
Create Your First Programming Project Directory (Python, Jupyter Notebook) 1/7
Install Pythonlink copied
Python is a popular language for data science, machine learning, robotics, design, engineering, and among others. Installing it is simple.
Installing Python Directly from the Source
Go to the official source for downloading the latest Python package. Download the installer, and follow the instructions.
Python.org: https://www.python.org/downloads/
NOTE: Important: Check the box that says “Add Python to PATH” before clicking “Install Now.” If you are unsure, launch the Command Prompt on your computer and check if you have python installed by typing “python –version”. If a version number appears (e.g., Python 3.12.1), Python is already installed, and you can skip the installation.
Verify Installation is Successful
Launch the Command Prompt on your computer and type the following:
python --versionIs the latest version of python listed there? Then you are good to go! You can already run python code in the terminal, but we will use VS Code to create and save files more effectively.
Create Your First Programming Project Directory (Python, Jupyter Notebook) 2/7
Visual Studio Code (VS Code)link copied
A code editor is an essential tool for programming. This of it like the ‘word document processor’ for code. You can write code on any program, including good ol’ Notepad. However, Notepad lacks useful features like syntax highlighting, autocompletion, and debugging tools found on popular code editors.
VS Code is an open source integrated development environment (code editor) developed by Microsoft for Windows, macOS, and Linux operating system. VS Code is as good as any other code editor for the purposes of education and learning how to code, however, we will recommend using and familiarize yourself with its user interface.
Installing VS Code
Follow installation instructions on the website:
Download Visual Studio Codes: https://code.visualstudio.com/download
Following the default installation options is sufficient. Once VS Code is launched, you can take a short moment to celebrate and explore its user interface!
Alternative Code Editors
Other note editors that you can use as alternatives are provided below for your reference.
- Notepad ++
- Sublime Text
- Google Colab (cloud-based Jupyter Notebook)
- PyCharm
Create Your First Programming Project Directory (Python, Jupyter Notebook) 3/7
Setting up Your First Directorylink copied
Let’s create a new project directory. Assume you are taking a course and you like to organize the files in a folder structure to keep track of different files you based on the workshop name or date.
Your Project Code Directory
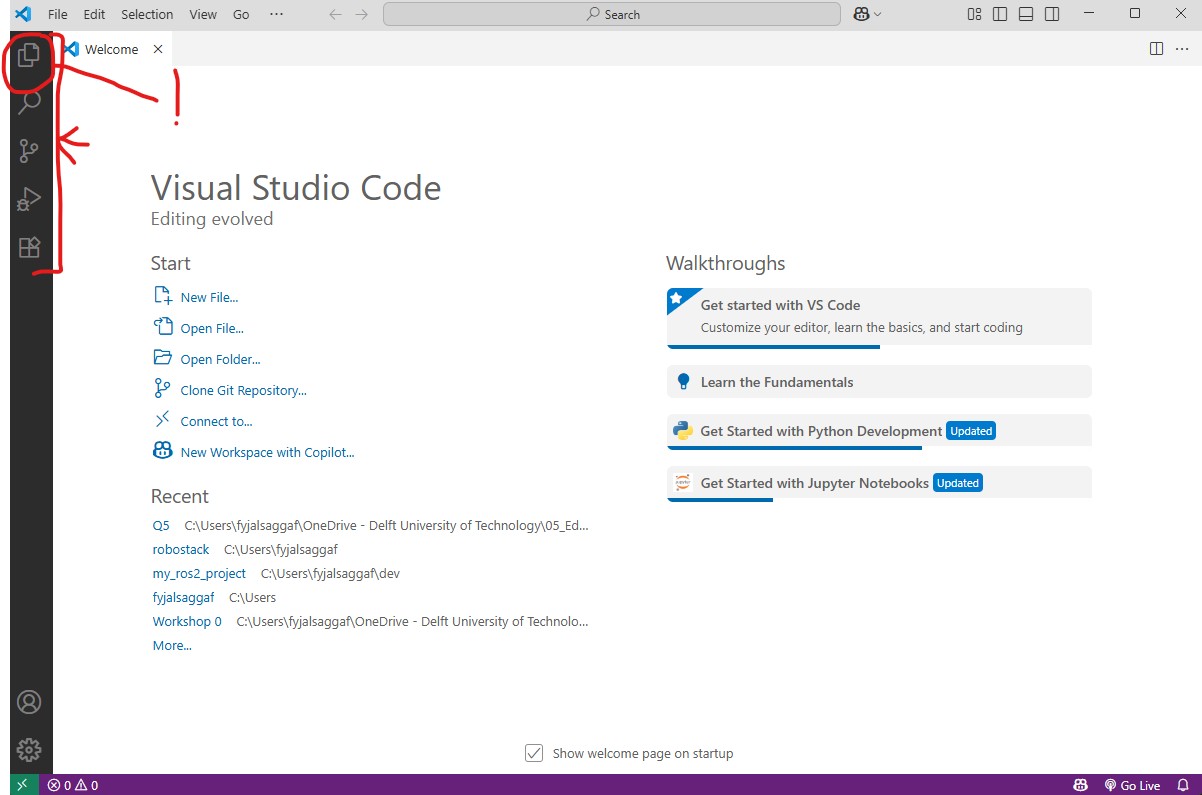
On the left hand side, there is a side-bar menu which you can explore. You can hover over these icons to read more about these menus.
The side menu is structured as follows:
- Explorer: We use this to organize the files in our project.
- Search: Search helps you find specific text in your code and easily edit them if needed.
- Source Control: Source control is a feature that helps you manage changes to your code using version control systems like Git, enabling collaboration, tracking, and history of your project.
- Run and Debug: This feature provides advanced debugging tools if needed.
- Extensions: you can download ‘extensions’ to VS code to add additional features.
Setup a Files Directory for your Project
Let’s create a file directory that you can use to learn Python. Feel free to create your own file directory structure to best fit your needs. In this tutorial, this file structure below is recommended to use while you are following programming workshops.
To make it easier for you, we have included a zip file below which you can download and unzip it somewhere in your computer. For example, in your Documents folder or somewhere easily accessible.
📁 Programming-Workshops/
├── 📁 _Archive/
├── 📁 Readings/
├── 📁 Pre-Workshop/
│   ├── 📁 Codes/
│   └── Notes.txt
├── 📁 Week_1
│   ├── 📁 01_Workshop Notebooks/
│   ├── 📁 02_Assignment Exercises/
│   ├── 📁 03_Data/
│   └── Notes.txt
├── 📁 Week_2 /
│   ├── 📁 01_Workshop Notebooks/
│   ├── 📁 02_Assignment Exercises/
│   ├── 📁 03_Data/
│   └── Notes.txt
Go to the Explorer Menu, click “Open Folder” and select the project folder “Programming-Workshops”. You should see the file structure looks something like the image below.
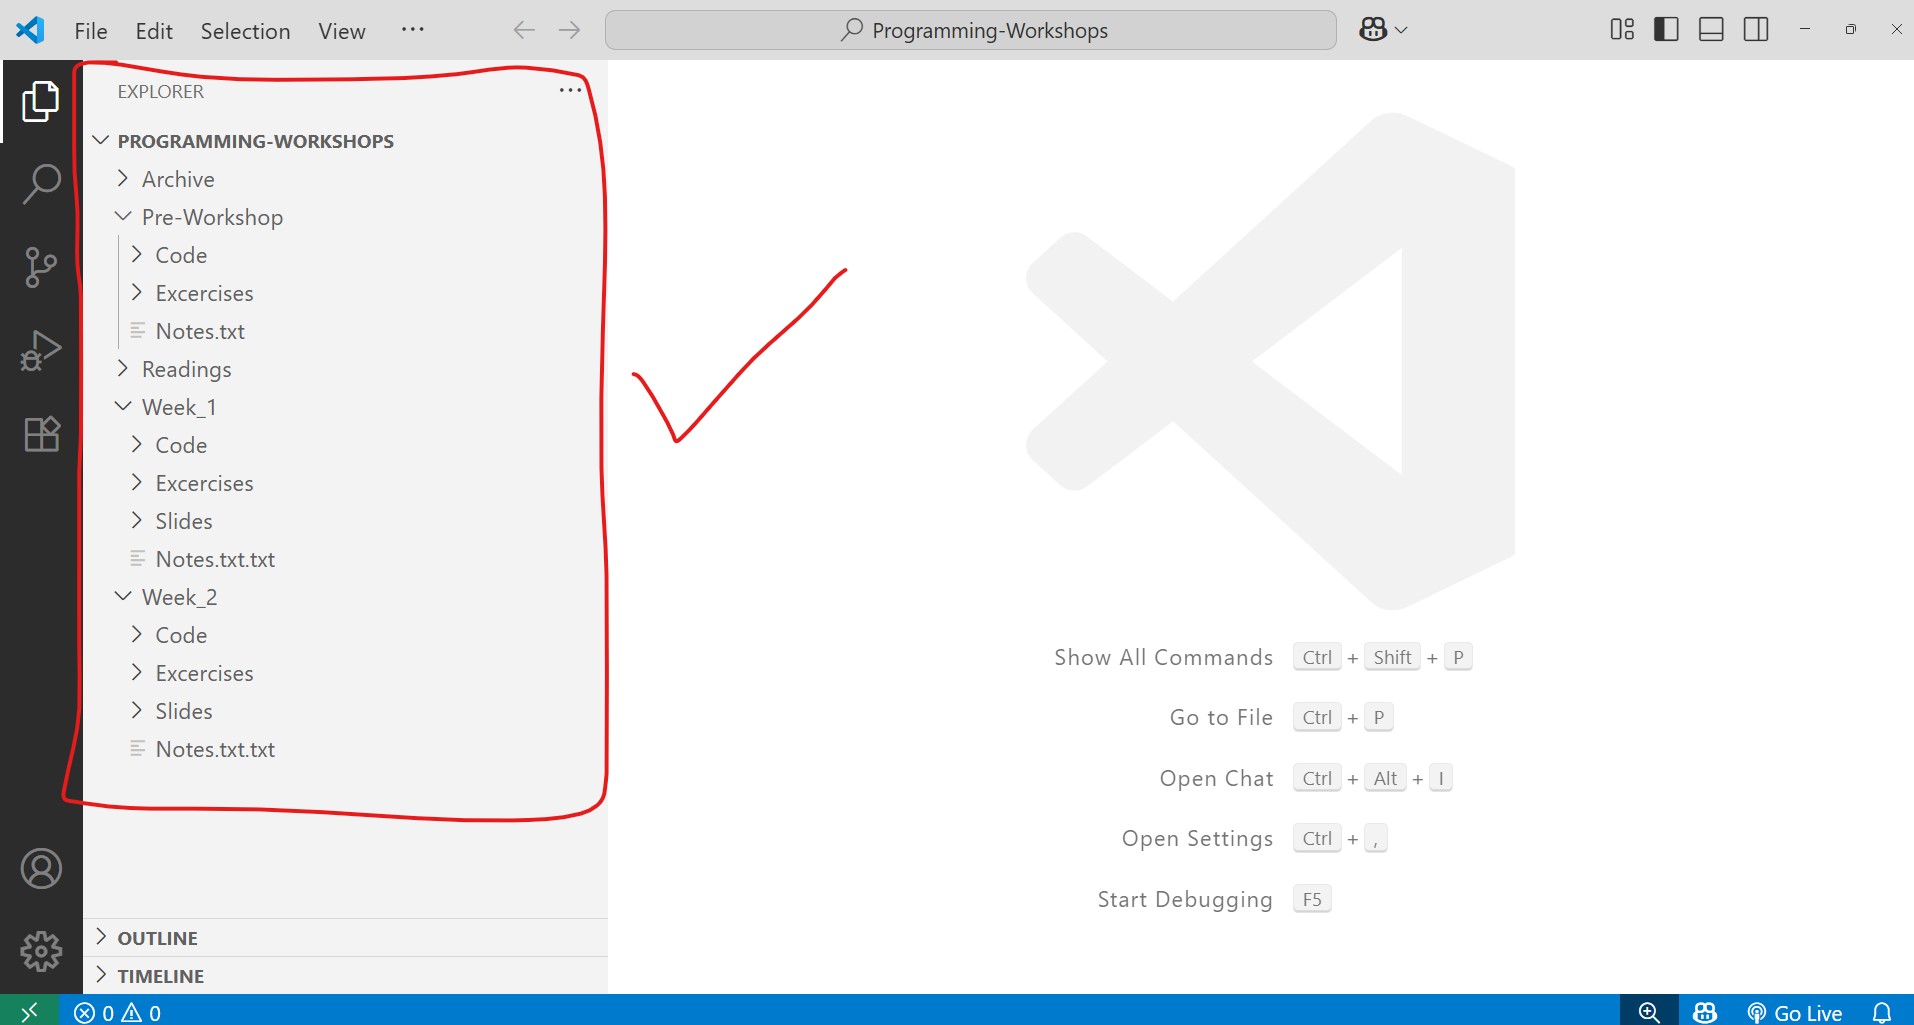
Note: The file structure may look slightly different than what’s shown in image 3. You are free to edit it to your liking of course but you can make use of the file structure provided in the download file above.
Install the Python Extension on VS Code
To make the code easier to read, install the Python extension! Verify that it is the official source by Microsoft.

Create a File in Explorer Sub Menu

You can directly create new folders and files in VS Code. Let’s create your first Python file in VS Code.
- Select the folder you want to create the file, for example, the “Code” folder in the pre-workshop folder.
- You will see a “+” sign next to the main project directory. Click on the one furthest to the left to “add new file”.
- Give a name to the file: “code.py”.
- The file will open in a tab in the main development environment.
Run a Simple Python Code
You can write a line of code there and execute it to see if it works. Copy the code below and pasted inside the code.py file.
print('Hello, World!')Click on the ‘play’ button to execute the code.
Notice that the terminal will show up at the bottom of VS Code. This let’s you run code directly within the VS Code editor. What you need to know about it is that this is a direct terminal for your project which you can install packages later on.

Congratulations on running your first python file! Running python code directly from a .py file extension (native Python) works well. But for many workshops and lessons, it is common to use Jupyter Notebook, a file type that can run Python. You can check the next chapter to try it out.
Create Your First Programming Project Directory (Python, Jupyter Notebook) 4/7
Create a Jupyter Notebooklink copied
As explained before, Jupyter Notebook are extremely useful learning python. It can help structure your code in parts, and makes it easier to run the code section by section and see where problems occur. A Jupyter Notebook as the file extension of ipynb which stands Interactive Python Notebook.
Install a Jupyter Notebook Extension
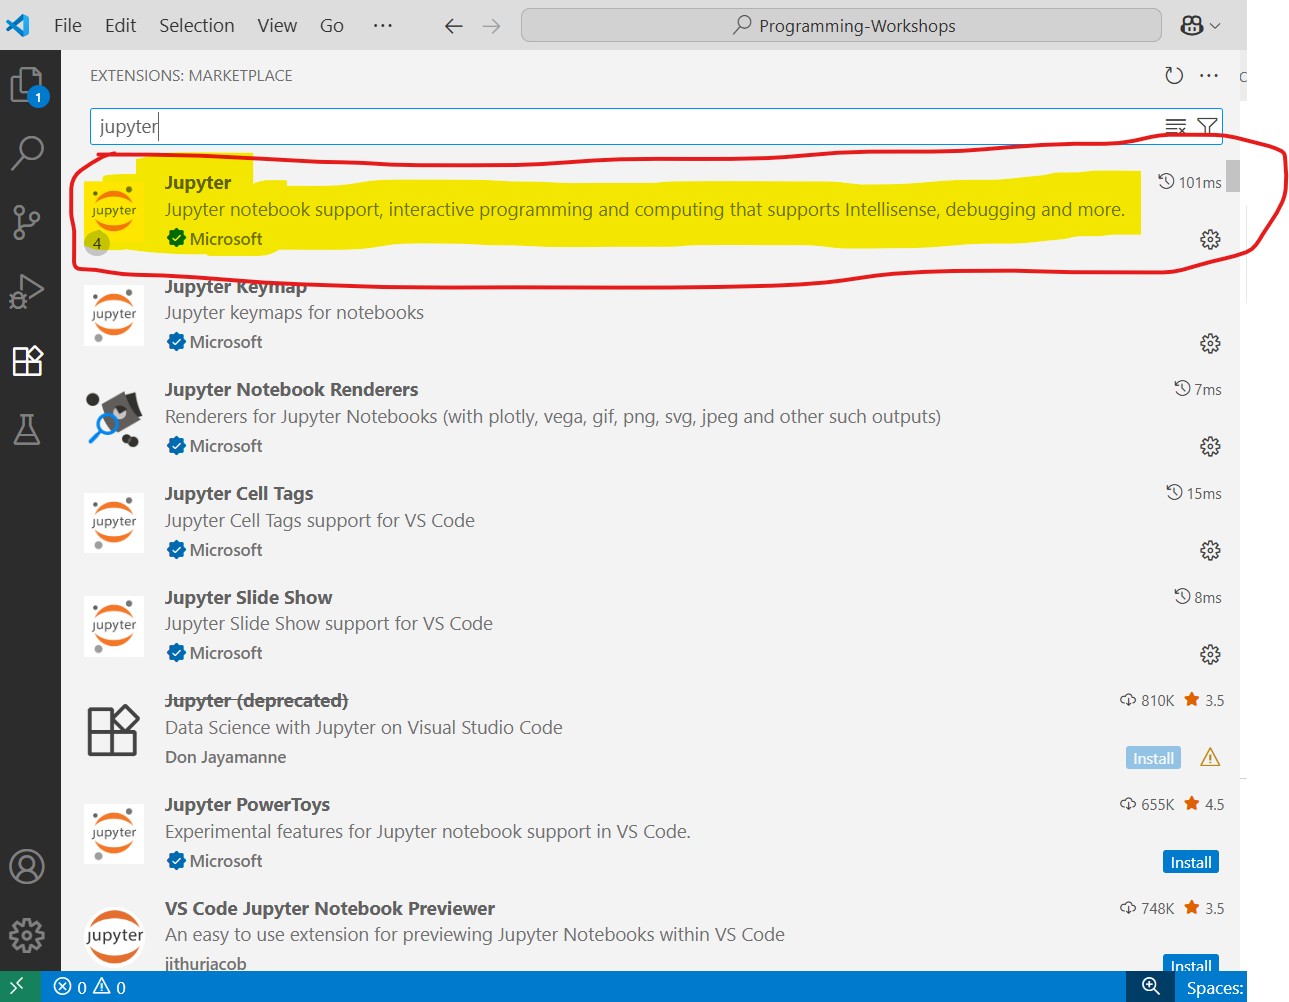
Go to Extensions and install the Jupyter Notebook extension for VS Code! This is an important step to successfully complete this tutorial.
Create a Jupyter Notebook File
Let’s create a new file in our project directory. Let’s call it “code.ipynb”
Create a new code cell.
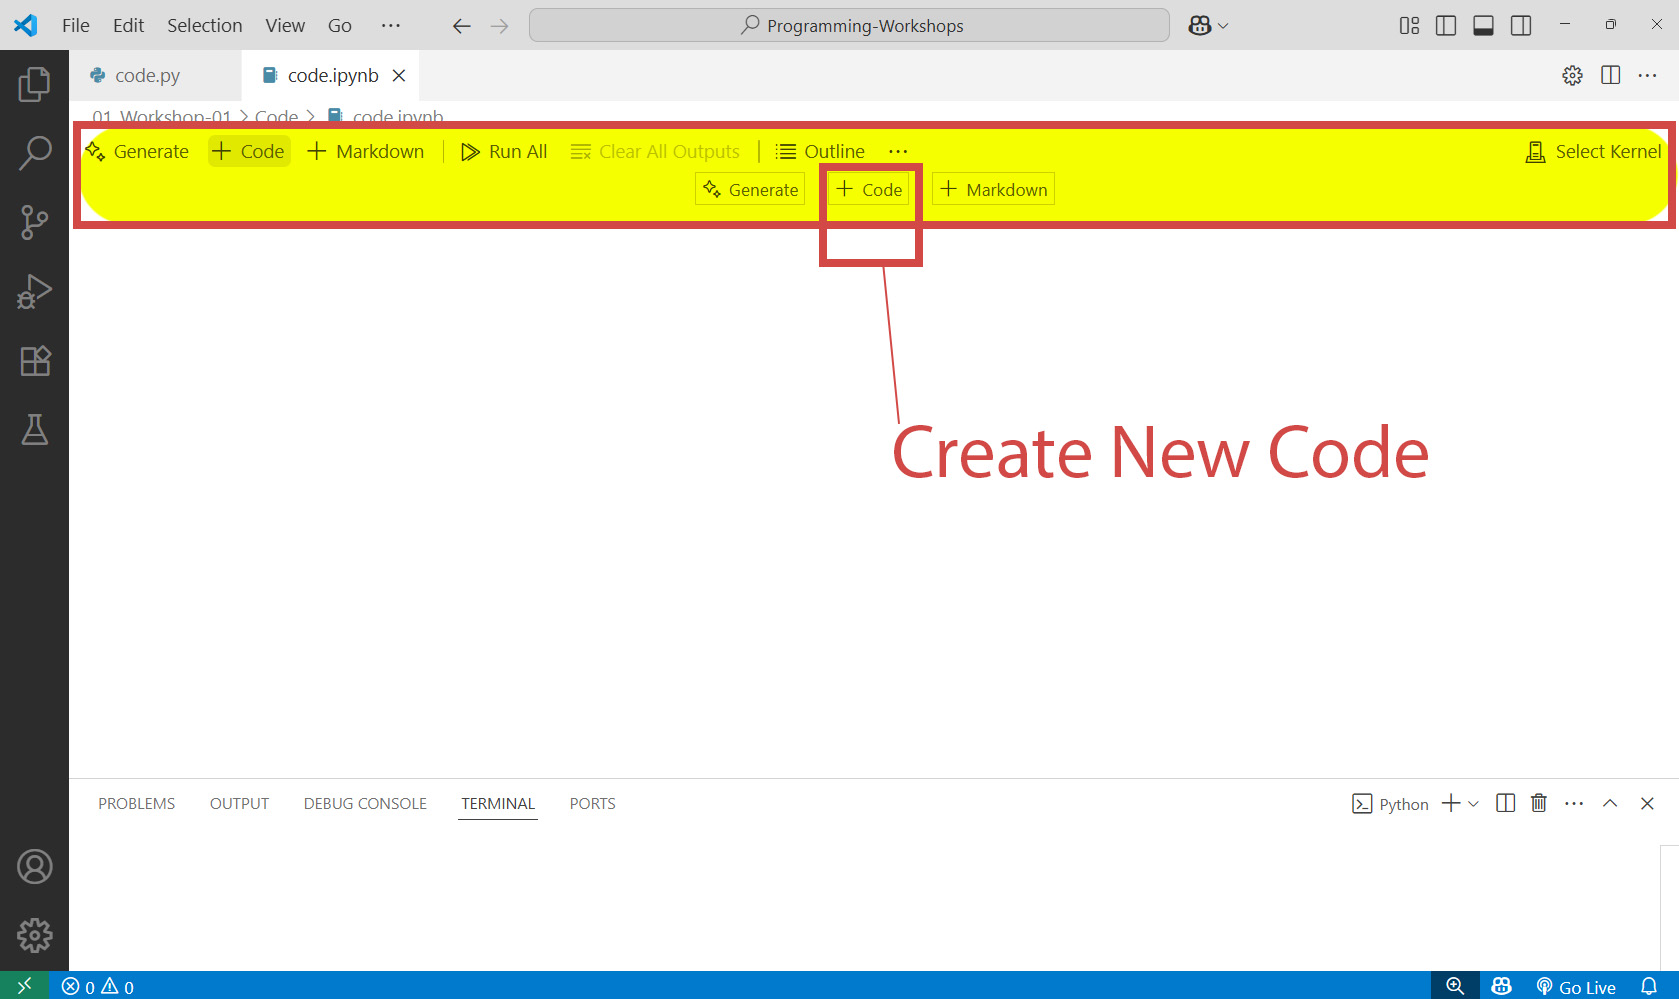
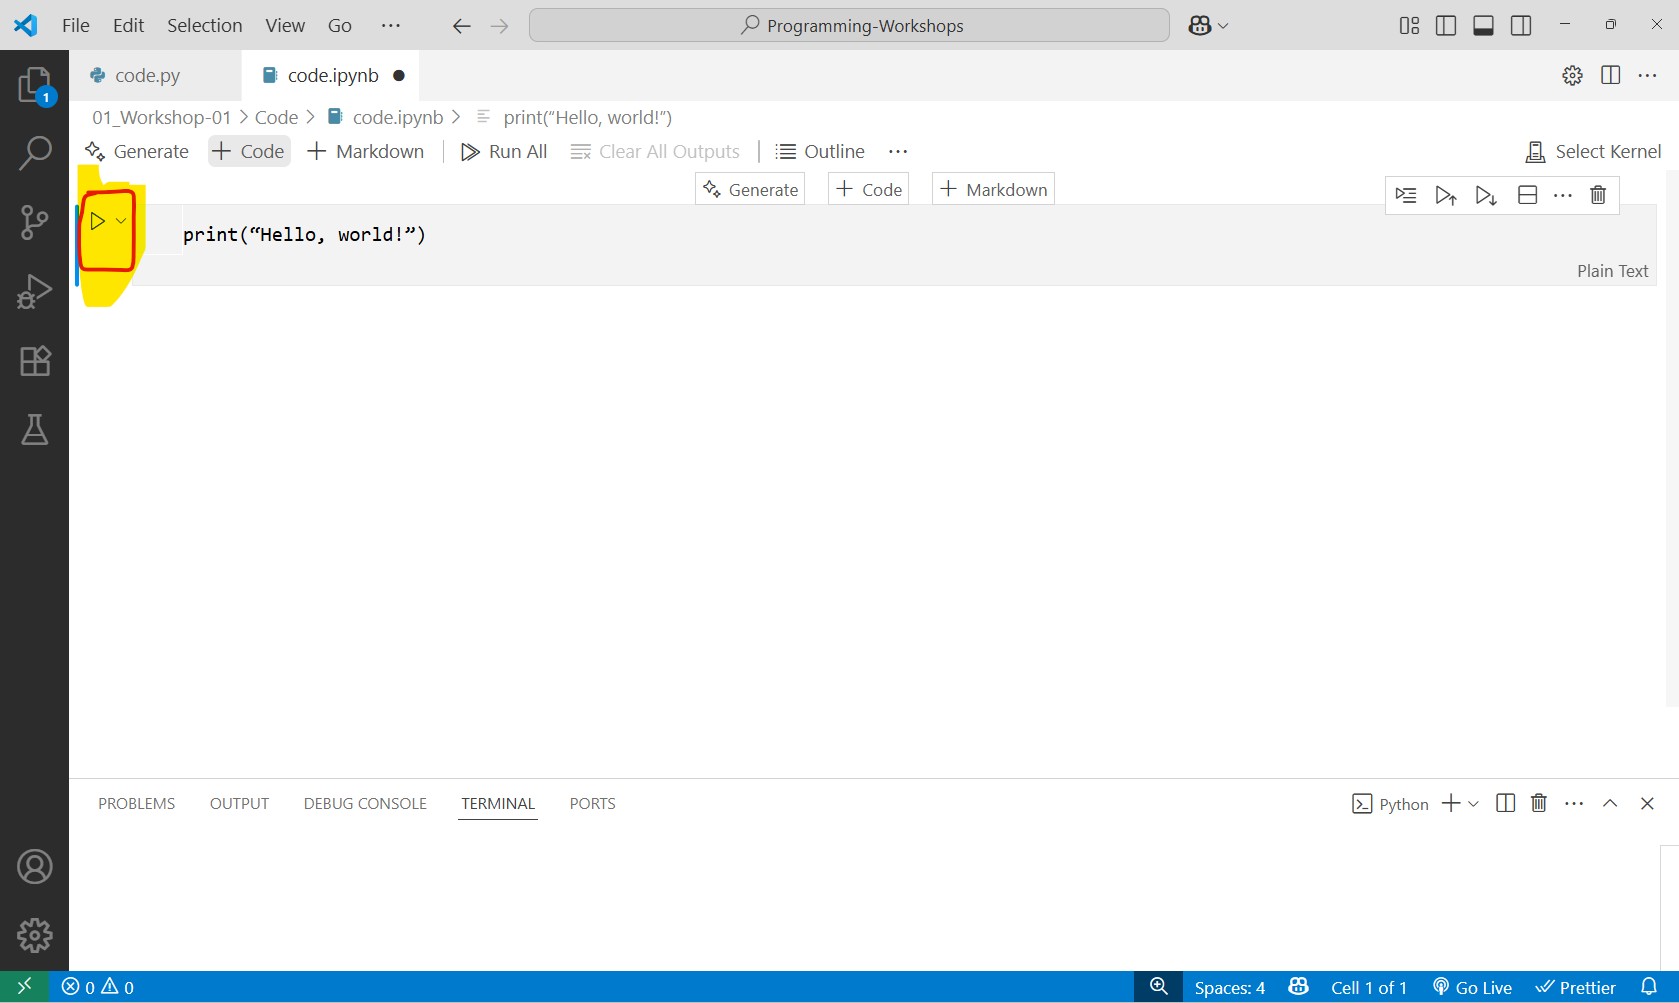
You will notice a ribbon at the top. Click on “Code” to add a new field where you can enter the python code from the previous chapter:
print('Hello, World!')On the left-side of the field, you will see a play button which says when hovered over “execute cell”. This will tell the notebook to run this one particular cell.
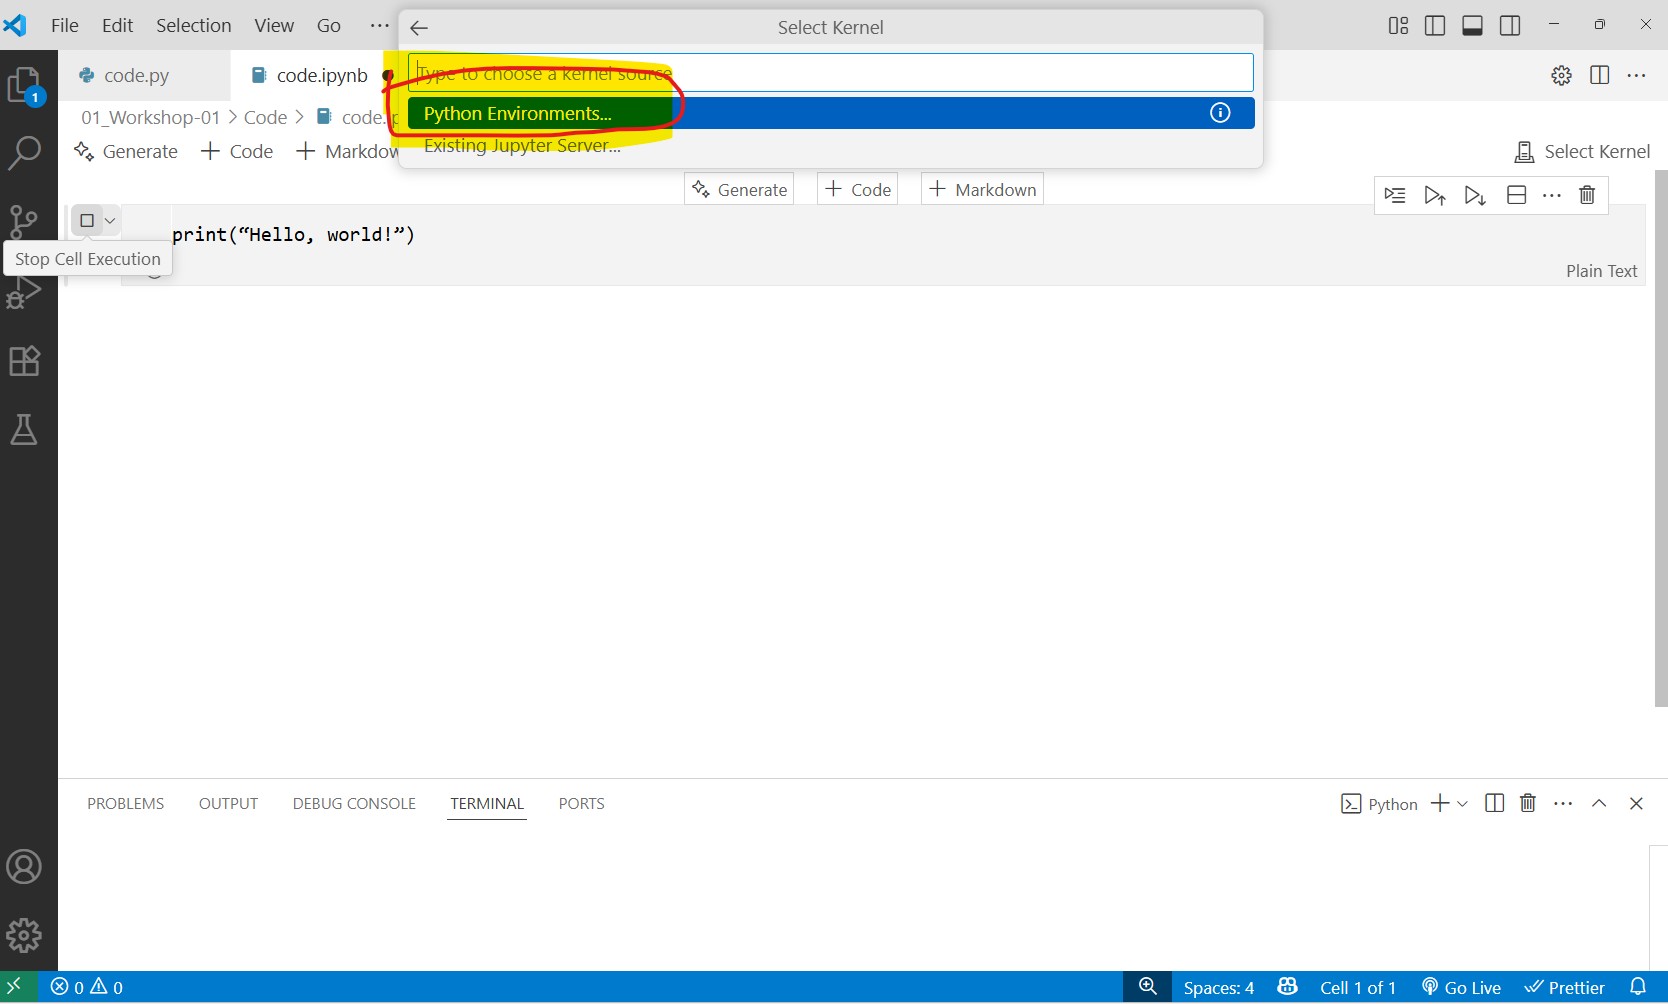
VS Code will ask you to select an environment. You can select any of the python environments that’s listed on your computer. Virtual environments will be explained more in the next chapter. If you are asked to install an ipykernal package, click “install”.
The output will be displayed below the code cell. If you see an output “Hello, World!”, then your code works and the files is successfully running.
TIP: You can use the shortcut ctrl+enter on Windows to execute a cell that you are currently editing.
Markdown
Markdowns fields are useful to add your own notes in the file. This will not be executable code, but rather a way to organize your notebook and include any notes important for the program to function correctly.
Create a new Markdown field and add a chapter title by adding the hashtag ‘#’ before the text.
# Section 1
Section 1 notes.
In the Explorer menu, you can view the outline of the current Jupyter notebook you are editing. This is handy for long codes.

And that’s it for now! You are almost ready to start learning programming with your current setup. In the next chapter, the concept of virtual environments in VS Code are explained. This is useful for when you have complex projects later on to make your development environment more effective and organized.
Create Your First Programming Project Directory (Python, Jupyter Notebook) 5/7
Create a Virtual Environment (recommended)link copied
Virtual environments allow us to have a higher level of control over what Python version we use and the specific Python libraries we wish to install for this course. The reason this step is critical is to make code easily reproducible between different computers by using the exact same Python version and the specific libraries we use.
You will just need to follow a few steps to create a virtual environment for the course or workshop you are taking. Once everything is set up, you will begin installing all the libraries you need for the course without affecting your main Python installation. If you are thinking about diving deeper into Python in future courses or projects, it is highly recommended to follow through with this step.
Create a (Virtual) Environment
- To create a virtual environment, activate the Command Palette in VS Code by pressing “ctrl+shirt+P” in Windows operating system.
- Type: “Python: Create Environment”.
- Select Venv to create an environment in your current space (‘Programming-Workshop’ project directory)
- Select a base Python version, you can choose the latest one if you have multiple.
- Your virtual environment will be added to your project directory.
In your project folder directory, you now have a specific version of Python and the necessary base files to get started. Any additional libraries you add here will be specific only to this project and will not be made available ‘globally’ on your computer.
TIP: you can re-name your new .venv folder to something like “.venv-python-course” to keep track of multiple environments in the future. You will have to reload your window after renaming the virtual environment. You can do so by pressing “ctrl+shift+P” then type “Developer: Reload Window”.
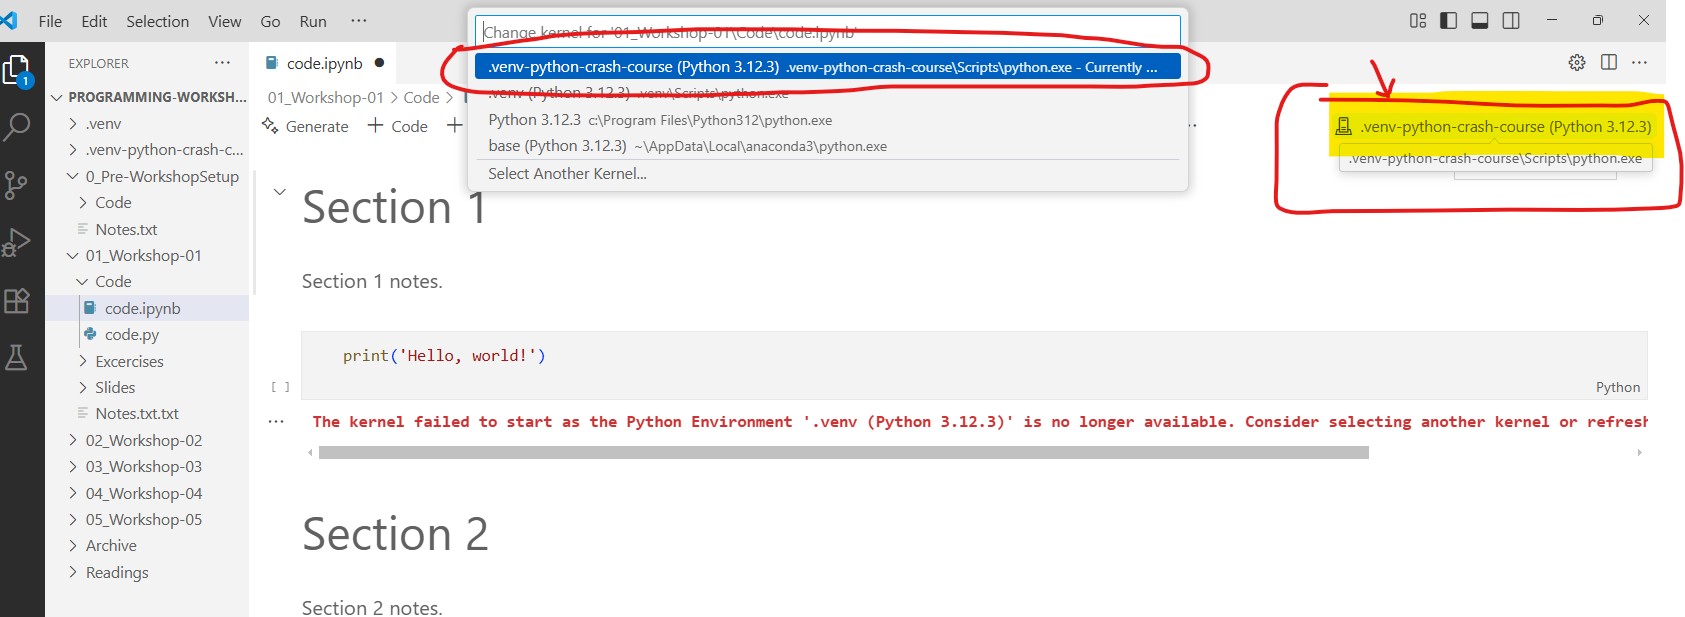
You can now select the correct kernel in any Jupyter Notebook. Look for the kernel selection option (usually in the top-right corner of the notebook) and choose the one that points to your new .venv environment. This ensures your notebook uses the isolated set of libraries you are about to install.
And that is it! You will not to do anything more than that for now. If your programming workflow requires additional virtual environments, you can do a little bit of research on this. For all intents and purposes, you can create a new virtual environment for every new project to start a new “fresh” Python project! Enjoy!
Create Your First Programming Project Directory (Python, Jupyter Notebook) 6/7
Conclusionlink copied
You are now ready to embark on your programming journey! After completing this tutorial, you will have had Python installed along with a powerful code editor, VS Code. You can now look up more learning materials to get started with Python.
Recommended Follow-Up Tutorials
Follow the tutorial below to practice basic Python syntax. You can follow the entire tutorial but these specific chapters are recommended to start with:
- Python Syntax Basics
- Conditional Statements & Loops
(Highly) Recommended Resources
Here are some useful links that you will be helpful for your learning journey:
Create Your First Programming Project Directory (Python, Jupyter Notebook) 7/7
Next Workshop: Programming Crash Courselink copied
Workshop 1: Introduction to Python
If you are ready to practice some programming, follow the next page for the first introductory workshop.
Required Readings Before the Workshop
If you are unfamiliar with Python, have a look at the following tutorials to better prime yourself for the workshop.
Write your feedback.
Write your feedback on "Create Your First Programming Project Directory (Python, Jupyter Notebook)"".
If you're providing a specific feedback to a part of the chapter, mention which part (text, image, or video) that you have specific feedback for."Thank your for your feedback.
Your feedback has been submitted successfully and is now awaiting review. We appreciate your input and will ensure it aligns with our guidelines before it’s published.