HTML and CSS Basics
-
Intro
-
HTML Concepts
-
HTML Building Blocks
-
Identifying Elements – The Bridge to CSS
-
CSS Concepts
-
Conclusion
-
Test your Knowledge
-
Useful Resources and Links
Information
| Primary software used | Visual Studio Code |
| Software version | 1.0 |
| Course | HTML and CSS Basics |
| Primary subject | Other |
| Level | Beginner |
| Last updated | April 3, 2025 |
| Keywords |
Responsible
| Teachers | |
| Faculty |
HTML and CSS Basics 0/7
HTML and CSS Basics
Introductory basics for HTML and CSS to develop your own web portfolio.
The basic building blocks of webpages are HTML and CSS. Both concepts are explained here. They are very much interrelated, but to clearly explain these concepts, they will be handled separately. It comes down to this: with HTML the structure of a document’s content is defined, and CSS then allows us to layout the document to make it graphically appealing. This is also the order in which we will approach the building of a webpage.
In this tutorial, we will go back to the basics of HTML and CSS. This way it is easier to understand how it really works, and you will have more control over the final output. Both HTML and CSS can be written in a simple text editor like Notepad, we will use Visual Studio Code (VS Code for short).
Visual Studio Code is a free development environment which you can easily download and install online from https://code.visualstudio.com/
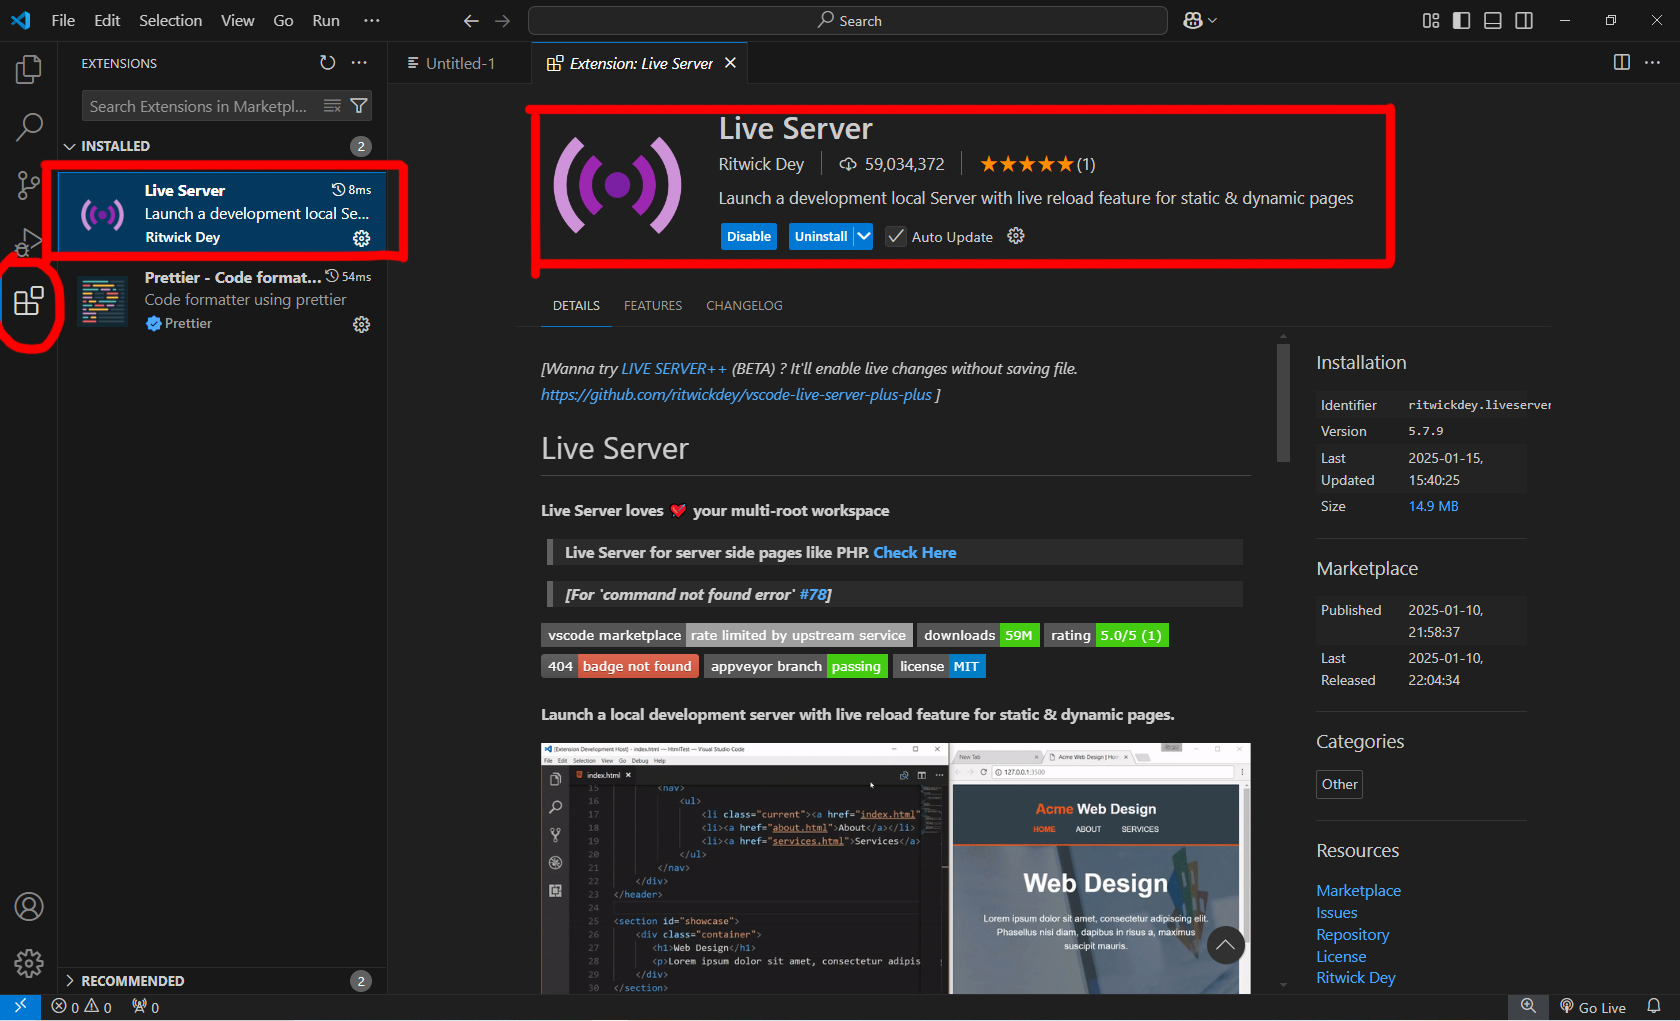
To get started with the tutorial, follow the software introduction to Visual Studio Code above. Install an extension that will allow us to test our code in our browser live as we edit, called Live Server. And you can also install Prettier as it will come in handy for making code more legible and consistent before sharing your code with others.
Then, start a new text file to follow along with the tutorial.
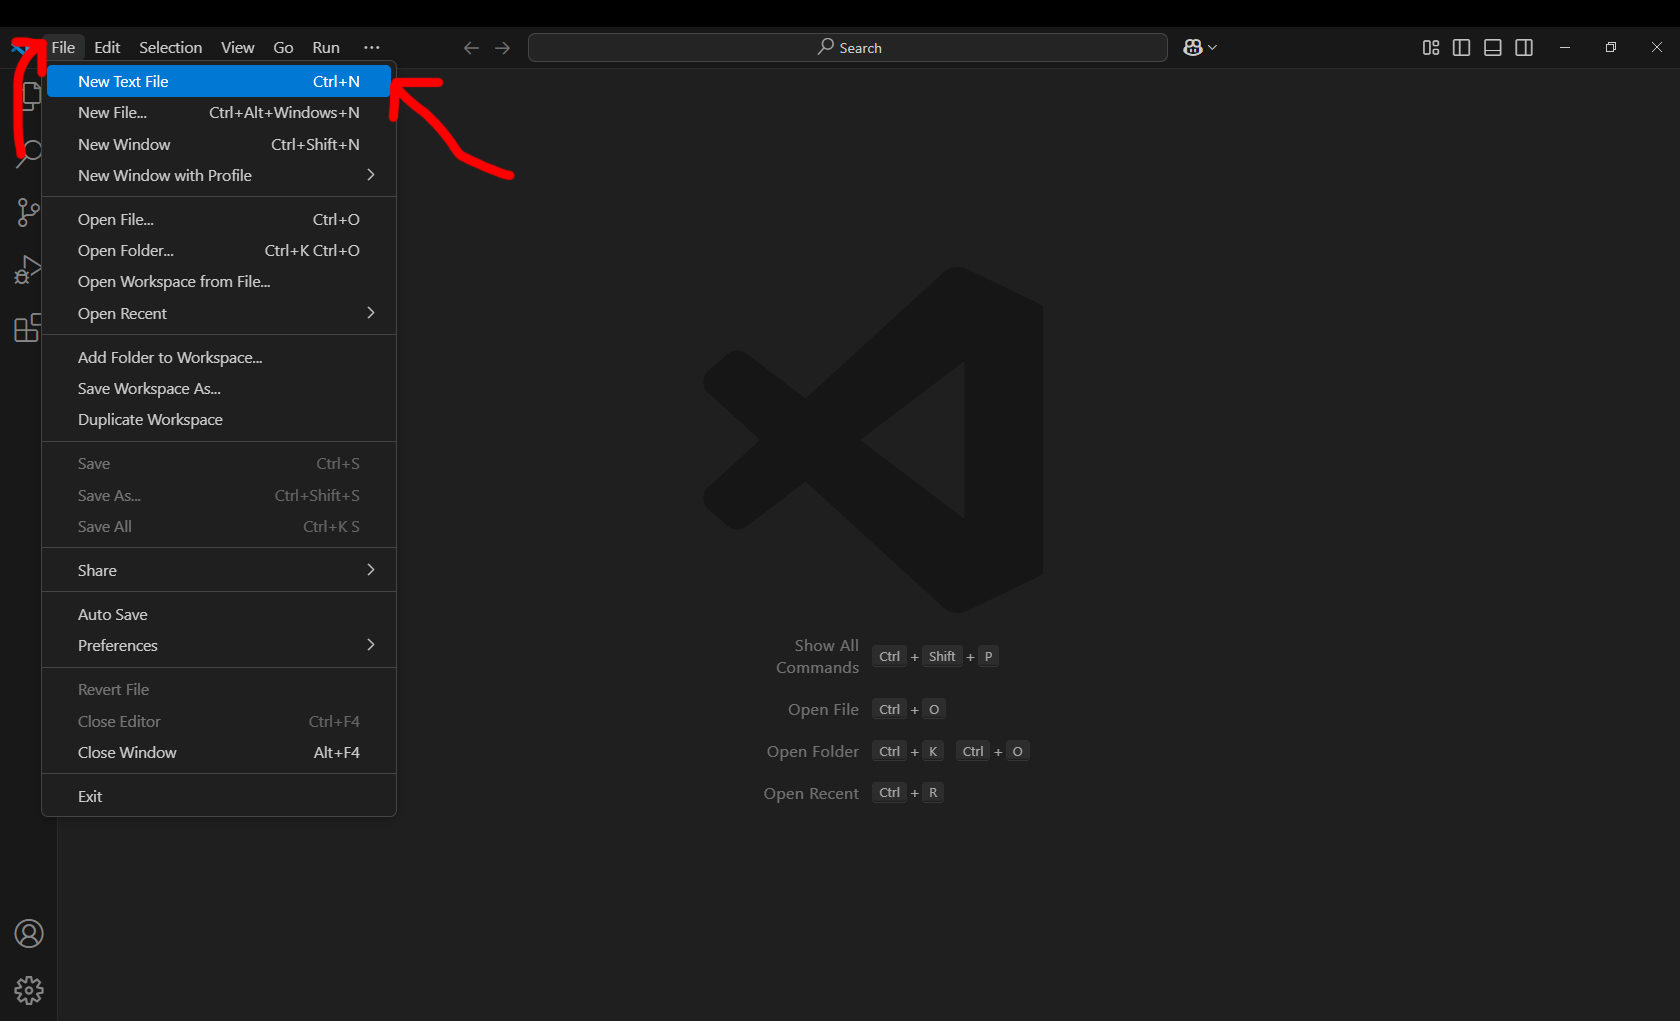
Then save your file somewhere in your computer. Name your file as “index” which is a common terminology for your ‘home’ page.
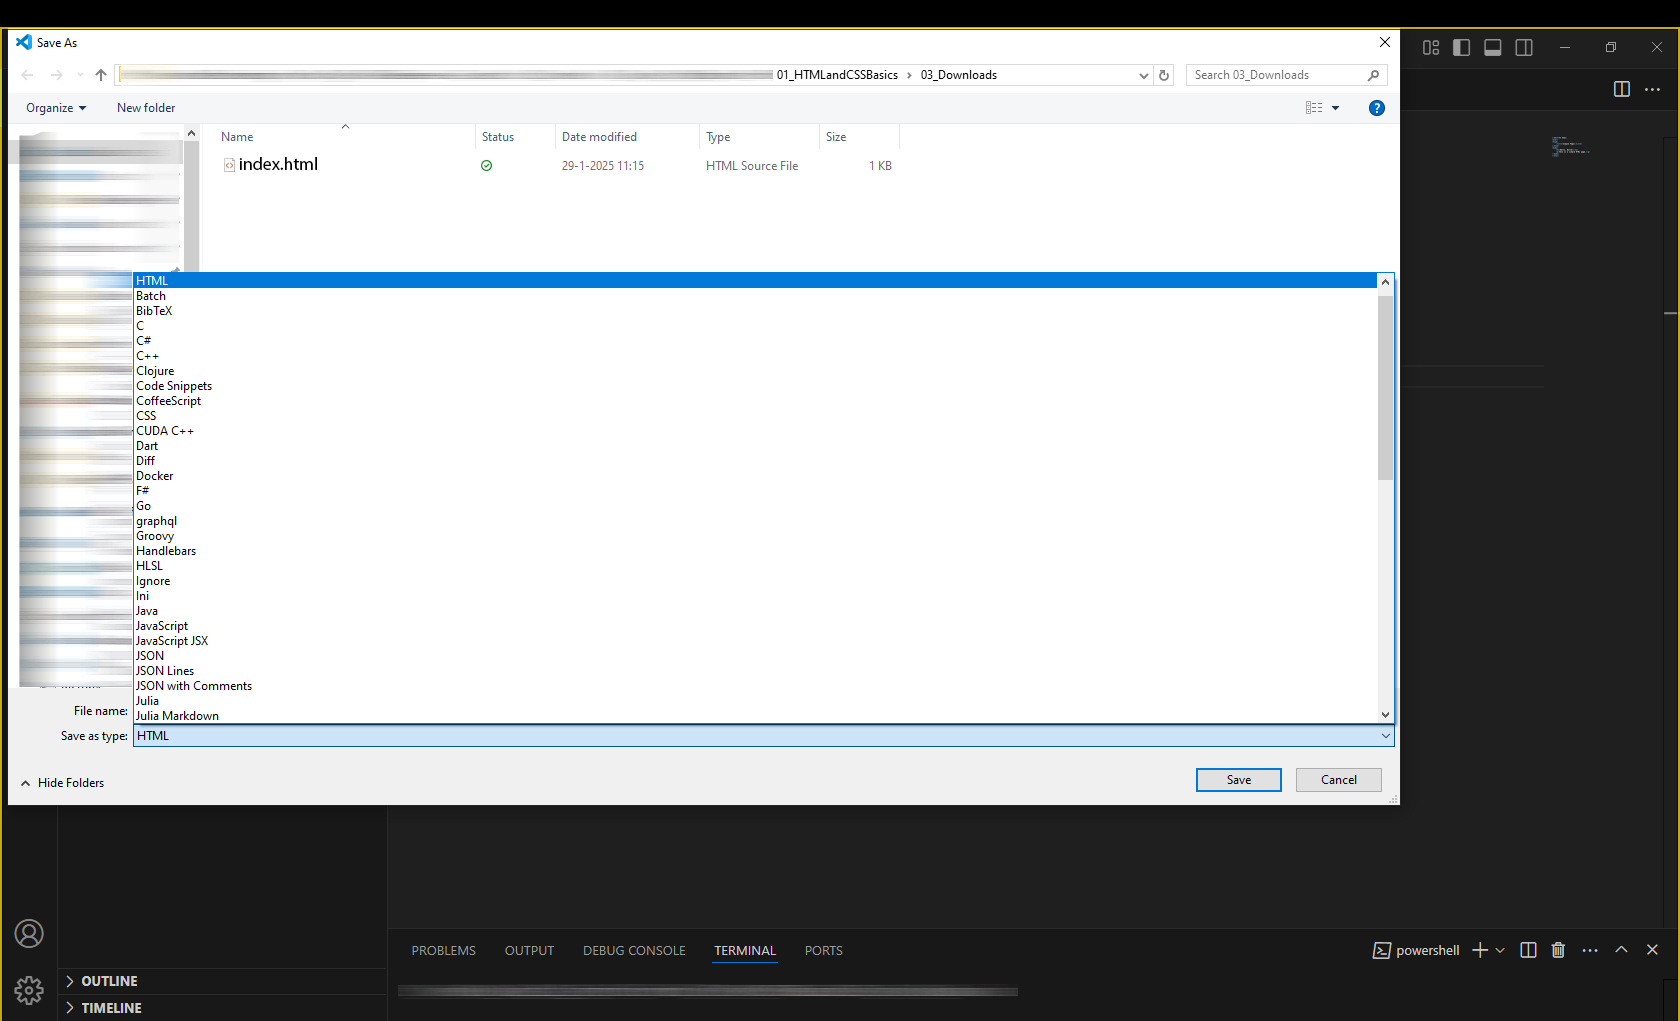
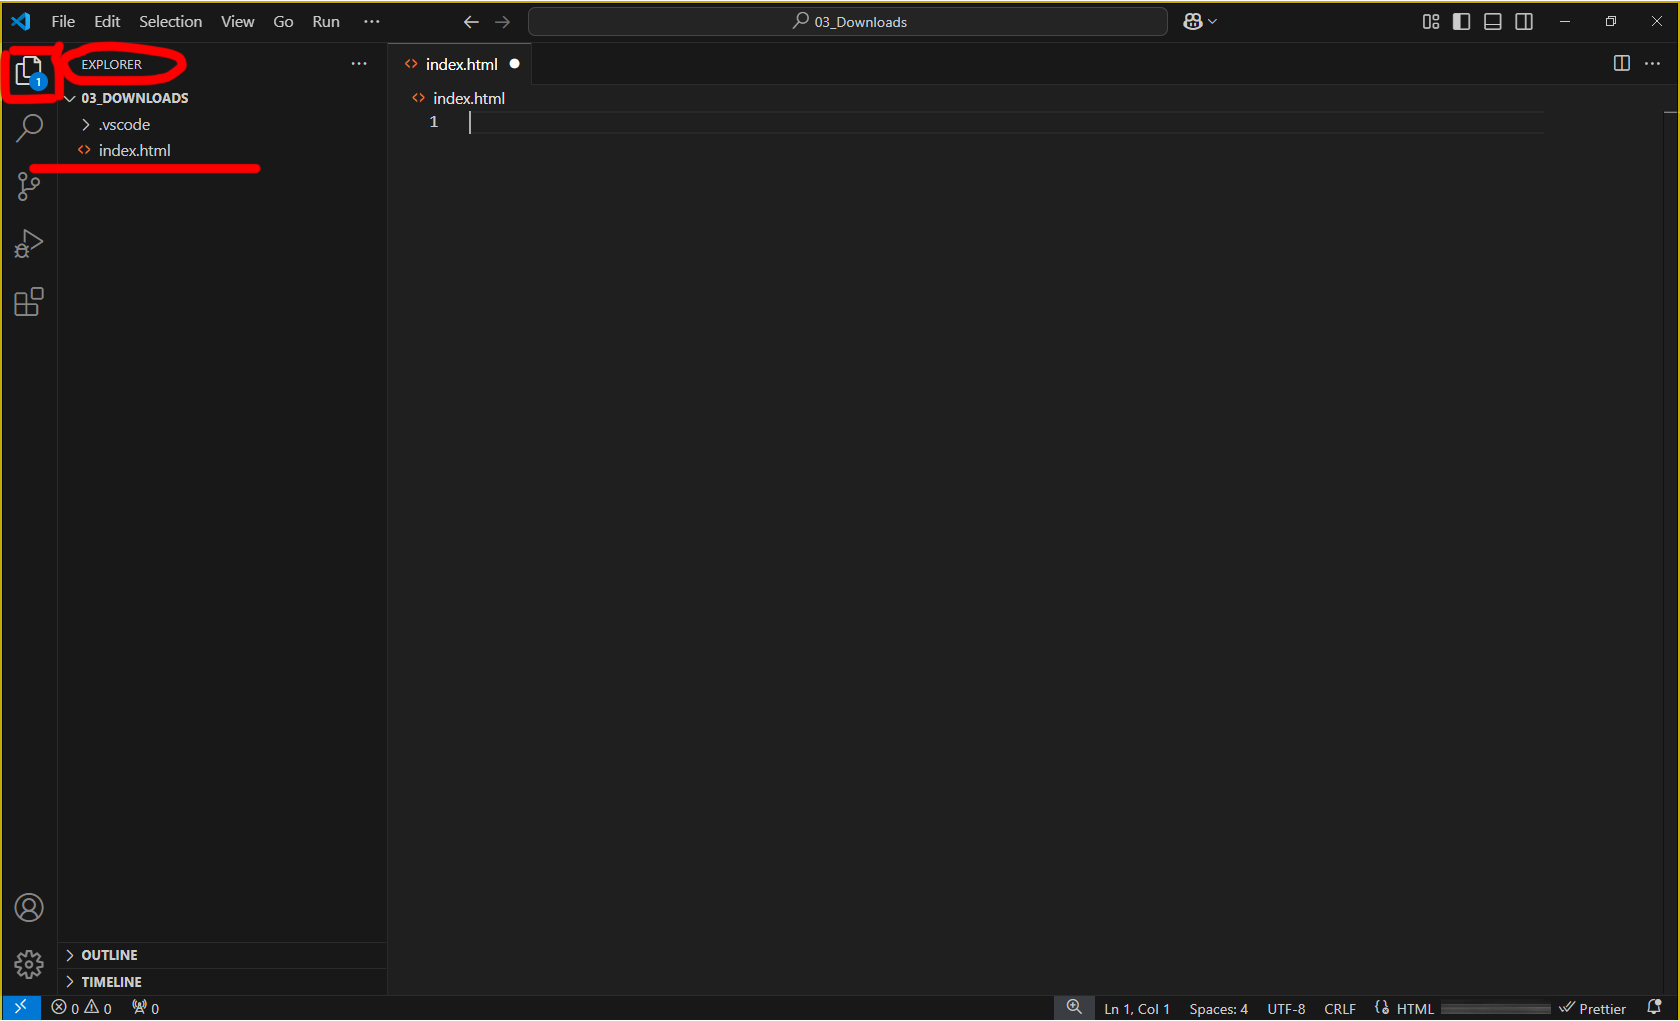
Once saved, click on File > Open Folder and select the folder where you saved this file. Your file name will have the extension afterwards, such as index.html.
HTML and CSS Basics 1/7
HTML Conceptslink copied
HTML is a language to define the structure of the contents of our webpage. Just like you would structure a normal text document, we will define sections, heading and paragraphs for the webpage, called elements. This structure allows us to easily read the contents of the document and later on provides us a way to stylize the layout of the webpage using CSS.
Below is a very basic document written in HTML.
<!DOCTYPE html>
<html>
<head>
    <title>Simple Page</title>
</head>
<body>
    <h1>Hello, World!</h1>
    <p>This is a simple HTML page.</p>
</body>
</html>
This code snippet displays the most basic structure of a webpage.
- <!DOCTYPE html>: Think of this as the “cover page” that tells the browser what type of document it is. This tells the browser that we are using HTML 5.
- <html>: This is like the “book cover” that wraps everything inside.
- <head>: This is the “header” section where you put the title and other important information about the document.
- <title>Simple Page</title>: This is the “title” of your webpage, similar to the title of a book This will display on the browser tab.
- </head>: This closes the header section.
- <body>: This is the “main content” area where you write the actual content of your webpage.
- <h1>Hello, World!</h1>: This is a “heading,” like a chapter title in a book.
- <p>This is a simple HTML page.</p>: This is a “paragraph” of text.
- </body>: This closes the main content area.
- </html>: This closes the entire document, like the back cover of a book.
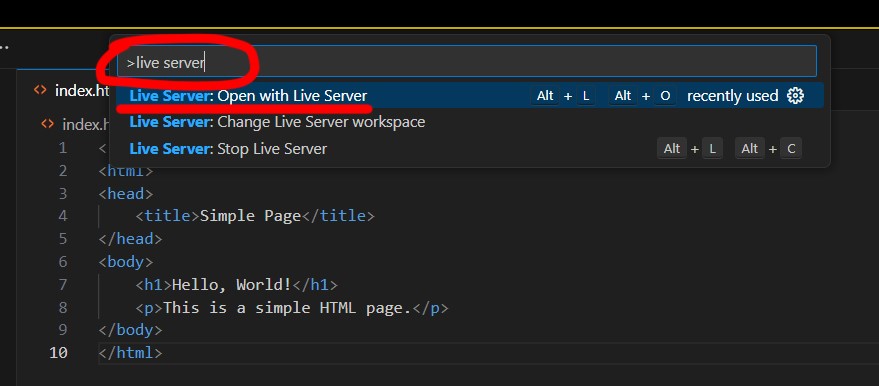
Copy this code snippet above into your file. To view the code, press F1 on your keyboard, and type Live Server. You will find a command to start server. Click on it and your code will show in your default browser.
You will have something that looks like this. On the browser is the HTML document structured as intended, and in your VS Code interface is the source code.
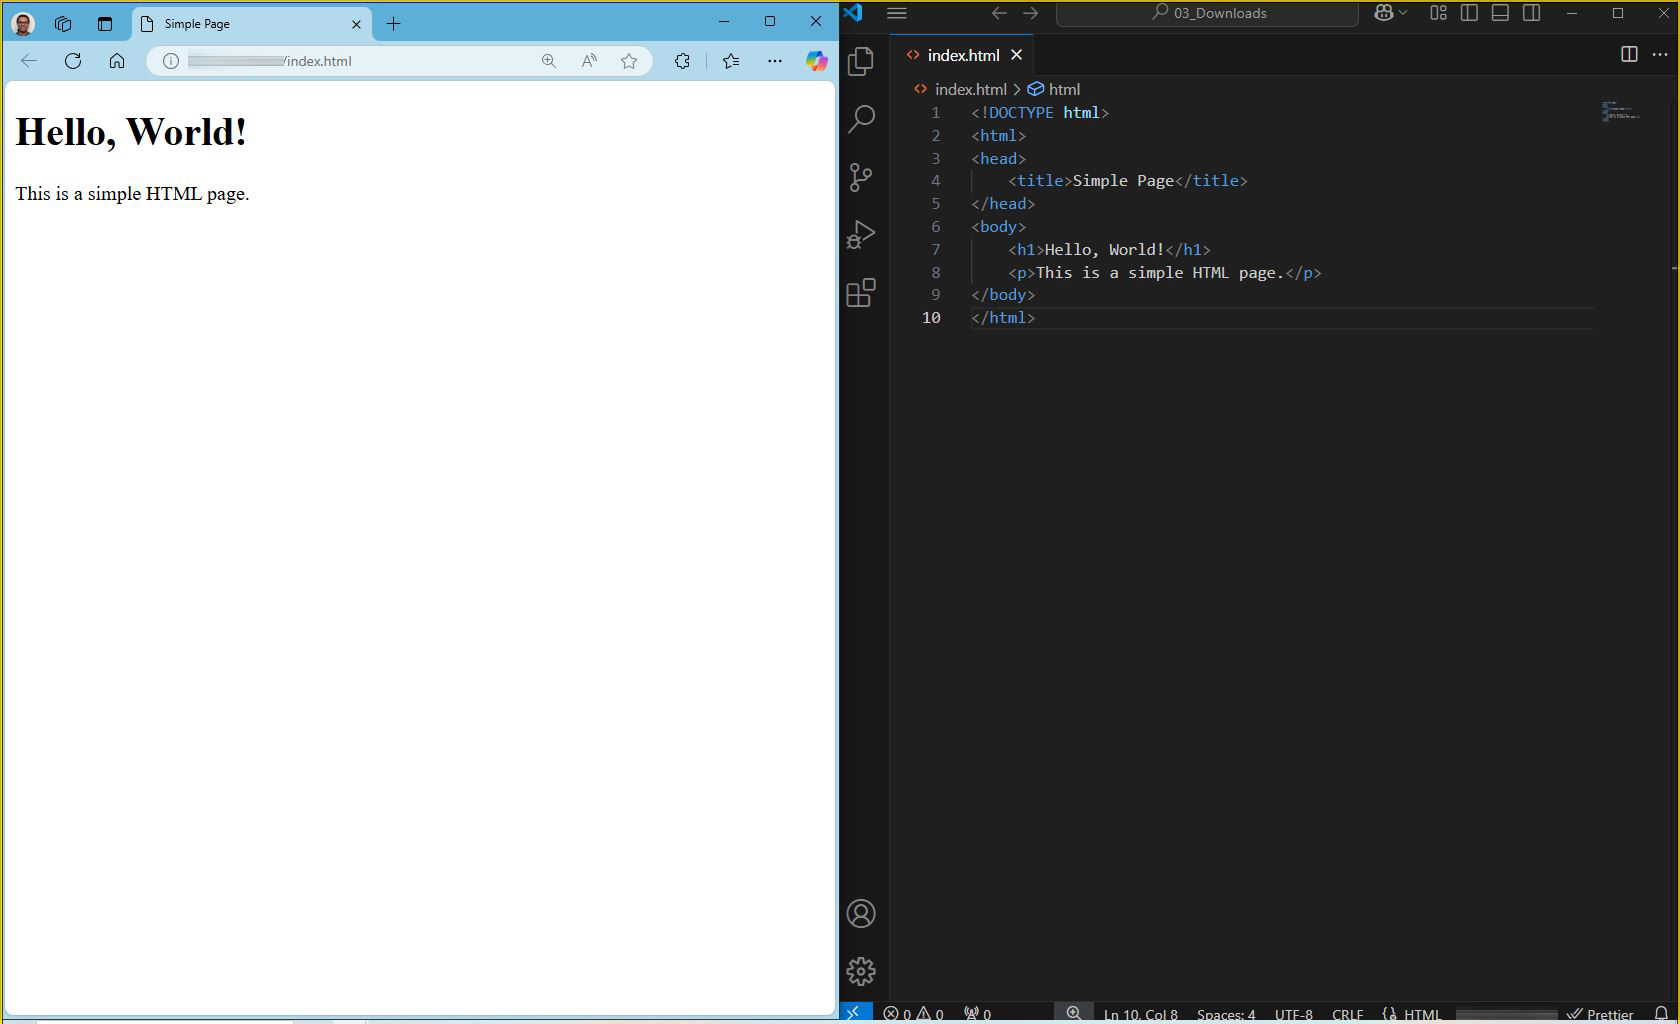
Note: with Live Server enabled, you can edit and save the file to see changes on the page by saving your html file every time you make edits.
Next, we will dive into the specifics of HTML to get a better grasp of how you can structure your pages.
Tags
Html is written in between tags. Every element of the webpage is wrapped inside an opening “tag” and a closing tag to define where an element starts and ends. An opening tag looks like <tagname>. The tag name is enclosed in the less than (<) and greater than (>) signs. A closing tag looks like </tagname>. The tag name is again enclosed in the less than and greater than sign. The less than sign is followed by a slash (/).
Note that HTML language consists of several different tags to define different elements. Even though perhaps you are not yet too familiar with the different tags available (and it’s okay since you can always refer to the documentation for information on the available tags) here is an example of a simple HTML document:
<html>
	<body>
		<p>This is some content of this basic html document</p>
	</body>
</html>
To view this example document in a web browser, save your file to see the changes if you have already an open Live Server running. You will notice that the html tags are not visible. The browser will not render them but instead use them to interpret how to display the webpage. The blank spaces in the HTML document are also ignored by the browser. I.e., you can essentially write everything in a single line and the results will be unchanged.
Attributes
Now that we know what tags are, we can extend them by using attributes. Every tag can have multiple attributes. These define additional information about the element which is wrapped inside the tags. For example, a name can be provided for the element. An element with several attributes looks like this:
<tagname attribute="value" attribute="value">content of this element</tagname>Note that in this case, the attributes must be separated from the tagname by a blank space. Each attribute has a value which is inside quotation marks (“”). Each tag has a unique set of attributes which you can look up.
And that’s it! (for the most part)
That is how HTML works. Of course, you will still have little knowledge of the different tags and attributes, but we will expand that knowledge in the next section. If you understand this basic concept of HTML, you have come a long way. Many of the people that write HTML don’t know all the available tags and attributes by heart. But they know where to find them. In the next section we will explain many of the common tags, but you will probably use a reference to look them up frequently. Links to these resources are provided in the section ‘useful resources’ for this tutorial.
HTML and CSS Basics 2/7
HTML Building Blockslink copied
We will practice the basic building blocks of HTML in this chapter.
HTML Document Structure
(Almost) every webpage has the following basic structure. This structure, though a little bit extended, is provided for you to start working from.
You can download the file below. You can save this for now and re-visit once we cover CSS and Javascript concepts.
<html>
	<head></head>
	<body></body>
</html>
When writing an HTML document, it’s important to use indentation to show the hierarchical structure of the elements. This makes the document easier to read. Elements inside other elements are called nested elements.
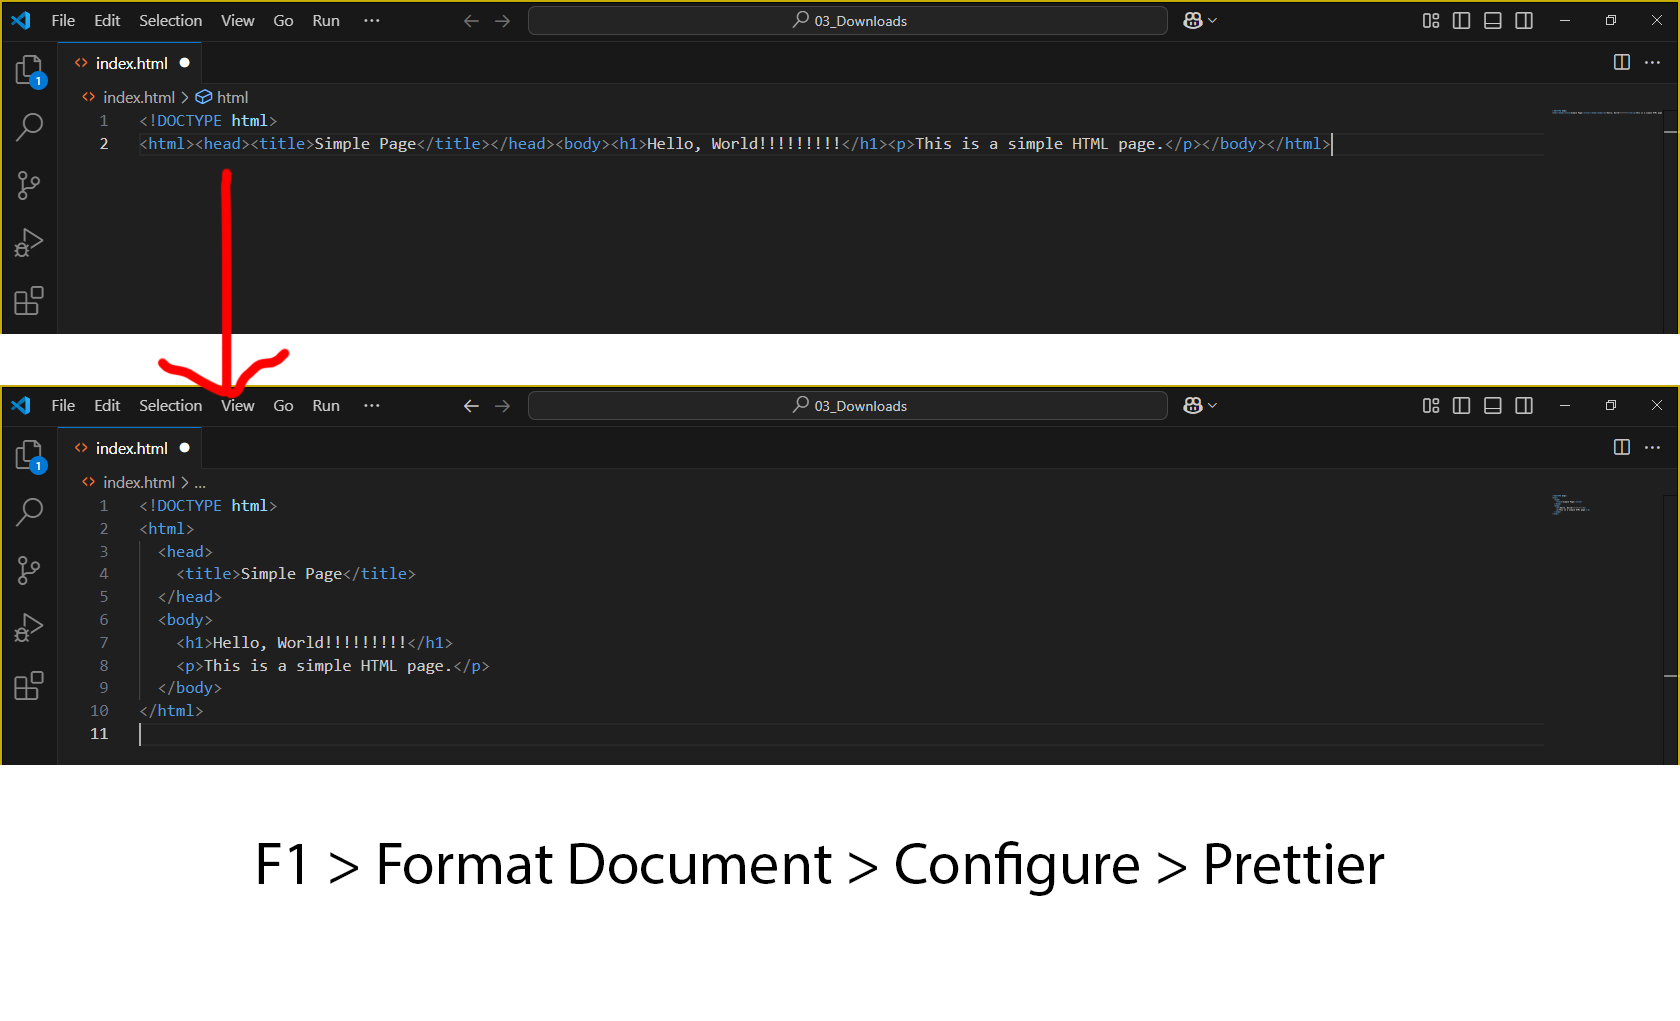
Tip: you can use the document formatter in VS Code to automatically add indentation to your html code. Note indentation does not affect the function of the code, it just makes it easier to read.
The first tag you encounter is the <html> tag. All the code for the webpage is enclosed between the opening <html> and closing </html> tags, allowing it to be interpreted correctly as HTML. The <html> tag can also have attributes.
Inside the <html> element, there are two main sections: the <head> and the <body>.
- The <head> element contains information about the document that is not visible in the browser. This can include the page title (<title>), style rules (<style>), and additional meta-information (<meta>).
- The <body> element contains all the content that is visible in the browser. This is where you will spend most of your time when building a webpage, as it includes the actual structure for the visible content.
Although the information in the <head> section is important, this tutorial will focus on the elements used in the <body> section, as they are crucial for creating the visible content of your webpage.
For a complete reference of attributes for the html-tag, see http://www.w3schools.com/tags/tag_html.asp
HTML Body Elements
Structuring the Content
It was already mentioned before that HTML defines the structure of a webpage. The tags that are available to define this structure are <h1>, <h2>, <h3>, <h4>, <h5>, <h6>, <p> and <div>.
<h1> to <h6> are tags to define headings, like for example a chapter title or a section title. <h1> is the largest and <h6> is the smallest.
<p> is the tag to define a paragraph of the content. The “paragraph” element can contain any inline content like text or images.
<div> is the tag to define divisions in the webpage. With “division” elements you could define sections in your document. The “division” element is very commonly used in conjunction to CSS to position and style sections of the webpage.
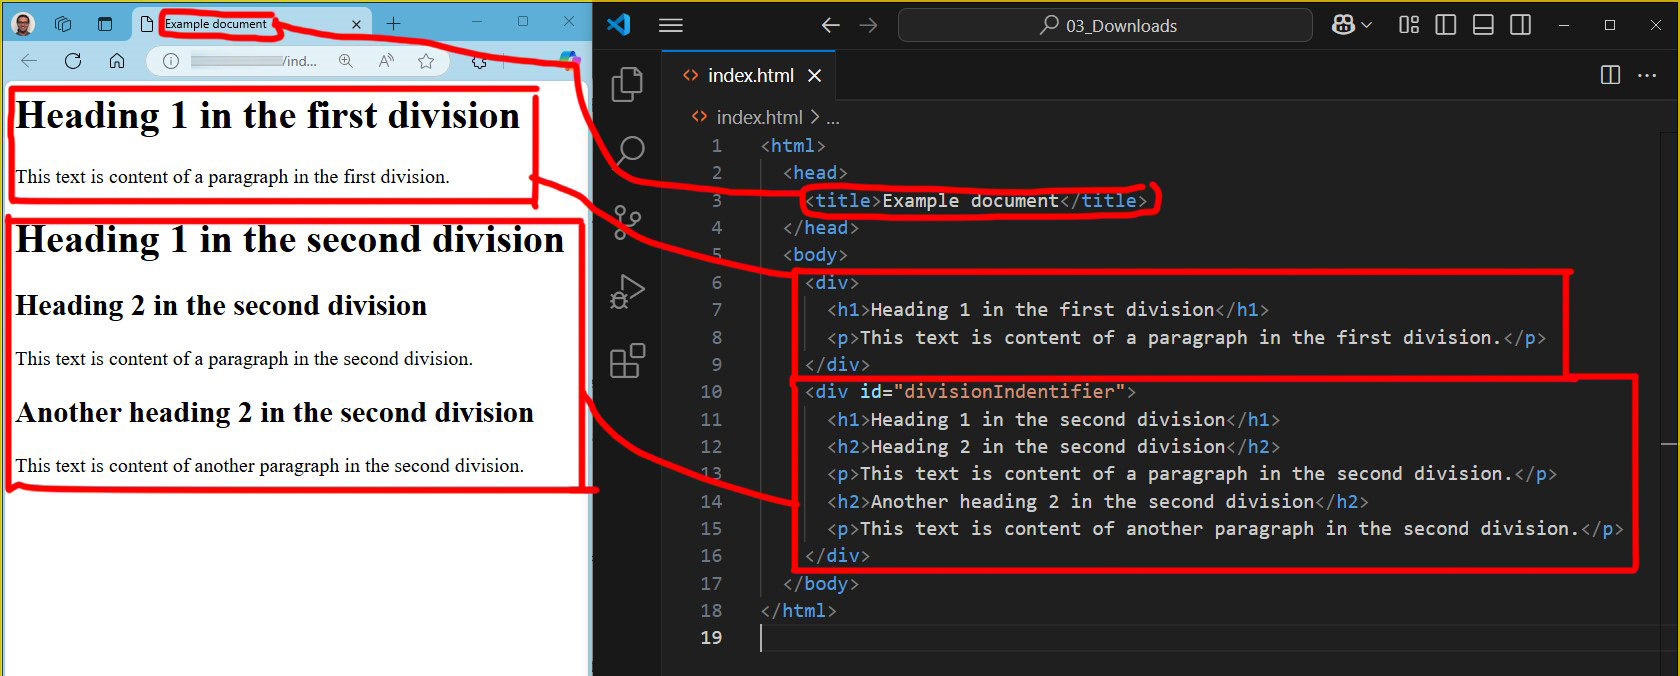
With the current knowledge the following example could be written. Try to understand the function of every part of the HTML by analysing it carefully. If it is unclear, go back and read again what the function of each element is. Also save this code as a HTML-document to view it in the browser and see what it will look like.
<html>
	<head>
		<title>Example document</title>
	</head>
	<body>
		<div>
			<h1>Heading 1 in the first division</h1>
			<p>
			This text is content of a paragraph in the first division.
			</p>
		</div>
		<div id="divisionIndentifier">
			<h1>Heading 1 in the second division</h1>
			<h2>Heading 2 in the second division</h2>
			<p>
			This text is content of a paragraph in the second division.
			</p>
			<h2>Another heading 2 in the second division</h2>
			<p>
			This text is content of another paragraph in the second division.
			</p>
		</div>
	</body>
</html>
Hyperlinks
You are already familiar to hyperlinks, otherwise you would probably not be able to reach this page. A hyperlink is a reference to a resource on the web. This resource can be another webpage, a document like an image or movie, or another place on the same webpage. An anchor is a term used to define a hyperlink destination inside a document. For both the definition of hyperlinks and hyperlink destinations the anchor element <a> is used. The following example describes best how it works.
<a href="https://digipedia.tudelft.nl/" target="_blank">Text linked to hyperlink</a>The href attribute describes the address of the resource (in this case another webpage). This address is called a URL.
Absolute vs Relative Path
URLs can be either absolute or relative. In the example above, the URL is absolute, meaning it describes the full path to the resource. The path points to different folders, each separated by a forward slash (/). While this is very clear, it can sometimes be impractical. For instance, for every link to a page on our website, we would have to type the whole address again.
If you’re on the page https://digipedia.tudelft.nl/software/visual-studio-code/?tab=chapter-0 and I want to link to the next page in a tutorial, https://digipedia.tudelft.nl/software/visual-studio-code/?tab=chapter-1, the first part of the URL is the same. Instead, I could use the relative path ?tab=chapter-1 to link to the next chapter of the tutorial.
A relative URL is the path to the resource relative to the current page. The URL of the current page will be added before the relative URL to form the correct absolute URL to the resource. This is especially useful when you move your website from your local computer to another location, like a web server. Although the first part of all URLs changes, by using relative URLs, the absolute URLs can still be constructed correctly.
The target attribute is very useful because it allows you to specify where to open the linked resource. For example, you can open it in the same browser window or in a new tab. Such as target=”_blank” opens a link a new tab.
Adding Images
We have seen that it is possible to structure some content using common HTML tags in the example above. In the example only text content is added. To add images the <img> tag is used.
<img> is the tag that is used to add image. This is done together with some required attributes for the <img> tag. The following example describes best how it works.
Let’s practice an example for adding an image into your code and displaying it on your browser.
- First, create a folder in your ‘project folder’ and rename it to “img”
- Add an image of your choice inside the folder. Name your image “image”
Then add this code snippet to reference your image using its relative path from your index.html file.
<img src="img/image.jpg" alt="test image" width="450px" />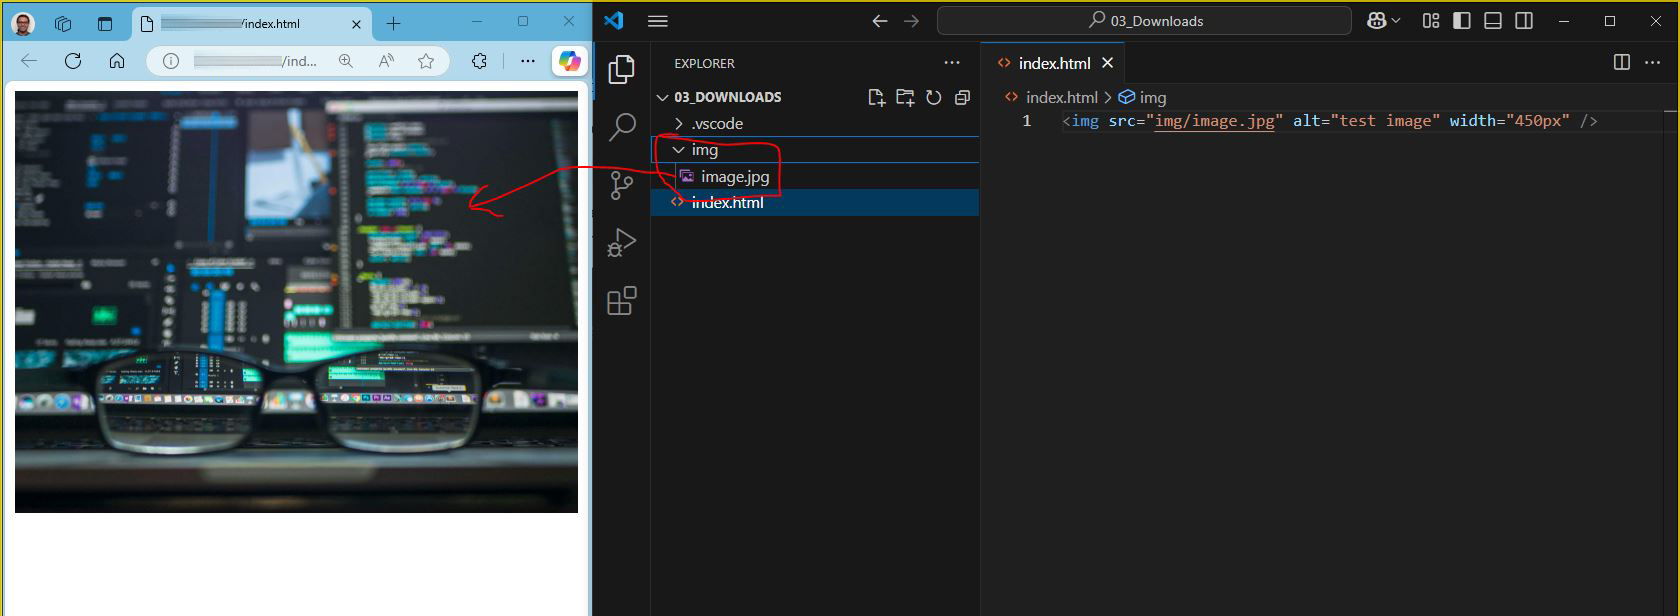
You will also notice the fact that the <img> tag doesn’t need a closing tag. Every piece of information required to add the images is inside the opening tag, so no closing tag is needed. Therefore, the closing of the element is done by adding a slash (/) at the end of the tag, just before the greater than sign (>). For example, (/>).
To display an image on a page, you need to use the src attribute. Src stands for “source”. The value of the src attribute is the URL of the image you want to display on your page.
The alt attribute is also required in the img tag and gives a short description of the image. This is very helpful for blind people to understand a webpage.
Although the width and height attributes are not required, they are very helpful for the browser to know the dimensions of the image before the image is actually loaded. It makes the webpage appear to load quicker.
Lists
Like tables are useful to insert spreadsheet-like data into a webpage, lists can be useful to insert list type data into a webpage. There are three types of lists: unordered lists, ordered lists and definition lists. In this tutorial we will only provide a simple example. For a more extensive explanation and reference on lists see http://www.w3schools.com/html/html_lists.asp.
<ul>
	<li>First list item</li>
	<li>Second list item</li>
	<li>Third list item</li>
</ul>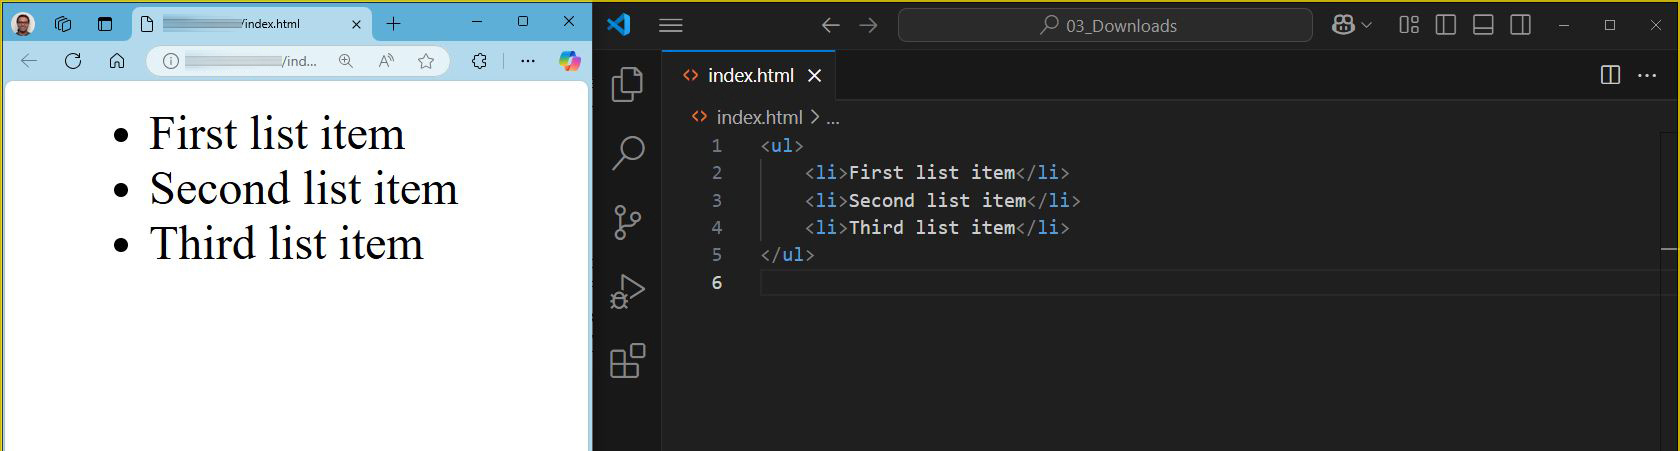
Some Simple Formatting
Although the styling of a webpage is done separately using CSS, some HTML tags are useful to provide some simple formatting tools. It is though recommended to keep formatting using HTML tags to a minimum. Useful HTML formatting tags are <strong>, <em> and <br>.
<strong> is the tag to make text pop out by making it stronger than regular text. Most browser will format text between strong tags as bold text. Example:
<strong>This text is formatted as strong</strong>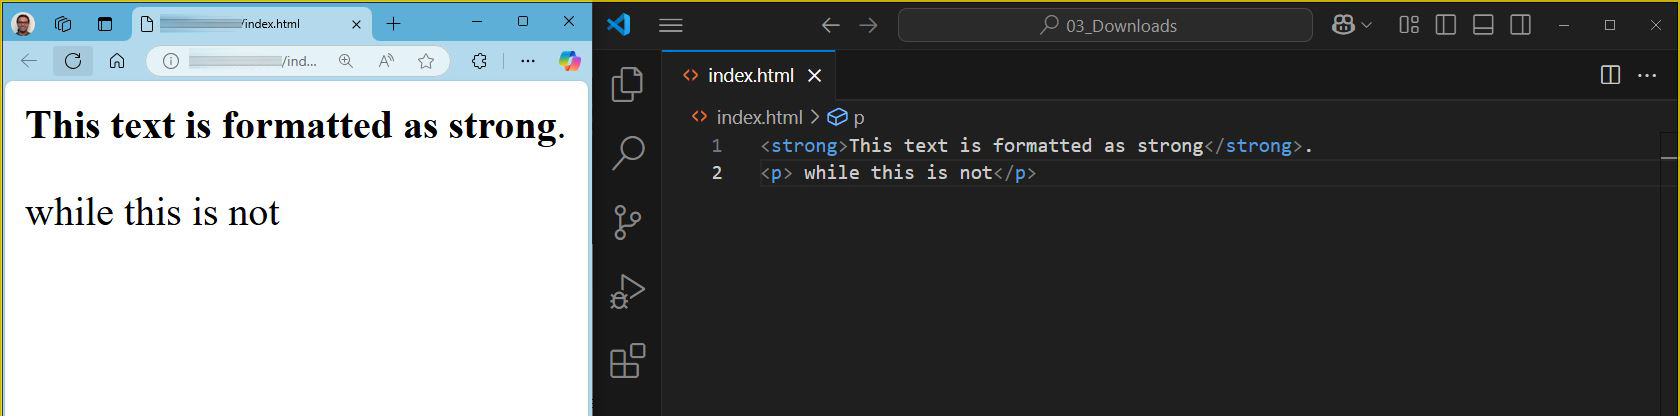
<em> is the tag to emphasize text. Most browsers will format text between emphasis tags an italic text. Example:
<em>This text is formatted as emphasized text</em>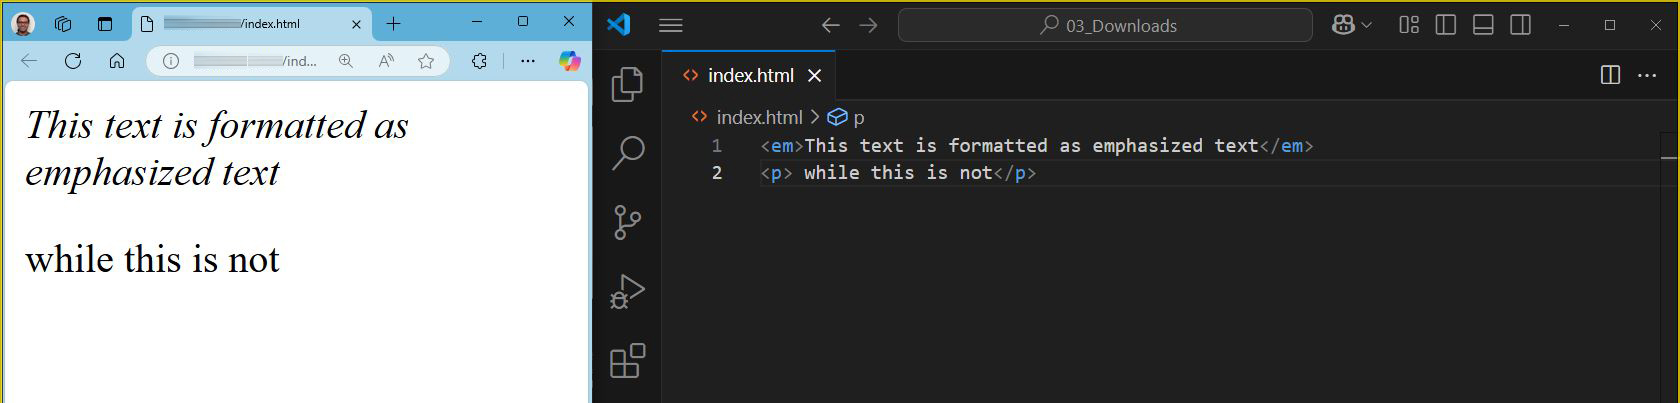
<br> is the tag to force a line break inside a piece of content like text. As mentioned before, the blank space in the HTML document is ignored, so it doesn’t matter how many hard returns you place inside the HTML document, they will not show as blank lines. The break tag allows you to insert line breaks instead. Example:
a piece of text. <br> another piece of text in a new line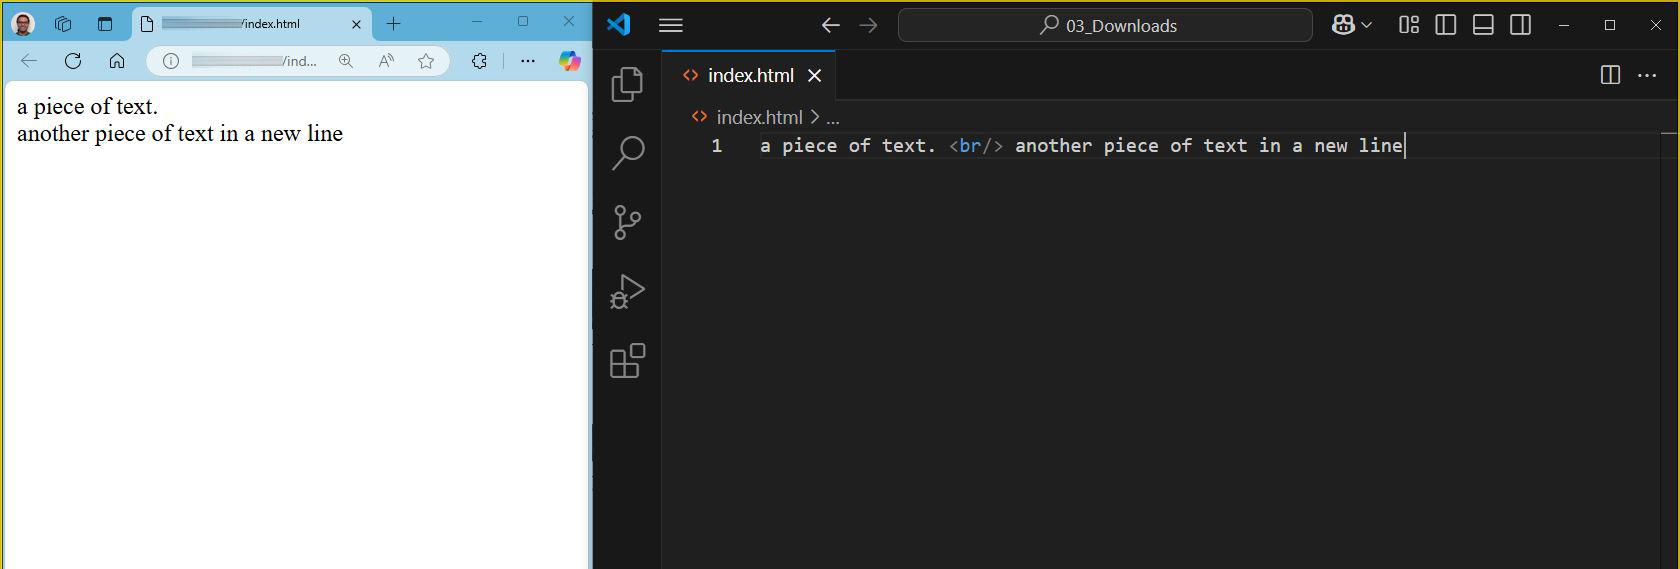
Comments
While writing the HTML code, especially when it is gradually becoming more complex, it is very useful to add comments as a reminder for yourself. For example, to explain why you placed something at that particular place or when you need to remind yourself to add additional code later. Obviously, you don’t want these comments to be visible when the page is viewed in the browser. If you enclose comments between the following tags <!– and –> they won’t be visible in the browser and won’t affect the webpage in any way. However, comments will be viewed on the browser through inspection tools. (you could send secret messages to other developers checking your website 😉)
See example below:
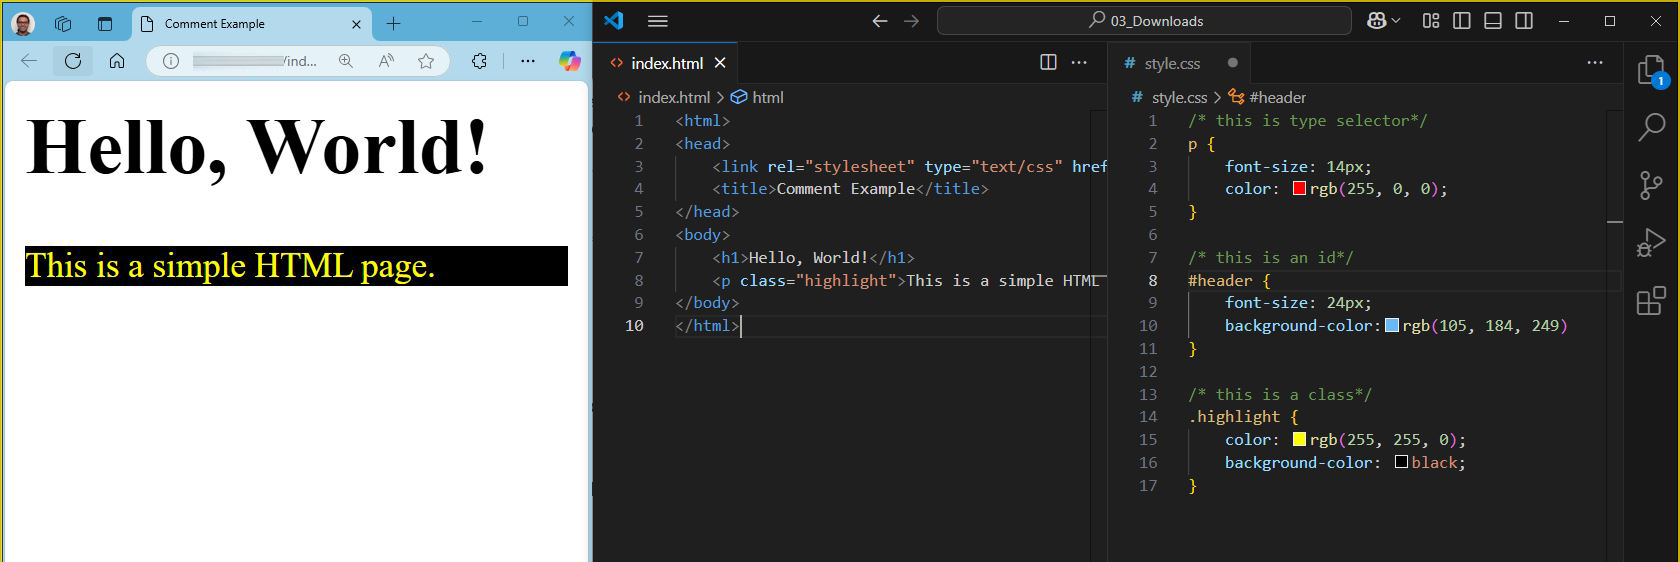
<html>
<head>
    <title>Comment Example</title>
</head>
<body>
    <!-- This is a comment and won't be visible in the browser -->
    <h1>Hello, World!</h1>
    <p>This is a simple HTML page.</p>
</body>
</html>
You can also cancel-out multiple lines like so:
<html>
<head>
    <title>Comment Example</title>
</head>
<!--
<body>
   This is a comment and won't be visible in the browser
    <h1>Hello, World!</h1>
    <p>This is a simple HTML page.</p>
</body>
-->
</html>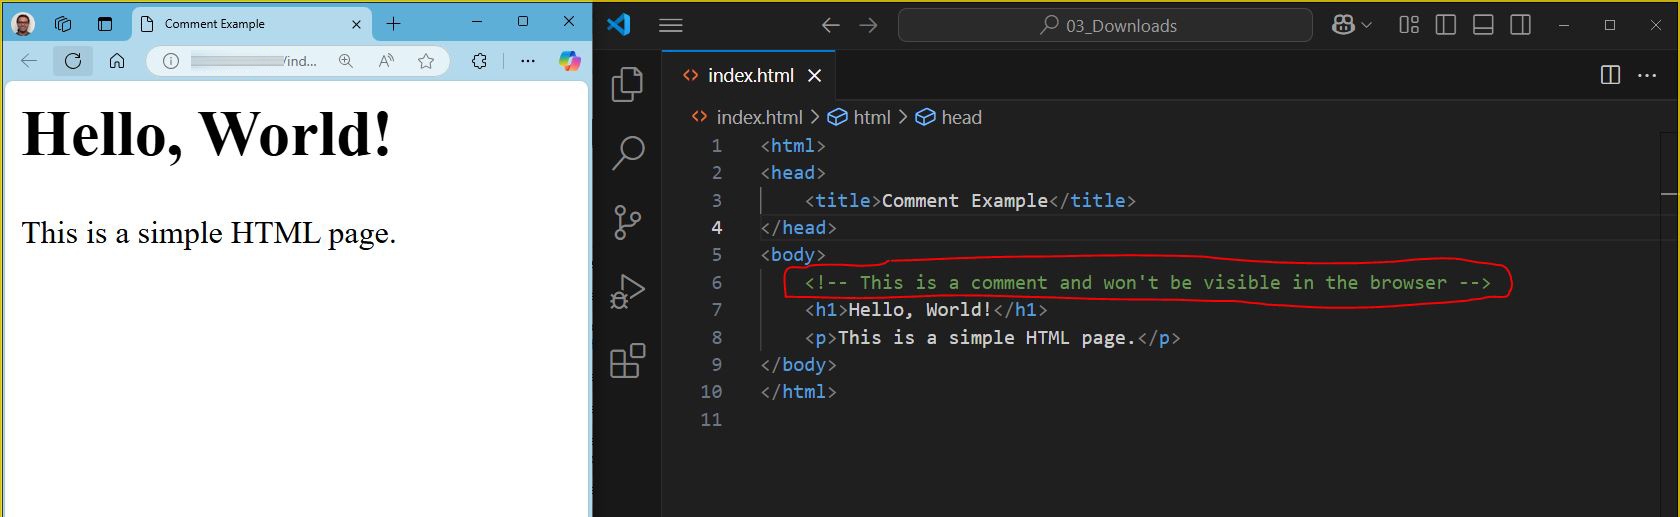
HTML and CSS Basics 3/7
Identifying Elements – The Bridge to CSSlink copied
Aside from the specific attributes for each html tag, there are some standard attributes that can be added to almost any tag. The ones that are relevant for CSS are the id and the class attribute.
The id attribute can be added to a tag to define a unique identifier for that specific element. We can use the identifier to select this element with CSS.
Example:
<div id="idname">content</div>The class attribute can be added to a tag to define a global identifier for that element. We can use this identifier with CSS to select any element that has this identifier.
Example:
<div class="classname">content</div>
Helpful Resoruces
Extensive HTML tutorial with references and examples, W3 Schools – http://www.w3schools.com/html/default.asp
Full html-tag reference, W3 Schools – http://www.w3schools.com/tags/default.asp
HTML and CSS Basics 4/7
CSS Conceptslink copied
CSS stands for Cascading Style Sheets. We have used the shorthand definition CSS for it in the tutorial until now and we will keep using it. CSS makes it possible to define the layout of a webpage in a separate CSS document from the HTML document. It separates contents (HTML), such as text and images, from style (CSS), which is a good thing and it is possible to efficiently define the style of HTML elements. CSS is, like HTML, a language that can be written in a simple text editor. We will use Visual Studio Code for our CSS too.
CSS works by selecting one or more HTML elements and then adding one or more style rules to them. A typical line of CSS code looks like this:
selector {property:value; property:value;}or
selector {
     property:value;
     property:value;
}
A CSS document will have many of these style rules. To save a CSS document”
- Go to VS Code “Explorer” menu to view the files in your folder
- Hover over the folder, click on the “New File…” icon
- save your new file with the .css extension, for example “style.css”
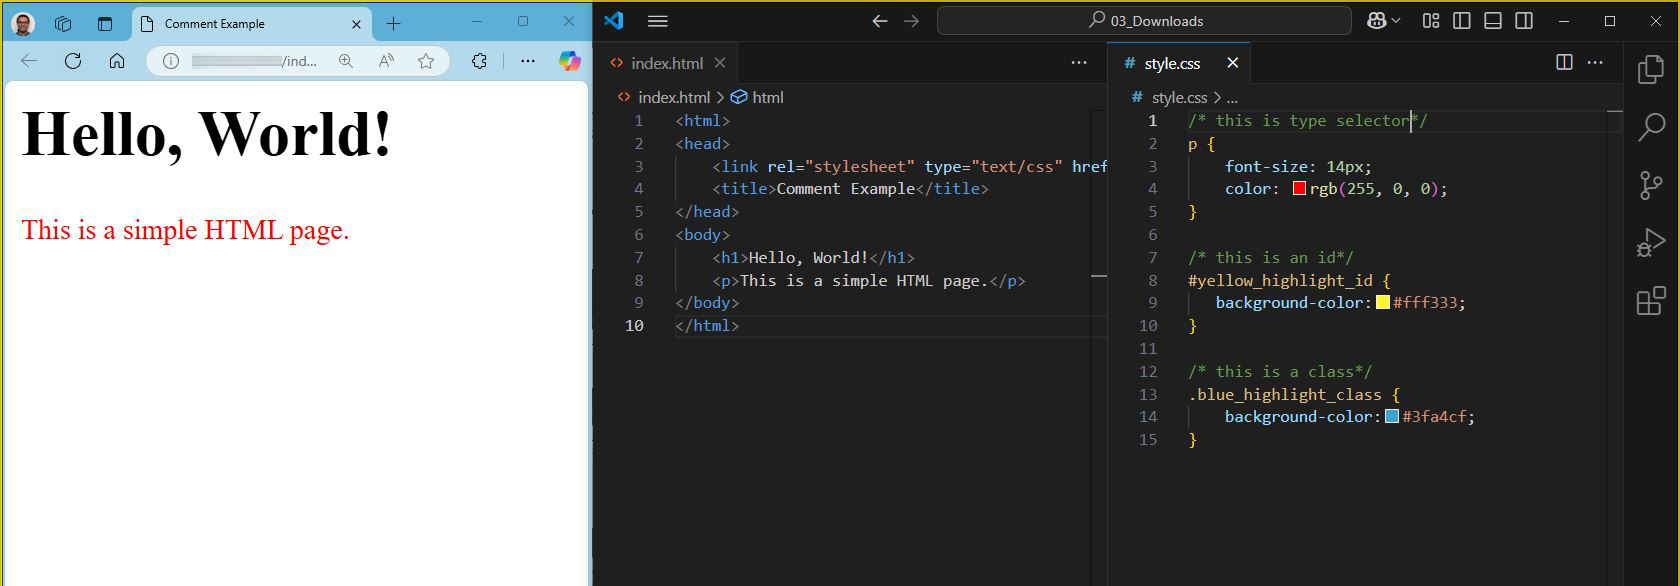
Here is an example of a CSS document:
p {
    font-size: 14px;
    color: rgb(255, 0, 0);
}

#yellow_highlight_id {
   background-color:#fff333;
}

.blue_highlight_class {
    background-color:#3fa4cf;
}

a:hover {
     color:red;
}Tip: you can wrap CSS elements with /* and */ to make a comment.
For example: /* this is a comment */
Attach the Stylesheet to the HTML Document
Now we have two separate documents, one HTML document and one CSS document. To attach the style sheet to a HTML document we have to add one line of code to the HTML document inside the head element.
<head>
	<link rel="stylesheet" type="text/css" href="style.css">
</head>
The rel attributes specifies the relationship which in this case is a stylesheet (i.e. a CSS file). The type attributes specifies the file type, which in this case it is a CSS file. The attribute of href specifies the path, in this instance we use the relative path, which is in the same folder as the html file.
Now your stylesheet is attached to your HTML document. The advantage is that you can easily edit your stylesheet, even attach another stylesheet to it making the page appear totally different or attach the same stylesheet to many other HTML documents.
Bonus: see this example of a website where you can attach different stylesheets to the same HTML document and see the visual style change significantly. http://www.csszengarden.com/
Selecting HTML Elements in CSS
There are four ways to select HTML elements in a CSS document.
Element Selectors
Selects all elements of the specified tag name from the HTML document. For example, p selects all <p> elements and stylizes it according to the CSS rules.
Here is an example for a style rule for all <p> tags:
p {
    font-size: 14px;
    color: rgb(255, 0, 0);
}
This will make the paragraph <p> tag look like this:
This is useful when setting a default font for your page. This can include things like font type, font size, font color, etc. for all the paragraph elements.
Class Selector
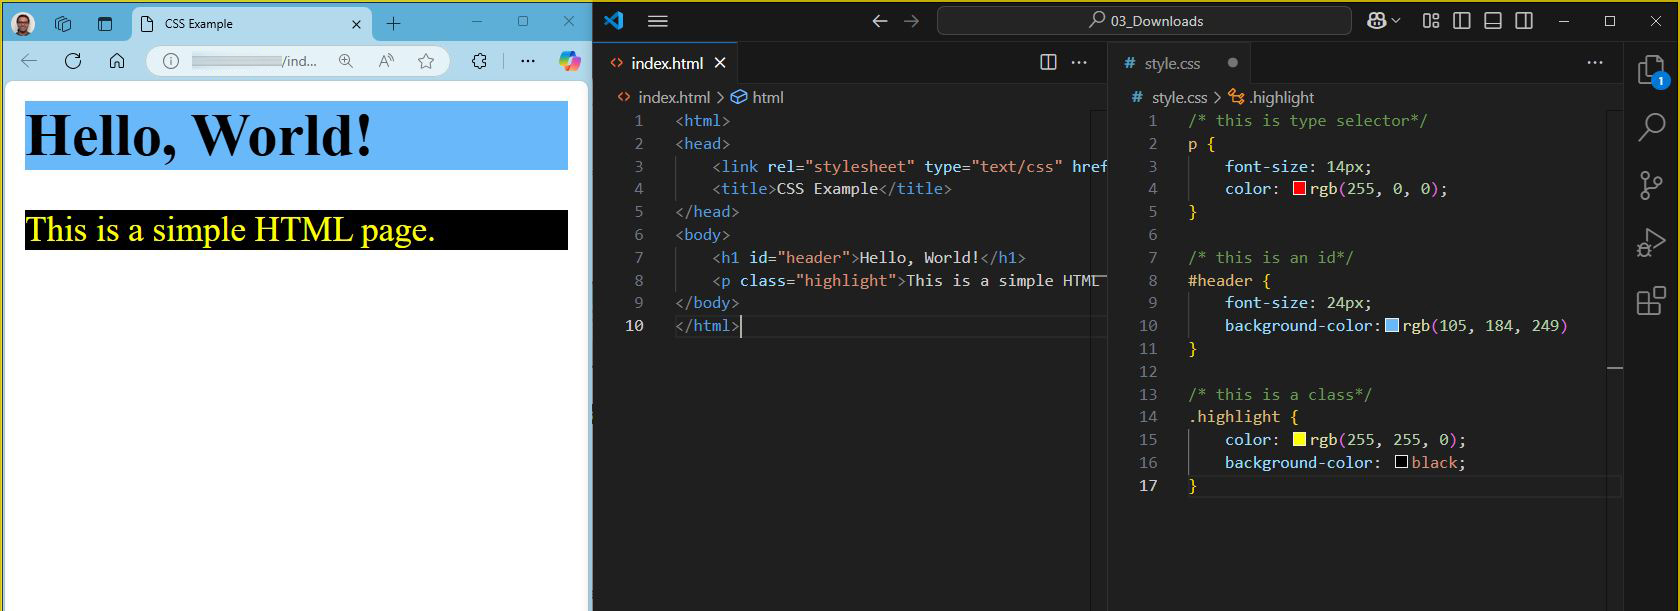
Selects all elements with the specified class attribute. You can create new classes by adding the period (.) before your class name. For example, .highlight selects all elements with class=”highlight”. You can assign a class attribute in HTML as follows:
<p class="highlight">This is a simple HTML page.</p>If applied correctly, you will see your paragraph text highlighted.
Note: Do NOT add spaces in your class name! Use underscores. For example, class_name.
ID Selectors
id selectors selects the element with the specified id attribute. You can specify a new id in CSS by using the hashtag (#) before the id name. For example, #header selects the element with id=”header”. IDs should be unique within a page.
<h1 id="header">Hello, World!</h1>If implemented correctly, you should see something like this:
Pseudo-Class Selector
Pseudo-Class selector selects elements based on their state or position. For example, a:hover selects <a> elements when the user hovers over them.
<p>This is a <a href="#">simple</a> HTML page.</p>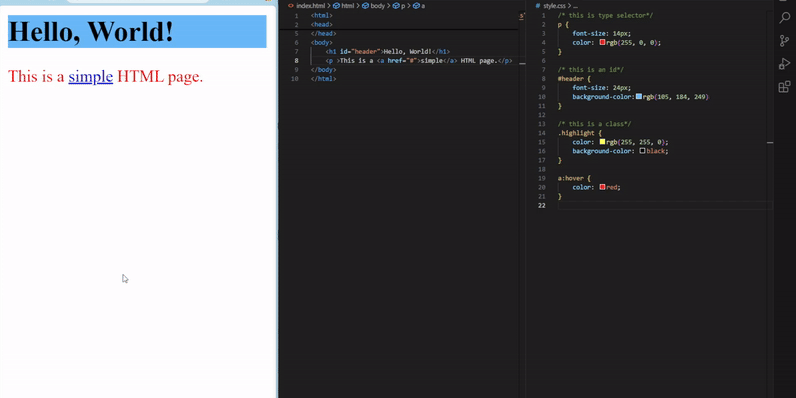
Tip: these selectors can be used separately or in combination with each other. You can read more about the CSS selectors here: https://www.w3schools.com/CSS/css_selectors.asp
Pseudo-Classes
Pseudo-classes do not actually exist in CSS, but can exist after certain events have happened. An example of a pseudo-class is a:hover, this exist when a link is hovered over with the mouse. These pseudo-classes can be very useful to create some basic dynamics in your page. Learn more about pseudo-classes on http://www.w3schools.com/css/css_pseudo_classes.asp
Some Examples of Different Selectors
p {font-size:10px;}This line of code selects all paragraph elements and sets the font-size to 10 pixels.
.textblock {border-width:1px}This line of code selects all elements that have the class “textblock” assigned to it and sets their border-width to 1 pixel.
#menubar {background-color:blue}This line of code selects the element with the ID of “menubar” and sets the background color to blue.
.mainColumn div p {color:#000000;}This line of code selects all paragraph elements that are within a div that is inside an element that has the “mainColumn” class assigned to it and sets the text color for these elements to the hexadecimal code #000000, which corresponds to black.
h1, h2, h3, p {font-family:serif; color:black;}This line of code selects all h1, h2, h3 and all paragraph tags and sets the font-family to serif and the text color to black.
a:visited {color:red;}This line of code selects all hyperlinks that are visited and sets the text color to red.
You can read more about the CSS selectors here: https://www.w3schools.com/CSS/css_selectors.asp
Boxmodel
When styling HTML elements it is important to understand how they behave. The boxmodel explains how an elements behaves. The concept of the boxmodel is described on this page: http://www.w3schools.com/css/css_boxmodel.asp
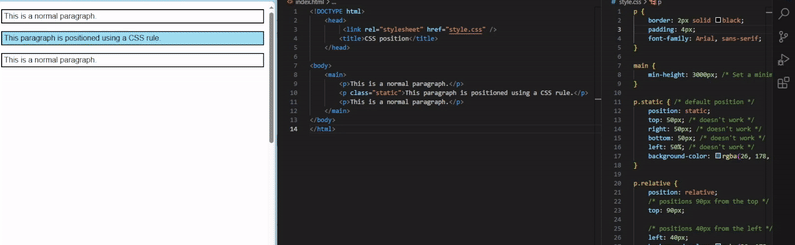
Positioning
Positioning in CSS allows you to control the layout of elements on your webpage. It provides various methods to place elements precisely where you want them.
- Static Positioning: Default positioning for all elements.
- Relative Positioning: Moves an element relative to its normal position. The original location of the element is still ‘reserved’ and is simply shifted away from its original position.
- Absolute Positioning: Positions an element relative to its nearest positioned ancestor. The original location is no longer taken into consideration in the HTML file and the flow of the HTML changes.
- Fixed Positioning: Positions an element relative to the browser window, staying fixed during scrolling.
- Sticky Positioning: A hybrid of relative and fixed positioning, sticking to a specified position when scrolling.
Copy this CSS code below and then copy the HTML code after it. Change the class from ‘static’ to other positioning styles to see the changes take place in your browser.
p {
    border: 2px solid black;
    padding: 4px;
    font-family: Arial, sans-serif;
}

main {
    min-height: 3000px; /* Set a minimum height to create scrollable space */
}

p.static { /* default position */
    position: static;
    top: 50px; /* doesn't work */
    right: 50px; /* doesn't work */
    bottom: 50px; /* doesn't work */
    left: 50%; /* doesn't work */
    background-color: rgba(26, 178, 224, 0.418);
}

p.relative {
    position: relative;
    /* positions 90px from the top */
    top: 90px;

    /* positions 40px from the left */
    left: 40px;
    background-color: rgba(26, 178, 224, 0.418);
}

p.absolute {
    position: absolute;
    top: 90px;
    left: 40px;
    background-color: rgba(26, 178, 224, 0.418);
}

p.fixed {
    position: fixed;
    top: 100px;
    background-color: rgba(26, 178, 224, 0.418);
}

p.sticky {
    position: sticky;
    top: 10px;
    background-color: rgba(26, 178, 224, 0.418);
}
And the HTML below. Change the class to each respective CSS positioning rule.
<!DOCTYPE html>
    <head>
         <link rel="stylesheet" href="style.css" />
        <title>CSS position</title>
    </head>

<body>
    <main>
        <p>This is a normal paragraph.</p>
        <p class="static">This paragraph is positioned using a CSS rule.</p>
        <p>This is a normal paragraph.</p>
    </main>
</body>
</html>
You should see something like this:
Using Units in CSS
When styling your webpage with CSS, you’ll often need to specify sizes, colors, lengths, and other measurements. CSS provides various units to define these values, and understanding how to use them effectively is crucial for creating responsive and well-designed layouts.
Absolute Units
- px (pixels): The most commonly used unit. One pixel is a single dot on the screen.
- cm (centimeters): Useful for print styles.
- mm (millimeters): Also useful for print styles.
- in (inches): Another unit for print styles.
- pt (points): 1 point is 1/72 of an inch, commonly used in typography.
- pc (picas): 1 pica is equal to 12 points
Relative Units
- % (percentage): Relative to the parent element’s size.
- em: Relative to the font size of the element. For example, 2em means twice the size of the current font.
- rem: Relative to the font size of the root element (<html>). Useful for maintaining consistent sizing across the entire document.
- vw (viewport width): 1vw is 1% of the viewport’s width.
- vh (viewport height): 1vh is 1% of the viewport’s height.
- vmin: The smaller of vw and vh.
- vmax: The larger of vw and vh.
Properties
There are many CSS properties that you can use to style your HTML elements. It is beyond the scope of this tutorial to describe them all in detail. Have a look at this page for a full reference of all CSS properties available: https://www.w3schools.com/cssref/index.php
HTML and CSS Basics 5/7
Conclusionlink copied
Congratulations on making it so far! 😊 you are off to a good start on your journey to developing your digital portfolio. There is a lot to learn about HTML and CSS, so don’t worry for not knowing everything just yet. You now have the basics to get started. Later on you will learn advanced CSS styling to make your site more aesthetically aligned to what you envision. For now, keep experimenting and when you are ready, you can follow the advanced tutorials.
After completing this tutorial, you can now:
- Setup a folder for your HTML, CSS, and images to use in Visual Studio Code
- Know the basics of HTML structure
- Know the basics of CSS styling rules
Good luck!
HTML and CSS Basics 6/7
Test your Knowledgelink copied
This is a self-evaluation opportunity after completing the tutorial. Review the concepts of HTML and CSS to test your knowledge after completing the exercise.
What does HTML stand for?
Choose the correct HTML element for the largest heading:
What is the correct HTML element for inserting a line break?
What does CSS stand for?
What is the correct HTML for referring to an external style sheet?
Full HTML quiz: W3Schools HTML Quiz
Full CSS quiz: W3Schools CSS Quiz
HTML and CSS Basics 7/7
Useful Resources and Linkslink copied
Below are some additional helpful resources for you to dive into.
Useful HTML and CSS Resources
Extensive documentation and tutorials with references and examples: https://www.w3schools.com/
HTML element references (tags): https://www.w3schools.com/tags/default.asp
HTML attributes: https://www.w3schools.com/tags/ref_attributes.asp
Learn CSS in 12 minutes: https://www.youtube.com/watch?v=0afZj1G0BIE&ab_channel=JakeWright
Working with Flexbox: https://www.youtube.com/watch?v=wsTv9y931o8
Download HTML and CSS Cheat Sheet
HTML and CSS cheat sheet
Write your feedback.
Write your feedback on "HTML and CSS Basics"".
If you're providing a specific feedback to a part of the chapter, mention which part (text, image, or video) that you have specific feedback for."Thank your for your feedback.
Your feedback has been submitted successfully and is now awaiting review. We appreciate your input and will ensure it aligns with our guidelines before it’s published.